horn FORD ESCAPE 2013 3.G Owners Manual
[x] Cancel search | Manufacturer: FORD, Model Year: 2013, Model line: ESCAPE, Model: FORD ESCAPE 2013 3.GPages: 423, PDF Size: 4.59 MB
Page 36 of 423
SOS POST-CRASH ALERT
SYSTEM
The system flashes the turn signal lamps
and sounds the horn (intermittently) in the
event of a serious impact that deploys an
airbag (front, side, side curtain or Safety
Canopy) or the safety belt pretensioners.
The horn and lamps will turn off when:
•the hazard control button is pressed
• the panic button is pressed on the
remote entry transmitter, or
• the vehicle runs out of power.
DRIVER AND PASSENGER
AIRBAGS
WARNINGS
Never place your arm or any objects
over an airbag module. Placing your
arm over a deploying airbag can
result in serious arm fractures or other
injuries. Objects placed on or over the
airbag inflation area may cause those
objects to be propelled by the airbag into
your face and torso causing serious injury.
Airbags can kill or injure a child in a
child seat. Never place a rear-facing
child seat in front of an active airbag.
If you must use a forward-facing child seat
in the front seat, move the seat all the way
back.
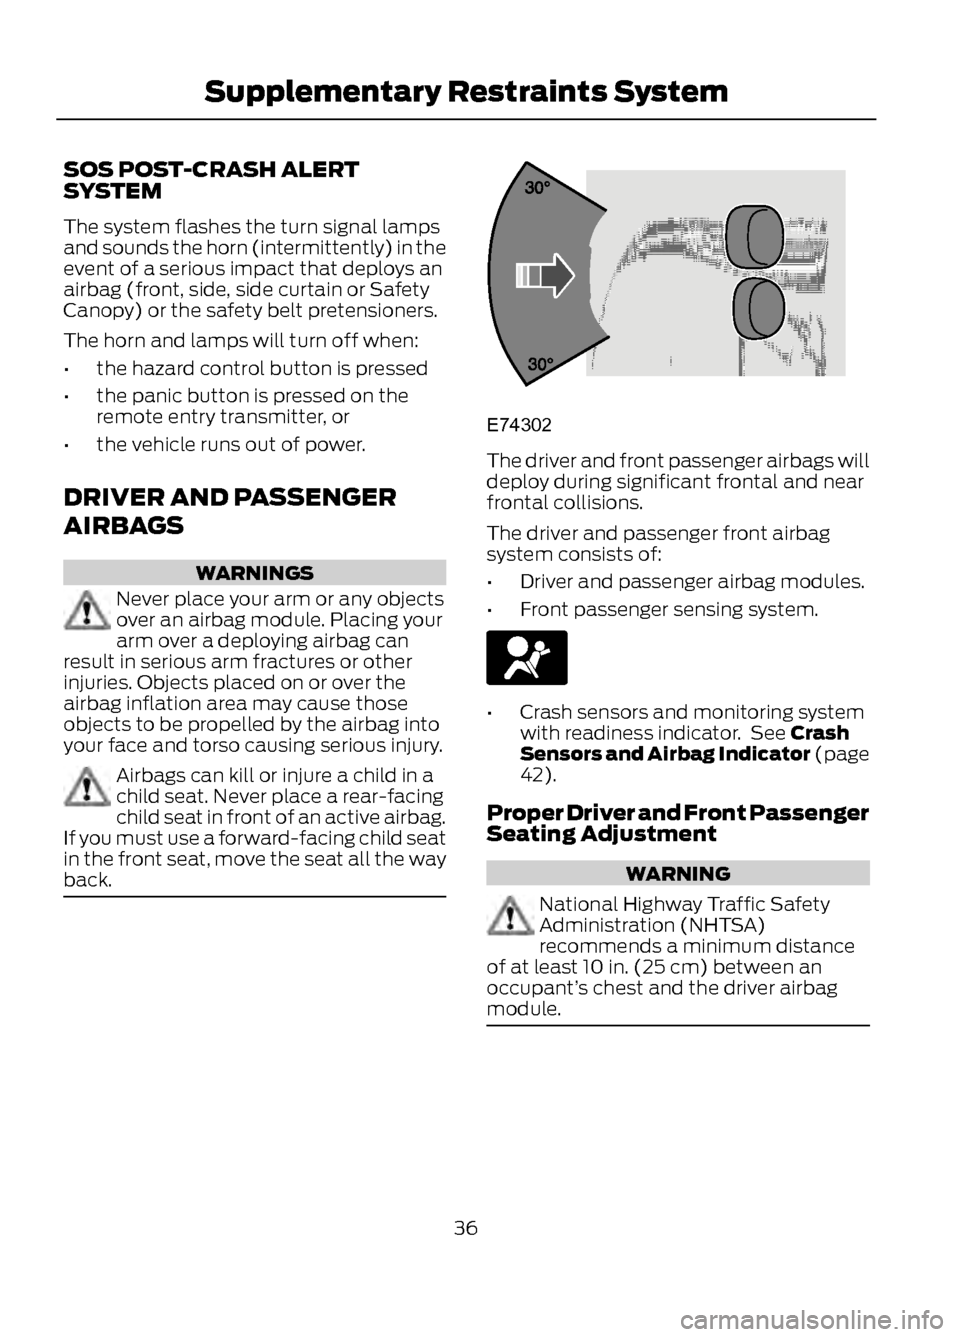
The driver and front passenger airbags will
deploy during significant frontal and near
frontal collisions.
The driver and passenger front airbag
system consists of:
• Driver and passenger airbag modules.
• Front passenger sensing system.
•Crash sensors and monitoring system
with readiness indicator. See Crash
Sensors and Airbag Indicator (page
42).
Proper Driver and Front Passenger
Seating Adjustment
WARNING
National Highway Traffic Safety
Administration (NHTSA)
recommends a minimum distance
of at least 10 in. (25 cm) between an
occupant’ s chest and the driver airbag
module.
36
Supplementary Restraints System
E74302
Page 46 of 423
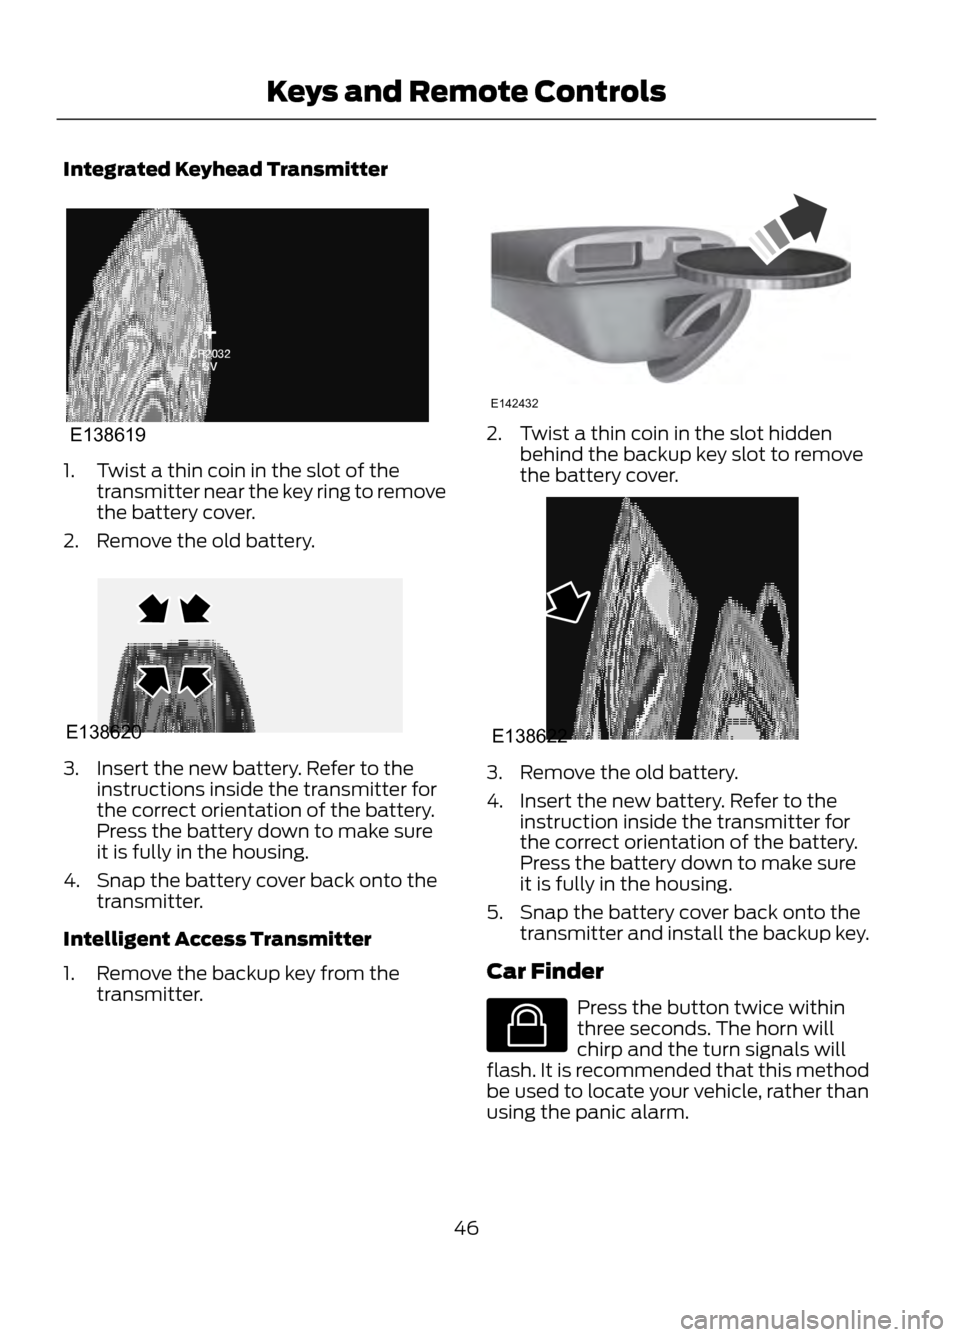
Integrated Keyhead Transmitter
1. Twist a thin coin in the slot of thetransmitter near the key ring to remove
the battery cover.
2. Remove the old battery.
3. Insert the new battery. Refer to the instructions inside the transmitter for
the correct orientation of the battery.
Press the battery down to make sure
it is fully in the housing.
4. Snap the battery cover back onto the transmitter.
Intelligent Access Transmitter
1. Remove the backup key from the transmitter.
2. Twist a thin coin in the slot hiddenbehind the backup key slot to remove
the battery cover.
3. Remove the old battery.
4. Insert the new battery. Refer to theinstruction inside the transmitter for
the correct orientation of the battery.
Press the battery down to make sure
it is fully in the housing.
5. Snap the battery cover back onto the transmitter and install the backup key.
Car Finder
Press the button twice within
three seconds. The horn will
chirp and the turn signals will
flash. It is recommended that this method
be used to locate your vehicle, rather than
using the panic alarm.
46
Keys and Remote Controls
E138619
E138620
E142432
E138622
E138623
Page 47 of 423
Note:If locking was not successful or any
door or the liftgate is not closed, or if the
hood is not closed on vehicles equipped
with a perimeter alarm or remote start, the
horn will chirp twice and the lamps will not
flash.
Sounding a Panic Alarm
Note: The panic alarm will only operate
when the ignition is off.
Press the button to activate the
alarm. Press the button again or
turn the ignition on to deactivate.
Remote Start (If Equipped)
WARNING
To avoid exhaust fumes, do not use
remote start if your vehicle is parked
indoors or areas that are not well
ventilated.
Note: Do not use remote start if your vehicle
is low on fuel.
Your vehicle has remote start if
the transmitter has this button.
The remote start feature allows you to
start the engine from outside the vehicle.
The transmitter has an extended operating
range.
Vehicles with automatic climate control
can be configured to operate when the
vehicle is remote started. See Automatic
Climate Control (page 114).
Many states and provinces have
restrictions for the use of remote start.
Check your local and state or provincial
laws for specific requirements regarding
remote start systems.
The remote start system will not work if:
• the ignition is on
• the alarm system is triggered •
the feature has been disabled
• the hood is not closed
• two remote vehicle starts have already
been attempted within the last hour
• the vehicle is not in P (Park)
• the vehicle battery voltage is too low
• the service engine soon indicator was
on the last time the vehicle was driven.
Remote Starting the Engine
Note: Each button press must be done
within three seconds of each other. The
vehicle will not remote start if this sequence
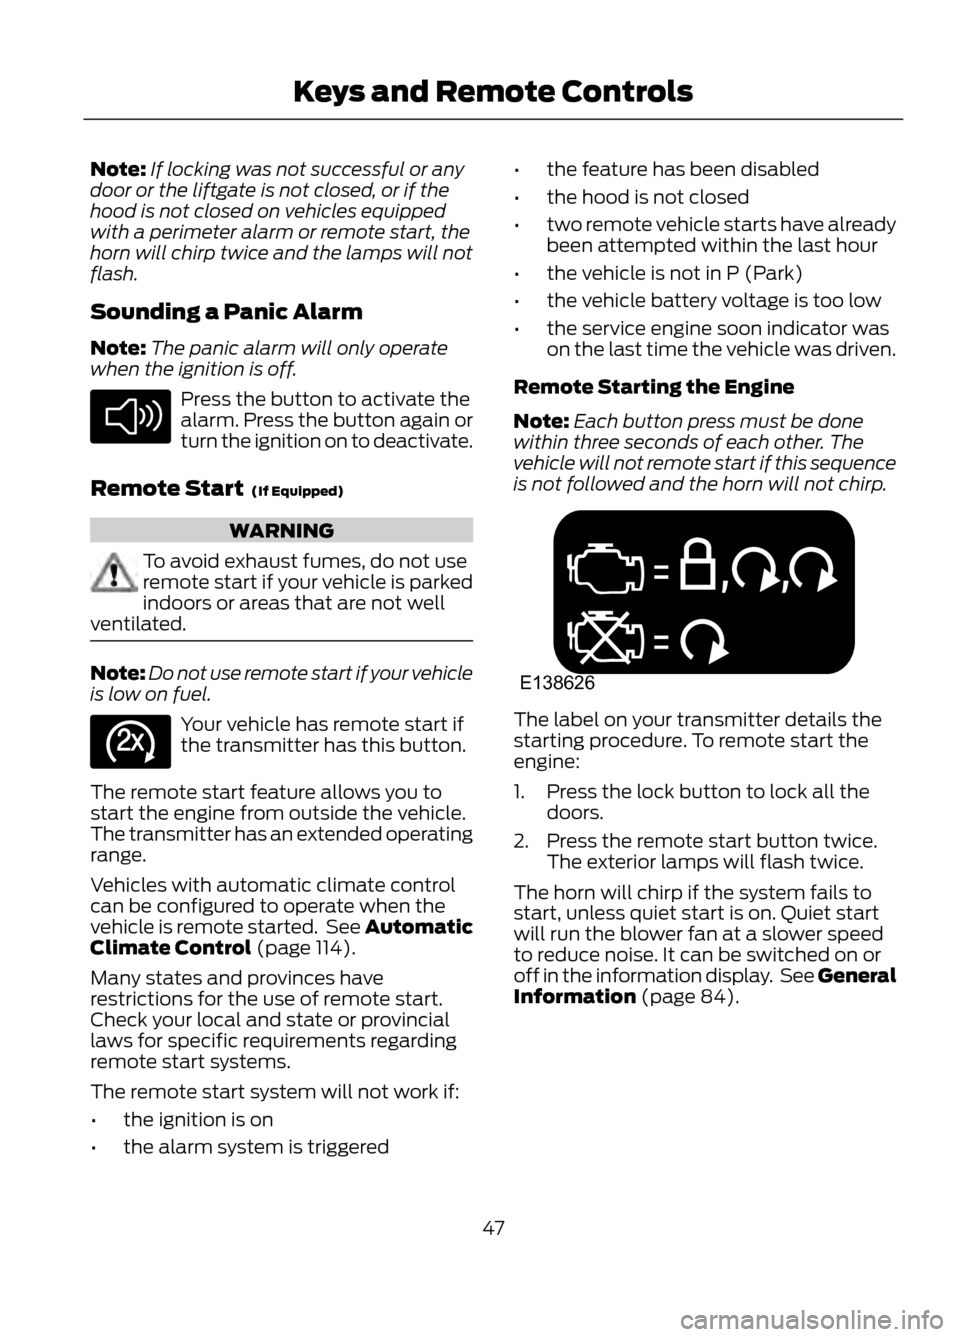
is not followed and the horn will not chirp.The label on your transmitter details the
starting procedure. To remote start the
engine:
1. Press the lock button to lock all the doors.
2. Press the remote start button twice. The exterior lamps will flash twice.
The horn will chirp if the system fails to
start, unless quiet start is on. Quiet start
will run the blower fan at a slower speed
to reduce noise. It can be switched on or
off in the information display. See General
Information (page 84).
47
Keys and Remote Controls
E138624
E138625
E138626
Page 54 of 423

LOCKING AND UNLOCKING
You can use the power door lock control
or the remote control to lock and unlock
the vehicle.
Power Door Locks
Unlock
A
Lock
B
Remote Control
The remote control can be used any time
the vehicle is not running.
Unlocking the Doors (Two-Stage
Unlock)
Press the button to unlock the
driver ’s door.
Press the button again within
three seconds to unlock all doors. The turn
signals will flash.
Press and hold both the lock and unlock
buttons on the remote control for four
seconds to disable or enable two-stage
unlocking. Disabling two-stage unlocking
allows all vehicle doors to unlock with one
press of the button. The turn signals will
flash twice to indicate the unlocking mode
was changed. The unlocking mode will be
applied to the remote control, keyless entry
keypad and intelligent access. Intelligent access at the driver
’s door will
unlock all doors when two-stage unlocking
is disabled.
Locking the Doors
Press the button to lock all the
doors. The turn signals will
illuminate.
Press the button again within three
seconds to confirm that all the doors are
closed. The doors will lock again, the horn
will chirp and the turn signals will
illuminate if all the doors and the luggage
compartment are closed.
Note: If locking was not successful or any
door or the liftgate is not closed, or if the
hood is not closed on vehicles equipped
with a perimeter alarm or remote start, the
horn will chirp twice and the lamps will not
flash.
Power Liftgate (if equipped)
WARNINGS
Make sure all persons are clear of the
liftgate area before using power
liftgate control.
Make sure the liftgate is closed to
prevent exhaust fumes from being
drawn into the vehicle. This will also
prevent passengers and cargo from falling
out. If you must drive with the liftgate open,
keep the vents open so outside air comes
into the vehicle.
Note: Be careful when opening or closing
the liftgate in a garage or other enclosed
area to avoid damaging the liftgate.
Press twice within three seconds
to open or close the liftgate, or
to reverse the movement. See
Power Liftgate (page 57).
54
Locks
E138628
E138629
E138623
E138630
Page 55 of 423
Activating Intelligent Access (If
Equipped)
The intelligent access key must be within
3 feet (1 meter) of the vehicle.
At the Front Doors
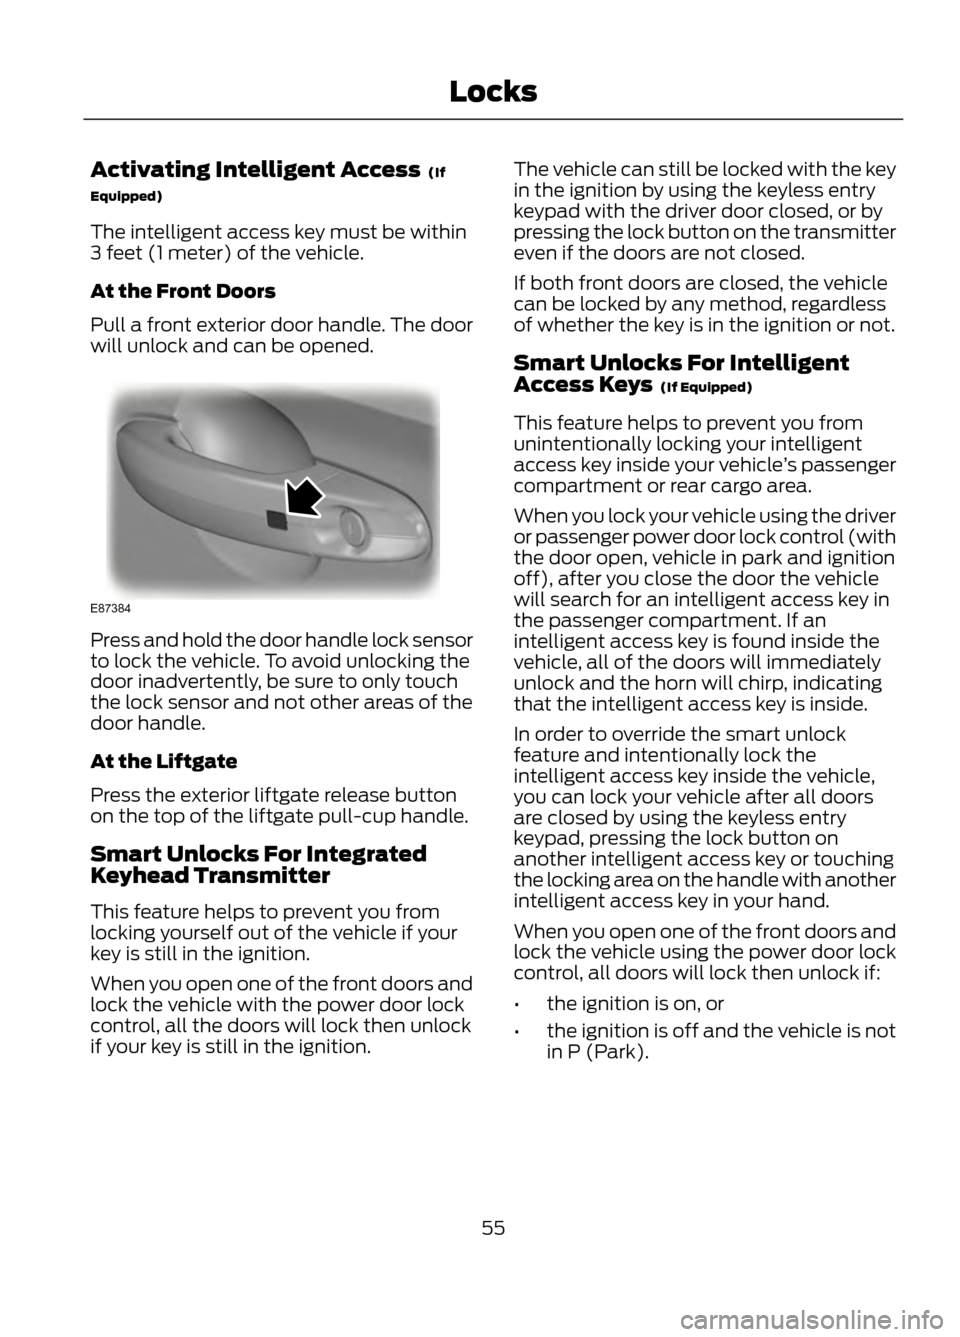
Pull a front exterior door handle. The door
will unlock and can be opened.
Press and hold the door handle lock sensor
to lock the vehicle. To avoid unlocking the
door inadvertently, be sure to only touch
the lock sensor and not other areas of the
door handle.
At the Liftgate
Press the exterior liftgate release button
on the top of the liftgate pull-cup handle.
Smart Unlocks For Integrated
Keyhead Transmitter
This feature helps to prevent you from
locking yourself out of the vehicle if your
key is still in the ignition.
When you open one of the front doors and
lock the vehicle with the power door lock
control, all the doors will lock then unlock
if your key is still in the ignition.The vehicle can still be locked with the key
in the ignition by using the keyless entry
keypad with the driver door closed, or by
pressing the lock button on the transmitter
even if the doors are not closed.
If both front doors are closed, the vehicle
can be locked by any method, regardless
of whether the key is in the ignition or not.
Smart Unlocks For Intelligent
Access Keys (If Equipped)
This feature helps to prevent you from
unintentionally locking your intelligent
access key inside your vehicle
’s passenger
compartment or rear cargo area.
When you lock your vehicle using the driver
or passenger power door lock control (with
the door open, vehicle in park and ignition
off), after you close the door the vehicle
will search for an intelligent access key in
the passenger compartment. If an
intelligent access key is found inside the
vehicle, all of the doors will immediately
unlock and the horn will chirp, indicating
that the intelligent access key is inside.
In order to override the smart unlock
feature and intentionally lock the
intelligent access key inside the vehicle,
you can lock your vehicle after all doors
are closed by using the keyless entry
keypad, pressing the lock button on
another intelligent access key or touching
the locking area on the handle with another
intelligent access key in your hand.
When you open one of the front doors and
lock the vehicle using the power door lock
control, all doors will lock then unlock if:
• the ignition is on, or
• the ignition is off and the vehicle is not
in P (Park).
55
Locks
E87384
Page 56 of 423
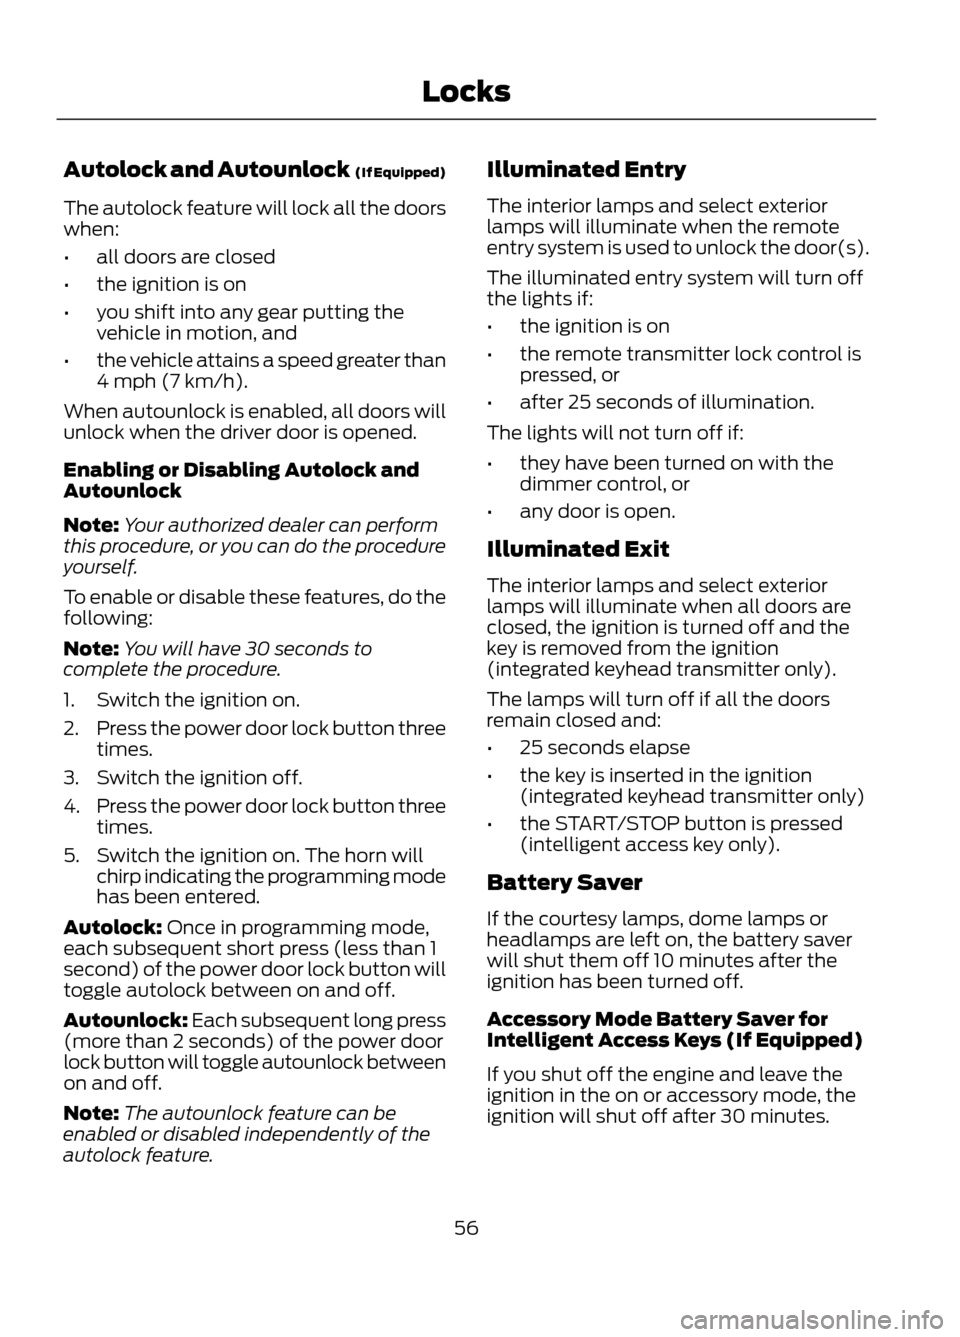
Autolock and Autounlock (If Equipped)
The autolock feature will lock all the doors
when:
•all doors are closed
• the ignition is on
• you shift into any gear putting the
vehicle in motion, and
• the vehicle attains a speed greater than
4 mph (7 km/h).
When autounlock is enabled, all doors will
unlock when the driver door is opened.
Enabling or Disabling Autolock and
Autounlock
Note: Your authorized dealer can perform
this procedure, or you can do the procedure
yourself.
To enable or disable these features, do the
following:
Note: You will have 30 seconds to
complete the procedure.
1. Switch the ignition on.
2. Press the power door lock button three
times.
3. Switch the ignition off.
4. Press the power door lock button three
times.
5. Switch the ignition on. The horn will chirp indicating the programming mode
has been entered.
Autolock: Once in programming mode,
each subsequent short press (less than 1
second) of the power door lock button will
toggle autolock between on and off.
Autounlock: Each subsequent long press
(more than 2 seconds) of the power door
lock button will toggle autounlock between
on and off.
Note: The autounlock feature can be
enabled or disabled independently of the
autolock feature. Illuminated Entry
The interior lamps and select exterior
lamps will illuminate when the remote
entry system is used to unlock the door(s).
The illuminated entry system will turn off
the lights if:
•
the ignition is on
• the remote transmitter lock control is
pressed, or
• after 25 seconds of illumination.
The lights will not turn off if:
• they have been turned on with the
dimmer control, or
• any door is open.
Illuminated Exit
The interior lamps and select exterior
lamps will illuminate when all doors are
closed, the ignition is turned off and the
key is removed from the ignition
(integrated keyhead transmitter only).
The lamps will turn off if all the doors
remain closed and:
• 25 seconds elapse
• the key is inserted in the ignition
(integrated keyhead transmitter only)
• the START/STOP button is pressed
(intelligent access key only).
Battery Saver
If the courtesy lamps, dome lamps or
headlamps are left on, the battery saver
will shut them off 10 minutes after the
ignition has been turned off.
Accessory Mode Battery Saver for
Intelligent Access Keys (If Equipped)
If you shut off the engine and leave the
ignition in the on or accessory mode, the
ignition will shut off after 30 minutes.
56
Locks
Page 63 of 423
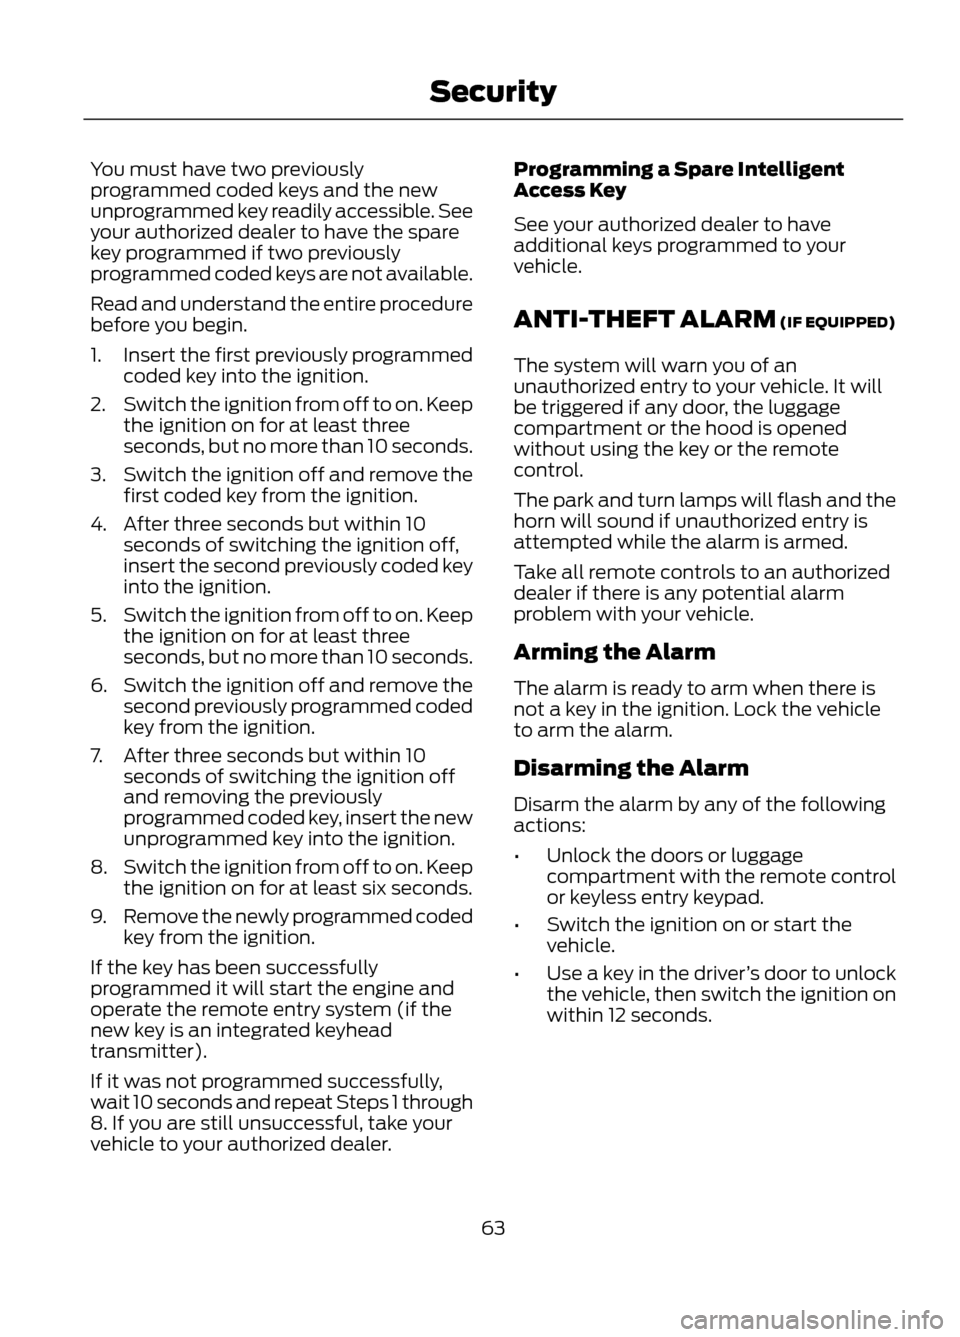
You must have two previously
programmed coded keys and the new
unprogrammed key readily accessible. See
your authorized dealer to have the spare
key programmed if two previously
programmed coded keys are not available.
Read and understand the entire procedure
before you begin.
1.Insert the first previously programmed
coded key into the ignition.
2. Switch the ignition from off to on. Keep
the ignition on for at least three
seconds, but no more than 10 seconds.
3. Switch the ignition off and remove the
first coded key from the ignition.
4. After three seconds but within 10 seconds of switching the ignition off,
insert the second previously coded key
into the ignition.
5. Switch the ignition from off to on. Keep
the ignition on for at least three
seconds, but no more than 10 seconds.
6. Switch the ignition off and remove the
second previously programmed coded
key from the ignition.
7. After three seconds but within 10 seconds of switching the ignition off
and removing the previously
programmed coded key, insert the new
unprogrammed key into the ignition.
8. Switch the ignition from off to on. Keep
the ignition on for at least six seconds.
9. Remove the newly programmed coded
key from the ignition.
If the key has been successfully
programmed it will start the engine and
operate the remote entry system (if the
new key is an integrated keyhead
transmitter).
If it was not programmed successfully,
wait 10 seconds and repeat Steps 1 through
8. If you are still unsuccessful, take your
vehicle to your authorized dealer. Programming a Spare Intelligent
Access Key
See your authorized dealer to have
additional keys programmed to your
vehicle.
ANTI-THEFT ALARM (IF EQUIPPED)
The system will warn you of an
unauthorized entry to your vehicle. It will
be triggered if any door, the luggage
compartment or the hood is opened
without using the key or the remote
control.
The park and turn lamps will flash and the
horn will sound if unauthorized entry is
attempted while the alarm is armed.
Take all remote controls to an authorized
dealer if there is any potential alarm
problem with your vehicle.
Arming the Alarm
The alarm is ready to arm when there is
not a key in the ignition. Lock the vehicle
to arm the alarm.
Disarming the Alarm
Disarm the alarm by any of the following
actions:
•
Unlock the doors or luggage
compartment with the remote control
or keyless entry keypad.
• Switch the ignition on or start the
vehicle.
• Use a key in the driver ’s door to unlock
the vehicle, then switch the ignition on
within 12 seconds.
63
Security
Page 209 of 423
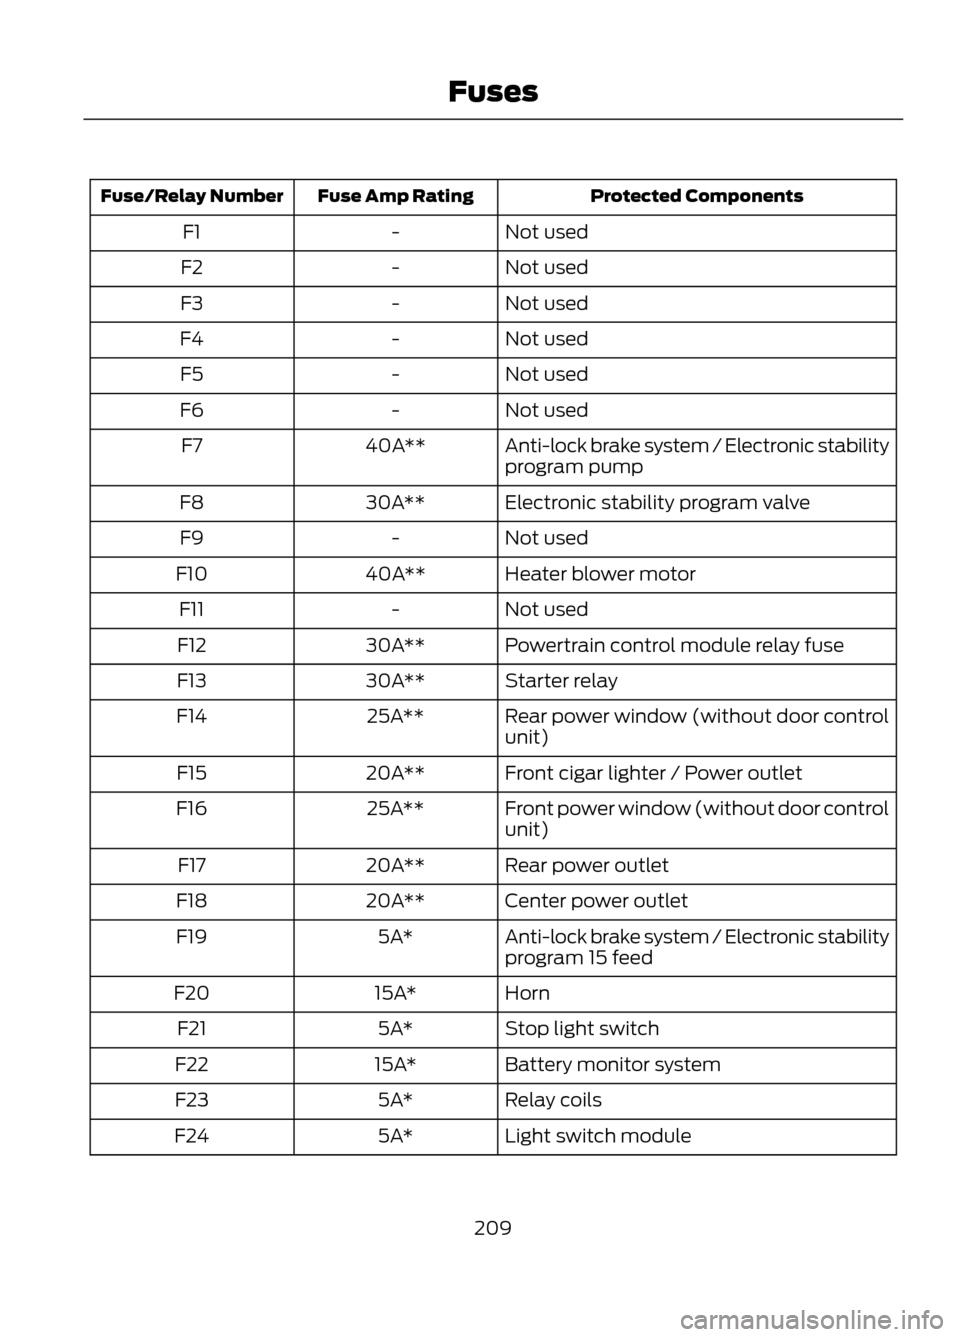
Protected Components
Fuse Amp Rating
Fuse/Relay Number
Not used
-
F1
Not used
-
F2
Not used
-
F3
Not used
-
F4
Not used
-
F5
Not used
-
F6
Anti-lock brake system / Electronic stability
program pump
40A**
F7
Electronic stability program valve
30A**
F8
Not used
-
F9
Heater blower motor
40A**
F10
Not used
-
F11
Powertrain control module relay fuse
30A**
F12
Starter relay
30A**
F13
Rear power window (without door control
unit)
25A**
F14
Front cigar lighter / Power outlet
20A**
F15
Front power window (without door control
unit)
25A**
F16
Rear power outlet
20A**
F17
Center power outlet
20A**
F18
Anti-lock brake system / Electronic stability
program 15 feed
5A*
F19
Horn
15A*
F20
Stop light switch
5A*
F21
Battery monitor system
15A*
F22
Relay coils
5A*
F23
Light switch module
5A*
F24
209
Fuses
Page 211 of 423
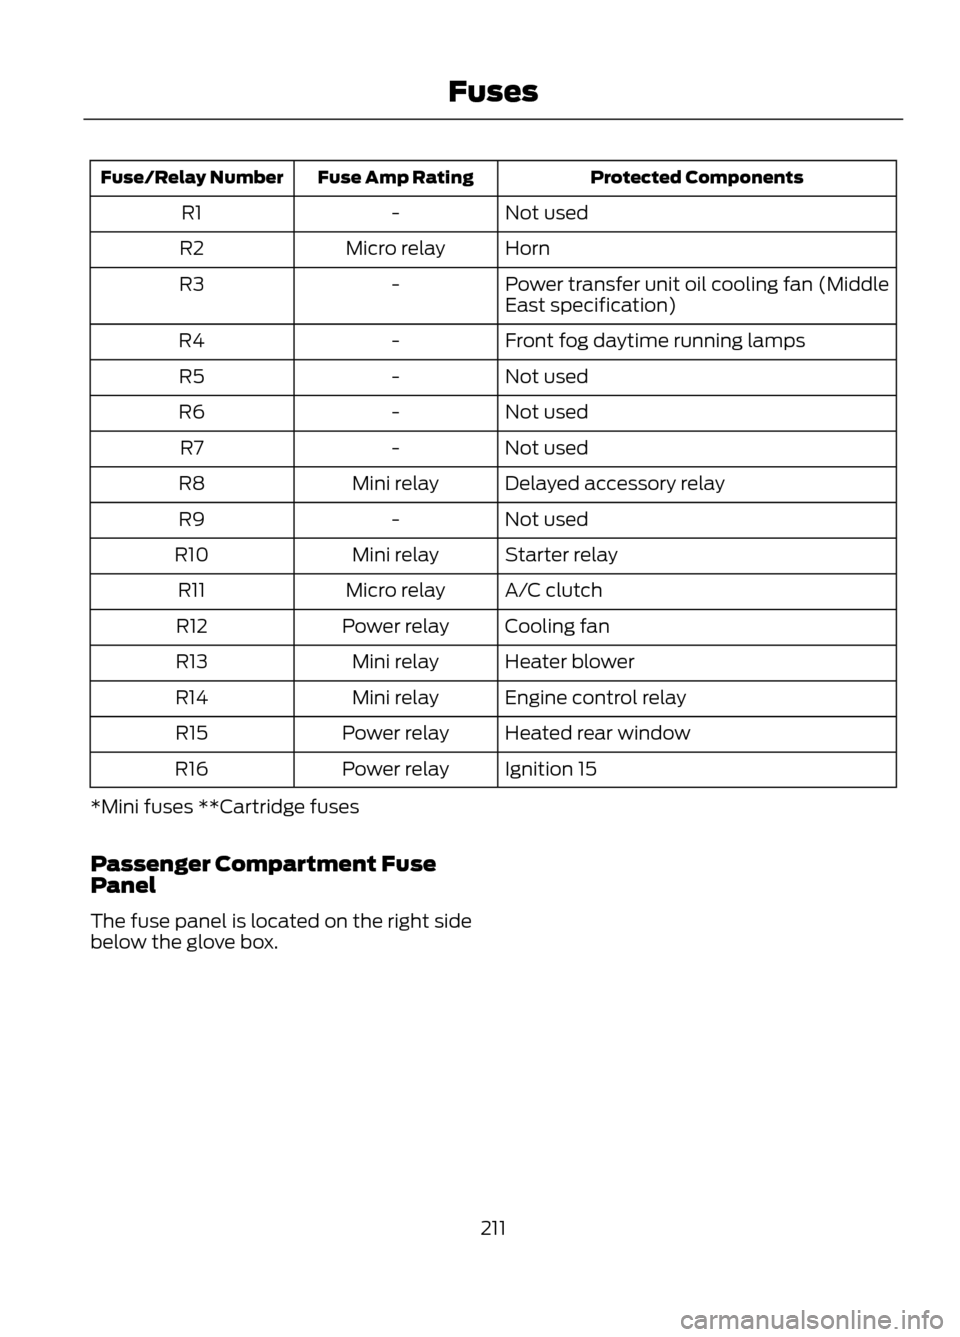
Protected Components
Fuse Amp Rating
Fuse/Relay Number
Not used
-
R1
Horn
Micro relay
R2
Power transfer unit oil cooling fan (Middle
East specification)
-
R3
Front fog daytime running lamps
-
R4
Not used
-
R5
Not used
-
R6
Not used
-
R7
Delayed accessory relay
Mini relay
R8
Not used
-
R9
Starter relay
Mini relay
R10
A/C clutch
Micro relay
R11
Cooling fan
Power relay
R12
Heater blower
Mini relay
R13
Engine control relay
Mini relay
R14
Heated rear window
Power relay
R15
Ignition 15
Power relay
R16
*Mini fuses **Cartridge fuses
Passenger Compartment Fuse
Panel
The fuse panel is located on the right side
below the glove box.
211
Fuses
Page 398 of 423
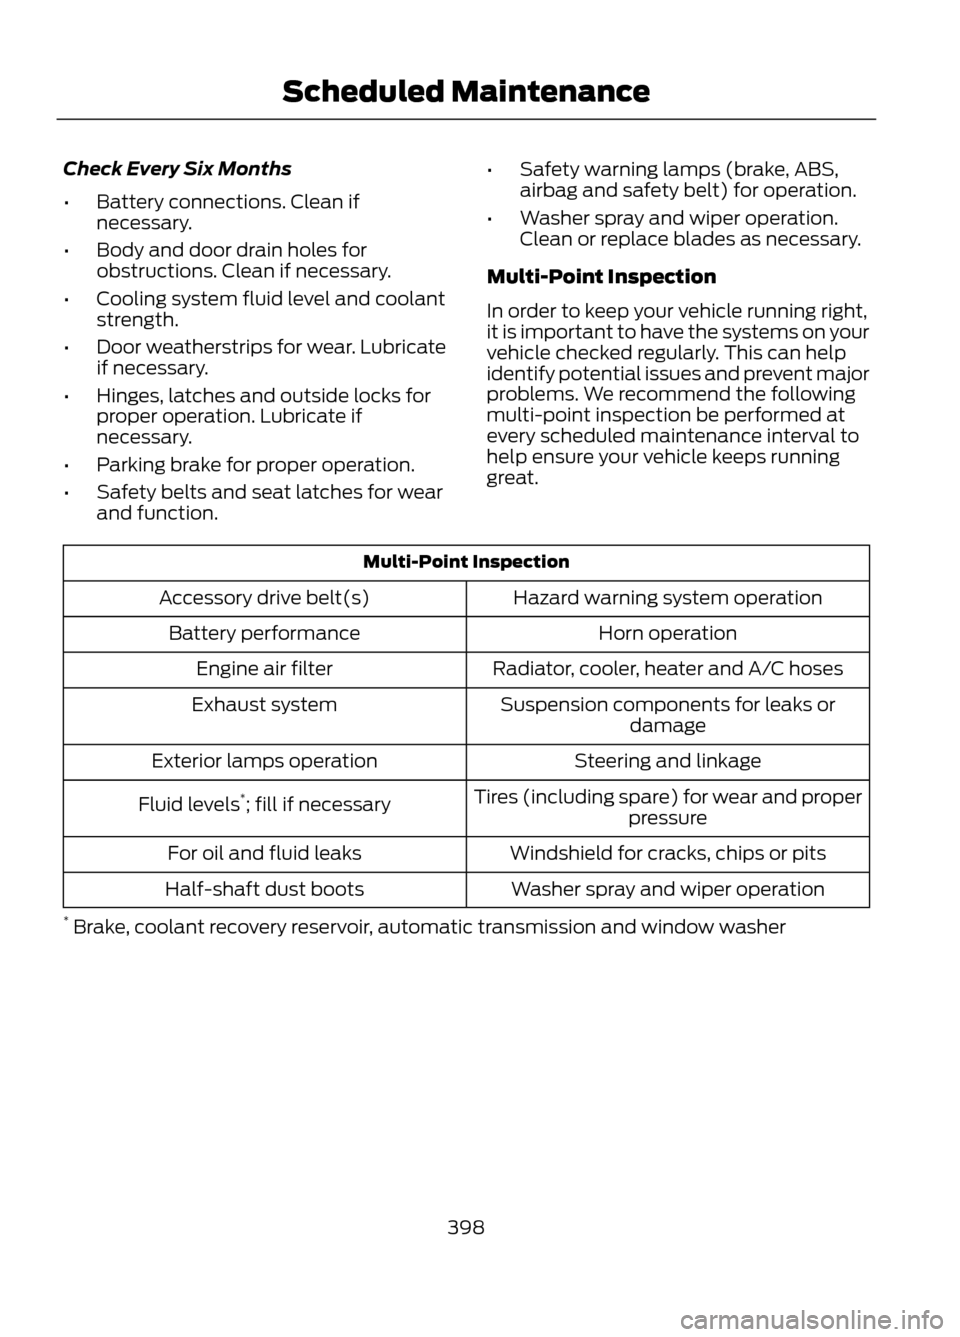
Check Every Six Months
•Battery connections. Clean if
necessary.
• Body and door drain holes for
obstructions. Clean if necessary.
• Cooling system fluid level and coolant
strength.
• Door weatherstrips for wear. Lubricate
if necessary.
• Hinges, latches and outside locks for
proper operation. Lubricate if
necessary.
• Parking brake for proper operation.
• Safety belts and seat latches for wear
and function. •
Safety warning lamps (brake, ABS,
airbag and safety belt) for operation.
• Washer spray and wiper operation.
Clean or replace blades as necessary.
Multi-Point Inspection
In order to keep your vehicle running right,
it is important to have the systems on your
vehicle checked regularly. This can help
identify potential issues and prevent major
problems. We recommend the following
multi-point inspection be performed at
every scheduled maintenance interval to
help ensure your vehicle keeps running
great.
Multi-Point Inspection Hazard warning system operation
Accessory drive belt(s)
Horn operation
Battery performance
Radiator, cooler, heater and A/C hoses
Engine air filter
Suspension components for leaks ordamage
Exhaust system
Steering and linkage
Exterior lamps operation
Tires (including spare) for wear and properpressure
Fluid levels
*
; fill if necessary
Windshield for cracks, chips or pits
For oil and fluid leaks
Washer spray and wiper operation
Half-shaft dust boots
* Brake, coolant recovery reservoir, automatic transmission and window washer
398
Scheduled Maintenance