check engine FORD ESCAPE 2020 Service Manual
[x] Cancel search | Manufacturer: FORD, Model Year: 2020, Model line: ESCAPE, Model: FORD ESCAPE 2020Pages: 553, PDF Size: 7.73 MB
Page 326 of 553
Dispose of used engine coolant in an
appropriate manner. Follow your
community's regulations and standards
for recycling and disposing of automotive
fluids.
Severe Climates
If you drive in extremely cold climates:
•
It may be necessary to increase the
coolant concentration above 50%.
• A coolant concentration of 60%
provides improved freeze point
protection. Coolant concentrations
above 60% decrease the overheat
protection characteristics of the
coolant and may cause engine
damage.
If you drive in extremely hot climates:
• You can decrease the coolant
concentration to 40%.
• Coolant concentrations below 40%
decrease the freeze and corrosion
protection characteristics of the
coolant and may cause engine
damage.
Vehicles driven year-round in non-extreme
climates should use prediluted coolant for
optimum cooling system and engine
protection.
Coolant Change
At specific mileage intervals, as listed in
the scheduled maintenance information,
the coolant should be changed. Add
prediluted coolant approved to the correct
specification. See Capacities and
Specifications (page 376).
Fail-Safe Cooling
Fail-safe cooling allows you to temporarily
drive your vehicle before any incremental
component damage occurs. The fail-safe
distance depends on ambient
temperature, vehicle load and terrain. How Fail-Safe Cooling Works If the engine begins to overheat,
the coolant temperature gauge
moves toward the red zone:
A warning lamp illuminates and
a message may appear in the
information display.
If the engine reaches a preset
over-temperature condition, the engine
automatically switches to alternating
cylinder operation. Each disabled cylinder
acts as an air pump and cools the engine.
When this occurs, your vehicle still
operates, however:
• Engine power is limited.
• The air conditioning system turns off.
Continued operation increases the engine
temperature, causing the engine to
completely shut down. Your steering and
braking effort increases in this situation.
When the engine temperature cools, you
can re-start the engine. Have your vehicle
checked as soon as possible to minimize
engine damage.
When Fail-Safe Mode Is Activated WARNING:
Fail-safe mode is for
use during emergencies only. Operate
your vehicle in fail-safe mode only as
long as necessary to bring your vehicle
to rest in a safe location and seek
immediate repairs. When in fail-safe
mode, your vehicle will have limited
power, will not be able to maintain
high-speed operation, and may
completely shut down without warning,
potentially losing engine power, power
steering assist, and power brake assist,
which may increase the possibility of a
crash resulting in serious injury.
323
Escape (CTC) Canada/United States of America, Vehicles Built From: 17-06-2019, enUSA, Edition date: 201906, Third-Printing- Maintenance
Page 327 of 553
WARNING: Do not remove the
coolant reservoir cap when the engine is
on or the cooling system is hot. Wait 10
minutes for the cooling system to cool
down. Cover the coolant reservoir cap
with a thick cloth to prevent the
possibility of scalding and slowly remove
the cap. Failure to follow this instruction
could result in personal injury.
Your vehicle has limited engine power
when in the fail-safe mode, drive your
vehicle with caution. Your vehicle does not
maintain high-speed operation and the
engine may operate poorly.
Remember that the engine is capable of
automatically shutting down to prevent
engine damage. In this situation:
1. Pull off the road as soon as safely possible and switch the engine off.
2. If you are a member of a roadside assistance program, we recommend
that you contact your roadside
assistance service provider.
3. If this is not possible, wait a short period for the engine to cool.
4. Check the coolant level. If the coolant level is at or below the minimum mark,
add prediluted coolant immediately.
5. When the engine temperature cools, you can re-start the engine. Have your
vehicle checked as soon as possible to
minimize engine damage.
Note: Driving your vehicle without repair
increases the chance of engine damage. Engine Coolant Temperature
Management (If Equipped) WARNING:
To reduce the risk of
crash and injury, be prepared that the
vehicle speed may reduce and the
vehicle may not be able to accelerate
with full power until the coolant
temperature reduces.
If you tow a trailer with your vehicle, the
engine may temporarily reach a higher
temperature during severe operating
conditions, for example ascending a long
or steep grade in high ambient
temperatures.
At this time, you may notice the coolant
temperature gauge moves toward the red
zone and a message may appear in the
information display.
You may notice a reduction in vehicle
speed caused by reduced engine power in
order to manage the engine coolant
temperature. Your vehicle may enter this
mode if certain high-temperature and
high-load conditions take place. The
amount of speed reduction depends on
vehicle loading, grade and ambient
temperature. If this occurs, there is no
need to stop your vehicle. You can
continue to drive.
The air conditioning may automatically
turn on and off during severe operating
conditions to protect the engine from
overheating. When the coolant
temperature decreases to the normal
operating temperature, the air conditioning
turns on.
If the coolant temperature gauge moves
fully into the red zone, or if the coolant
temperature warning or service engine
soon messages appear in your information
display, do the following:
324
Escape (CTC) Canada/United States of America, Vehicles Built From: 17-06-2019, enUSA, Edition date: 201906, Third-Printing- Maintenance
Page 328 of 553
1. Stop your vehicle as soon as it is safe
to do so. Fully apply the parking brake,
shift into park (P) or neutral (N).
2. Leave the engine running until the coolant temperature gauge needle
returns to the normal position. After
several minutes, if the temperature
does not drop, follow the remaining
steps.
3. Switch the engine off and wait for it to
cool. Check the coolant level.
4. If the coolant level is at or below the minimum mark, add prediluted coolant
immediately.
5. If the coolant level is normal, restart the engine and continue.
AUTOMATIC TRANSMISSION
FLUID CHECK
The automatic transmission does not have
a transmission fluid dipstick.
Have an authorized dealer check and
change the transmission fluid at the
correct service interval. See Scheduled
Maintenance (page 486). Your
transmission does not consume fluid.
However, if the transmission slips, shifts
slowly or if you notice a sign of leaking
fluid, contact an authorized dealer.
Do not use supplemental transmission
fluid additives, treatments or cleaning
agents. The use of these materials may
affect transmission operation and result
in damage to internal transmission
components. BRAKE FLUID CHECK WARNING:
Do not use any fluid
other than the recommended brake fluid
as this will reduce brake efficiency. Use
of incorrect fluid could result in the loss
of vehicle control, serious personal injury
or death. WARNING:
Only use brake fluid
from a sealed container. Contamination
with dirt, water, petroleum products or
other materials may result in brake
system damage or failure. Failure to
adhere to this warning could result in the
loss of vehicle control, serious personal
injury or death. WARNING:
Do not allow the fluid
to touch your skin or eyes. If this
happens, rinse the affected areas
immediately with plenty of water and
contact your physician. WARNING:
The brake system
could be affected if the brake fluid level
is below the MIN mark or above the MAX
mark on the brake fluid reservoir.
325
Escape (CTC) Canada/United States of America, Vehicles Built From: 17-06-2019, enUSA, Edition date: 201906, Third-Printing- Maintenance
Page 331 of 553
4. Disconnect the negative battery cable
terminal.
5. Disconnect the positive battery cable terminal.
6. Remove the battery securing clamp.
7. Remove the battery.
8. To install, reverse the removal procedure.
Note: Before reconnecting the battery,
make sure the ignition remains switched off.
Note: Make sure the battery cable terminals
are fully tightened.
If you disconnect or replace the vehicle
battery, you must reset the following
features:
• Window bounce-back. See Windows
and Mirrors (page 93).
• Clock Settings.
• Pre-set radio stations.
• Steering Angle Sensor.
Note: To calibrate the steering angle
sensor, drive the vehicle above
30 mph
(50 km/h) for a minimum of 1.2 mi (2 km).
Make sure to drive straight ahead for a
minimum of 30 seconds. Several vehicle
functions are disabled and a warning light
could appear until the sensor is calibrated.
Note: For flexible fuel vehicles, if you are
operating on E85, you could experience poor
starts or an inability to start the engine, and
driveability problems until the fuel trim and
ethanol content have been relearned. Drive
the vehicle at least
10 mi (16 km) to
completely relearn the idle trim and fuel
trim strategy.
Battery Disposal Make sure that you dispose of
old batteries in an
environmentally friendly way.
Seek advice from your local authority
about recycling old batteries. ADJUSTING THE HEADLAMPS
Vertical Aim Adjustment
The headlamps on your vehicle are
properly aimed at the assembly plant. If
your vehicle has been in an accident, the
alignment of your headlamps should be
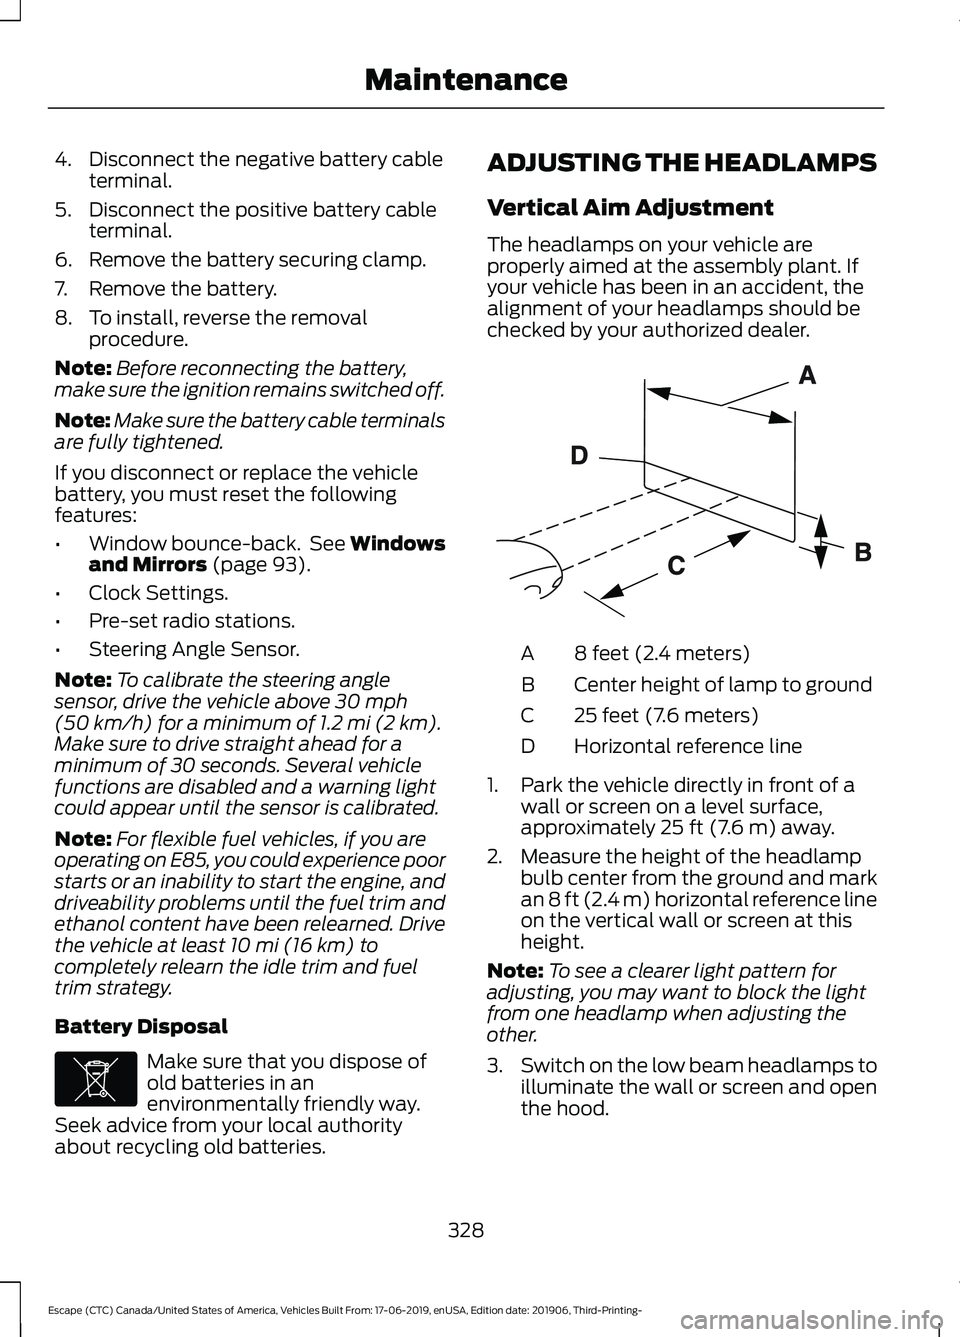
checked by your authorized dealer.
8 feet (2.4 meters)
A
Center height of lamp to ground
B
25 feet (7.6 meters)
C
Horizontal reference line
D
1. Park the vehicle directly in front of a wall or screen on a level surface,
approximately
25 ft (7.6 m) away.
2. Measure the height of the headlamp bulb center from the ground and mark
an
8 ft (2.4 m) horizontal reference line
on the vertical wall or screen at this
height.
Note: To see a clearer light pattern for
adjusting, you may want to block the light
from one headlamp when adjusting the
other.
3. Switch on the low beam headlamps to
illuminate the wall or screen and open
the hood.
328
Escape (CTC) Canada/United States of America, Vehicles Built From: 17-06-2019, enUSA, Edition date: 201906, Third-Printing- MaintenanceE107998 E142592
Page 344 of 553
•
Lubricate all hood, door and luggage
compartment hinges and latches with
a light grade oil.
• Cover interior trim to prevent fading.
• Keep all rubber parts free from oil and
solvents.
Engine
• Change the engine oil and filter prior to
storage because used engine oil
contains contaminates which may
cause engine damage.
• Start the engine every 15 days for a
minimum of 15 minutes. Run at fast
idle with the climate controls set to
defrost until the engine reaches normal
operating temperature.
• With your foot on the brake, shift
through all the gears while the engine
is running.
• We recommend that you change the
engine oil before you use your vehicle
again.
Fuel system
• Fill the fuel tank with high-quality fuel
until the first automatic shutoff of the
fuel pump nozzle.
Cooling system
• Protect against freezing temperatures.
• When removing your vehicle from
storage, check coolant fluid level.
Confirm that there are no cooling
system leaks and that fluid is at the
recommended level. Disconnecting Your 12 Volt Battery
•
Check and recharge as necessary. Keep
connections clean.
• If storing your vehicle for more than 30
days without recharging the battery,
we recommend that you disconnect
the battery cables to maintain battery
charge for quick starting.
Note: It is necessary to reset memory
features if you disconnect the battery
cables.
Plugging in Your HYBRID
We recommend the following options for
your plug-in vehicle (PHEV) :
• Leave your vehicle plugged in. The 12
volt battery maintains power if left
plugged in. However, this periodically
uses electricity from the household
outlet.
• Connect a battery charger to your 12
volt battery and leave it on a
continuous, slow charge.
• Disconnect the 12 volt battery. If your
12 volt battery is located in the luggage
compartment, do not fully shut the
luggage compartment after
disconnecting the 12 volt battery. Only
leave the luggage compartment open
if your vehicle is stored in a locked
location.
Brakes
• Make sure the brakes and parking brake
release fully.
Tires
• Maintain recommended air pressure.
341
Escape (CTC) Canada/United States of America, Vehicles Built From: 17-06-2019, enUSA, Edition date: 201906, Third-Printing- Vehicle Care
Page 349 of 553
General Information
WARNING: Failure to follow these
guidelines could result in an increased
risk of loss of vehicle control, injury or
death.
Note: Do not use the kit if a tire has become
severely damaged. Only punctures located
within the tire tread can be sealed with the
kit.
Do not attempt to repair punctures larger
than 0.24 in (6 mm) or damage to the tire's
sidewall. The tire may not completely seal.
Loss of air pressure may adversely affect
tire performance. For this reason:
Note: Do not drive the vehicle above
50 mph (80 km/h)
.
Note: Do not drive further than
120 mi
(200 km). Drive only to the closest
authorized Ford dealer or tire repair shop to
have your tire inspected.
• Drive carefully and avoid abrupt
steering maneuvers.
• Periodically monitor tire inflation
pressure in the affected tire; if the tire
is losing pressure, have the vehicle
towed.
• Read the information in the Tips for
Use of the Kit section to make sure safe
operation of the kit and your vehicle.
Tips for Use of the Kit
To ensure safe operation of the kit:
• Read all instructions and cautions fully.
• Before operating the kit, make sure
your vehicle is safely off the road and
away from moving traffic. Turn on the
hazard lights.
• Always set the parking brake to ensure
the vehicle doesn't move unexpectedly. •
Do not remove any foreign objects,
such as nails or screws, from the tire.
• When using the kit, leave the engine
running (only if the vehicle is outdoors
or in a well-ventilated area) so the
compressor does not drain the
vehicle's battery.
• Do not allow the compressor to
operate continuously for more than 15
minutes. This will help prevent the
compressor from overheating.
• Never leave the kit unattended during
operation.
• Sealant compound contains latex.
Those with latex sensitivities should
use appropriate precautions to avoid
an allergic reaction.
• Keep the kit away from children.
• Only use the kit when the ambient
temperature is between -22°F (-30°C)
and 158°F (70°C).
• Only use the sealing compound before
the use-by date. The use-by date is on
a label on the sealant canister and can
be seen through the rectangular
viewing window on the bottom of the
compressor. Check the use-by date
regularly and replace the canister when
the sealant expires.
• Do not store the kit unsecured inside
the passenger compartment of the
vehicle as it may cause injury during a
sudden stop or crash. Always store the
kit in its original location.
• After sealant use, the tire pressure
monitoring system sensor and valve
stem on the wheel must be replaced
by an authorized Ford dealer.
• Operating the kit could cause an
electrical disturbance in radio, CD, and
DVD player operation.
346
Escape (CTC) Canada/United States of America, Vehicles Built From: 17-06-2019, enUSA, Edition date: 201906, Third-Printing- Wheels and Tires
Page 350 of 553
* When inflation only is required
for a tire or other objects, the
selector must be in the Air
position.
What to do when a Tire Is
Punctured
A tire puncture within the tire's tread area
can be repaired in two stages with the kit.
• In the first stage, the tire will be
reinflated with a sealing compound
and air. After the tire has been inflated,
you will need to drive the vehicle a
short distance 4 mi (6 km) to distribute
the sealant in the tire.
• In the second stage, you will need to
check the tire pressure and adjust, if
necessary, to the vehicle's specified
tire inflation pressure.
First Stage: Reinflating the Tire
with Sealing Compound and Air WARNING: Do not stand directly
over the kit while inflating the tire. If you
notice any unusual bulges or
deformations in the tire's sidewall during
inflation, stop and call roadside
assistance. WARNING:
If the tire does not
inflate to the recommended tire pressure
within 15 minutes, stop and call roadside
assistance. WARNING:
Do not run the engine
when operating the air compressor
unless the vehicle is outdoors or in a
well-ventilated area.
Preparation: Park the vehicle in a safe, level
and secure area, away from moving traffic.
Turn the hazard lights on. Apply the parking
brake and turn the engine off. Inspect the
flat tire for visible damage. Sealant compound contains latex. Use
appropriate precautions to avoid any
allergic reactions.
Do not remove any foreign object that has
pierced the tire. If a puncture is located in
the tire sidewall, stop and call roadside
assistance.
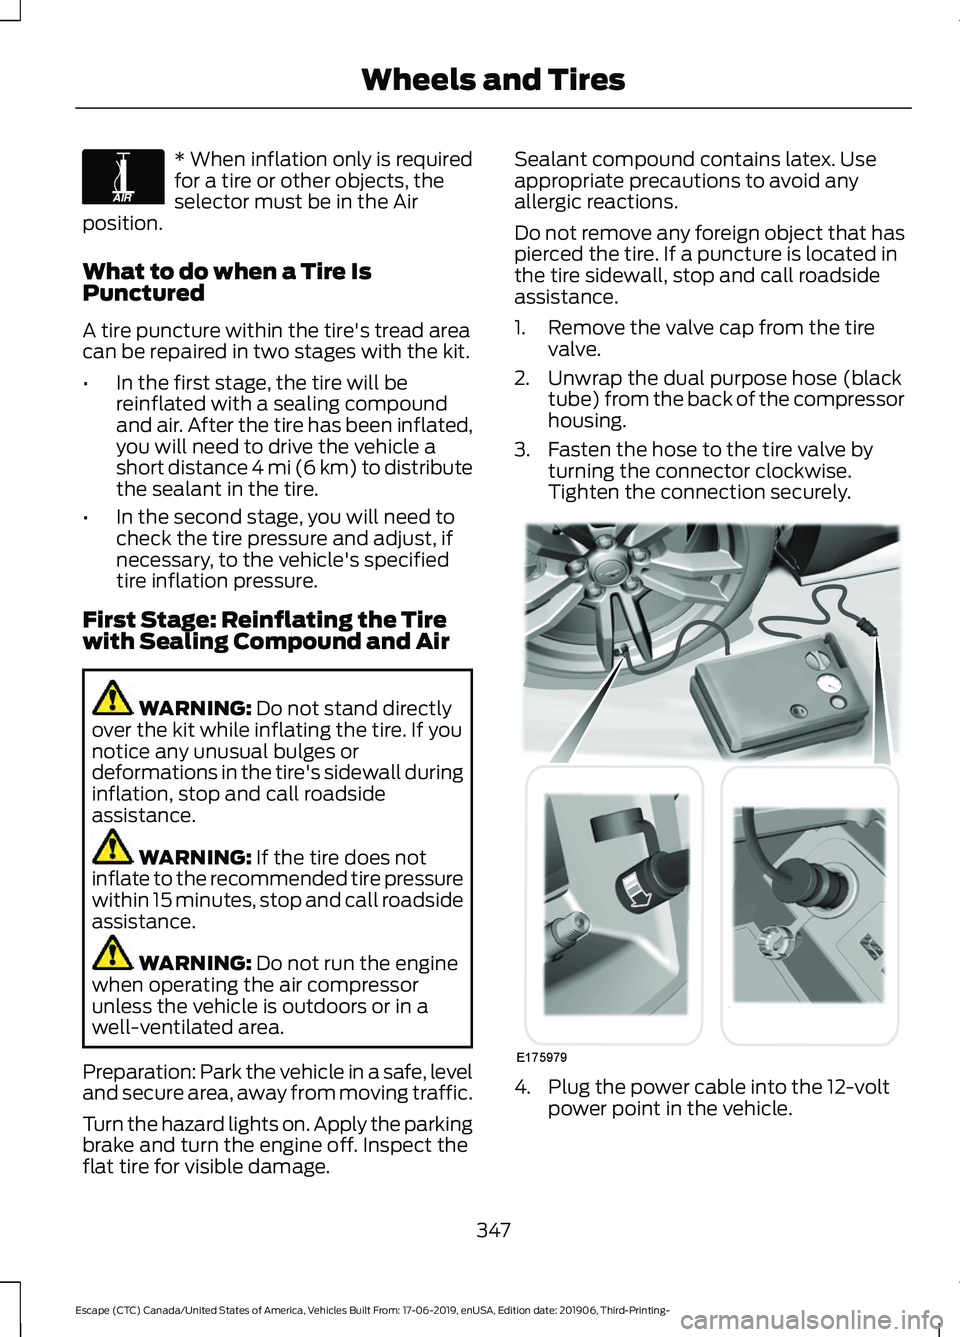
1. Remove the valve cap from the tire
valve.
2. Unwrap the dual purpose hose (black tube) from the back of the compressor
housing.
3. Fasten the hose to the tire valve by turning the connector clockwise.
Tighten the connection securely. 4. Plug the power cable into the 12-volt
power point in the vehicle.
347
Escape (CTC) Canada/United States of America, Vehicles Built From: 17-06-2019, enUSA, Edition date: 201906, Third-Printing- Wheels and TiresE175978 E175979
Page 351 of 553
5. Remove the warning sticker found on
the casing/housing and place it on the
top of the instrument panel or the
center of the dash.
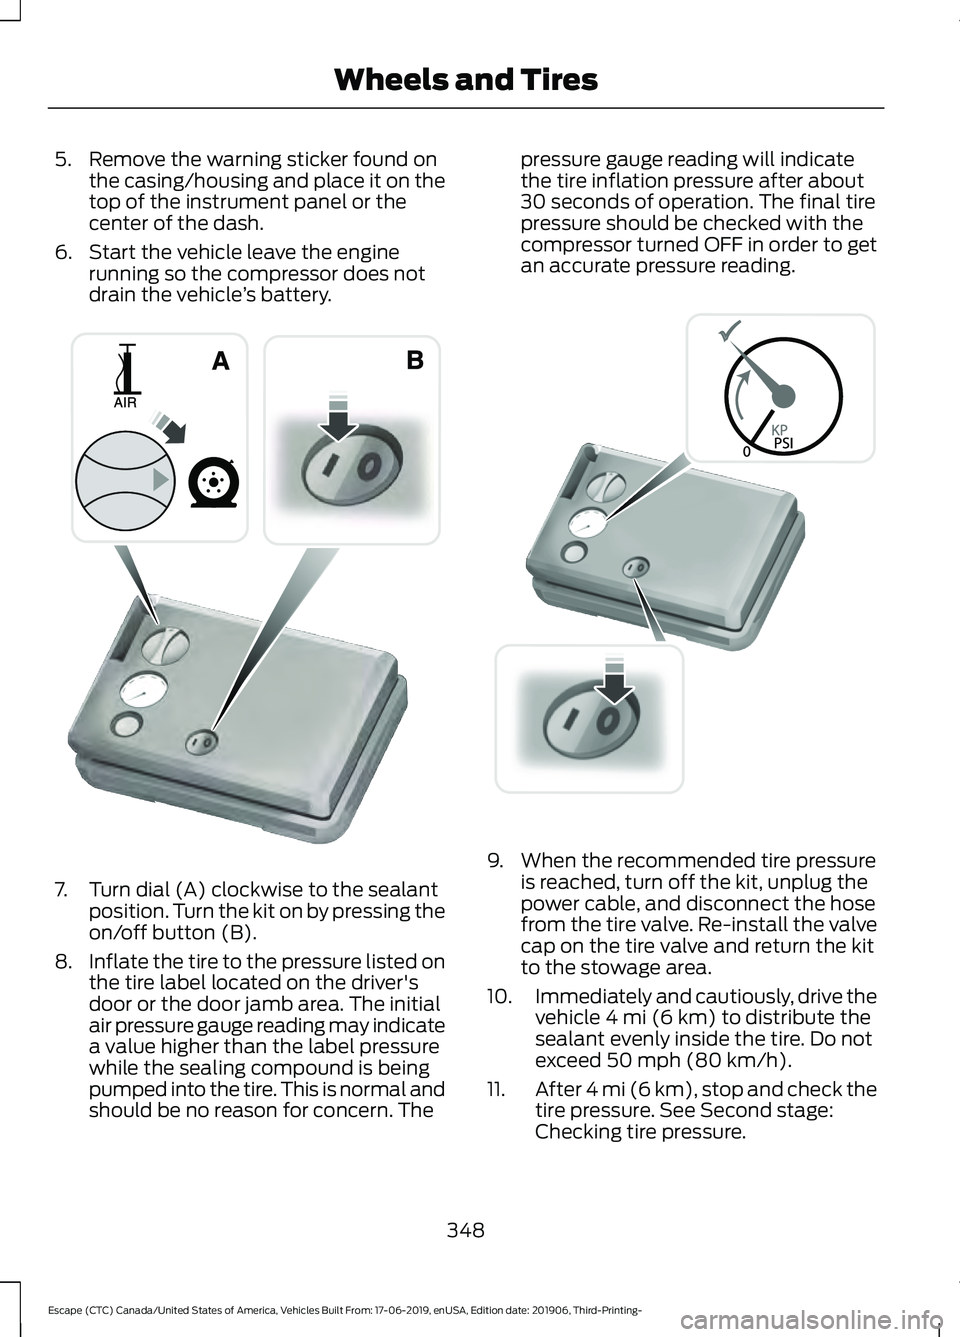
6. Start the vehicle leave the engine running so the compressor does not
drain the vehicle ’s battery. 7. Turn dial (A) clockwise to the sealant
position. Turn the kit on by pressing the
on/off button (B).
8. Inflate the tire to the pressure listed on
the tire label located on the driver's
door or the door jamb area. The initial
air pressure gauge reading may indicate
a value higher than the label pressure
while the sealing compound is being
pumped into the tire. This is normal and
should be no reason for concern. The pressure gauge reading will indicate
the tire inflation pressure after about
30 seconds of operation. The final tire
pressure should be checked with the
compressor turned OFF in order to get
an accurate pressure reading.
9. When the recommended tire pressure
is reached, turn off the kit, unplug the
power cable, and disconnect the hose
from the tire valve. Re-install the valve
cap on the tire valve and return the kit
to the stowage area.
10. Immediately and cautiously, drive the
vehicle 4 mi (6 km) to distribute the
sealant evenly inside the tire. Do not
exceed
50 mph (80 km/h).
11. After 4 mi (6 km), stop and check the
tire pressure. See Second stage:
Checking tire pressure.
348
Escape (CTC) Canada/United States of America, Vehicles Built From: 17-06-2019, enUSA, Edition date: 201906, Third-Printing- Wheels and TiresE175981 E175982
Page 374 of 553
WARNING: To help prevent your
vehicle from moving when changing a
wheel, shift the transmission into park
(P), set the parking brake and use an
appropriate block or wheel chock to
secure the wheel diagonally opposite to
the wheel being changed. For example,
when changing the front left wheel,
place an appropriate block or wheel
chock on the right rear wheel. WARNING: It is recommended that
the wheels of the vehicle be chocked,
and that no person should remain in a
vehicle that is being jacked. WARNING:
Always use the jack
provided as original equipment with your
vehicle. If using a jack other than the one
provided, make sure the jack capacity is
adequate for the vehicle weight,
including any vehicle cargo or
modifications. If you are unsure if the jack
capacity is adequate, contact the
authorized dealer. WARNING:
The jack supplied with
this vehicle is only intended for changing
wheels. Do not use the vehicle jack other
than when you are changing a wheel in
an emergency. WARNING: Check that the vehicle
jack is not damaged or deformed and
the thread is lubricated and clean. WARNING:
The jack should be
used on level firm ground wherever
possible. WARNING:
Use only the specified
jacking points. If you use other positions,
you may damage the body, steering,
suspension, engine, braking system or
the fuel lines. WARNING:
Switch the ignition off
and apply the park brake fully before
lifting vehicle. WARNING:
Park your vehicle so
that you do not obstruct the flow of
traffic or place yourself in any danger and
set up a warning triangle. WARNING:
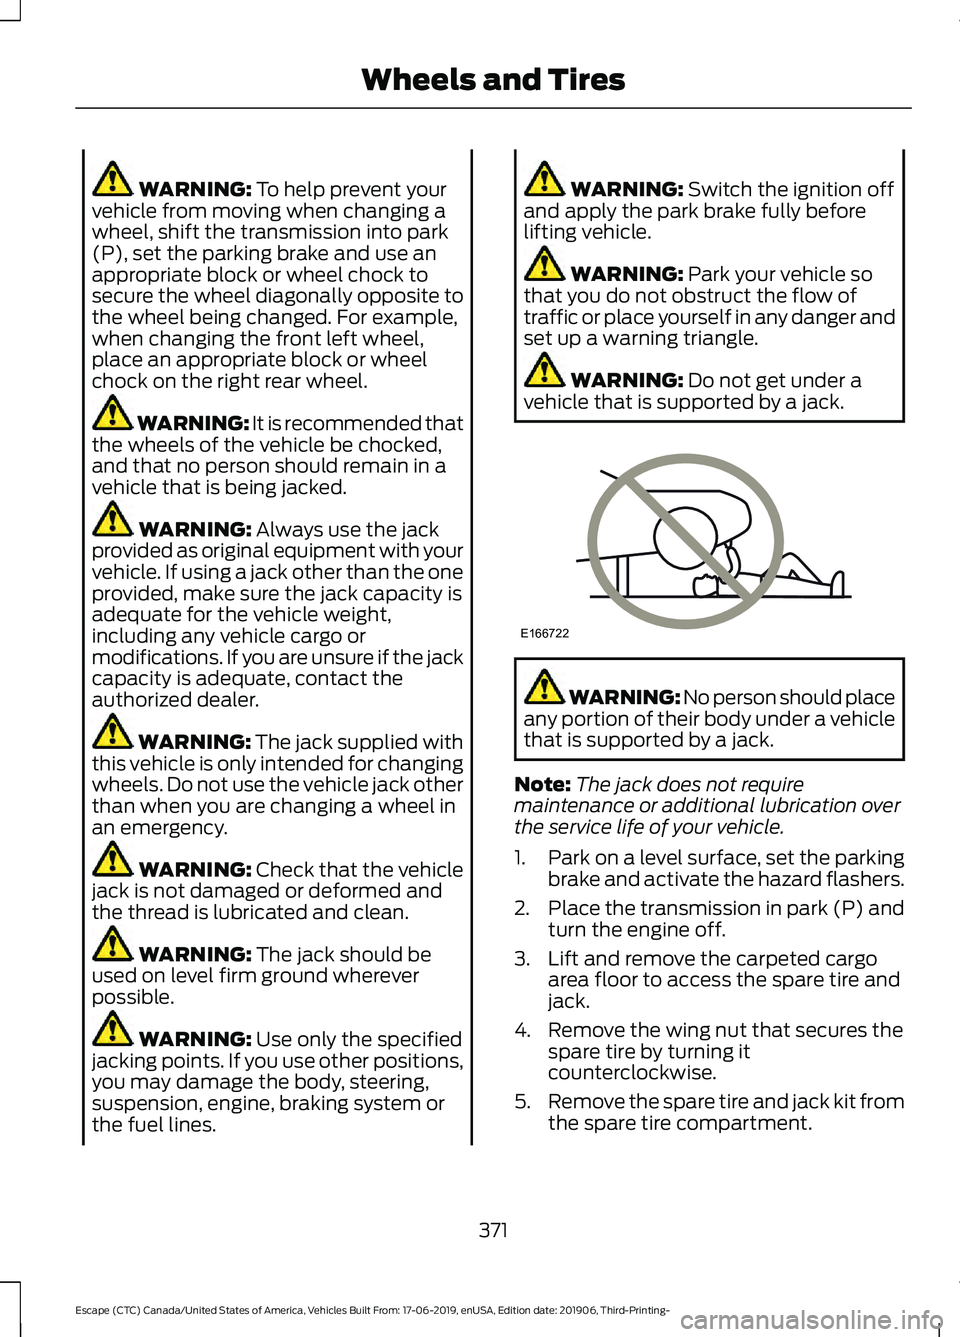
Do not get under a
vehicle that is supported by a jack. WARNING: No person should place
any portion of their body under a vehicle
that is supported by a jack.
Note: The jack does not require
maintenance or additional lubrication over
the service life of your vehicle.
1. Park on a level surface, set the parking
brake and activate the hazard flashers.
2. Place the transmission in park (P) and
turn the engine off.
3. Lift and remove the carpeted cargo area floor to access the spare tire and
jack.
4. Remove the wing nut that secures the spare tire by turning it
counterclockwise.
5. Remove the spare tire and jack kit from
the spare tire compartment.
371
Escape (CTC) Canada/United States of America, Vehicles Built From: 17-06-2019, enUSA, Edition date: 201906, Third-Printing- Wheels and TiresE166722
Page 384 of 553
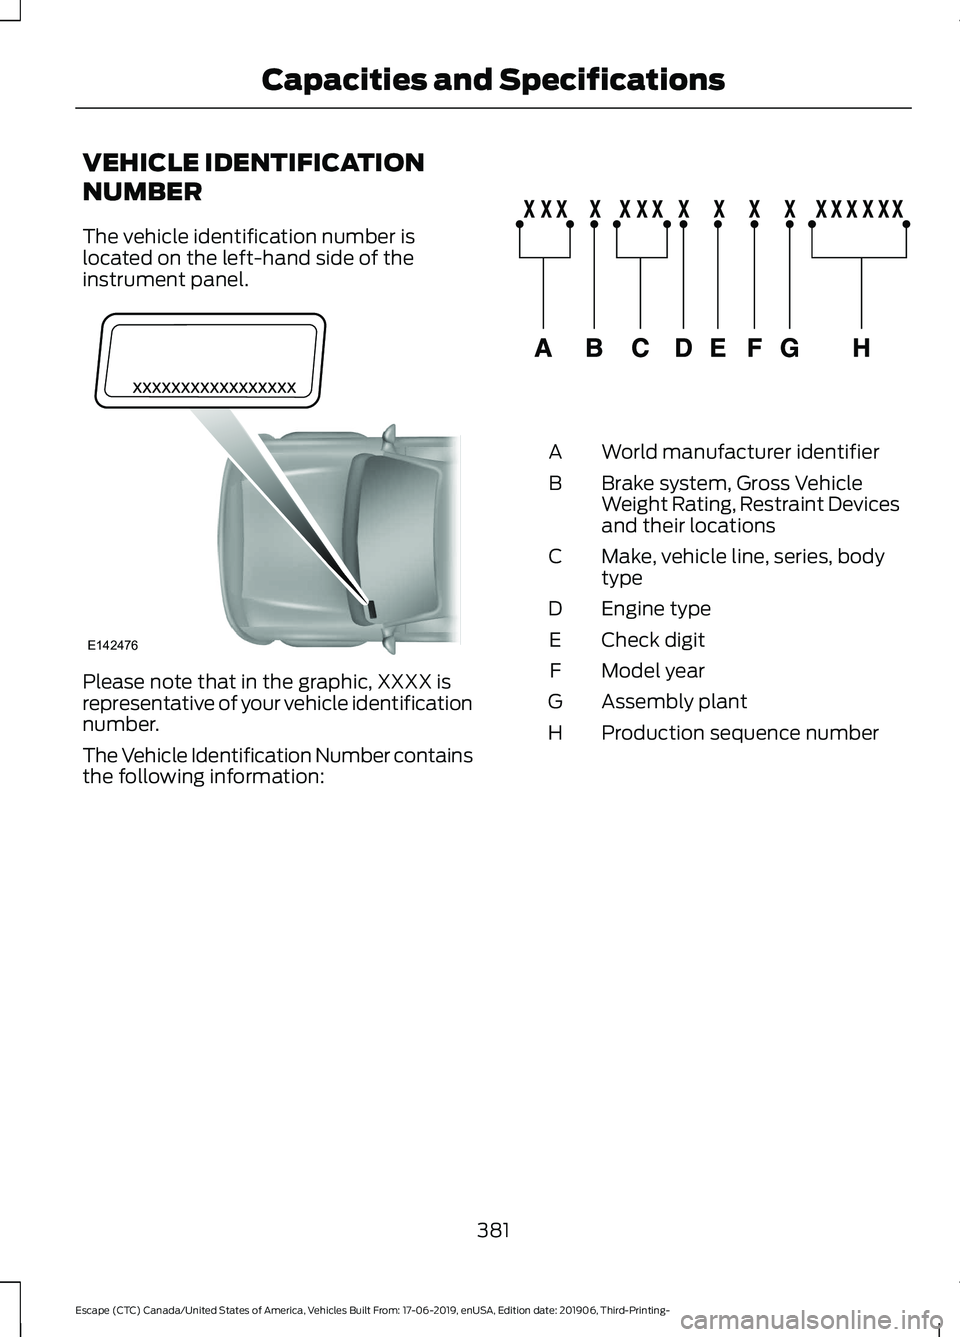
VEHICLE IDENTIFICATION
NUMBER
The vehicle identification number is
located on the left-hand side of the
instrument panel.
Please note that in the graphic, XXXX is
representative of your vehicle identification
number.
The Vehicle Identification Number contains
the following information: World manufacturer identifier
A
Brake system, Gross Vehicle
Weight Rating, Restraint Devices
and their locations
B
Make, vehicle line, series, body
type
C
Engine type
D
Check digit
E
Model year
F
Assembly plant
G
Production sequence number
H
381
Escape (CTC) Canada/United States of America, Vehicles Built From: 17-06-2019, enUSA, Edition date: 201906, Third-Printing- Capacities and SpecificationsE142476 E142477