warning light FORD ESCAPE 2021 Owners Manual
[x] Cancel search | Manufacturer: FORD, Model Year: 2021, Model line: ESCAPE, Model: FORD ESCAPE 2021Pages: 589, PDF Size: 9.2 MB
Page 23 of 589
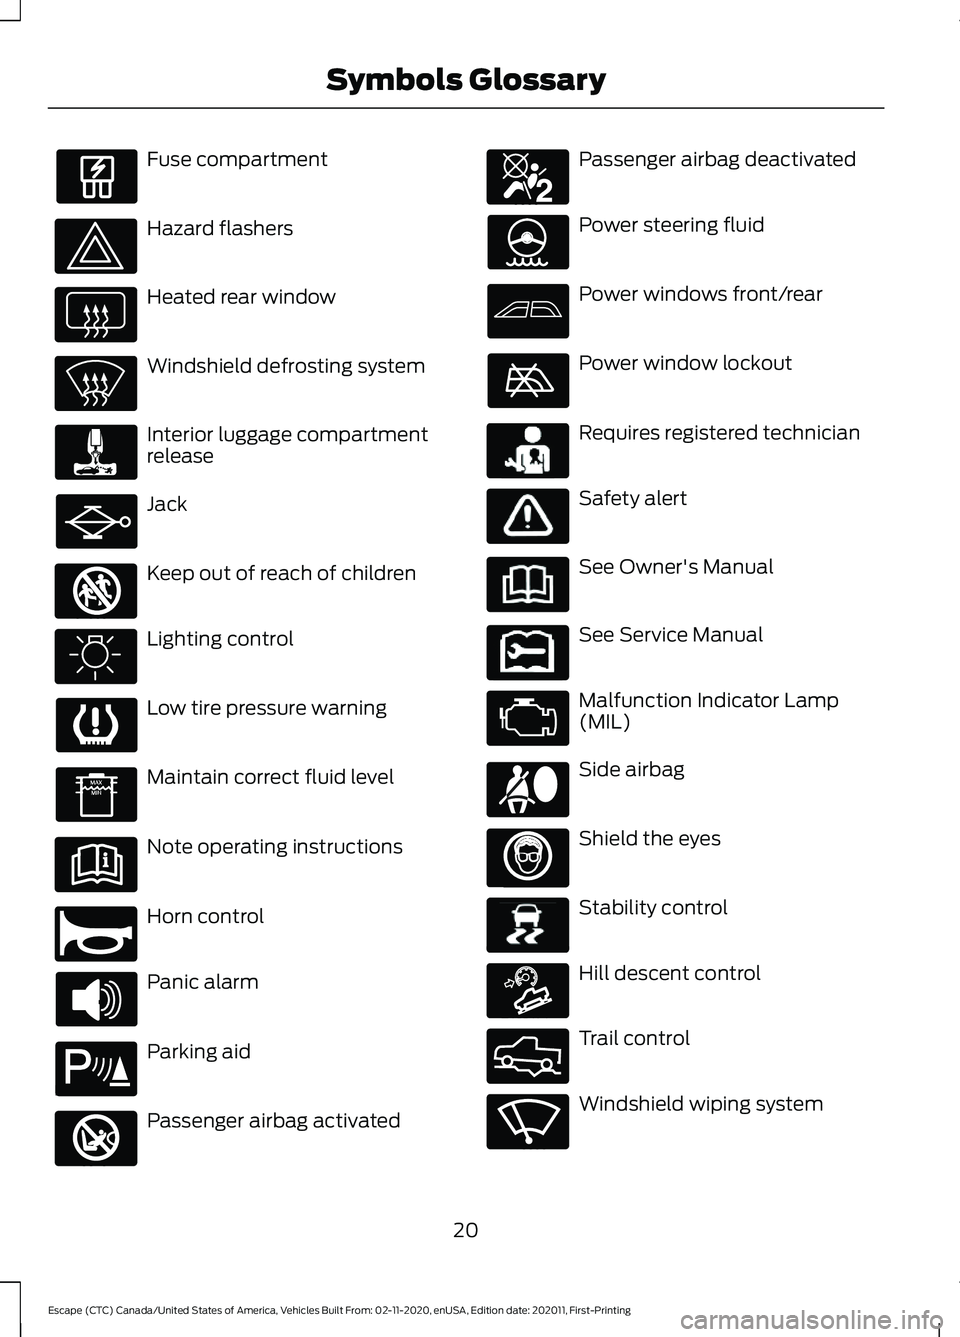
Fuse compartment
Hazard flashers
Heated rear window
Windshield defrosting system
Interior luggage compartment
release
Jack
Keep out of reach of children
Lighting control
Low tire pressure warning
Maintain correct fluid level
Note operating instructions
Horn control
Panic alarm
Parking aid
Passenger airbag activated Passenger airbag deactivated
Power steering fluid
Power windows front/rear
Power window lockout
Requires registered technician
Safety alert
See Owner's Manual
See Service Manual
Malfunction Indicator Lamp
(MIL)
Side airbag
Shield the eyes
Stability control
Hill descent control
Trail control
Windshield wiping system
20
Escape (CTC) Canada/United States of America, Vehicles Built From: 02-11-2020, enUSA, Edition date: 202011, First-Printing Symbols Glossary E161353 E270945 E139213 E270849 E270850 E231159 E231158 E167012 E138639 E163171 E332910 E270969
Page 36 of 589
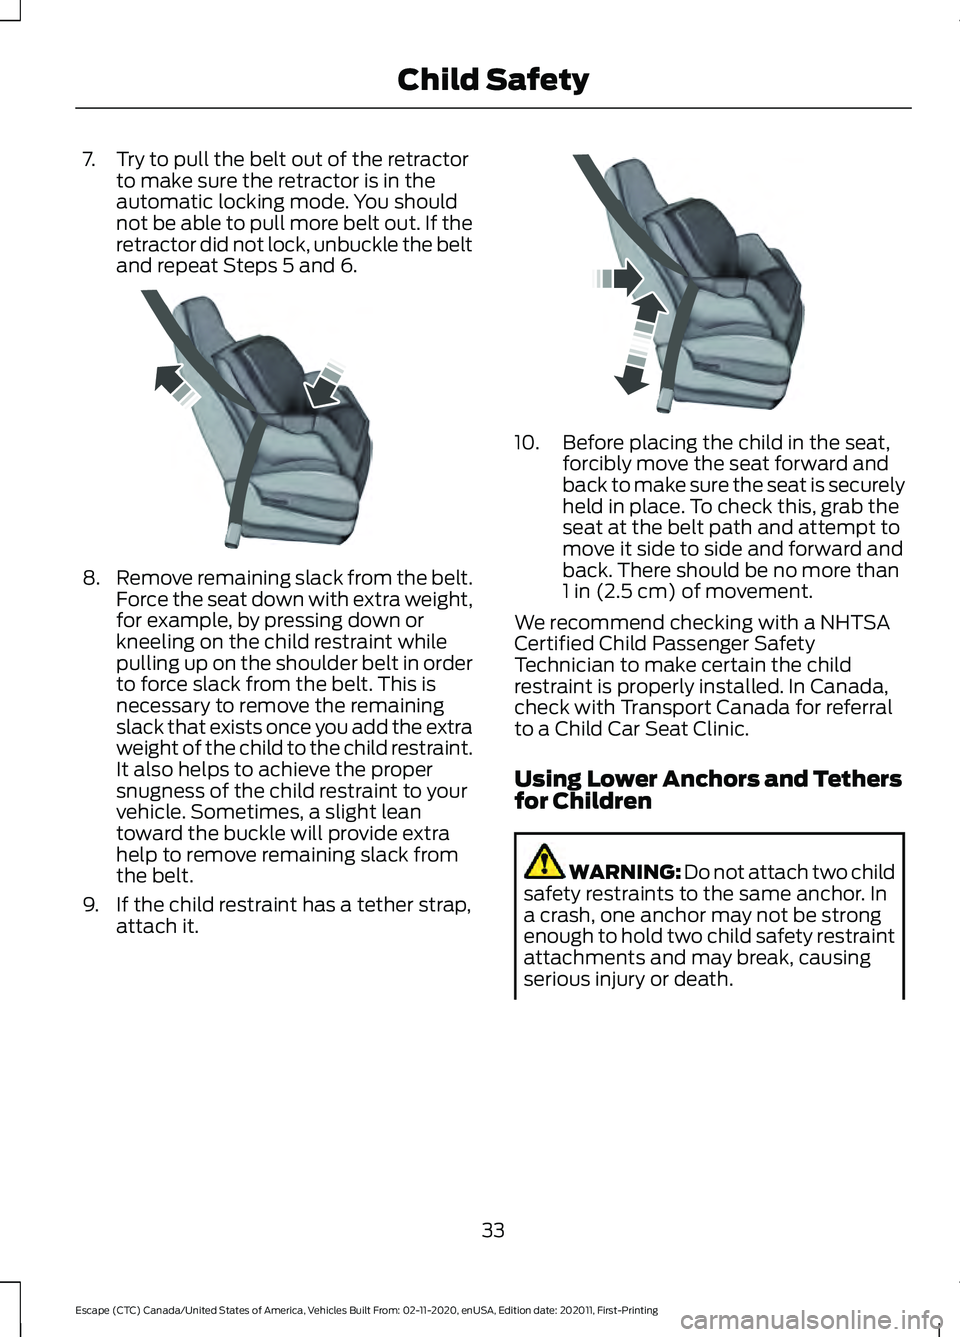
7. Try to pull the belt out of the retractor
to make sure the retractor is in the
automatic locking mode. You should
not be able to pull more belt out. If the
retractor did not lock, unbuckle the belt
and repeat Steps 5 and 6. 8.
Remove remaining slack from the belt.
Force the seat down with extra weight,
for example, by pressing down or
kneeling on the child restraint while
pulling up on the shoulder belt in order
to force slack from the belt. This is
necessary to remove the remaining
slack that exists once you add the extra
weight of the child to the child restraint.
It also helps to achieve the proper
snugness of the child restraint to your
vehicle. Sometimes, a slight lean
toward the buckle will provide extra
help to remove remaining slack from
the belt.
9. If the child restraint has a tether strap, attach it. 10. Before placing the child in the seat,
forcibly move the seat forward and
back to make sure the seat is securely
held in place. To check this, grab the
seat at the belt path and attempt to
move it side to side and forward and
back. There should be no more than
1 in (2.5 cm) of movement.
We recommend checking with a NHTSA
Certified Child Passenger Safety
Technician to make certain the child
restraint is properly installed. In Canada,
check with Transport Canada for referral
to a Child Car Seat Clinic.
Using Lower Anchors and Tethers
for Children WARNING: Do not attach two child
safety restraints to the same anchor. In
a crash, one anchor may not be strong
enough to hold two child safety restraint
attachments and may break, causing
serious injury or death.
33
Escape (CTC) Canada/United States of America, Vehicles Built From: 02-11-2020, enUSA, Edition date: 202011, First-Printing Child SafetyE142533 E142534
Page 43 of 589
•
Seatbelt pretensioners at the front
outermost and second row outermost
seating positions.
• Belt tension sensor at the front
outermost passenger seating position. A seatbelt warning light and
chime.
Crash sensors and monitoring
system with readiness indicator.
The seatbelt pretensioners are designed
to tighten the seatbelts when activated. In
frontal and near-frontal crashes, the
seatbelt pretensioners may be activated
alone or, if the crash is of sufficient severity,
together with the front airbags. The
pretensioners may also activate when a
Safety Canopy airbag deploys.
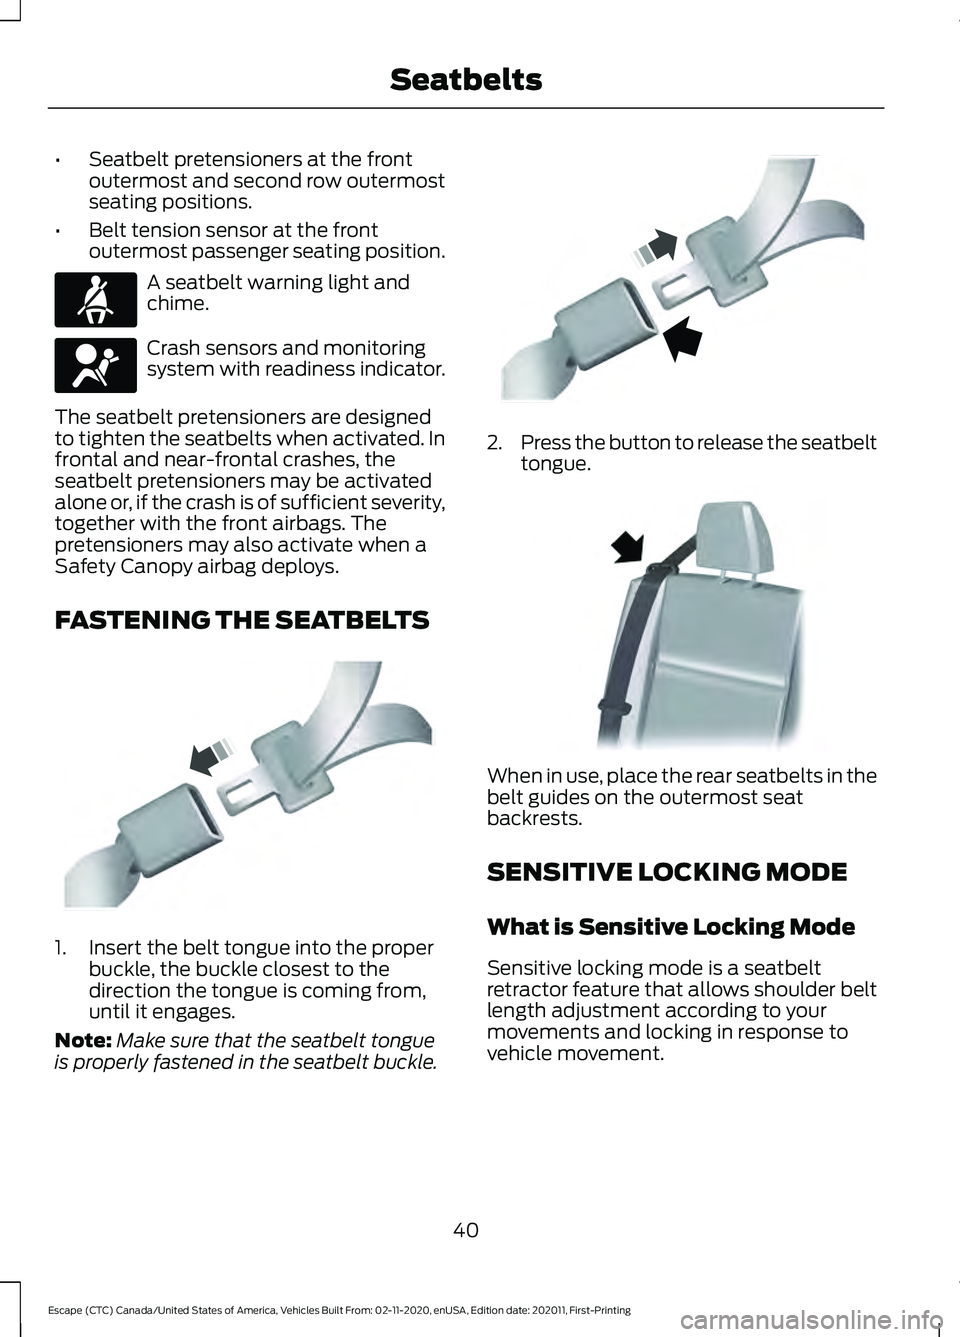
FASTENING THE SEATBELTS 1. Insert the belt tongue into the proper
buckle, the buckle closest to the
direction the tongue is coming from,
until it engages.
Note: Make sure that the seatbelt tongue
is properly fastened in the seatbelt buckle. 2.
Press the button to release the seatbelt
tongue. When in use, place the rear seatbelts in the
belt guides on the outermost seat
backrests.
SENSITIVE LOCKING MODE
What is Sensitive Locking Mode
Sensitive locking mode is a seatbelt
retractor feature that allows shoulder belt
length adjustment according to your
movements and locking in response to
vehicle movement.
40
Escape (CTC) Canada/United States of America, Vehicles Built From: 02-11-2020, enUSA, Edition date: 202011, First-Printing SeatbeltsE71880 E67017 E142587 E142588 E142589
Page 47 of 589
When the initial warning expires for the
driver, more warnings are provided for the
driver and front passenger. This warning
tone sounds if you or your front passenger
do not fasten the seatbelt buckle and the
vehicle speed exceeds 6 mph (10 km/h).
This tone also sounds if an occupant
unfastens the rear seatbelt buckle or it
becomes unfastened.
Switching the Seatbelt Reminder
On and Off WARNING:
While the system
allows you to deactivate it, this system
is designed to improve your chances of
being safely belted and surviving an
accident. We recommend you leave the
system activated for yourself and others
who may use the vehicle.
Note: The driver and front passenger
warnings switch off independently. When
you perform this procedure for one seating
position, do not buckle the other position as
this cancels the process.
Read Steps 1 - 4 before proceeding with
the programming procedure.
Make sure that:
• You set the parking brake.
• The transmission is in park (P).
• The ignition is off.
• You close all vehicle doors.
• You unfasten the driver and front
passenger seatbelts.
1. Switch the ignition on. Do not start the
engine. 2. Wait about one minute until the
seatbelt warning light switches off.
After Step 2, wait an additional five
seconds before proceeding with Step
3. Once you start Step 3, you must
complete the procedure within 60
seconds.
3. For the seating position you are switching off, fasten then unfasten the
seatbelt three times at a moderate
speed, ending in the unfastened state.
After Step 3, the seatbelt warning light
switches on.
4. When the seatbelt warning light is on, fasten then unfasten the seatbelt. After
Step 4, the seatbelt warning light
flashes for confirmation.
This switches the feature off for that
seating position if it is currently on.
This switches the feature on for that
seating position if it is currently off.
CHECKING THE SEATBELTS
Check the seatbelts and child restraints
periodically to make sure they work
properly and are not damaged. Make sure
there are no nicks, tears or cuts. Replace if
necessary.
Check the following seatbelt assemblies
after a crash.
• Retractors.
• Buckles.
• Front seatbelt buckle assemblies.
• Shoulder belt height adjusters.
• Shoulder belt guide on seat backrest.
• Child restraint LATCH and tether
anchors.
• Attaching hardware.
44
Escape (CTC) Canada/United States of America, Vehicles Built From: 02-11-2020, enUSA, Edition date: 202011, First-Printing Seatbelts
Page 49 of 589
WHAT IS THE PERSONAL
SAFETY SYSTEM
An advanced safety system that protects
occupants in frontal crashes.
HOW DOES THE PERSONAL
SAFETY SYSTEM WORK
This system provides an improved level of
frontal crash protection to front seat
occupants and is designed to reduce the
risk of airbag-related injuries. The system
analyzes occupant conditions and crash
severity before activating the appropriate
safety devices. During a crash, the
restraints control module may deploy the
seatbelt pretensioners, and one or both
stages of the dual-stage airbags based on
crash severity and occupant conditions.
PERSONAL SAFETY SYSTEM
COMPONENTS
•
Driver and passenger dual-stage airbag
supplemental restraints.
• Front seat outermost seatbelts with
pretensioners, energy management
retractors and seatbelt usage sensors.
• Driver seat position sensor.
• Passenger seat position sensor.
• Front passenger sensing system.
• Passenger airbag off and on indicators.
• Front crash severity sensors.
• Restraints control module with impact
and safing sensors. •
Restraint system warning light and
tone.
• The electrical wiring for the airbags,
crash sensors, seatbelt pretensioners,
front seatbelt usage sensors, front
passenger sensing system and
indicator lights.
46
Escape (CTC) Canada/United States of America, Vehicles Built From: 02-11-2020, enUSA, Edition date: 202011, First-Printing Personal Safety System
™
Page 53 of 589
WARNING: Keep the areas in front
of the airbags free from obstruction. Do
not affix anything to or over the airbag
covers. Objects could become projectiles
during airbag deployment. Failure to
follow this instruction could result in
personal injury or death. WARNING:
To reduce risk of injury,
do not obstruct or place objects in the
deployment path of the airbag. WARNING:
Do not place a
rearward facing child restraint in front of
an active airbag. Failure to follow this
instruction could result in personal injury
or death. WARNING:
Do not attempt to
service, repair, or modify the
supplementary restraint system or
associated components. Failure to
follow this instruction could result in
personal injury or death. WARNING:
Several airbag system
components get hot after inflation. To
reduce the risk of injury, do not touch
them after inflation. WARNING:
If a supplementary
restraint system component has
deployed, it will not function again. Have
the system and associated components
inspected as soon as possible. Failure to
follow this instruction could result in
personal injury or death. PROPERLY ADJUSTING THE
DRIVER AND FRONT
PASSENGER SEATS WARNING:
National Highway
Traffic Safety Administration (NHTSA)
recommends a minimum distance of at
least
10 in (25 cm) between an
occupant's chest and the driver airbag
module.
To properly position yourself away from
the airbag:
• Move your seat to the rear as far as you
can while still reaching the pedals
comfortably.
• Recline the seat slightly one or two
degrees from the upright position.
After all occupants have adjusted their
seats and put on seatbelts, it is very
important that they continue to sit
properly. Properly seated occupants sit
upright, lean against the seat backrest, and
center themselves on the seat cushion,
with their feet comfortably extended on
the floor. Sitting improperly can increase
the chance of injury in a crash event. For
example, if an occupant slouches, lies
down, turns sideways, sits forward, leans
forward or sideways, or puts one or both
feet up, the chance of injury during a crash
greatly increases.
CHILDREN AND AIRBAGS WARNING:
Do not place a
rearward facing child restraint in front of
an active airbag. Failure to follow this
instruction could result in personal injury
or death.
50
Escape (CTC) Canada/United States of America, Vehicles Built From: 02-11-2020, enUSA, Edition date: 202011, First-Printing Airbags
Page 57 of 589
CRASH SENSORS AND
AIRBAG INDICATOR
WARNING: Modifying or adding
equipment to the front end of your
vehicle (including hood, bumper system,
frame, front end body structure, tow
hooks and hood pins) may affect the
performance of the airbag system,
increasing the risk of injury. Do not
modify or add equipment to the front
end of your vehicle.
Your vehicle has a collection of crash and
occupant sensors. These sensors provide
information to the restraints control
module which deploys (activates) the
following:
• Seatbelt pretensioners.
• Driver airbag.
• Passenger airbag.
• Knee airbag(s).
• Seat mounted side airbags.
• Safety Canopy.
Based on the type of crash, the restraints
control module deploys the appropriate
safety devices.
The restraints control module also
monitors the readiness of the above safety
devices plus the crash and occupant
sensors. The readiness of the safety
system is indicated by a warning indicator
light in the instrument cluster or by a
backup tone if the warning light is not
working. Routine maintenance of the
airbag is not required.
A difficulty with the system is indicated by
one or more of the following: The readiness light will not
illuminate immediately after you
switch the ignition on. •
The readiness light either flashes or
stays on.
• You hear a series of five beeps. The
tone pattern repeats periodically until
the problem, the light or both are
repaired.
If any of these things happen, even
intermittently, have the supplemental
restraint system serviced at an authorized
dealer immediately. Unless serviced, the
system may not function properly in the
event of a crash.
The fact that the seatbelt pretensioners
or front airbags did not activate for both
front seat occupants in a crash does not
mean that something is wrong with the
system. Rather, it means the restraints
control module determined the accident
conditions (crash severity, seatbelt usage)
were not appropriate to activate these
safety devices.
• The design of the front airbags is to
activate only in frontal and near-frontal
crashes (not rollovers, side impacts or
rear impacts) unless the crash causes
sufficient frontal deceleration.
• The design of the front seatbelt
pretensioners is to activate in frontal,
near-frontal and side crashes, and in
rollovers. The design of the rear
seatbelt pretensioners is to activate in
frontal crashes and in rollovers.
• The design of the knee airbag(s) is to
deploy based on crash severity and
occupant conditions.
54
Escape (CTC) Canada/United States of America, Vehicles Built From: 02-11-2020, enUSA, Edition date: 202011, First-Printing AirbagsE67017
Page 101 of 589
HEADLAMPS –
TROUBLESHOOTING
Headlamps – Frequently Asked
Questions
Why is there condensation in the
headlamps?
Headlamps have vents to
accommodate normal changes in air
pressure. Condensation can be a
natural by-product of this design.
When moist air enters the lamp
assembly through the vents, there is a
possibility that condensation can
occur when the temperature is cold.
When normal condensation occurs, a
fine mist can form on the interior of the
lens. The fine mist eventually clears
and exits through the vents during
normal operation.
How much condensation is
acceptable? The presence of a fine mist, for
example no streaks, drip marks or
large droplets. A fine mist covers less
than 50% of the lens.
How long may it take for the
acceptable condensation to be
cleared? Clearing time may take as long as 48
hours under dry weather conditions.
How much condensation is
unacceptable? A water puddle inside the lamp.
Streaks, drip marks or large droplets
present on the interior of the lens.
What should I do if unacceptable
condensation is present? Have your vehicle checked as soon as
possible. Why do my headlamps turn off when I
have them switched on when I switch
my vehicle off?
The battery saver turns the headlamps
off after a short period of time after
you switch your vehicle off.
AUTOLAMPS
What Are Autolamps WARNING: The system does not
relieve you of your responsibility to drive
with due care and attention. You may
need to override the system if it does not
turn the headlamps on in low visibility
conditions, for example daytime fog.
Autolamps turn the headlamps on in low
light situations or when the windshield
wipers operate.
Autolamp Settings
1. Press
Settings on the touchscreen.
2. Press
Vehicle Settings.
3. Press
Lighting.
4. Press
Autolamp Delay.
5. Press a setting.
98
Escape (CTC) Canada/United States of America, Vehicles Built From: 02-11-2020, enUSA, Edition date: 202011, First-Printing Exterior Lighting
Page 102 of 589
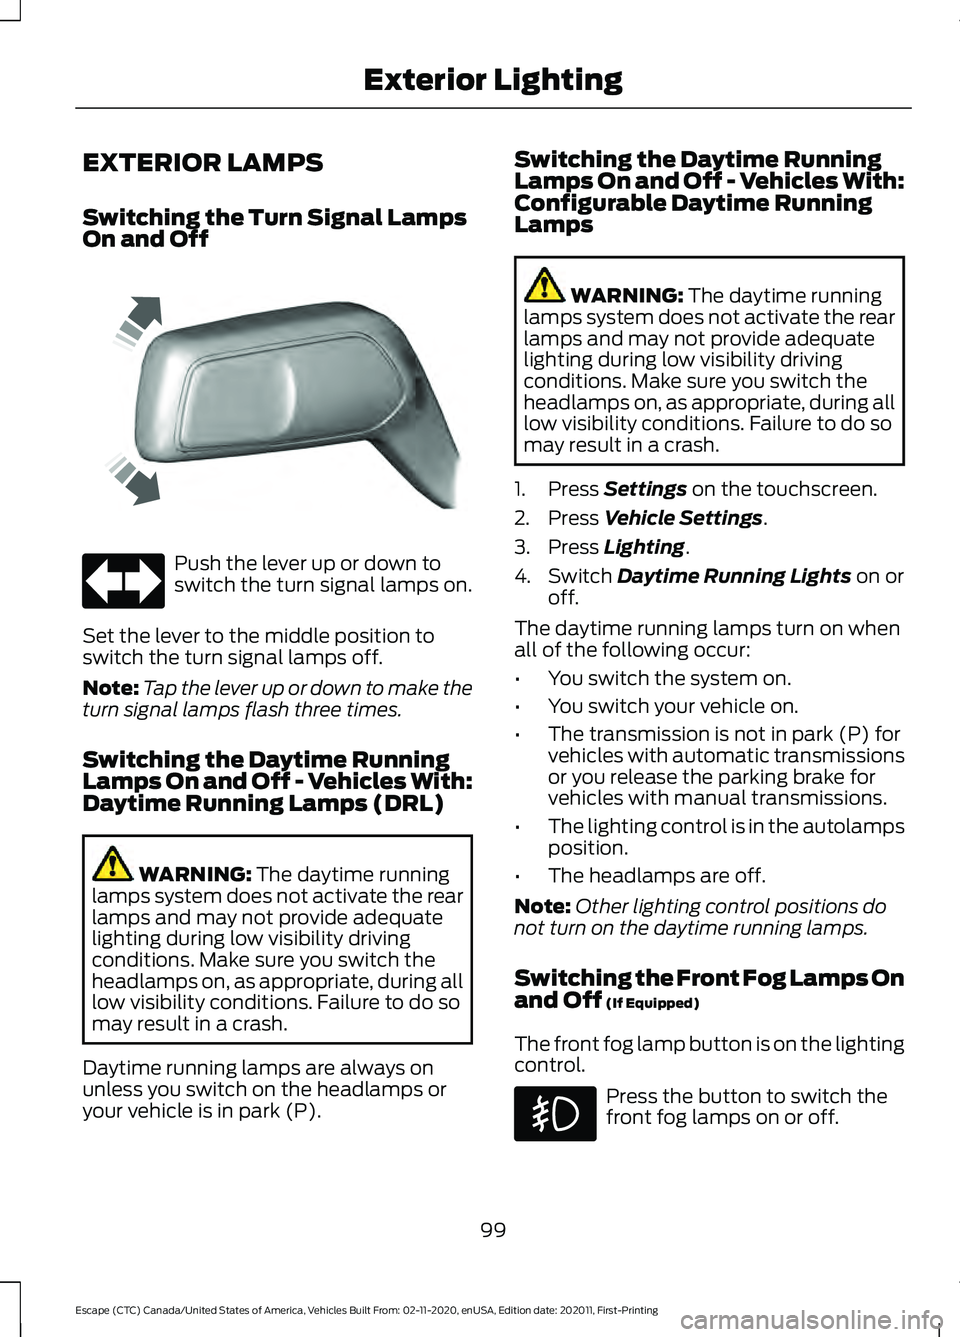
EXTERIOR LAMPS
Switching the Turn Signal Lamps
On and Off
Push the lever up or down to
switch the turn signal lamps on.
Set the lever to the middle position to
switch the turn signal lamps off.
Note: Tap the lever up or down to make the
turn signal lamps flash three times.
Switching the Daytime Running
Lamps On and Off - Vehicles With:
Daytime Running Lamps (DRL) WARNING: The daytime running
lamps system does not activate the rear
lamps and may not provide adequate
lighting during low visibility driving
conditions. Make sure you switch the
headlamps on, as appropriate, during all
low visibility conditions. Failure to do so
may result in a crash.
Daytime running lamps are always on
unless you switch on the headlamps or
your vehicle is in park (P). Switching the Daytime Running
Lamps On and Off - Vehicles With:
Configurable Daytime Running
Lamps WARNING:
The daytime running
lamps system does not activate the rear
lamps and may not provide adequate
lighting during low visibility driving
conditions. Make sure you switch the
headlamps on, as appropriate, during all
low visibility conditions. Failure to do so
may result in a crash.
1. Press
Settings on the touchscreen.
2. Press
Vehicle Settings.
3. Press
Lighting.
4. Switch
Daytime Running Lights on or
off.
The daytime running lamps turn on when
all of the following occur:
• You switch the system on.
• You switch your vehicle on.
• The transmission is not in park (P) for
vehicles with automatic transmissions
or you release the parking brake for
vehicles with manual transmissions.
• The lighting control is in the autolamps
position.
• The headlamps are off.
Note: Other lighting control positions do
not turn on the daytime running lamps.
Switching the Front Fog Lamps On
and Off
(If Equipped)
The front fog lamp button is on the lighting
control. Press the button to switch the
front fog lamps on or off.
99
Escape (CTC) Canada/United States of America, Vehicles Built From: 02-11-2020, enUSA, Edition date: 202011, First-Printing Exterior LightingE242676
Page 103 of 589
Note:
Only switch the front fog lamps on
during reduced visibility.
Note: The brightness of the daytime running
lamps may decrease when the front fog
lamps are switched on.
Note: When the lighting control is in the
autolamps position, you cannot switch the
fog lamps on unless the headlamps are on.
Exterior Lamp Indicators
Front Fog Lamp It illuminates when you switch
the front fog lamps on.
Turn Signal Lamp It flashes when you switch the
turn signal lamps on.
Note: An increase in the rate of flashing
warns of a failed turn signal lamp bulb.
Exterior Lamp Audible Warning
Exterior Lamps On
Sounds when you open the driver door and
the exterior lamps are on.
AUTOMATIC HIGH BEAM
CONTROL
How Does Automatic High Beam
Control Work
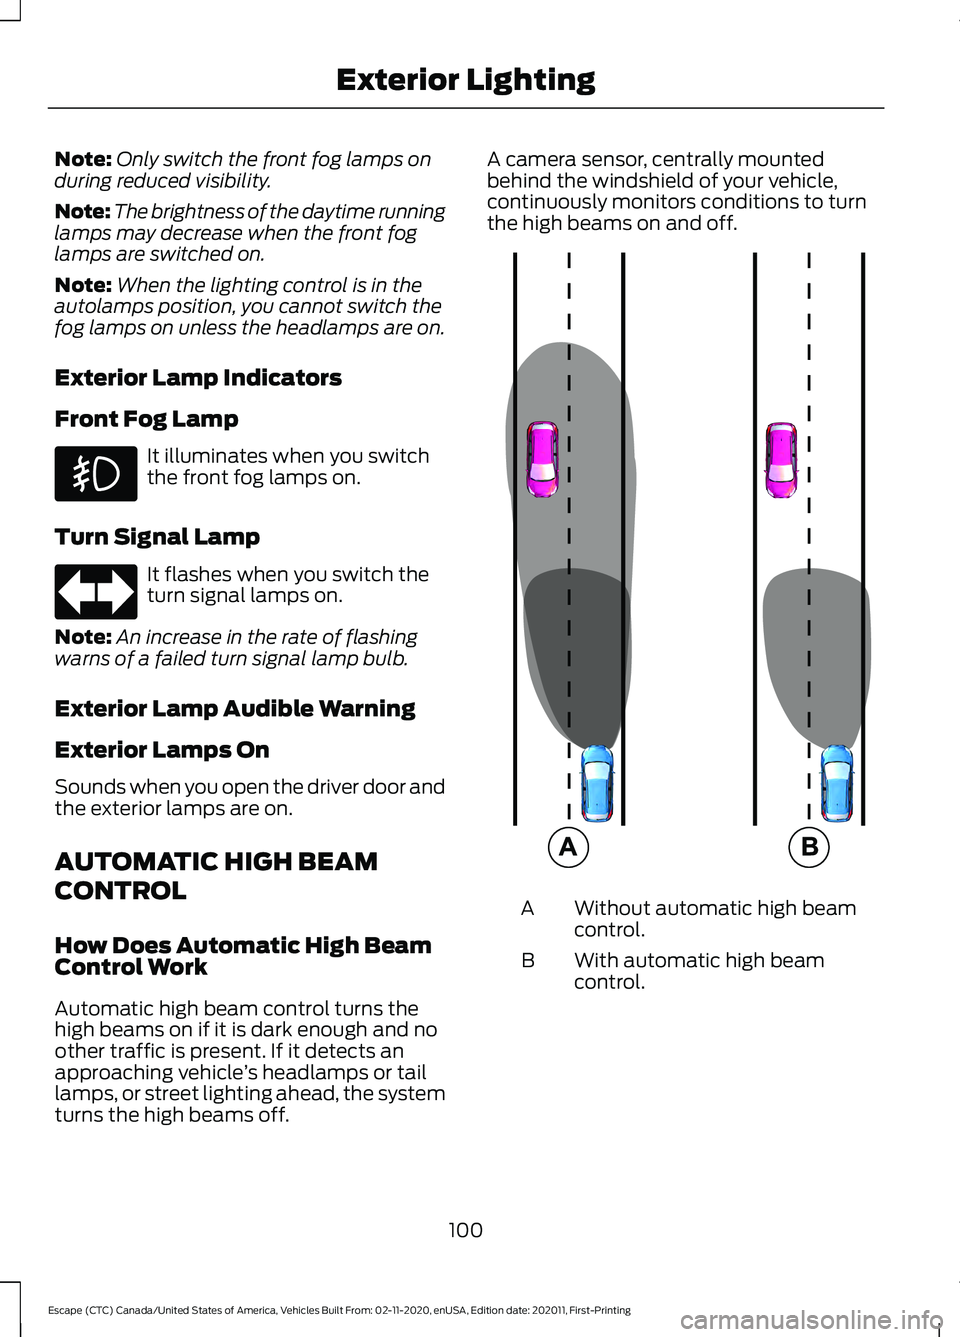
Automatic high beam control turns the
high beams on if it is dark enough and no
other traffic is present. If it detects an
approaching vehicle ’s headlamps or tail
lamps, or street lighting ahead, the system
turns the high beams off. A camera sensor, centrally mounted
behind the windshield of your vehicle,
continuously monitors conditions to turn
the high beams on and off.
Without automatic high beam
control.
A
With automatic high beam
control.
B
100
Escape (CTC) Canada/United States of America, Vehicles Built From: 02-11-2020, enUSA, Edition date: 202011, First-Printing Exterior Lighting E327596