ECU FORD ESCAPE 2022 Owner's Guide
[x] Cancel search | Manufacturer: FORD, Model Year: 2022, Model line: ESCAPE, Model: FORD ESCAPE 2022Pages: 585, PDF Size: 6.15 MB
Page 386 of 585

3. Lift and remove the carpeted cargoarea floor to access the spare tire and
jack.
4. Remove the wing nut that secures the spare tire by turning it
counterclockwise.
5. Remove the spare tire and jack kit from the spare tire compartment.
Note: On Plug-in and Full Hybrid Electric
Vehicles you can find the jack and wrench
to the left of the spare tire.
E294118
Note: On Non Plug-in or Full Hybrid Electric
Vehicles, you can find the jack and wrench
under the spare tire.
6. Remove the jack and the flat tire retainer strap from the jack base.
E305308E305308E305308
7. Turn the jack hex nut drive screwcounterclockwise to detach the lug
wrench from the jack. This lowers the
jack and releases the mechanical lock.
E294117
8. Unfold the lug wrench for use.
E181744E181744
9. Block the diagonally opposite wheel.
E142551
10. Loosen each wheel lug nut one-half turn counterclockwise, but do not
remove them until the wheel is raised
off the ground.
383
Changing a Road Wheel (If Equipped)
Page 387 of 585
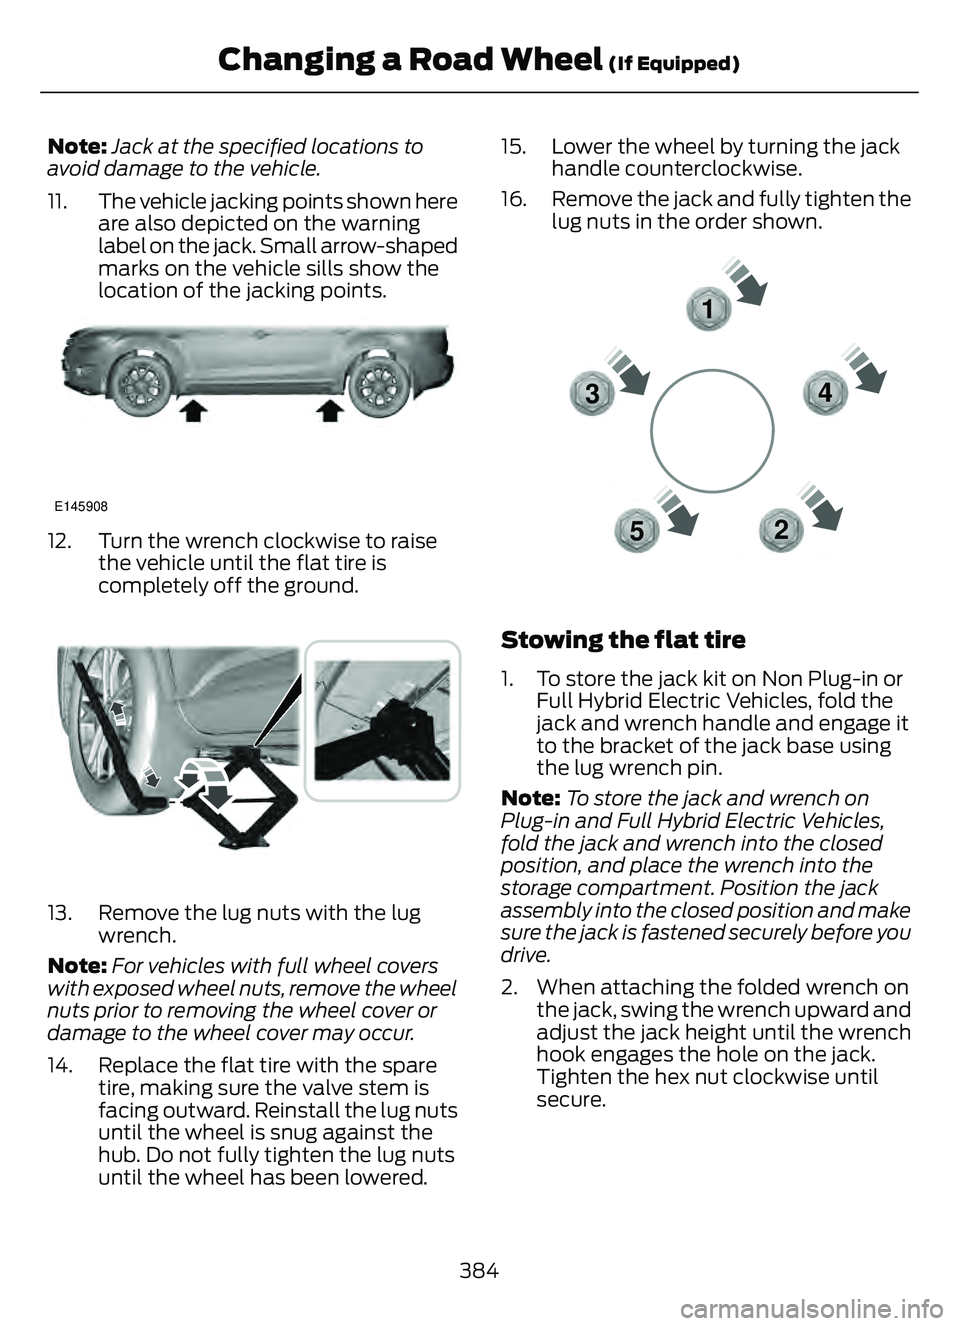
Note:Jack at the specified locations to
avoid damage to the vehicle.
11. The vehicle jacking points shown here are also depicted on the warning
label on the jack. Small arrow-shaped
marks on the vehicle sills show the
location of the jacking points.
E145908
12. Turn the wrench clockwise to raisethe vehicle until the flat tire is
completely off the ground.
E338668E338668
13. Remove the lug nuts with the lugwrench.
Note: For vehicles with full wheel covers
with exposed wheel nuts, remove the wheel
nuts prior to removing the wheel cover or
damage to the wheel cover may occur.
14. Replace the flat tire with the spare tire, making sure the valve stem is
facing outward. Reinstall the lug nuts
until the wheel is snug against the
hub. Do not fully tighten the lug nuts
until the wheel has been lowered. 15. Lower the wheel by turning the jack
handle counterclockwise.
16. Remove the jack and fully tighten the lug nuts in the order shown.
1
2
3
4
5
E306781
Stowing the flat tire
1. To store the jack kit on Non Plug-in or Full Hybrid Electric Vehicles, fold the
jack and wrench handle and engage it
to the bracket of the jack base using
the lug wrench pin.
Note: To store the jack and wrench on
Plug-in and Full Hybrid Electric Vehicles,
fold the jack and wrench into the closed
position, and place the wrench into the
storage compartment. Position the jack
assembly into the closed position and make
sure the jack is fastened securely before you
drive.
2. When attaching the folded wrench on the jack, swing the wrench upward and
adjust the jack height until the wrench
hook engages the hole on the jack.
Tighten the hex nut clockwise until
secure.
384
Changing a Road Wheel (If Equipped)
Page 388 of 585
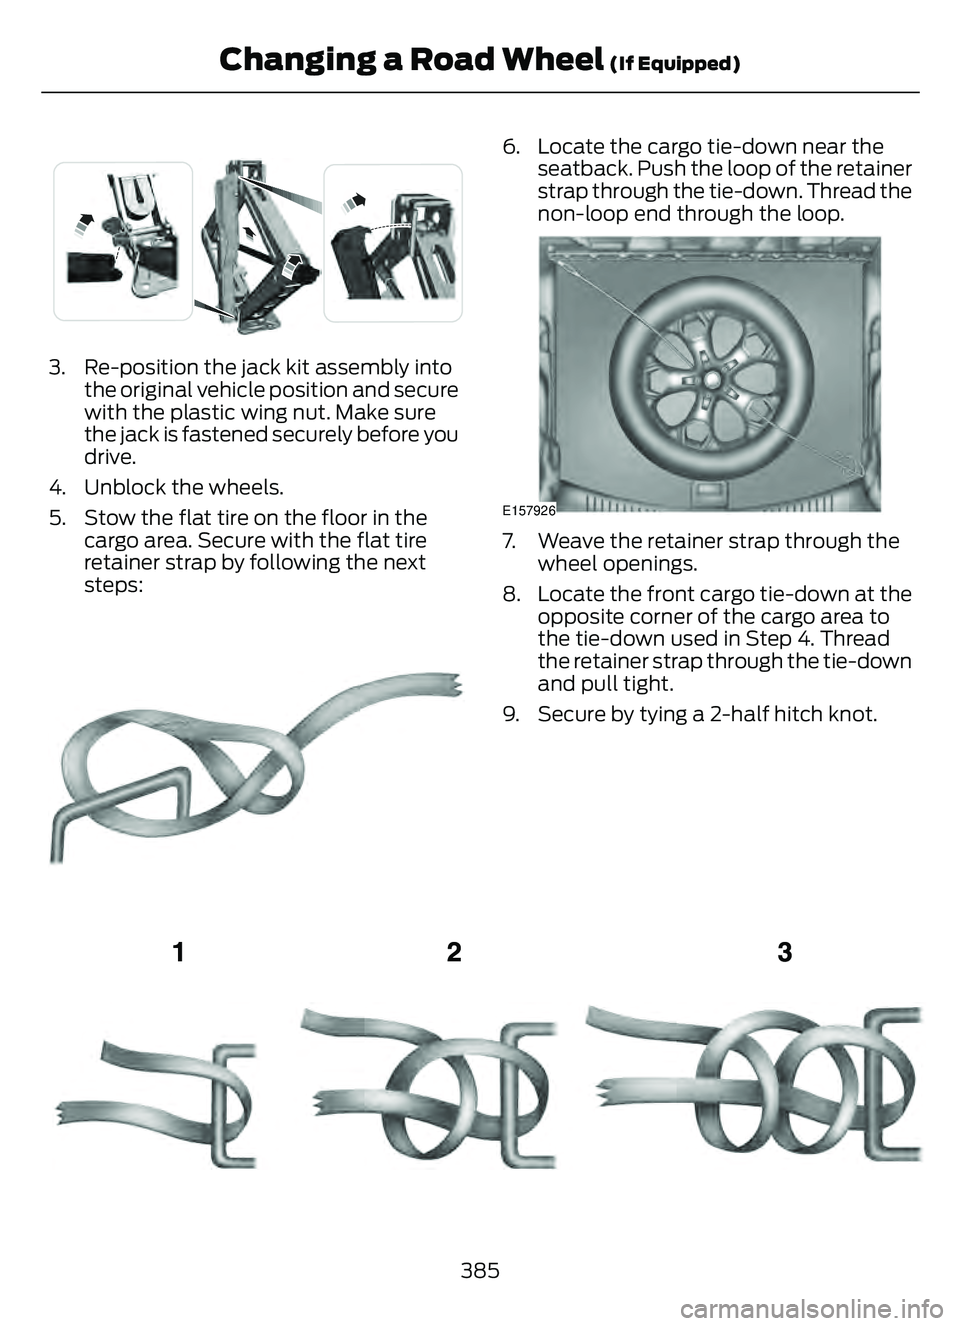
E294121
3. Re-position the jack kit assembly intothe original vehicle position and secure
with the plastic wing nut. Make sure
the jack is fastened securely before you
drive.
4. Unblock the wheels.
5. Stow the flat tire on the floor in the cargo area. Secure with the flat tire
retainer strap by following the next
steps:
E142906
6. Locate the cargo tie-down near theseatback. Push the loop of the retainer
strap through the tie-down. Thread the
non-loop end through the loop.
E157926
7. Weave the retainer strap through thewheel openings.
8. Locate the front cargo tie-down at the opposite corner of the cargo area to
the tie-down used in Step 4. Thread
the retainer strap through the tie-down
and pull tight.
9. Secure by tying a 2-half hitch knot.
E143746
385
Changing a Road Wheel (If Equipped)
Page 389 of 585
WHEEL NUTS
WARNING: When you install a wheel, always remove any corrosion, dirt or foreign
materials present on the mounting surfaces of the wheel or the surface of the wheel
hub, brake drum or brake disc that contacts the wheel. Make sure to secure any fasteners
that attach the rotor to the hub so they do not interfere with the mounting surfaces of
the wheel. Installing wheels without correct metal-to-metal contact at the wheel
mounting surfaces can cause the wheel nuts to loosen and the wheel to come off while
your vehicle is in motion, resulting in loss of vehicle control, personal injury or death.
lb.ft (Nm)
Bolt size
100 lb.ft (135 Nm)
M12 x 1.5
*Torque specifications are for nut and bolt threads free of dirt and rust. Use only Ford
recommended replacement fasteners.
Retighten the lug nuts to the specified torque within 100 mi (160 km) after any wheel
disturbance (such as tire rotation, changing a flat tire, wheel removal).
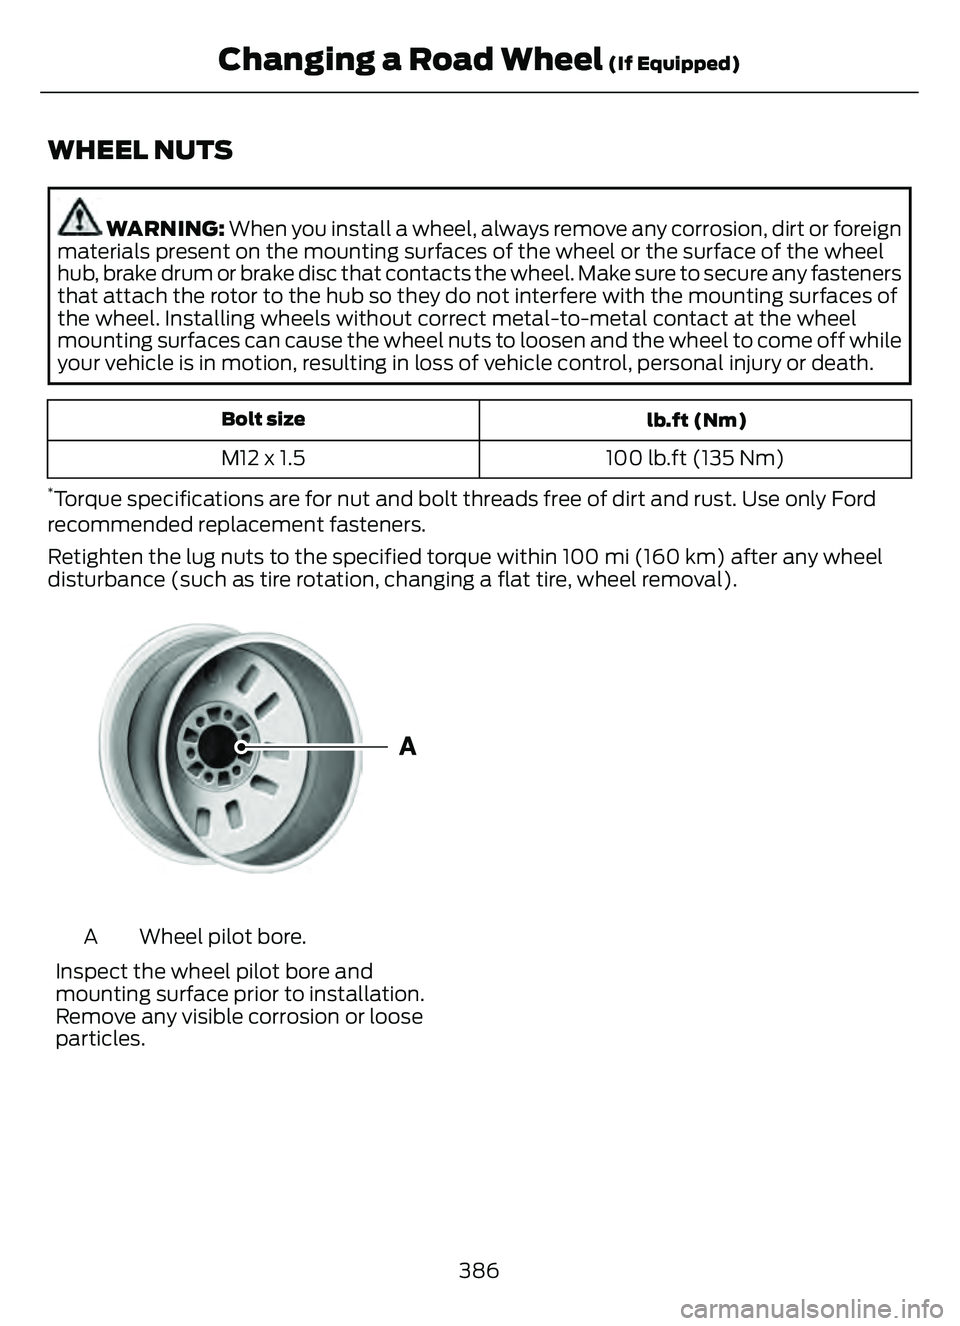
E1459550
Wheel pilot bore.
A
Inspect the wheel pilot bore and
mounting surface prior to installation.
Remove any visible corrosion or loose
particles.
386
Changing a Road Wheel (If Equipped)
Page 408 of 585
CONNECTED VEHICLE
REQUIREMENTS
Connected service and related feature
functionality requires a compatible vehicle
network.
Some remote features require additional
service activation. Log in to your Ford
account for details. Some restrictions, third
party terms and message or data rates
may apply.
CONNECTED VEHICLE
LIMITATIONS
Evolving technology, cellular networks, or
regulations could affect functionality and
availability, or continued provision of some
features. These changes could even stop
some features from functioning.
CONNECTING THE VEHICLE TO
A MOBILE NETWORK
WHAT IS THE MODEM
The modem allows access to a
range of features built into your
vehicle.
ENABLING AND DISABLING THE
MODEM
1. Press Settings. 2. Press FordPass Connect.
3. Press Connectivity Settings
.
4. Switch connectivity features on or off.
CONNECTING FORDPASS TO THE
MODEM
1. Make sure that the modem is enabled using the vehicle settings menu.
2. Open the FordPass app on your device and log in.
3. Add your vehicle or select your vehicle if already added.
4. Select the option to activate your vehicle.
5. Make sure that the name on the screen matches the name shown in your
FordPass account.
6. Confirm that FordPass account is connected to the modem.
CONNECTING THE VEHICLE TO
A WI-FI NETWORK
1. Press Settings .
2. Press Wi-Fi.
3. Switch Wi-Fi on.
4. Press View Available Networks.
5. Select an available Wi-Fi network.
Note: Enter the network password to
connect to a secure network.
405
Connected Vehicle (If Equipped)
Page 412 of 585
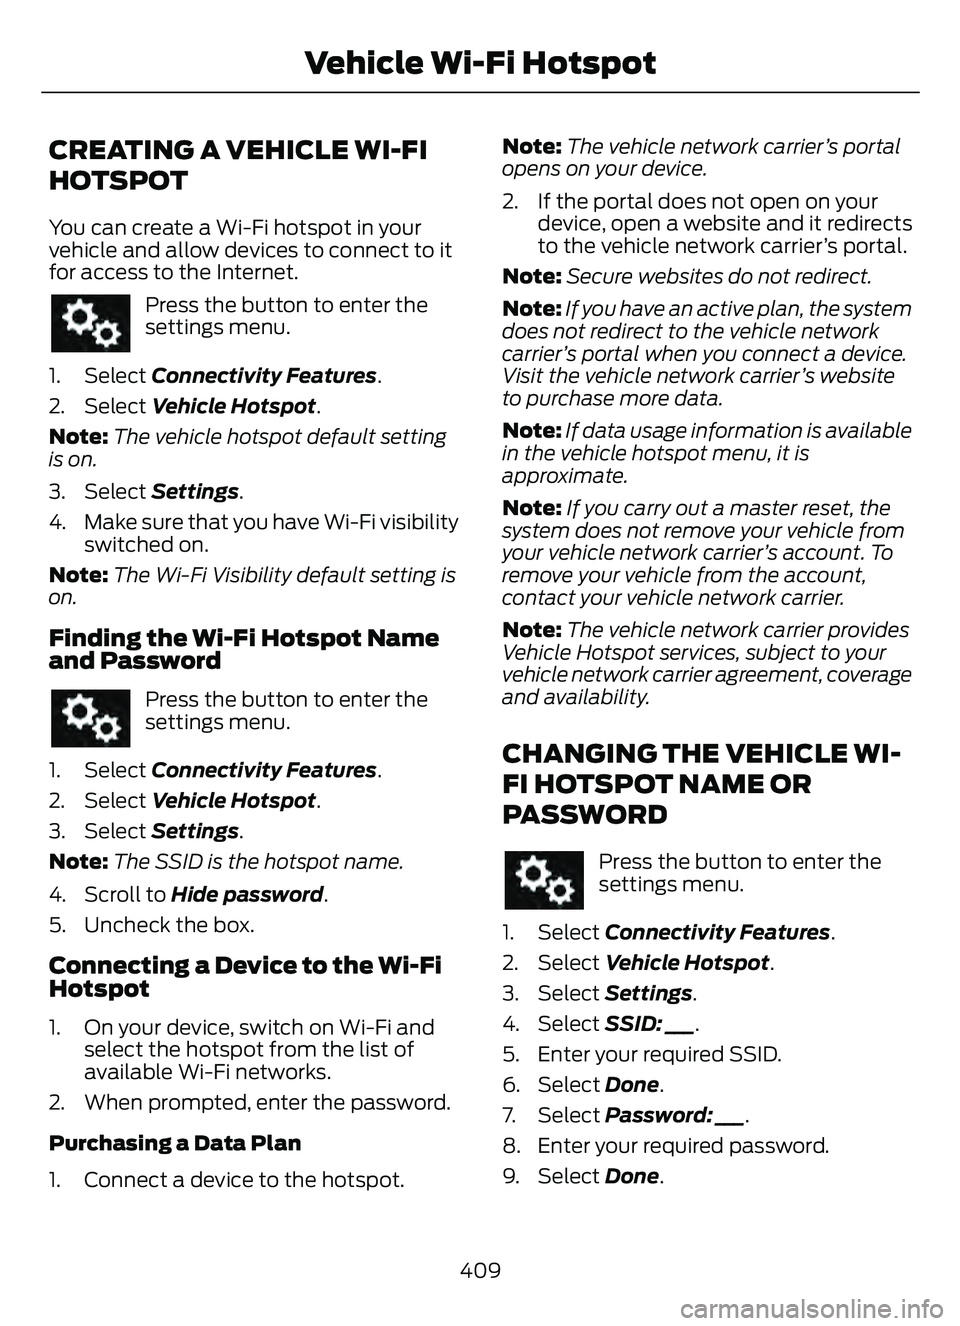
CREATING A VEHICLE WI-FI
HOTSPOT
You can create a Wi-Fi hotspot in your
vehicle and allow devices to connect to it
for access to the Internet.
Press the button to enter the
settings menu.
1. Select Connectivity Features.
2. Select Vehicle Hotspot.
Note: The vehicle hotspot default setting
is on.
3. Select Settings .
4. Make sure that you have Wi-Fi visibility switched on.
Note: The Wi-Fi Visibility default setting is
on.
Finding the Wi-Fi Hotspot Name
and Password
Press the button to enter the
settings menu.
1. Select Connectivity Features.
2. Select Vehicle Hotspot.
3. Select Settings .
Note: The SSID is the hotspot name.
4. Scroll to Hide password .
5. Uncheck the box.
Connecting a Device to the Wi-Fi
Hotspot
1. On your device, switch on Wi-Fi and select the hotspot from the list of
available Wi-Fi networks.
2. When prompted, enter the password.
Purchasing a Data Plan
1. Connect a device to the hotspot. Note:
The vehicle network carrier’s portal
opens on your device.
2. If the portal does not open on your device, open a website and it redirects
to the vehicle network carrier’s portal.
Note: Secure websites do not redirect.
Note: If you have an active plan, the system
does not redirect to the vehicle network
carrier’s portal when you connect a device.
Visit the vehicle network carrier’s website
to purchase more data.
Note: If data usage information is available
in the vehicle hotspot menu, it is
approximate.
Note: If you carry out a master reset, the
system does not remove your vehicle from
your vehicle network carrier’s account. To
remove your vehicle from the account,
contact your vehicle network carrier.
Note: The vehicle network carrier provides
Vehicle Hotspot services, subject to your
vehicle network carrier agreement, coverage
and availability.
CHANGING THE VEHICLE WI-
FI HOTSPOT NAME OR
PASSWORD
Press the button to enter the
settings menu.
1. Select Connectivity Features.
2. Select Vehicle Hotspot.
3. Select Settings .
4. Select SSID: ___.
5. Enter your required SSID.
6. Select Done.
7. S e l e c t Password: ___ .
8. Enter your required password.
9. Select Done.
409
Vehicle Wi-Fi Hotspot
Page 426 of 585
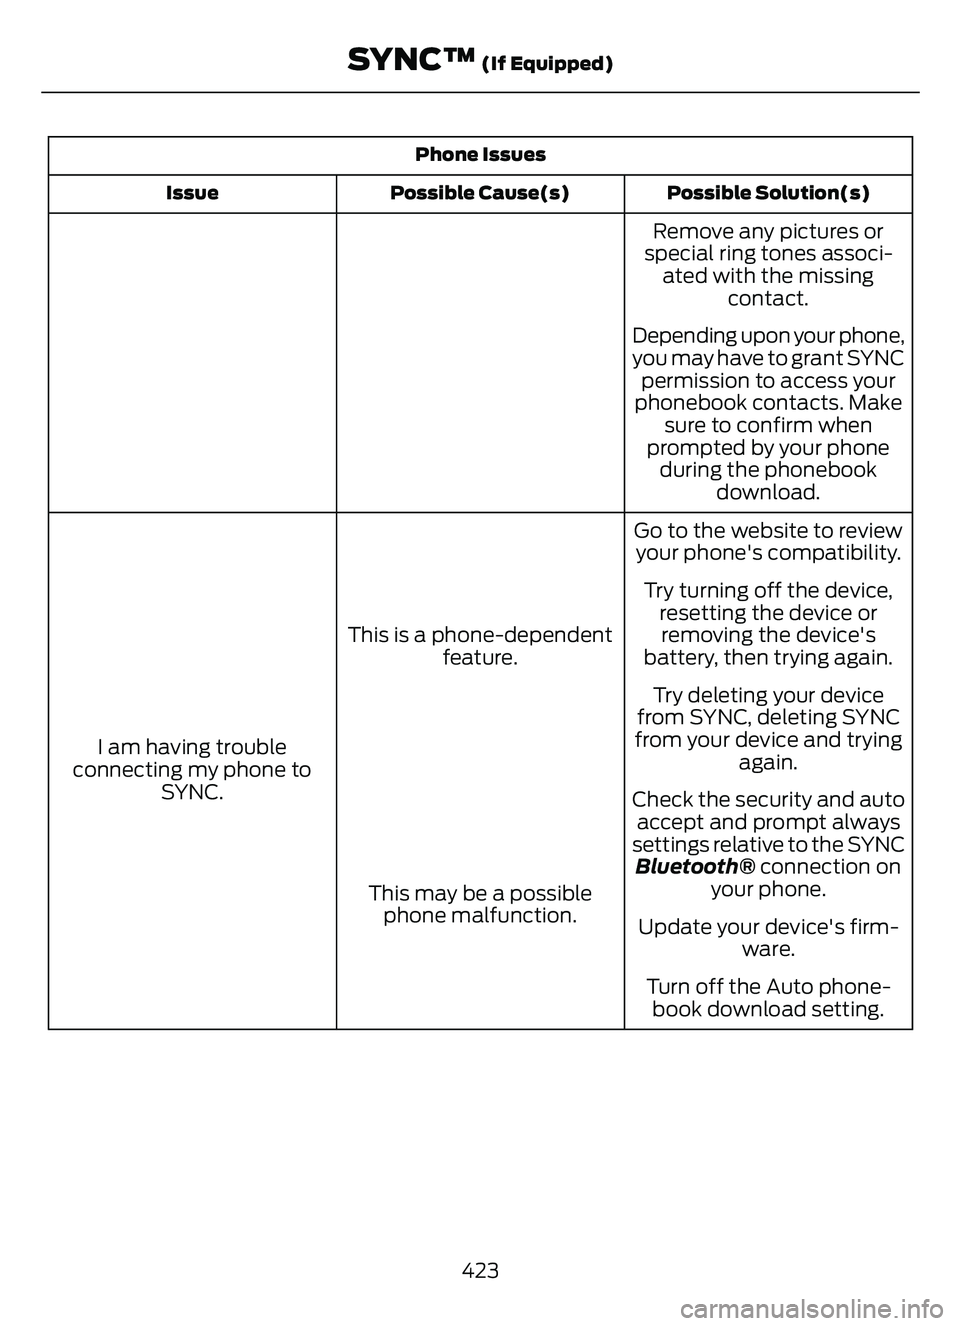
Phone IssuesPossible Solution(s)
Possible Cause(s)
Issue
Remove any pictures or
special ring tones associ- ated with the missing contact.
Depending upon your phone,
you may have to grant SYNC permission to access your
phonebook contacts. Make sure to confirm when
prompted by your phone during the phonebook download.
Go to the website to review your phone's compatibility.
This is a phone-dependent feature.
I am having trouble
connecting my phone to SYNC. Try turning off the device,
resetting the device orremoving the device's
battery, then trying again.
Try deleting your device
from SYNC, deleting SYNC
from your device and trying again.
Check the security and auto accept and prompt always
settings relative to the SYNC Bluetooth® connection on your phone.
This may be a possible
phone malfunction. Update your device's firm-
ware.
Turn off the Auto phone- book download setting.
423
SYNC™ (If Equipped)
Page 427 of 585
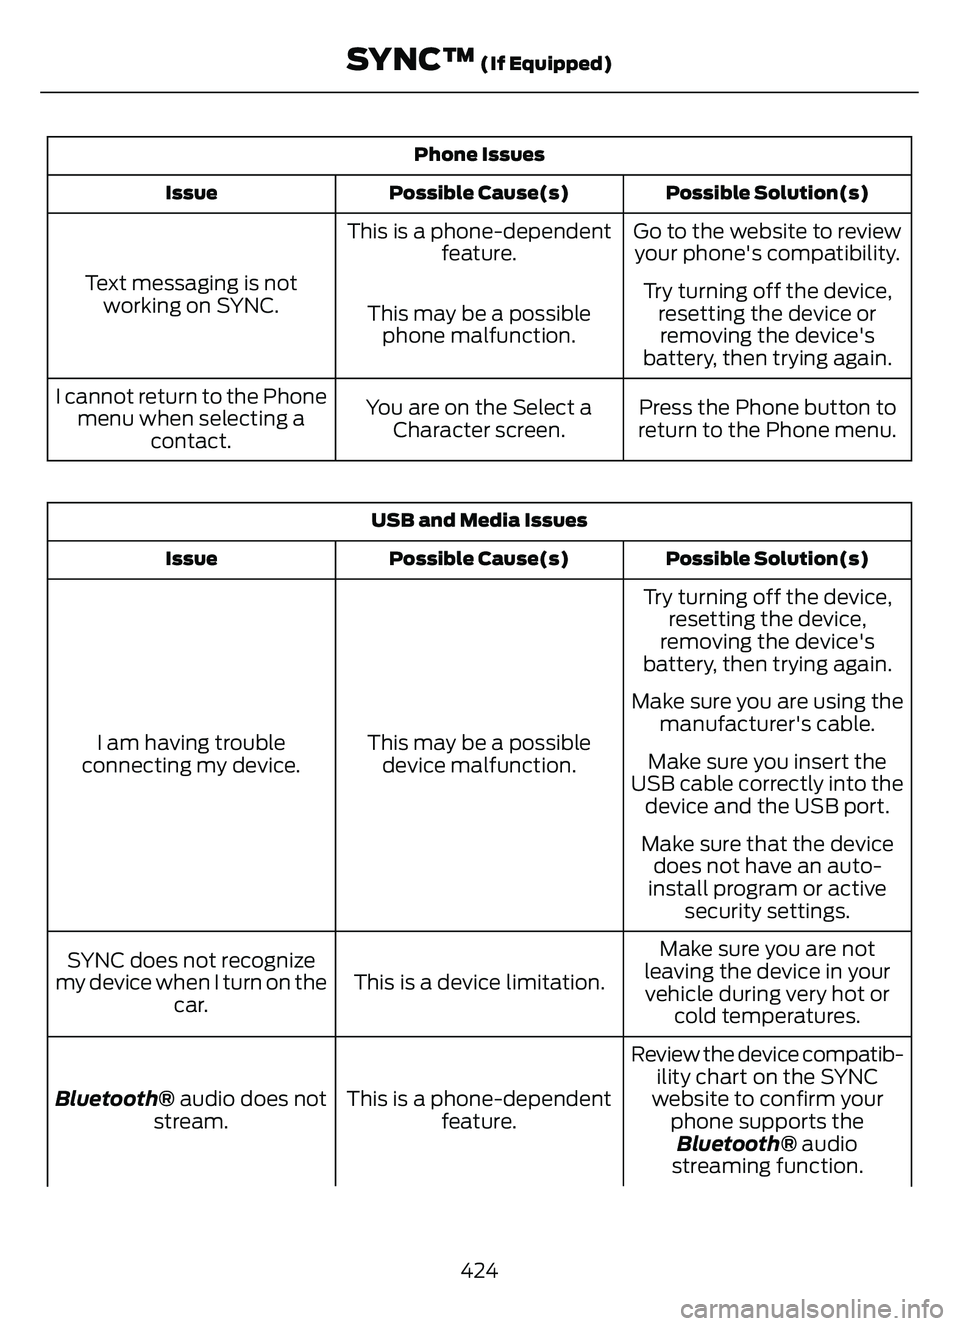
Phone IssuesPossible Solution(s)
Possible Cause(s)
Issue
Go to the website to review
your phone's compatibility.
This is a phone-dependent
feature.
Text messaging is not working on SYNC. Try turning off the device,
resetting the device orremoving the device's
battery, then trying again.
This may be a possible
phone malfunction.
Press the Phone button to
return to the Phone menu.
You are on the Select a
Character screen.
I cannot return to the Phone
menu when selecting a contact.
USB and Media Issues
Possible Solution(s)
Possible Cause(s)
Issue
Try turning off the device,
resetting the device,
removing the device's
battery, then trying again.
This may be a possible device malfunction.
I am having trouble
connecting my device. Make sure you are using the
manufacturer's cable.
Make sure you insert the
USB cable correctly into the device and the USB port.
Make sure that the device does not have an auto-
install program or active security settings.
Make sure you are not
leaving the device in your vehicle during very hot or cold temperatures.
This is a device limitation.
SYNC does not recognize
my device when I turn on the car.
Review the device compatib-ility chart on the SYNC
website to confirm your phone supports theBluetooth® audio
streaming function.
This is a phone-dependent
feature.
Bluetooth® audio does not
stream.
424
SYNC™ (If Equipped)
Page 436 of 585
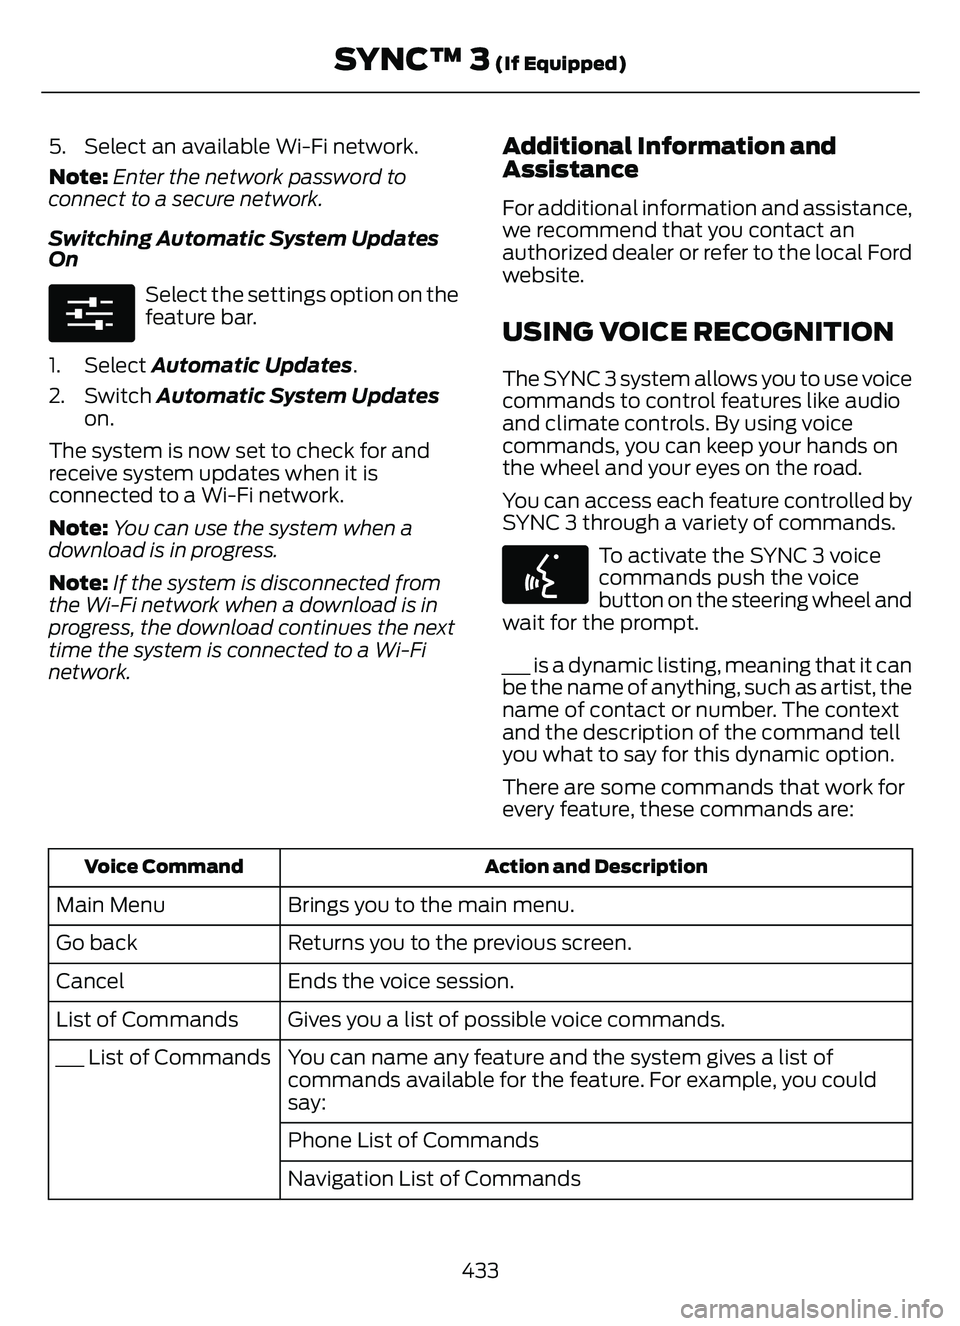
5. Select an available Wi-Fi network.
Note:Enter the network password to
connect to a secure network.
Switching Automatic System Updates
On
E280315
Select the settings option on the
feature bar.
1. Select Automatic Updates.
2. Switch Automatic System Updates on.
The system is now set to check for and
receive system updates when it is
connected to a Wi-Fi network.
Note: You can use the system when a
download is in progress.
Note: If the system is disconnected from
the Wi-Fi network when a download is in
progress, the download continues the next
time the system is connected to a Wi-Fi
network.
Additional Information and
Assistance
For additional information and assistance,
we recommend that you contact an
authorized dealer or refer to the local Ford
website.
USING VOICE RECOGNITION
The SYNC 3 system allows you to use voice
commands to control features like audio
and climate controls. By using voice
commands, you can keep your hands on
the wheel and your eyes on the road.
You can access each feature controlled by
SYNC 3 through a variety of commands.
E142599
To activate the SYNC 3 voice
commands push the voice
button on the steering wheel and
wait for the prompt.
___ is a dynamic listing, meaning that it can
be the name of anything, such as artist, the
name of contact or number. The context
and the description of the command tell
you what to say for this dynamic option.
There are some commands that work for
every feature, these commands are:
Action and Description
Voice Command
Brings you to the main menu.
Main Menu
Returns you to the previous screen.
Go back
Ends the voice session.
Cancel
Gives you a list of possible voice commands.
List of Commands
You can name any feature and the system gives a list of
commands available for the feature. For example, you could
say:
___ List of Commands
Phone List of Commands
Navigation List of Commands
433
SYNC™ 3 (If Equipped)
Page 471 of 585
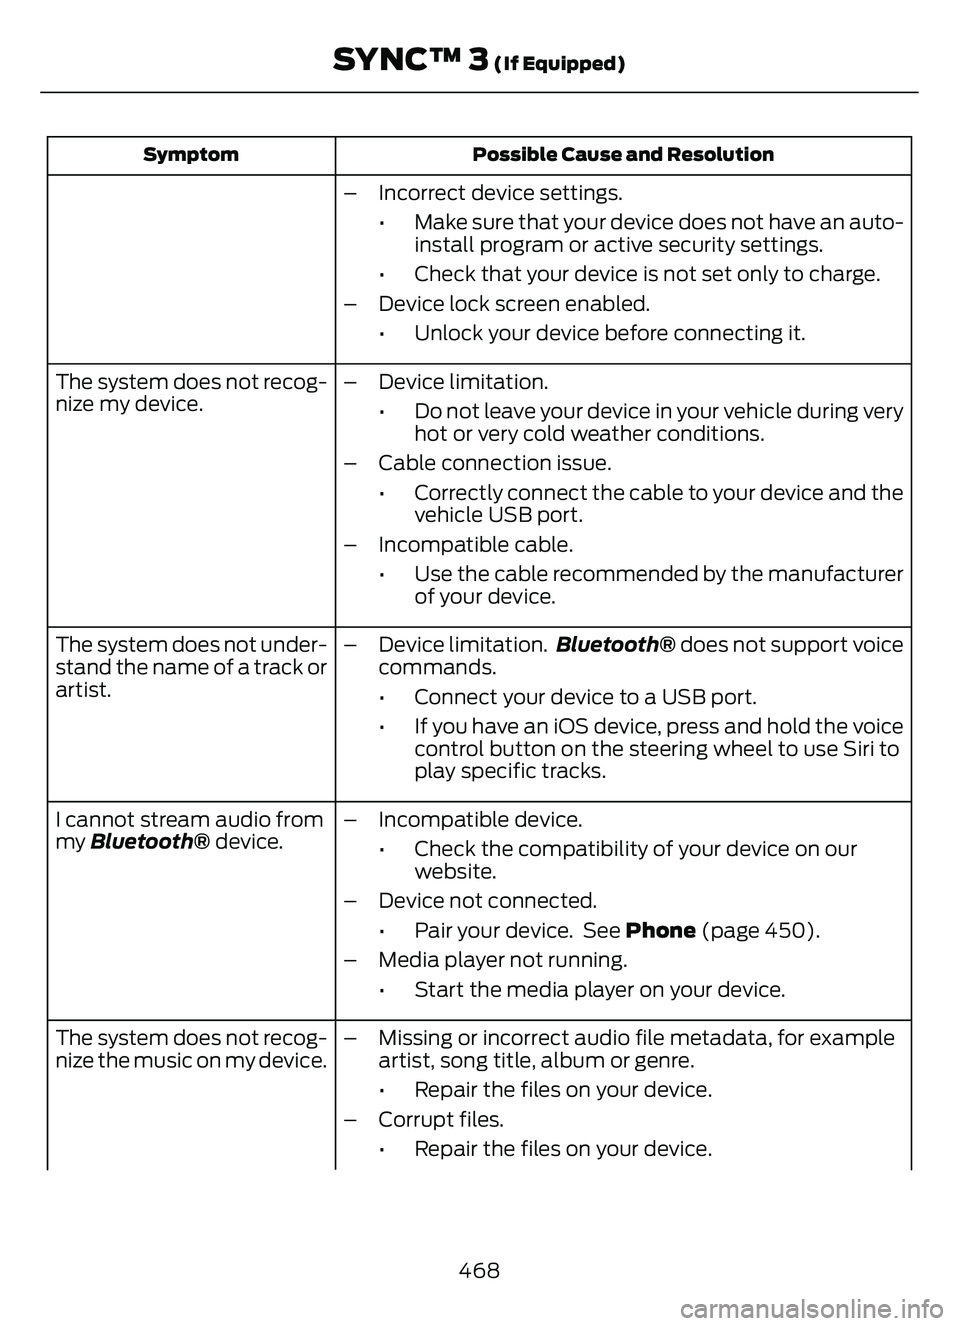
Possible Cause and Resolution
Symptom
– Incorrect device settings.
• Make sure that your device does not have an auto-install program or active security settings.
• Check that your device is not set only to charge.
– Device lock screen enabled. • Unlock your device before connecting it.
The system does not recog-
nize my device. – Device limitation.
• Do not leave your device in your vehicle during veryhot or very cold weather conditions.
– Cable connection issue. • Correctly connect the cable to your device and thevehicle USB port.
– Incompatible cable. • Use the cable recommended by the manufacturerof your device.
The system does not under-
stand the name of a track or
artist. – Device limitation.
Bluetooth® does not support voice
commands.
• Connect your device to a USB port.
• If you have an iOS device, press and hold the voice control button on the steering wheel to use Siri to
play specific tracks.
I cannot stream audio from
my Bluetooth® device. – Incompatible device.
• Check the compatibility of your device on ourwebsite.
– Device not connected. • Pair your device. See Phone (page 450).
– Media player not running. • Start the media player on your device.
The system does not recog-
nize the music on my device. – Missing or incorrect audio file metadata, for example
artist, song title, album or genre.
• Repair the files on your device.
– Corrupt files. • Repair the files on your device.
468
SYNC™ 3 (If Equipped)