Ev button FORD ESCAPE 2022 Owner's Guide
[x] Cancel search | Manufacturer: FORD, Model Year: 2022, Model line: ESCAPE, Model: FORD ESCAPE 2022Pages: 585, PDF Size: 6.15 MB
Page 102 of 585
EXTERIOR LAMPS
SWITCHING THE TURN SIGNAL
LAMPS ON AND OFF
66E242676
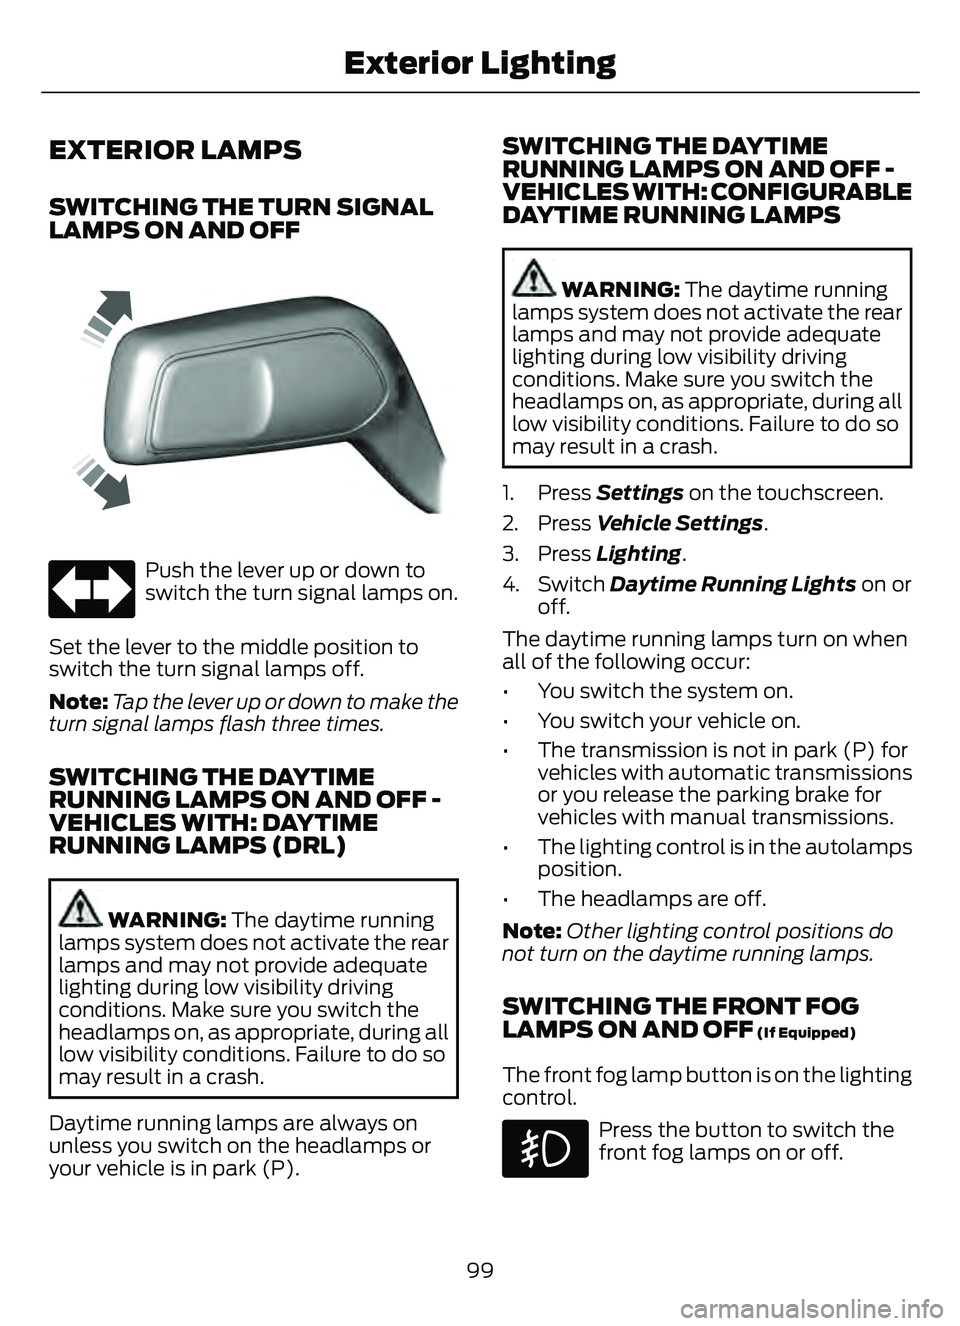
Push the lever up or down to
switch the turn signal lamps on.
Set the lever to the middle position to
switch the turn signal lamps off.
Note: Tap the lever up or down to make the
turn signal lamps flash three times.
SWITCHING THE DAYTIME
RUNNING LAMPS ON AND OFF -
VEHICLES WITH: DAYTIME
RUNNING LAMPS (DRL)
WARNING: The daytime running
lamps system does not activate the rear
lamps and may not provide adequate
lighting during low visibility driving
conditions. Make sure you switch the
headlamps on, as appropriate, during all
low visibility conditions. Failure to do so
may result in a crash.
Daytime running lamps are always on
unless you switch on the headlamps or
your vehicle is in park (P).
SWITCHING THE DAYTIME
RUNNING LAMPS ON AND OFF -
VEHICLES WITH: CONFIGURABLE
DAYTIME RUNNING LAMPS
WARNING: The daytime running
lamps system does not activate the rear
lamps and may not provide adequate
lighting during low visibility driving
conditions. Make sure you switch the
headlamps on, as appropriate, during all
low visibility conditions. Failure to do so
may result in a crash.
1. Press Settings on the touchscreen.
2. Press Vehicle Settings .
3. Press Lighting.
4. Switch Daytime Running Lights on or
off.
The daytime running lamps turn on when
all of the following occur:
• You switch the system on.
• You switch your vehicle on.
• The transmission is not in park (P) for vehicles with automatic transmissions
or you release the parking brake for
vehicles with manual transmissions.
• The lighting control is in the autolamps position.
• The headlamps are off.
Note: Other lighting control positions do
not turn on the daytime running lamps.
SWITCHING THE FRONT FOG
LAMPS ON AND OFF (If Equipped)
The front fog lamp button is on the lighting
control.
Press the button to switch the
front fog lamps on or off.
99
Exterior Lighting
Page 106 of 585
SWITCHING ALL OF THE
INTERIOR LAMPS ON AND OFF
The lamps turn on under the following
conditions:
• You open any door.
• You press a button on the remotecontrol.
• You press the all lamps on button on the overhead console.
Press to switch all interior lamps
on or off.
SWITCHING THE FRONT
INTERIOR LAMPS ON AND OFF
99E249791
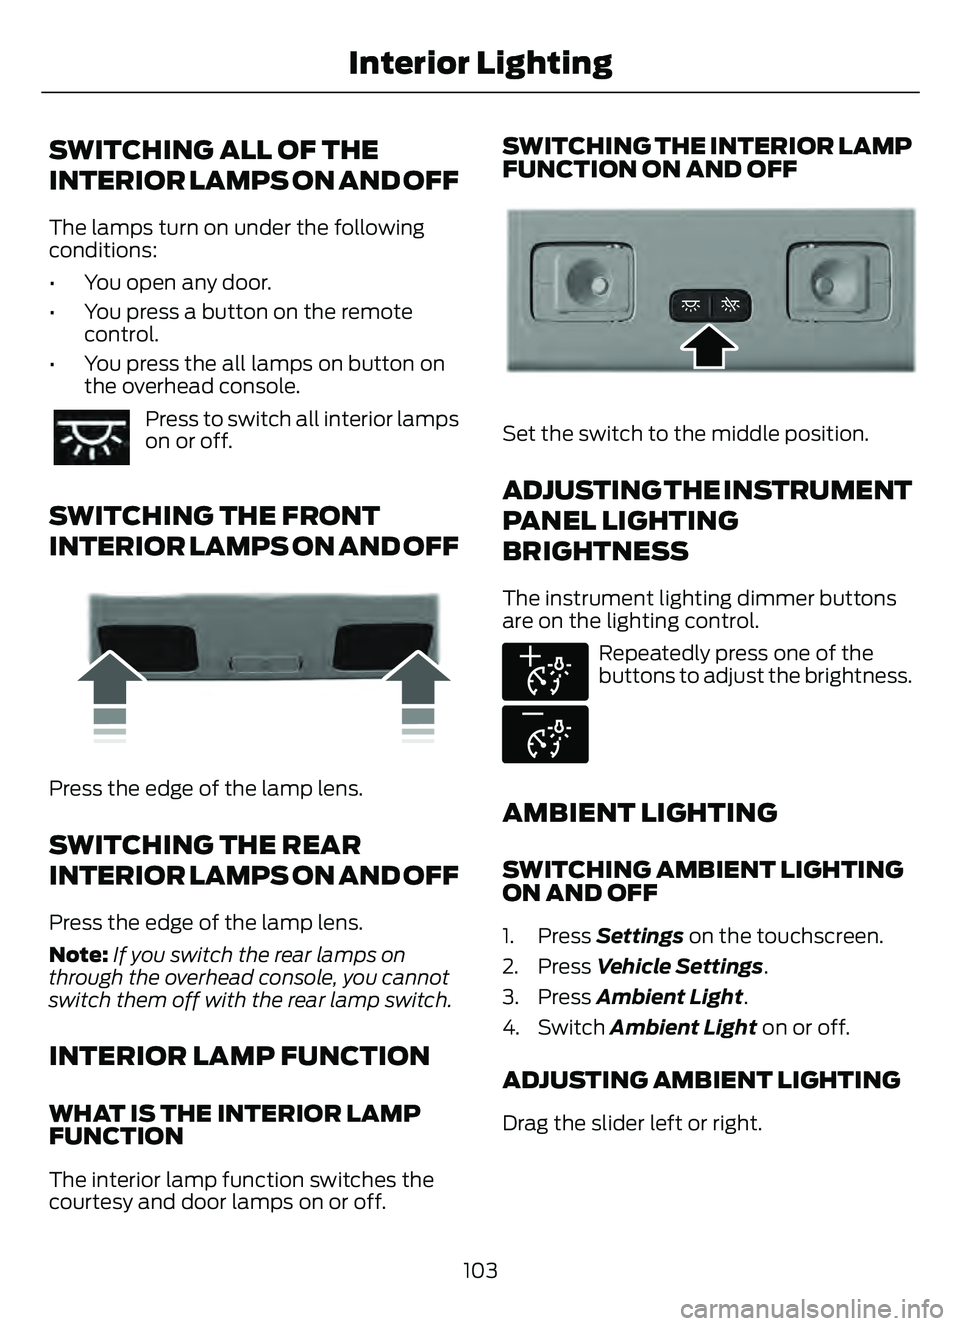
Press the edge of the lamp lens.
SWITCHING THE REAR
INTERIOR LAMPS ON AND OFF
Press the edge of the lamp lens.
Note: If you switch the rear lamps on
through the overhead console, you cannot
switch them off with the rear lamp switch.
INTERIOR LAMP FUNCTION
WHAT IS THE INTERIOR LAMP
FUNCTION
The interior lamp function switches the
courtesy and door lamps on or off.
SWITCHING THE INTERIOR LAMP
FUNCTION ON AND OFF
E299443E299443
Set the switch to the middle position.
ADJUSTING THE INSTRUMENT
PANEL LIGHTING
BRIGHTNESS
The instrument lighting dimmer buttons
are on the lighting control.
E291299
E296433
Repeatedly press one of the
buttons to adjust the brightness.
AMBIENT LIGHTING
SWITCHING AMBIENT LIGHTING
ON AND OFF
1. Press Settings on the touchscreen.
2. Press Vehicle Settings .
3. Press Ambient Light.
4. Switch Ambient Light on or off.
ADJUSTING AMBIENT LIGHTING
Drag the slider left or right.
103
Interior Lighting
Page 113 of 585
E312252E31225225
With the moonroof in the closed
position, press and release the
switch to vent the moonroof. To
close the moonroof from the vent position,
press and release the switch again.
MOONROOF BOUNCE-BACK
WHAT IS MOONROOF BOUNCE-
BACK
The moonroof stops and reverses some
distance if it detects an obstacle when
closing.
OVERRIDING MOONROOF
BOUNCE-BACK
Press and hold the close button within two
seconds after the moonroof comes to a
stop.
110
Moonroof (If Equipped)
Page 126 of 585
USING THE INSTRUMENT
CLUSTER DISPLAY CONTROLS
WARNING: Driving while distracted
can result in loss of vehicle control, crash
and injury. We strongly recommend that
you use extreme caution when using any
device that may take your focus off the
road. Your primary responsibility is the
safe operation of your vehicle. We
recommend against the use of any
hand-held device while driving and
encourage the use of voice-operated
systems when possible. Make sure you
are aware of all applicable local laws
that may affect the use of electronic
devices while driving.
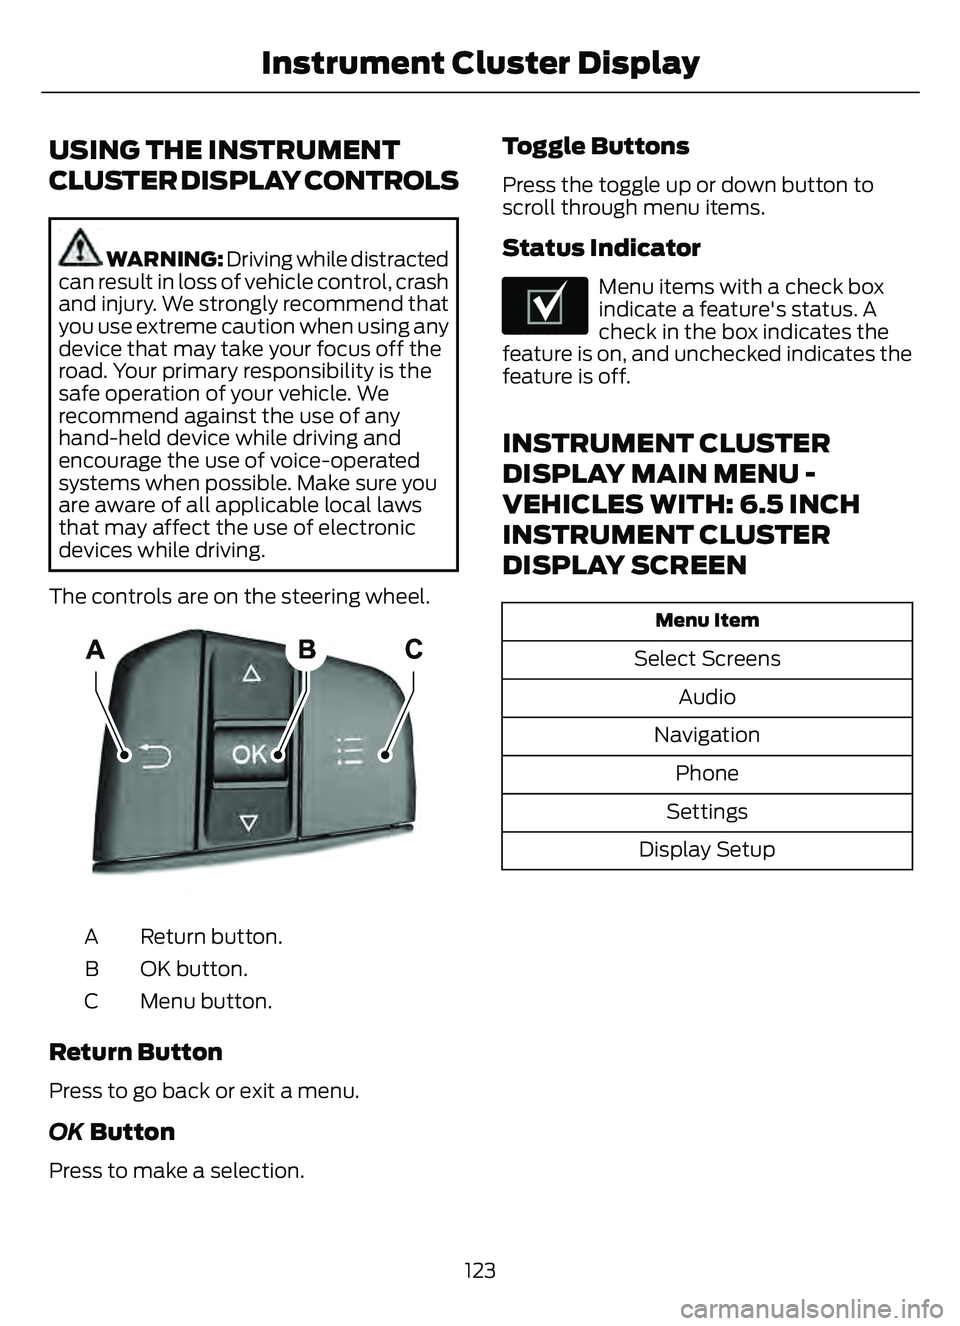
The controls are on the steering wheel.
5003E2500320032
Return button.
A
OK button.
B
Menu button.
C
Return Button
Press to go back or exit a menu.
OK Button
Press to make a selection.
Toggle Buttons
Press the toggle up or down button to
scroll through menu items.
Status Indicator
E204495
Menu items with a check box
indicate a feature's status. A
check in the box indicates the
feature is on, and unchecked indicates the
feature is off.
INSTRUMENT CLUSTER
DISPLAY MAIN MENU -
VEHICLES WITH: 6.5 INCH
INSTRUMENT CLUSTER
DISPLAY SCREEN
Menu Item
Select Screens
Audio
Navigation Phone
Settings
Display Setup
123
Instrument Cluster Display
Page 127 of 585
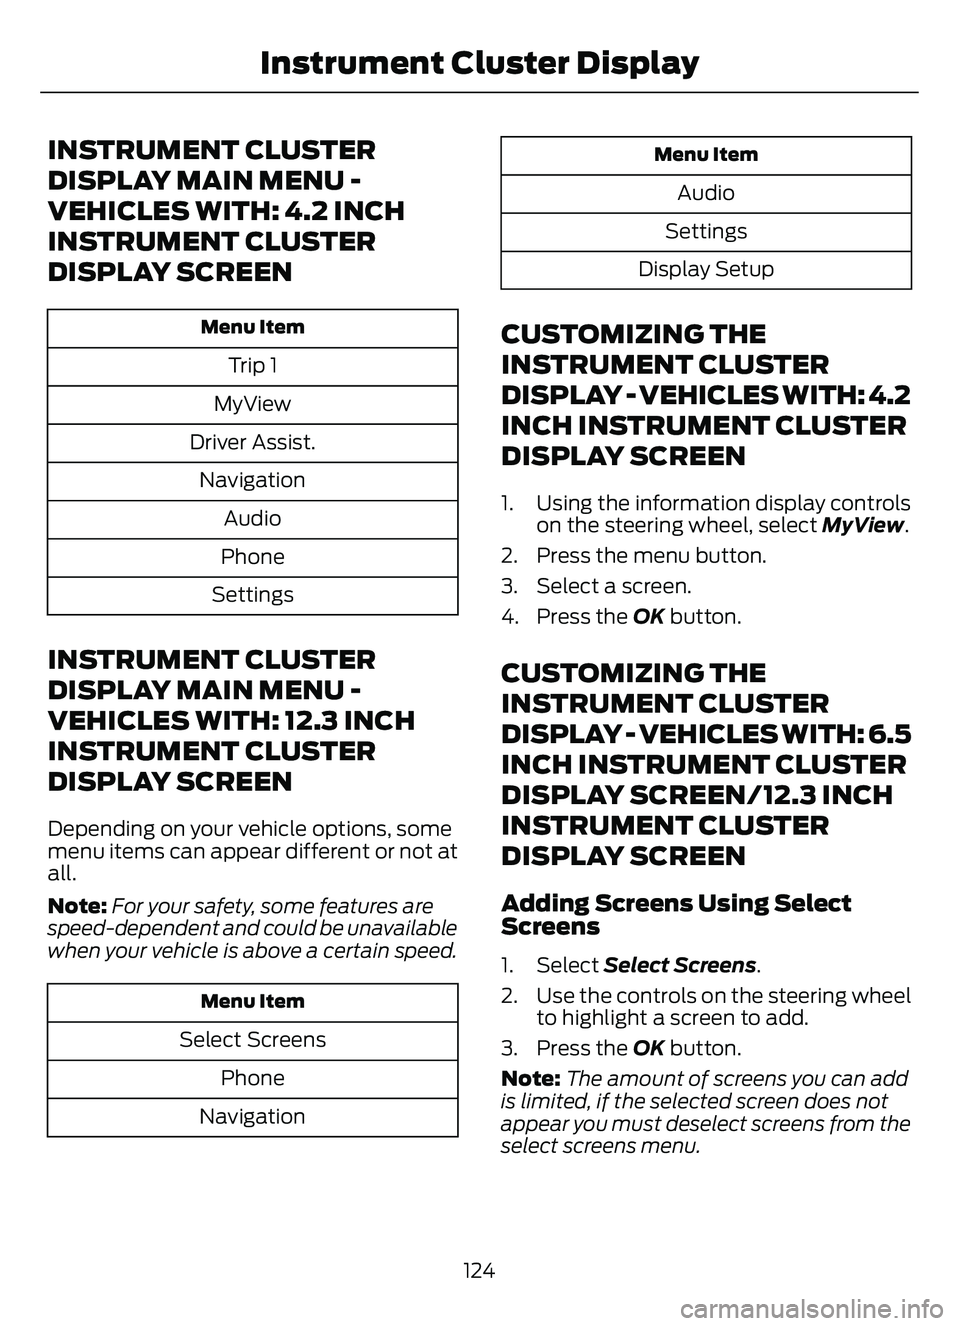
INSTRUMENT CLUSTER
DISPLAY MAIN MENU -
VEHICLES WITH: 4.2 INCH
INSTRUMENT CLUSTER
DISPLAY SCREEN
Menu Item
Trip 1
MyView
Driver Assist. Navigation Audio
Phone
Settings
INSTRUMENT CLUSTER
DISPLAY MAIN MENU -
VEHICLES WITH: 12.3 INCH
INSTRUMENT CLUSTER
DISPLAY SCREEN
Depending on your vehicle options, some
menu items can appear different or not at
all.
Note: For your safety, some features are
speed-dependent and could be unavailable
when your vehicle is above a certain speed.
Menu Item
Select Screens
Phone
Navigation
Menu Item
Audio
Settings
Display Setup
CUSTOMIZING THE
INSTRUMENT CLUSTER
DISPLAY - VEHICLES WITH: 4.2
INCH INSTRUMENT CLUSTER
DISPLAY SCREEN
1. Using the information display controls on the steering wheel, select MyView.
2. Press the menu button.
3. Select a screen.
4. Press the OK button.
CUSTOMIZING THE
INSTRUMENT CLUSTER
DISPLAY - VEHICLES WITH: 6.5
INCH INSTRUMENT CLUSTER
DISPLAY SCREEN/12.3 INCH
INSTRUMENT CLUSTER
DISPLAY SCREEN
Adding Screens Using Select
Screens
1. Select Select Screens .
2. Use the controls on the steering wheel to highlight a screen to add.
3. Press the OK button.
Note: The amount of screens you can add
is limited, if the selected screen does not
appear you must deselect screens from the
select screens menu.
124
Instrument Cluster Display
Page 128 of 585
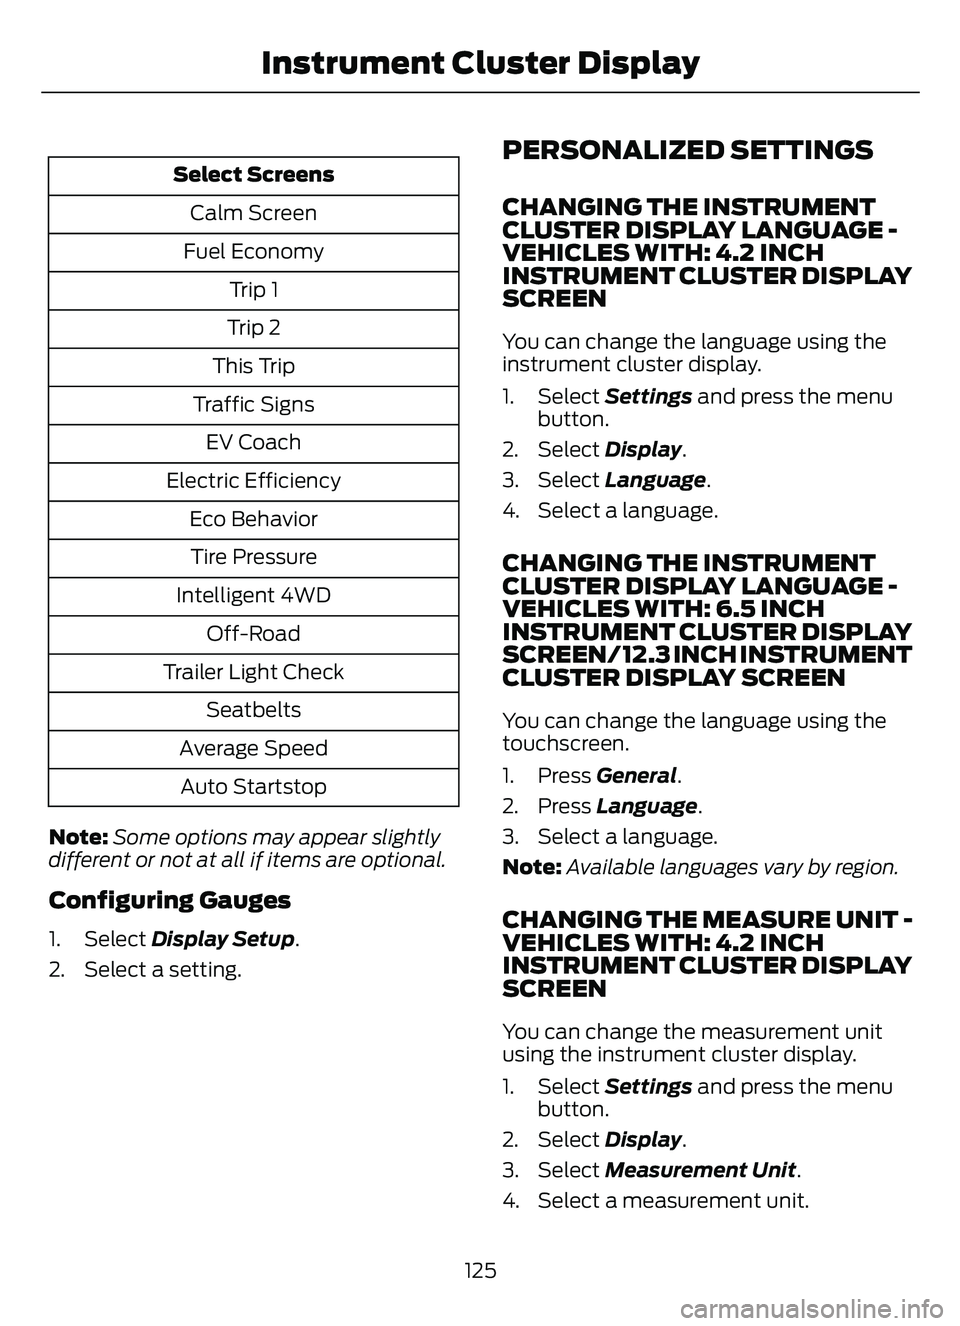
Select ScreensCalm Screen
Fuel Economy Trip 1
Trip 2
This Trip
Traffic Signs EV Coach
Electric Efficiency Eco BehaviorTire Pressure
Intelligent 4WD Off-Road
Trailer Light Check Seatbelts
Average Speed Auto Startstop
Note: Some options may appear slightly
different or not at all if items are optional.
Configuring Gauges
1. Select Display Setup .
2. Select a setting.
PERSONALIZED SETTINGS
CHANGING THE INSTRUMENT
CLUSTER DISPLAY LANGUAGE -
VEHICLES WITH: 4.2 INCH
INSTRUMENT CLUSTER DISPLAY
SCREEN
You can change the language using the
instrument cluster display.
1. Select Settings and press the menu
button.
2. Select Display.
3. Select Language.
4. Select a language.
CHANGING THE INSTRUMENT
CLUSTER DISPLAY LANGUAGE -
VEHICLES WITH: 6.5 INCH
INSTRUMENT CLUSTER DISPLAY
SCREEN/ 12.3 INCH INSTRUMENT
CLUSTER DISPLAY SCREEN
You can change the language using the
touchscreen.
1. Press General.
2. Press Language .
3. Select a language.
Note: Available languages vary by region.
CHANGING THE MEASURE UNIT -
VEHICLES WITH: 4.2 INCH
INSTRUMENT CLUSTER DISPLAY
SCREEN
You can change the measurement unit
using the instrument cluster display.
1. Select Settings and press the menu
button.
2. Select Display.
3. Select Measurement Unit .
4. Select a measurement unit.
125
Instrument Cluster Display
Page 129 of 585
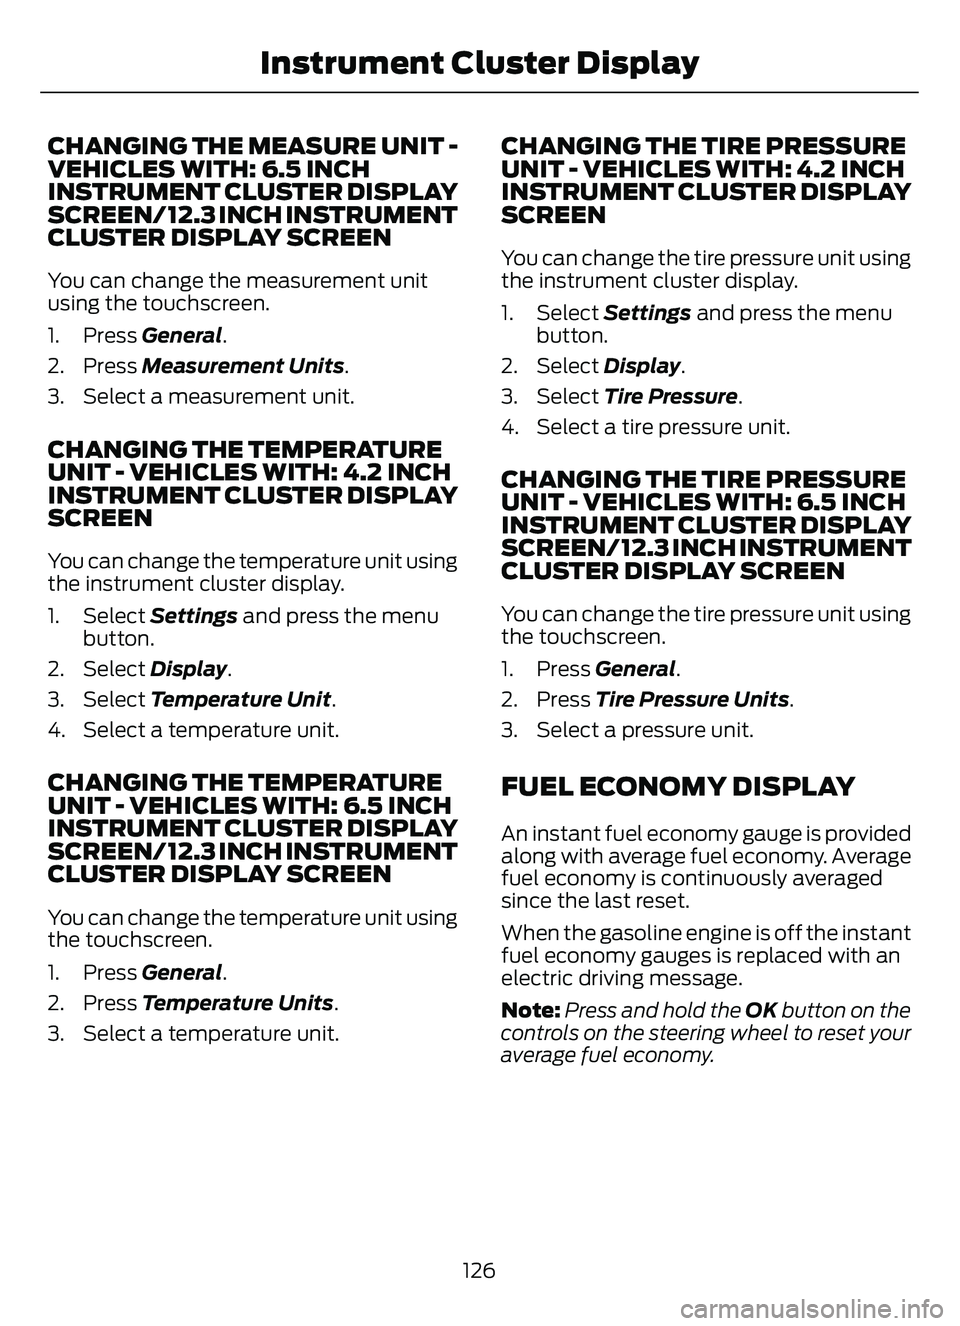
CHANGING THE MEASURE UNIT -
VEHICLES WITH: 6.5 INCH
INSTRUMENT CLUSTER DISPLAY
SCREEN/ 12.3 INCH INSTRUMENT
CLUSTER DISPLAY SCREEN
You can change the measurement unit
using the touchscreen.
1. Press General.
2. Press Measurement Units.
3. Select a measurement unit.
CHANGING THE TEMPERATURE
UNIT - VEHICLES WITH: 4.2 INCH
INSTRUMENT CLUSTER DISPLAY
SCREEN
You can change the temperature unit using
the instrument cluster display.
1. Select Settings and press the menu
button.
2. Select Display.
3. Select Temperature Unit.
4. Select a temperature unit.
CHANGING THE TEMPERATURE
UNIT - VEHICLES WITH: 6.5 INCH
INSTRUMENT CLUSTER DISPLAY
SCREEN/ 12.3 INCH INSTRUMENT
CLUSTER DISPLAY SCREEN
You can change the temperature unit using
the touchscreen.
1. Press General.
2. Press Temperature Units .
3. Select a temperature unit.
CHANGING THE TIRE PRESSURE
UNIT - VEHICLES WITH: 4.2 INCH
INSTRUMENT CLUSTER DISPLAY
SCREEN
You can change the tire pressure unit using
the instrument cluster display.
1. Select Settings and press the menu
button.
2. Select Display.
3. Select Tire Pressure.
4. Select a tire pressure unit.
CHANGING THE TIRE PRESSURE
UNIT - VEHICLES WITH: 6.5 INCH
INSTRUMENT CLUSTER DISPLAY
SCREEN/ 12.3 INCH INSTRUMENT
CLUSTER DISPLAY SCREEN
You can change the tire pressure unit using
the touchscreen.
1. Press General.
2. Press Tire Pressure Units .
3. Select a pressure unit.
FUEL ECONOMY DISPLAY
An instant fuel economy gauge is provided
along with average fuel economy. Average
fuel economy is continuously averaged
since the last reset.
When the gasoline engine is off the instant
fuel economy gauges is replaced with an
electric driving message.
Note: Press and hold the OK button on the
controls on the steering wheel to reset your
average fuel economy.
126
Instrument Cluster Display
Page 130 of 585
FUEL ECONOMY DISPLAY -
PLUG-IN HYBRID ELECTRIC
VEHICLE (PHEV)
An instant fuel economy gauge is provided
along with average fuel economy. Average
fuel economy is continuously averaged
since the last reset.
Both the electric only and hybrid operation
are included in the calculation. More
electric only driving results in a greater
average fuel economy.
When the gasoline engine is off, the instant
fuel economy gauges are replaced with an
electric driving message.
Note:Press and hold the OK button on the
controls on the steering wheel to reset your
average fuel economy.
FUEL ECONOMY DISPLAY -
GASOLINE
An instant fuel economy gauge is provided
along with average fuel economy. Average
fuel economy is continuously averaged
since the last reset.
Note: Press and hold the OK button on the
controls on the steering wheel to reset your
average fuel economy.
EV COACH - HYBRID ELECTRIC
VEHICLE (HEV)/PLUG-IN
HYBRID ELECTRIC VEHICLE
(PHEV)
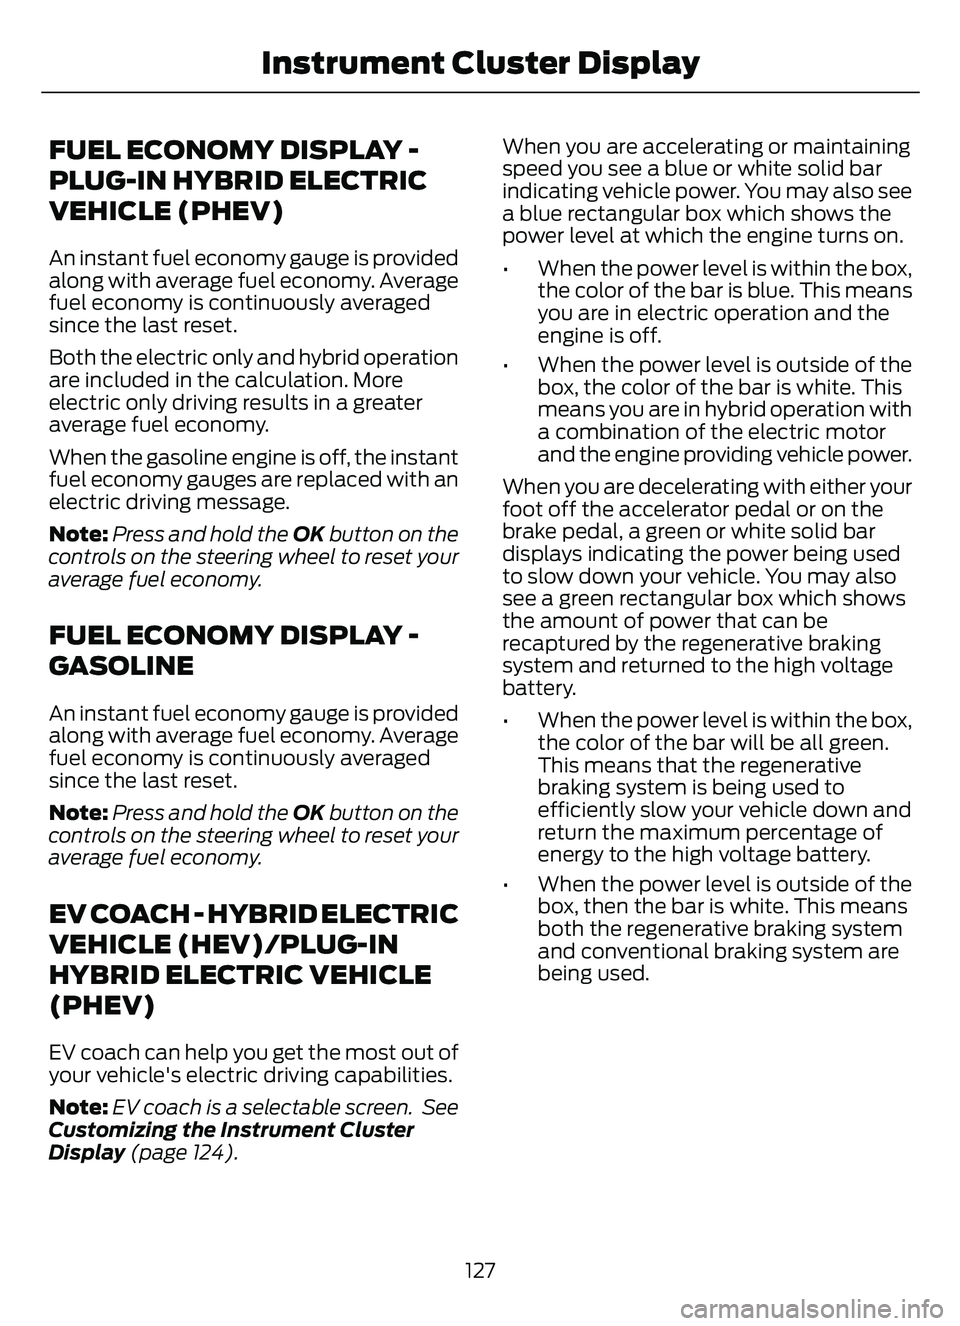
EV coach can help you get the most out of
your vehicle's electric driving capabilities.
Note: EV coach is a selectable screen. See
Customizing the Instrument Cluster
Display (page 124). When you are accelerating or maintaining
speed you see a blue or white solid bar
indicating vehicle power. You may also see
a blue rectangular box which shows the
power level at which the engine turns on.
• When the power level is within the box,
the color of the bar is blue. This means
you are in electric operation and the
engine is off.
• When the power level is outside of the box, the color of the bar is white. This
means you are in hybrid operation with
a combination of the electric motor
and the engine providing vehicle power.
When you are decelerating with either your
foot off the accelerator pedal or on the
brake pedal, a green or white solid bar
displays indicating the power being used
to slow down your vehicle. You may also
see a green rectangular box which shows
the amount of power that can be
recaptured by the regenerative braking
system and returned to the high voltage
battery.
• When the power level is within the box, the color of the bar will be all green.
This means that the regenerative
braking system is being used to
efficiently slow your vehicle down and
return the maximum percentage of
energy to the high voltage battery.
• When the power level is outside of the box, then the bar is white. This means
both the regenerative braking system
and conventional braking system are
being used.
127
Instrument Cluster Display
Page 132 of 585
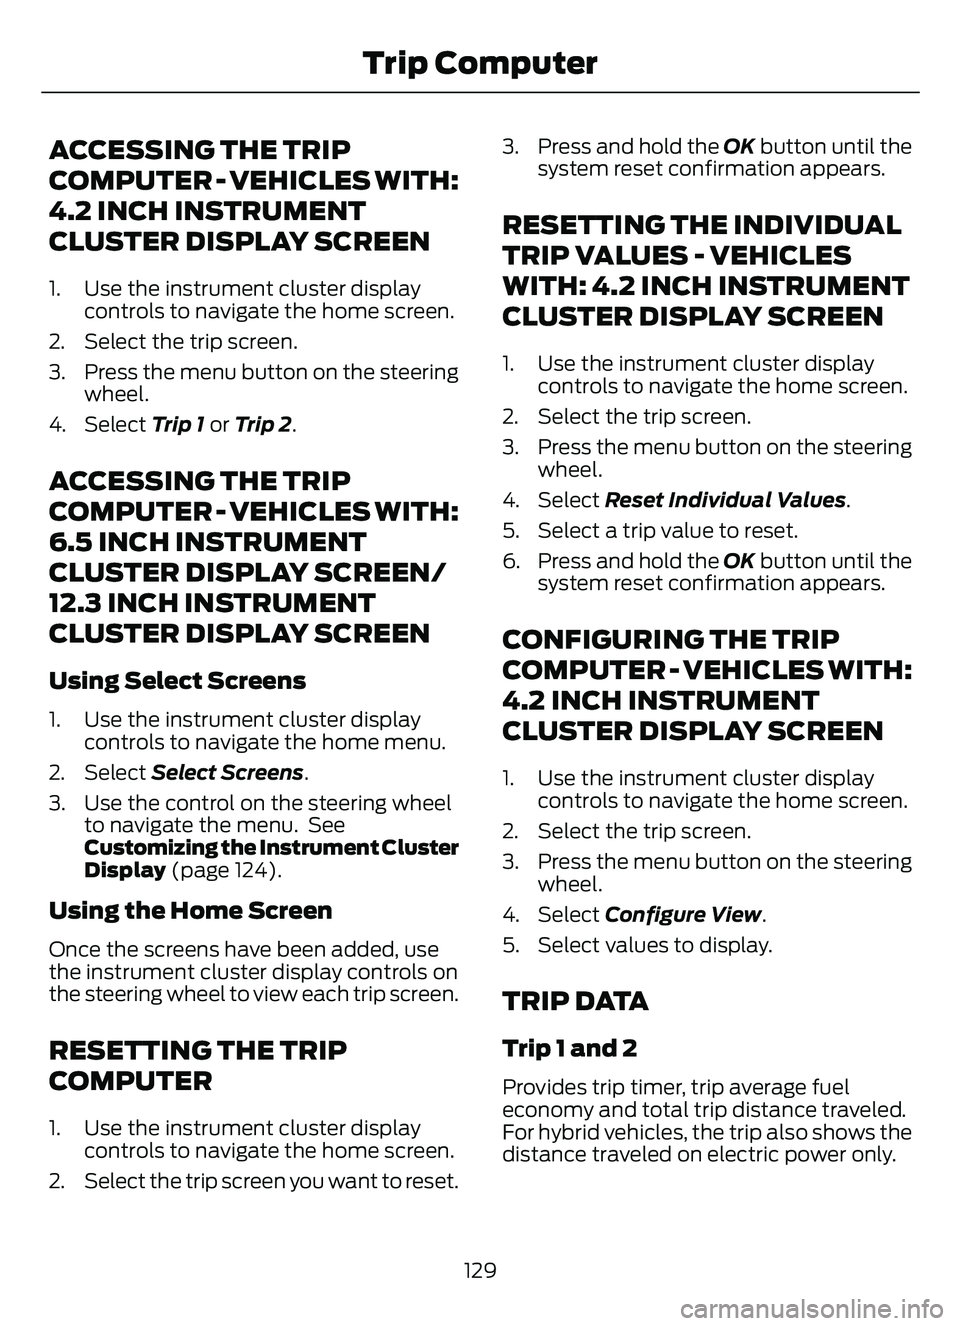
ACCESSING THE TRIP
COMPUTER - VEHICLES WITH:
4.2 INCH INSTRUMENT
CLUSTER DISPLAY SCREEN
1. Use the instrument cluster displaycontrols to navigate the home screen.
2. Select the trip screen.
3. Press the menu button on the steering wheel.
4. Select Trip 1 or Trip 2.
ACCESSING THE TRIP
COMPUTER - VEHICLES WITH:
6.5 INCH INSTRUMENT
CLUSTER DISPLAY SCREEN/
12.3 INCH INSTRUMENT
CLUSTER DISPLAY SCREEN
Using Select Screens
1. Use the instrument cluster display
controls to navigate the home menu.
2. Select Select Screens .
3. Use the control on the steering wheel to navigate the menu. See
Customizing the Instrument Cluster
Display (page 124).
Using the Home Screen
Once the screens have been added, use
the instrument cluster display controls on
the steering wheel to view each trip screen.
RESETTING THE TRIP
COMPUTER
1. Use the instrument cluster display
controls to navigate the home screen.
2. Select the trip screen you want to reset. 3. Press and hold the OK button until the
system reset confirmation appears.
RESETTING THE INDIVIDUAL
TRIP VALUES - VEHICLES
WITH: 4.2 INCH INSTRUMENT
CLUSTER DISPLAY SCREEN
1. Use the instrument cluster displaycontrols to navigate the home screen.
2. Select the trip screen.
3. Press the menu button on the steering wheel.
4. Select Reset Individual Values .
5. Select a trip value to reset.
6. Press and hold the OK button until the system reset confirmation appears.
CONFIGURING THE TRIP
COMPUTER - VEHICLES WITH:
4.2 INCH INSTRUMENT
CLUSTER DISPLAY SCREEN
1. Use the instrument cluster displaycontrols to navigate the home screen.
2. Select the trip screen.
3. Press the menu button on the steering wheel.
4. Select Configure View .
5. Select values to display.
TRIP DATA
Trip 1 and 2
Provides trip timer, trip average fuel
economy and total trip distance traveled.
For hybrid vehicles, the trip also shows the
distance traveled on electric power only.
129
Trip Computer
Page 134 of 585
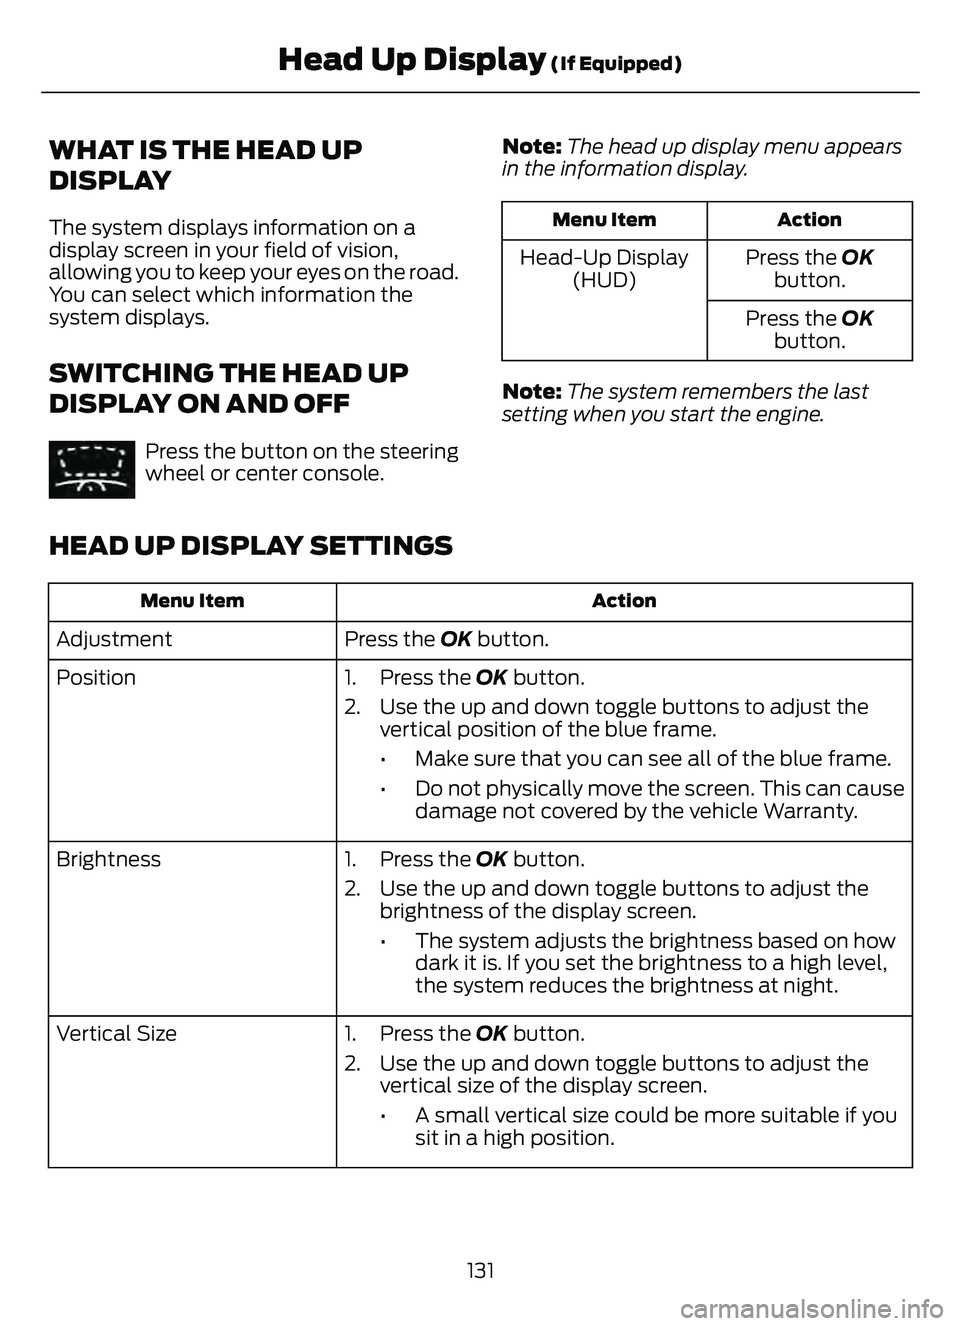
WHAT IS THE HEAD UP
DISPLAY
The system displays information on a
display screen in your field of vision,
allowing you to keep your eyes on the road.
You can select which information the
system displays.
SWITCHING THE HEAD UP
DISPLAY ON AND OFF
E265900Press the button on the steering
wheel or center console.Note:
The head up display menu appears
in the information display.
Action
Menu Item
Press the OK
button.
Head-Up Display
(HUD)
Press the OKbutton.
Note: The system remembers the last
setting when you start the engine.
HEAD UP DISPLAY SETTINGS
Action
Menu Item
Press the OK button.
Adjustment
Position 1. Press the OK button.
2. Use the up and down toggle buttons to adjust the
vertical position of the blue frame.
• Make sure that you can see all of the blue frame.
• Do not physically move the screen. This can causedamage not covered by the vehicle Warranty.
Brightness 1. Press the OK button.
2. Use the up and down toggle buttons to adjust the brightness of the display screen.
• The system adjusts the brightness based on howdark it is. If you set the brightness to a high level,
the system reduces the brightness at night.
Vertical Size 1. Press the OK button.
2. Use the up and down toggle buttons to adjust the vertical size of the display screen.
• A small vertical size could be more suitable if yousit in a high position.
131
Head Up Display (If Equipped)