Ev button FORD ESCAPE 2022 Workshop Manual
[x] Cancel search | Manufacturer: FORD, Model Year: 2022, Model line: ESCAPE, Model: FORD ESCAPE 2022Pages: 585, PDF Size: 6.15 MB
Page 146 of 585
Auto Mode Indicator Status
Description
Auto Mode Indicator
Status
One indicator illumin-
ated. • The blower motor speed is reduced.
• Use this setting to minimize the amount of noise fromthe blower motor.
• This setting increases the time taken to cool the interior.
Two indicators illumin-
ated. • The blower motor speed is moderate.
Three indicators illumin-
ated. • The blower motor speed is increased.
• This setting increases the amount of noise from theblower motor.
• Use this setting to reduce the time taken to cool the interior.
Switching the Air Conditioning On
and Off
Press and release the button to
switch the air conditioning on or
off.
Use air conditioning with recirculated air
to improve cooling performance and
efficiency.
Note: In certain conditions, for example,
maximum defrost, the air conditioning
compressor may continue to operate even
though you switch off the air conditioning.
Switching the Climate Control On
and Off
Press and release the button.
Note: The button may be on the
temperature control.
Switching Maximum Air
Conditioning On and Off
Press and release the button for
maximum cooling.
Recirculated air flows through the
instrument panel air vents, air conditioning
turns on and the blower motor adjusts to
the highest speed.
Switching Maximum Defrost On
and Off
Press and release the button for
maximum defrosting.
Air flows through the windshield air vents,
and the blower motor adjusts to the
highest speed.
You can also use this setting to defog and
clear the windshield of a thin covering of
ice.
143
Climate Control
Page 147 of 585
Note:To prevent window fogging, you
cannot select recirculated air when
maximum defrost is on.
Note: The heated rear window also turns
on when you select maximum defrost.
Switching Recirculated Air On and
Off
Press and release the button to
switch between outside air and
recirculated air.
The air currently in the passenger
compartment recirculates. This may
reduce the time needed to cool the interior,
when used with A/C, and reduce unwanted
odors from entering your vehicle.
Note: Recirculated air may turn off, or
prevent you from switching on, in all air flow
modes except MAX A/C to reduce the risk
of fogging. Recirculation may also turn on
and off in various air distribution control
combinations to improve heating or cooling
efficiency.
HINTS ON CONTROLLING THE
INTERIOR CLIMATE -
VEHICLES WITH: AUTOMATIC
TEMPERATURE CONTROL
General Hints
Note: Prolonged use of recirculated air may
cause the windows to fog up.
Note: You may feel a small amount of air
from the footwell air vents regardless of the
air distribution setting.
Note: To reduce humidity build-up inside
your vehicle, do not drive with the system
switched off or with recirculated air always
switched on.
Note: Do not place objects under the front
seats as this may interfere with the airflow
to the rear seats. Note:
Remove any snow, ice or leaves from
the air intake area at the base of the
windshield.
Note: To improve the time to reach a
comfortable temperature in hot weather,
drive with the windows open until you feel
cold air through the air vents.
Automatic Climate Control
Note: Adjusting the settings when your
vehicle interior is extremely hot or cold is
not necessary. Automatic mode is best
recommended to maintain set temperature.
Note: The system adjusts to heat or cool
the interior to the temperature you select
as quickly as possible.
Note: For the system to function efficiently,
the instrument panel and side air vents
should be fully open.
Note: If you select AUTO during cold
outside temperatures, the system directs
air flow to the windshield and side window
air vents. In addition, the blower motor may
run at a slower speed until the engine warms
up.
Note: If you select AUTO during hot
temperatures and the inside of the vehicle
is hot, the system uses recirculated air to
maximize interior cooling. Blower motor
speed may also reduce until the air cools.
Quickly Heating the Interior
1. Press and release AUTO .
2. Adjust the temperature function to the setting you prefer.
Recommended Settings for
Heating
1. Press and release AUTO .
2. Adjust the temperature function to the setting you prefer. Use 72°F (22°C) as
a starting point, then adjust the setting
as necessary.
144
Climate Control
Page 149 of 585
4. Adjust the blower motor speed to thelowest speed setting.
Defogging the Side Windows in
Cold Weather
1. Direct air to the instrument panel andwindshield air vents.
2. Press and release A/C.
3. Adjust the temperature control to the setting you prefer.
4. Adjust the blower motor speed to the highest setting.
5. Direct air toward the side windows.
6. Close the instrument panel air vents.
HEATED WINDSHIELD (IF
EQUIPPED)
Windshield Wiper De-Icer
When you switch the heated rear
window on, the windshield wiper
de-icer turns on.
HEATED REAR WINDOW
Press the button to clear the rear
window of thin ice and fog. The
heated rear window turns off
after a short period of time.
Note: Make sure the engine is on before
operating the heated windows.
Note: Do not use harsh chemicals, razor
blades or other sharp objects to clean or
remove decals from the inside of the heated
rear window. The vehicle warranty may not
cover damage to the heated rear window
grid lines.
HEATED EXTERIOR MIRRORS
(IF EQUIPPED)
When you switch the heated rear window
on, the heated exterior mirrors turn on.
Note: Do not remove ice from the mirrors
with a scraper or adjust the mirror glass
when it is frozen in place.
Note: Do not clean the mirror housing or
glass with harsh abrasives, fuel or other
petroleum-based cleaning products. The
vehicle warranty may not cover damage
caused to the mirror housing or glass.
146
Climate Control
Page 152 of 585

• Bend your legs slightly so that you canpress the pedals fully.
• Position the shoulder strap of the seatbelt over the center of your
shoulder and position the lap strap
tightly across your hips.
Make sure that your driving position is
comfortable and that you can maintain full
control of your vehicle.
MANUAL SEATS
HEAD RESTRAINT COMPONENTS
E291E29139139
The front seat head restraints consists of:
An energy absorbing head
restraint.
A
Two steel stems.
B
Guide sleeve adjust and unlock
button.
C
ADJUSTING THE HEAD
RESTRAINT
WARNING: Fully adjust the head
restraint before you sit in or operate your
vehicle. This will help minimize the risk
of neck injury in the event of a crash. Do
not adjust the head restraint when your
vehicle is moving.
WARNING: The head restraint is a
safety device. Whenever possible it
should be installed and properly
adjusted when the seat is occupied.
Failure to adjust the head restraint
properly could reduce its effectiveness
during certain impacts.
WARNING: Adjust the head
restraints for all passengers before you
drive your vehicle. This will help minimize
the risk of neck injury in the event of a
crash. Do not adjust the head restraints
when your vehicle is moving.
Note: Adjust the seat backrest to an upright
driving position before adjusting the head
restraint. Adjust the head restraint so that
the top of it is level with the top of your head
and as far forward as possible. Make sure
that you remain comfortable. If you are
extremely tall, adjust the head restraint to
its highest position.
Pull the head restraint up to raise it.
To lower the head restraint:
1. Press and hold the adjust and unlock button.
2. Push the head restraint down.
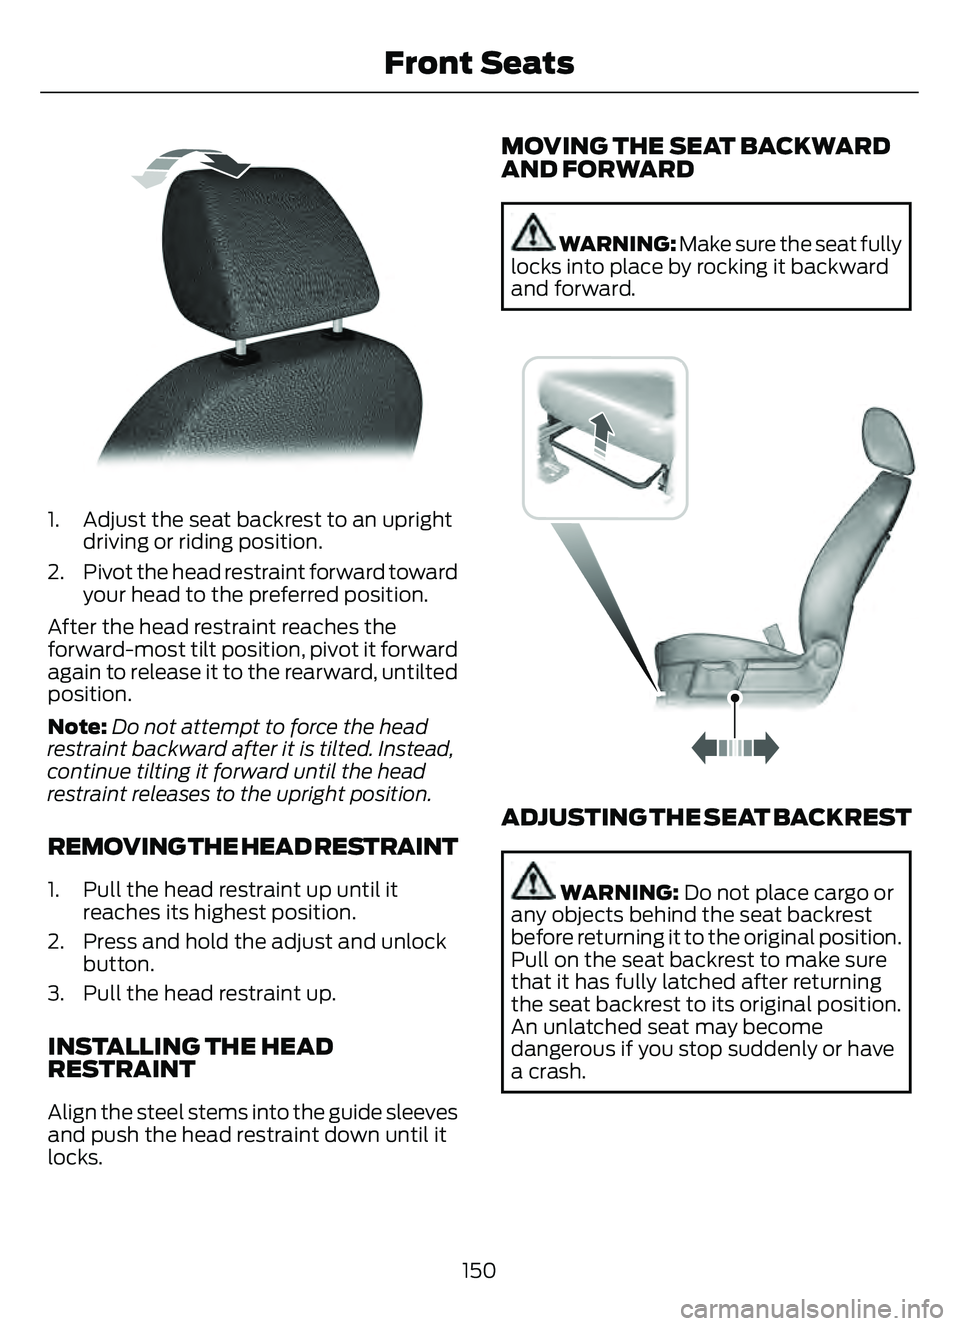
To tilt the head restraint (if equipped):
149
Front Seats
Page 153 of 585
E144727
1. Adjust the seat backrest to an uprightdriving or riding position.
2. Pivot the head restraint forward toward your head to the preferred position.
After the head restraint reaches the
forward-most tilt position, pivot it forward
again to release it to the rearward, untilted
position.
Note: Do not attempt to force the head
restraint backward after it is tilted. Instead,
continue tilting it forward until the head
restraint releases to the upright position.
REMOVING THE HEAD RESTRAINT
1. Pull the head restraint up until it reaches its highest position.
2. Press and hold the adjust and unlock button.
3. Pull the head restraint up.
INSTALLING THE HEAD
RESTRAINT
Align the steel stems into the guide sleeves
and push the head restraint down until it
locks.
MOVING THE SEAT BACKWARD
AND FORWARD
WARNING: Make sure the seat fully
locks into place by rocking it backward
and forward.
E163870E163870
ADJUSTING THE SEAT BACKREST
WARNING: Do not place cargo or
any objects behind the seat backrest
before returning it to the original position.
Pull on the seat backrest to make sure
that it has fully latched after returning
the seat backrest to its original position.
An unlatched seat may become
dangerous if you stop suddenly or have
a crash.
150
Front Seats
Page 154 of 585
E293558
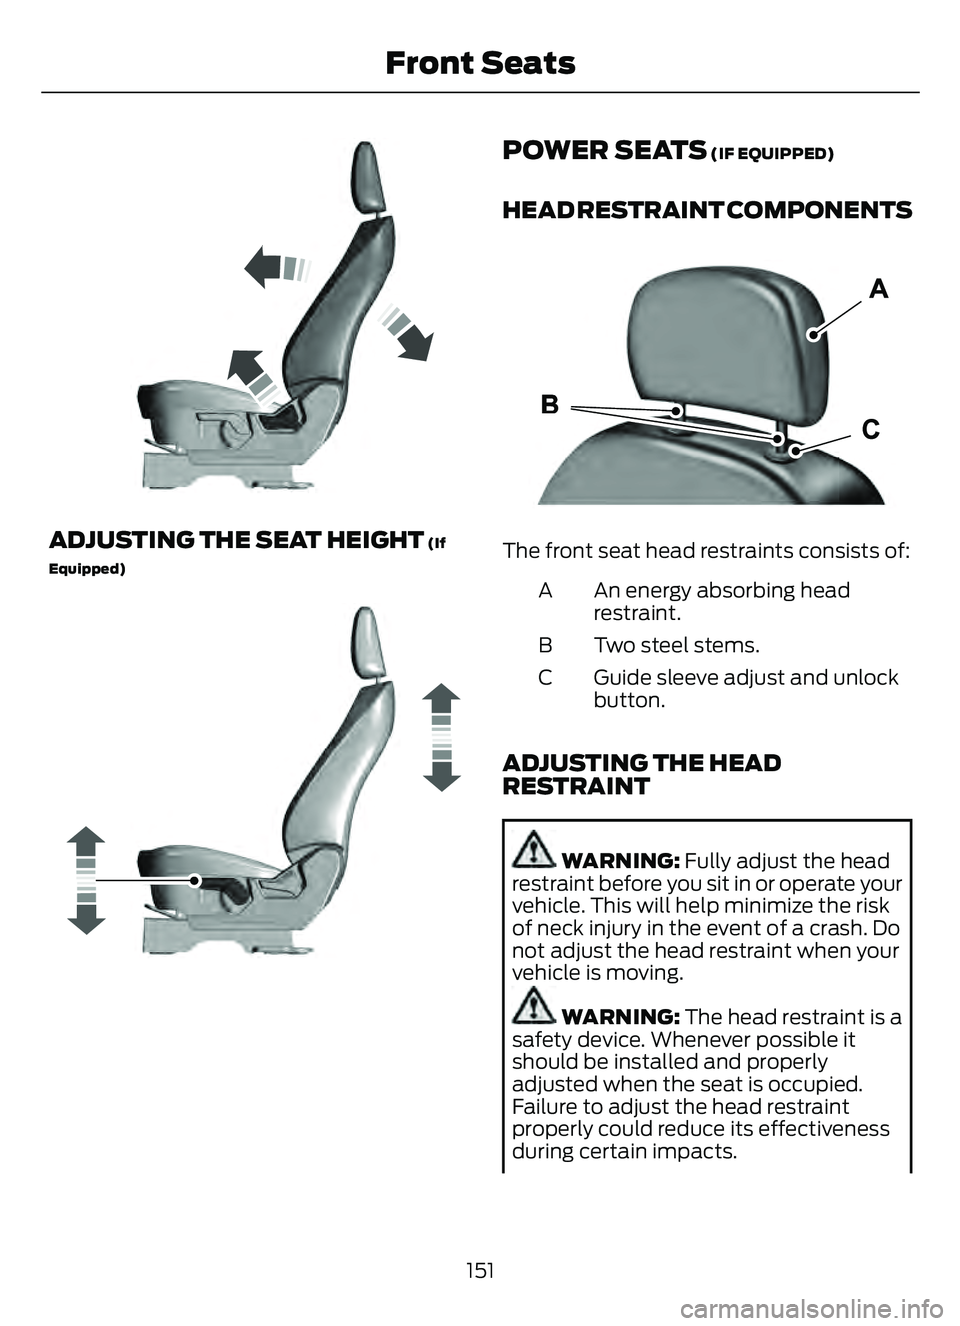
ADJUSTING THE SEAT HEIGHT (If
Equipped)
E293554
POWER SEATS (IF EQUIPPED)
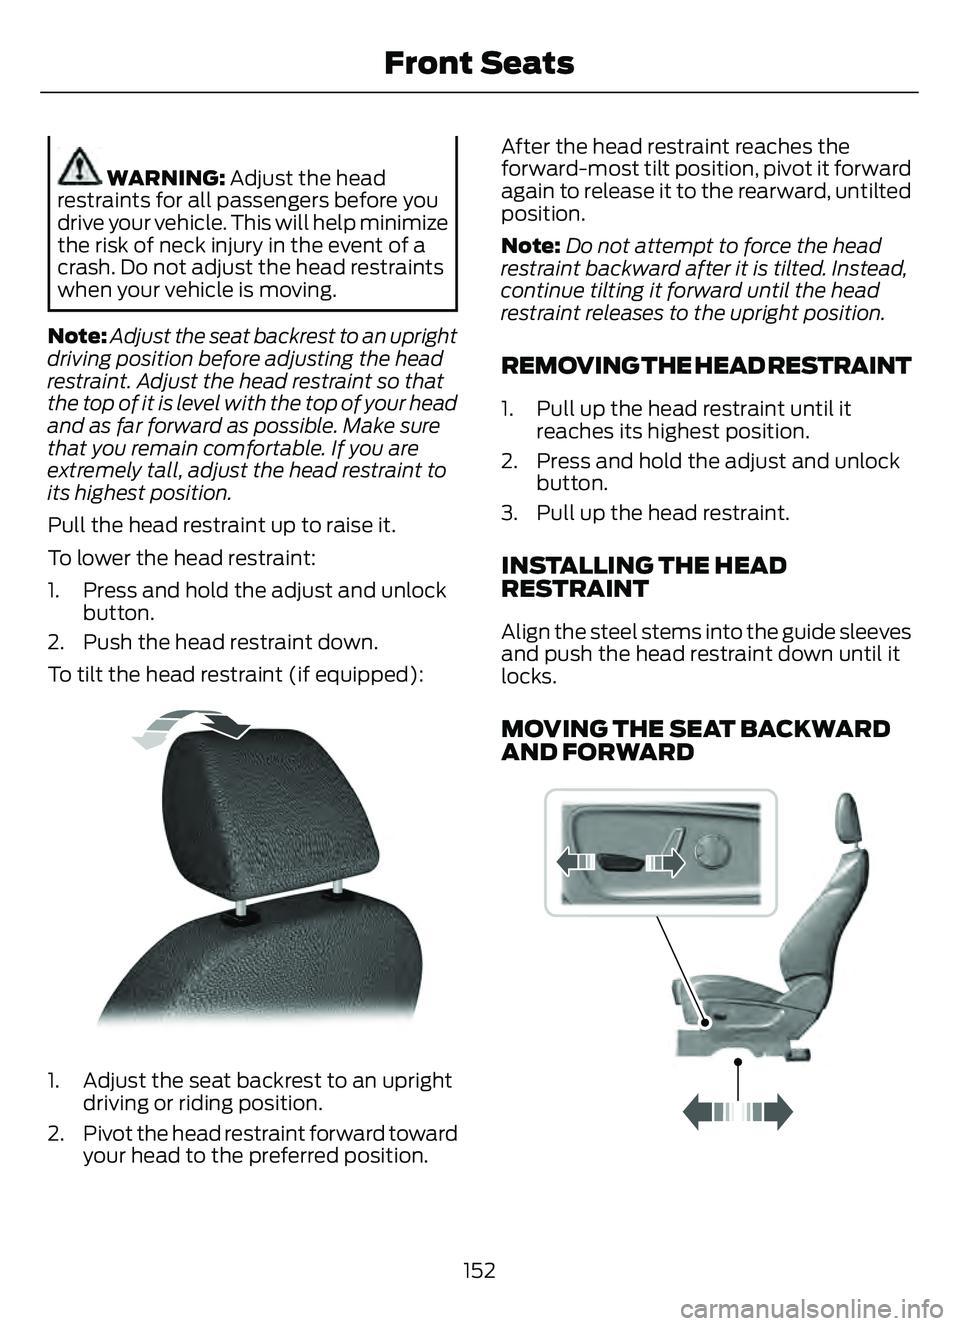
HEAD RESTRAINT COMPONENTS
E291E29139139
The front seat head restraints consists of:
An energy absorbing head
restraint.
A
Two steel stems.
B
Guide sleeve adjust and unlock
button.
C
ADJUSTING THE HEAD
RESTRAINT
WARNING: Fully adjust the head
restraint before you sit in or operate your
vehicle. This will help minimize the risk
of neck injury in the event of a crash. Do
not adjust the head restraint when your
vehicle is moving.
WARNING: The head restraint is a
safety device. Whenever possible it
should be installed and properly
adjusted when the seat is occupied.
Failure to adjust the head restraint
properly could reduce its effectiveness
during certain impacts.
151
Front Seats
Page 155 of 585
WARNING: Adjust the head
restraints for all passengers before you
drive your vehicle. This will help minimize
the risk of neck injury in the event of a
crash. Do not adjust the head restraints
when your vehicle is moving.
Note: Adjust the seat backrest to an upright
driving position before adjusting the head
restraint. Adjust the head restraint so that
the top of it is level with the top of your head
and as far forward as possible. Make sure
that you remain comfortable. If you are
extremely tall, adjust the head restraint to
its highest position.
Pull the head restraint up to raise it.
To lower the head restraint:
1. Press and hold the adjust and unlock button.
2. Push the head restraint down.
To tilt the head restraint (if equipped):
E144727
1. Adjust the seat backrest to an upright driving or riding position.
2. Pivot the head restraint forward toward your head to the preferred position. After the head restraint reaches the
forward-most tilt position, pivot it forward
again to release it to the rearward, untilted
position.
Note:
Do not attempt to force the head
restraint backward after it is tilted. Instead,
continue tilting it forward until the head
restraint releases to the upright position.
REMOVING THE HEAD RESTRAINT
1. Pull up the head restraint until it reaches its highest position.
2. Press and hold the adjust and unlock button.
3. Pull up the head restraint.
INSTALLING THE HEAD
RESTRAINT
Align the steel stems into the guide sleeves
and push the head restraint down until it
locks.
MOVING THE SEAT BACKWARD
AND FORWARD
989E298944
152
Front Seats
Page 158 of 585
MANUAL SEATS
HEAD RESTRAINT COMPONENTS
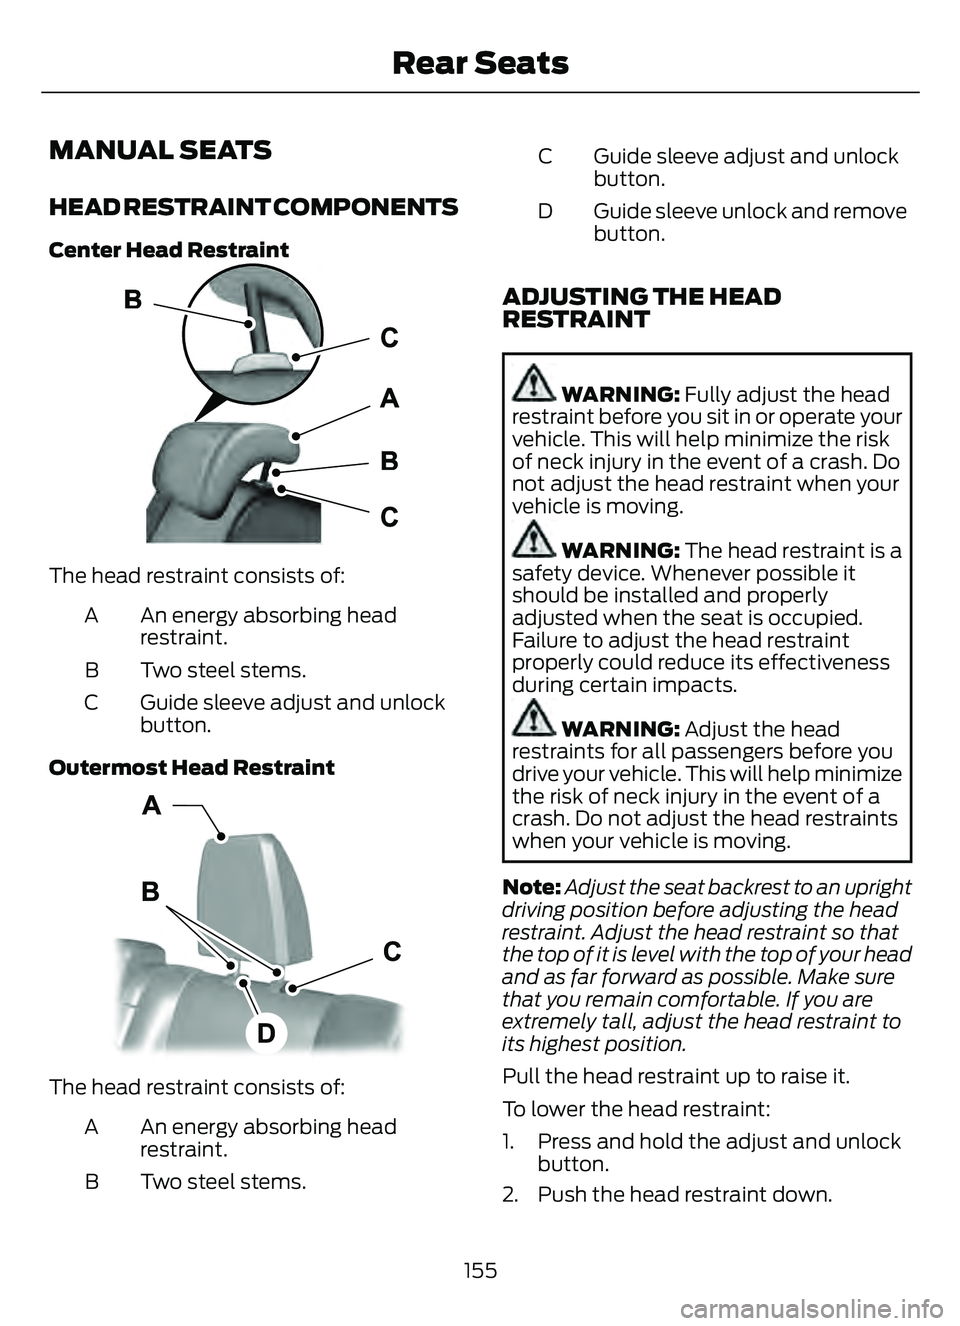
Center Head Restraint
E187325
The head restraint consists of:An energy absorbing head
restraint.
A
Two steel stems.
B
Guide sleeve adjust and unlock
button.
C
Outermost Head Restraint
E153105
The head restraint consists of: An energy absorbing head
restraint.
A
Two steel stems.
B Guide sleeve adjust and unlock
button.
C
Guide sleeve unlock and remove
button.
D
ADJUSTING THE HEAD
RESTRAINT
WARNING: Fully adjust the head
restraint before you sit in or operate your
vehicle. This will help minimize the risk
of neck injury in the event of a crash. Do
not adjust the head restraint when your
vehicle is moving.
WARNING: The head restraint is a
safety device. Whenever possible it
should be installed and properly
adjusted when the seat is occupied.
Failure to adjust the head restraint
properly could reduce its effectiveness
during certain impacts.
WARNING: Adjust the head
restraints for all passengers before you
drive your vehicle. This will help minimize
the risk of neck injury in the event of a
crash. Do not adjust the head restraints
when your vehicle is moving.
Note: Adjust the seat backrest to an upright
driving position before adjusting the head
restraint. Adjust the head restraint so that
the top of it is level with the top of your head
and as far forward as possible. Make sure
that you remain comfortable. If you are
extremely tall, adjust the head restraint to
its highest position.
Pull the head restraint up to raise it.
To lower the head restraint:
1. Press and hold the adjust and unlock button.
2. Push the head restraint down.
155
Rear Seats
Page 159 of 585
REMOVING THE HEAD RESTRAINT
1. Pull up the head restraint until itreaches its highest position.
2. Press and hold the adjust and unlock button.
3. Pull up the head restraint.
INSTALLING THE HEAD
RESTRAINT
1. Fold the seat backrest forward before installing the head restraint.
2. Align the steel stems into the guide sleeves and push the head restraint
down until it locks.
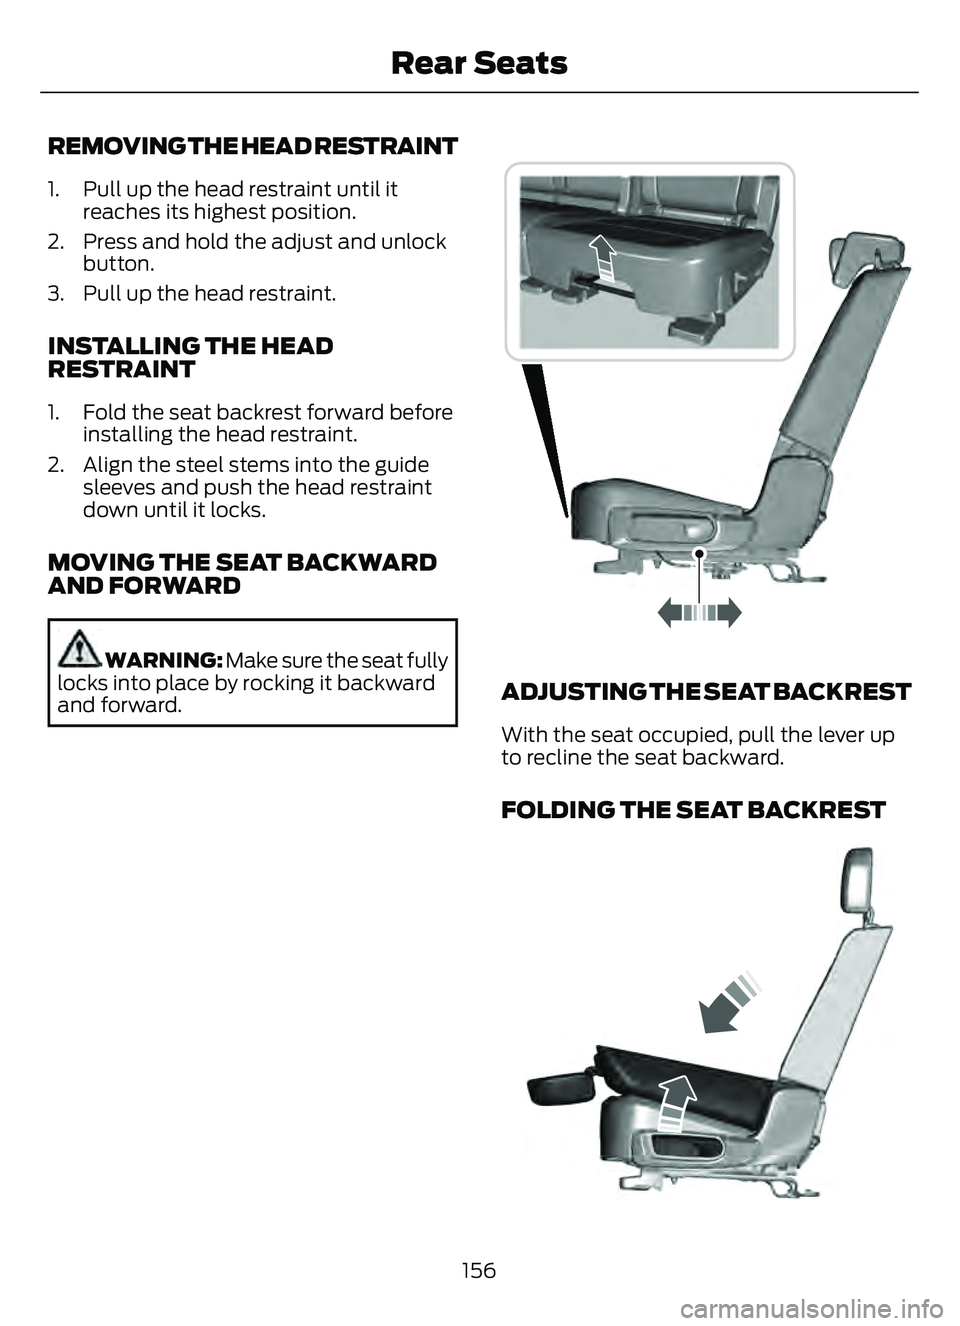
MOVING THE SEAT BACKWARD
AND FORWARD
WARNING: Make sure the seat fully
locks into place by rocking it backward
and forward.E298125E298125
ADJUSTING THE SEAT BACKREST
With the seat occupied, pull the lever up
to recline the seat backward.
FOLDING THE SEAT BACKREST
E3331247E3331247
156
Rear Seats
Page 163 of 585
HOW DOES THE MEMORY
FUNCTION WORK
The memory function recalls the position
of these features:
• Driver seat.
• Power mirrors.
MEMORY FUNCTION
PRECAUTIONS
WARNING: Before activating the
memory seat, make sure that the area
immediately surrounding the seat is clear
of obstructions and that all occupants
are clear of moving parts.
WARNING: Do not use the memory
function when your vehicle is moving.
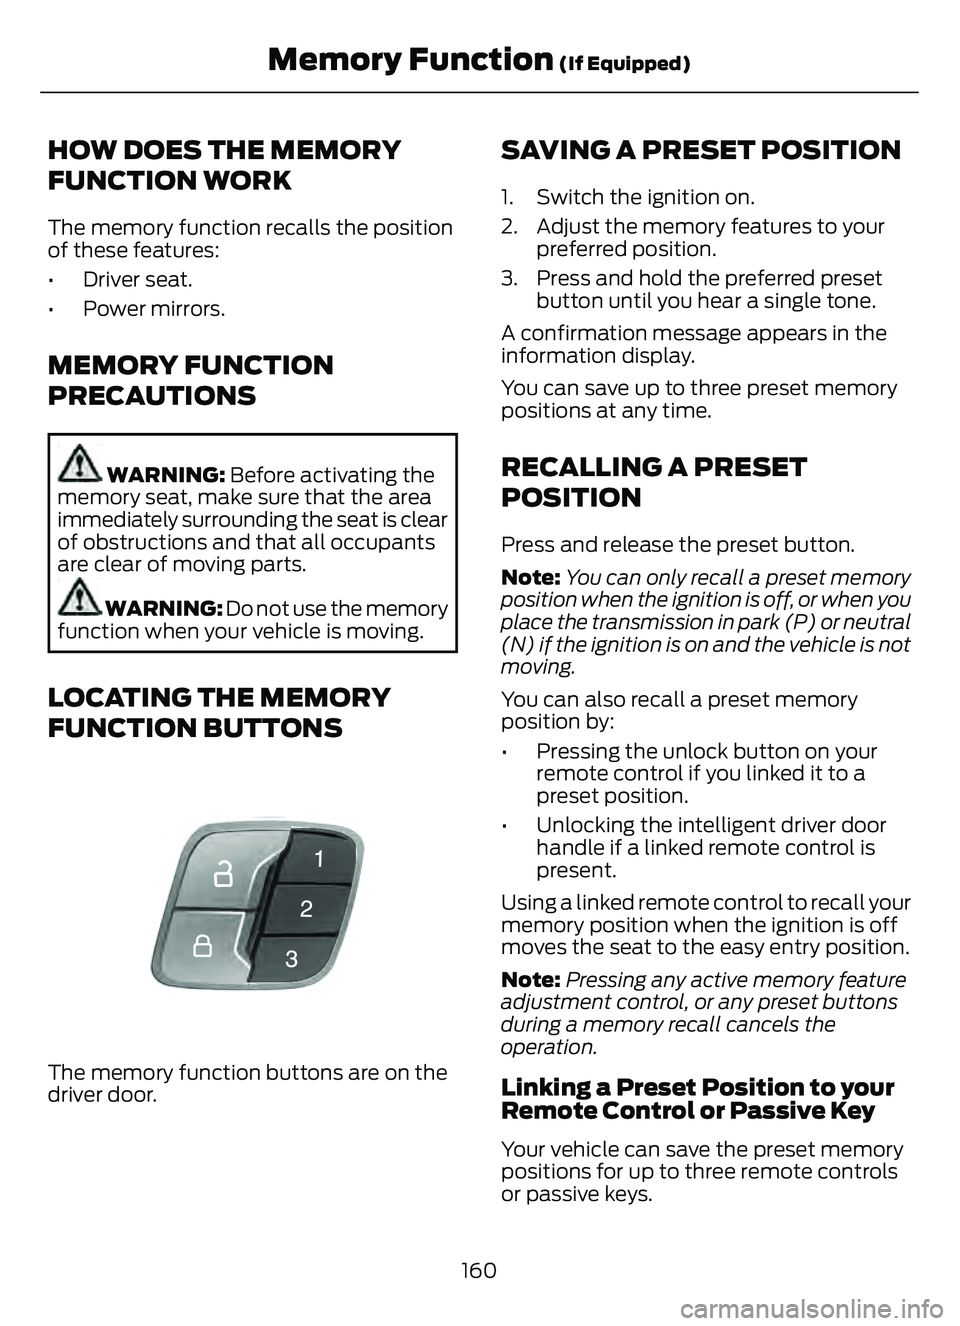
LOCATING THE MEMORY
FUNCTION BUTTONS
E142554
The memory function buttons are on the
driver door.
SAVING A PRESET POSITION
1. Switch the ignition on.
2. Adjust the memory features to your preferred position.
3. Press and hold the preferred preset button until you hear a single tone.
A confirmation message appears in the
information display.
You can save up to three preset memory
positions at any time.
RECALLING A PRESET
POSITION
Press and release the preset button.
Note: You can only recall a preset memory
position when the ignition is off, or when you
place the transmission in park (P) or neutral
(N) if the ignition is on and the vehicle is not
moving.
You can also recall a preset memory
position by:
• Pressing the unlock button on your remote control if you linked it to a
preset position.
• Unlocking the intelligent driver door handle if a linked remote control is
present.
Using a linked remote control to recall your
memory position when the ignition is off
moves the seat to the easy entry position.
Note: Pressing any active memory feature
adjustment control, or any preset buttons
during a memory recall cancels the
operation.
Linking a Preset Position to your
Remote Control or Passive Key
Your vehicle can save the preset memory
positions for up to three remote controls
or passive keys.
160
Memory Function (If Equipped)