FORD ESCAPE 2022 Owners Manual
Manufacturer: FORD, Model Year: 2022, Model line: ESCAPE, Model: FORD ESCAPE 2022Pages: 585, PDF Size: 6.15 MB
Page 461 of 585
• Drive Power: The engine is on due toaccelerator pedal pressure or speed
control activation. Reduce pressure on
the accelerator pedal or switch off the
speed control to return to full electric
mode.
• High Speed: The engine is on because the vehicle speed exceeds the level for
full electric operation. Reduce the
speed to return to electric operation.
• Heater Setting: The engine is on because of the heater setting. Reduce
or turn off the heater setting to return
to electric operation.
• Neutral Gear: The engine is on because the vehicle is in Neutral (N). Shift out
of neutral gear to return to electric
operation.
• Engine Cold: The engine is on because it is cold. The vehicle returns to electric
operation once the engine is sufficiently
warm.
• Battery Charging: The engine is on to charge the high-voltage battery. The
vehicle returns to electric operation
once the battery is charged.
• Low Gear: The engine is on because the vehicle is in low gear. Shift out of
low gear to return to electric operation.
• Normal Operation: The engine is on to optimize vehicle operation. The vehicle
returns to electric operation when
possible.
• Low Use: The engine is on to maintain engine oil quality. The vehicle returns
to electric operation when low engine
use mode is complete. See How Does
Low Engine Use Mode Work (page
182). • Engine Braking Active: The engine is on
to provide increased powertrain
braking. This can occur when you turn
on the grade assist feature, when
speed control is on or when driving with
your foot off the accelerator pedal.
Turning off grade assist or speed
control may allow the vehicle to return
to electric operation.
• Battery Temperature: The engine is on due to high or low high-voltage battery
temperature. This is a normal operating
condition. The vehicle returns to
electric operation when possible.
• Drive Mode: The engine is on due to the drive mode selection. Select an
appropriate drive mode for electric only
operation.
Charge Settings
E304452
The Charge Settings information
for your plug-in hybrid vehicle is
available through the Home
screen or under Vehicle Settings. To
Improve your charging experience, your
vehicle has the following convenience
features.
Charge Times
Once you set up Charge Times for a
specific charging location, your vehicle
prioritizes charging based on your preferred
time settings. You can set two preferred
charging time windows for weekdays and
two for weekends. This feature allows you
to take advantage of electric utility rate
plans that offer lower pricing during certain
times of day. Contact your utility company
to see what plans are available.
Note: You can also set up and use these
features using the FordPass app.
458
SYNC™ 3 (If Equipped)
Page 462 of 585
Departure Times
Setting Departure Times allows you to
control charging schedules and have the
vehicle cabin heated or cooled while
plugged in, so your vehicle is ready to drive
when you are. By setting a departure time
your vehicle can use your charge time
settings to minimize your electricity costs
but still prioritize finishing charging before
your scheduled departure. A calendar viewallows you to program two departure times
per day for each day of the week.
Note:
You can also set up and use these
features using the FordPass app.
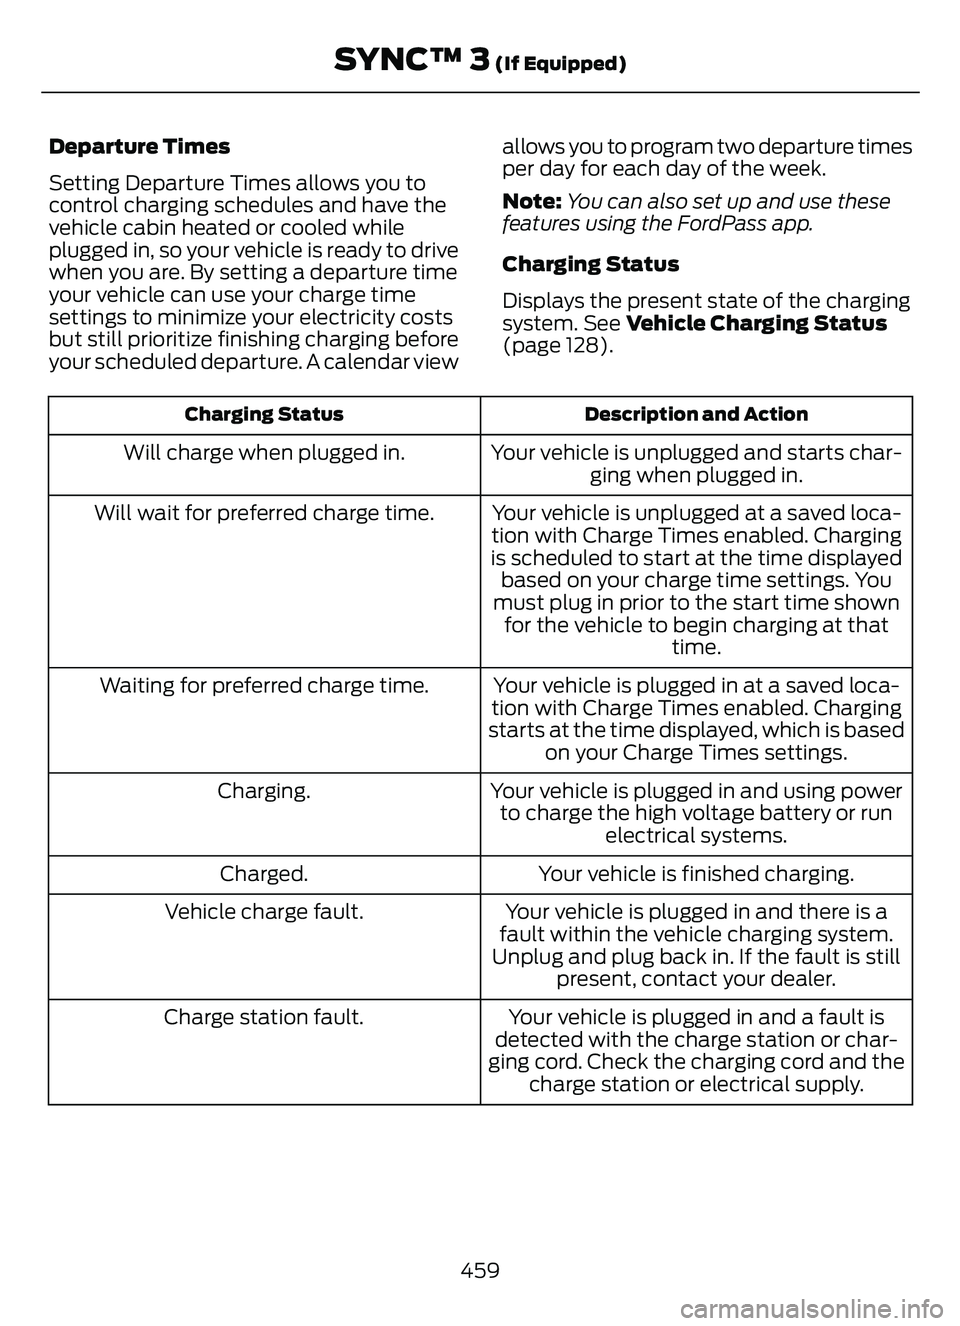
Charging Status
Displays the present state of the charging
system. See Vehicle Charging Status
(page 128).
Description and Action
Charging Status
Your vehicle is unplugged and starts char-
ging when plugged in.
Will charge when plugged in.
Your vehicle is unplugged at a saved loca-
tion with Charge Times enabled. Charging
is scheduled to start at the time displayed based on your charge time settings. You
must plug in prior to the start time shown for the vehicle to begin charging at that time.
Will wait for preferred charge time.
Your vehicle is plugged in at a saved loca-
tion with Charge Times enabled. Charging
starts at the time displayed, which is based on your Charge Times settings.
Waiting for preferred charge time.
Your vehicle is plugged in and using powerto charge the high voltage battery or run electrical systems.
Charging.
Your vehicle is finished charging.
Charged.
Your vehicle is plugged in and there is a
fault within the vehicle charging system.
Unplug and plug back in. If the fault is still present, contact your dealer.
Vehicle charge fault.
Your vehicle is plugged in and a fault is
detected with the charge station or char-
ging cord. Check the charging cord and the charge station or electrical supply.
Charge station fault.
459
SYNC™ 3 (If Equipped)
Page 463 of 585
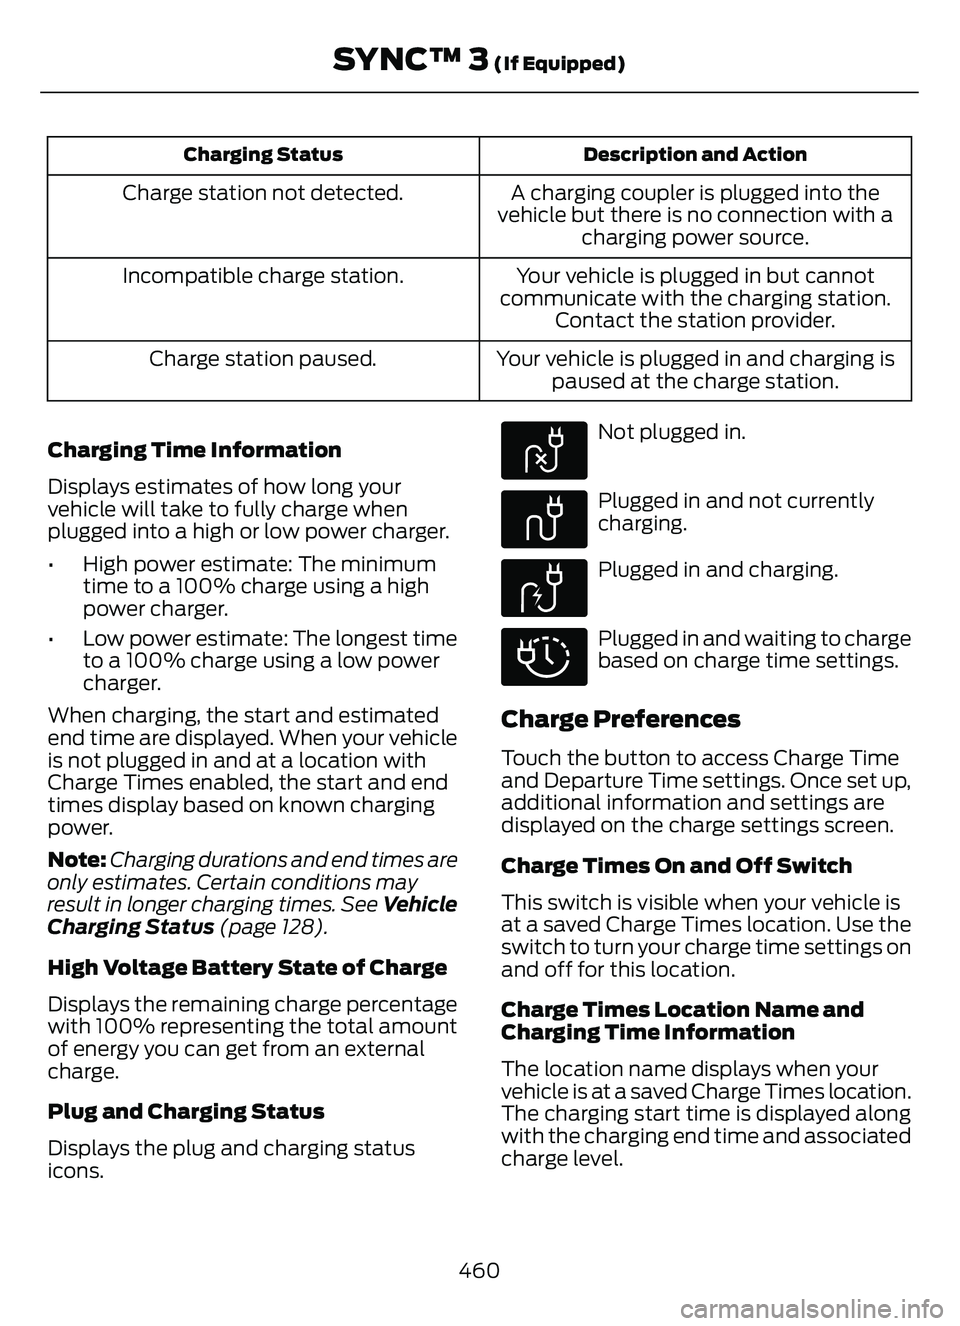
Description and Action
Charging Status
A charging coupler is plugged into the
vehicle but there is no connection with a charging power source.
Charge station not detected.
Your vehicle is plugged in but cannot
communicate with the charging station. Contact the station provider.
Incompatible charge station.
Your vehicle is plugged in and charging ispaused at the charge station.
Charge station paused.
Charging Time Information
Displays estimates of how long your
vehicle will take to fully charge when
plugged into a high or low power charger.
• High power estimate: The minimum time to a 100% charge using a high
power charger.
• Low power estimate: The longest time to a 100% charge using a low power
charger.
When charging, the start and estimated
end time are displayed. When your vehicle
is not plugged in and at a location with
Charge Times enabled, the start and end
times display based on known charging
power.
Note: Charging durations and end times are
only estimates. Certain conditions may
result in longer charging times. See Vehicle
Charging Status (page 128).
High Voltage Battery State of Charge
Displays the remaining charge percentage
with 100% representing the total amount
of energy you can get from an external
charge.
Plug and Charging Status
Displays the plug and charging status
icons.
E304458
Not plugged in.
E304459
Plugged in and not currently
charging.
E304460
Plugged in and charging.
E304461
Plugged in and waiting to charge
based on charge time settings.
Charge Preferences
Touch the button to access Charge Time
and Departure Time settings. Once set up,
additional information and settings are
displayed on the charge settings screen.
Charge Times On and Off Switch
This switch is visible when your vehicle is
at a saved Charge Times location. Use the
switch to turn your charge time settings on
and off for this location.
Charge Times Location Name and
Charging Time Information
The location name displays when your
vehicle is at a saved Charge Times location.
The charging start time is displayed along
with the charging end time and associated
charge level.
460
SYNC™ 3 (If Equipped)
Page 464 of 585
Departure Times On and Off Switch
This switch is visible when you have at
least one departure time set. Use this
switch to turn all departure times on and
off. Switching departure times off does not
delete your settings.
Next Departure Times and Cabin
Temperature
Displays the next departure time and
associated cabin temperature setting.
Charge Time Settings
Follow these steps to set a preferred
charge time for a charging location.
1. Select Charge Preferences on theCharge Settings screen.
2. Select Charge Time Setup on the Edit Charge Preferences screen.
3. Select Add New Location on the Charge Times screen. You can also edit
settings for previously saved locations
from this screen.
4. Select an address from the Recent Charge Locations screen.
5. On the Confirm Location for Charge Times screen, you can edit the location
name and set a max charge level as
desired. Once you have your desired
location name and max charge level,
select Continue to Schedule.
Note: Charging will stop when your vehicle
reaches the max charge level.
6. Select WEEKDAY or WEEKEND on the Preferred Charge Times screen.
7. On the Select preferred WEEKDAY or WEEKEND Charge Times screen, use
the circular 24 hour clock to select your
charging time windows. You can select
up to two time windows by pressing
and dragging across the hour buttons. When you have selected your preferred
times then press Next to return to the
Preferred Charge Times screen. Repeat
for WEEKEND or WEEKDAY as desired.
Once you are done setting preferred
charge times, press Save.
Note: Selecting all or none of the 24 hours
results in any time of day given equal priority
for charging.
8. Your saved location now shows on the Charge Times screen. Select Done to
return to the main charge settings
screen. Whenever your vehicle is at a
saved charging location the charge
settings screen displays the location
name, and the charging times are
based on your Charge Time settings for
that location plus the next Departure
Time.
Note: Reaching your max charge level by
your next Departure Time is always the
priority. When Charge Times are set,
charging outside your preferred charging
time windows could be necessary in order
to finish by your next Departure Time.
Departure Time Settings
1. Select Charge Preferences on the Charge Settings screen.
2. Select Departure Time Setup on the Edit Charge Preferences screen.
3. Two time settings show for each day of the week on the Departure Times
schedule screen. Select any one.
4. On the Departure Time settings screen, set your desired departure time, cabin
temperature and days of the week to
repeat. Press Save.
5. Your settings are now shown on the Departure Times schedule screen.
Press Back two times to return to the
main charge settings screen. The next
departure time and cabin temperature
setting display.
461
SYNC™ 3 (If Equipped)
Page 465 of 585

Note:Cabin conditioning can perform
differently depending on if you plug in with
the included convenience cord or a higher
power charging station. The power available
for conditioning is limited to the charging
station power available.
Note: Your vehicle may not always reach
the set cabin temperature due to charging
and ambient temperature conditions. This
is normal operation.
APPS
The system allows you interact with select
mobile apps while keeping your eyes on
the road. Voice commands, your steering
wheel buttons, or a quick tap on your
touchscreen give you advanced control of
compatible mobile apps. You can also
stream your favorite music or podcasts,
share your time of arrival with friends, and
keep connected safely.
When you start an app through the system
for the first time, you could be asked to
grant certain permissions. You can review
and change the permissions that you have
granted at any time when your vehicle is
not moving. We recommend that you
check your data plan before using your
apps through the system. Using them
could result in additional charges. We also
recommend that you check the app
provider's terms and conditions and
privacy policy before using their app. Make
sure that you have an active account for
apps that you want to use through the
system. Some apps will work with no
setup. Others require you to configure
some personal settings before you can use
them.
Note: For more information about available
apps, visit catalog.ford.com.
Using Apps on an iOS Device
Select the apps option on the
feature bar.
1. If your device is connected via USB, switch Apple CarPlay off. See Phone
(page 450).
2. Connect your device to a USB port or pair and connect using Bluetooth.
3. If prompted to enable CarPlay, select Disable.
4. Start the apps on your device that you want to use through SYNC.
Note: If you close the apps on your device,
you will not be able to use them through the
system.
5. Select the app that you want to use on the touchscreen.
Note: Connect your device to a USB port if
you want to use a navigation app. When
using a navigation app, keep your device
unlocked and the app open.
Using Apps on an Android Device
Select the apps option on the
feature bar.
1. If your device is connected via USB, switch Android Auto off. See Phone
(page 450).
2. Pair your device. See Phone (page 450).
3. Start the apps on your device that you want to use through SYNC.
Note: If you close the apps on your device,
you will not be able to use them through the
system.
4. Select Find Mobile Apps.
Note: The system searches and connects
to compatible apps that are running on your
device.
5. Select the app that you want to use on the touchscreen.
462
SYNC™ 3 (If Equipped)
Page 466 of 585
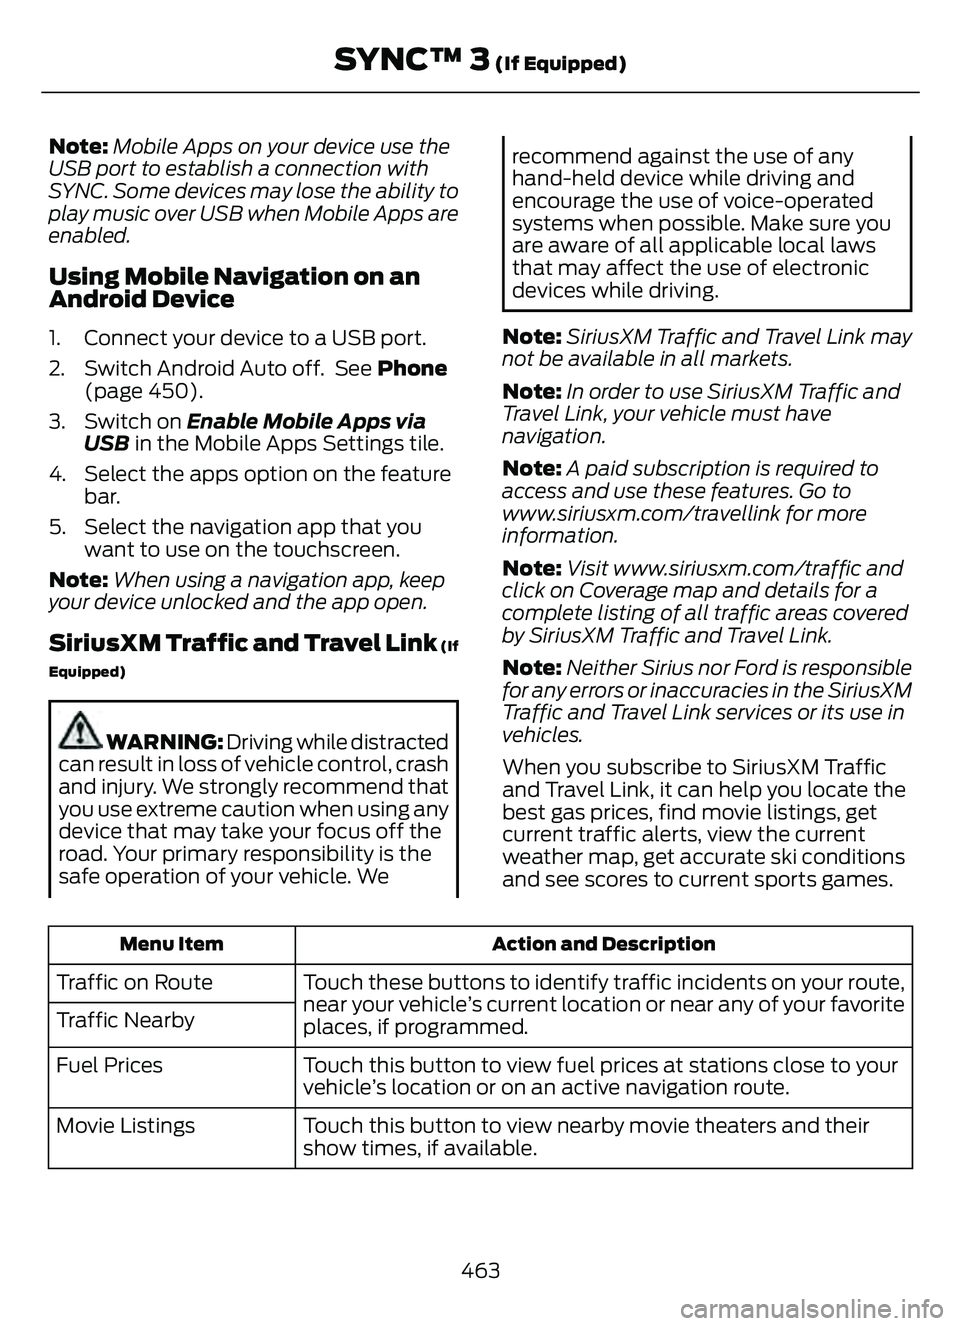
Note:Mobile Apps on your device use the
USB port to establish a connection with
SYNC. Some devices may lose the ability to
play music over USB when Mobile Apps are
enabled.
Using Mobile Navigation on an
Android Device
1. Connect your device to a USB port.
2. Switch Android Auto off. See Phone (page 450).
3. Switch on Enable Mobile Apps via USB in the Mobile Apps Settings tile.
4. Select the apps option on the feature bar.
5. Select the navigation app that you want to use on the touchscreen.
Note: When using a navigation app, keep
your device unlocked and the app open.
SiriusXM Traffic and T ravel Link (If
Equipped)
WARNING: Driving while distracted
can result in loss of vehicle control, crash
and injury. We strongly recommend that
you use extreme caution when using any
device that may take your focus off the
road. Your primary responsibility is the
safe operation of your vehicle. We
recommend against the use of any
hand-held device while driving and
encourage the use of voice-operated
systems when possible. Make sure you
are aware of all applicable local laws
that may affect the use of electronic
devices while driving.
Note: SiriusXM Traffic and Travel Link may
not be available in all markets.
Note: In order to use SiriusXM Traffic and
Travel Link, your vehicle must have
navigation.
Note: A paid subscription is required to
access and use these features. Go to
www.siriusxm.com/travellink for more
information.
Note: Visit www.siriusxm.com/traffic and
click on Coverage map and details for a
complete listing of all traffic areas covered
by SiriusXM Traffic and Travel Link.
Note: Neither Sirius nor Ford is responsible
for any errors or inaccuracies in the SiriusXM
Traffic and Travel Link services or its use in
vehicles.
When you subscribe to SiriusXM Traffic
and Travel Link, it can help you locate the
best gas prices, find movie listings, get
current traffic alerts, view the current
weather map, get accurate ski conditions
and see scores to current sports games.
Action and Description
Menu Item
Touch these buttons to identify traffic incidents on your route,
near your vehicle’s current location or near any of your favorite
places, if programmed.
Traffic on Route
Traffic Nearby
Touch this button to view fuel prices at stations close to your
vehicle’s location or on an active navigation route.
Fuel Prices
Touch this button to view nearby movie theaters and their
show times, if available.
Movie Listings
463
SYNC™ 3 (If Equipped)
Page 467 of 585
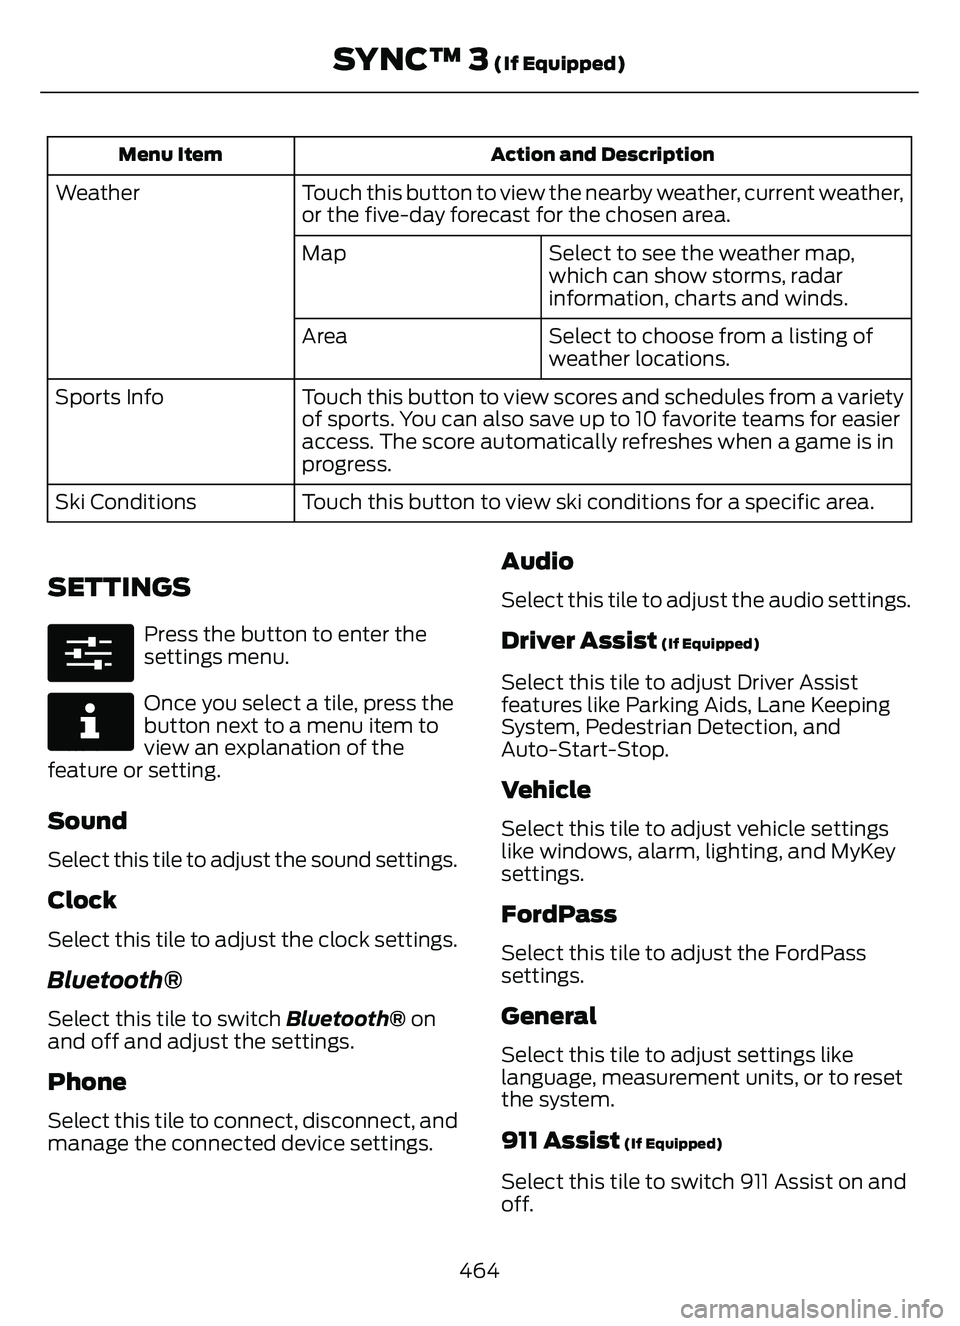
Action and Description
Menu Item
Touch this button to view the nearby weather, current weather,
or the five-day forecast for the chosen area.
Weather
Select to see the weather map,
which can show storms, radar
information, charts and winds.
Map
Select to choose from a listing of
weather locations.
Area
Touch this button to view scores and schedules from a variety
of sports. You can also save up to 10 favorite teams for easier
access. The score automatically refreshes when a game is in
progress.
Sports Info
Touch this button to view ski conditions for a specific area.
Ski Conditions
SETTINGS
E280315
Press the button to enter the
settings menu.
E268570
Once you select a tile, press the
button next to a menu item to
view an explanation of the
feature or setting.
Sound
Select this tile to adjust the sound settings.
Clock
Select this tile to adjust the clock settings.
Bluetooth®
Select this tile to switch Bluetooth® on
and off and adjust the settings.
Phone
Select this tile to connect, disconnect, and
manage the connected device settings.
Audio
Select this tile to adjust the audio settings.
Driver Assist (If Equipped)
Select this tile to adjust Driver Assist
features like Parking Aids, Lane Keeping
System, Pedestrian Detection, and
Auto-Start-Stop.
Vehicle
Select this tile to adjust vehicle settings
like windows, alarm, lighting, and MyKey
settings.
FordPass
Select this tile to adjust the FordPass
settings.
General
Select this tile to adjust settings like
language, measurement units, or to reset
the system.
911 Assist (If Equipped)
Select this tile to switch 911 Assist on and
off.
464
SYNC™ 3 (If Equipped)
Page 468 of 585
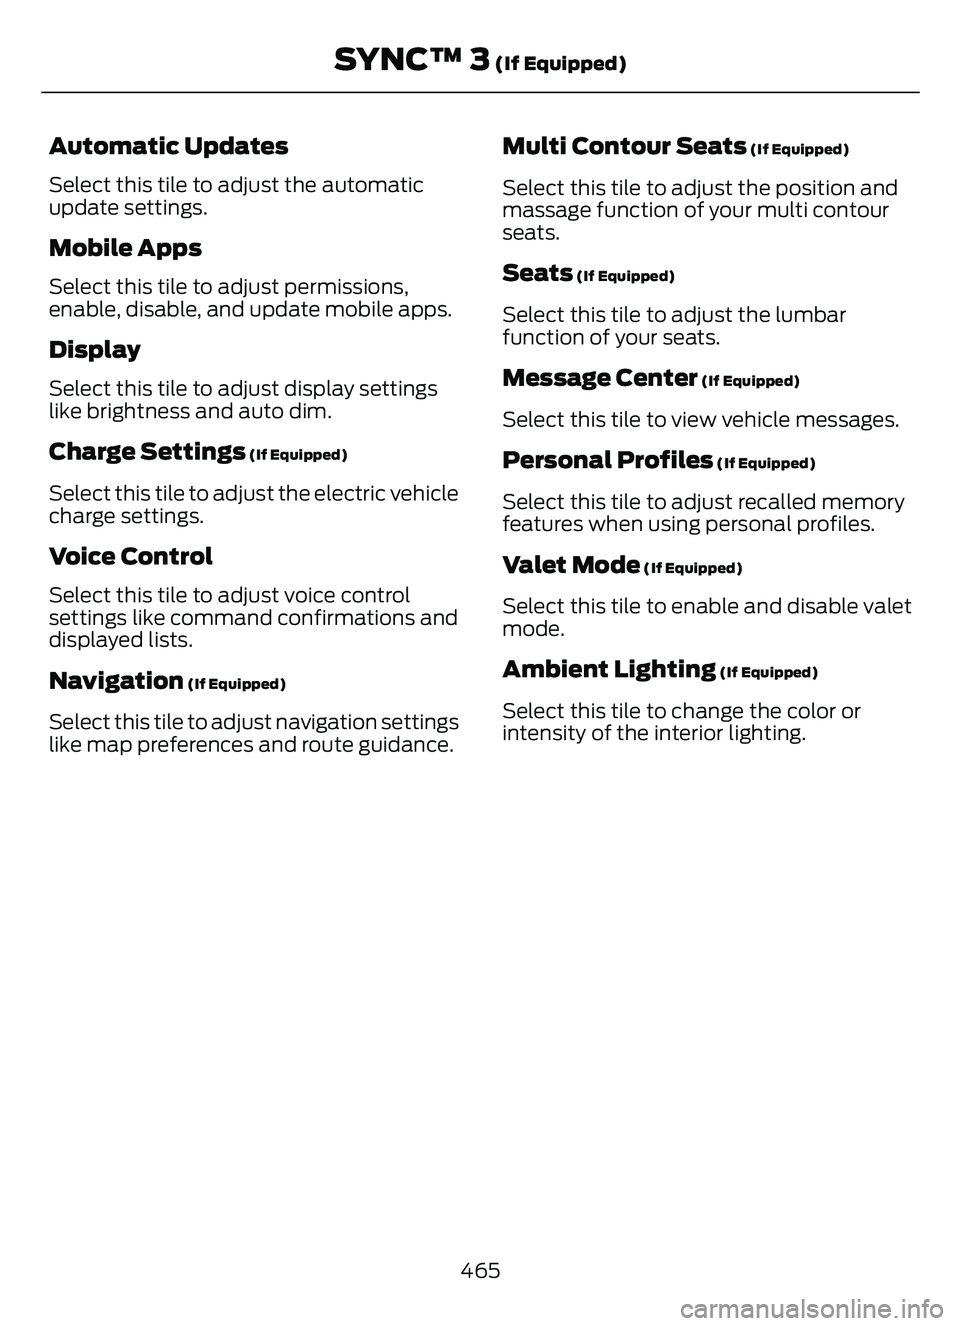
Automatic Updates
Select this tile to adjust the automatic
update settings.
Mobile Apps
Select this tile to adjust permissions,
enable, disable, and update mobile apps.
Display
Select this tile to adjust display settings
like brightness and auto dim.
Charge Settings (If Equipped)
Select this tile to adjust the electric vehicle
charge settings.
Voice Control
Select this tile to adjust voice control
settings like command confirmations and
displayed lists.
Navigation (If Equipped)
Select this tile to adjust navigation settings
like map preferences and route guidance.
Multi Contour Seats (If Equipped)
Select this tile to adjust the position and
massage function of your multi contour
seats.
Seats (If Equipped)
Select this tile to adjust the lumbar
function of your seats.
Message Center (If Equipped)
Select this tile to view vehicle messages.
Personal Profiles (If Equipped)
Select this tile to adjust recalled memory
features when using personal profiles.
Valet Mode (If Equipped)
Select this tile to enable and disable valet
mode.
Ambient Lighting (If Equipped)
Select this tile to change the color or
intensity of the interior lighting.
465
SYNC™ 3 (If Equipped)
Page 469 of 585
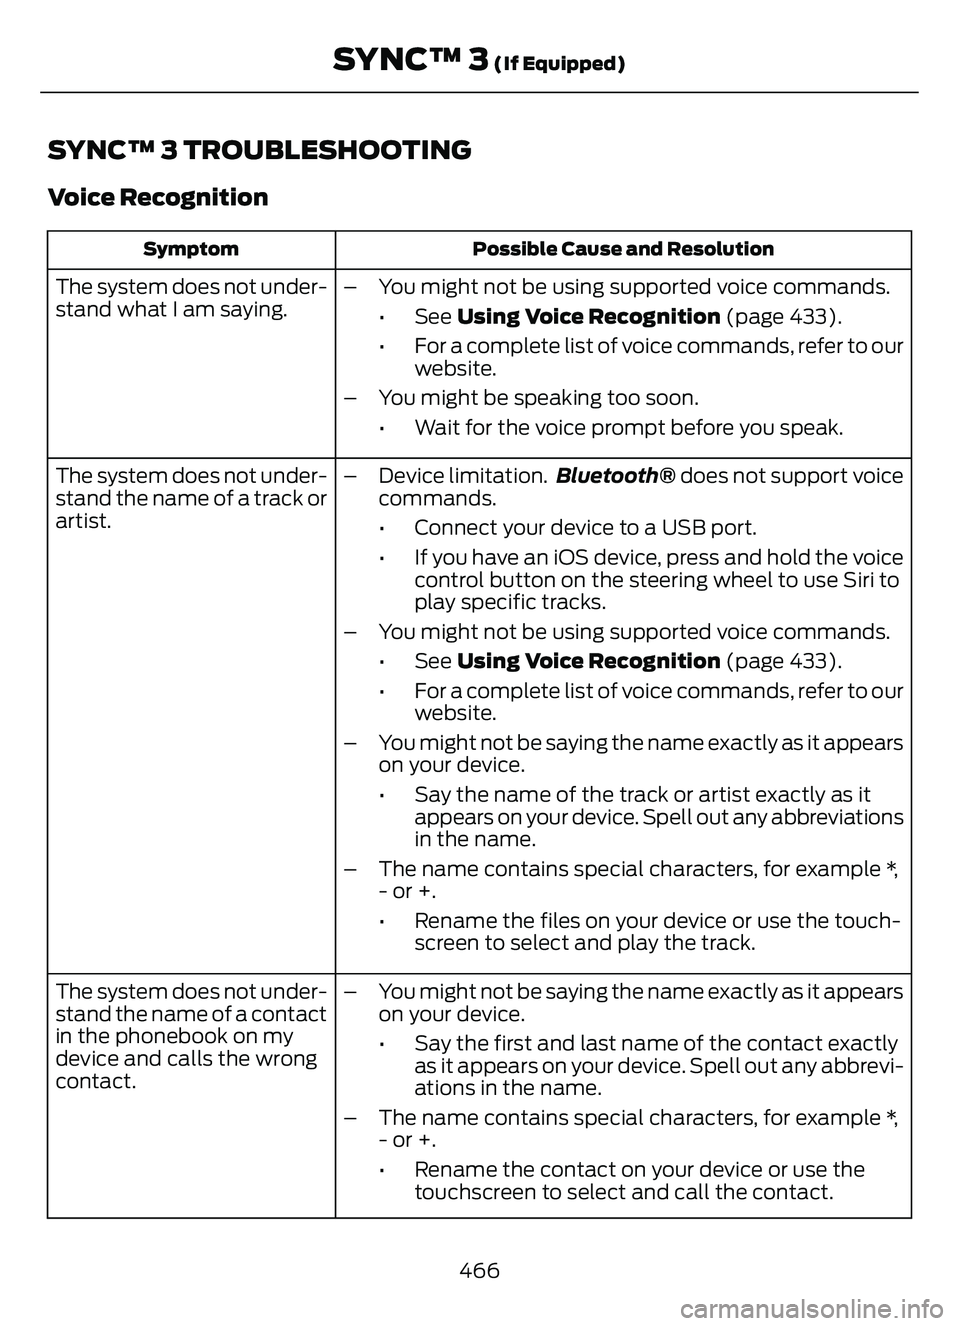
SYNC™ 3 TROUBLESHOOTING
Voice Recognition
Possible Cause and Resolution
Symptom
The system does not under-
stand what I am saying. – You might not be using supported voice commands.
•See Using Voice Recognition (page 433).
• For a complete list of voice commands, refer to our website.
– You might be speaking too soon. • Wait for the voice prompt before you speak.
The system does not under-
stand the name of a track or
artist. – Device limitation.
Bluetooth® does not support voice
commands.
• Connect your device to a USB port.
• If you have an iOS device, press and hold the voice control button on the steering wheel to use Siri to
play specific tracks.
– You might not be using supported voice commands. •See Using Voice Recognition (page 433).
• For a complete list of voice commands, refer to our website.
– You might not be saying the name exactly as it appears on your device.
• Say the name of the track or artist exactly as itappears on your device. Spell out any abbreviations
in the name.
– The name contains special characters, for example *, - or +.
• Rename the files on your device or use the touch-screen to select and play the track.
The system does not under-
stand the name of a contact
in the phonebook on my
device and calls the wrong
contact. – You might not be saying the name exactly as it appears
on your device.
• Say the first and last name of the contact exactlyas it appears on your device. Spell out any abbrevi-
ations in the name.
– The name contains special characters, for example *, - or +.
• Rename the contact on your device or use thetouchscreen to select and call the contact.
466
SYNC™ 3 (If Equipped)
Page 470 of 585
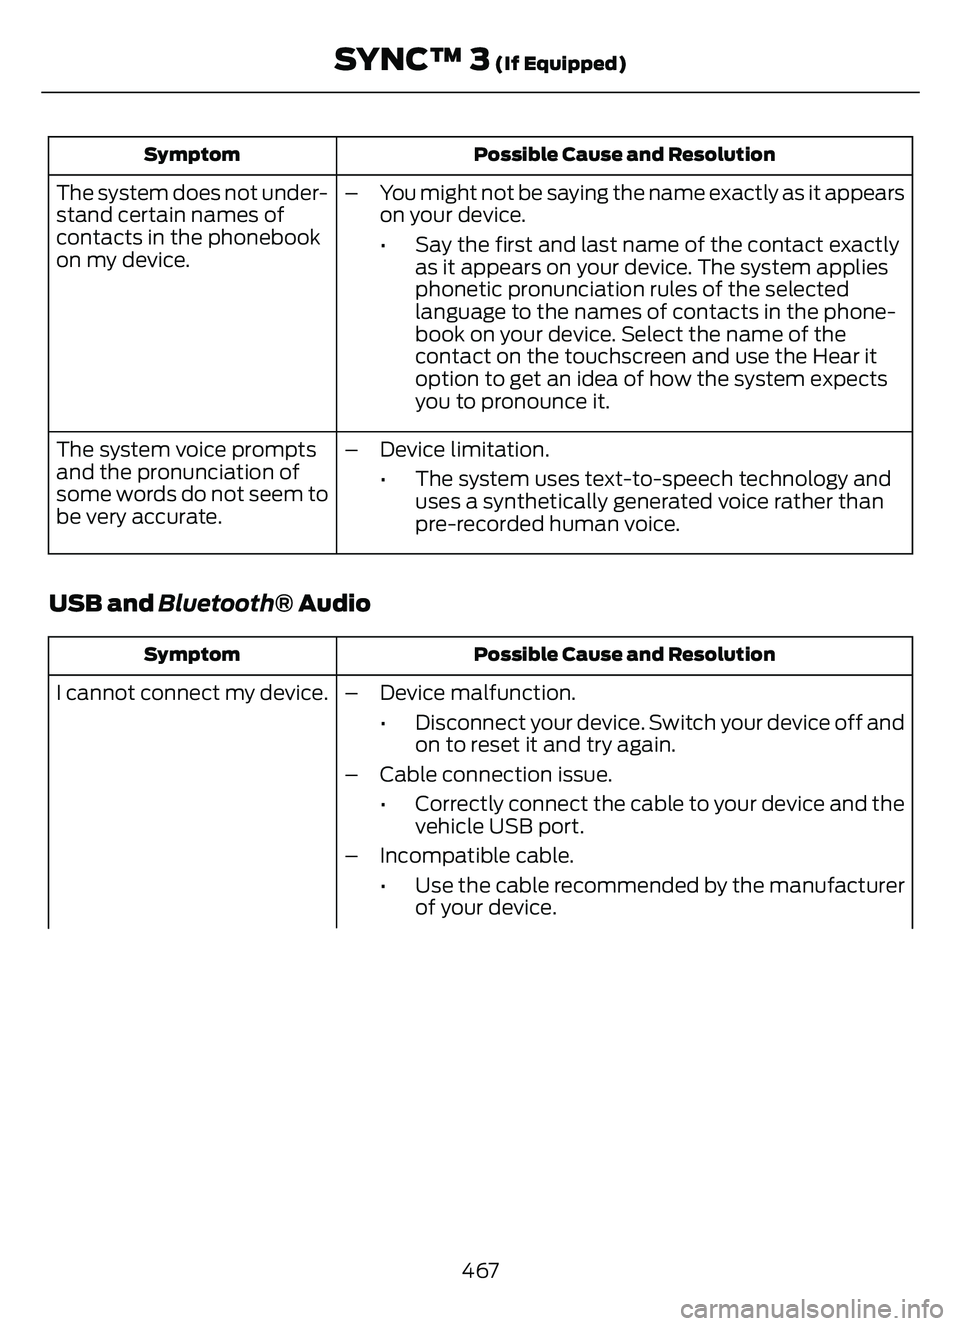
Possible Cause and Resolution
Symptom
– You might not be saying the name exactly as it appears
on your device.
• Say the first and last name of the contact exactlyas it appears on your device. The system applies
phonetic pronunciation rules of the selected
language to the names of contacts in the phone-
book on your device. Select the name of the
contact on the touchscreen and use the Hear it
option to get an idea of how the system expects
you to pronounce it.
The system does not under-
stand certain names of
contacts in the phonebook
on my device.
– Device limitation.• The system uses text-to-speech technology anduses a synthetically generated voice rather than
pre-recorded human voice.
The system voice prompts
and the pronunciation of
some words do not seem to
be very accurate.
USB and Bluetooth® Audio
Possible Cause and Resolution
Symptom
I cannot connect my device. – Device malfunction.
• Disconnect your device. Switch your device off andon to reset it and try again.
– Cable connection issue. • Correctly connect the cable to your device and thevehicle USB port.
– Incompatible cable. • Use the cable recommended by the manufacturerof your device.
467
SYNC™ 3 (If Equipped)