display FORD ESCAPE 2022 Workshop Manual
[x] Cancel search | Manufacturer: FORD, Model Year: 2022, Model line: ESCAPE, Model: FORD ESCAPE 2022Pages: 585, PDF Size: 6.15 MB
Page 216 of 585
WARNING: If the parking brake is
fully released, but the brake warning
lamp remains illuminated, the brakes
may not be working properly. Have your
vehicle checked as soon as possible.
WARNING: Do not drive your
vehicle until you verify that the
stoplamps are working.
USING MANUAL PARK RELEASE
Activating the Manual Park Release
Cable
1. Apply the parking brake. See What Is
the Electric Parking Brake (page 220).
Note: If the vehicle battery is dead, for
example, no electrical power is available,
you could use an external power source to
apply the parking brake.
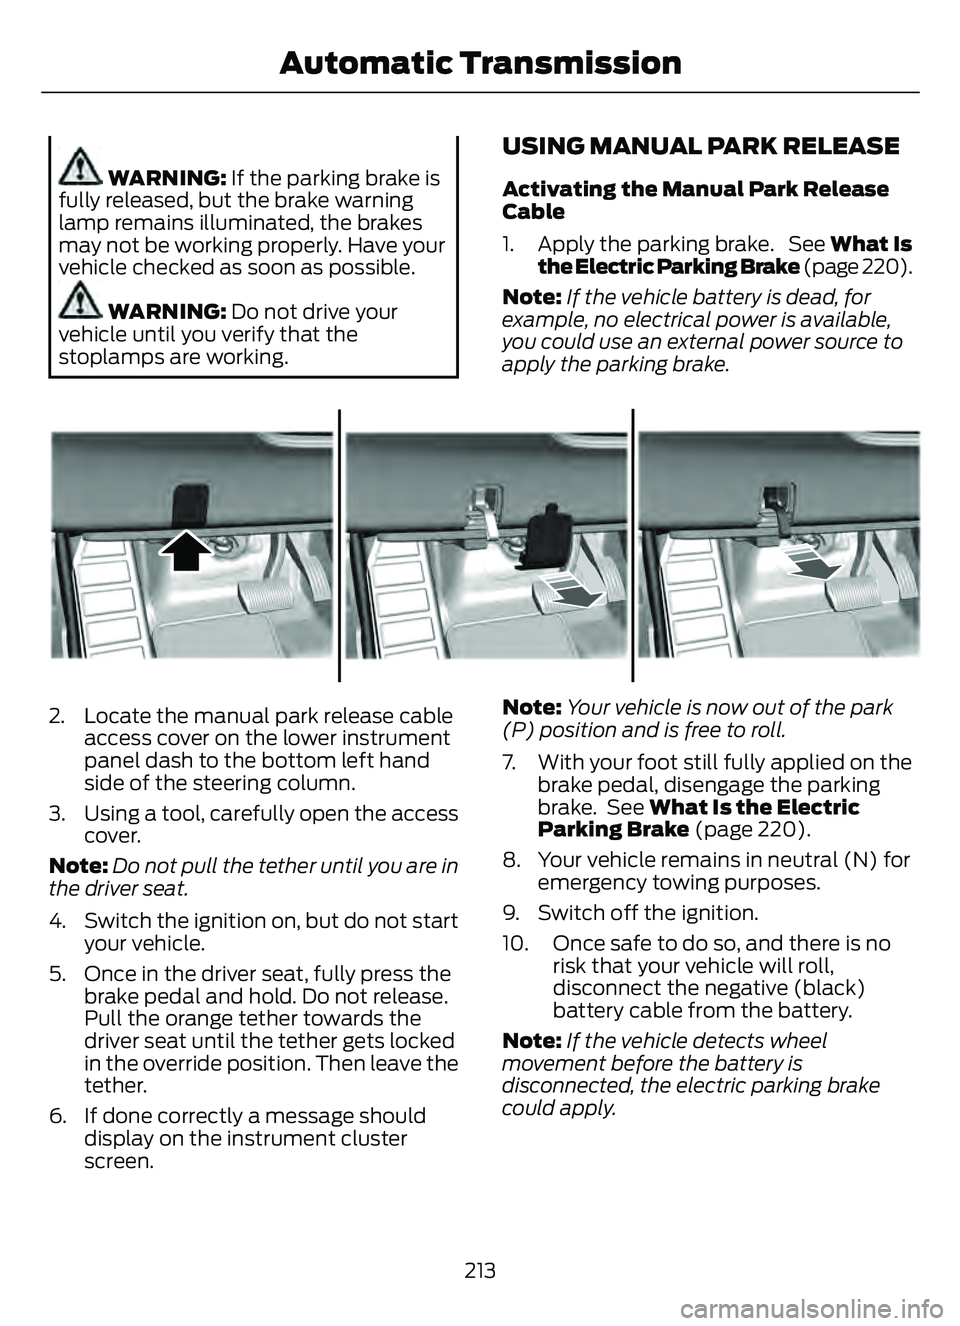
E307867E307867
2. Locate the manual park release cable access cover on the lower instrument
panel dash to the bottom left hand
side of the steering column.
3. Using a tool, carefully open the access cover.
Note: Do not pull the tether until you are in
the driver seat.
4. Switch the ignition on, but do not start your vehicle.
5. Once in the driver seat, fully press the brake pedal and hold. Do not release.
Pull the orange tether towards the
driver seat until the tether gets locked
in the override position. Then leave the
tether.
6. If done correctly a message should display on the instrument cluster
screen. Note:
Your vehicle is now out of the park
(P) position and is free to roll.
7. With your foot still fully applied on the brake pedal, disengage the parking
brake. See What Is the Electric
Parking Brake (page 220).
8. Your vehicle remains in neutral (N) for emergency towing purposes.
9. Switch off the ignition.
10. Once safe to do so, and there is no risk that your vehicle will roll,
disconnect the negative (black)
battery cable from the battery.
Note: If the vehicle detects wheel
movement before the battery is
disconnected, the electric parking brake
could apply.
213
Automatic Transmission
Page 217 of 585
Returning Your Vehicle to Normal
Mode
1. Once it is safe to do so, reconnect thenegative (black) battery cable to the
battery.
2. Apply the parking brake. See What Is
the Electric Parking Brake (page 220).
Note: If the vehicle battery is dead, for
example, no electrical power is available,
you could use an external power source to
apply the parking brake.
3. Fully apply the brake pedal and hold. Do not release. Pull the orange tether
outward towards the driver seat to
release it from the override position.
4. The cable will release and retract back to its original rest position.
5. Stow the manual park release cable tether back inside the instrument panel
dash hole, install the access cover by
pressing it back in position.
6. With your foot fully applied on the brake pedal, start your vehicle. Confirm
that your vehicle is in the park (P)
position and that the instrument
cluster indicates park (P).
7. If the instrument cluster is not displaying the park (P) position or a
message displays on the instrument
cluster screen, make sure you apply the
parking brake before exiting your
vehicle. Contact an authorized dealer
for service.
AUTOMATIC TRANSMISSION
AUDIBLE WARNINGS
Transmission Not In Park (P)
Audible Warning
Sounds if you open the driver door before
shifting into park (P).
AUTOMATIC TRANSMISSION
– TROUBLESHOOTING
AUTOMATIC TRANSMISSION –
INFORMATION MESSAGES
Description
Message
The electric parking
brake is not fully applied.
Park Brake Not
Applied
A reminder to shiftinto park. In addi-
tion, this message is typically afterreconnecting or recharging the
battery until you
cycle the ignition to the on mode.
Transmission Not in
Park
Displays when
there is a system
fault and the park
brake needs to be depressed before
exiting the vehicle.
See your authorized dealer.
SHIFT SYS FAULT
Apply Park Brake
Before Exiting the Vehicle
The system has
detected a fault that requires
service. Have your
vehicle checked as soon as possible.
Transmission
Malfunction Service Now
214
Automatic Transmission
Page 218 of 585
Description
Message
Displays when you
shift into neutral (N).
Select L To Confirm
Stay In Neutral Mode
Displays to confirmthat your vehicle
has entered Stay in Neutral Mode.
Stay in Neutral
Mode Engaged
The system has
detected a fault that requires
service. Have your
vehicle checked as soon as possible.
Select M To
Confirm Stay In Neutral Mode
215
Automatic Transmission
Page 226 of 585
WHAT IS HILL START ASSIST
Hill Start Assist makes it easier for you to
pull away when your vehicle is on a slope
without using the parking brake.
HOW DOES HILL START
ASSIST WORK
When the system activates, your vehicle
remains stationary for a few seconds after
you release the brake pedal. This gives you
time to move your foot from the brake
pedal to the accelerator pedal. The brakes
release when the engine has developed
sufficient torque to prevent your vehicle
from rolling down the slope.
HILL START ASSIST
PRECAUTIONS
WARNING: The system does not
replace the parking brake. When you
leave your vehicle, always apply the
parking brake.
WARNING: You must remain in
your vehicle when the system turns on.
At all times, you are responsible for
controlling your vehicle, supervising the
system and intervening, if required.
Failure to take care may result in the loss
of control of your vehicle, serious
personal injury or death.
WARNING: The system will turn
off if a malfunction is apparent. Failure
to take care may result in the loss of
control of your vehicle, serious personal
injury or death.
HILL START ASSIST –
TROUBLESHOOTING
HILL START ASSIST –
INFORMATION MESSAGES
Action
Message
Displays when
system is not avail- able. Have your
vehicle checked as soon as possible.
Hill Start Assist Not
Available
223
Hill Start Assist
Page 227 of 585
HOW DOES AUTO HOLD WORK
Auto Hold applies the brakes to hold your
vehicle after you stop it and release the
brake pedal. This can help when waiting
on a hill or in traffic.
SWITCHING AUTO HOLD ON
AND OFF
WARNING: The system does not
replace the parking brake. When you
leave your vehicle, always apply the
parking brake.
WARNING: You must remain in
your vehicle when the system turns on.
At all times, you are responsible for
controlling your vehicle, supervising the
system and intervening, if required.
Failure to take care may result in the loss
of control of your vehicle, serious
personal injury or death.
You can switch the system on or off by
accessing the menu in the SYNC display
screen.
1. Press Features on the touchscreen.
2. Press Driver Assistance.
Note: You can only switch the system on
after you close the driver door, and fasten
your seatbelt.
Note: The system remembers the last
setting when you start your vehicle.
Note: Make sure you switch the system off
before using an automatic car wash.
USING AUTO HOLD
1. Bring your vehicle to a complete stop. The auto hold active indicator
illuminates in the information display. 2. Release the brake pedal. The system
holds your vehicle at a standstill. The
auto hold active indicator remains
illuminated in the information display.
3. Pull away in the normal manner. The system releases the brakes and the
auto hold active indicator switches off.
Note: The system only activates if you
apply enough brake pressure on the brake
pedal.
Note: Under certain conditions, the system
could apply the electric parking brake. The
brake system warning lamp illuminates. The
electric parking brake releases when you
press the accelerator pedal. See
Automatically Releasing the Electric
Parking Brake (page 221).
Note: The system switches off if you shift
into reverse (R) and press the brake pedal.
There could be actions that can cause the
auto hold system not to work when the
following occur:
• When you use active park assist.
• Your vehicle is in stay in neutral mode.
• The driver door is open.
• You have not fastened your seatbelt.
• You shift into reverse (R) before the system is active.
AUTO HOLD INDICATORS
E323448Illuminates when the system is
active.
E323449Illuminates when the system is
on but cannot hold your vehicle
at a standstill at this particular
time.
224
Auto Hold
Page 228 of 585
HOW DOES TRACTION
CONTROL WORK
If your vehicle begins to slide, the system
applies the brakes to individual wheels
and, when needed, reduces power at the
same time. If the wheels spin when
accelerating on slippery or loose surfaces,
the system reduces power in order to
increase traction.
SWITCHING TRACTION
CONTROL ON AND OFF
WARNING: The stability and
traction control light illuminates steadily
if the system detects a failure. Make sure
you did not manually disable the traction
control system using the information
display controls or the switch. If the
stability control and traction control light
is still illuminating steadily, have the
system serviced by an authorized dealer
immediately. Operating your vehicle with
the traction control disabled could lead
to an increased risk of loss of vehicle
control, vehicle rollover, personal injury
and death.
The traction control system turns on each
time you switch the power on.
If your vehicle is stuck in mud or snow,
switching traction control off may be
beneficial as this allows the wheels to spin. Note:
When you switch traction control off,
stability control remains fully active.
Your vehicle could have MyKey restrictions
regarding this feature. See What Is
MyKey (page 64).
TRACTION CONTROL
INDICATOR
E138639
E130458
TRACTION CONTROL –
TROUBLESHOOTING
TRACTION CONTROL – WARNING
LAMPS
System Messages
E138639
The traction control light
temporarily illuminates on
start-up and flashes when
activated by a driving condition.
The traction control off light temporarily
illuminates on start-up and stays on:
• When you switch the traction control system off.
• When you select an alternative stability control mode.
• If a problem occurs in the system.
225
Traction Control
Page 232 of 585
ELECTRIC POWER STEERING
ELECTRIC POWER STEERING
PRECAUTIONS
WARNING: The electric power
steering system has diagnostic checks
that continuously monitor the system. If
a fault is detected, a message displays
in the information display. Stop your
vehicle as soon as it is safe to do so.
Switch the vehicle off. After at least 10
seconds, switch the vehicle on and
watch the information display for a
steering system warning message. If a
steering system warning message
returns, have the system checked as
soon as possible.
WARNING: If the system detects
an error, you may not feel a difference in
the steering, however a serious condition
may exist. Have your vehicle checked as
soon as possible. Failure to do so may
result in loss of steering control.
Adapt your speed and driving behavior
according to reduced steering assist.
Extreme continuous steering may increase
the effort to steer. This occurs to prevent
internal overheating and damage to the
steering system. If this occurs, you will not
lose the ability to steer your vehicle
manually nor will it cause damage to the
system. Normal steering and driving allows
the system to cool down and steering
assist returns to normal.
Note: There is no fluid reservoir to check or
fill.
STEERING – TROUBLESHOOTING
STEERING – INFORMATION MESSAGES
Action
Message
The power steering system has detected a
condition that requires service. Have your vehicle checked as soon as possible.
Steering Fault Service Now
The power steering system is not working.
Stop your vehicle in a safe place. Have your vehicle checked as soon as possible.
Steering Loss Stop Safely
The power steering system has detected acondition that requires service. Have your vehicle checked as soon as possible.
Steering Assist Fault Service Required
The steering system has detected a condi-
tion that requires service. Have your vehiclechecked as soon as possible.
Steering Lock Malfunction Service Now
229
Steering
Page 236 of 585
If the transmission is in reverse (R), the side
sensing system provides audible warnings.
When your vehicle is moving slowly,
obstacles are detected within 24 in
(60 cm) and are inside the driving path of
your vehicle. Once your vehicle reaches a
standstill condition, the audible warning
stops after a few seconds. Visual indication
is always present in reverse (R).
If your vehicle is in neutral (N), the side
sensing system provides visual indication
only when your vehicle is moving slowly
and there is a front or rear park aid
obstacle detected, and the side obstacle
is within 24 in (60 cm) from the side of
your vehicle. Once your vehicle reaches a
stop, the visual indication stops after a few
seconds.
If the transmission is in drive (D) or any
other forward gear, the side sensing system
provides audible and visual warnings.
When your vehicle is moving slowly,
obstacles are detected within 24 in
(60 cm) and are inside the driving path of
your vehicle. Once your vehicle reaches a
standstill condition, the audible warning
and visual indication stops after a few
seconds.
LOCATING THE SIDE PARKING AID
SENSORS
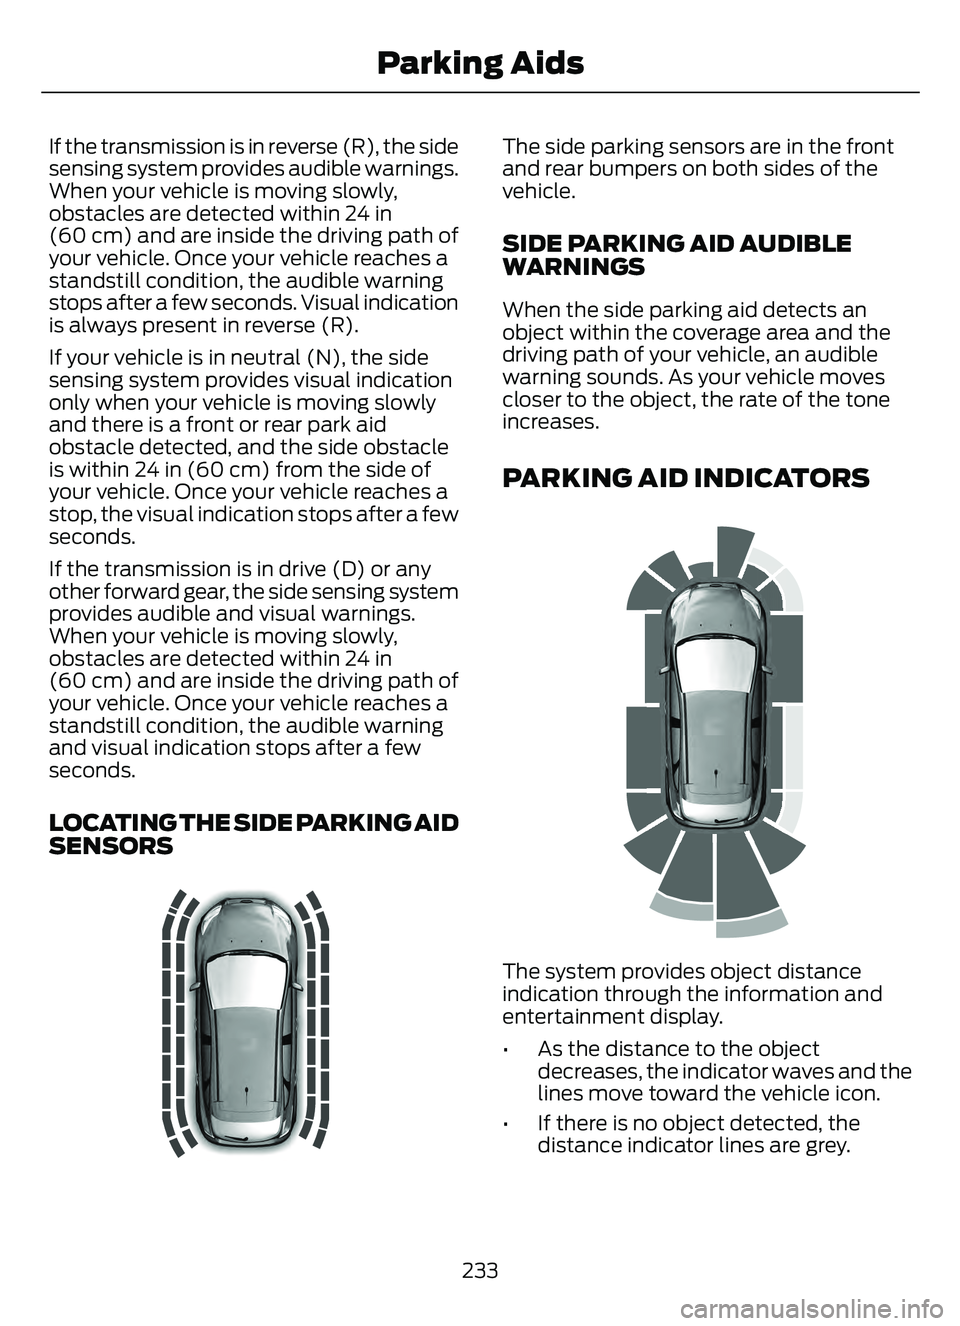
The side parking sensors are in the front
and rear bumpers on both sides of the
vehicle.
SIDE PARKING AID AUDIBLE
WARNINGS
When the side parking aid detects an
object within the coverage area and the
driving path of your vehicle, an audible
warning sounds. As your vehicle moves
closer to the object, the rate of the tone
increases.
PARKING AID INDICATORS
E190459
The system provides object distance
indication through the information and
entertainment display.
• As the distance to the objectdecreases, the indicator waves and the
lines move toward the vehicle icon.
• If there is no object detected, the distance indicator lines are grey.
233
Parking Aids
Page 237 of 585
Visual indication remains on when your
vehicle is in reverse (R). In any other gear,
when you stop your vehicle, visual
indication turns off after four seconds.
If the parking aids are not available, the
side distance indicator lines do not display.PARKING AIDS –
TROUBLESHOOTING
PARKING AIDS – INFORMATION
MESSAGES
If a fault is present in the parking aids, a
warning message appears in the
instrument cluster or the information and
entertainment display.
Action
Message
The system detects a condition that
requires service. Have your vehicle checked as soon as possible.
Check Front Park Aid
The system detects a condition that
requires service. Have your vehicle checked as soon as possible.
Check Rear Park Aid
Displays the park aid status.
Front Park Aid On Off
Displays the park aid status.
Rear Park Aid On Off
234
Parking Aids
Page 239 of 585
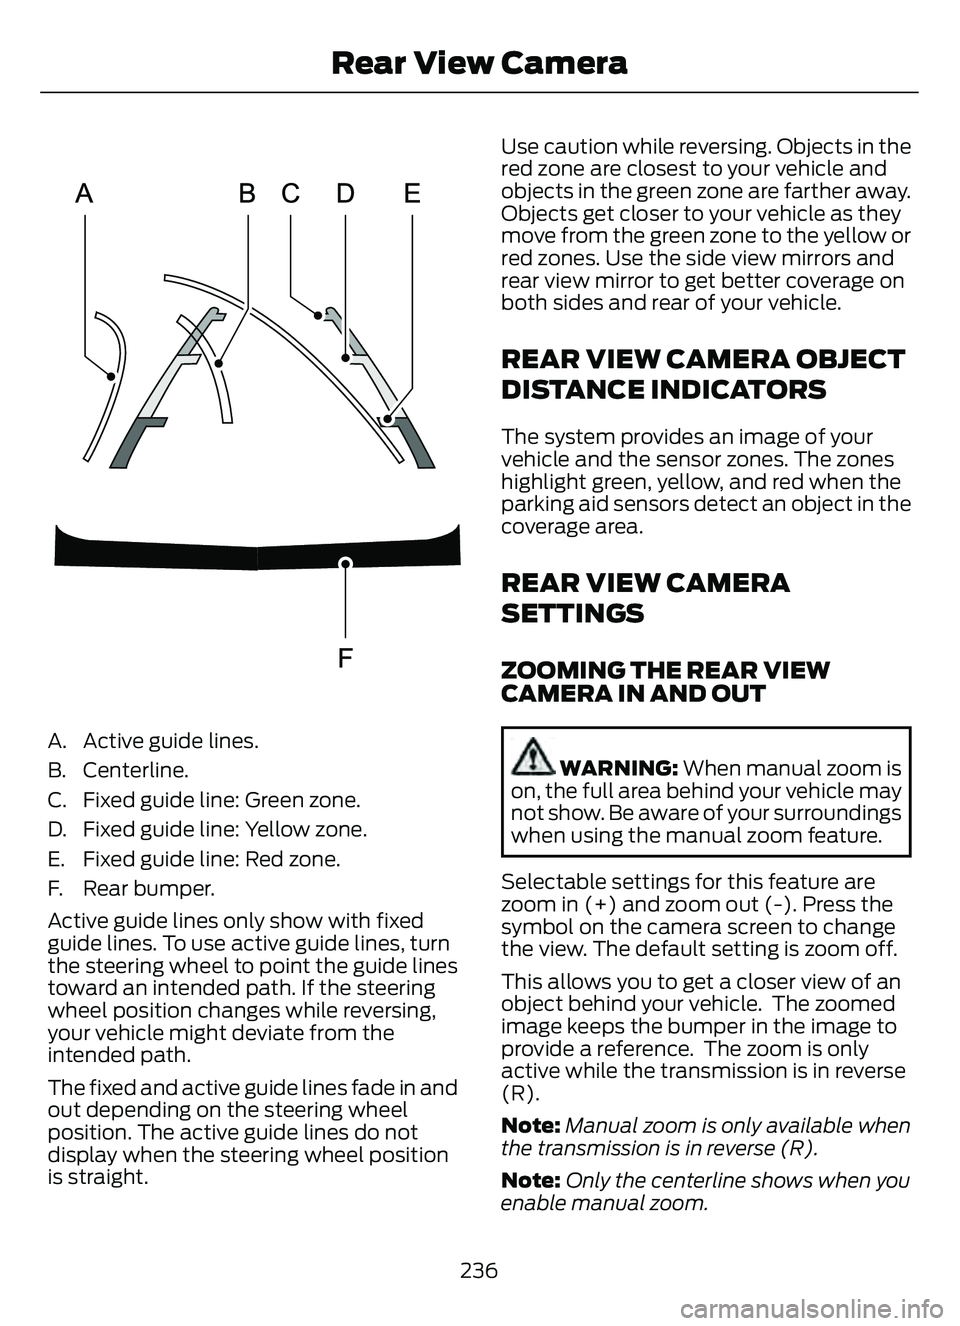
A. Active guide lines.
B. Centerline.
C. Fixed guide line: Green zone.
D. Fixed guide line: Yellow zone.
E. Fixed guide line: Red zone.
F. Rear bumper.
Active guide lines only show with fixed
guide lines. To use active guide lines, turn
the steering wheel to point the guide lines
toward an intended path. If the steering
wheel position changes while reversing,
your vehicle might deviate from the
intended path.
The fixed and active guide lines fade in and
out depending on the steering wheel
position. The active guide lines do not
display when the steering wheel position
is straight.Use caution while reversing. Objects in the
red zone are closest to your vehicle and
objects in the green zone are farther away.
Objects get closer to your vehicle as they
move from the green zone to the yellow or
red zones. Use the side view mirrors and
rear view mirror to get better coverage on
both sides and rear of your vehicle.
REAR VIEW CAMERA OBJECT
DISTANCE INDICATORS
The system provides an image of your
vehicle and the sensor zones. The zones
highlight green, yellow, and red when the
parking aid sensors detect an object in the
coverage area.
REAR VIEW CAMERA
SETTINGS
ZOOMING THE REAR VIEW
CAMERA IN AND OUT
WARNING:
When manual zoom is
on, the full area behind your vehicle may
not show. Be aware of your surroundings
when using the manual zoom feature.
Selectable settings for this feature are
zoom in (+) and zoom out (-). Press the
symbol on the camera screen to change
the view. The default setting is zoom off.
This allows you to get a closer view of an
object behind your vehicle. The zoomed
image keeps the bumper in the image to
provide a reference. The zoom is only
active while the transmission is in reverse
(R).
Note: Manual zoom is only available when
the transmission is in reverse (R).
Note: Only the centerline shows when you
enable manual zoom.
236
Rear View Camera