FORD EXCURSION 2000 1.G Owners Manual
Manufacturer: FORD, Model Year: 2000, Model line: EXCURSION, Model: FORD EXCURSION 2000 1.GPages: 232, PDF Size: 2.01 MB
Page 141 of 232
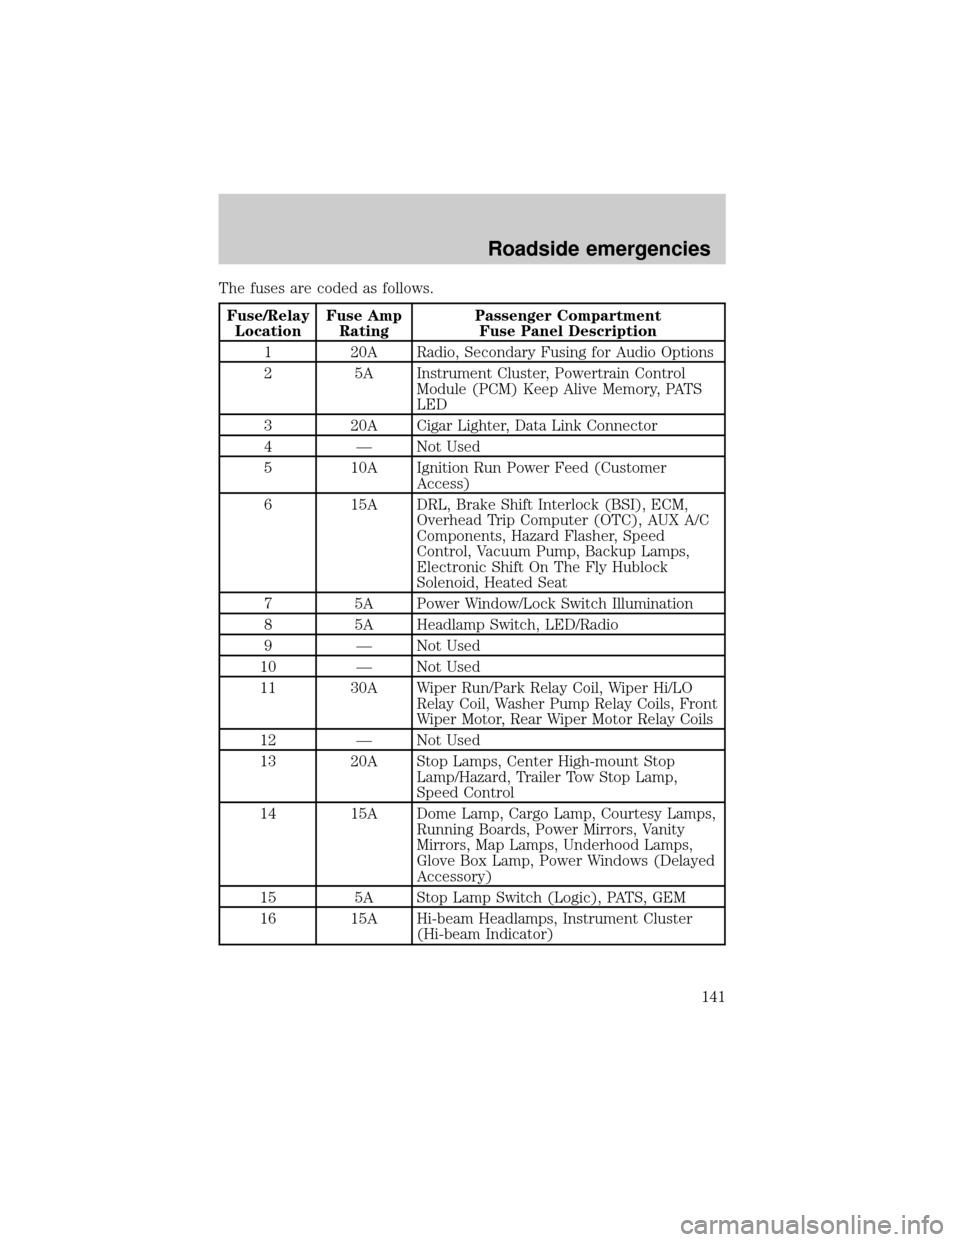
The fuses are coded as follows.
Fuse/Relay
LocationFuse Amp
RatingPassenger Compartment
Fuse Panel Description
1 20A Radio, Secondary Fusing for Audio Options
2 5A Instrument Cluster, Powertrain Control
Module (PCM) Keep Alive Memory, PATS
LED
3 20A Cigar Lighter, Data Link Connector
4 Ð Not Used
5 10A Ignition Run Power Feed (Customer
Access)
6 15A DRL, Brake Shift Interlock (BSI), ECM,
Overhead Trip Computer (OTC), AUX A/C
Components, Hazard Flasher, Speed
Control, Vacuum Pump, Backup Lamps,
Electronic Shift On The Fly Hublock
Solenoid, Heated Seat
7 5A Power Window/Lock Switch Illumination
8 5A Headlamp Switch, LED/Radio
9 Ð Not Used
10 Ð Not Used
11 30A Wiper Run/Park Relay Coil, Wiper Hi/LO
Relay Coil, Washer Pump Relay Coils, Front
Wiper Motor, Rear Wiper Motor Relay Coils
12 Ð Not Used
13 20A Stop Lamps, Center High-mount Stop
Lamp/Hazard, Trailer Tow Stop Lamp,
Speed Control
14 15A Dome Lamp, Cargo Lamp, Courtesy Lamps,
Running Boards, Power Mirrors, Vanity
Mirrors, Map Lamps, Underhood Lamps,
Glove Box Lamp, Power Windows (Delayed
Accessory)
15 5A Stop Lamp Switch (Logic), PATS, GEM
16 15A Hi-beam Headlamps, Instrument Cluster
(Hi-beam Indicator)
Roadside emergencies
141
Page 142 of 232
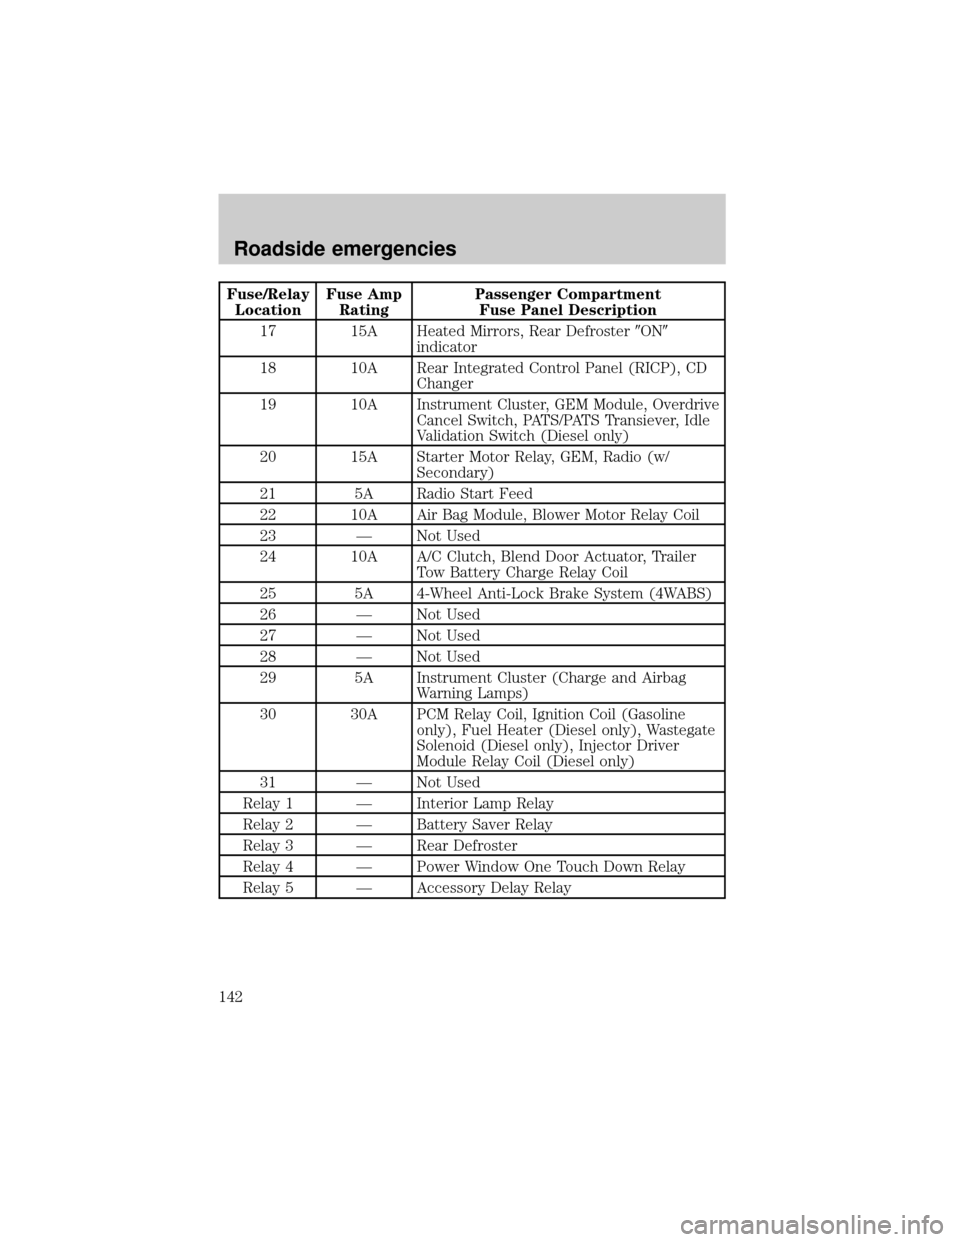
Fuse/Relay
LocationFuse Amp
RatingPassenger Compartment
Fuse Panel Description
17 15A Heated Mirrors, Rear Defroster9ON9
indicator
18 10A Rear Integrated Control Panel (RICP), CD
Changer
19 10A Instrument Cluster, GEM Module, Overdrive
Cancel Switch, PATS/PATS Transiever, Idle
Validation Switch (Diesel only)
20 15A Starter Motor Relay, GEM, Radio (w/
Secondary)
21 5A Radio Start Feed
22 10A Air Bag Module, Blower Motor Relay Coil
23 Ð Not Used
24 10A A/C Clutch, Blend Door Actuator, Trailer
Tow Battery Charge Relay Coil
25 5A 4-Wheel Anti-Lock Brake System (4WABS)
26 Ð Not Used
27 Ð Not Used
28 Ð Not Used
29 5A Instrument Cluster (Charge and Airbag
Warning Lamps)
30 30A PCM Relay Coil, Ignition Coil (Gasoline
only), Fuel Heater (Diesel only), Wastegate
Solenoid (Diesel only), Injector Driver
Module Relay Coil (Diesel only)
31 Ð Not Used
Relay 1 Ð Interior Lamp Relay
Relay 2 Ð Battery Saver Relay
Relay 3 Ð Rear Defroster
Relay 4 Ð Power Window One Touch Down Relay
Relay 5 Ð Accessory Delay Relay
Roadside emergencies
142
Page 143 of 232
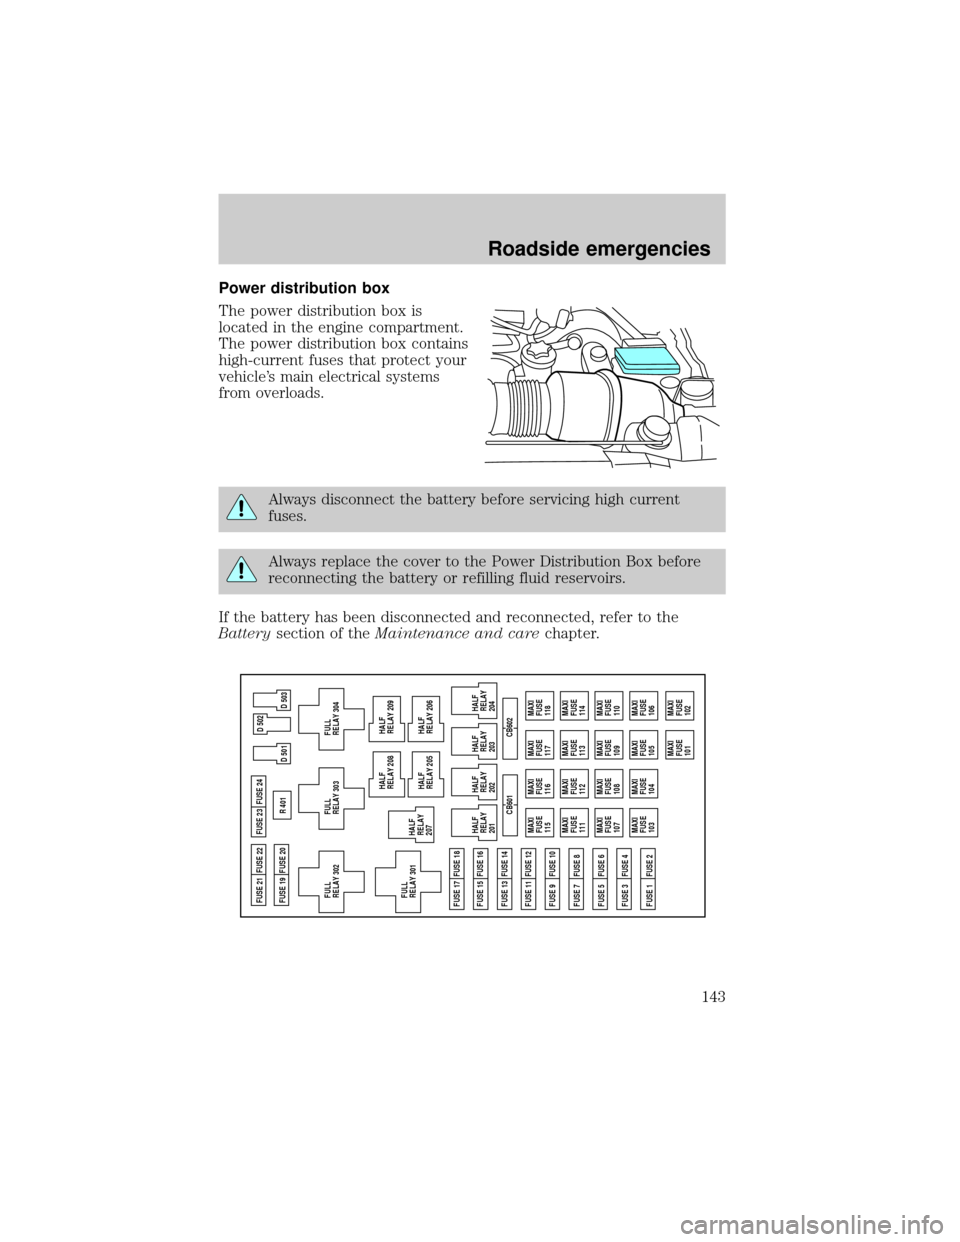
Power distribution box
The power distribution box is
located in the engine compartment.
The power distribution box contains
high-current fuses that protect your
vehicle's main electrical systems
from overloads.
Always disconnect the battery before servicing high current
fuses.
Always replace the cover to the Power Distribution Box before
reconnecting the battery or refilling fluid reservoirs.
If the battery has been disconnected and reconnected, refer to the
Batterysection of theMaintenance and carechapter.
MAXI
FUSE
115MAXI
FUSE
116MAXI
FUSE
117
MAXI
FUSE
118
MAXI
FUSE
111MAXI
FUSE
112MAXI
FUSE
113
MAXI
FUSE
114
MAXI
FUSE
107MAXI
FUSE
108MAXI
FUSE
109
MAXI
FUSE
110
MAXI
FUSE
103MAXI
FUSE
104MAXI
FUSE
105
MAXI
FUSE
106
MAXI
FUSE
101MAXI
FUSE
102 CB601 CB602 FUSE 17 FUSE 18FUSE 21 FUSE 22
FUSE 19 FUSE 20FUSE 23
FULL
RELAY 302R 401
D 501 FUSE 24
FUSE 15 FUSE 16
FUSE 13 FUSE 14
FUSE 11 FUSE 12
FUSE 9 FUSE 10
FUSE 7 FUSE 8
FUSE 5 FUSE 6
FUSE 3 FUSE 4
FUSE 1 FUSE 2
D 503 D 502
FULL
RELAY 301HALF
RELAY
207
FULL
RELAY 303
FULL
RELAY 304
HALF
RELAY
201
HALF
RELAY
202HALF
RELAY 208
HALF
RELAY 209
HALF
RELAY 205
HALF
RELAY 206
HALF
RELAY
203
HALF
RELAY
204
Roadside emergencies
143
Page 144 of 232
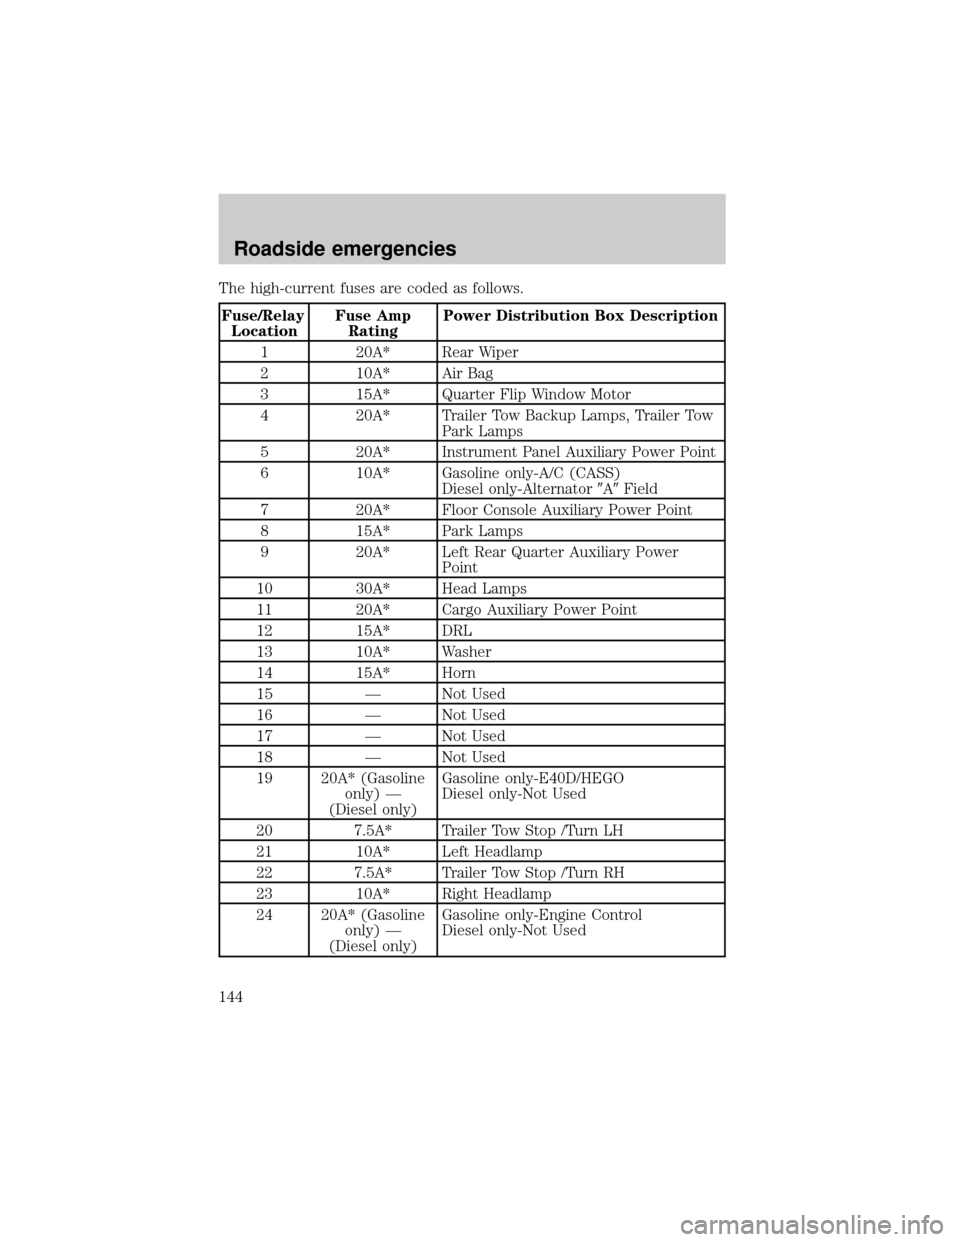
The high-current fuses are coded as follows.
Fuse/Relay
LocationFuse Amp
RatingPower Distribution Box Description
1 20A* Rear Wiper
2 10A* Air Bag
3 15A* Quarter Flip Window Motor
4 20A* Trailer Tow Backup Lamps, Trailer Tow
Park Lamps
5 20A* Instrument Panel Auxiliary Power Point
6 10A* Gasoline only-A/C (CASS)
Diesel only-Alternator9A9Field
7 20A* Floor Console Auxiliary Power Point
8 15A* Park Lamps
9 20A* Left Rear Quarter Auxiliary Power
Point
10 30A* Head Lamps
11 20A* Cargo Auxiliary Power Point
12 15A* DRL
13 10A* Washer
14 15A* Horn
15 Ð Not Used
16 Ð Not Used
17 Ð Not Used
18 Ð Not Used
19 20A* (Gasoline
only) Ð
(Diesel only)Gasoline only-E40D/HEGO
Diesel only-Not Used
20 7.5A* Trailer Tow Stop /Turn LH
21 10A* Left Headlamp
22 7.5A* Trailer Tow Stop /Turn RH
23 10A* Right Headlamp
24 20A* (Gasoline
only) Ð
(Diesel only)Gasoline only-Engine Control
Diesel only-Not Used
Roadside emergencies
144
Page 145 of 232
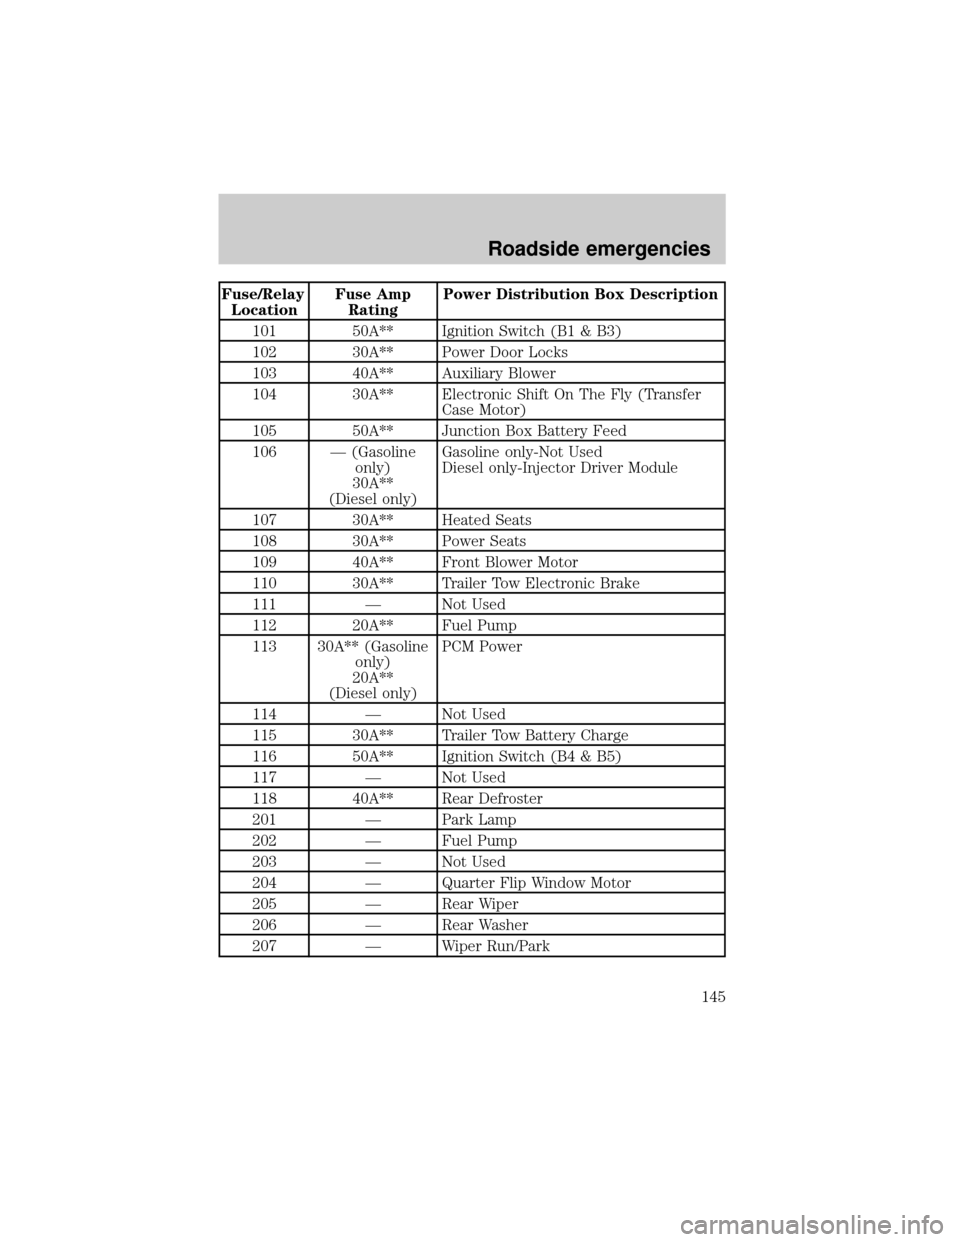
Fuse/Relay
LocationFuse Amp
RatingPower Distribution Box Description
101 50A** Ignition Switch (B1 & B3)
102 30A** Power Door Locks
103 40A** Auxiliary Blower
104 30A** Electronic Shift On The Fly (Transfer
Case Motor)
105 50A** Junction Box Battery Feed
106 Ð (Gasoline
only)
30A**
(Diesel only)Gasoline only-Not Used
Diesel only-Injector Driver Module
107 30A** Heated Seats
108 30A** Power Seats
109 40A** Front Blower Motor
110 30A** Trailer Tow Electronic Brake
111 Ð Not Used
112 20A** Fuel Pump
113 30A** (Gasoline
only)
20A**
(Diesel only)PCM Power
114 Ð Not Used
115 30A** Trailer Tow Battery Charge
116 50A** Ignition Switch (B4 & B5)
117 Ð Not Used
118 40A** Rear Defroster
201 Ð Park Lamp
202 Ð Fuel Pump
203 Ð Not Used
204 Ð Quarter Flip Window Motor
205 Ð Rear Wiper
206 Ð Rear Washer
207 Ð Wiper Run/Park
Roadside emergencies
145
Page 146 of 232
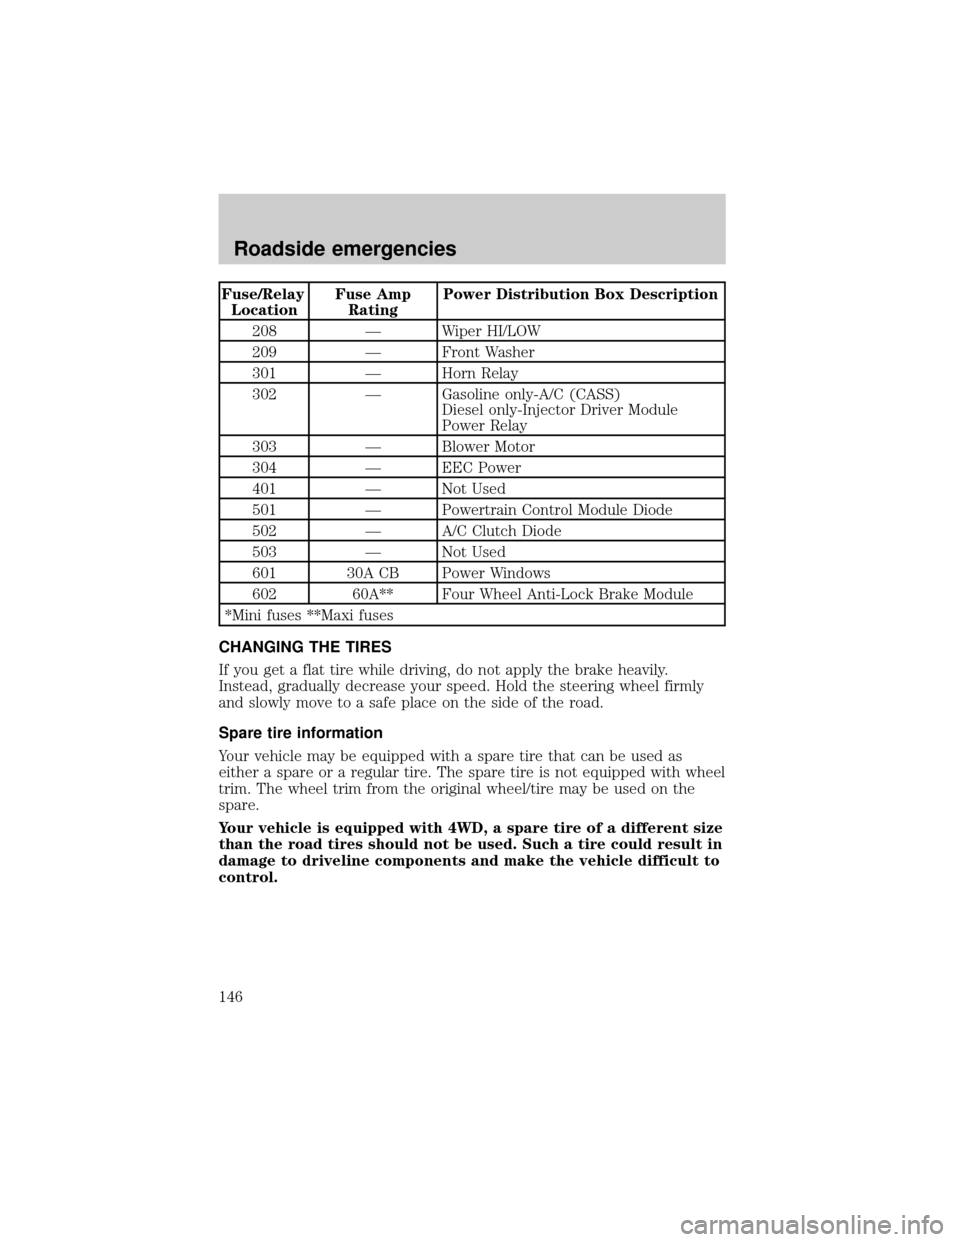
Fuse/Relay
LocationFuse Amp
RatingPower Distribution Box Description
208 Ð Wiper HI/LOW
209 Ð Front Washer
301 Ð Horn Relay
302 Ð Gasoline only-A/C (CASS)
Diesel only-Injector Driver Module
Power Relay
303 Ð Blower Motor
304 Ð EEC Power
401 Ð Not Used
501 Ð Powertrain Control Module Diode
502 Ð A/C Clutch Diode
503 Ð Not Used
601 30A CB Power Windows
602 60A** Four Wheel Anti-Lock Brake Module
*Mini fuses **Maxi fuses
CHANGING THE TIRES
If you get a flat tire while driving, do not apply the brake heavily.
Instead, gradually decrease your speed. Hold the steering wheel firmly
and slowly move to a safe place on the side of the road.
Spare tire information
Your vehicle may be equipped with a spare tire that can be used as
either a spare or a regular tire. The spare tire is not equipped with wheel
trim. The wheel trim from the original wheel/tire may be used on the
spare.
Your vehicle is equipped with 4WD, a spare tire of a different size
than the road tires should not be used. Such a tire could result in
damage to driveline components and make the vehicle difficult to
control.
Roadside emergencies
146
Page 147 of 232
Location of the spare tire and tools
The spare tire and tools for your vehicle are stowed in the following
locations:
Tool Location
Spare tire Mounted on the left rear quarter
panel in the cargo area
Jack In the rear cargo area stowage bin.
Jack handle and lug wrench On top of the radiator support in
the engine compartment
Tire change procedure
To prevent the vehicle from moving when you change a tire, be
sure the parking brake is set, then block (in both directions) the
wheel that is diagonally opposite (other side and end of the vehicle) to
the tire being changed.
If the vehicle slips off the jack, you or someone else could be
seriously injured.
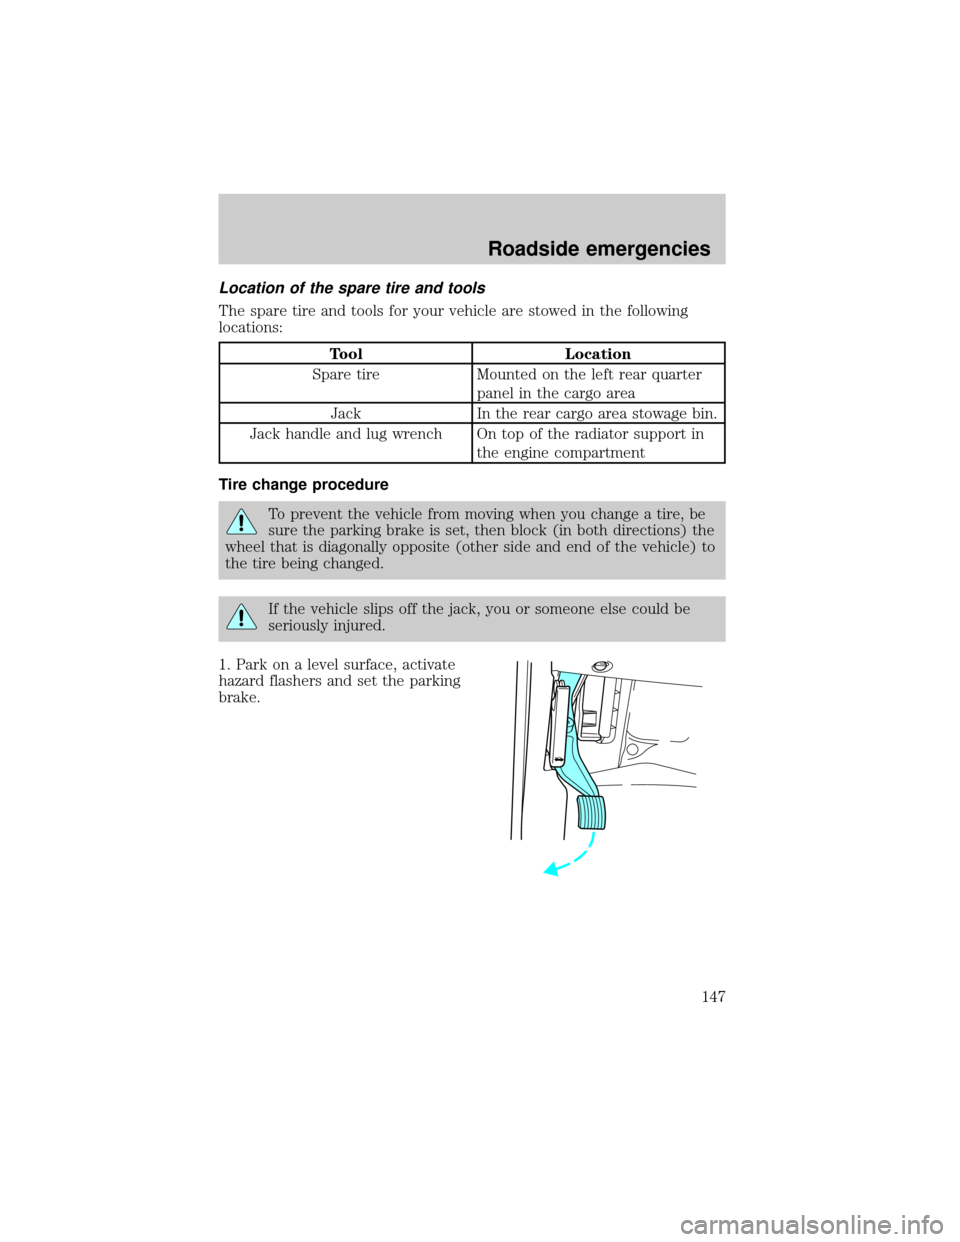
1. Park on a level surface, activate
hazard flashers and set the parking
brake.
Roadside emergencies
147
Page 148 of 232
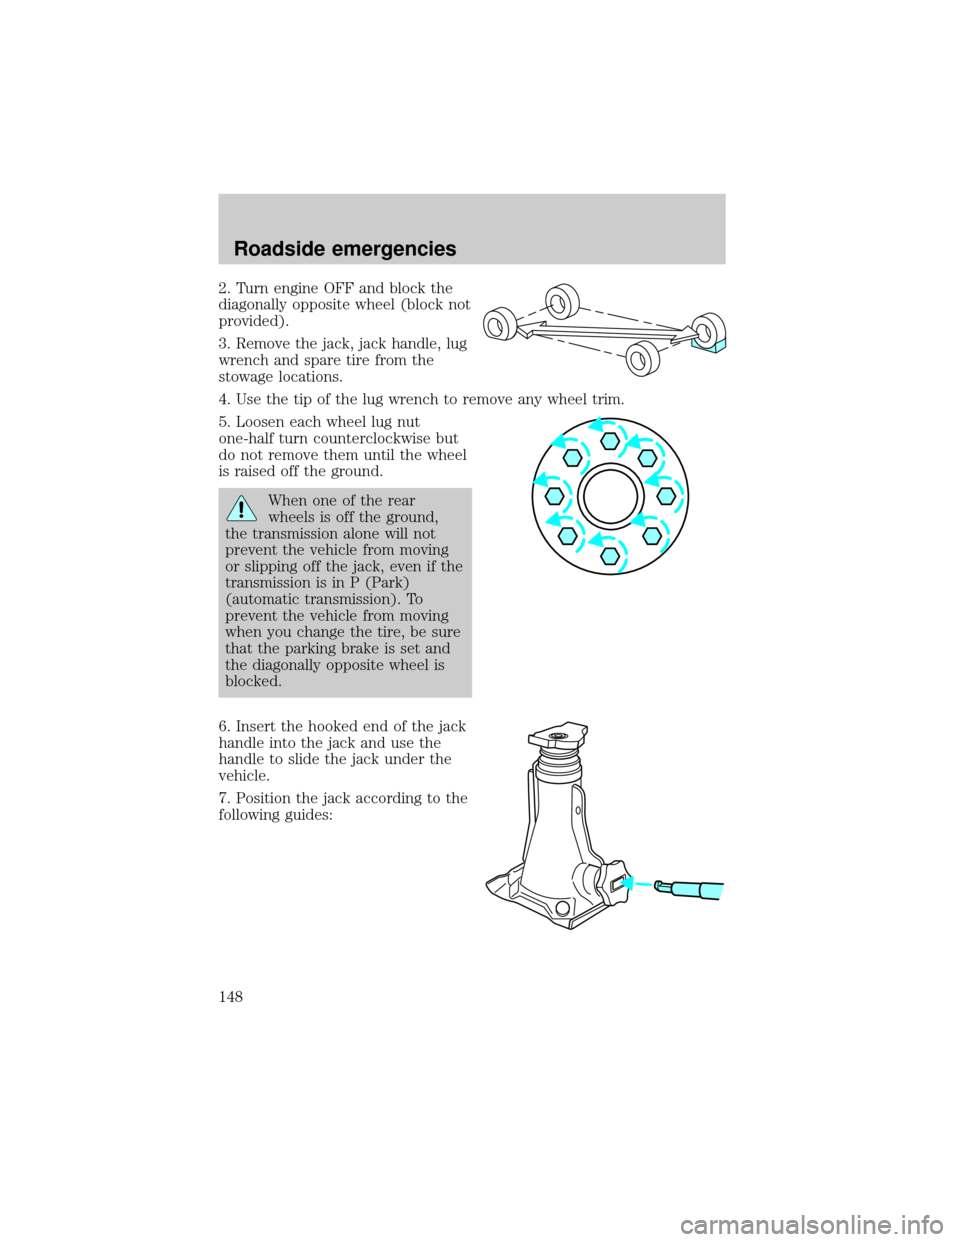
2. Turn engine OFF and block the
diagonally opposite wheel (block not
provided).
3. Remove the jack, jack handle, lug
wrench and spare tire from the
stowage locations.
4. Use the tip of the lug wrench to remove any wheel trim.
5. Loosen each wheel lug nut
one-half turn counterclockwise but
do not remove them until the wheel
is raised off the ground.
When one of the rear
wheels is off the ground,
the transmission alone will not
prevent the vehicle from moving
or slipping off the jack, even if the
transmission is in P (Park)
(automatic transmission). To
prevent the vehicle from moving
when you change the tire, be sure
that the parking brake is set and
the diagonally opposite wheel is
blocked.
6. Insert the hooked end of the jack
handle into the jack and use the
handle to slide the jack under the
vehicle.
7. Position the jack according to the
following guides:
Roadside emergencies
148
Page 149 of 232
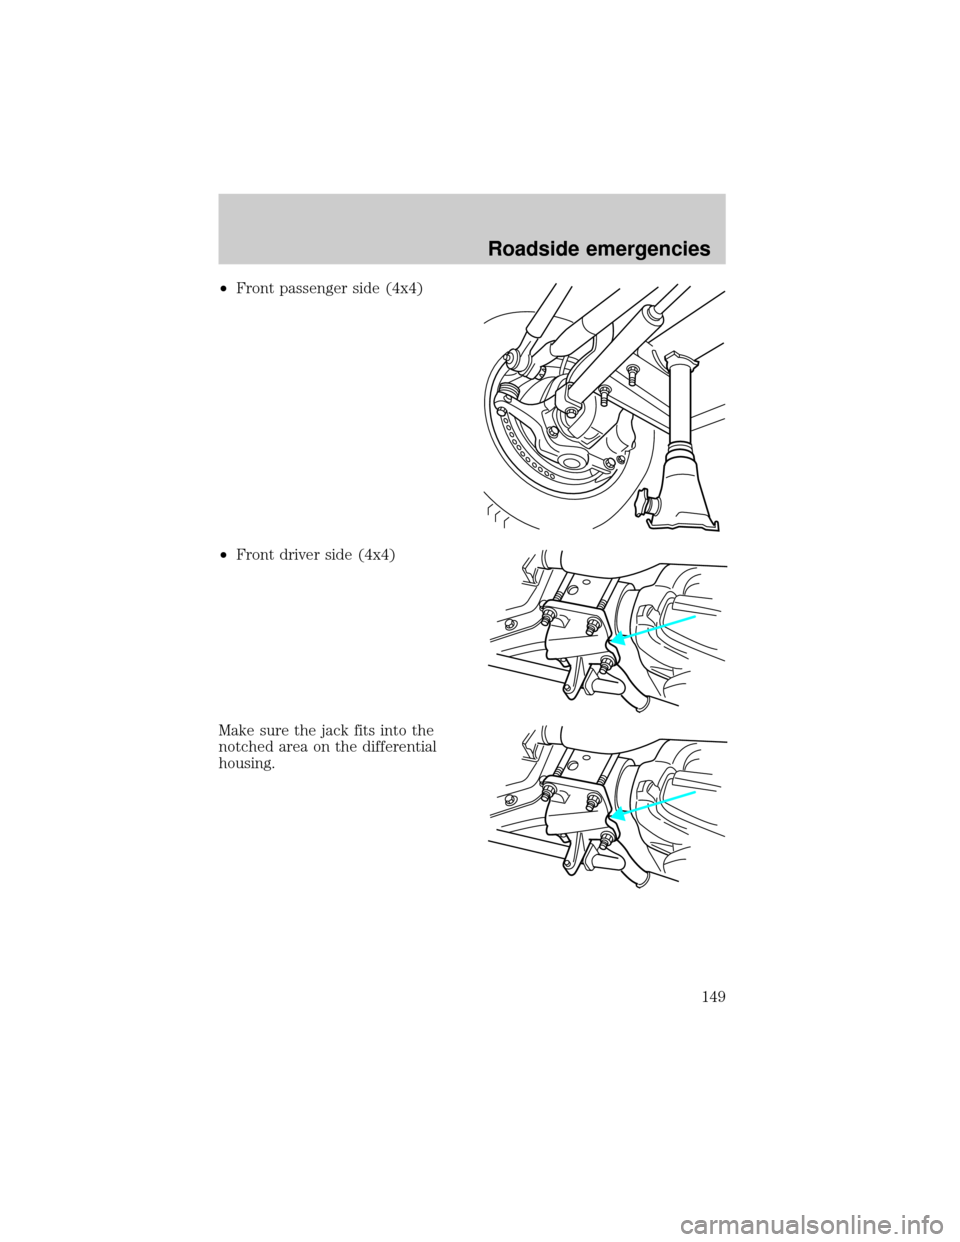
²Front passenger side (4x4)
²Front driver side (4x4)
Make sure the jack fits into the
notched area on the differential
housing.
Roadside emergencies
149
Page 150 of 232
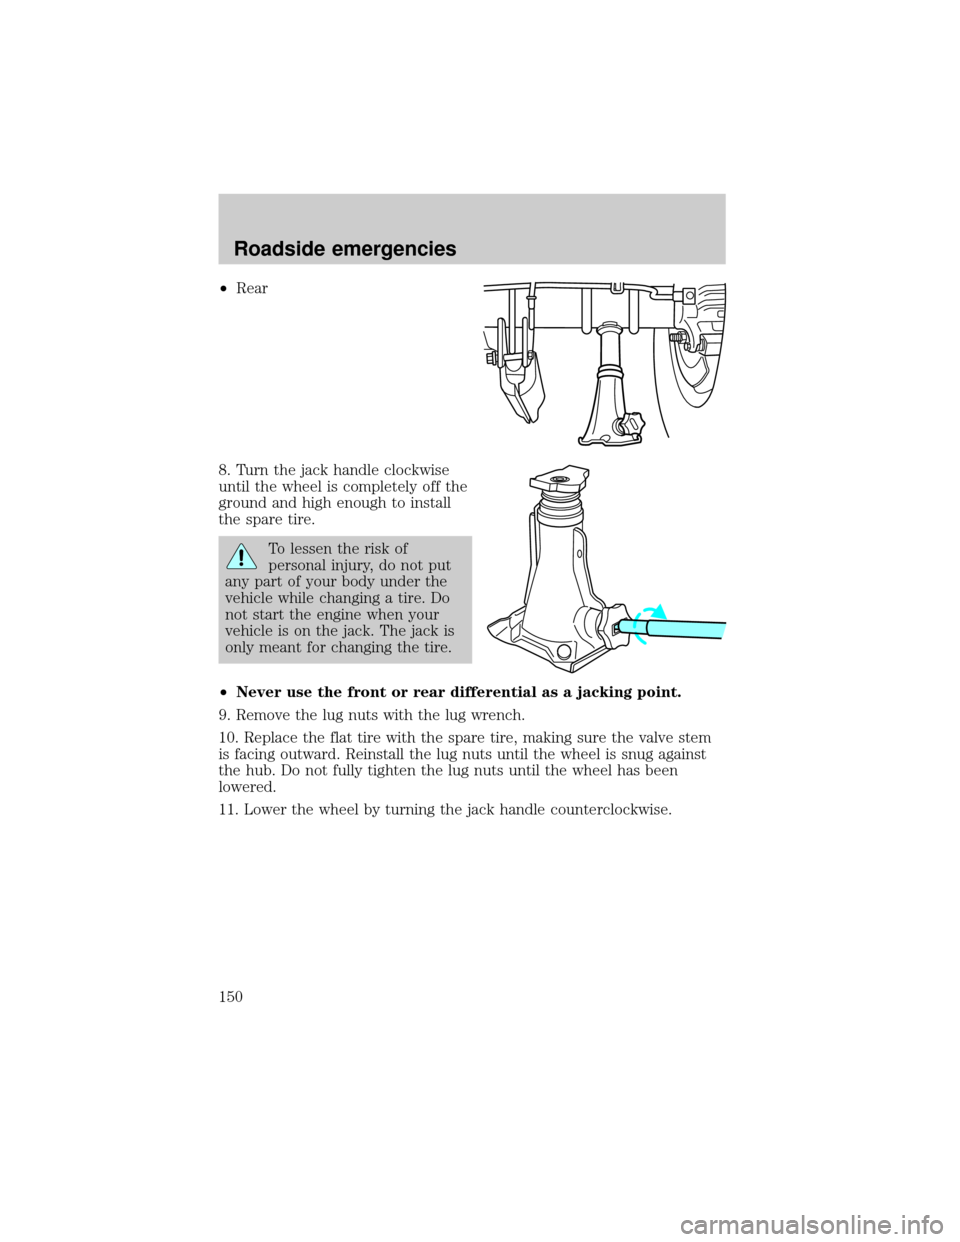
²Rear
8. Turn the jack handle clockwise
until the wheel is completely off the
ground and high enough to install
the spare tire.
To lessen the risk of
personal injury, do not put
any part of your body under the
vehicle while changing a tire. Do
not start the engine when your
vehicle is on the jack. The jack is
only meant for changing the tire.
²Never use the front or rear differential as a jacking point.
9. Remove the lug nuts with the lug wrench.
10. Replace the flat tire with the spare tire, making sure the valve stem
is facing outward. Reinstall the lug nuts until the wheel is snug against
the hub. Do not fully tighten the lug nuts until the wheel has been
lowered.
11. Lower the wheel by turning the jack handle counterclockwise.
Roadside emergencies
150