clock FORD EXCURSION 2004 1.G User Guide
[x] Cancel search | Manufacturer: FORD, Model Year: 2004, Model line: EXCURSION, Model: FORD EXCURSION 2004 1.GPages: 272, PDF Size: 1.82 MB
Page 196 of 272
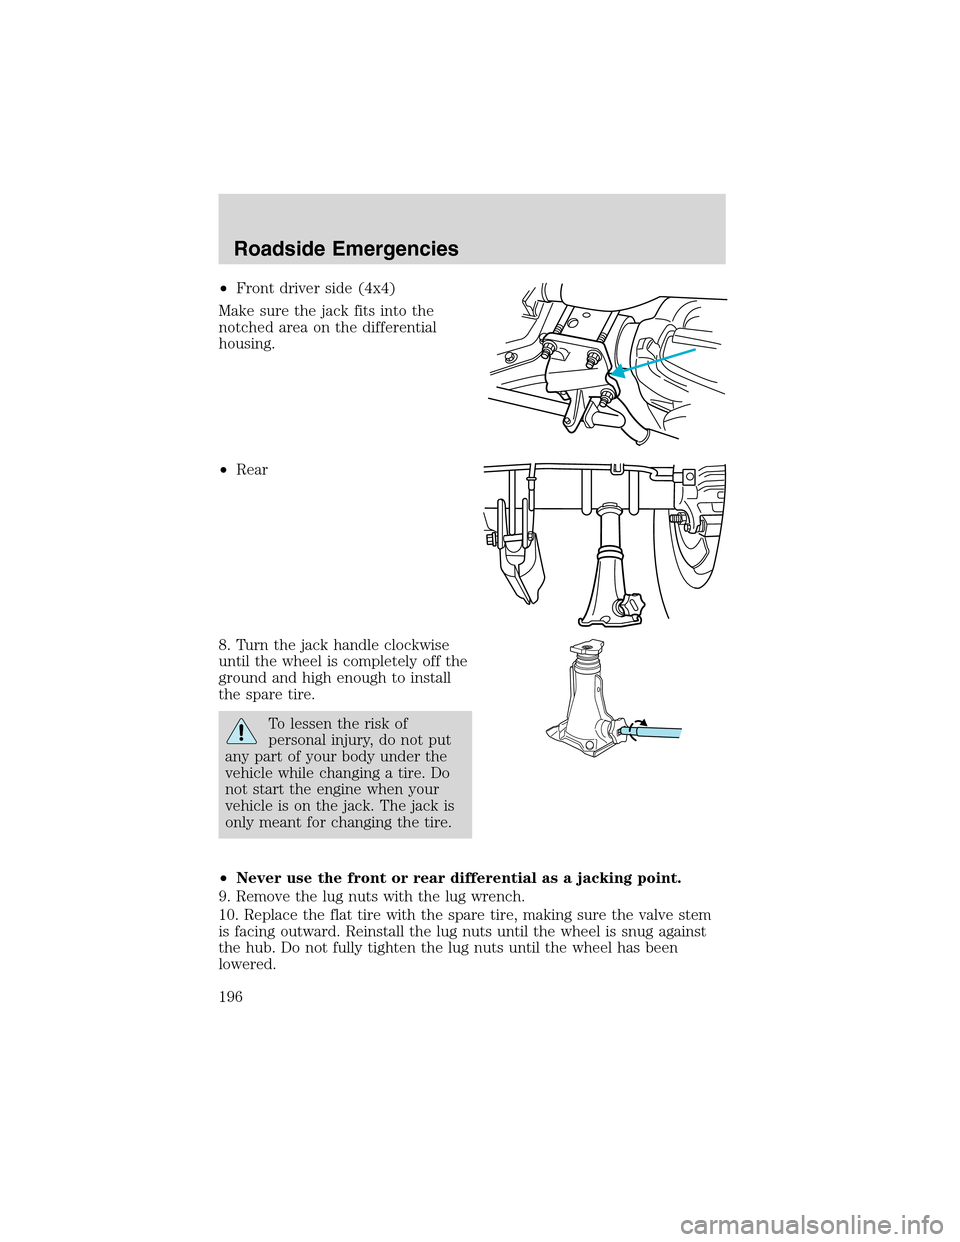
•Front driver side (4x4)
Make sure the jack fits into the
notched area on the differential
housing.
•Rear
8. Turn the jack handle clockwise
until the wheel is completely off the
ground and high enough to install
the spare tire.
To lessen the risk of
personal injury, do not put
any part of your body under the
vehicle while changing a tire. Do
not start the engine when your
vehicle is on the jack. The jack is
only meant for changing the tire.
•Never use the front or rear differential as a jacking point.
9. Remove the lug nuts with the lug wrench.
10. Replace the flat tire with the spare tire, making sure the valve stem
is facing outward. Reinstall the lug nuts until the wheel is snug against
the hub. Do not fully tighten the lug nuts until the wheel has been
lowered.
Roadside Emergencies
196
Page 197 of 272
11. Lower the wheel by turning the jack handle counterclockwise.
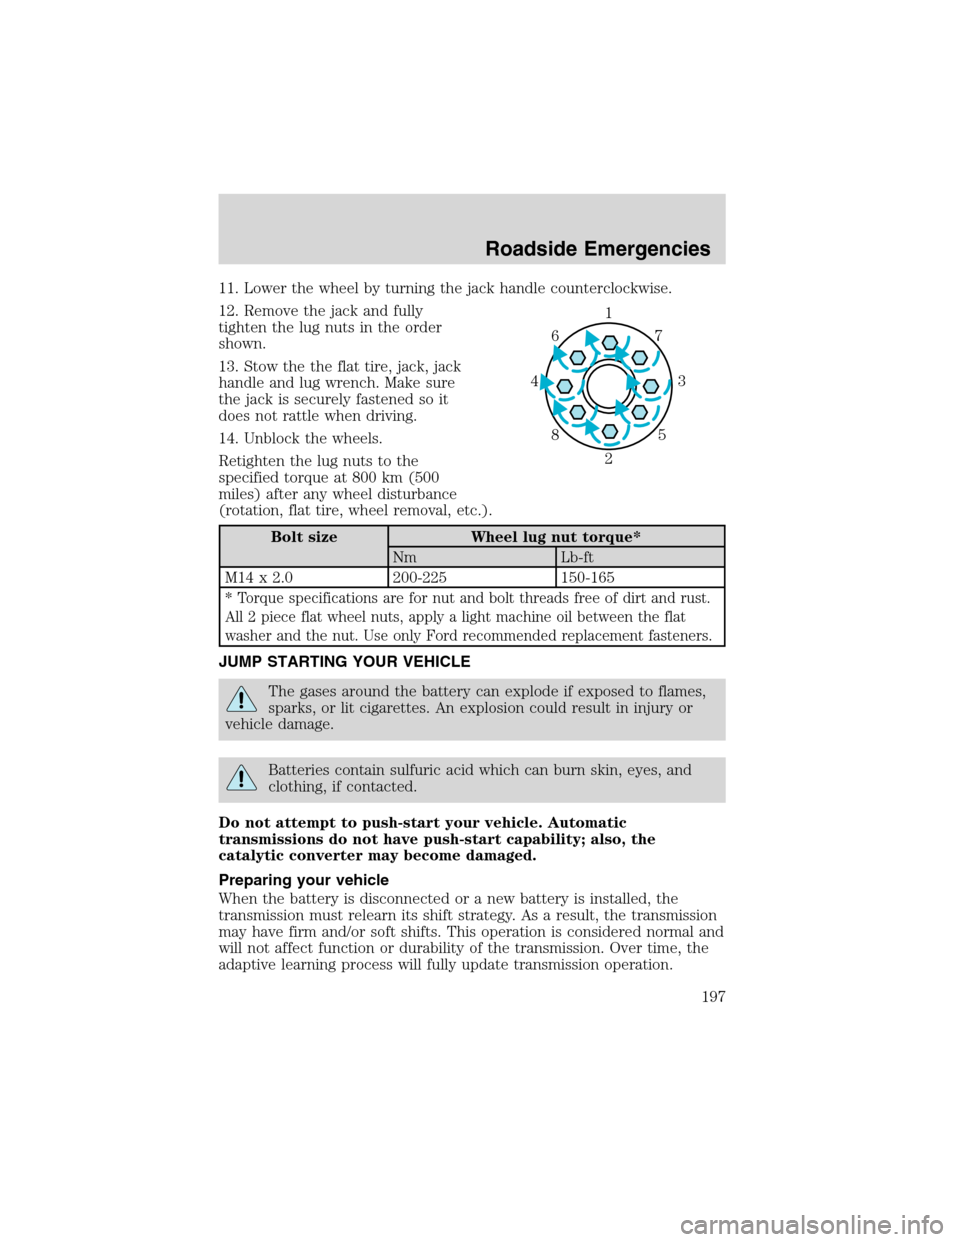
12. Remove the jack and fully
tighten the lug nuts in the order
shown.
13. Stow the the flat tire, jack, jack
handle and lug wrench. Make sure
the jack is securely fastened so it
does not rattle when driving.
14. Unblock the wheels.
Retighten the lug nuts to the
specified torque at 800 km (500
miles) after any wheel disturbance
(rotation, flat tire, wheel removal, etc.).
Bolt size Wheel lug nut torque*
Nm Lb-ft
M14 x 2.0 200-225 150-165
*
Torque specifications are for nut and bolt threads free of dirt and rust.
All 2 piece flat wheel nuts, apply a light machine oil between the flat
washer and the nut. Use only Ford recommended replacement fasteners.
JUMP STARTING YOUR VEHICLE
The gases around the battery can explode if exposed to flames,
sparks, or lit cigarettes. An explosion could result in injury or
vehicle damage.
Batteries contain sulfuric acid which can burn skin, eyes, and
clothing, if contacted.
Do not attempt to push-start your vehicle. Automatic
transmissions do not have push-start capability; also, the
catalytic converter may become damaged.
Preparing your vehicle
When the battery is disconnected or a new battery is installed, the
transmission must relearn its shift strategy. As a result, the transmission
may have firm and/or soft shifts. This operation is considered normal and
will not affect function or durability of the transmission. Over time, the
adaptive learning process will fully update transmission operation.
1
3 4
27 6
5 8
Roadside Emergencies
197
Page 224 of 272
3. Recheck the engine oil level. Make sure the oil level is not above the
MAX mark on the engine oil level indicator (dipstick).
4. Install the indicator and ensure it is fully seated.
5. Fully install the engine oil filler cap by turning the filler cap clockwise
1/4 of a turn until three clicks are heard or until the cap is fully seated.
To avoid possible oil loss, DO NOT operate the vehicle with the
engine oil level indicator and/or the engine oil filler cap removed.
Engine oil and filter recommendations
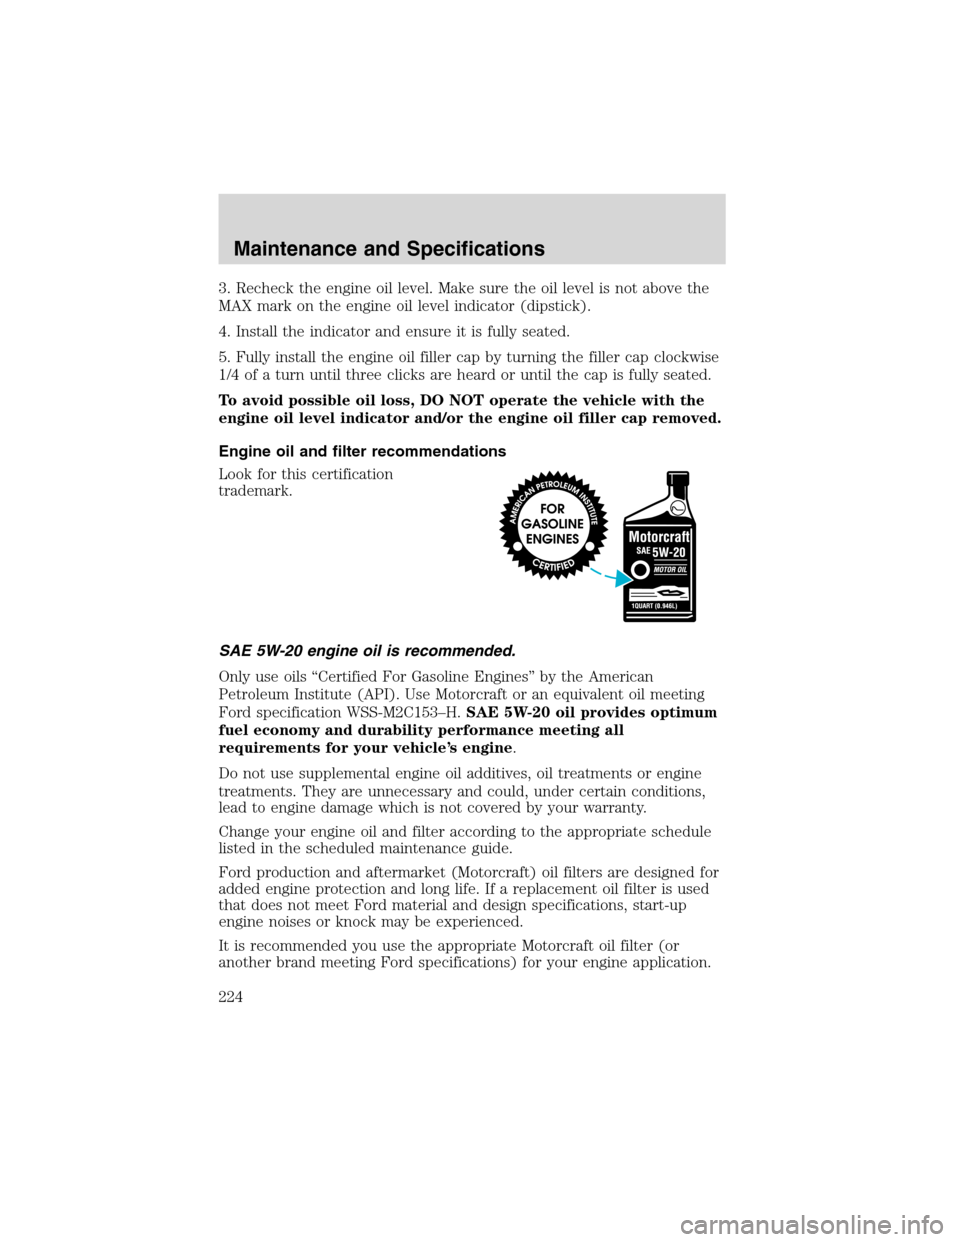
Look for this certification
trademark.
SAE 5W-20 engine oil is recommended.
Only use oils “Certified For Gasoline Engines” by the American
Petroleum Institute (API). Use Motorcraft or an equivalent oil meeting
Ford specification WSS-M2C153–H.SAE 5W-20 oil provides optimum
fuel economy and durability performance meeting all
requirements for your vehicle’s engine.
Do not use supplemental engine oil additives, oil treatments or engine
treatments. They are unnecessary and could, under certain conditions,
lead to engine damage which is not covered by your warranty.
Change your engine oil and filter according to the appropriate schedule
listed in the scheduled maintenance guide.
Ford production and aftermarket (Motorcraft) oil filters are designed for
added engine protection and long life. If a replacement oil filter is used
that does not meet Ford material and design specifications, start-up
engine noises or knock may be experienced.
It is recommended you use the appropriate Motorcraft oil filter (or
another brand meeting Ford specifications) for your engine application.
Maintenance and Specifications
224
Page 227 of 272
If the battery has been disconnected or a new battery has been installed,
the clock must be reset once the battery is reconnected.
•Always dispose of automotive
batteries in a responsible manner.
Follow your local authorized
standards for disposal. Call your
local authorized recycling center
to find out more about recycling
automotive batteries.
ENGINE COOLANT
Checking engine coolant
The concentration and level of engine coolant should be checked at the
mileage intervals listed in the scheduled maintenance guide. The coolant
concentration should be maintained at 50/50 coolant and water, which
equates to a freeze point of -36° C (-34° F). Coolant concentration
testing is possible with a hydrometer or antifreeze tester (such as the
Rotunda Battery and Antifreeze Tester, 014–R1060). The level of coolant
should be maintained at the “cold full” of “cold fill range” level in the
coolant reservoir. If the level falls below, add coolant per the instructions
in theAdding engine coolantsection.
Your vehicle was factory-filled with a 50/50 engine coolant and water
concentration. If the concentration of coolant falls below 40% or above
60%, the engine parts could become damaged or not work properly.A
50–50 mixture of coolant and water provides the following:
•Freeze protection down to -36° C (-34° F).
•Boiling protection up to 129° C (265° F).
•Protection against rust and other forms of corrosion.
•Enables calibrated gauges to work properly.
L
E
A
D
RETURN
RECYCLE
Maintenance and Specifications
227
Page 230 of 272
For vehicles with overflow coolant systems with a non-pressurized cap
on the coolant recovery system, add coolant to the coolant recovery
reservoir when the engine is cool. Add the proper mixture of coolant and
water to the “cold full” level. For all other vehicles, which have a coolant
degas system with a pressurized cap, or if it is necessary to remove the
coolant pressure relief cap on the radiator of a vehicle with an overflow
system, follow these steps to add engine coolant.
To reduce the risk of personal injury, make sure the engine is
cool before unscrewing the coolant pressure relief cap. The
cooling system is under pressure; steam and hot liquid can come out
forcefully when the cap is loosened slightly.
1. Before you begin, turn the engine off and let it cool.
2. When the engine is cool, wrap a thick cloth around the coolant
pressure relief cap on the coolant reservoir (an opaque plastic bottle).
Slowly turn cap counterclockwise (left) until pressure begins to release.
3. Step back while the pressure releases.
4. When you are sure that all the pressure has been released, use the
cloth to turn it counterclockwise and remove the cap.
5. Fill the coolant reservoir slowly with the proper coolant mixture (see
above), to within the “cold fill range” or the “cold full” level on the
reservoir. If you removed the radiator cap in an overflow system, fill the
radiator until the coolant is visible and radiator is almost full.
6. Replace the cap. Turn until tightly installed. (Cap must be tightly
installed to prevent coolant loss.)
After any coolant has been added, check the coolant concentration see
Checking Engine Coolant section). If the concentration is not 50/50
(protection to –34° F/–36° C), drain some coolant and adjust the
concentration. It may take several drains and additions to obtain a 50/50
coolant concentration.
Whenever coolant has been added, the coolant level in the coolant
reservoir should be checked the next few times you drive the vehicle. If
necessary, add enough 50/50 concentration of engine coolant and
distilled water to bring the liquid level to the proper level.
If you have to add more than 1.0 liter (1.0 quart) of engine coolant per
month, have your dealer check the engine cooling system. Your cooling
system may have a leak. Operating an engine with a low level of coolant
can result in engine overheating and possible engine damage.
Maintenance and Specifications
230
Page 235 of 272
The flow of fuel through a fuel pump nozzle can produce static
electricity, which can cause a fire if fuel is pumped into an
ungrounded fuel container.
Use the following guidelines to avoid static build-up when filling an
ungrounded fuel container:
•Place approved fuel container on the ground.
•DO NOT fill a fuel container while it is in the vehicle (including the
cargo area).
•Keep the fuel pump nozzle in contact with the fuel container while
filling.
•DO NOT use a device that would hold the fuel pump handle in the fill
position.
Fuel Filler Cap
Your fuel tank filler cap has an indexed design with a 1/8 turn on/off
feature.
When fueling your vehicle:
1. Turn the engine off.
2. Carefully turn the filler cap counterclockwise 1/8 of a turn until it
stops.
3. Pull to remove the cap from the fuel filler pipe.
4. To install the cap, align the tabs on the cap with the notches on the
filler pipe.
5. Turn the filler cap clockwise 1/8 of a turn until it stops.
If the “Service Engine Soon/Check Engine” indicator comes on and stays
on after you start the engine, the fuel filler cap may not be properly
installed. Turn off the engine, remove the fuel filler cap, align the cap
properly and reinstall it.
If you must replace the fuel filler cap, replace it with a fuel filler
cap that is designed for your vehicle. The customer warranty may
be void for any damage to the fuel tank or fuel system if the
correct genuine Ford or Motorcraft fuel filler cap is not used.
The fuel system may be under pressure. If the fuel filler cap is
venting vapor or if you hear a hissing sound, wait until it stops
before completely removing the fuel filler cap. Otherwise, fuel may
spray out and injure you or others.
Maintenance and Specifications
235
Page 267 of 272
attaching with tether straps ..149
in front seat ............................147
in rear seat ..............................147
Cleaning your vehicle
engine compartment ..............214
exterior ....................................217
instrument panel ....................216
interior .....................................216
plastic parts ............................215
washing ....................................213
waxing .....................................213
wheels ......................................214
wiper blades ....................215–216
woodtone trim ........................216
Climate control (see Air
conditioning or Heating) ......57, 60
Clock ......................................23, 32
Compass, electronic ..............86, 95
calibration .................................96
set zone adjustment .................96
Console ......................................101
overhead ..............................82–83
Controls
power seat ...............................119
steering column ........................93
Coolant
checking and adding ..............227
refill capacities ................231, 254
specifications ..................257, 259
Cruise control (see Speed
control) ........................................89
Customer Assistance ................185
Ford accessories for your
vehicle .............................217–218
Ford Extended Service
Plan ..........................................206
Getting assistance outside the
U.S. and Canada .....................210
Getting roadside assistance ...185Getting the service you
need .........................................204
Ordering additional owner’s
literature .................................211
The Dispute Settlement
Board .......................................206
Utilizing the
Mediation/Arbitration
Program ...................................209
D
Daytime running lamps
(see Lamps) ................................72
Defrost
rear window ..............................70
Dipstick
automatic transmission
fluid ..........................................245
engine oil .................................222
Doors
door ajar warning .....................14
lubricant specifications ..........257
Driving under special
conditions ..........................171, 173
sand .........................................172
snow and ice ...........................174
through water .................173, 177
E
Emergencies, roadside
jump-starting ..........................197
Emission control system ..........241
Engine ................................259–260
check engine/service engine
soon light ..................................10
cleaning ...................................214
coolant .....................................227
diesel ...........................................7
Index
267