radio FORD EXPEDITION 1998 1.G Owners Manual
[x] Cancel search | Manufacturer: FORD, Model Year: 1998, Model line: EXPEDITION, Model: FORD EXPEDITION 1998 1.GPages: 216, PDF Size: 1.51 MB
Page 32 of 216
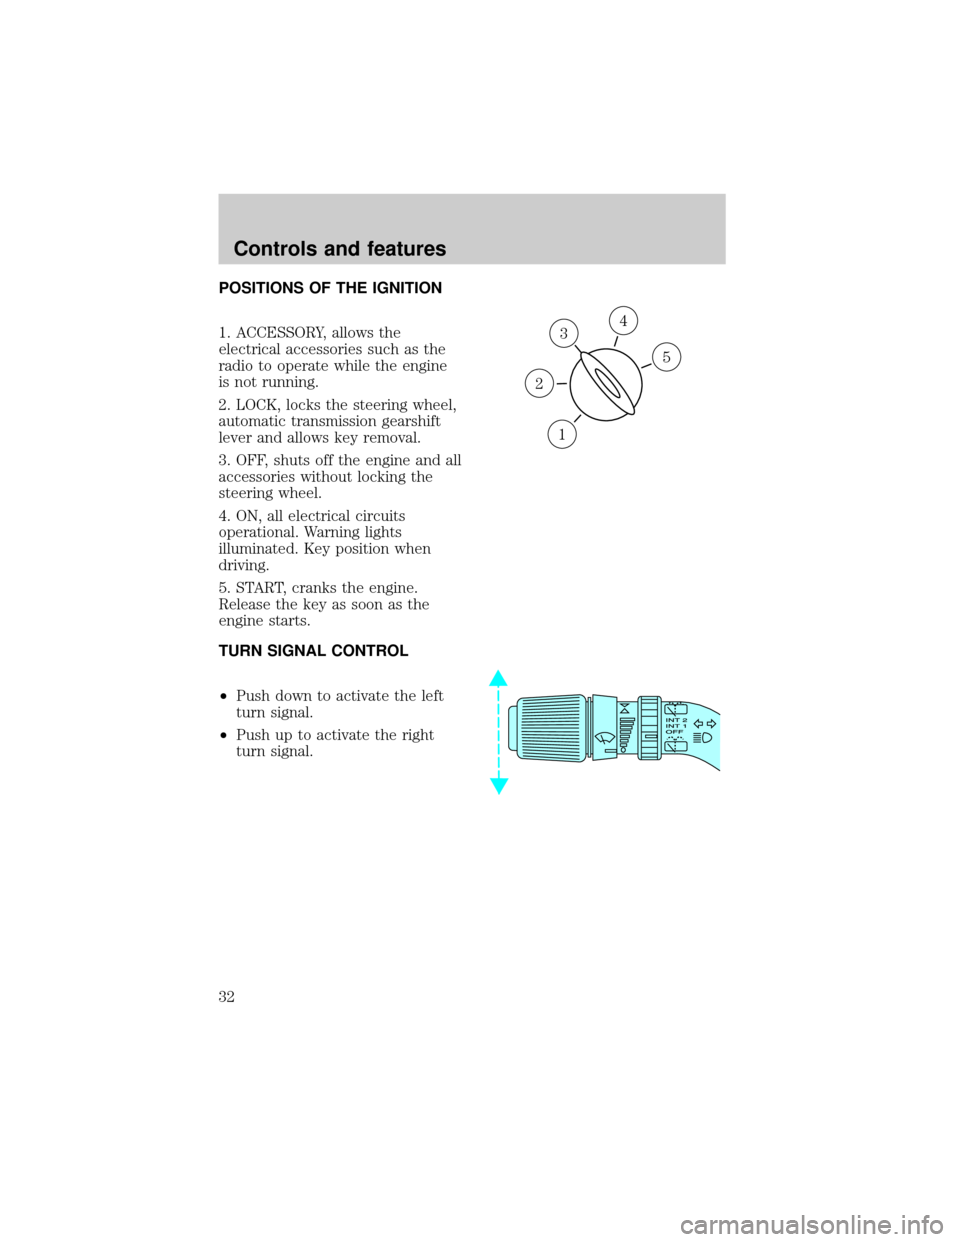
POSITIONS OF THE IGNITION
1. ACCESSORY, allows the
electrical accessories such as the
radio to operate while the engine
is not running.
2. LOCK, locks the steering wheel,
automatic transmission gearshift
lever and allows key removal.
3. OFF, shuts off the engine and all
accessories without locking the
steering wheel.
4. ON, all electrical circuits
operational. Warning lights
illuminated. Key position when
driving.
5. START, cranks the engine.
Release the key as soon as the
engine starts.
TURN SIGNAL CONTROL
²Push down to activate the left
turn signal.
²Push up to activate the right
turn signal.
3
1
2
5
4
Controls and features
32
Page 57 of 216

Replacing the batteries
The transmitter is powered by one
coin type three-volt lithium battery
CR2032 or equivalent. Typical
operating range will allow you to
be up to 10 meters (33 feet) away
from your vehicle. A decrease in
operating range can be caused by:
²battery weakness due to time
and use
²weather conditions
²nearby radio towers
²structures around the vehicle
²other vehicles parked next to
the vehicle
To replace the battery:
1. Twist a thin coin between the
two halves of the transmitter near
the key ring. DO NOT TAKE THE
FRONT PART OF THE
TRANSMITTER APART.
2. Place the positive (+) side of
new battery in the same
orientation. Refer to the diagram
inside the transmitter unit.
3. Snap the two halves back
together.
Controls and features
57
Page 92 of 216
PREPARING TO START YOUR
VEHICLE
Engine starting is controlled by the
spark ignition system. This system
meets all Canadian
Interference-Causing Equipment
standard requirements regulating
the impulse electrical field strength
of radio noise.
When starting a fuel-injected
engine, avoid pressing the
accelerator before or during
starting. Only use the accelerator
when you have difficulty starting
the engine. For more information
on starting the vehicle, refer to
Starting the enginein this
chapter.
Extended idling at high
engine speeds can produce
very high temperatures in the
engine and exhaust system,
creating the risk of fire or other
damage.
Do not park, idle, or drive
your vehicle in dry grass
or other dry ground cover. The
emission system heats up the
engine compartment and exhaust
system, which can start a fire.
Starting
92
Page 131 of 216
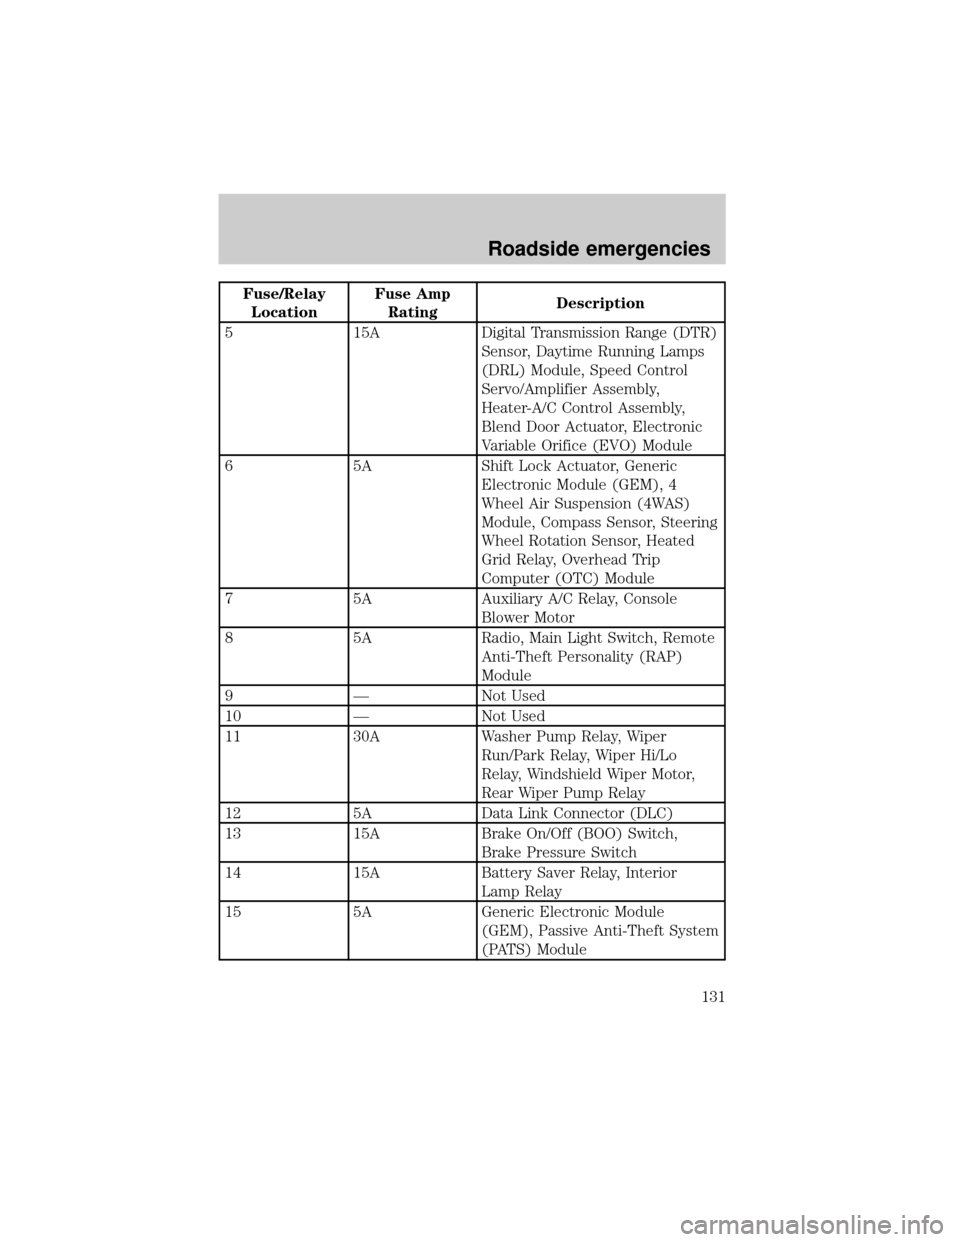
Fuse/Relay
LocationFuse Amp
RatingDescription
5 15A Digital Transmission Range (DTR)
Sensor, Daytime Running Lamps
(DRL) Module, Speed Control
Servo/Amplifier Assembly,
Heater-A/C Control Assembly,
Blend Door Actuator, Electronic
Variable Orifice (EVO) Module
6 5A Shift Lock Actuator, Generic
Electronic Module (GEM), 4
Wheel Air Suspension (4WAS)
Module, Compass Sensor, Steering
Wheel Rotation Sensor, Heated
Grid Relay, Overhead Trip
Computer (OTC) Module
7 5A Auxiliary A/C Relay, Console
Blower Motor
8 5A Radio, Main Light Switch, Remote
Anti-Theft Personality (RAP)
Module
9 Ð Not Used
10 Ð Not Used
11 30A Washer Pump Relay, Wiper
Run/Park Relay, Wiper Hi/Lo
Relay, Windshield Wiper Motor,
Rear Wiper Pump Relay
12 5A Data Link Connector (DLC)
13 15A Brake On/Off (BOO) Switch,
Brake Pressure Switch
14 15A Battery Saver Relay, Interior
Lamp Relay
15 5A Generic Electronic Module
(GEM), Passive Anti-Theft System
(PATS) Module
Roadside emergencies
131
Page 133 of 216
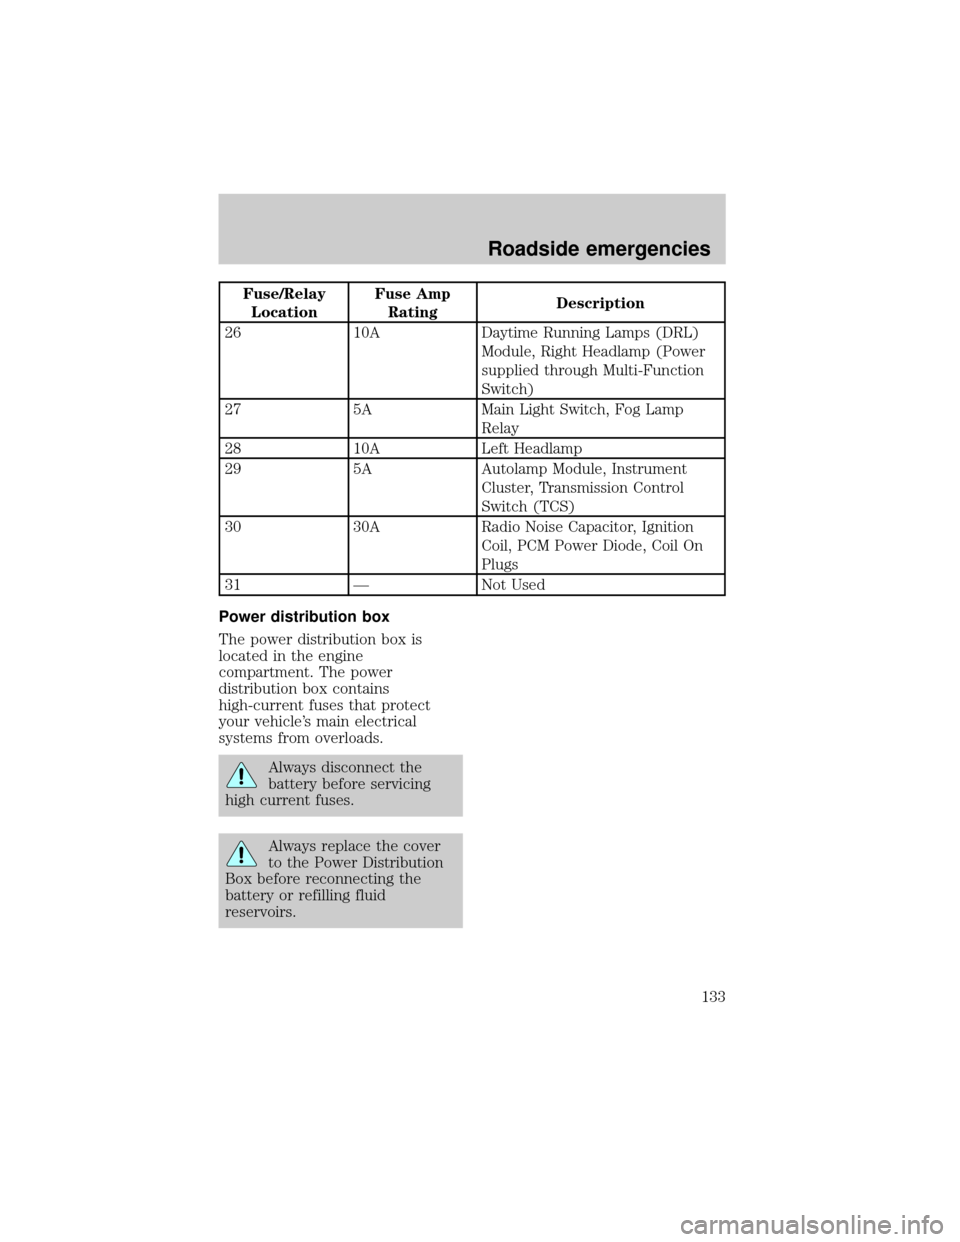
Fuse/Relay
LocationFuse Amp
RatingDescription
26 10A Daytime Running Lamps (DRL)
Module, Right Headlamp (Power
supplied through Multi-Function
Switch)
27 5A Main Light Switch, Fog Lamp
Relay
28 10A Left Headlamp
29 5A Autolamp Module, Instrument
Cluster, Transmission Control
Switch (TCS)
30 30A Radio Noise Capacitor, Ignition
Coil, PCM Power Diode, Coil On
Plugs
31 Ð Not Used
Power distribution box
The power distribution box is
located in the engine
compartment. The power
distribution box contains
high-current fuses that protect
your vehicle's main electrical
systems from overloads.
Always disconnect the
battery before servicing
high current fuses.
Always replace the cover
to the Power Distribution
Box before reconnecting the
battery or refilling fluid
reservoirs.
Roadside emergencies
133
Page 134 of 216
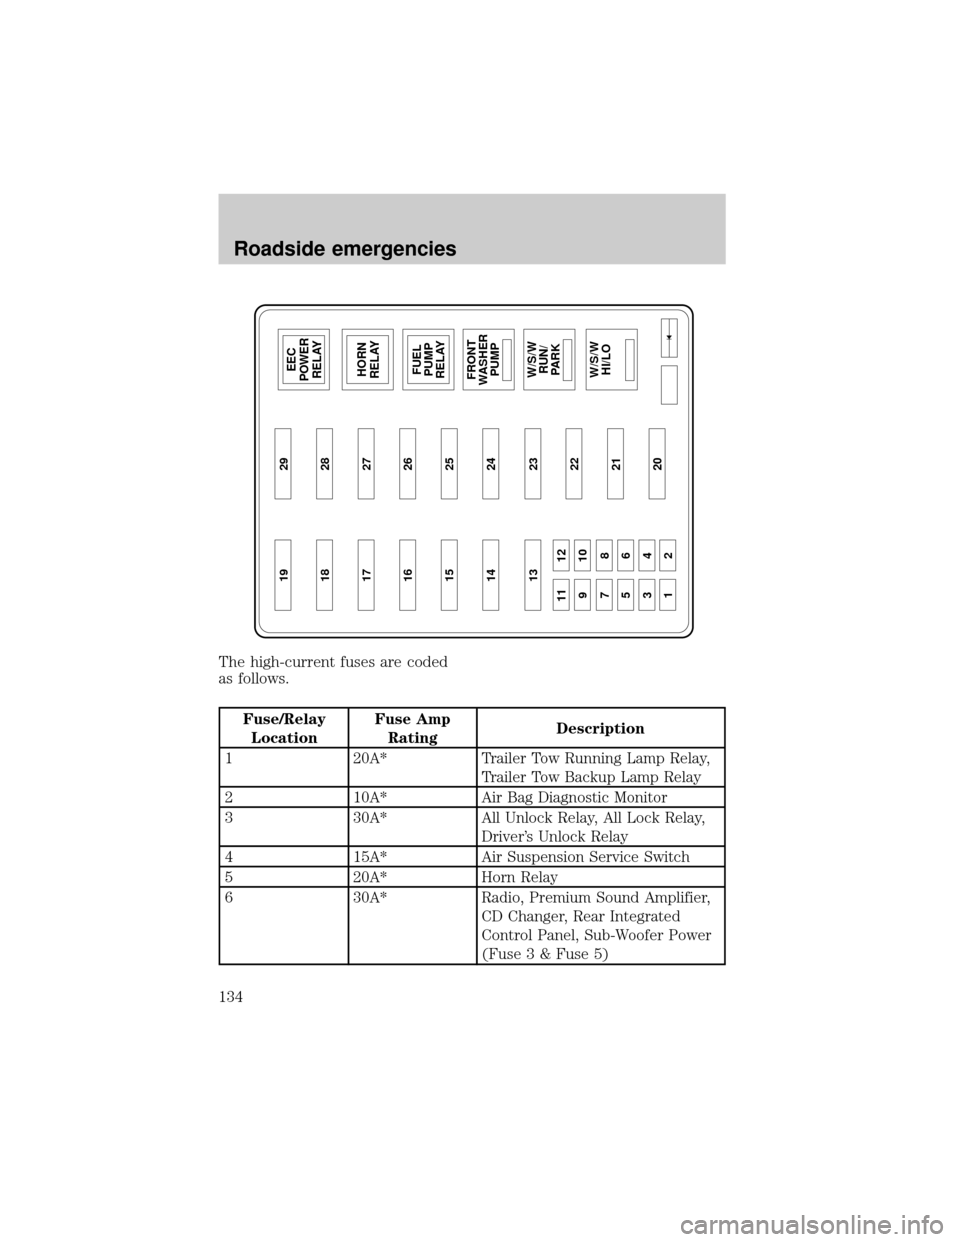
The high-current fuses are coded
as follows.
Fuse/Relay
LocationFuse Amp
RatingDescription
1 20A* Trailer Tow Running Lamp Relay,
Trailer Tow Backup Lamp Relay
2 10A* Air Bag Diagnostic Monitor
3 30A* All Unlock Relay, All Lock Relay,
Driver's Unlock Relay
4 15A* Air Suspension Service Switch
5 20A* Horn Relay
6 30A* Radio, Premium Sound Amplifier,
CD Changer, Rear Integrated
Control Panel, Sub-Woofer Power
(Fuse 3 & Fuse 5)
19 29
18 28EEC
POWER
RELAY
FUEL
PUMP
RELAY
FRONT
WASHER
PUMP HORN
RELAY 17 27
16 26
15 25
14 24
13
11 12
910
78
56
34
1223
22
21
20
W/S/W
RUN/
PARKW/S/W
HI/LO
Roadside emergencies
134
Page 138 of 216
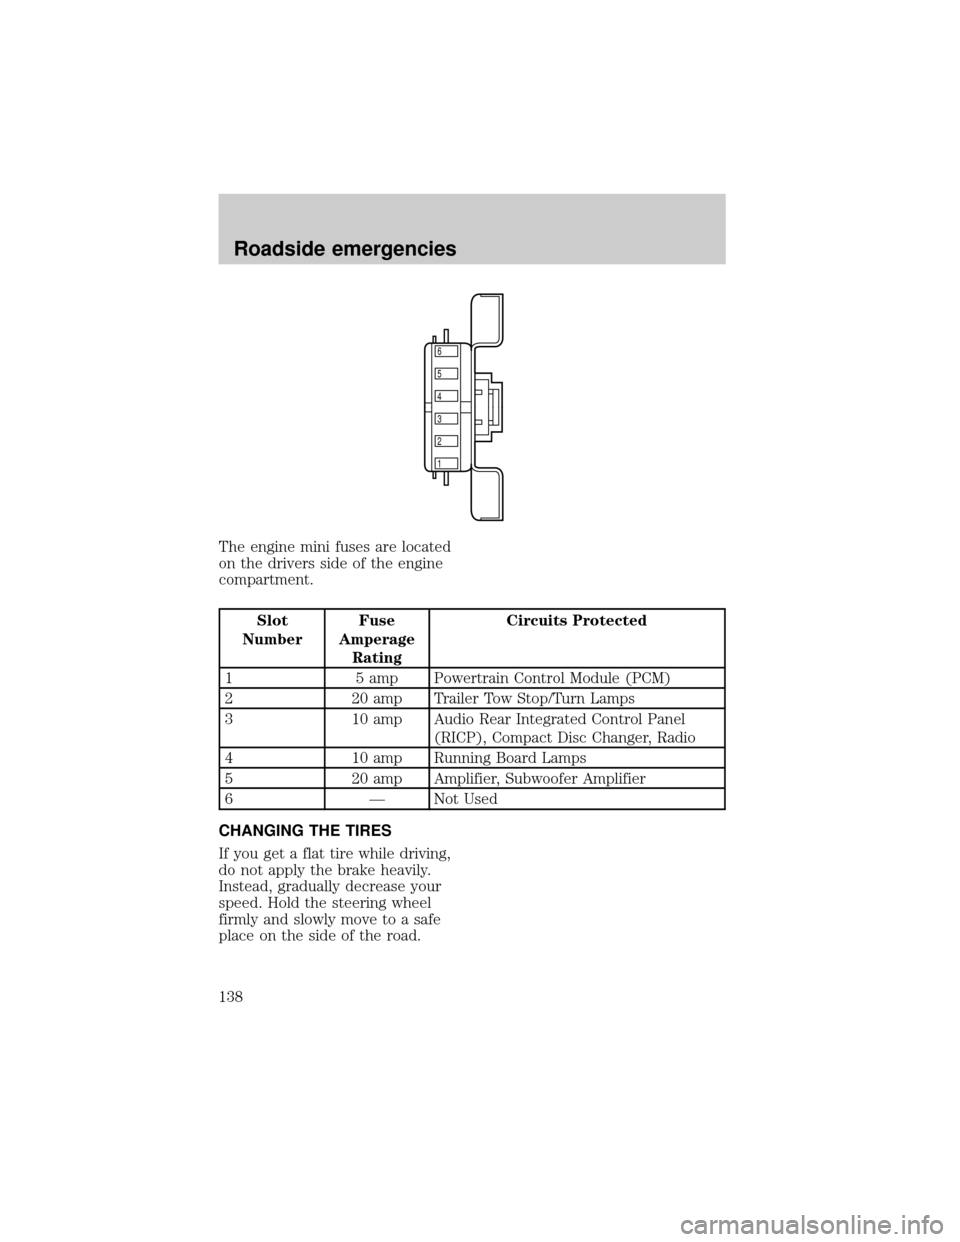
The engine mini fuses are located
on the drivers side of the engine
compartment.
Slot
NumberFuse
Amperage
RatingCircuits Protected
1 5 amp Powertrain Control Module (PCM)
2 20 amp Trailer Tow Stop/Turn Lamps
3 10 amp Audio Rear Integrated Control Panel
(RICP), Compact Disc Changer, Radio
4 10 amp Running Board Lamps
5 20 amp Amplifier, Subwoofer Amplifier
6 Ð Not Used
CHANGING THE TIRES
If you get a flat tire while driving,
do not apply the brake heavily.
Instead, gradually decrease your
speed. Hold the steering wheel
firmly and slowly move to a safe
place on the side of the road.
6
5
4
3
2
1
Roadside emergencies
138
Page 169 of 216

cleaning them, and apply a small
quantity of grease to the top of
each battery terminal to help
prevent corrosion.
If your battery has a
cover/shield, make sure it is
reinstalled after the battery is
replaced.
Because your vehicle's engine is
electronically controlled by a
computer, some control conditions
are maintained by power from the
battery. When the battery is
disconnected or a new battery is
installed, the engine must relearn
its idle conditions before your
vehicle will drive properly. To
begin this process:
1. Put the gearshift in P (Park),
turn off all accessories and start
the vehicle.
2. Let the engine idle for at least
one minute.
3. The relearning process will
automatically complete as you
drive the vehicle.
²If you do not allow the engine to
relearn its idle, the idle quality
of your vehicle may be adversely
affected until the idle is
eventually relearned.
²If the battery has been
disconnected or a new battery
has been installed, the clock and
the preset radio stations must
be reset once the battery is
reconnected.
Maintenance and care
169