cooling FORD EXPEDITION 2017 3.G Owners Manual
[x] Cancel search | Manufacturer: FORD, Model Year: 2017, Model line: EXPEDITION, Model: FORD EXPEDITION 2017 3.GPages: 500, PDF Size: 4.83 MB
Page 111 of 500
Action
Message
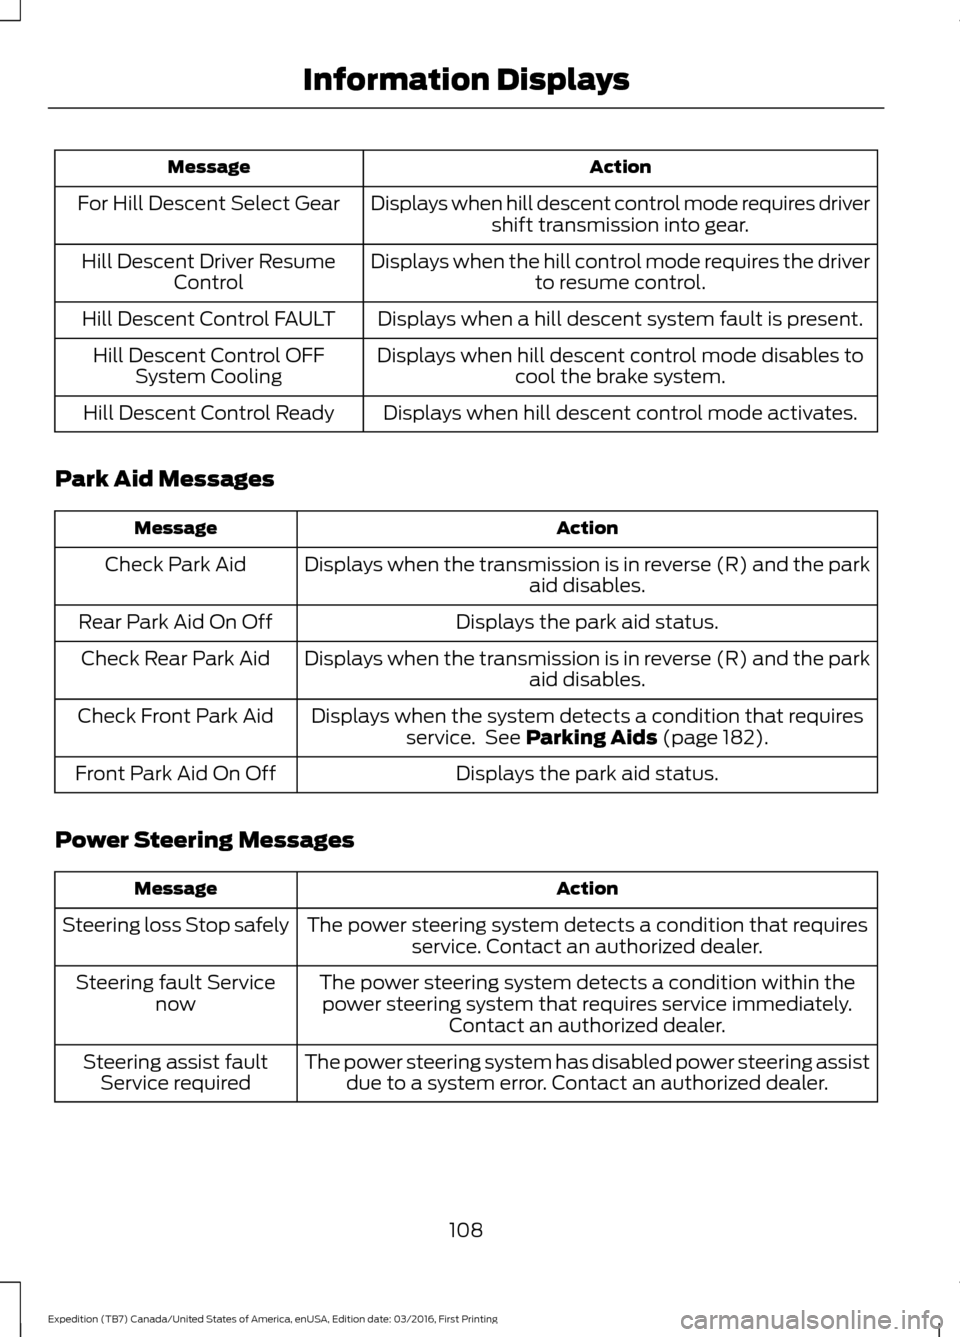
Displays when hill descent control mode requires drivershift transmission into gear.
For Hill Descent Select Gear
Displays when the hill control mode requires the driverto resume control.
Hill Descent Driver Resume
Control
Displays when a hill descent system fault is present.
Hill Descent Control FAULT
Displays when hill descent control mode disables tocool the brake system.
Hill Descent Control OFF
System Cooling
Displays when hill descent control mode activates.
Hill Descent Control Ready
Park Aid Messages Action
Message
Displays when the transmission is in reverse (R) and the park aid disables.
Check Park Aid
Displays the park aid status.
Rear Park Aid On Off
Displays when the transmission is in reverse (R) and the parkaid disables.
Check Rear Park Aid
Displays when the system detects a condition that requiresservice. See Parking Aids (page 182).
Check Front Park Aid
Displays the park aid status.
Front Park Aid On Off
Power Steering Messages Action
Message
The power steering system detects a condition that requiresservice. Contact an authorized dealer.
Steering loss Stop safely
The power steering system detects a condition within thepower steering system that requires service immediately. Contact an authorized dealer.
Steering fault Service
now
The power steering system has disabled power steering assistdue to a system error. Contact an authorized dealer.
Steering assist fault
Service required
108
Expedition (TB7) Canada/United States of America, enUSA, Edition date: 03/2016, First Printing Information Displays
Page 116 of 500
Note: Recirculated air may also turn on and off automatically in instrument
panel or instrument panel and floor airflow modes during hot weather to improve
cooling efficiency.
A/C:
Press the button to switch the air conditioning on or off. Air conditioning
cools your vehicle using outside air. To improve the time to reach a comfortable
temperature in hot weather, drive with the windows open until you feel cold air
through the air vents.
I
MANUAL CLIMATE CONTROL - VEHICLES WITH: ELECTRONIC
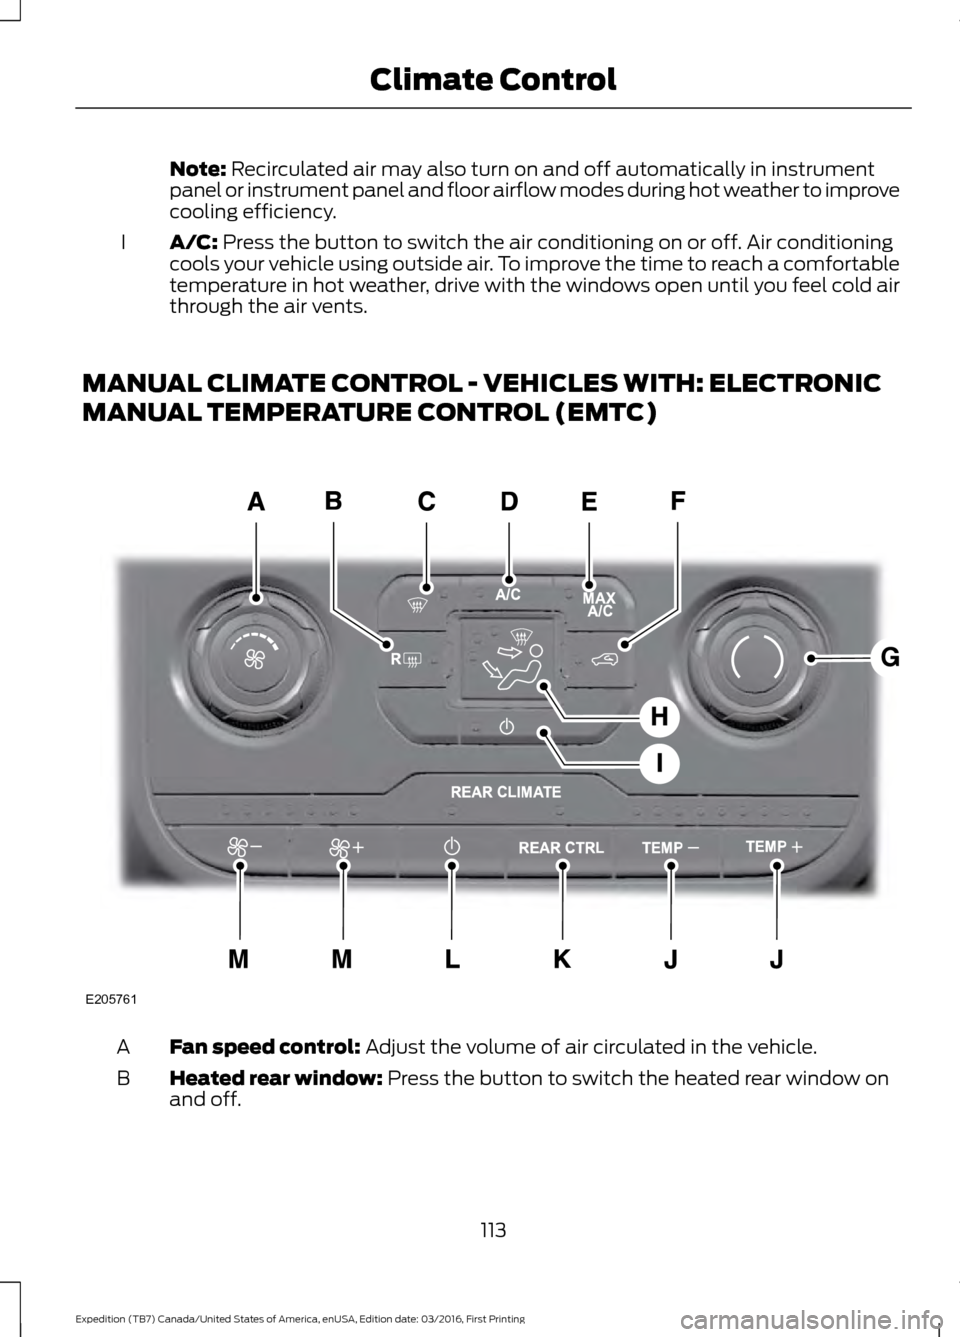
MANUAL TEMPERATURE CONTROL (EMTC) Fan speed control:
Adjust the volume of air circulated in the vehicle.
A
Heated rear window:
Press the button to switch the heated rear window on
and off.
B
113
Expedition (TB7) Canada/United States of America, enUSA, Edition date: 03/2016, First Printing Climate ControlE205761
Page 117 of 500
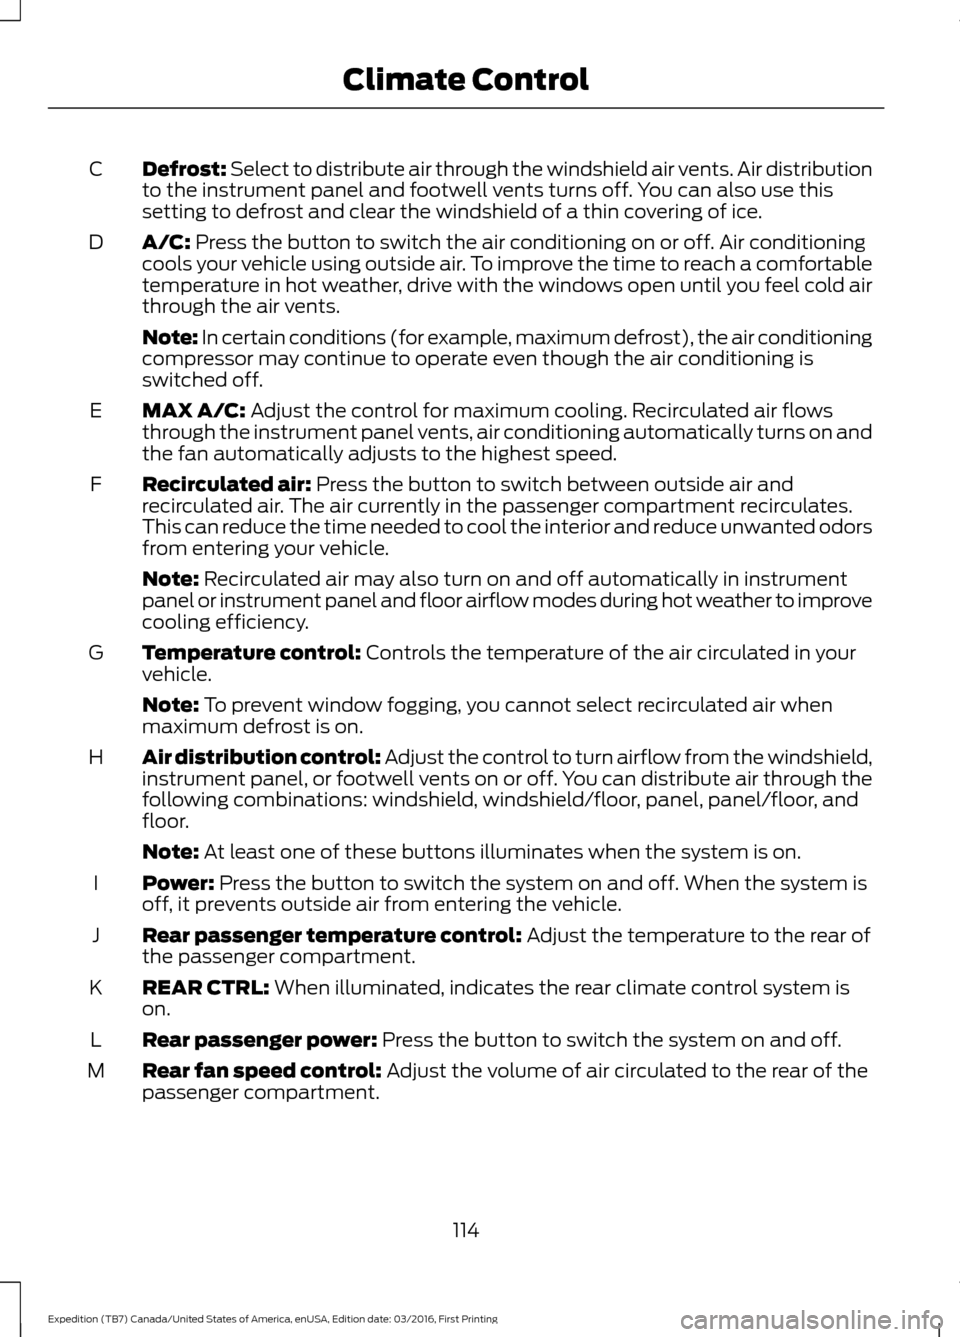
Defrost: Select to distribute air through the windshield air vents. Air distribution
to the instrument panel and footwell vents turns off. You can also use this
setting to defrost and clear the windshield of a thin covering of ice.
C
A/C: Press the button to switch the air conditioning on or off. Air conditioning
cools your vehicle using outside air. To improve the time to reach a comfortable
temperature in hot weather, drive with the windows open until you feel cold air
through the air vents.
D
Note: In certain conditions (for example, maximum defrost), the air conditioning
compressor may continue to operate even though the air conditioning is
switched off.
MAX A/C:
Adjust the control for maximum cooling. Recirculated air flows
through the instrument panel vents, air conditioning automatically turns on and
the fan automatically adjusts to the highest speed.
E
Recirculated air:
Press the button to switch between outside air and
recirculated air. The air currently in the passenger compartment recirculates.
This can reduce the time needed to cool the interior and reduce unwanted odors
from entering your vehicle.
F
Note:
Recirculated air may also turn on and off automatically in instrument
panel or instrument panel and floor airflow modes during hot weather to improve
cooling efficiency.
Temperature control:
Controls the temperature of the air circulated in your
vehicle.
G
Note:
To prevent window fogging, you cannot select recirculated air when
maximum defrost is on.
Air distribution control: Adjust the control to turn airflow from the windshield,
instrument panel, or footwell vents on or off. You can distribute air through the
following combinations: windshield, windshield/floor, panel, panel/floor, and
floor.
H
Note:
At least one of these buttons illuminates when the system is on.
Power:
Press the button to switch the system on and off. When the system is
off, it prevents outside air from entering the vehicle.
I
Rear passenger temperature control:
Adjust the temperature to the rear of
the passenger compartment.
J
REAR CTRL:
When illuminated, indicates the rear climate control system is
on.
K
Rear passenger power:
Press the button to switch the system on and off.
L
Rear fan speed control:
Adjust the volume of air circulated to the rear of the
passenger compartment.
M
114
Expedition (TB7) Canada/United States of America, enUSA, Edition date: 03/2016, First Printing Climate Control
Page 119 of 500
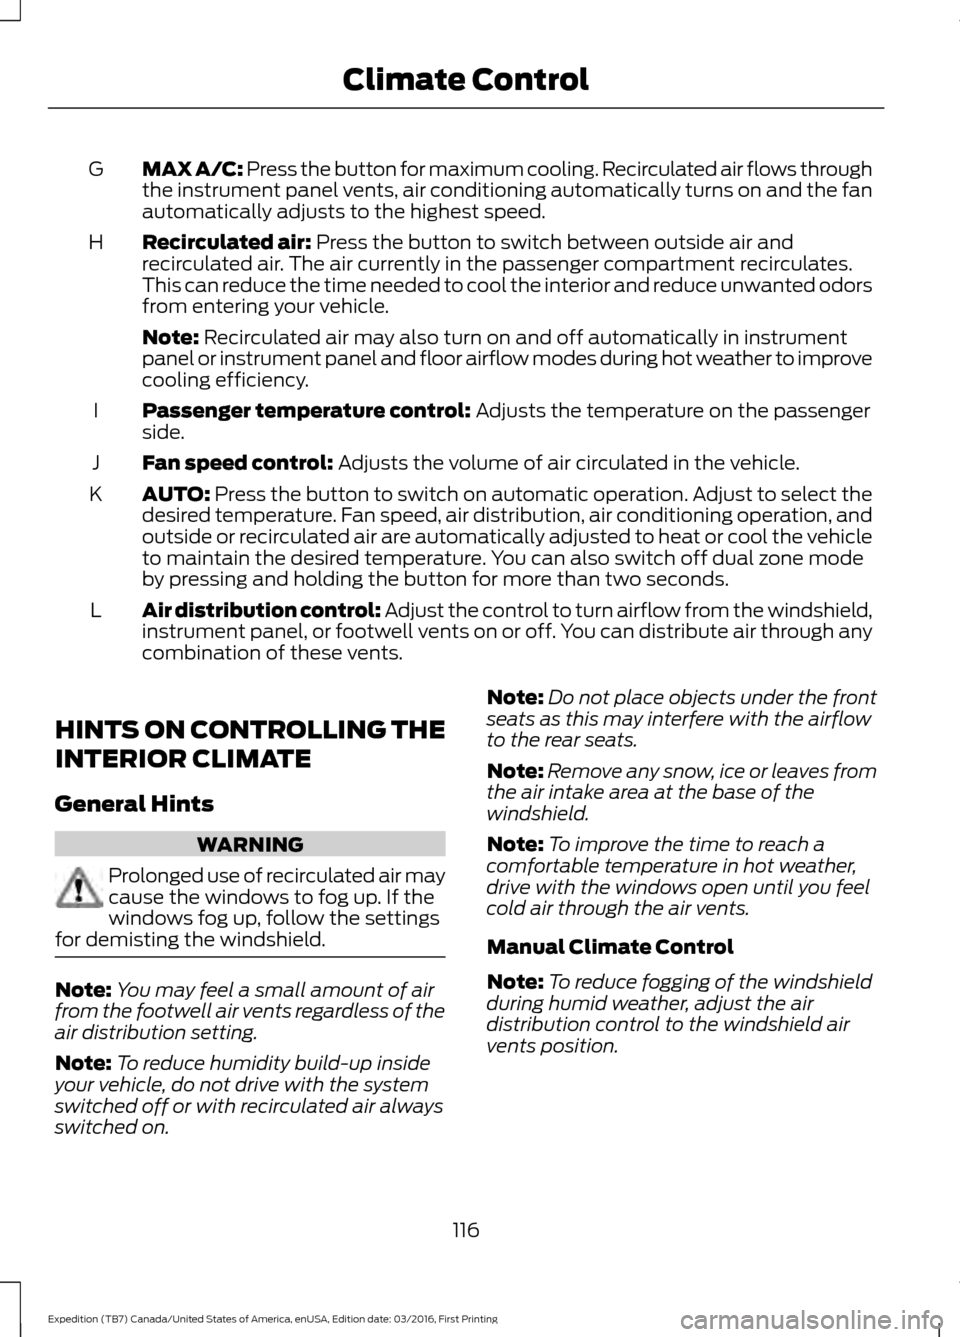
MAX A/C: Press the button for maximum cooling. Recirculated air flows through
the instrument panel vents, air conditioning automatically turns on and the fan
automatically adjusts to the highest speed.
G
Recirculated air: Press the button to switch between outside air and
recirculated air. The air currently in the passenger compartment recirculates.
This can reduce the time needed to cool the interior and reduce unwanted odors
from entering your vehicle.
H
Note:
Recirculated air may also turn on and off automatically in instrument
panel or instrument panel and floor airflow modes during hot weather to improve
cooling efficiency.
Passenger temperature control:
Adjusts the temperature on the passenger
side.
I
Fan speed control:
Adjusts the volume of air circulated in the vehicle.
J
AUTO:
Press the button to switch on automatic operation. Adjust to select the
desired temperature. Fan speed, air distribution, air conditioning operation, and
outside or recirculated air are automatically adjusted to heat or cool the vehicle
to maintain the desired temperature. You can also switch off dual zone mode
by pressing and holding the button for more than two seconds.
K
Air distribution control: Adjust the control to turn airflow from the windshield,
instrument panel, or footwell vents on or off. You can distribute air through any
combination of these vents.
L
HINTS ON CONTROLLING THE
INTERIOR CLIMATE
General Hints WARNING
Prolonged use of recirculated air may
cause the windows to fog up. If the
windows fog up, follow the settings
for demisting the windshield. Note:
You may feel a small amount of air
from the footwell air vents regardless of the
air distribution setting.
Note: To reduce humidity build-up inside
your vehicle, do not drive with the system
switched off or with recirculated air always
switched on. Note:
Do not place objects under the front
seats as this may interfere with the airflow
to the rear seats.
Note: Remove any snow, ice or leaves from
the air intake area at the base of the
windshield.
Note: To improve the time to reach a
comfortable temperature in hot weather,
drive with the windows open until you feel
cold air through the air vents.
Manual Climate Control
Note: To reduce fogging of the windshield
during humid weather, adjust the air
distribution control to the windshield air
vents position.
116
Expedition (TB7) Canada/United States of America, enUSA, Edition date: 03/2016, First Printing Climate Control
Page 120 of 500
Automatic Climate Control
Note:
Adjusting the settings when your
vehicle interior is extremely hot or cold is
not necessary. The system automatically
adjusts to heat or cool the interior to your
selected temperature as quickly as possible.
For the system to function efficiently, the
instrument panel and side air vents should
be fully open. Note:
If you select AUTO during cold
outside temperatures, the system directs
airflow to the windshield and side window
vents. In addition, the fan may run at a
slower speed until the engine warms up.
Note: If you select AUTO during hot outside
temperatures, or when the inside of the
vehicle is hot, the system automatically uses
recirculated air to maximize interior cooling.
When the interior reaches the selected
temperature, the system automatically
switches to using outside air.
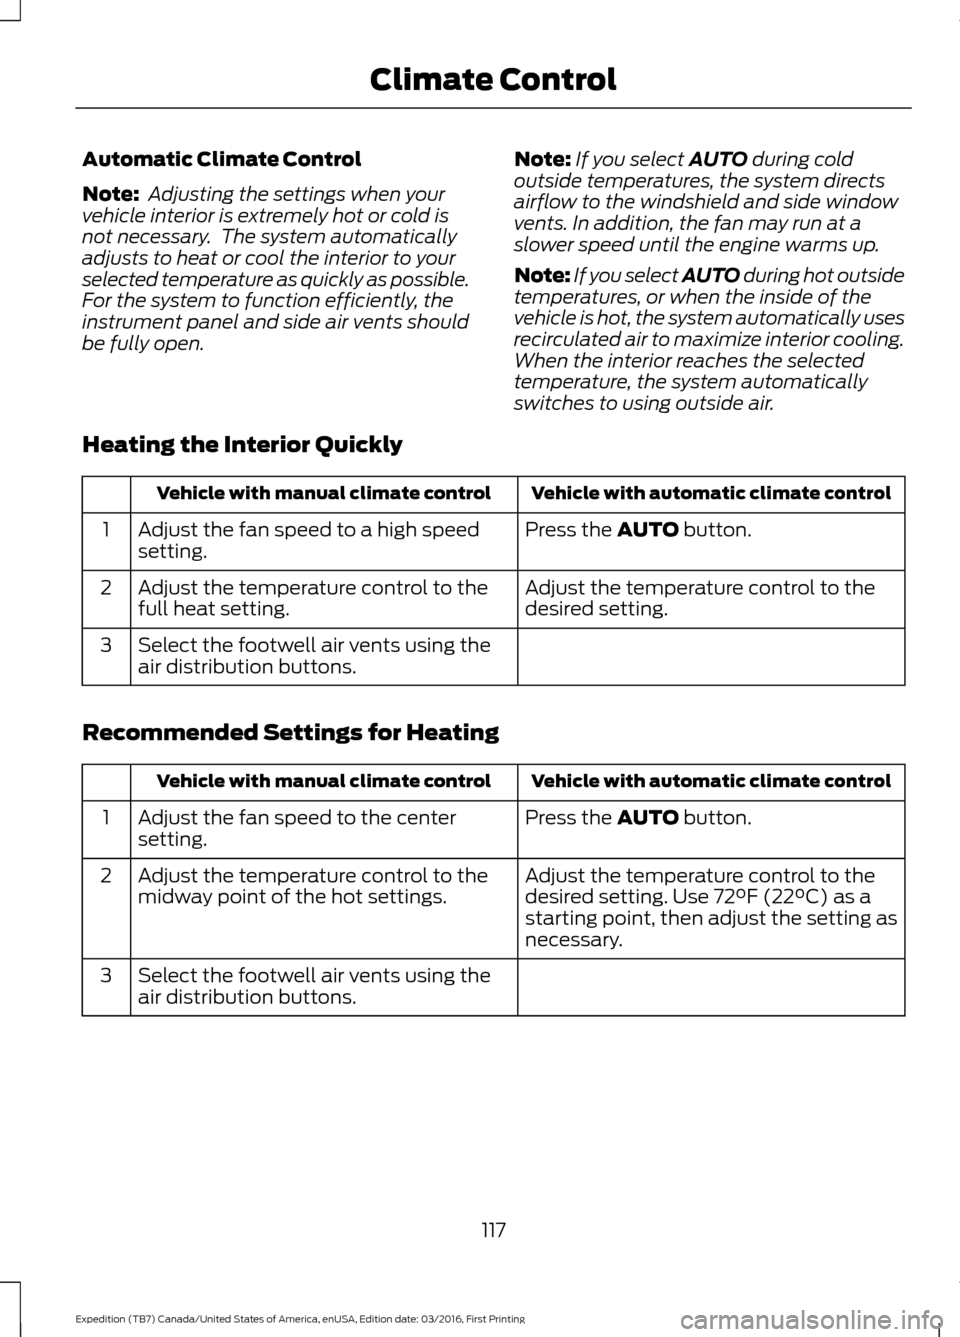
Heating the Interior Quickly Vehicle with automatic climate control
Vehicle with manual climate control
Press the
AUTO button.
Adjust the fan speed to a high speed
setting.
1
Adjust the temperature control to the
desired setting.
Adjust the temperature control to the
full heat setting.
2
Select the footwell air vents using the
air distribution buttons.
3
Recommended Settings for Heating Vehicle with automatic climate control
Vehicle with manual climate control
Press the
AUTO button.
Adjust the fan speed to the center
setting.
1
Adjust the temperature control to the
desired setting. Use
72°F (22°C) as a
starting point, then adjust the setting as
necessary.
Adjust the temperature control to the
midway point of the hot settings.
2
Select the footwell air vents using the
air distribution buttons.
3
117
Expedition (TB7) Canada/United States of America, enUSA, Edition date: 03/2016, First Printing Climate Control
Page 121 of 500
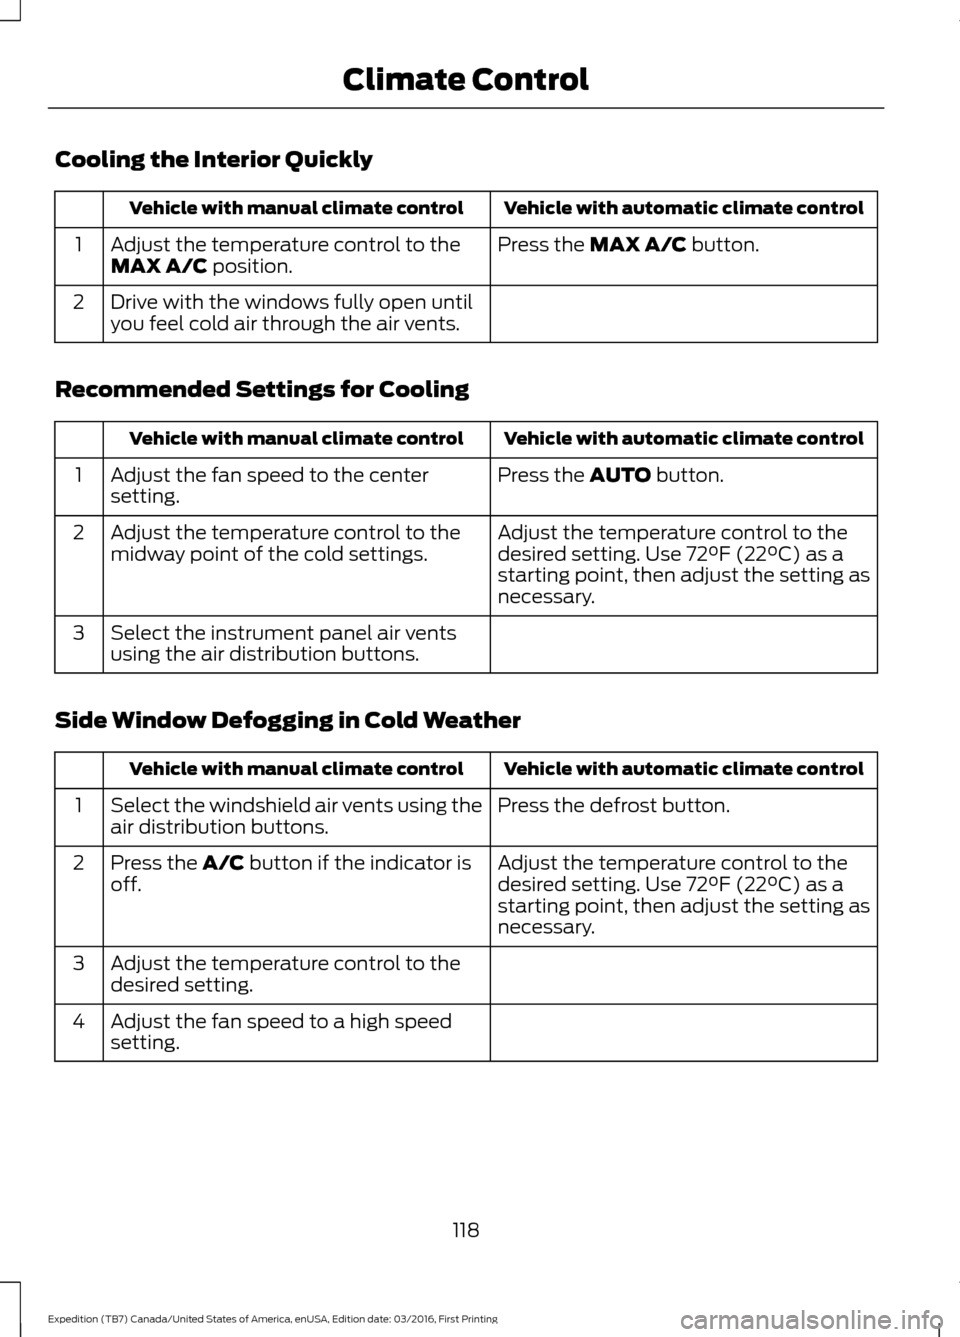
Cooling the Interior Quickly
Vehicle with automatic climate control
Vehicle with manual climate control
Press the MAX A/C button.
Adjust the temperature control to the
MAX A/C position.
1
Drive with the windows fully open until
you feel cold air through the air vents.
2
Recommended Settings for Cooling Vehicle with automatic climate control
Vehicle with manual climate control
Press the
AUTO button.
Adjust the fan speed to the center
setting.
1
Adjust the temperature control to the
desired setting. Use
72°F (22°C) as a
starting point, then adjust the setting as
necessary.
Adjust the temperature control to the
midway point of the cold settings.
2
Select the instrument panel air vents
using the air distribution buttons.
3
Side Window Defogging in Cold Weather Vehicle with automatic climate control
Vehicle with manual climate control
Press the defrost button.
Select the windshield air vents using the
air distribution buttons.
1
Adjust the temperature control to the
desired setting. Use
72°F (22°C) as a
starting point, then adjust the setting as
necessary.
Press the A/C button if the indicator is
off.
2
Adjust the temperature control to the
desired setting.
3
Adjust the fan speed to a high speed
setting.
4
118
Expedition (TB7) Canada/United States of America, enUSA, Edition date: 03/2016, First Printing Climate Control
Page 137 of 500
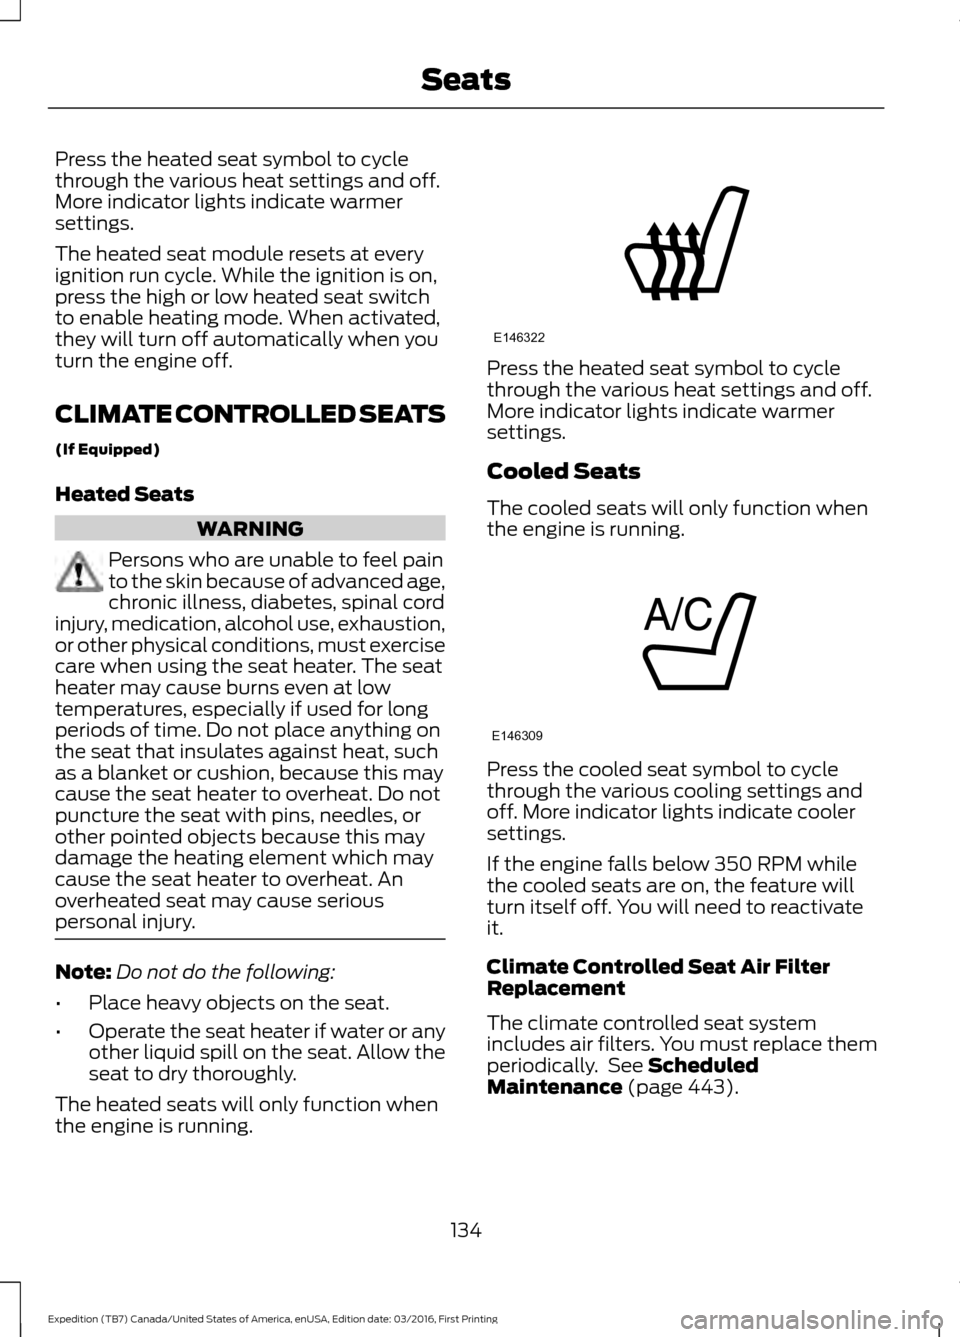
Press the heated seat symbol to cycle
through the various heat settings and off.
More indicator lights indicate warmer
settings.
The heated seat module resets at every
ignition run cycle. While the ignition is on,
press the high or low heated seat switch
to enable heating mode. When activated,
they will turn off automatically when you
turn the engine off.
CLIMATE CONTROLLED SEATS
(If Equipped)
Heated Seats
WARNING
Persons who are unable to feel pain
to the skin because of advanced age,
chronic illness, diabetes, spinal cord
injury, medication, alcohol use, exhaustion,
or other physical conditions, must exercise
care when using the seat heater. The seat
heater may cause burns even at low
temperatures, especially if used for long
periods of time. Do not place anything on
the seat that insulates against heat, such
as a blanket or cushion, because this may
cause the seat heater to overheat. Do not
puncture the seat with pins, needles, or
other pointed objects because this may
damage the heating element which may
cause the seat heater to overheat. An
overheated seat may cause serious
personal injury. Note:
Do not do the following:
• Place heavy objects on the seat.
• Operate the seat heater if water or any
other liquid spill on the seat. Allow the
seat to dry thoroughly.
The heated seats will only function when
the engine is running. Press the heated seat symbol to cycle
through the various heat settings and off.
More indicator lights indicate warmer
settings.
Cooled Seats
The cooled seats will only function when
the engine is running.
Press the cooled seat symbol to cycle
through the various cooling settings and
off. More indicator lights indicate cooler
settings.
If the engine falls below 350 RPM while
the cooled seats are on, the feature will
turn itself off. You will need to reactivate
it.
Climate Controlled Seat Air Filter
Replacement
The climate controlled seat system
includes air filters. You must replace them
periodically. See Scheduled
Maintenance (page 443).
134
Expedition (TB7) Canada/United States of America, enUSA, Edition date: 03/2016, First Printing SeatsE146322 E146309
Page 183 of 500
USING HILL DESCENT
CONTROL
Principle of Operation
WARNINGS
Hill descent control cannot control
descent in all surface conditions and
circumstances, such as ice or
extremely steep grades. Hill descent
control is a driver assist system and cannot
substitute for good judgment by the driver.
Failure to do so may result in loss of vehicle
control, crash or serious injury. Hill descent control does not provide
hill hold at 0 mph (0 km/h). When
stopped, the parking brake must be
applied or the vehicle must be placed in
park (P) or it may roll away. Hill descent control allows the driver to set
and maintain vehicle speed while
descending steep grades in various surface
conditions.
Hill descent control can maintain vehicle
speeds on downhill grades between 3 mph
(5 km/h)
and 20 mph (32 km/h). Above
20 mph (32 km/h), the system remains
armed, but descent speed cannot be set
or maintained. Hill descent control requires a cooling
down interval after sustained use. The
amount of time that the feature can
remain active before cooling varies with
conditions. The system provides a warning
in the message center and a chime sounds
when the system is about to disengage for
cooling. At this time, manually apply the
brakes to maintain descent speed.
Using Hill Descent Control Press and release the hill
descent button in the center of
the terrain management control.
The button illuminates and a chime sounds
when you switch this feature on.
To increase descent speed, press the
accelerator pedal until you reach the
desired speed. To decrease descent
speed, press the brake pedal until you
reach the desired speed.
Whether accelerating or decelerating, once
you reach the desired descent speed,
remove your feet from the pedals and hill
descent control maintains the chosen
vehicle speed.
Note: You may observe noise from the ABS
pump motor during hill descent control
operation. This is a normal characteristic of
the ABS and should be no reason for
concern.
180
Expedition (TB7) Canada/United States of America, enUSA, Edition date: 03/2016, First Printing Terrain Response
(If Equipped)
Page 216 of 500
•
Your vehicle's brake system and the
trailer brake system work
independently of each other. Changing
the gain setting on the controller does
not affect the operation of your
vehicle's brakes whether you attach a
trailer or not.
• When you switch the engine off, the
controller output is disabled and the
display and module shut down. The
controller module and display turn on
when you switch the ignition on.
• The trailer brake controller is only a
factory-installed or dealer-installed
item. Ford is not responsible for
warranty or performance of the
controller due to misuse or customer
installation.
Trailer Lamps WARNING
Never connect any trailer lamp wiring
to the vehicle's tail lamp wiring; this
may damage the electrical system
resulting in fire. Contact your authorized
dealer as soon as possible for assistance
in proper trailer tow wiring installation.
Additional electrical equipment may be
required. Trailer lamps are required on most towed
vehicles. Make sure all running lights, brake
lights, turn signals and hazard lights are
working.
Before Towing a Trailer
Practice turning, stopping and backing up
to get the feel of your vehicle-trailer
combination before starting on a trip.
When turning, make wider turns so the
trailer wheels clear curbs and other
obstacles. When Towing a Trailer
•
Do not drive faster than 70 mph (113
km/h) during the first 500 miles (800
kilometers).
• Do not make full-throttle starts.
• Check your hitch, electrical connections
and trailer wheel lug nuts thoroughly
after you have traveled 50 miles (80
kilometers).
• When stopped in congested or heavy
traffic during hot weather, place the
gearshift in position P to aid engine and
transmission cooling and to help A/C
performance.
• Turn off the speed control with heavy
loads or in hilly terrain. The speed
control may turn off automatically
when you are towing on long, steep
grades.
• Shift to a lower gear when driving down
a long or steep hill. Do not apply the
brakes continuously, as they may
overheat and become less effective.
• If your transmission is equipped with a
Grade Assist or Tow/Haul feature, use
this feature when towing. This provides
engine braking and helps eliminate
excessive transmission shifting for
optimum fuel economy and
transmission cooling.
• If your vehicle is equipped with
AdvanceTrac with RSC, this system
may turn on during typical cornering
maneuvers with a heavily loaded trailer.
This is normal. Turning the corner at a
slower speed while towing may reduce
this tendency.
• If you are towing a trailer frequently in
hot weather, hilly conditions, at the
gross combined weight rating (or any
combination of these factors), consider
refilling your rear axle with synthetic
gear lubricant (if the axle is not already
filled with it). See Capacities and
Specifications (page 304).
213
Expedition (TB7) Canada/United States of America, enUSA, Edition date: 03/2016, First Printing Towing
Page 221 of 500
BREAKING-IN
You need to break in new tires for
approximately 300 miles (480
kilometers). During this time, your vehicle
may exhibit some unusual driving
characteristics.
Avoid driving too fast during the first 1000
miles (1600 kilometers). Vary your speed
frequently and change up through the
gears early. Do not labor the engine.
Do not tow during the first 1000 miles
(1600 kilometers).
REDUCED ENGINE
PERFORMANCE
WARNING
Continued operation will increase the
engine temperature and cause the
engine to shut down completely.
If the engine coolant temperature gauge
needle moves to the upper limit position,
the engine is overheating. See Gauges
(page 84).
You must only drive your vehicle for a short
distance if the engine overheats. The
distance you can travel depends on
ambient temperature, vehicle load and
terrain. The engine will continue to operate
with limited power for a short time.
If the engine temperature continues to rise,
the fuel supply to the engine will reduce.
The air conditioning will switch off and the
engine cooling fan will operate continually.
1. Reduce your speed gradually and stop
your vehicle as soon as it is safe to do
so.
2. Switch the engine off immediately to prevent severe engine damage.
3. Wait for the engine to cool down. 4. Check the coolant level. See
Engine
Coolant Check (page 247).
5. Have your vehicle checked by an authorized dealer as soon as possible.
ECONOMICAL DRIVING
Fuel economy is affected by several things
such as how you drive, the conditions you
drive under and how you maintain your
vehicle.
There are some things to keep in mind that
may improve your fuel economy:
• Accelerate and slow down in a smooth,
moderate fashion.
• Drive at steady speeds.
• Anticipate stops; slowing down may
eliminate the need to stop.
• Combine errands and minimize
stop-and-go driving (When running
errands, go to the furthest destination
first and then work your way back
home).
• Close the windows for high-speed
driving.
• Drive at reasonable speeds.
• Keep the tires properly inflated and use
only the recommended size.
• Use the recommended engine oil.
• Perform all regularly scheduled
maintenance.
There are also some things you may want
to avoid doing because they reduce your
fuel economy:
• Avoid sudden or hard accelerations.
• Avoid revving the engine before turning
off the car.
• Avoid long idle periods.
• Do not warm up your vehicle on cold
mornings.
• Reduce the use of air conditioning and
heat.
218
Expedition (TB7) Canada/United States of America, enUSA, Edition date: 03/2016, First Printing Driving Hints