ignition FORD EXPEDITION 2019 Owners Manual
[x] Cancel search | Manufacturer: FORD, Model Year: 2019, Model line: EXPEDITION, Model: FORD EXPEDITION 2019Pages: 583, PDF Size: 6.71 MB
Page 6 of 583
Climate Controlled Seats
.........................167
Garage Door Opener
Universal Garage Door Opener ..............
170
Auxiliary Power Points
Auxiliary Power Points ...............................
174
Wireless Accessory Charging ..................
175
Storage Compartments
Center Console .............................................
178
Overhead Console .......................................
178
Starting and Stopping the Engine
General Information ...................................
179
Ignition Switch ..............................................
179
Keyless Starting ...........................................
180
Starting a Gasoline Engine ......................
180
Engine Block Heater ...................................
183
Unique Driving Characteristics
Auto-Start-Stop ..........................................
185
Fuel and Refueling
Safety Precautions .....................................
188
Fuel Quality ...................................................
188
Fuel Filler Funnel Location ......................
189
Running Out of Fuel ...................................
189
Refueling ..........................................................
191
Fuel Consumption .......................................
193
Engine Emission Control
Emission Law ................................................
195
Catalytic Converter .....................................
196
Transmission
Automatic Transmission ..........................
199Four-Wheel Drive
Using Four-Wheel Drive
..........................
206
Rear Axle
Limited Slip Differential ............................
214
Brakes
General Information ...................................
215
Hints on Driving With Anti-Lock Brakes ........................................................................\
.
215
Electric Parking Brake ................................
216
Hill Start Assist ..............................................
217
Traction Control
Principle of Operation ................................
219
Using Traction Control ...............................
219
Stability Control
Principle of Operation ...............................
220
Using Stability Control ...............................
221
Hill Descent Control
Principle of Operation ...............................
223
Using Hill Descent Control ......................
223
Parking Aids
Principle of Operation ...............................
225
Rear Parking Aid ..........................................
226
Front Parking Aid ........................................
226
Side Sensing System .................................
227
Active Park Assist .......................................
229
Rear View Camera ......................................
235
360 Degree Camera ..................................
238
Cruise Control
Principle of Operation ................................
241
Using Cruise Control ...................................
241
Using Adaptive Cruise Control ...............
242
3
Expedition (TB8) Canada/United States of America, enUSA, Edition date: 201808, Second-Printing Table of Contents
Page 46 of 583
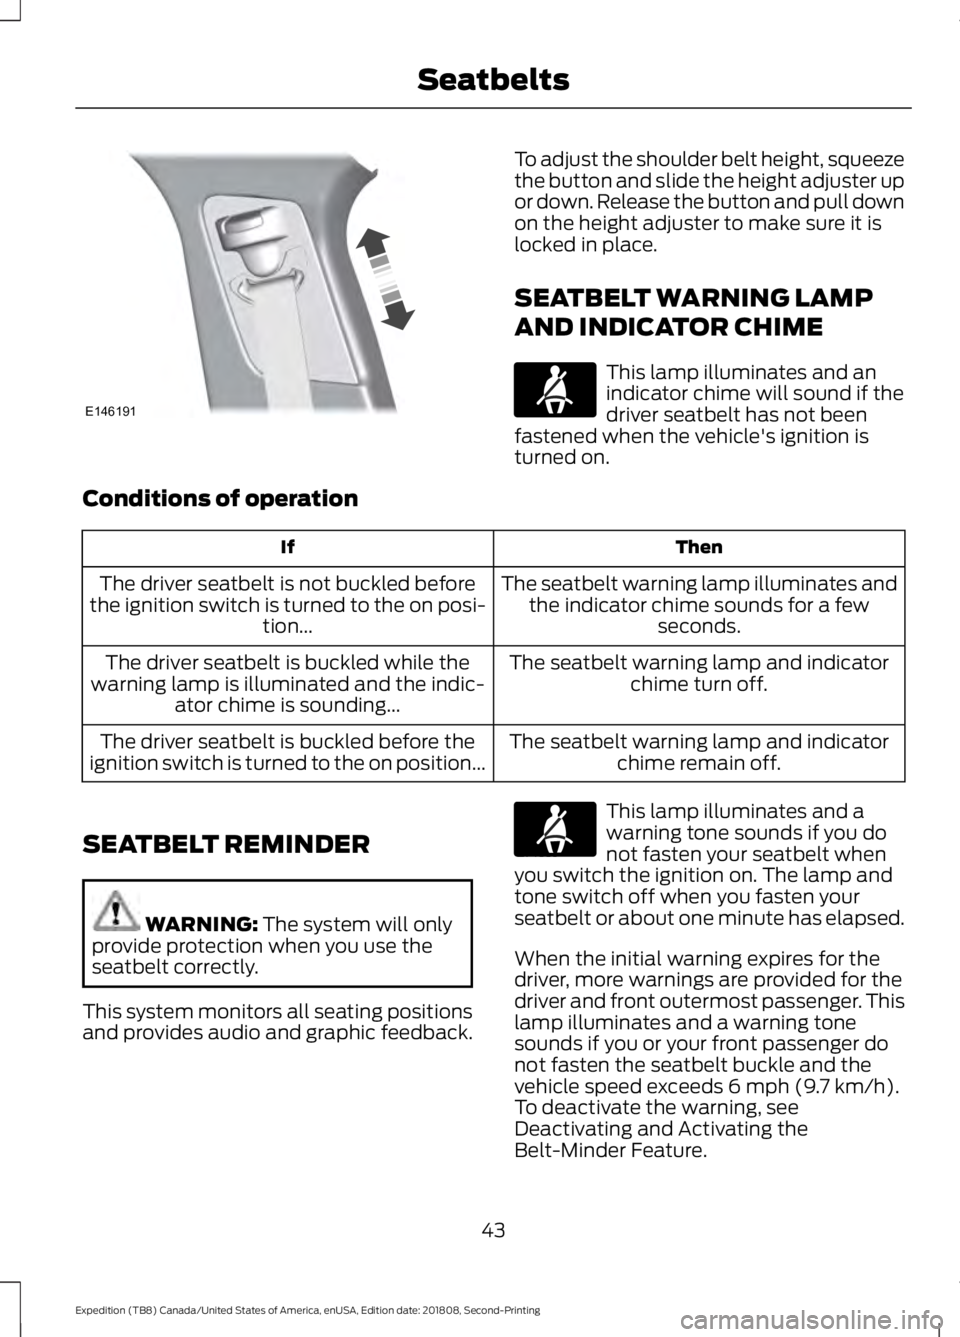
To adjust the shoulder belt height, squeeze
the button and slide the height adjuster up
or down. Release the button and pull down
on the height adjuster to make sure it is
locked in place.
SEATBELT WARNING LAMP
AND INDICATOR CHIME
This lamp illuminates and an
indicator chime will sound if the
driver seatbelt has not been
fastened when the vehicle's ignition is
turned on.
Conditions of operation Then
If
The seatbelt warning lamp illuminates andthe indicator chime sounds for a few seconds.
The driver seatbelt is not buckled before
the ignition switch is turned to the on posi- tion...
The seatbelt warning lamp and indicatorchime turn off.
The driver seatbelt is buckled while the
warning lamp is illuminated and the indic- ator chime is sounding...
The seatbelt warning lamp and indicatorchime remain off.
The driver seatbelt is buckled before the
ignition switch is turned to the on position...
SEATBELT REMINDER WARNING: The system will only
provide protection when you use the
seatbelt correctly.
This system monitors all seating positions
and provides audio and graphic feedback. This lamp illuminates and a
warning tone sounds if you do
not fasten your seatbelt when
you switch the ignition on. The lamp and
tone switch off when you fasten your
seatbelt or about one minute has elapsed.
When the initial warning expires for the
driver, more warnings are provided for the
driver and front outermost passenger. This
lamp illuminates and a warning tone
sounds if you or your front passenger do
not fasten the seatbelt buckle and the
vehicle speed exceeds
6 mph (9.7 km/h).
To deactivate the warning, see
Deactivating and Activating the
Belt-Minder Feature.
43
Expedition (TB8) Canada/United States of America, enUSA, Edition date: 201808, Second-Printing SeatbeltsE146191 E71880 E71880
Page 47 of 583
Note:
To avoid inadvertent warnings, do
not place large objects on the front
passenger seat. This lamp illuminates when you
switch the ignition on, identifying
the number of seating positions
with fastened buckles. It illuminates again
when a seating position changes from
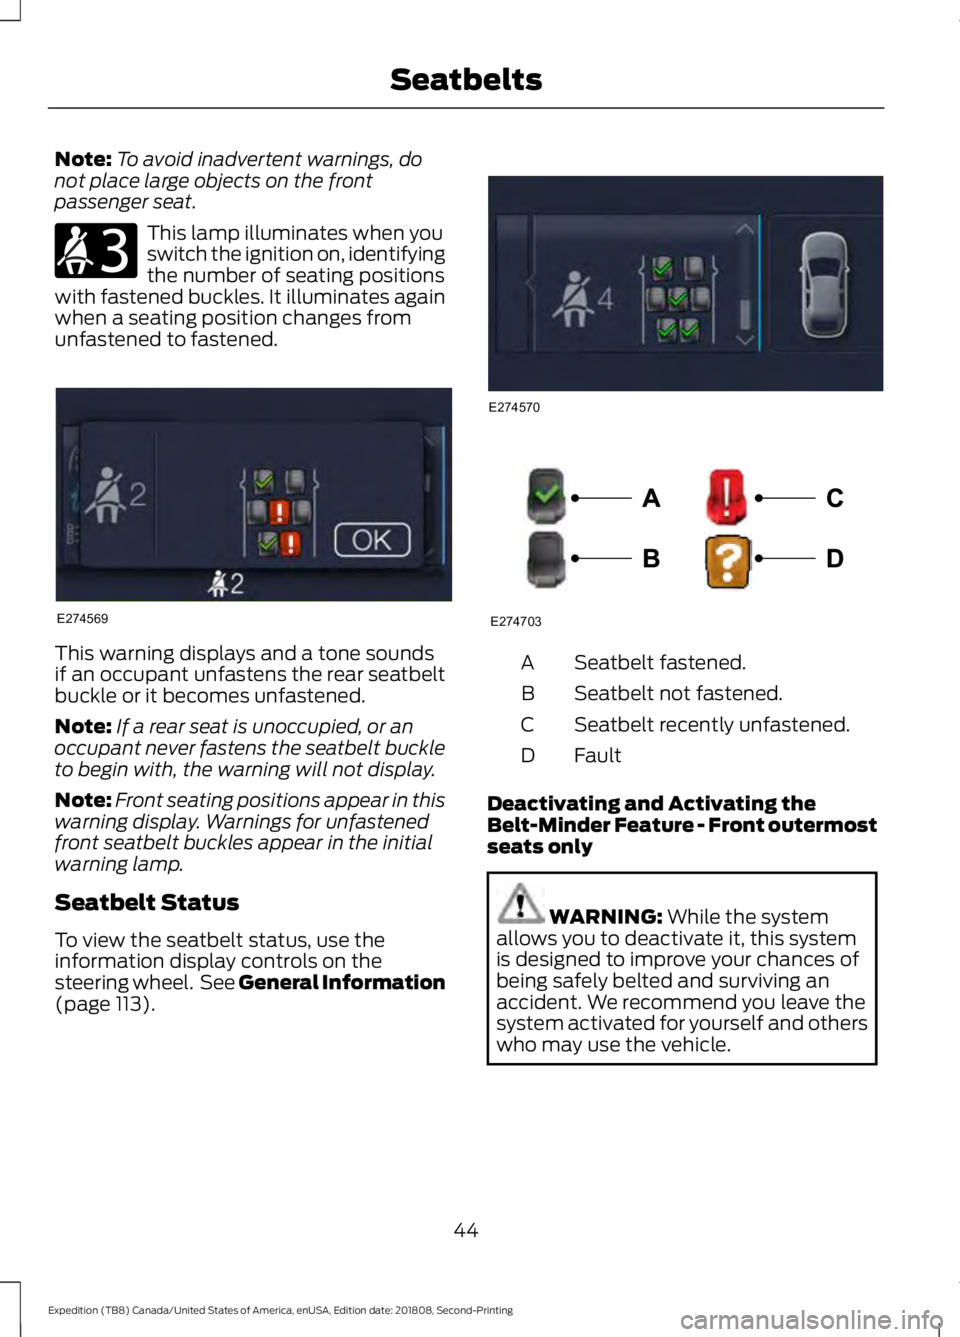
unfastened to fastened. This warning displays and a tone sounds
if an occupant unfastens the rear seatbelt
buckle or it becomes unfastened.
Note:
If a rear seat is unoccupied, or an
occupant never fastens the seatbelt buckle
to begin with, the warning will not display.
Note: Front seating positions appear in this
warning display. Warnings for unfastened
front seatbelt buckles appear in the initial
warning lamp.
Seatbelt Status
To view the seatbelt status, use the
information display controls on the
steering wheel. See General Information
(page 113). Seatbelt fastened.
A
Seatbelt not fastened.
B
Seatbelt recently unfastened.
C
Fault
D
Deactivating and Activating the
Belt-Minder Feature - Front outermost
seats only WARNING:
While the system
allows you to deactivate it, this system
is designed to improve your chances of
being safely belted and surviving an
accident. We recommend you leave the
system activated for yourself and others
who may use the vehicle.
44
Expedition (TB8) Canada/United States of America, enUSA, Edition date: 201808, Second-Printing SeatbeltsE206718 E274569 E274570 E274703
Page 48 of 583
Note:
The driver and front passenger
warnings switch on and off independently.
When you perform this procedure for one
seating position, do not buckle the other
position as this terminates the process.
Read Steps 1 - 4 before starting the
procedure.
Make sure that:
• You set the parking brake.
• The transmission is in park (P).
• The ignition is off.
• You close all vehicle doors.
• You unbuckle the driver and front
passenger seatbelts.
1. Switch the ignition on. Do not start the
engine.
2. Wait until the seatbelt warning lamp turns off (about one minute). After
Step 2, wait an additional five seconds
before proceeding with Step 3. Once
you start Step 3, you must complete
the procedure within 60 seconds.
3. For the seating position you are switching off, buckle then unbuckle the
seatbelt three times at a moderate
speed, ending in the unbuckled state.
After Step 3, the seatbelt warning lamp
turns on.
4. When the seatbelt warning lamp is on,
buckle then unbuckle the seatbelt.
After Step 4, the seatbelt warning lamp
flashes for confirmation.
• This switches the feature off if it is
currently on.
• This switches the feature on if it is
currently off. CHILD RESTRAINT AND
SEATBELT MAINTENANCE
Inspect the vehicle seatbelts and child
safety seat systems periodically to make
sure they work properly and are not
damaged. Inspect the vehicle and child
restraint seatbelts to make sure there are
no nicks, tears or cuts. Replace if
necessary. All vehicle seatbelt assemblies,
including retractors, buckles, front seatbelt
buckle assemblies, buckle support
assemblies (slide bar-if equipped),
shoulder belt height adjusters (if
equipped), shoulder belt guide on seat
backrest (if equipped), child safety seat
LATCH and tether anchors, and attaching
hardware, should be inspected after a
crash. Read the child restraint
manufacturer's instructions for additional
inspection and maintenance information
specific to the child restraint.
We recommend that all seatbelt
assemblies in use in vehicles involved in a
crash be replaced. However, if the crash
was minor and an authorized dealer finds
that the belts do not show damage and
continue to operate properly, they do not
need to be replaced. Seatbelt assemblies
not in use during a crash should also be
inspected and replaced if either damage
or improper operation is noted.
Properly care for seatbelts. See Vehicle
Care (page 349).
SEATBELT EXTENSION WARNING:
Persons who fit into
the vehicle's seatbelt should not use an
extension. Unnecessary use could result
in serious personal injury in the event of
a crash.
45
Expedition (TB8) Canada/United States of America, enUSA, Edition date: 201808, Second-Printing Seatbelts
Page 54 of 583
Note:
When you first switch the ignition on,
the passenger airbag status indicator off
and on lamps illuminate for a short period
to confirm it is functional.
The front passenger sensing system is
designed to disable (will not inflate) the
front passenger frontal airbag under
certain conditions:
• The front passenger seat is
unoccupied.
• The system determines an infant is
present in a child restraint.
• A passenger takes their weight off of
the seat for a period of time.
• If there is a problem with the airbag
system or the passenger sensing
system.
Even with this technology, parents are
strongly encouraged to always properly
restrain children in the rear seat.
• When the front passenger sensing
system disables (will not inflate) the
front passenger frontal airbag, the
passenger airbag status indicator
illuminates the off lamp and stays lit
to remind you that the front passenger
frontal airbag is disabled.
• If you have installed the child restraint
and the passenger airbag status
indicator illuminates the on lamp, then
switch your vehicle off, remove the
child restraint from your vehicle and
reinstall the restraint following the
child restraint manufacturer's
instructions.
The front passenger sensing system works
with sensors that are part of the front
passenger seat and seatbelt. The sensors
are designed to detect the presence of a
properly seated occupant and determine
if the front passenger frontal airbag should
be enabled. •
When the front passenger sensing
system enables the front passenger
frontal airbag (may inflate), the
passenger airbag status indicator
illuminates the on lamp and remains
illuminated.
If a person of adult size is sitting in the front
passenger seat, but the passenger airbag
status indicator off lamp is lit, it is possible
that the person is not sitting properly in the
seat. If this happens:
• Switch your vehicle off and ask the
person to place the seatback in an
upright position.
• Have the person sit upright in the seat,
centered on the seat cushion, with the
person's legs comfortably extended.
• Restart your vehicle and have the
person remain in this position for about
two minutes. This allows the system
to detect that person and enable the
passenger frontal airbag.
• If the indicator off lamp remains lit
even after this, you should advise the
person to ride in the rear seat.
Note: When the passenger airbag status
indicator off lamp illuminates, the passenger
side airbag (seat mounted) may be disabled
to avoid the risk of airbag deployment
issues.
After all occupants have adjusted their
seats and put on seatbelts, it is very
important that they continue to sit
properly. A properly seated occupant sits
upright, leaning against the seatback, and
centered on the seat cushion, with their
feet comfortably extended on the floor.
Sitting improperly can increase the chance
of injury in a crash event. For example, if
an occupant slouches, lies down, turns
sideways, sits forward, leans forward or
sideways, or puts one or both feet up, the
chance of injury during a crash greatly
increases.
51
Expedition (TB8) Canada/United States of America, enUSA, Edition date: 201808, Second-Printing Supplementary Restraints System
Page 58 of 583
Your vehicle has a collection of crash and
occupant sensors which provide
information to the restraints control
module which deploys (activates) the
front seatbelt pretensioners, driver airbag,
passenger airbag, rear inflatable belts, seat
mounted side airbags, and the Safety
Canopy. Based on the type of crash, the
restraints control module will deploy the
appropriate safety devices.
The restraints control module also
monitors the readiness of the above safety
devices plus the crash and occupant
sensors. The readiness of the safety
system is indicated by a warning indicator
light in the instrument cluster or by a
backup tone if the warning light is not
working. See Instrument Cluster (page
106). Routine maintenance of the airbag is
not required.
A difficulty with the system is indicated by
one or more of the following: The readiness light will not
illuminate immediately after you
switch the ignition on.
• The readiness light either flashes or
stays lit.
• A series of five beeps will be heard. The
tone pattern will repeat periodically
until the problem, the light or both are
repaired.
If any of these things happen, even
intermittently, have the supplemental
restraint system serviced at an authorized
dealer immediately. Unless serviced, the
system may not function properly in the
event of a crash. The fact that the seatbelt pretensioners
or front airbags did not activate for both
front seat occupants in a crash does not
mean that something is wrong with the
system. Rather, it means the restraints
control module determined the accident
conditions (crash severity, belt usage)
were not appropriate to activate these
safety devices.
•
The design of the front airbags is to
activate only in frontal and near-frontal
crashes (not rollovers, side impacts or
rear impacts) unless the crash causes
sufficient frontal deceleration.
• The design of the seatbelt
pretensioners and rear inflatable belts
is to activate in frontal, near-frontal
and side crashes, and in rollovers.
• The design of the side airbags is to
inflate in certain side impact crashes.
Side airbags may activate in other
types of crashes if the vehicle
experiences sufficient sideways motion
or deformation.
• The design of the Safety Canopy is to
inflate in certain side impact crashes
or rollover events. The Safety Canopy
may activate in other types of crashes
if the vehicle experiences sufficient
sideways motion or deformation, or a
certain likelihood of rollover.
AIRBAG DISPOSAL
Contact your authorized dealer as soon as
possible. Airbags must be disposed of by
qualified personnel.
55
Expedition (TB8) Canada/United States of America, enUSA, Edition date: 201808, Second-Printing Supplementary Restraints SystemE67017
Page 59 of 583
GENERAL INFORMATION ON
RADIO FREQUENCIES
This device complies with Part 15 of the
FCC Rules and with Licence exempt RSS
Standards of Industry Canada. Operation
is subject to the following two conditions:
•
This device may not cause harmful
interference, and
• This device must accept any
interference received, including
interference that may cause undesired
operation.
Note: Changes or modifications not
expressively approved by the party
responsible for compliance could void the
user's authority to operate the equipment.
The term "IC:" before the radio certification
number only signifies that Industry Canada
technical specifications were met.
The typical operating range for your
transmitter is approximately 33 ft (10 m).
Vehicles with the remote start feature will
have a greater range. One of the following
could cause a decrease in operating range:
• Weather conditions.
• Nearby radio towers.
• Structures around the vehicle.
• Other vehicles parked next to your
vehicle.
The radio frequency used by your remote
control can also be used by other radio
transmitters, for example amateur radios,
medical equipment, wireless headphones,
wireless remote controls, cell phones,
battery chargers and alarm systems. If the
frequencies are jammed, you will not be
able to use your remote control. You can
lock and unlock the doors with the key.
Note: Make sure you lock your vehicle
before leaving it unattended. Note:
If you are within range of your vehicle,
the remote control will operate if you
unintentionally press any button.
Intelligent Access
(If Equipped)
The system uses a radio frequency signal
to communicate with your vehicle and
authorizes your vehicle to unlock when one
of the following conditions are met:
• You touch the unlock sensor on the
back of the door handle with the
intelligent access key within
3 ft (1 m)
of your vehicle.
• You press the luggage compartment
button.
• You press the unlock button on the
transmitter.
If excessive radio frequency interference
is present in the area or if the transmitter
battery is low, you may need to
mechanically unlock your door. You can
use the mechanical key blade in your
intelligent access key to open the driver
door in this situation. See
Remote
Control (page 56).
REMOTE CONTROL
Integrated Keyhead Transmitter (If
Equipped)
Note: A two-button remote control
operates similarly.
Use the key blade to start your vehicle and
unlock or lock the driver door from outside
your vehicle. The integrated keyhead
transmitter functions as a programmed
ignition key that operates all the locks and
starts your vehicle, as well as a remote
control.
56
Expedition (TB8) Canada/United States of America, enUSA, Edition date: 201808, Second-Printing Keys and Remote Controls
Page 64 of 583
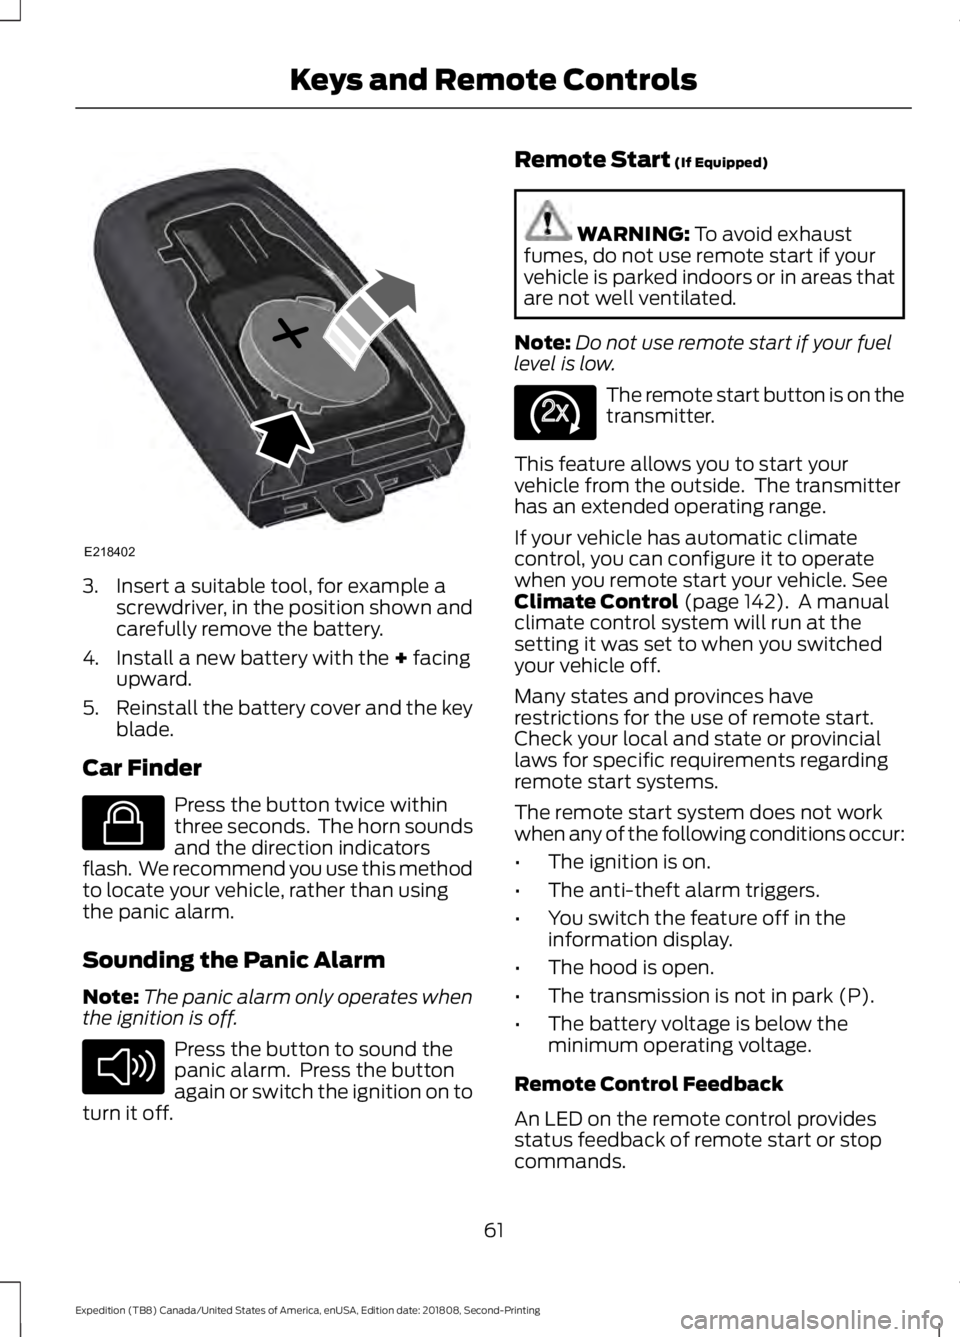
3. Insert a suitable tool, for example a
screwdriver, in the position shown and
carefully remove the battery.
4. Install a new battery with the + facing
upward.
5. Reinstall the battery cover and the key
blade.
Car Finder Press the button twice within
three seconds. The horn sounds
and the direction indicators
flash. We recommend you use this method
to locate your vehicle, rather than using
the panic alarm.
Sounding the Panic Alarm
Note: The panic alarm only operates when
the ignition is off. Press the button to sound the
panic alarm. Press the button
again or switch the ignition on to
turn it off. Remote Start
(If Equipped) WARNING:
To avoid exhaust
fumes, do not use remote start if your
vehicle is parked indoors or in areas that
are not well ventilated.
Note: Do not use remote start if your fuel
level is low. The remote start button is on the
transmitter.
This feature allows you to start your
vehicle from the outside. The transmitter
has an extended operating range.
If your vehicle has automatic climate
control, you can configure it to operate
when you remote start your vehicle.
See
Climate Control (page 142). A manual
climate control system will run at the
setting it was set to when you switched
your vehicle off.
Many states and provinces have
restrictions for the use of remote start.
Check your local and state or provincial
laws for specific requirements regarding
remote start systems.
The remote start system does not work
when any of the following conditions occur:
• The ignition is on.
• The anti-theft alarm triggers.
• You switch the feature off in the
information display.
• The hood is open.
• The transmission is not in park (P).
• The battery voltage is below the
minimum operating voltage.
Remote Control Feedback
An LED on the remote control provides
status feedback of remote start or stop
commands.
61
Expedition (TB8) Canada/United States of America, enUSA, Edition date: 201808, Second-Printing Keys and Remote ControlsE218402 E138623 E138624 E138625
Page 65 of 583
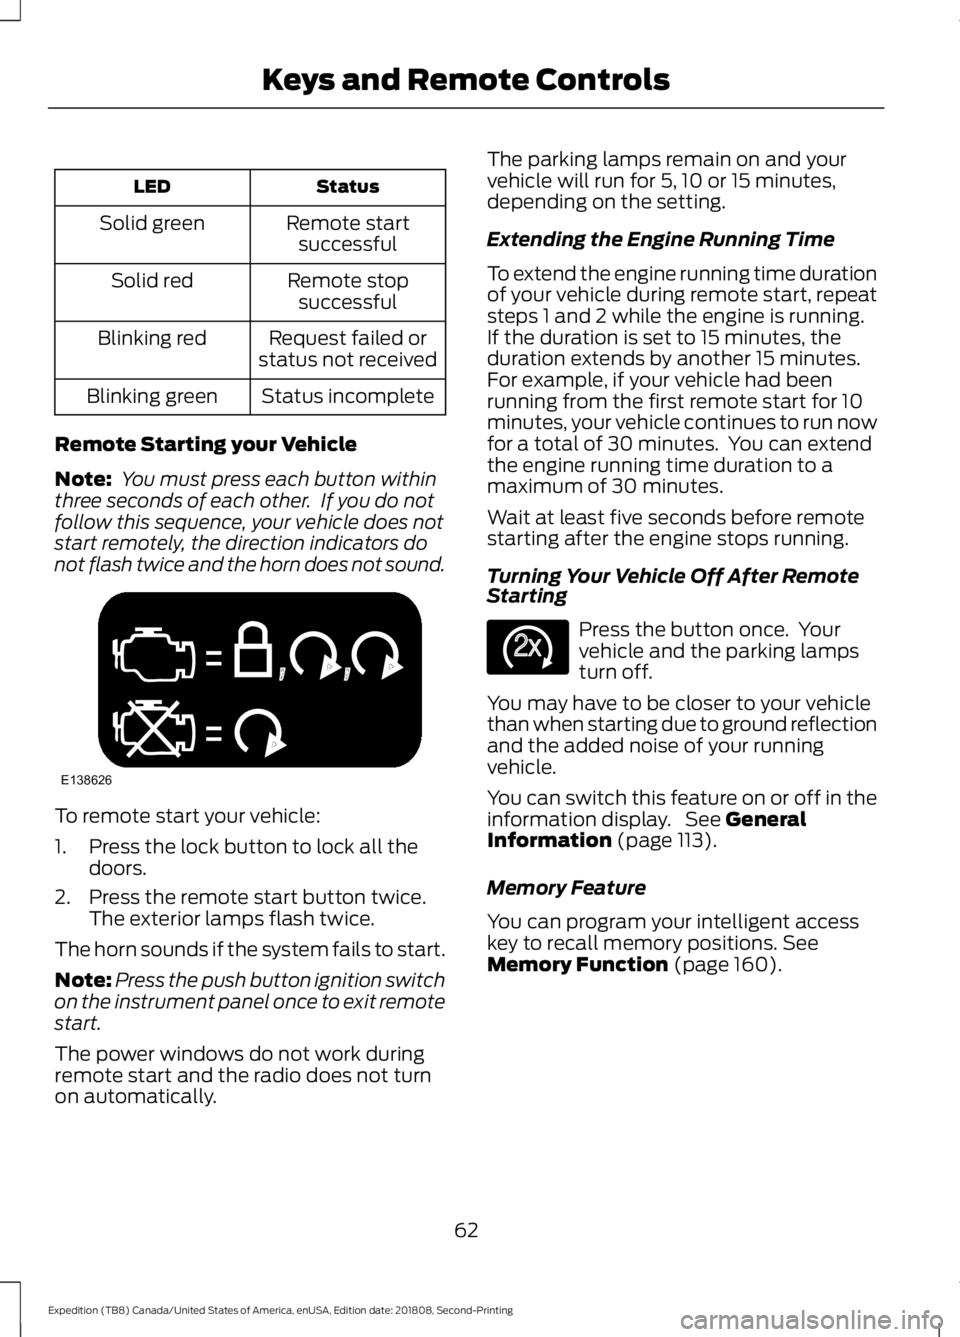
Status
LED
Remote startsuccessful
Solid green
Remote stopsuccessful
Solid red
Request failed or
status not received
Blinking red
Status incomplete
Blinking green
Remote Starting your Vehicle
Note: You must press each button within
three seconds of each other. If you do not
follow this sequence, your vehicle does not
start remotely, the direction indicators do
not flash twice and the horn does not sound. To remote start your vehicle:
1. Press the lock button to lock all the
doors.
2. Press the remote start button twice. The exterior lamps flash twice.
The horn sounds if the system fails to start.
Note: Press the push button ignition switch
on the instrument panel once to exit remote
start.
The power windows do not work during
remote start and the radio does not turn
on automatically. The parking lamps remain on and your
vehicle will run for 5, 10 or 15 minutes,
depending on the setting.
Extending the Engine Running Time
To extend the engine running time duration
of your vehicle during remote start, repeat
steps 1 and 2 while the engine is running.
If the duration is set to 15 minutes, the
duration extends by another 15 minutes.
For example, if your vehicle had been
running from the first remote start for 10
minutes, your vehicle continues to run now
for a total of 30 minutes. You can extend
the engine running time duration to a
maximum of 30 minutes.
Wait at least five seconds before remote
starting after the engine stops running.
Turning Your Vehicle Off After Remote
Starting
Press the button once. Your
vehicle and the parking lamps
turn off.
You may have to be closer to your vehicle
than when starting due to ground reflection
and the added noise of your running
vehicle.
You can switch this feature on or off in the
information display. See General
Information (page 113).
Memory Feature
You can program your intelligent access
key to recall memory positions.
See
Memory Function (page 160).
62
Expedition (TB8) Canada/United States of America, enUSA, Edition date: 201808, Second-Printing Keys and Remote ControlsE138626 E138625
Page 68 of 583
Note:
Not every feature applies to every
vehicle in every market. When they are
available for your vehicle, then they appear
in your information display, providing
choices to switch them on or off, or to select
a more specific setting.
• Various vehicle speed limits so the
MyKey driver cannot exceed certain
speeds. The information display shows
warnings followed by an audible tone
when the MyKey driver reaches the set
speed. You cannot override the set
speed by fully depressing the
accelerator pedal. WARNING: Do not set MyKey
maximum speed limit to a limit that will
prevent the driver from maintaining a
safe speed considering posted speed
limits and prevailing road conditions. The
driver is always responsible to drive in
accordance with local laws and
prevailing conditions. Failure to do so
could result in accident or injury. •
Various vehicle speed reminders so
MyKey drivers know when their vehicle
speed approaches the limits. Warnings
appear in your information display and
a tone sounds when the MyKey drivers
exceed the set vehicle speed.
• The audio system's maximum volume
limits to 45% so MyKey drivers can
concentrate on the road. A message
appears in the information display
when MyKey drivers attempt to exceed
the limited volume. MyKey also
disables the automatic volume control.
Note:
If your vehicle includes an
AM/FM radio or a very basic audio
system, then the radio may not limit.
• Always on setting. This setting forces
certain features to remain on and
active for MyKey drivers. For example,
E911 or emergency assistance and the
do not disturb features stay on even if
a MyKey driver uses the feature's
control to switch it off. When selected,
you will not be able to turn off Advance
Trac or traction control (if your vehicle
has this feature).
CREATING A MYKEY
Use the information display to create a
MyKey:
1. Insert the key you want to program into
the ignition. If your vehicle is equipped
with a push-button start, place the
remote control into the backup slot.
See
Passive Anti-Theft System
(page 81).
2. Switch the ignition on.
3. Access the main menu in the information display and then scroll
through the menus to change the
settings of your MyKey. From the
MyKey menu select the option Create
MyKey. See
Information Displays
(page 113).
65
Expedition (TB8) Canada/United States of America, enUSA, Edition date: 201808, Second-Printing MyKey
™