buttons FORD EXPEDITION 2021 Owners Manual
[x] Cancel search | Manufacturer: FORD, Model Year: 2021, Model line: EXPEDITION, Model: FORD EXPEDITION 2021Pages: 574, PDF Size: 8.33 MB
Page 33 of 574
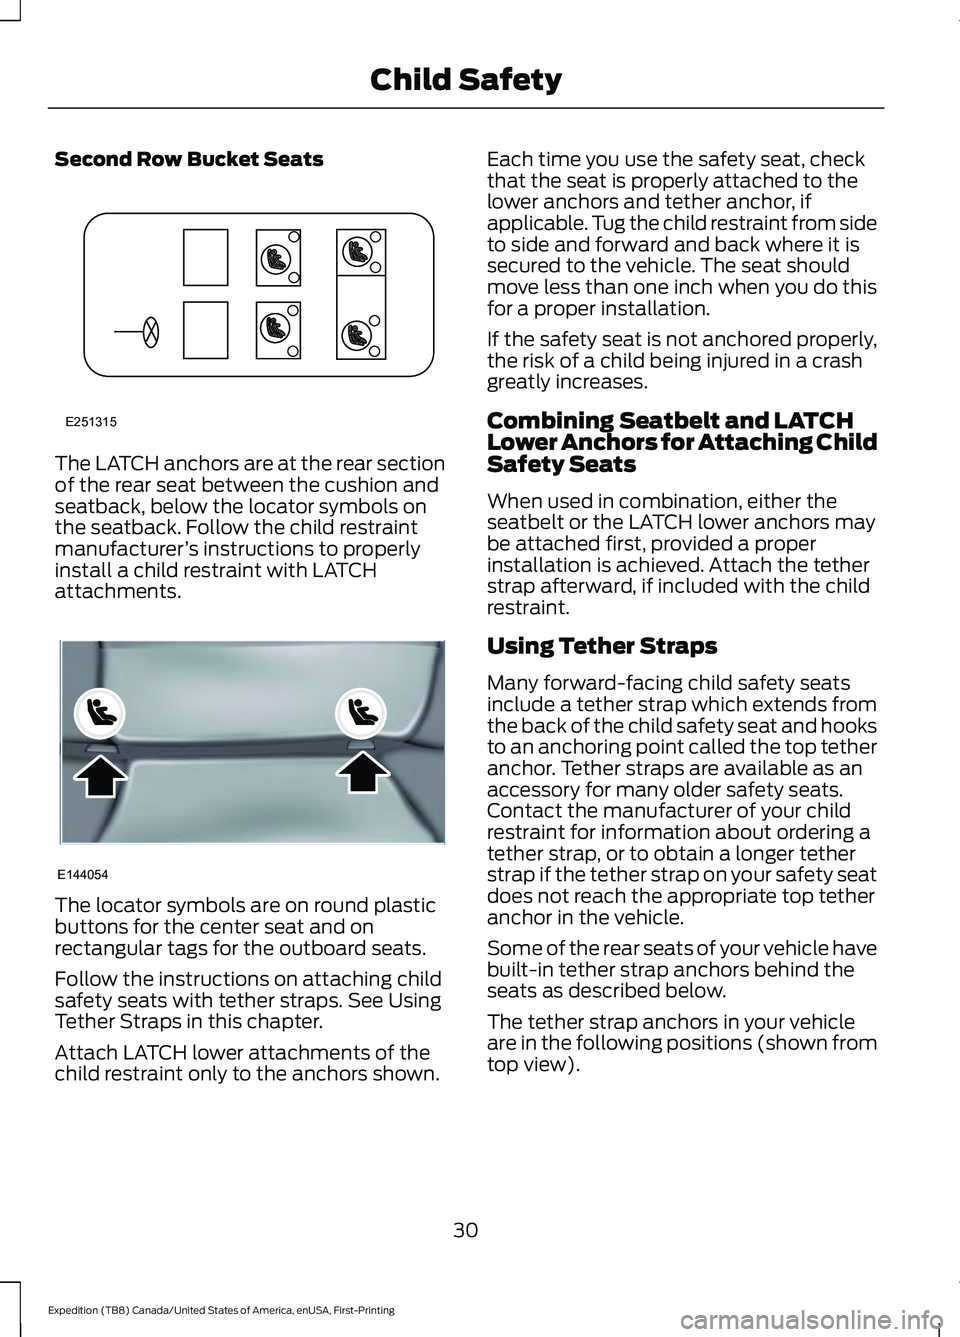
Second Row Bucket Seats
The LATCH anchors are at the rear section
of the rear seat between the cushion and
seatback, below the locator symbols on
the seatback. Follow the child restraint
manufacturer
’s instructions to properly
install a child restraint with LATCH
attachments. The locator symbols are on round plastic
buttons for the center seat and on
rectangular tags for the outboard seats.
Follow the instructions on attaching child
safety seats with tether straps. See Using
Tether Straps in this chapter.
Attach LATCH lower attachments of the
child restraint only to the anchors shown. Each time you use the safety seat, check
that the seat is properly attached to the
lower anchors and tether anchor, if
applicable. Tug the child restraint from side
to side and forward and back where it is
secured to the vehicle. The seat should
move less than one inch when you do this
for a proper installation.
If the safety seat is not anchored properly,
the risk of a child being injured in a crash
greatly increases.
Combining Seatbelt and LATCH
Lower Anchors for Attaching Child
Safety Seats
When used in combination, either the
seatbelt or the LATCH lower anchors may
be attached first, provided a proper
installation is achieved. Attach the tether
strap afterward, if included with the child
restraint.
Using Tether Straps
Many forward-facing child safety seats
include a tether strap which extends from
the back of the child safety seat and hooks
to an anchoring point called the top tether
anchor. Tether straps are available as an
accessory for many older safety seats.
Contact the manufacturer of your child
restraint for information about ordering a
tether strap, or to obtain a longer tether
strap if the tether strap on your safety seat
does not reach the appropriate top tether
anchor in the vehicle.
Some of the rear seats of your vehicle have
built-in tether strap anchors behind the
seats as described below.
The tether strap anchors in your vehicle
are in the following positions (shown from
top view).
30
Expedition (TB8) Canada/United States of America, enUSA, First-Printing Child SafetyE251315 E144054
Page 76 of 574
LOCKING AND UNLOCKING
You can use the power door lock control
or the remote control to lock and unlock
your vehicle.
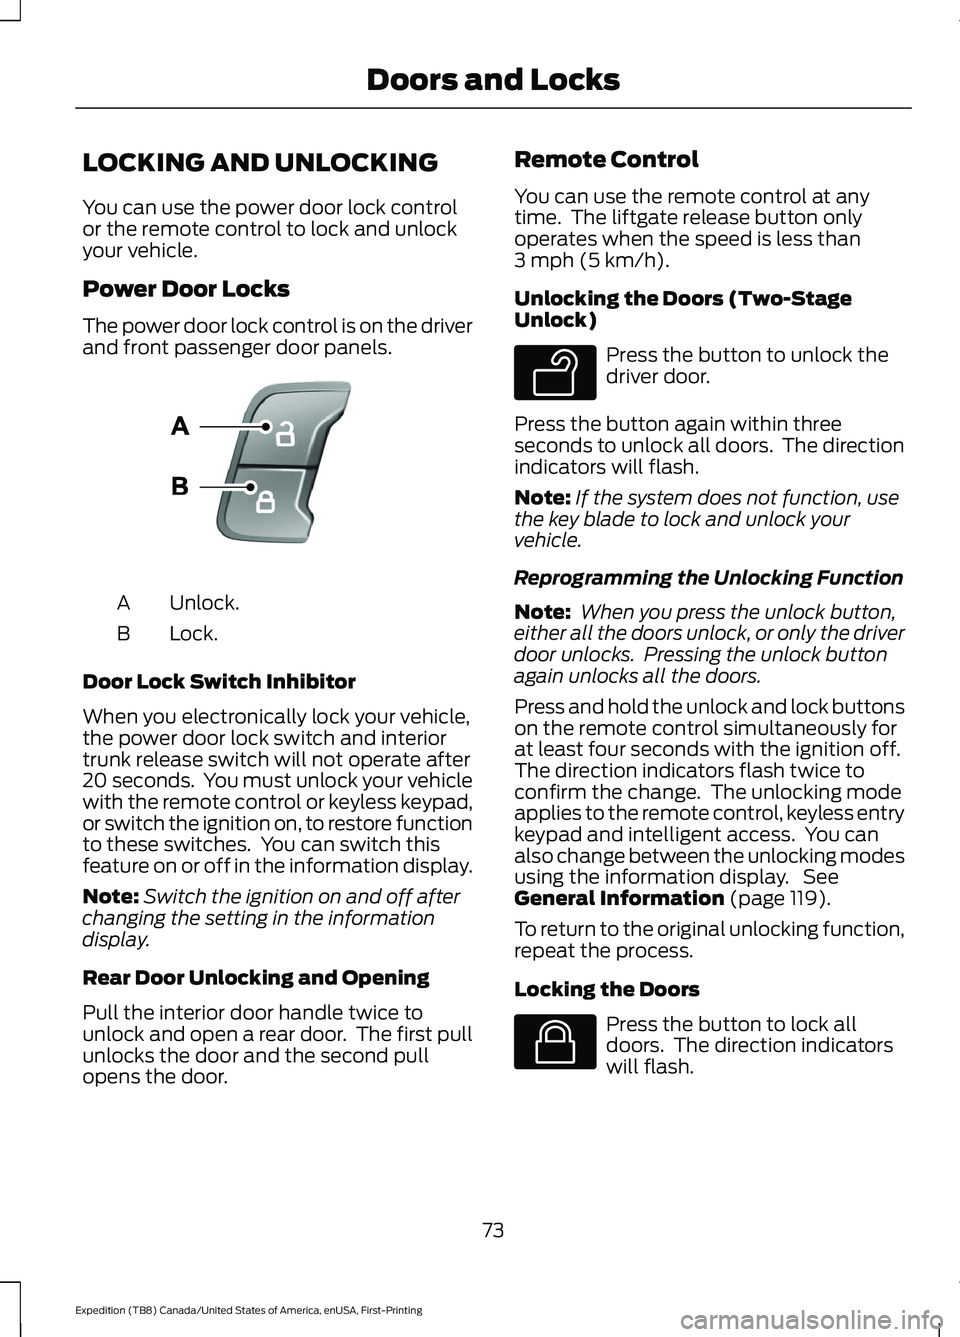
Power Door Locks
The power door lock control is on the driver
and front passenger door panels.
Unlock.
A
Lock.
B
Door Lock Switch Inhibitor
When you electronically lock your vehicle,
the power door lock switch and interior
trunk release switch will not operate after
20 seconds. You must unlock your vehicle
with the remote control or keyless keypad,
or switch the ignition on, to restore function
to these switches. You can switch this
feature on or off in the information display.
Note: Switch the ignition on and off after
changing the setting in the information
display.
Rear Door Unlocking and Opening
Pull the interior door handle twice to
unlock and open a rear door. The first pull
unlocks the door and the second pull
opens the door. Remote Control
You can use the remote control at any
time. The liftgate release button only
operates when the speed is less than
3 mph (5 km/h).
Unlocking the Doors (Two-Stage
Unlock) Press the button to unlock the
driver door.
Press the button again within three
seconds to unlock all doors. The direction
indicators will flash.
Note: If the system does not function, use
the key blade to lock and unlock your
vehicle.
Reprogramming the Unlocking Function
Note: When you press the unlock button,
either all the doors unlock, or only the driver
door unlocks. Pressing the unlock button
again unlocks all the doors.
Press and hold the unlock and lock buttons
on the remote control simultaneously for
at least four seconds with the ignition off.
The direction indicators flash twice to
confirm the change. The unlocking mode
applies to the remote control, keyless entry
keypad and intelligent access. You can
also change between the unlocking modes
using the information display. See
General Information
(page 119).
To return to the original unlocking function,
repeat the process.
Locking the Doors Press the button to lock all
doors. The direction indicators
will flash.
73
Expedition (TB8) Canada/United States of America, enUSA, First-Printing Doors and LocksE138628 E138629 E138623
Page 82 of 574
2.
With the buttons facing the rear of your
vehicle and the key ring facing upward,
place the first intelligent access key
into the backup slot inside the center
console.
3. Press the push button ignition switch once and wait for a few seconds.
4. Press the push button ignition switch again and remove the intelligent access
key from the center console.
5. Insert the second programmed key into
the backup slot in the center console,
then press the push button ignition
switch.
The factory-set code appears in the
information display for a few seconds.
Note: The code may not display until after
any other warning messages first display.
79
Expedition (TB8) Canada/United States of America, enUSA, First-Printing Doors and Locks
Page 102 of 574
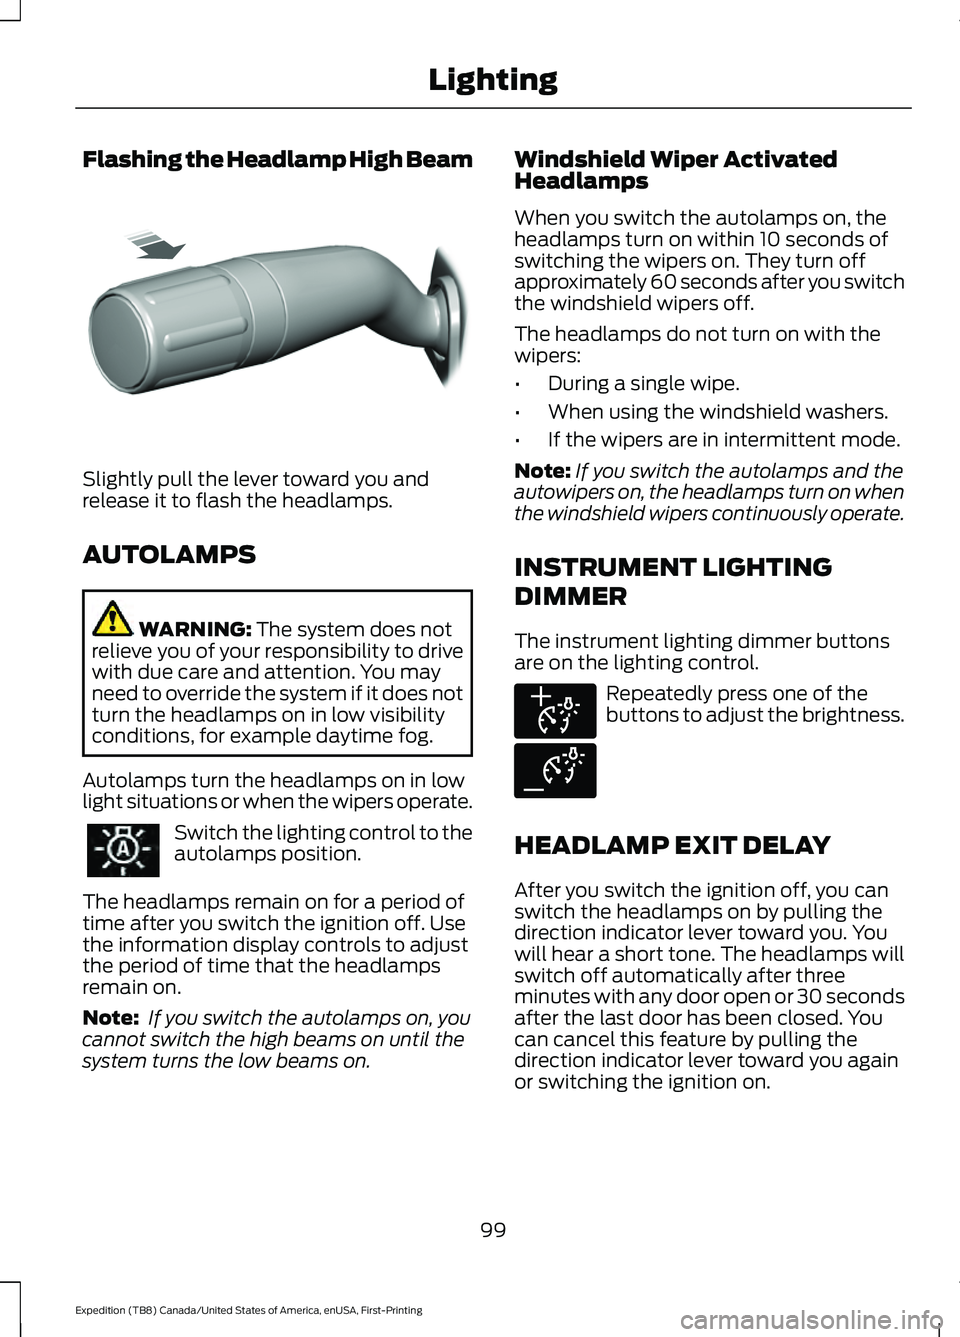
Flashing the Headlamp High Beam
Slightly pull the lever toward you and
release it to flash the headlamps.
AUTOLAMPS
WARNING: The system does not
relieve you of your responsibility to drive
with due care and attention. You may
need to override the system if it does not
turn the headlamps on in low visibility
conditions, for example daytime fog.
Autolamps turn the headlamps on in low
light situations or when the wipers operate. Switch the lighting control to the
autolamps position.
The headlamps remain on for a period of
time after you switch the ignition off. Use
the information display controls to adjust
the period of time that the headlamps
remain on.
Note: If you switch the autolamps on, you
cannot switch the high beams on until the
system turns the low beams on. Windshield Wiper Activated
Headlamps
When you switch the autolamps on, the
headlamps turn on within 10 seconds of
switching the wipers on. They turn off
approximately 60 seconds after you switch
the windshield wipers off.
The headlamps do not turn on with the
wipers:
•
During a single wipe.
• When using the windshield washers.
• If the wipers are in intermittent mode.
Note: If you switch the autolamps and the
autowipers on, the headlamps turn on when
the windshield wipers continuously operate.
INSTRUMENT LIGHTING
DIMMER
The instrument lighting dimmer buttons
are on the lighting control. Repeatedly press one of the
buttons to adjust the brightness.
HEADLAMP EXIT DELAY
After you switch the ignition off, you can
switch the headlamps on by pulling the
direction indicator lever toward you. You
will hear a short tone. The headlamps will
switch off automatically after three
minutes with any door open or 30 seconds
after the last door has been closed. You
can cancel this feature by pulling the
direction indicator lever toward you again
or switching the ignition on.
99
Expedition (TB8) Canada/United States of America, enUSA, First-Printing LightingE311233 E291299 E291298
Page 122 of 574
GENERAL INFORMATION -
VEHICLES WITH: 4 INCH
INFORMATION AND
ENTERTAINMENT DISPLAY
SCREEN
WARNING: Driving while distracted
can result in loss of vehicle control, crash
and injury. We strongly recommend that
you use extreme caution when using any
device that may take your focus off the
road. Your primary responsibility is the
safe operation of your vehicle. We
recommend against the use of any
hand-held device while driving and
encourage the use of voice-operated
systems when possible. Make sure you
are aware of all applicable local laws
that may affect the use of electronic
devices while driving.
You can control various systems on your
vehicle using the information display
controls on the steering wheel.
Corresponding information appears in the
information display. Note:
Some options could appear slightly
different or not at all if the items are
optional.
Note: Trailer options are not available if
your vehicle speed is greater than 3 mph
(5 km/h).
Note: Some MyKey menu options only
appear if MyKey is enabled and you
programmed at least one MyKey. This icon gives you the ability to
switch a feature on or off. A
check in the box indicates the
feature is on, and unchecked indicates the
feature is off.
Information Display Controls (4
Inch Display)
• Press the up and down arrow buttons
to scroll through and highlight the
options within a menu.
• Press the right arrow button to enter a
sub-menu.
• Press the left arrow button to exit a
menu.
• Press the
OK button to choose and
confirm a setting or messages.
4 Inch Display Main Menu
Display Mode Trip/FuelTowing
Off Road Settings
119
Expedition (TB8) Canada/United States of America, enUSA, First-Printing Information DisplaysE204495
Page 127 of 574
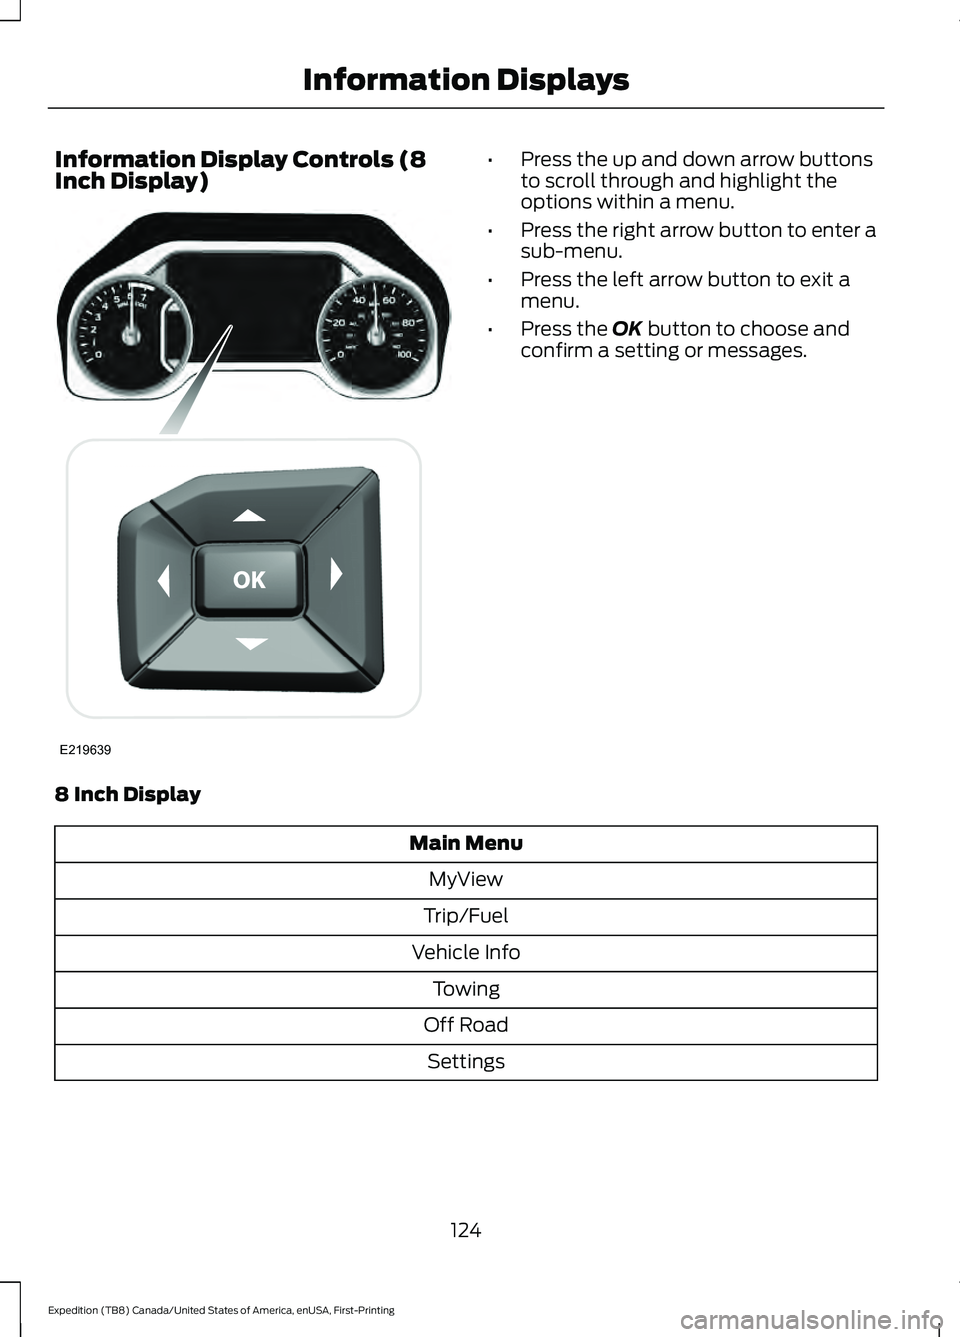
Information Display Controls (8
Inch Display) •
Press the up and down arrow buttons
to scroll through and highlight the
options within a menu.
• Press the right arrow button to enter a
sub-menu.
• Press the left arrow button to exit a
menu.
• Press the OK button to choose and
confirm a setting or messages.
8 Inch Display Main Menu
MyView
Trip/Fuel
Vehicle Info Towing
Off Road Settings
124
Expedition (TB8) Canada/United States of America, enUSA, First-Printing Information DisplaysE219639
Page 161 of 574
WARNING: The head restraint is a
safety device. Whenever possible it
should be installed and properly
adjusted when the seat is occupied.
Failure to adjust the head restraint
properly could reduce its effectiveness
during certain impacts.
Note: Adjust the seat backrest to an upright
driving position before adjusting the head
restraint. Adjust the head restraint so that
the top of it is level with the top of your head
and as far forward as possible. Make sure
that you remain comfortable. If you are
extremely tall, adjust the head restraint to
its highest position.
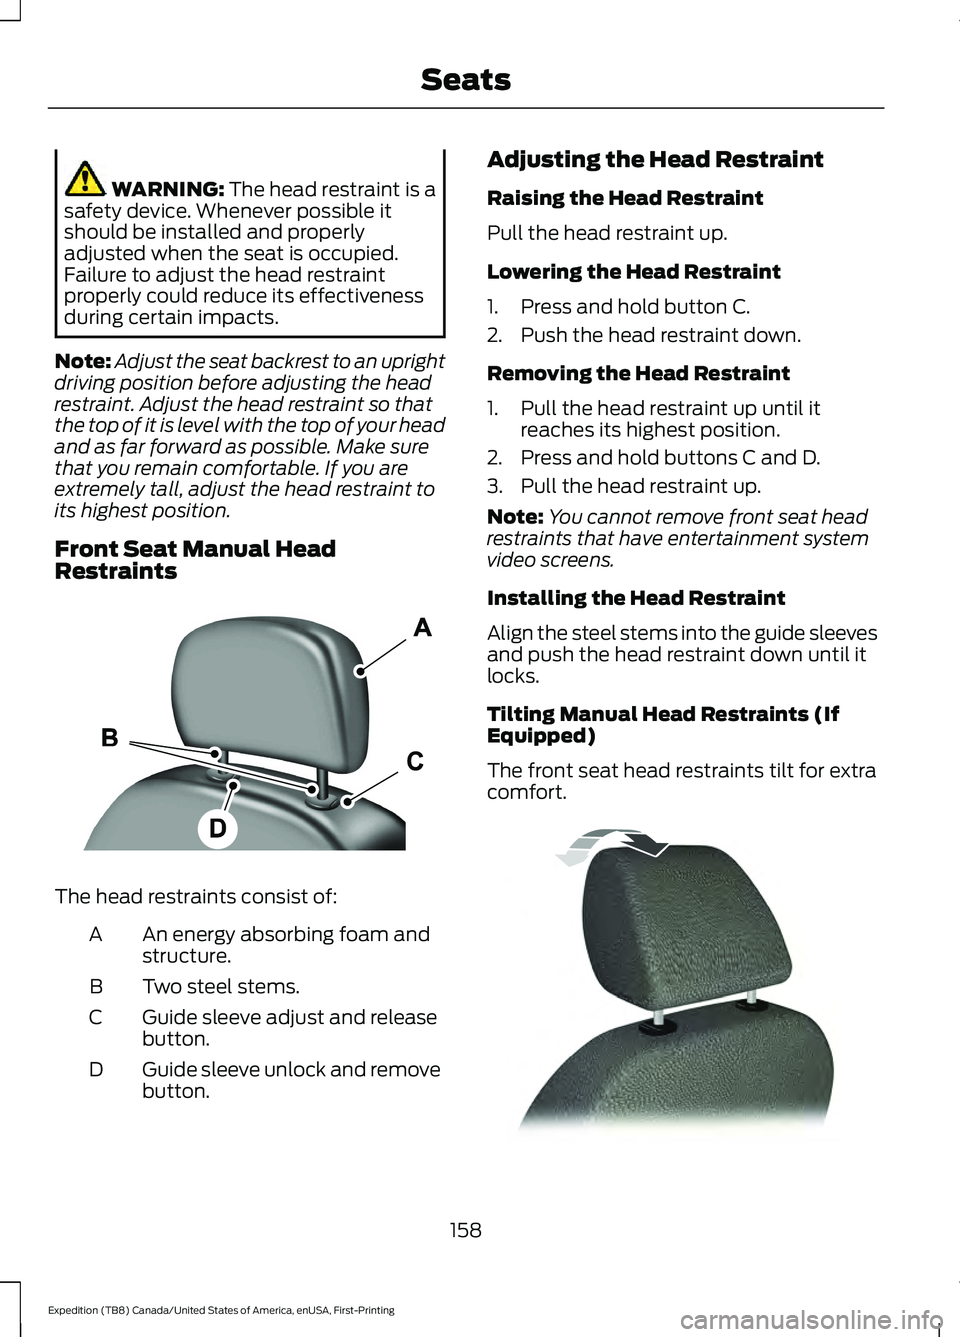
Front Seat Manual Head
Restraints The head restraints consist of:
An energy absorbing foam and
structure.
A
Two steel stems.
B
Guide sleeve adjust and release
button.
C
Guide sleeve unlock and remove
button.
D Adjusting the Head Restraint
Raising the Head Restraint
Pull the head restraint up.
Lowering the Head Restraint
1. Press and hold button C.
2. Push the head restraint down.
Removing the Head Restraint
1. Pull the head restraint up until it
reaches its highest position.
2. Press and hold buttons C and D.
3. Pull the head restraint up.
Note: You cannot remove front seat head
restraints that have entertainment system
video screens.
Installing the Head Restraint
Align the steel stems into the guide sleeves
and push the head restraint down until it
locks.
Tilting Manual Head Restraints (If
Equipped)
The front seat head restraints tilt for extra
comfort. 158
Expedition (TB8) Canada/United States of America, enUSA, First-Printing SeatsE138642 E144727
Page 162 of 574
1. Adjust the seat backrest to an upright
driving or riding position.
2. Pivot the head restraint forward toward
your head to the desired position.
After the head restraint reaches the
forward-most tilt position, pivot it forward
again to release it to the rearward, un-tilted
position.
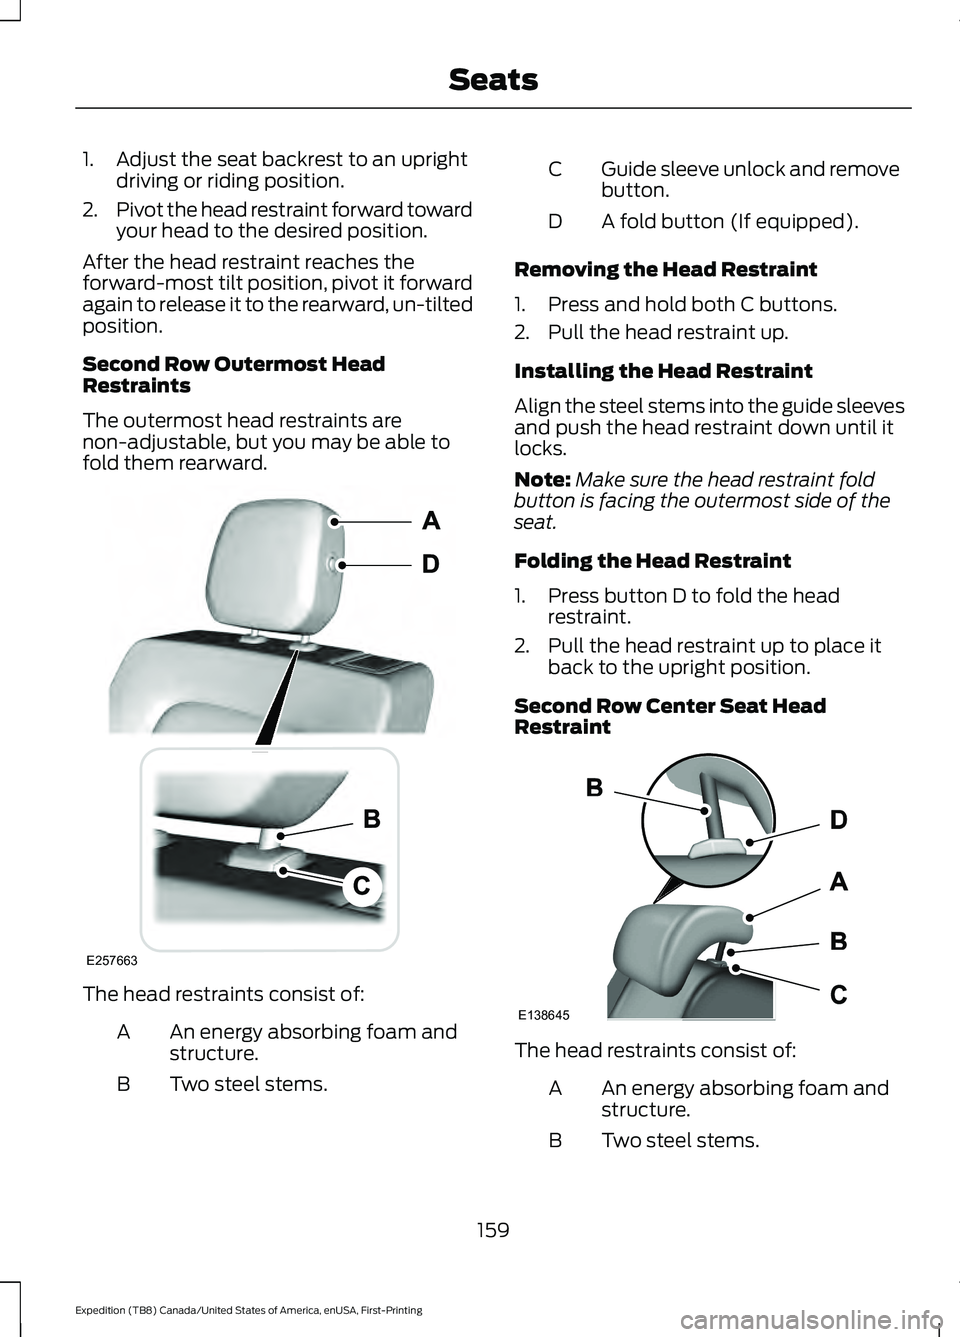
Second Row Outermost Head
Restraints
The outermost head restraints are
non-adjustable, but you may be able to
fold them rearward. The head restraints consist of:
An energy absorbing foam and
structure.
A
Two steel stems.
B Guide sleeve unlock and remove
button.
C
A fold button (If equipped).
D
Removing the Head Restraint
1. Press and hold both C buttons.
2. Pull the head restraint up.
Installing the Head Restraint
Align the steel stems into the guide sleeves
and push the head restraint down until it
locks.
Note: Make sure the head restraint fold
button is facing the outermost side of the
seat.
Folding the Head Restraint
1. Press button D to fold the head restraint.
2. Pull the head restraint up to place it back to the upright position.
Second Row Center Seat Head
Restraint The head restraints consist of:
An energy absorbing foam and
structure.
A
Two steel stems.
B
159
Expedition (TB8) Canada/United States of America, enUSA, First-Printing SeatsE257663 E138645
Page 163 of 574
Guide sleeve adjust and release
button.
C
Guide sleeve unlock and remove
button.
D
Raising the Head Restraint
Pull the head restraint up.
Lowering the Head Restraint
1. Press and hold button C.
2. Push the head restraint down.
Removing the Head Restraint
1. Pull the head restraint up until it reaches its highest position.
2. Press and hold buttons C and D.
3. Pull the head restraint up.
Installing the Head Restraint
Align the steel stems into the guide sleeves
and push the head restraint down until it
locks.
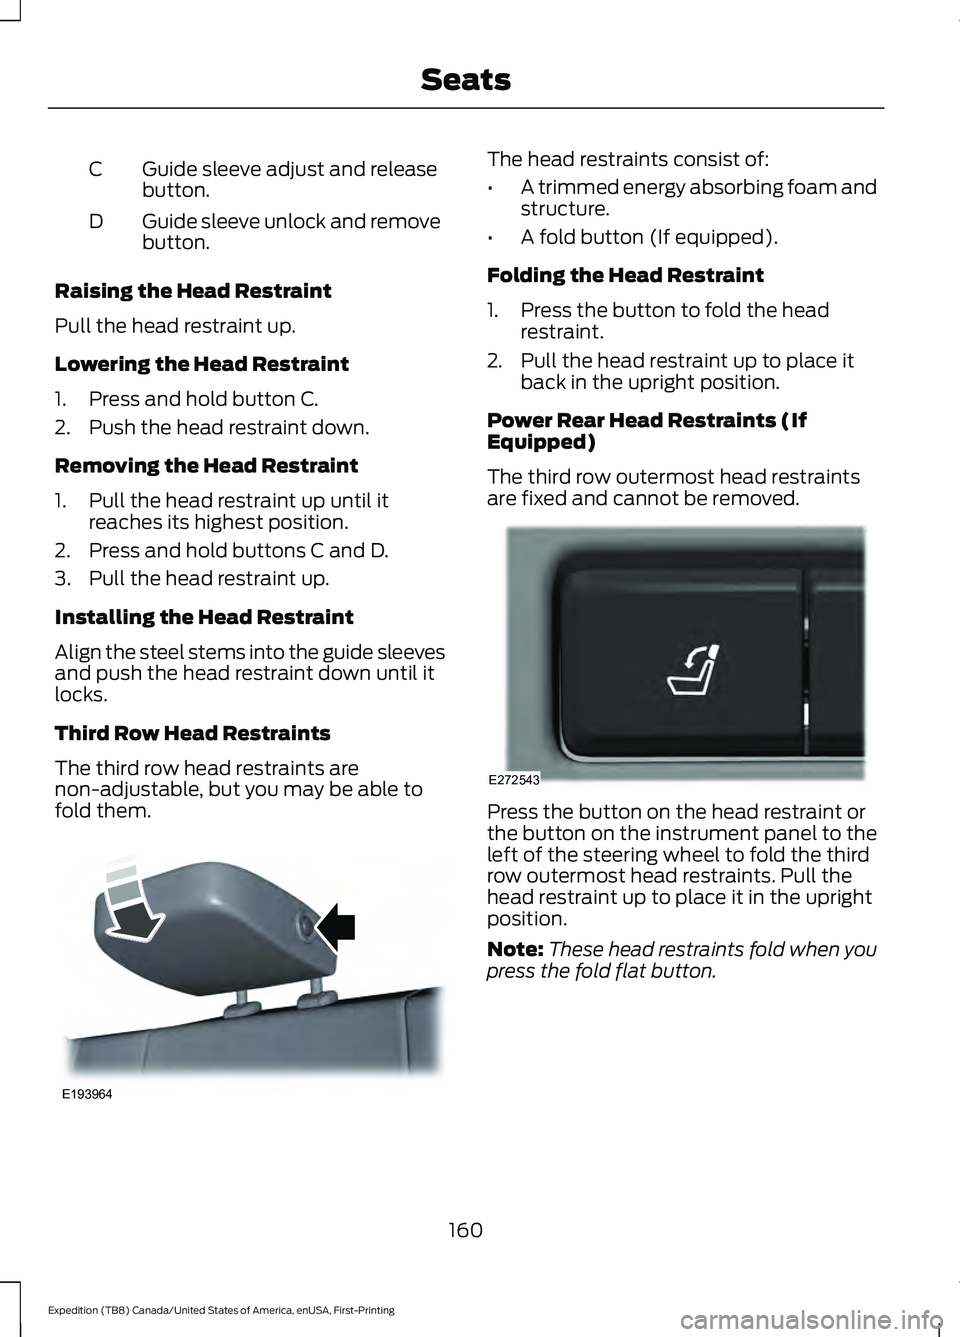
Third Row Head Restraints
The third row head restraints are
non-adjustable, but you may be able to
fold them. The head restraints consist of:
•
A trimmed energy absorbing foam and
structure.
• A fold button (If equipped).
Folding the Head Restraint
1. Press the button to fold the head restraint.
2. Pull the head restraint up to place it back in the upright position.
Power Rear Head Restraints (If
Equipped)
The third row outermost head restraints
are fixed and cannot be removed. Press the button on the head restraint or
the button on the instrument panel to the
left of the steering wheel to fold the third
row outermost head restraints. Pull the
head restraint up to place it in the upright
position.
Note:
These head restraints fold when you
press the fold flat button.
160
Expedition (TB8) Canada/United States of America, enUSA, First-Printing SeatsE193964 E272543
Page 171 of 574
Adjusting the Second Row Center
Seat (If Equipped)
Note: Move this seat forward to keep a
child in a child restraint close to the front
seat occupants. Move the seat to the full
rearward position when it is occupied by
older children or adults, including children
in booster seats. Lift the handle to move the seat forward
or backward.
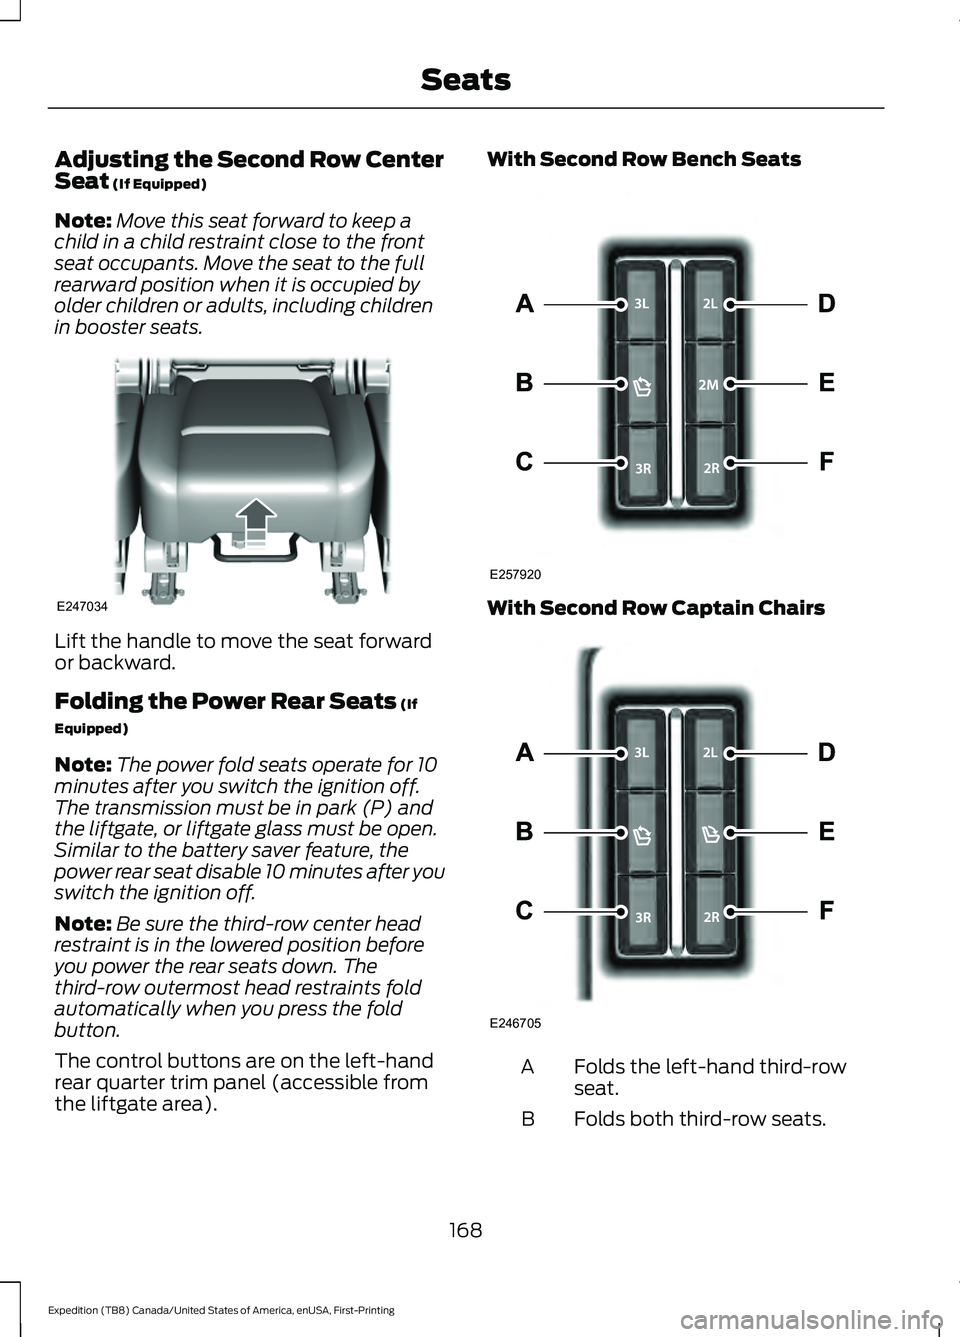
Folding the Power Rear Seats
(If
Equipped)
Note: The power fold seats operate for 10
minutes after you switch the ignition off.
The transmission must be in park (P) and
the liftgate, or liftgate glass must be open.
Similar to the battery saver feature, the
power rear seat disable 10 minutes after you
switch the ignition off.
Note: Be sure the third-row center head
restraint is in the lowered position before
you power the rear seats down. The
third-row outermost head restraints fold
automatically when you press the fold
button.
The control buttons are on the left-hand
rear quarter trim panel (accessible from
the liftgate area). With Second Row Bench Seats
With Second Row Captain Chairs
Folds the left-hand third-row
seat.
A
Folds both third-row seats.
B
168
Expedition (TB8) Canada/United States of America, enUSA, First-Printing SeatsE247034 E257920 E246705