FORD EXPEDITION EL 2016 Owners Manual
Manufacturer: FORD, Model Year: 2016, Model line: EXPEDITION EL, Model: FORD EXPEDITION EL 2016Pages: 421, PDF Size: 7.39 MB
Page 221 of 421
Note:If completed successfully, theinformation display shows NEUTRAL TOWLEAVE IN N or NEUTRAL TOW ENABLEDLEAVE TRANSMISSION IN NEUTRAL.This indicates that your vehicle is safe totow with all wheels on the ground.
Note:If you do not see the message in thedisplay, you must perform the procedureagain from the beginning.
Note:You may hear an audible noise as thetransfer case shifts into its neutral position.This is normal.
6. Leave the transmission in position Nand turn the ignition as far as it will gotoward the off position (it will not turnfully off when the transmission is inposition N). If your vehicle has anignition key, you must leave the key inthe ignition while towing. To lock andunlock your vehicle, use the keylessentry keypad or extra set of keys. If yourvehicle has intelligent access, press theengine START/STOP button oncewithout pressing the brake pedal. Youdo not need to leave your keys in thevehicle. You can lock and unlock yourvehicle as you normally do.
7. Release the brake pedal.
WARNINGS
Do not disconnect the battery duringrecreational towing. Doing so willprevent the transfer case fromshifting properly and may cause the vehicleto roll even if the transmission is in P(Park).
Shifting the transfer case to itsneutral position for recreationaltowing may cause the vehicle to beable to roll even if the transmission is in P(Park). The driver or others could beinjured. Make sure the foot brake isdepressed and the vehicle is in a secureand safe position while the transfer caseis being shifted to its neutral position.
WARNINGS
Failing to put the transfer case in itsneutral position will damage vehiclecomponents.
Note:You can check four-wheel-downtowing status at any time by opening thedriver's door or turning the ignition to theaccessory or on position and verifying theNEUTRAL TOW ENABLED messagedisplays in the cluster.
Exiting Four-wheel-down Towing
To exit four-wheel-down towing and returnthe transfer case to its 2H position:
1.With your vehicle still properly securedto the tow vehicle, put the ignition inthe on position, but do not start theengine. If your vehicle has an ignitionkey, turn the key to on. If your vehiclehas intelligent access, press the engineSTART/STOP button twice withoutpressing the brake pedal.
2. Press and hold the brake pedal.
3.Shift the transmission out of N and intoany gear.
4. Release the brake pedal.
Note:If completed successfully, theinstrument cluster displays 4X2, andNEUTRAL TOW DISABLED.
Note:If the indicator light and message donot display, you must perform the procedureagain from the beginning.
Note:You may hear an audible noise as thetransfer case shifts out of its neutralposition. This is normal.
Note:If SHIFT DELAY PULL FORWARDdisplays in the instrument cluster, transfercase gear tooth blockage is present. See theinstructions after this section.
5. Apply the parking brake, and thendisconnect the vehicle from the towvehicle.
218
Expedition (TB7) Canada/United States of America, enUSA, First Printing
Towing
Page 222 of 421
6. Release the parking brake, start theengine, and shift the transmission toposition D to make sure the transfercase is out of position N.
7. If the transfer case does notsuccessfully shift out of position N, setthe parking brake until you can haveyour vehicle serviced.
Resolving the SHIFT DELAY PULLFORWARD Message
If the instrument cluster displays SHIFTDELAY PULL FORWARD perform thefollowing:
1. Press and hold the brake pedal.
2. Put the transmission into position N,and then start the engine.
3. With the engine running, shift thetransmission to position D and let thevehicle roll forward, up to 3 feet (1meter). You may hear an audible noiseas the transfer case shifts out of itsneutral position. This is normal.
4. Make sure the instrument clusterdisplays NEUTRAL TOW DISABLED.
219
Expedition (TB7) Canada/United States of America, enUSA, First Printing
Towing
Page 223 of 421
BREAKING-IN
You need to break in new tires forapproximately 300 miles (480kilometers). During this time, your vehiclemay exhibit some unusual drivingcharacteristics.
Avoid driving too fast during the first 1000miles (1600 kilometers). Vary your speedfrequently and change up through thegears early. Do not labor the engine.
Do not tow during the first 1000 miles(1600 kilometers).
REDUCED ENGINE
PERFORMANCE
WARNING
Continued operation will increase theengine temperature and cause theengine to shut down completely.
If the engine coolant temperature gaugeneedle moves to the upper limit position,the engine is overheating. See Gauges(page 85).
You must only drive your vehicle for a shortdistance if the engine overheats. Thedistance you can travel depends onambient temperature, vehicle load andterrain. The engine will continue to operatewith limited power for a short time.
If the engine temperature continues to rise,the fuel supply to the engine will reduce.The air conditioning will switch off and theengine cooling fan will operate continually.
1.Reduce your speed gradually and stopyour vehicle as soon as it is safe to doso.
2. Switch the engine off immediately toprevent severe engine damage.
3. Wait for the engine to cool down.
4. Check the coolant level. See EngineCoolant Check (page 247).
5. Have your vehicle checked by anauthorized dealer as soon as possible.
ECONOMICAL DRIVING
Fuel economy is affected by several thingssuch as how you drive, the conditions youdrive under and how you maintain yourvehicle.
There are some things to keep in mind thatmay improve your fuel economy:
•Accelerate and slow down in a smooth,moderate fashion.
•Drive at steady speeds.
•Anticipate stops; slowing down mayeliminate the need to stop.
•Combine errands and minimizestop-and-go driving(When runningerrands, go to the furthest destinationfirst and then work your way backhome).
•Close the windows for high-speeddriving.
•Drive at reasonable speeds.
•Keep the tires properly inflated and useonly the recommended size.
•Use the recommended engine oil.
•Perform all regularly scheduledmaintenance.
There are also some things you may wantto avoid doing because they reduce yourfuel economy:
•Avoid sudden or hard accelerations.
•Avoid revving the engine before turningoff the car.
•Avoid long idle periods.
•Do not warm up your vehicle on coldmornings.
•Reduce the use of air conditioning andheat.
220
Expedition (TB7) Canada/United States of America, enUSA, First Printing
Driving Hints
Page 224 of 421
•Avoid using speed control in hillyterrain.
•Do not rest your foot on the brakepedal while driving.
•Avoid carrying unnecessary weight.
•Avoid adding particular accessories toyour vehicle (e.g. bug deflectors,rollbars/light bars, running boards, skiracks).
•Avoid driving with the wheels out ofalignment.
DRIVING THROUGH WATER
WARNING
Do not drive through flowing or deepwater as you may lose control of yourvehicle.
Note:Driving through standing water cancause vehicle damage.
Note:Engine damage can occur if waterenters the air filter.
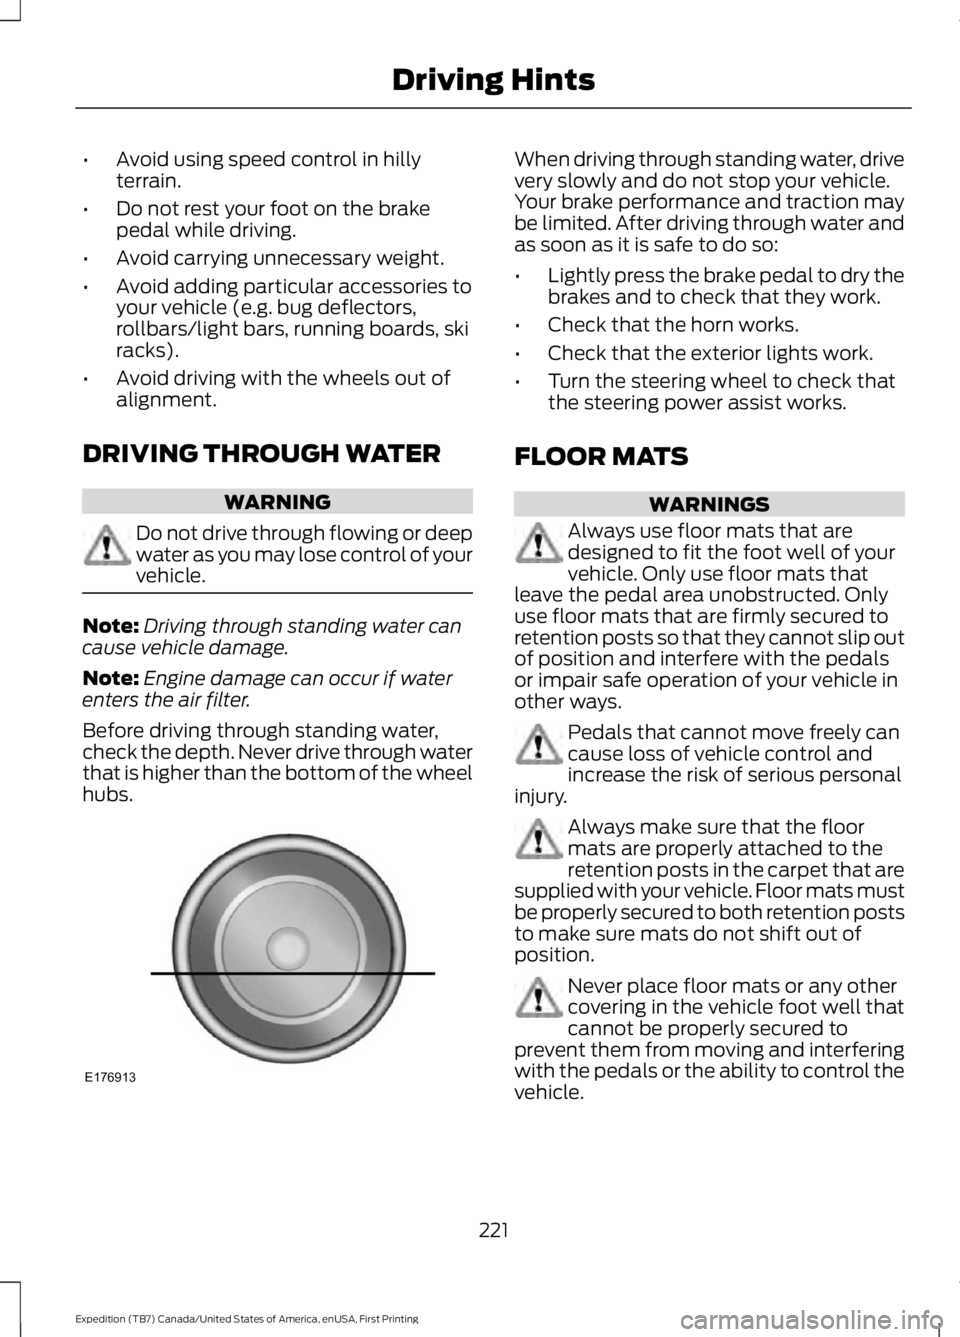
Before driving through standing water,check the depth. Never drive through waterthat is higher than the bottom of the wheelhubs.
When driving through standing water, drivevery slowly and do not stop your vehicle.Your brake performance and traction maybe limited. After driving through water andas soon as it is safe to do so:
•Lightly press the brake pedal to dry thebrakes and to check that they work.
•Check that the horn works.
•Check that the exterior lights work.
•Turn the steering wheel to check thatthe steering power assist works.
FLOOR MATS
WARNINGS
Always use floor mats that aredesigned to fit the foot well of yourvehicle. Only use floor mats thatleave the pedal area unobstructed. Onlyuse floor mats that are firmly secured toretention posts so that they cannot slip outof position and interfere with the pedalsor impair safe operation of your vehicle inother ways.
Pedals that cannot move freely cancause loss of vehicle control andincrease the risk of serious personalinjury.
Always make sure that the floormats are properly attached to theretention posts in the carpet that aresupplied with your vehicle. Floor mats mustbe properly secured to both retention poststo make sure mats do not shift out ofposition.
Never place floor mats or any othercovering in the vehicle foot well thatcannot be properly secured toprevent them from moving and interferingwith the pedals or the ability to control thevehicle.
221
Expedition (TB7) Canada/United States of America, enUSA, First Printing
Driving HintsE176913
Page 225 of 421
WARNINGS
Never place floor mats or any othercovering on top of already installedfloor mats. Floor mats should alwaysrest on top of vehicle carpeting surface andnot another floor mat or other covering.Additional floor mats or any other coveringwill reduce the pedal clearance andpotentially interfere with pedal operation.
Check attachment of floor mats ona regular basis. Always properlyreinstall and secure floor mats thathave been removed for cleaning orreplacement.
Always make sure that objectscannot fall into the driver foot wellwhile the vehicle is moving. Objectsthat are loose can become trapped underthe pedals causing a loss of vehicle control.
Failure to properly follow floor matinstallation or attachmentinstructions can potentially causeinterference with pedal operation causinga loss of vehicle control.
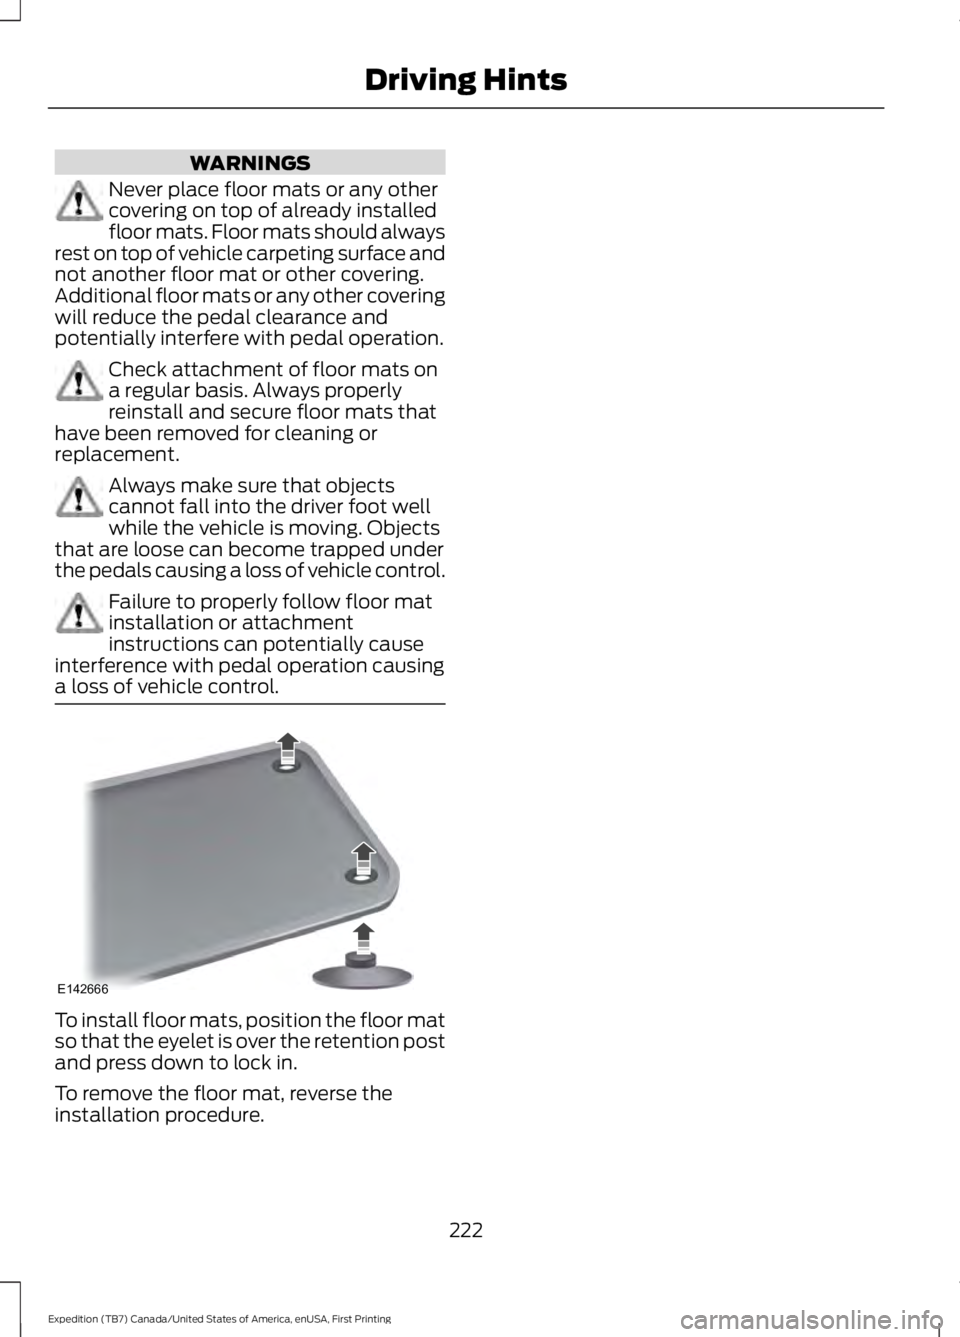
To install floor mats, position the floor matso that the eyelet is over the retention postand press down to lock in.
To remove the floor mat, reverse theinstallation procedure.
222
Expedition (TB7) Canada/United States of America, enUSA, First Printing
Driving HintsE142666
Page 226 of 421
ROADSIDE ASSISTANCE
Vehicles Sold in the United States:Getting Roadside Assistance
To fully assist you should you have avehicle concern, Ford Motor Companyoffers a complimentary roadsideassistance program. This program isseparate from the New Vehicle LimitedWarranty. The service is available:
•24 hours a day, seven days a week.
•For the coverage period listed on theRoadside Assistance Card included inyour Owner's Manual portfolio.
Roadside Assistance covers:
•A flat tire change with a good spare, ifprovided with the vehicle (exceptvehicles supplied with a tire inflationkit).
•Battery jump start.
•Lock-out assistance (key replacementcost is the customer's responsibility).
•Fuel delivery — independent servicecontractors, if not prohibited by state,local or municipal law, shall deliver upto 2 gal (7.6 L) of gasoline or 5 gal(18.9 L) of diesel fuel to a disabledvehicle. Roadside Assistance limits fueldelivery service to two no-chargeoccurrences within a 12-month period.
•Winch out — available within 100 ft(30.5 m) of a paved or countymaintained road, no recoveries.
•Towing — independent servicecontractors, if not prohibited by state,local or municipal law, shall tow Fordeligible vehicles to an authorized dealerwithin 35 mi (56 km) of thedisablement location or to the nearest
authorized dealer. If a memberrequests a tow to an authorized dealerthat is more than 35 mi (56 km) fromthe disablement location, the membershall be responsible for any mileagecosts in excess of 35 mi (56 km).
Roadside Assistance includes up to $200for a towed trailer if the disabled eligiblevehicle requires service at the nearestauthorized dealer. If the towing vehicle isoperational but the trailer is not, then thetrailer does not qualify for any roadsideservices.
Vehicles Sold in the United States:Using Roadside Assistance
Complete the roadside assistanceidentification card and place it in yourwallet for quick reference. This card is inthe owner's information portfolio in theglove compartment.
United States Ford vehicle customers whorequire Roadside Assistance, call1-800-241-3673.
If you need to arrange roadside assistancefor yourself, Ford Motor Companyreimburses a reasonable amount fortowing to the nearest dealership within35 mi (56 km). To obtain reimbursementinformation, United States Ford vehiclecustomers call 1-800-241-3673.Customers need to submit their originalreceipts.
Vehicles Sold in Canada: GettingRoadside Assistance
Canadian customers who require roadsideassistance, call 1-800-665-2006.
Vehicles Sold in Canada: UsingRoadside Assistance
For your convenience, you may completethe roadside assistance identification cardfound in the centerfold of your warrantyguide and retain for future reference.
223
Expedition (TB7) Canada/United States of America, enUSA, First Printing
Roadside Emergencies
Page 227 of 421
Canadian roadside coverage and benefitsmay differ from the U.S. coverage. If yourequire more information, please refer tothe coverage section of your warrantyguide, call us in Canada at1-800-665-2006, or visit our website atwww.ford.ca.
Sykes Assistance Services Corporationadministers the Roadside Assistanceprogram. You must receive coveredservices in Canada or the continentalUnited States. Coverage extends tovehicles that use public, non-seasonal,annually traveled roadways. RoadsideAssistance coverage does not extend tovehicles involved in cross-country driving,logging, autocross and any other form ofoff-road use. Well maintained roads andsurfaces help ensure safe travel for thesupplier, and allow their representativesto perform service as per the standardoperating procedures.
In Remote Locations
If our supplier cannot take your vehicle byroad to the nearest authorized dealership,transportation by rail or water may benecessary. The program covers a tow tothe dock or rail terminal and also to thedealership at the end of the trip.
For rail or water transportation, however,contact your authorized dealer to confirmif you are eligible for additional coveragebefore you authorize or pay for the service.
Call Ford Roadside Assistance at1-800-665-2006 for additionalinformation.
HAZARD WARNING FLASHERS
Note:If used when the vehicle is notrunning, the battery will lose charge. Theremay be insufficient power to restart yourvehicle.
The hazard warning button islocated on the instrument panel.Use it when your vehicle iscreating a safety hazard for othermotorists.
•Press the button to turn on the hazardwarning function, and the front andrear direction indicators will flash.
•Press the button again to turn themoff.
FUEL SHUTOFF
WARNING
Failure to inspect and, if necessary,repair fuel leaks after a collision mayincrease the risk of fire and seriousinjury. Ford Motor Company recommendsthat the fuel system be inspected by anauthorized dealer after any collision.
In the event of a moderate to severecollision, this vehicle includes a fuel pumpshutoff feature that stops the flow of fuelto the engine. Not every impact will causea shutoff.
Should your vehicle shut off after acollision, you may restart your vehicle. Forvehicles equipped with a key system:
1. Switch off the ignition.
2. Switch on the ignition.
3. Repeat Steps 1 and 2 to re-enable thefuel pump.
For vehicles equipped with a push buttonstart system:
1. Press the START/STOP button toswitch off the ignition.
2. Press the brake pedal and press theSTART/STOP button to switch on theignition.
224
Expedition (TB7) Canada/United States of America, enUSA, First Printing
Roadside Emergencies
Page 228 of 421
3.Remove your foot from the brake pedaland press the START/STOP buttonto switch off the ignition.
4. You can either attempt to start theengine by pressing the brake pedal andthe START/STOP button, or switchon the ignition only by pressing theSTART/STOP button withoutpressing the brake pedal. Both waysre-enable the fuel system.
Note:When you try to restart your vehicleafter a fuel shutoff, the vehicle makes surethat various systems are safe to restart.Once your vehicle determines that thesystems are safe, then the vehicle will allowyou to restart.
Note:In the event that your vehicle doesnot restart after your third attempt, contactan authorized dealer.
JUMP STARTING THE VEHICLE
WARNINGS
Batteries normally produce explosivegases which can cause personalinjury. Therefore, do not allowflames, sparks or lighted substances tocome near the battery. When working nearthe battery, always shield your face andprotect your eyes. Always provide correctventilation.
Keep batteries out of reach ofchildren. Batteries contain sulfuricacid. Avoid contact with skin, eyes orclothing. Shield your eyes when workingnear the battery to protect against possiblesplashing of acid solution. In case of acidcontact with skin or eyes, flushimmediately with water for a minimum of15 minutes and get prompt medicalattention. If acid is swallowed, call aphysician immediately.
Use only adequately sized cableswith insulated clamps.
Preparing Your Vehicle
Do not attempt to push-start yourautomatic transmission vehicle.
Note:Attempting to push-start a vehiclewith an automatic transmission may causetransmission damage.
Note:Use only a 12-volt supply to start yourvehicle.
Note:Do not disconnect the battery of thedisabled vehicle as this could damage thevehicle electrical system.
Park the booster vehicle close to the hoodof the disabled vehicle, making sure thetwo vehicles do not touch.
Connecting the Jumper Cables
WARNINGS
Do not attach the cables to fuel lines,engine rocker covers, the intakemanifold or electrical componentsas grounding points. Stay clear of movingparts. To avoid reverse polarityconnections, make sure that you correctlyidentify the positive (+) and negative (-)terminals on both the disabled and boostervehicles before connecting the cables.
Do not attach the end of the positivecable to the studs or L-shaped eyeletlocated above the positive (+)terminal of your vehicle’s battery. Highcurrent may flow through and causedamage to the fuses.
Do not connect the end of thesecond cable to the negative (-)terminal of the battery to be jumped.A spark may cause an explosion of thegases that surround the battery.
Note:In the illustration, the bottom vehiclerepresents the booster vehicle.
225
Expedition (TB7) Canada/United States of America, enUSA, First Printing
Roadside Emergencies
Page 229 of 421
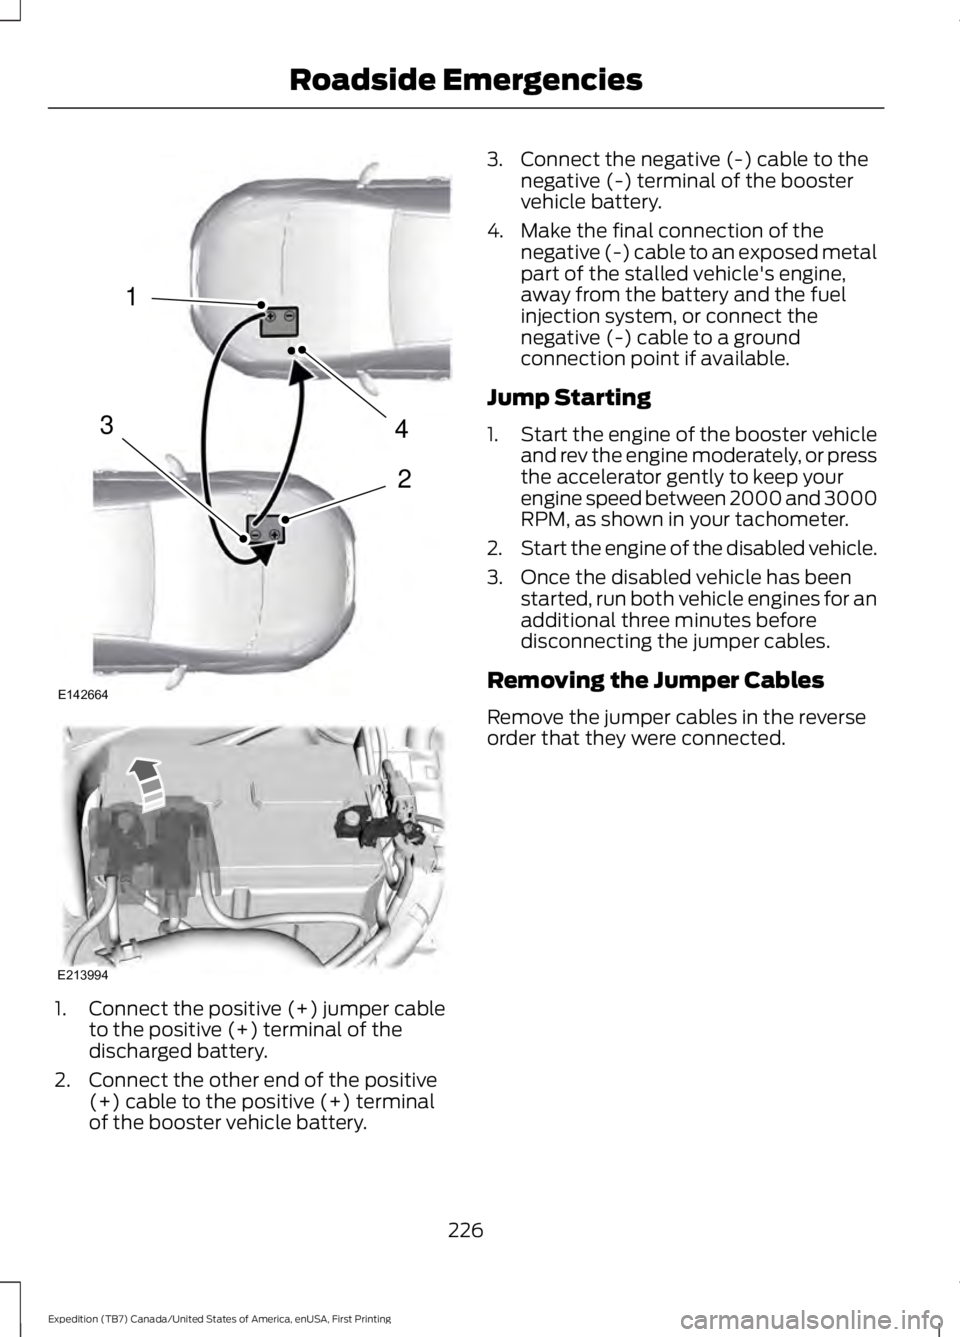
1.Connect the positive (+) jumper cableto the positive (+) terminal of thedischarged battery.
2. Connect the other end of the positive(+) cable to the positive (+) terminalof the booster vehicle battery.
3. Connect the negative (-) cable to thenegative (-) terminal of the boostervehicle battery.
4. Make the final connection of thenegative (-) cable to an exposed metalpart of the stalled vehicle's engine,away from the battery and the fuelinjection system, or connect thenegative (-) cable to a groundconnection point if available.
Jump Starting
1.Start the engine of the booster vehicleand rev the engine moderately, or pressthe accelerator gently to keep yourengine speed between 2000 and 3000RPM, as shown in your tachometer.
2.Start the engine of the disabled vehicle.
3. Once the disabled vehicle has beenstarted, run both vehicle engines for anadditional three minutes beforedisconnecting the jumper cables.
Removing the Jumper Cables
Remove the jumper cables in the reverseorder that they were connected.
226
Expedition (TB7) Canada/United States of America, enUSA, First Printing
Roadside Emergencies4
2
1
3
E142664 E213994
Page 230 of 421
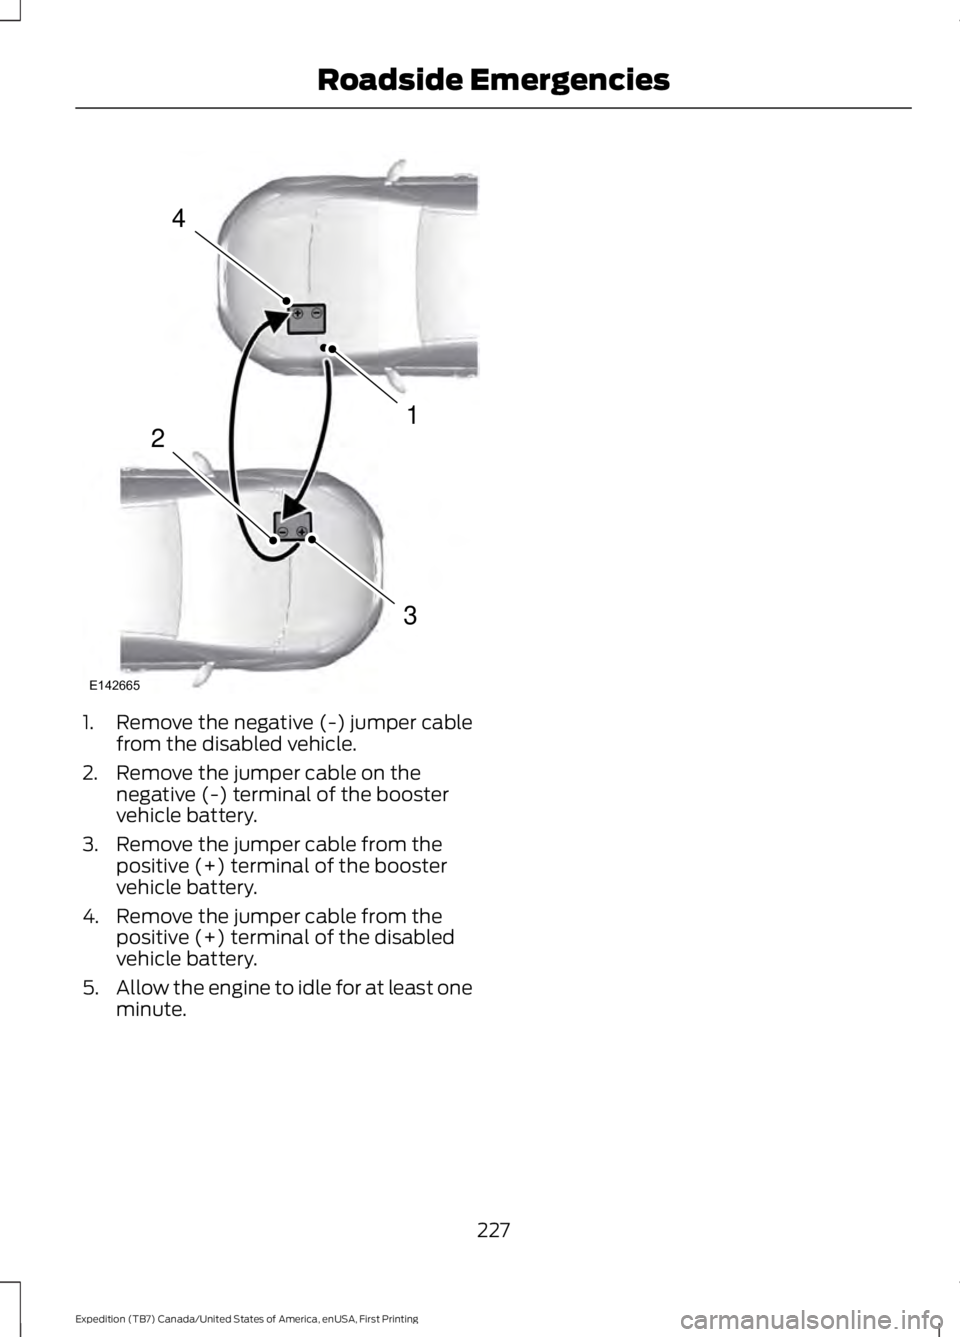
1. Remove the negative (-) jumper cablefrom the disabled vehicle.
2. Remove the jumper cable on thenegative (-) terminal of the boostervehicle battery.
3. Remove the jumper cable from thepositive (+) terminal of the boostervehicle battery.
4. Remove the jumper cable from thepositive (+) terminal of the disabledvehicle battery.
5.Allow the engine to idle for at least oneminute.
227
Expedition (TB7) Canada/United States of America, enUSA, First Printing
Roadside Emergencies4
1
3
2
E142665