FORD EXPEDITION EL 2016 Owners Manual
Manufacturer: FORD, Model Year: 2016, Model line: EXPEDITION EL, Model: FORD EXPEDITION EL 2016Pages: 421, PDF Size: 7.39 MB
Page 181 of 421
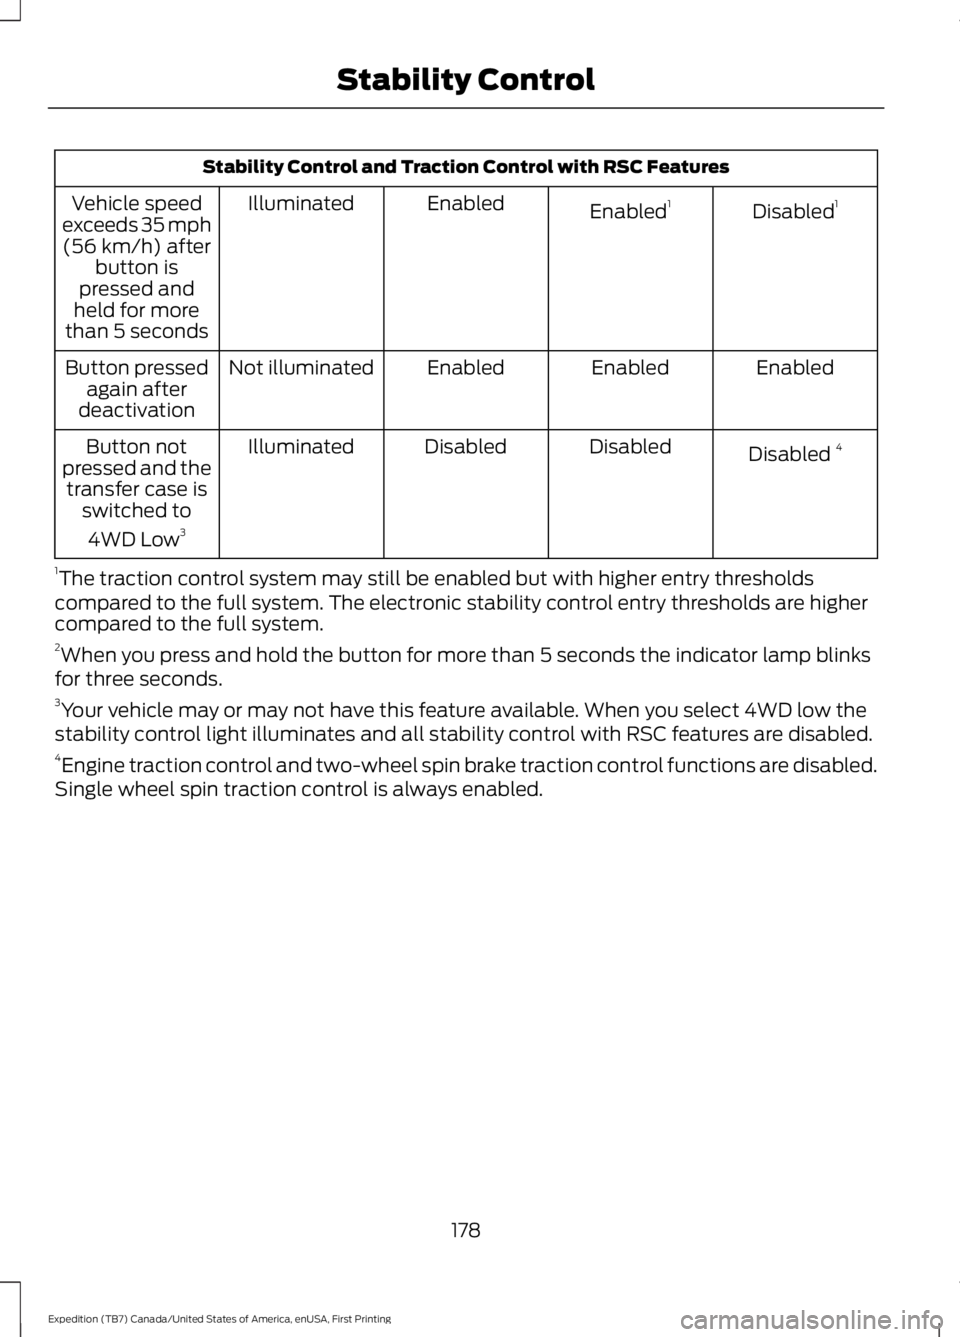
Stability Control and Traction Control with RSC Features
Disabled1Enabled1EnabledIlluminatedVehicle speedexceeds 35 mph(56 km/h) afterbutton ispressed andheld for morethan 5 seconds
EnabledEnabledEnabledNot illuminatedButton pressedagain afterdeactivation
Disabled 4DisabledDisabledIlluminatedButton notpressed and thetransfer case isswitched to
4WD Low3
1The traction control system may still be enabled but with higher entry thresholdscompared to the full system. The electronic stability control entry thresholds are highercompared to the full system.2When you press and hold the button for more than 5 seconds the indicator lamp blinksfor three seconds.3Your vehicle may or may not have this feature available. When you select 4WD low thestability control light illuminates and all stability control with RSC features are disabled.4Engine traction control and two-wheel spin brake traction control functions are disabled.Single wheel spin traction control is always enabled.
178
Expedition (TB7) Canada/United States of America, enUSA, First Printing
Stability Control
Page 182 of 421
USING HILL DESCENT
CONTROL
Principle of Operation
WARNINGS
Hill descent control cannot controldescent in all surface conditions andcircumstances, such as ice orextremely steep grades. Hill descentcontrol is a driver assist system and cannotsubstitute for good judgment by the driver.Failure to do so may result in loss of vehiclecontrol, crash or serious injury.
Hill descent control does not providehill hold at 0 mph (0 km/h). Whenstopped, the parking brake must beapplied or the vehicle must be placed inpark (P) or it may roll away.
Hill descent control allows the driver to setand maintain vehicle speed whiledescending steep grades in various surfaceconditions.
Hill descent control can maintain vehiclespeeds on downhill grades between 3 mph(5 km/h) and 20 mph (32 km/h). Above20 mph (32 km/h), the system remainsarmed, but descent speed cannot be setor maintained.
Hill descent control requires a coolingdown interval after sustained use. Theamount of time that the feature canremain active before cooling varies withconditions. The system provides a warningin the message center and a chime soundswhen the system is about to disengage forcooling. At this time, manually apply thebrakes to maintain descent speed.
Using Hill Descent Control
Press and release the hilldescent button in the center ofthe terrain management control.The button illuminates and a chime soundswhen you switch this feature on.
To increase descent speed, press theaccelerator pedal until you reach thedesired speed. To decrease descentspeed, press the brake pedal until youreach the desired speed.
Whether accelerating or decelerating, onceyou reach the desired descent speed,remove your feet from the pedals and hilldescent control maintains the chosenvehicle speed.
Note:You may observe noise from the ABSpump motor during hill descent controloperation. This is a normal characteristic ofthe ABS and should be no reason forconcern.
179
Expedition (TB7) Canada/United States of America, enUSA, First Printing
Terrain Response (If Equipped)
Page 183 of 421
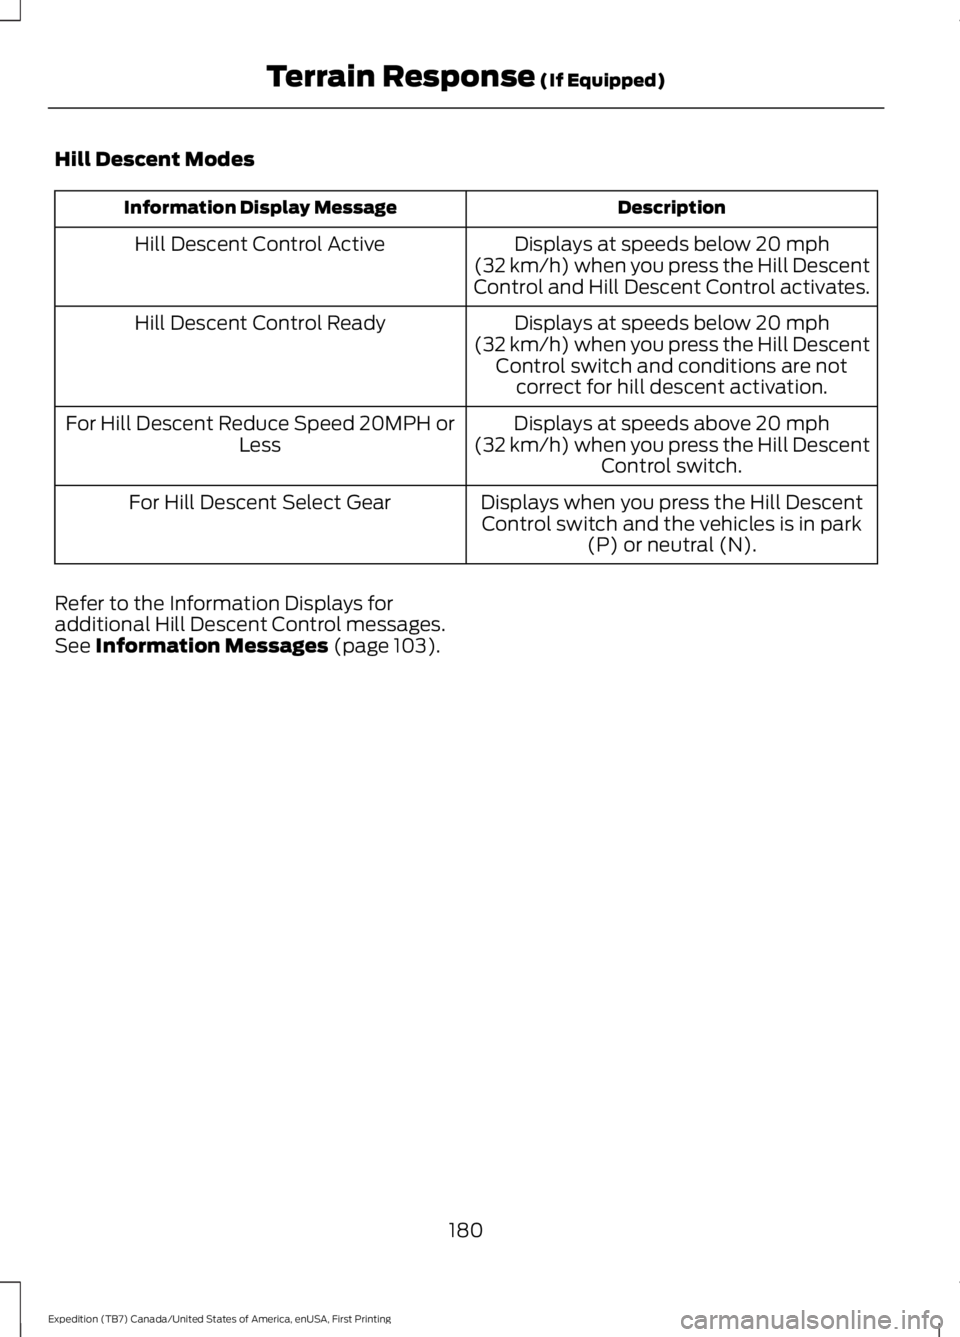
Hill Descent Modes
DescriptionInformation Display Message
Displays at speeds below 20 mph(32 km/h) when you press the Hill DescentControl and Hill Descent Control activates.
Hill Descent Control Active
Displays at speeds below 20 mph(32 km/h) when you press the Hill DescentControl switch and conditions are notcorrect for hill descent activation.
Hill Descent Control Ready
Displays at speeds above 20 mph(32 km/h) when you press the Hill DescentControl switch.
For Hill Descent Reduce Speed 20MPH orLess
Displays when you press the Hill DescentControl switch and the vehicles is in park(P) or neutral (N).
For Hill Descent Select Gear
Refer to the Information Displays foradditional Hill Descent Control messages.See Information Messages (page 103).
180
Expedition (TB7) Canada/United States of America, enUSA, First Printing
Terrain Response (If Equipped)
Page 184 of 421
PRINCIPLE OF OPERATION
WARNINGS
To help avoid personal injury, pleaseread and understand the limitationsof the system as contained in thissection. Sensing is only an aid for some(generally large and fixed) objects whenmoving on a flat surface at parking speeds.Certain objects with surfaces that absorbultrasonic waves, surrounding vehicle'sparking aid systems, traffic controlsystems, fluorescent lamps, inclementweather, air brakes, and external motorsand fans may also affect the function ofthe sensing system; this may includereduced performance or a false activation.
To help avoid personal injury, alwaysuse caution when in reverse (R) andwhen using the sensing system.
This system is not designed toprevent contact with small or movingobjects. The system is designed toprovide a warning to assist the driver indetecting large stationary objects to avoiddamaging your vehicle. The system maynot detect smaller objects, particularlythose close to the ground.
Certain add-on devices such as largetrailer hitches, bike or surfboard racksand any device that may block thenormal detection zone of the system, maycreate false beeps.
Note:Keep the sensors, located on thebumper or fascia, free from snow, ice andlarge accumulations of dirt. If the sensorsare covered, the system’s accuracy can beaffected. Do not clean the sensors withsharp objects.
Note:If your vehicle sustains damage tothe bumper or fascia, leaving it misalignedor bent, the sensing zone may be alteredcausing inaccurate measurement ofobstacles or false alarms.
Note:The sensing system cannot be turnedoff when a MyKey is present. See Principleof Operation (page 46).
Note:If you attach certain add-on devicessuch as a trailer or bike rack, the rear sensingsystem may detect that add-on device andtherefore provide warnings. It is suggestedthat you disable the rear sensing systemwhen you attach an add-on device to yourvehicle to prevent these warnings.
The sensing system warns the driver ofobstacles within a certain range of yourvehicle. The system turns on automaticallywhenever you switch the ignition on.
The system can be switched off throughthe information display menu or from thepop-up message that appears once youshift the transmission into reverse (R). SeeGeneral Information (page 92).
Note:On vehicles with front parking aid youcan use the parking aid switch to switch thesystem off.
If a fault is present in the system, a warningmessage appears in the informationdisplay. See Information Messages(page 103).
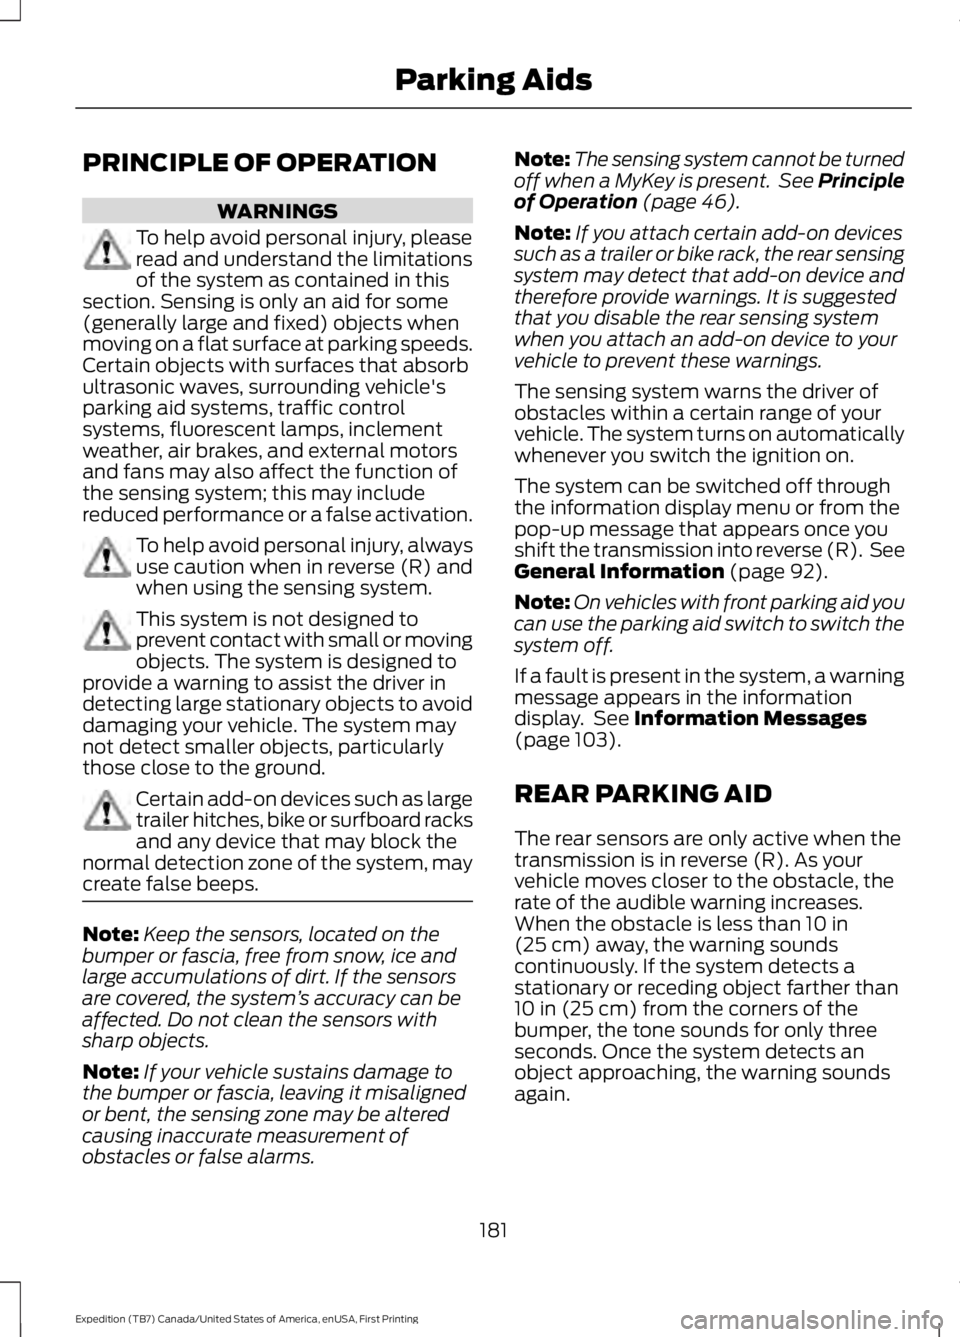
REAR PARKING AID
The rear sensors are only active when thetransmission is in reverse (R). As yourvehicle moves closer to the obstacle, therate of the audible warning increases.When the obstacle is less than 10 in(25 cm) away, the warning soundscontinuously. If the system detects astationary or receding object farther than10 in (25 cm) from the corners of thebumper, the tone sounds for only threeseconds. Once the system detects anobject approaching, the warning soundsagain.
181
Expedition (TB7) Canada/United States of America, enUSA, First Printing
Parking Aids
Page 185 of 421
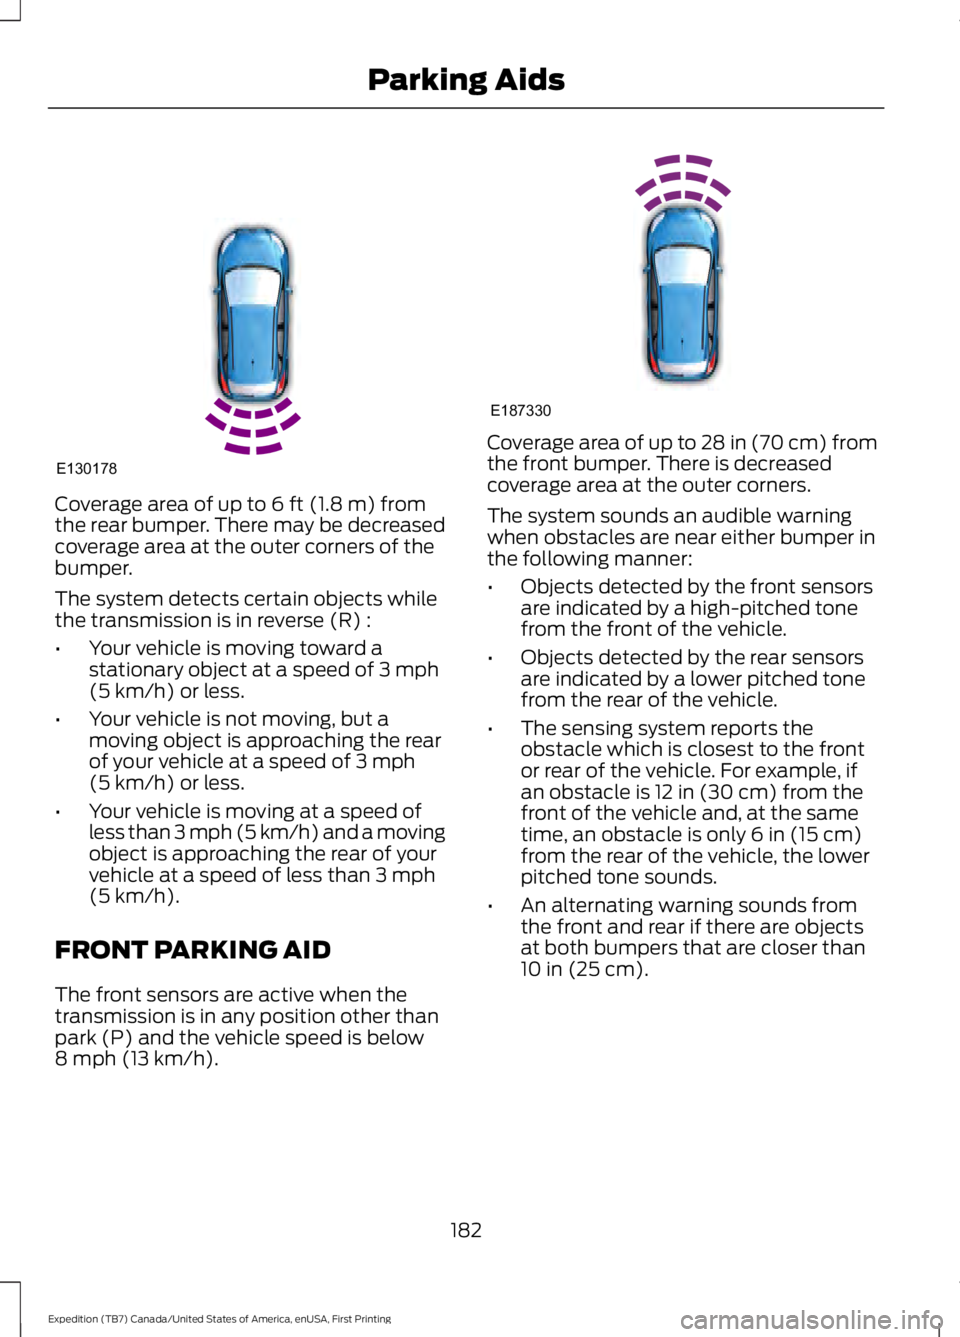
Coverage area of up to 6 ft (1.8 m) fromthe rear bumper. There may be decreasedcoverage area at the outer corners of thebumper.
The system detects certain objects whilethe transmission is in reverse (R) :
•Your vehicle is moving toward astationary object at a speed of 3 mph(5 km/h) or less.
•Your vehicle is not moving, but amoving object is approaching the rearof your vehicle at a speed of 3 mph(5 km/h) or less.
•Your vehicle is moving at a speed ofless than 3 mph (5 km/h) and a movingobject is approaching the rear of yourvehicle at a speed of less than 3 mph(5 km/h).
FRONT PARKING AID
The front sensors are active when thetransmission is in any position other thanpark (P) and the vehicle speed is below8 mph (13 km/h).
Coverage area of up to 28 in (70 cm) fromthe front bumper. There is decreasedcoverage area at the outer corners.
The system sounds an audible warningwhen obstacles are near either bumper inthe following manner:
•Objects detected by the front sensorsare indicated by a high-pitched tonefrom the front of the vehicle.
•Objects detected by the rear sensorsare indicated by a lower pitched tonefrom the rear of the vehicle.
•The sensing system reports theobstacle which is closest to the frontor rear of the vehicle. For example, ifan obstacle is 12 in (30 cm) from thefront of the vehicle and, at the sametime, an obstacle is only 6 in (15 cm)from the rear of the vehicle, the lowerpitched tone sounds.
•An alternating warning sounds fromthe front and rear if there are objectsat both bumpers that are closer than10 in (25 cm).
182
Expedition (TB7) Canada/United States of America, enUSA, First Printing
Parking AidsE130178 E187330
Page 186 of 421

REAR VIEW CAMERA
WARNINGS
The rear view camera system is areverse aid supplement device thatstill requires the driver to use it inconjunction with the interior and exteriormirrors for maximum coverage.
Objects that are close to eithercorner of the bumper or under thebumper, might not be seen on thescreen due to the limited coverage of thecamera system.
Back up as slow as possible sincehigher speeds might limit yourreaction time to stop your vehicle.
Use caution when using the rearvideo camera and the luggagecompartment door is ajar. If theluggage compartment door is ajar, thecamera will be out of position and thevideo image may be incorrect. Allguidelines disappear when the luggagecompartment door is ajar.
Use caution when turning camerafeatures on or off. Make sure yourvehicle is not moving.
The rear view camera system provides avideo image of the area behind yourvehicle.
During operation, lines appear in thedisplay which represent your vehicle’s pathand proximity to objects behind yourvehicle.
The camera is located on the luggagecompartment door.
Using the Rear View CameraSystem
The rear view camera system displayswhat is behind your vehicle when you placethe transmission in reverse (R).
The system uses two types of guides tohelp you see what is behind your vehicle:
•Fixed guidelines: Show the actual pathyour vehicle is moving in while reversingin a straight line. This can be helpfulwhen backing into a parking space oraligning your vehicle with anotherobject behind you.
•Centerline: Helps align the center ofyour vehicle with an object (forexample, a trailer).
Note:The image may remain onmomentarily when you shift thetransmission out of reverse (R). If yourvehicle speed reaches 6 mph (10 km/h) or10 seconds elapse and the image remainson, have your system inspected by anauthorized dealer.
183
Expedition (TB7) Canada/United States of America, enUSA, First Printing
Parking AidsE162528
Page 187 of 421
Note:When towing, the camera only seeswhat you are towing behind your vehicle.This might not provide adequate coverageas it usually provides in normal operationand you might not see some objects. Insome vehicles, the guidelines may disappearonce you engage the trailer tow connector.
The camera may not operate correctlyunder the following conditions:
•Nighttime or dark areas if one or bothreverse lamps are not operating.
•Mud, water or debris obstructs thecamera's view. Clean the lens with asoft, lint-free cloth and non-abrasivecleaner.
•The camera is misaligned due todamage to the rear of your vehicle.
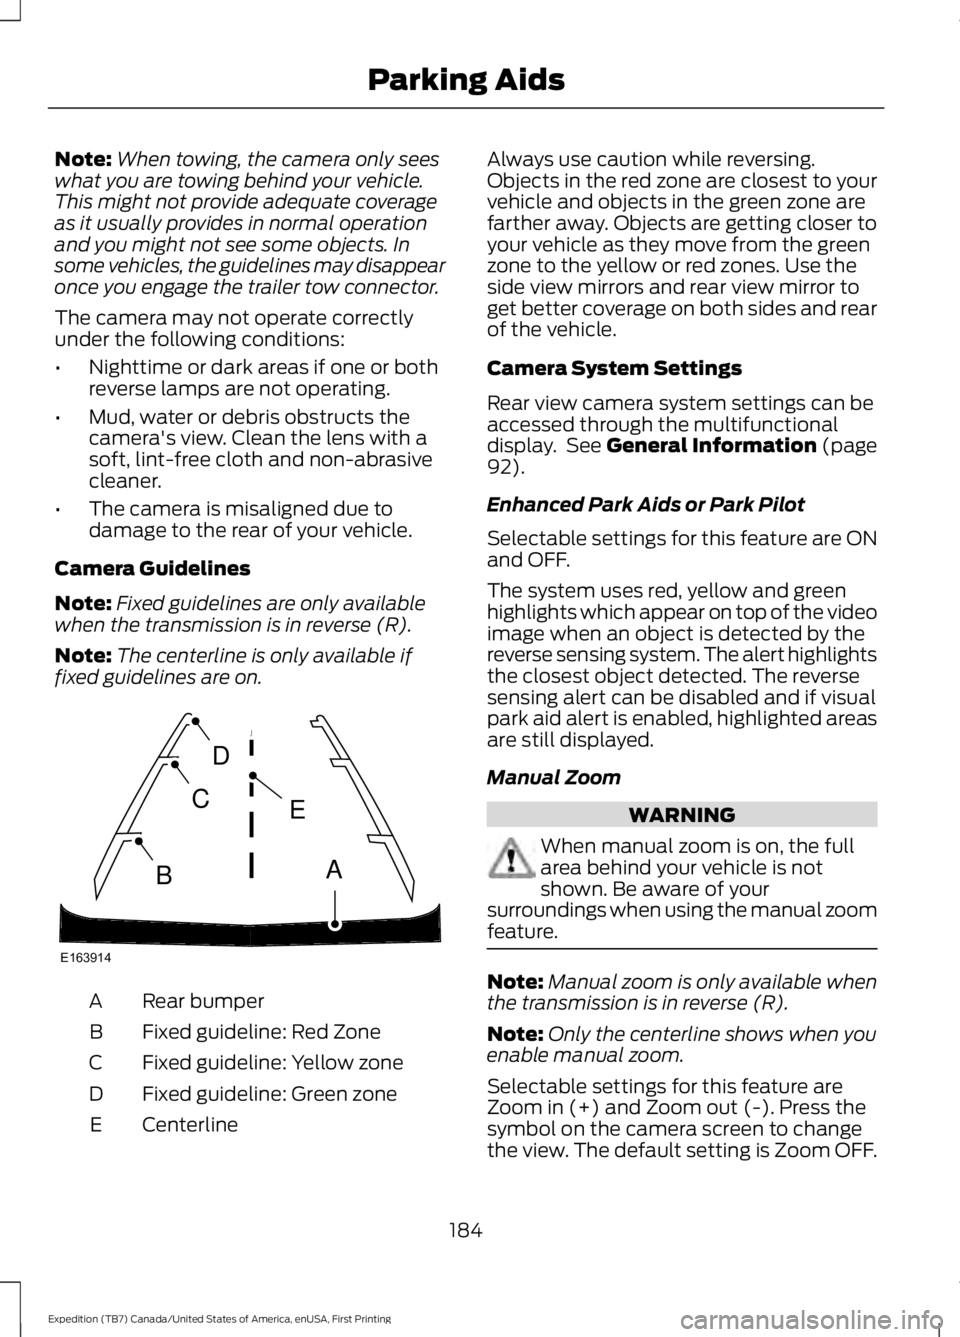
Camera Guidelines
Note:Fixed guidelines are only availablewhen the transmission is in reverse (R).
Note:The centerline is only available iffixed guidelines are on.
Rear bumperA
Fixed guideline: Red ZoneB
Fixed guideline: Yellow zoneC
Fixed guideline: Green zoneD
CenterlineE
Always use caution while reversing.Objects in the red zone are closest to yourvehicle and objects in the green zone arefarther away. Objects are getting closer toyour vehicle as they move from the greenzone to the yellow or red zones. Use theside view mirrors and rear view mirror toget better coverage on both sides and rearof the vehicle.
Camera System Settings
Rear view camera system settings can beaccessed through the multifunctionaldisplay. See General Information (page92).
Enhanced Park Aids or Park Pilot
Selectable settings for this feature are ONand OFF.
The system uses red, yellow and greenhighlights which appear on top of the videoimage when an object is detected by thereverse sensing system. The alert highlightsthe closest object detected. The reversesensing alert can be disabled and if visualpark aid alert is enabled, highlighted areasare still displayed.
Manual Zoom
WARNING
When manual zoom is on, the fullarea behind your vehicle is notshown. Be aware of yoursurroundings when using the manual zoomfeature.
Note:Manual zoom is only available whenthe transmission is in reverse (R).
Note:Only the centerline shows when youenable manual zoom.
Selectable settings for this feature areZoom in (+) and Zoom out (-). Press thesymbol on the camera screen to changethe view. The default setting is Zoom OFF.
184
Expedition (TB7) Canada/United States of America, enUSA, First Printing
Parking AidsE163914
A
E
D
C
B
Page 188 of 421
This allows you to get a closer view of anobject behind your vehicle. The zoomedimage keeps the bumper in the image toprovide a reference. The zoom is onlyactive while the transmission is in reverse(R).
Rear Camera Delay
Selectable settings for this feature are ONand OFF. The default setting for the rearcamera delay is OFF.
When shifting the transmission out ofreverse (R) and into any gear other thanpark (P), the camera image remains in thedisplay until:
•Your vehicle speed sufficientlyincreases.
•You shift your vehicle into park (P).
185
Expedition (TB7) Canada/United States of America, enUSA, First Printing
Parking Aids
Page 189 of 421
PRINCIPLE OF OPERATION
Cruise control lets you maintain a setspeed without keeping your foot on theaccelerator pedal. You can use cruisecontrol when your vehicle speed is greaterthan 20 mph (30 km/h).
USING CRUISE CONTROL
WARNINGS
Do not use cruise control on windingroads, in heavy traffic or when theroad surface is slippery. This couldresult in loss of vehicle control, seriousinjury or death.
When you are going downhill, yourvehicle speed may increase abovethe set speed. The system will notapply the brakes but a warning displays.Failure to follow this warning could resultin serious personal injury or death.
Note:Cruise control will disengage if thevehicle speed decreases more than 10 mph(16 km/h) below the set speed while drivinguphill.
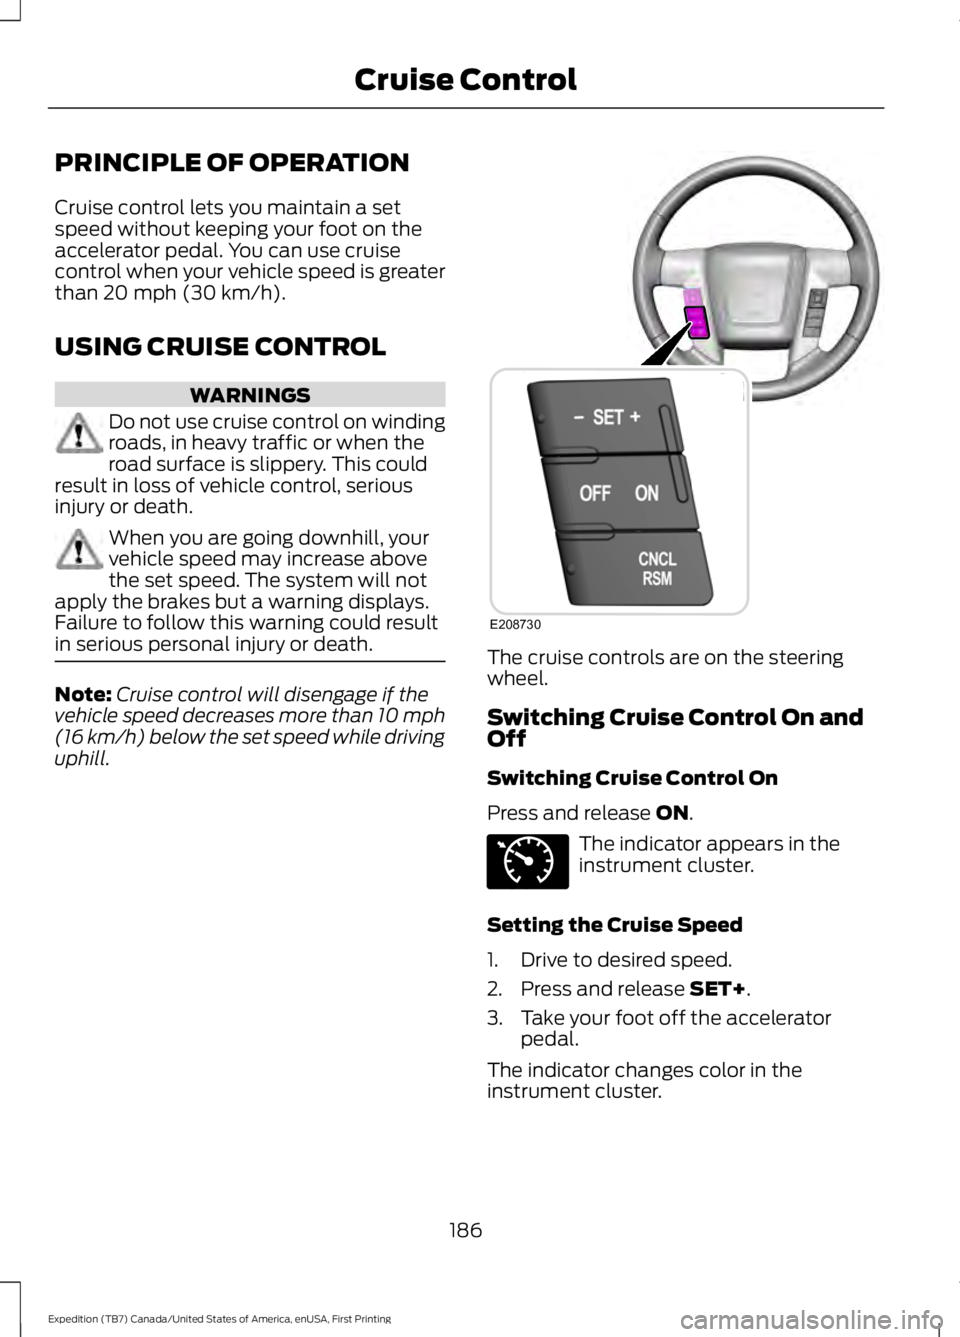
The cruise controls are on the steeringwheel.
Switching Cruise Control On andOff
Switching Cruise Control On
Press and release ON.
The indicator appears in theinstrument cluster.
Setting the Cruise Speed
1. Drive to desired speed.
2. Press and release SET+.
3. Take your foot off the acceleratorpedal.
The indicator changes color in theinstrument cluster.
186
Expedition (TB7) Canada/United States of America, enUSA, First Printing
Cruise ControlE208730 E71340
Page 190 of 421
Changing the Set Speed
Note: If you accelerate by pressing theaccelerator pedal, the set speed will notchange. When you release the acceleratorpedal, your vehicle returns to the speed thatyou previously set.
•Press and release SET+ or SET-. Whenyou select km/h as the displaymeasurement in the Informationdisplay the set speed changes inapproximately 2 km/h increments.When you select mph as the displaymeasurement in the informationdisplay the set speed changes inapproximately 1 mph increments.
•Press the accelerator or brake pedaluntil you reach the desired speed. Pressand release SET +.
•Press and hold SET+ or SET-. Releasethe control when you reach the desiredspeed.
Canceling the Set Speed
Press and release CNCL or tap the brakepedal. The set speed does not erase.
Resuming the Set Speed
Press and release RSM.
Switching Cruise Control Off
Press and release OFF when the systemis in stand by mode or switch the ignitionoff.
Note:You erase the set speed when youswitch the system off.
187
Expedition (TB7) Canada/United States of America, enUSA, First Printing
Cruise Control