tow FORD EXPEDITION EL 2016 Owners Manual
[x] Cancel search | Manufacturer: FORD, Model Year: 2016, Model line: EXPEDITION EL, Model: FORD EXPEDITION EL 2016Pages: 421, PDF Size: 7.39 MB
Page 5 of 421
Adjusting the Steering Wheel - VehiclesWith: Power Adjustable SteeringColumn...........................................................67
Audio Control..................................................68
Voice Control...................................................69
Cruise Control..................................................70
Information Display Control.......................70
Heated Steering Wheel................................70
Pedals
Adjusting the Pedals......................................71
Wipers and Washers
Windshield Wipers.........................................72
Autowipers........................................................72
Windshield Washers......................................73
Rear Window Wiper and Washers...........73
Lighting
General Information......................................74
Lighting Control...............................................74
Autolamps.........................................................75
Instrument Lighting Dimmer......................76
Daytime Running Lamps.............................76
Front Fog Lamps.............................................77
Direction Indicators........................................77
Interior Lamps.................................................78
Ambient Lighting............................................79
Windows and Mirrors
Power Windows.............................................80
Exterior Mirrors.................................................81
Interior Mirror...................................................82
Childminder Mirror.........................................82
Rear Quarter Windows................................83
Sun Visors.........................................................83
Moonroof...........................................................83
Instrument Cluster
Gauges...............................................................85
Warning Lamps and Indicators................88
Audible Warnings and Indicators..............91
Information Displays
General Information......................................92
Information Messages................................103
Climate Control
Manual Climate Control..............................113
Manual Climate Control - Vehicles With:Electronic Manual TemperatureControl (EMTC)..........................................114
Automatic Climate Control.......................116
Hints on Controlling the InteriorClimate..........................................................117
Rear Passenger Climate Controls..........120
Heated Windows and Mirrors....................121
Remote Start...................................................121
Seats
Sitting in the Correct Position..................122
Head Restraints.............................................122
Manual Seats.................................................124
Power Seats....................................................125
Memory Function.........................................126
Rear Seats........................................................127
Heated Seats..................................................134
Climate Controlled Seats..........................135
Universal Garage DoorOpener
Universal Garage Door Opener................137
Auxiliary Power Points
Auxiliary Power Points................................142
Storage Compartments
Center Console..............................................144
Overhead Console.......................................144
2
Expedition (TB7) Canada/United States of America, enUSA, First Printing
Table of Contents
Page 6 of 421
Starting and Stopping theEngine
General Information....................................145
Ignition Switch...............................................145
Keyless Starting............................................145
Starting a Gasoline Engine.......................146
Engine Block Heater....................................149
Fuel and Refueling
Safety Precautions........................................151
Fuel Quality.....................................................152
Fuel Filler Funnel Location........................152
Running Out of Fuel.....................................152
Refueling..........................................................153
Fuel Consumption........................................155
Emission Control System..........................156
Transmission
Automatic Transmission...........................159
Four-Wheel Drive
Using Four-Wheel Drive.............................164
Rear Axle
Limited Slip Differential...............................171
Brakes
General Information.....................................172
Hints on Driving With Anti-LockBrakes............................................................172
Parking Brake..................................................173
Hill Start Assist..............................................173
Traction Control
Principle of Operation.................................175
Using Traction Control................................175
Stability Control
Principle of Operation.................................176
Using Stability Control................................177
Terrain Response
Using Hill Descent Control........................179
Parking Aids
Principle of Operation..................................181
Rear Parking Aid.............................................181
Front Parking Aid..........................................182
Rear View Camera.......................................183
Cruise Control
Principle of Operation................................186
Using Cruise Control...................................186
Driving Aids
Blind Spot Information System..............188
Cross Traffic Alert........................................190
Steering............................................................193
Drive Control..................................................194
Self-Leveling Suspension.........................195
Load Carrying
Rear Under Floor Storage.........................196
Roof Racks and Load Carriers..................197
Load Limit.......................................................198
Towing
Towing a Trailer............................................205
Trailer Sway Control...................................206
Recommended Towing Weights...........206
Essential Towing Checks..........................208
Towing Points.................................................215
Transporting the Vehicle............................216
Towing the Vehicle on Four Wheels.......217
Driving Hints
Breaking-In.....................................................220
Reduced Engine Performance................220
3
Expedition (TB7) Canada/United States of America, enUSA, First Printing
Table of Contents
Page 17 of 421
PROTECTING THE
ENVIRONMENT
You must play your part in protecting theenvironment. Correct vehicle usage andthe authorized disposal of waste, cleaningand lubrication materials are significantsteps toward this aim.
14
Expedition (TB7) Canada/United States of America, enUSA, First Printing
Environment
Page 22 of 421
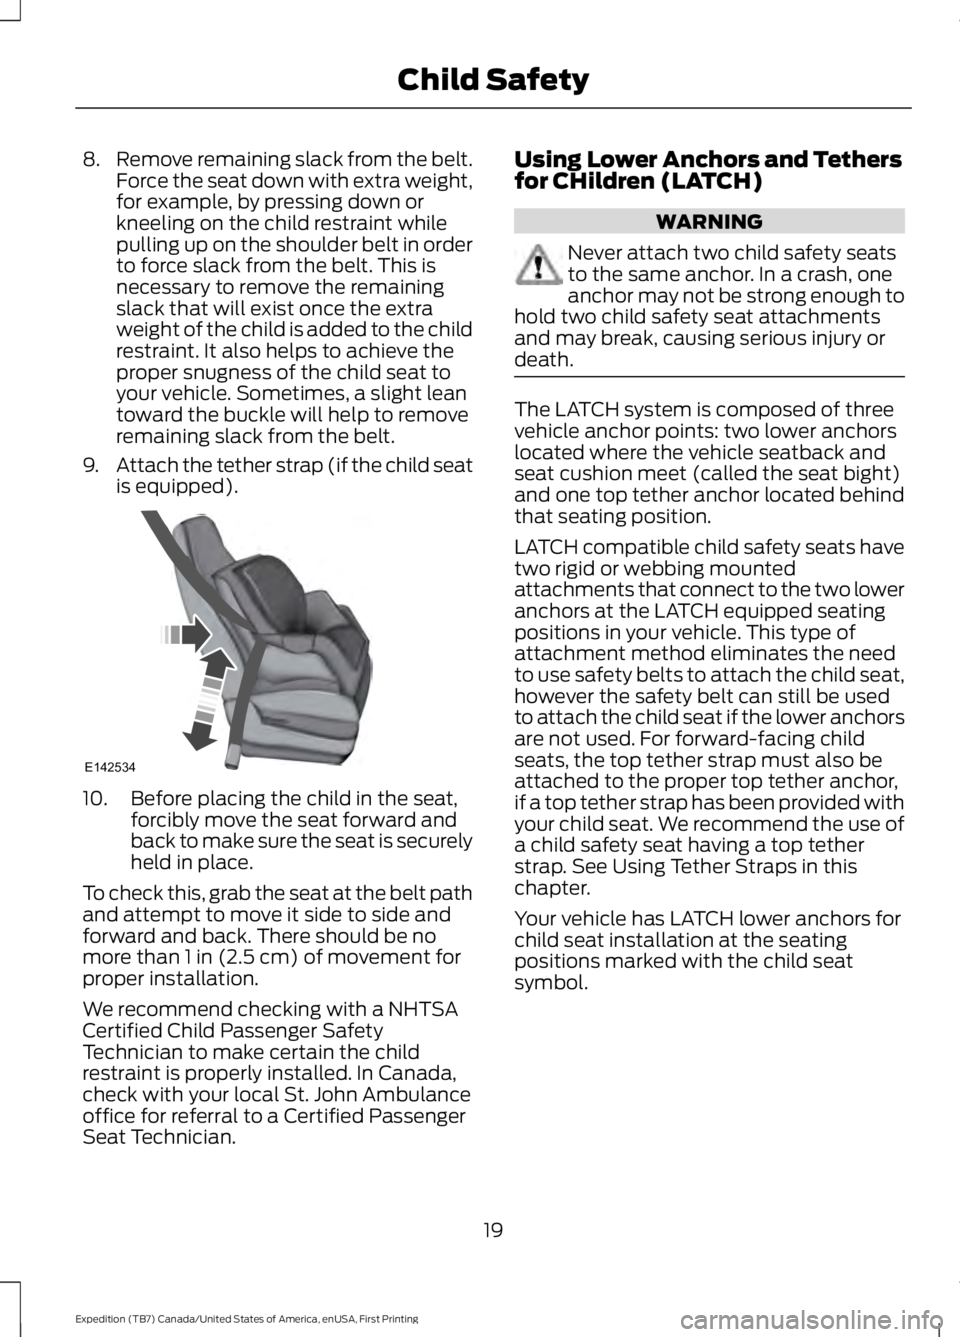
8.Remove remaining slack from the belt.Force the seat down with extra weight,for example, by pressing down orkneeling on the child restraint whilepulling up on the shoulder belt in orderto force slack from the belt. This isnecessary to remove the remainingslack that will exist once the extraweight of the child is added to the childrestraint. It also helps to achieve theproper snugness of the child seat toyour vehicle. Sometimes, a slight leantoward the buckle will help to removeremaining slack from the belt.
9.Attach the tether strap (if the child seatis equipped).
10. Before placing the child in the seat,forcibly move the seat forward andback to make sure the seat is securelyheld in place.
To check this, grab the seat at the belt pathand attempt to move it side to side andforward and back. There should be nomore than 1 in (2.5 cm) of movement forproper installation.
We recommend checking with a NHTSACertified Child Passenger SafetyTechnician to make certain the childrestraint is properly installed. In Canada,check with your local St. John Ambulanceoffice for referral to a Certified PassengerSeat Technician.
Using Lower Anchors and Tethersfor CHildren (LATCH)
WARNING
Never attach two child safety seatsto the same anchor. In a crash, oneanchor may not be strong enough tohold two child safety seat attachmentsand may break, causing serious injury ordeath.
The LATCH system is composed of threevehicle anchor points: two lower anchorslocated where the vehicle seatback andseat cushion meet (called the seat bight)and one top tether anchor located behindthat seating position.
LATCH compatible child safety seats havetwo rigid or webbing mountedattachments that connect to the two loweranchors at the LATCH equipped seatingpositions in your vehicle. This type ofattachment method eliminates the needto use safety belts to attach the child seat,however the safety belt can still be usedto attach the child seat if the lower anchorsare not used. For forward-facing childseats, the top tether strap must also beattached to the proper top tether anchor,if a top tether strap has been provided withyour child seat. We recommend the use ofa child safety seat having a top tetherstrap. See Using Tether Straps in thischapter.
Your vehicle has LATCH lower anchors forchild seat installation at the seatingpositions marked with the child seatsymbol.
19
Expedition (TB7) Canada/United States of America, enUSA, First Printing
Child SafetyE142534
Page 29 of 421
WARNINGS
manufacturer. A safety seat that isimproperly installed or utilized, isinappropriate for your child's height, age,or weight or does not properly fit the childmay increase the risk of serious injury ordeath.
Never let a passenger hold a child onhis or her lap while your vehicle ismoving. The passenger cannotprotect the child from injury in a crash,which may result in serious injury or death.
Never use pillows, books, or towelsto boost a child. They can slidearound and increase the likelihoodof injury or death in a crash.
WARNINGS
Always restrain an unoccupied childseat or booster seat. These objectsmay become projectiles in a crash orsudden stop, which may increase the riskof serious injury.
Never place, or allow a child to place,the shoulder belt under a child's armor behind the back because itreduces the protection for the upper partof the body and may increase the risk ofinjury or death in a crash.
To avoid risk of injury, do not leavechildren or pets unattended in yourvehicle.
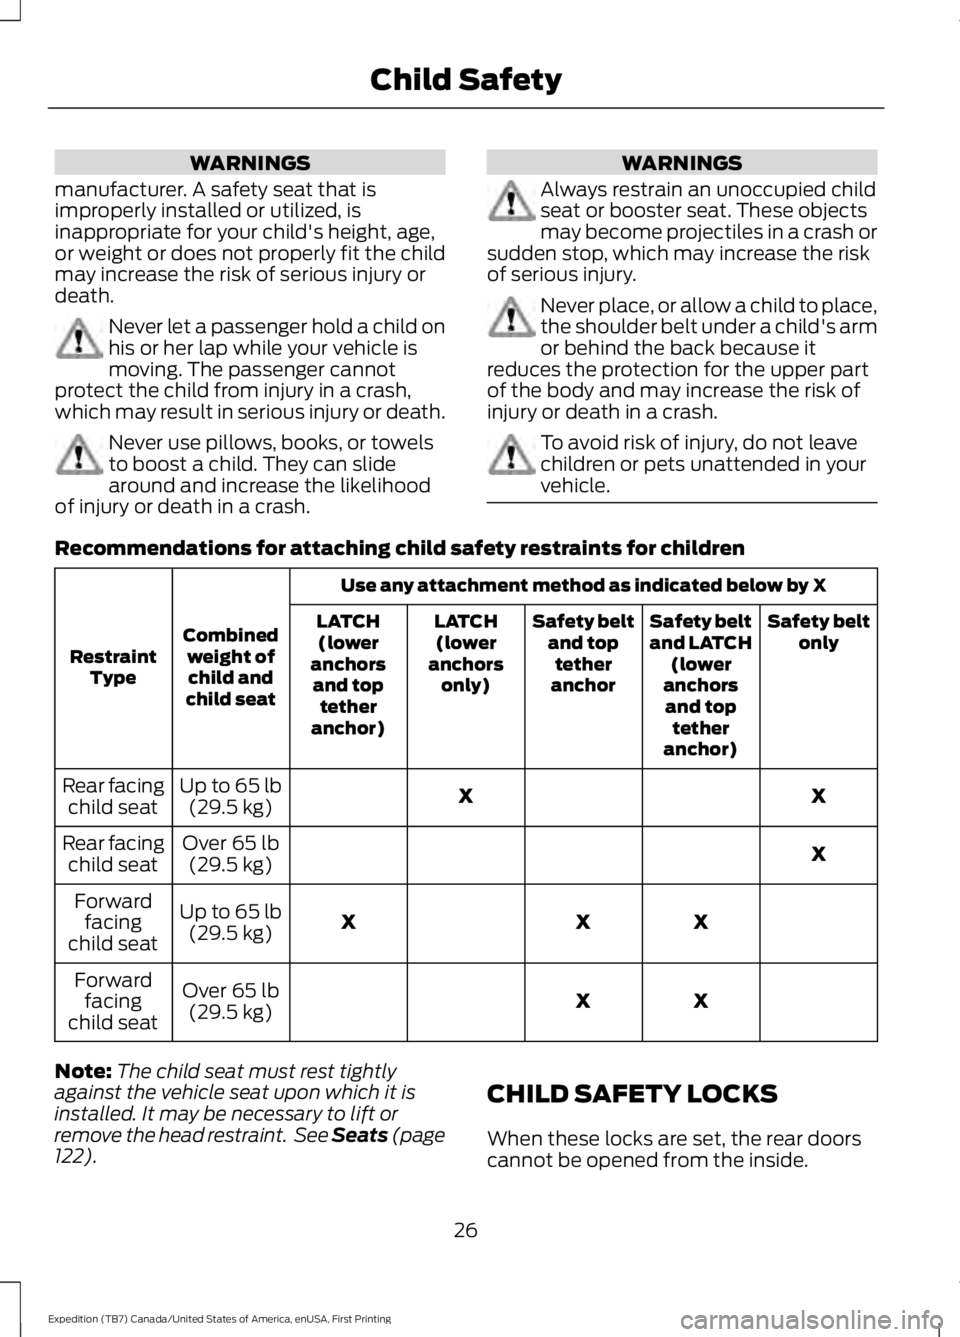
Recommendations for attaching child safety restraints for children
Use any attachment method as indicated below by X
Combinedweight ofchild andchild seat
RestraintType
Safety beltonlySafety beltand LATCH(loweranchorsand toptetheranchor)
Safety beltand toptetheranchor
LATCH(loweranchorsonly)
LATCH(loweranchorsand toptetheranchor)
XXUp to 65 lb(29.5 kg)Rear facingchild seat
XOver 65 lb(29.5 kg)Rear facingchild seat
XXXUp to 65 lb(29.5 kg)
Forwardfacingchild seat
XXOver 65 lb(29.5 kg)
Forwardfacingchild seat
Note:The child seat must rest tightlyagainst the vehicle seat upon which it isinstalled. It may be necessary to lift orremove the head restraint. See Seats (page122).
CHILD SAFETY LOCKS
When these locks are set, the rear doorscannot be opened from the inside.
26
Expedition (TB7) Canada/United States of America, enUSA, First Printing
Child Safety
Page 42 of 421
WARNINGS
To reduce risk of injury, do notobstruct or place objects in thedeployment path of the curtainairbag.
If the curtain airbags have deployed,the curtain airbags will not functionagain. The curtain airbags (includingthe A, B and C pillar trim and headliner)must be inspected and serviced by anauthorized dealer. If the curtain airbag isnot replaced, the unrepaired area willincrease the risk of injury in a crash.
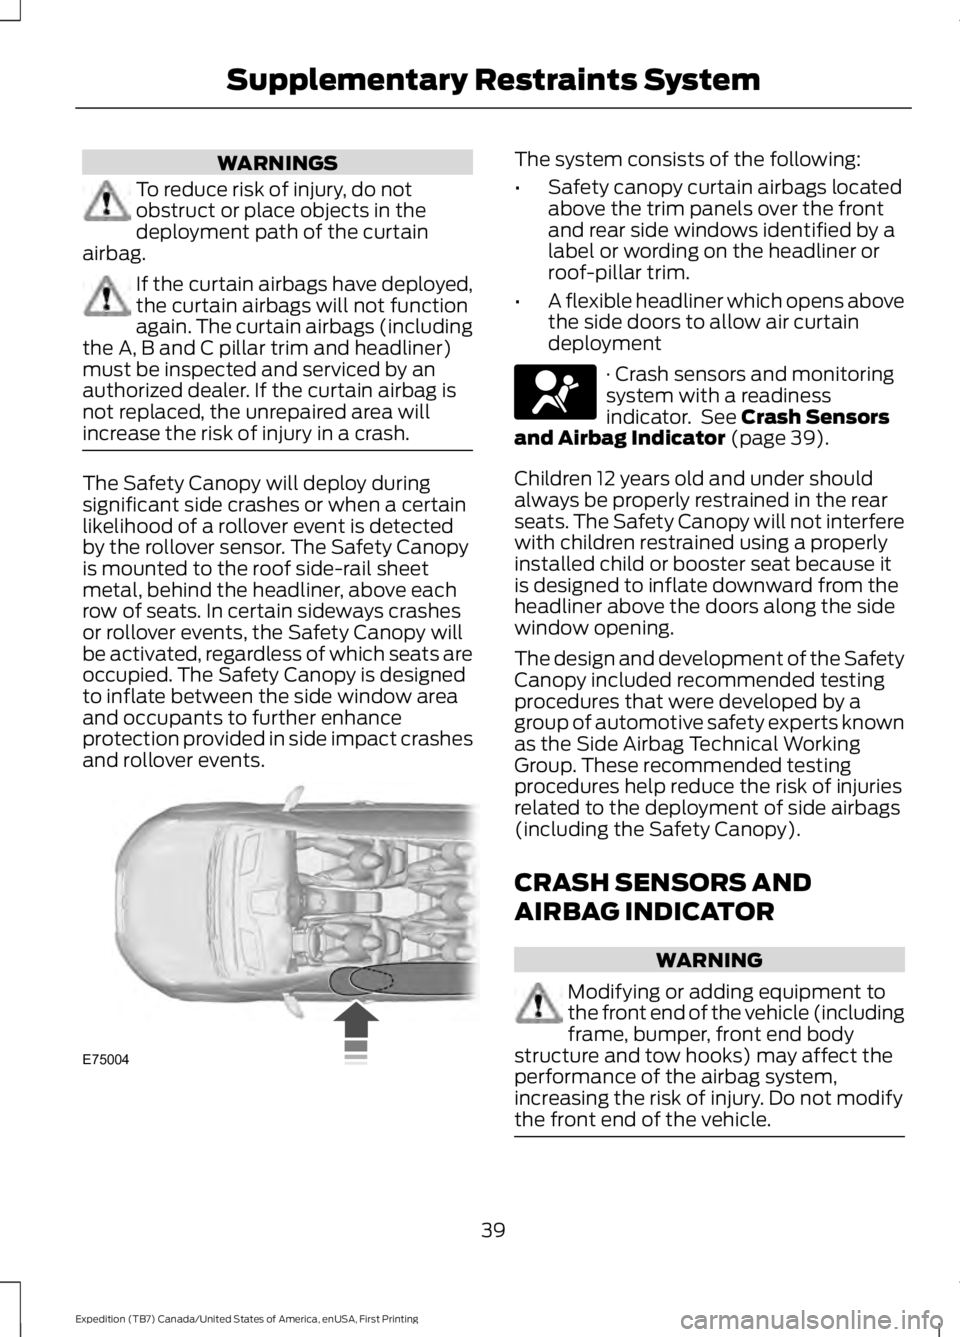
The Safety Canopy will deploy duringsignificant side crashes or when a certainlikelihood of a rollover event is detectedby the rollover sensor. The Safety Canopyis mounted to the roof side-rail sheetmetal, behind the headliner, above eachrow of seats. In certain sideways crashesor rollover events, the Safety Canopy willbe activated, regardless of which seats areoccupied. The Safety Canopy is designedto inflate between the side window areaand occupants to further enhanceprotection provided in side impact crashesand rollover events.
The system consists of the following:
•Safety canopy curtain airbags locatedabove the trim panels over the frontand rear side windows identified by alabel or wording on the headliner orroof-pillar trim.
•A flexible headliner which opens abovethe side doors to allow air curtaindeployment
· Crash sensors and monitoringsystem with a readinessindicator. See Crash Sensorsand Airbag Indicator (page 39).
Children 12 years old and under shouldalways be properly restrained in the rearseats. The Safety Canopy will not interferewith children restrained using a properlyinstalled child or booster seat because itis designed to inflate downward from theheadliner above the doors along the sidewindow opening.
The design and development of the SafetyCanopy included recommended testingprocedures that were developed by agroup of automotive safety experts knownas the Side Airbag Technical WorkingGroup. These recommended testingprocedures help reduce the risk of injuriesrelated to the deployment of side airbags(including the Safety Canopy).
CRASH SENSORS AND
AIRBAG INDICATOR
WARNING
Modifying or adding equipment tothe front end of the vehicle (includingframe, bumper, front end bodystructure and tow hooks) may affect theperformance of the airbag system,increasing the risk of injury. Do not modifythe front end of the vehicle.
39
Expedition (TB7) Canada/United States of America, enUSA, First Printing
Supplementary Restraints SystemE75004
Page 44 of 421
PRINCIPLE OF OPERATION
The remote control allows you to:
•Remotely lock or unlock the vehicledoors.
•Unlock the doors without actively usinga key or remote control (intelligentaccess only).
•Remotely open the power liftgate (ifequipped).
•Remotely start or stop the engine anduser pre-set features (if equipped).
•Arm and disarm the anti-theft system.
•Activate the panic alarm.
GENERAL INFORMATION ON
RADIO FREQUENCIES
This device complies with Part 15 of theFCC Rules and with Industry Canadalicense-exempt RSS standard(s).Operation is subject to the following twoconditions: (1) This device may not causeharmful interference, and (2) This devicemust accept any interference received,including interference that may causeundesired operation.
Note:Changes or modifications notexpressively approved by the partyresponsible for compliance could void theuser's authority to operate the equipment.The term IC before the radio certificationnumber only signifies that Industry Canadatechnical specifications were met.
The typical operating range for yourtransmitter is approximately 33 feet (10meters). Vehicles with the remote startfeature will have a greater range. One ofthe following could cause a decrease inoperating range:
•Weather conditions.
•Nearby radio towers.
•Structures around the vehicle.
•Other vehicles parked next to yourvehicle.
The radio frequency used by your remotecontrol can also be used by other radiotransmitters, for example amateur radios,medical equipment, wireless headphones,wireless remote controls, cell phones,battery chargers and alarm systems. If thefrequencies are jammed, you will not beable to use your remote control. You canlock and unlock the doors with the key.
Note:Make sure to lock your vehicle beforeleaving it unattended.
Note:If you are in range, the remote controlwill operate if you press any buttonunintentionally.
Intelligent Access (If Equipped)
The system uses a radio frequency signalto communicate with your vehicle andauthorize your vehicle to unlock when oneof the following conditions are met:
•You press any button on the keylessentry keypad within 3 ft (1 m) proximityof an intelligent access key.
•You press the luggage compartmentbutton.
•You press a button on the transmitter.
If excessive radio frequency interferenceis present in the area or if the transmitterbattery is low, you may need tomechanically unlock your door. You canuse the mechanical key blade in yourintelligent access key to open the driverdoor in this situation. See RemoteControl (page 42).
41
Expedition (TB7) Canada/United States of America, enUSA, First Printing
Keys and Remote Controls
Page 65 of 421
PASSIVE ANTI-THEFT
SYSTEM
Note:The system is not compatible withnon-Ford aftermarket remote start systems.Use of these systems may result in vehiclestarting problems and a loss of securityprotection.
Note:Metallic objects, electronic devicesor a second coded key on the same keychain may cause vehicle starting problemsif they are too close to the key when startingthe engine. Prevent these objects fromtouching the coded key while starting theengine. Switch the ignition off, move allobjects on the key chain away from thecoded key and restart the engine if aproblem occurs.
Note:Do not leave a duplicate coded keyin the vehicle. Always take your keys andlock all doors when leaving the vehicle.
SecuriLock®
The system is an engine immobilizationsystem. It is designed to help prevent theengine from being started unless a codedkey programmed to your vehicle is used.Using the wrong key may prevent theengine from starting. A message mayappear in the information display.
If you are unable to start the engine with acorrectly coded key, a malfunction hashappened and a message may appear inthe information display.
Automatic Arming
The vehicle arms immediately after youswitch the ignition off.
Automatic Disarming
Switching the ignition on with a coded keydisarms the vehicle.
Replacement Keys
Note:Your vehicle comes equipped withtwo integrated keyhead transmitters or twointelligent access keys.
The integrated keyhead transmitterfunctions as a programmed ignition keythat operates all the locks and starts thevehicle, as well as a remote control.
The intelligent access key functions as aprogrammed key that operates the driverdoor lock and activates the intelligentaccess with push button start system, aswell as a remote control.
If your programmed transmitters orstandard SecuriLock coded keys(integrated keyhead transmitters only) arelost or stolen and you do not have an extracoded key, you will need to have yourvehicle towed to an authorized dealer. Youneed to erase the key codes from yourvehicle and program new coded keys.
Store an extra programmed key away fromthe vehicle in a safe place to help preventany inconveniences. See your authorizeddealer to purchase additional spare orreplacement keys.
Programming a Spare IntegratedKeyhead Transmitter
Note:You can program a maximum of eightcoded keys to your vehicle. All eight can beintegrated keyhead transmitters.
You can program your own integratedkeyhead transmitter or standardSecuriLock coded keys to your vehicle. Thisprocedure will program both the engineimmobilizer keycode and the remote entryportion of the remote control to yourvehicle
Only use integrated keyhead transmittersor standard SecuriLock keys.
62
Expedition (TB7) Canada/United States of America, enUSA, First Printing
Security
Page 67 of 421
USING POWER RUNNING
BOARDS
WARNINGS
In extreme climates, excessive icebuildup may occur, causing therunning boards not to deploy. Makesure that the running boards havedeployed, and have finished moving beforeattempting to step on them. The runningboards will resume normal function oncethe blockage is cleared.
Turn off the running boards beforejacking or placing any object underyour vehicle. Never place your handbetween the extended running board andyour vehicle. A moving running board maycause injury.
Note:Do not use the running boards, frontand rear hinge assemblies, running boardmotors, or the running board underbodymounts to lift your vehicle when jacking.Always use proper jacking points.
Note:The running boards may operatemore slowly in cool temperatures.
Note:The running board mechanism maytrap debris such as mud, dirt, snow, ice andsalt. This may cause unwanted noise. If thishappens, manually set the running boardsto the deployed position. Then, wash thesystem, in particular the front and rear hingearms, with a high-pressure car wash wand.
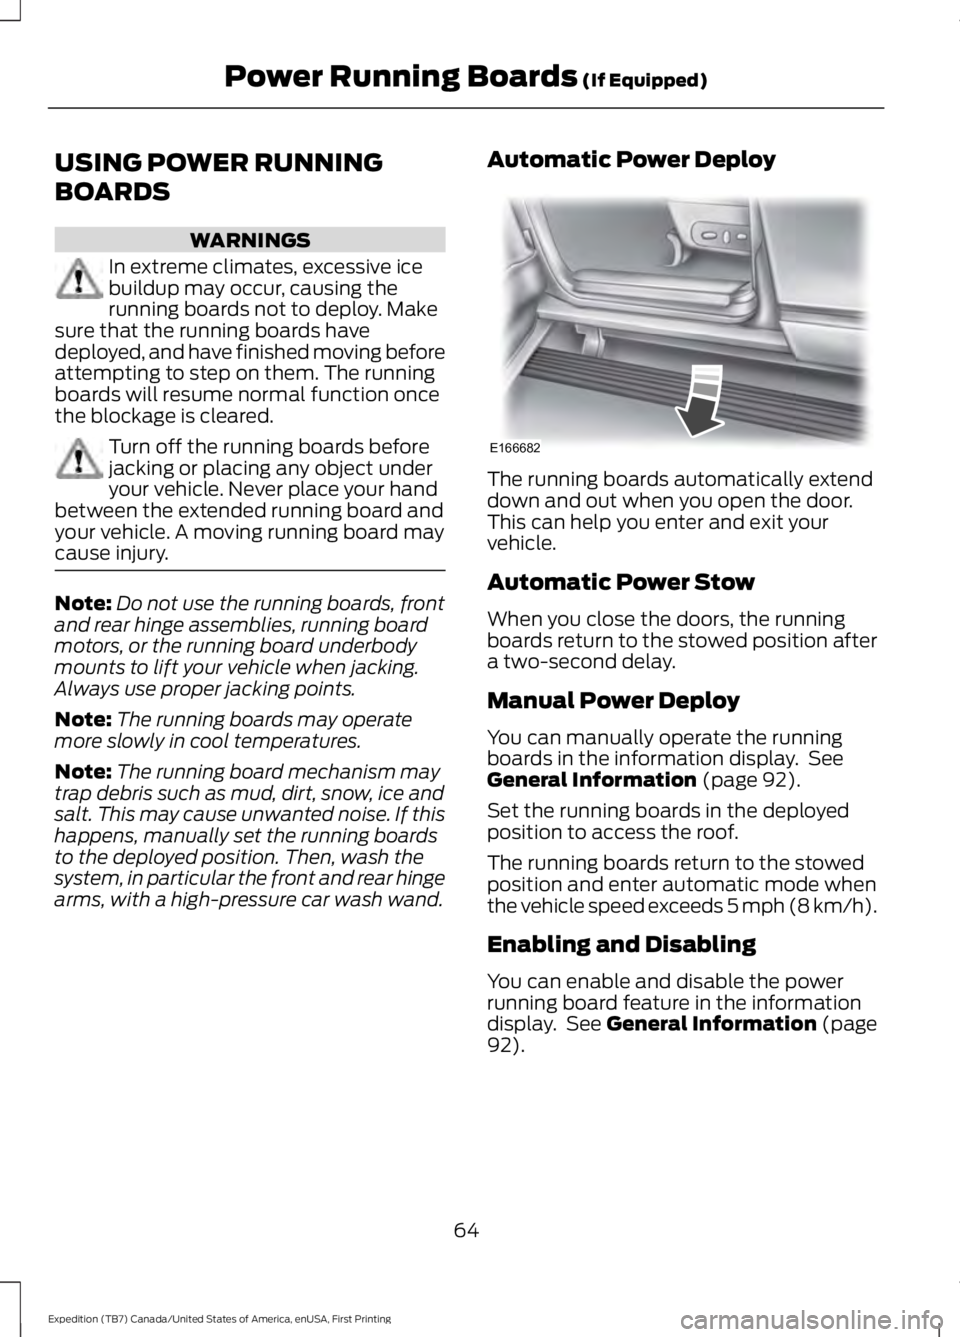
Automatic Power Deploy
The running boards automatically extenddown and out when you open the door.This can help you enter and exit yourvehicle.
Automatic Power Stow
When you close the doors, the runningboards return to the stowed position aftera two-second delay.
Manual Power Deploy
You can manually operate the runningboards in the information display. SeeGeneral Information (page 92).
Set the running boards in the deployedposition to access the roof.
The running boards return to the stowedposition and enter automatic mode whenthe vehicle speed exceeds 5 mph (8 km/h).
Enabling and Disabling
You can enable and disable the powerrunning board feature in the informationdisplay. See General Information (page92).
64
Expedition (TB7) Canada/United States of America, enUSA, First Printing
Power Running Boards (If Equipped)E166682
Page 68 of 421
•When disabled (OFF), the runningboards move to the stowed positionregardless of the door position.
•When enabled (AUTO), the runningboards move back to the correctpositions based on the door position.
Bounce-back
The running board will reverse directionand move to the end of travel if itencounters an object while moving.
65
Expedition (TB7) Canada/United States of America, enUSA, First Printing
Power Running Boards (If Equipped)