reset FORD EXPLORER 2019 Owners Manual
[x] Cancel search | Manufacturer: FORD, Model Year: 2019, Model line: EXPLORER, Model: FORD EXPLORER 2019Pages: 571, PDF Size: 6.8 MB
Page 7 of 571
Load Carrying
Rear Under Floor Storage
........................239
Cargo Nets .....................................................
239
Luggage Covers ...........................................
240
Roof Racks and Load Carriers ...............
240
Load Limit .......................................................
241
Towing
Towing a Trailer ............................................
247
Trailer Sway Control ..................................
248
Recommended Towing Weights ..........
248
Essential Towing Checks .........................
250
Towing the Vehicle on Four Wheels - 2.3L EcoBoost™ ......................................
252
Towing the Vehicle on Four Wheels - 3.5L Duratec/3.5L Ecoboost™ ..........
252
Driving Hints
Breaking-In ....................................................
255
Economical Driving ....................................
255
Driving Through Water ..............................
256
Floor Mats .....................................................
256
Roadside Emergencies
Roadside Assistance .................................
258
Hazard Flashers ..........................................
259
Fuel Shutoff ..................................................
259
Jump Starting the Vehicle .......................
260
Post-Crash Alert System .........................
262
Transporting the Vehicle ..........................
262
Towing Points ...............................................
263
Customer Assistance
Getting the Services You Need .............
264
In California (U.S. Only) ...........................
265
The Better Business Bureau (BBB) Auto Line Program (U.S. Only) ....................
266
Utilizing the Mediation/Arbitration Program (Canada Only) ......................
267Getting Assistance Outside the U.S. and
Canada .......................................................
267
Ordering Additional Owner's Literature ........................................................................\
269
Reporting Safety Defects (U.S. Only) ........................................................................\
269
Reporting Safety Defects (Canada Only) ........................................................................\
269
Fuses
Fuse Specification Chart ...........................
271
Changing a Fuse .........................................
280
Maintenance
General Information ..................................
282
Opening and Closing the Hood .............
282
Under Hood Overview - 2.3L EcoBoost™ ........................................................................\
283
Under Hood Overview - 3.5L Duratec ........................................................................\
284
Under Hood Overview - 3.5L Ecoboost™ ........................................................................\
285
Engine Oil Dipstick - 2.3L EcoBoost™ ........................................................................\
286
Engine Oil Dipstick - 3.5L Duratec/3.5L Ecoboost™ ...............................................
287
Engine Oil Check .........................................
287
Oil Change Indicator Reset .....................
288
Engine Coolant Check ..............................
289
Automatic Transmission Fluid Check - 2.3L EcoBoost™ .....................................
293
Automatic Transmission Fluid Check - 3.5L Duratec/3.5L Ecoboost™ ..........
293
Brake Fluid Check .......................................
295
Power Steering Fluid Check ...................
296
Washer Fluid Check ...................................
296
Changing the 12V Battery ........................
296
Checking the Wiper Blades ....................
298
Changing the Wiper Blades ....................
298
Adjusting the Headlamps .......................
299
Changing a Bulb .........................................
300
Changing the Engine Air Filter ...............
304
4
Explorer (TUB) Canada/United States of America, enUSA, Edition date: 201807, Second-Printing Table of Contents
Page 11 of 571
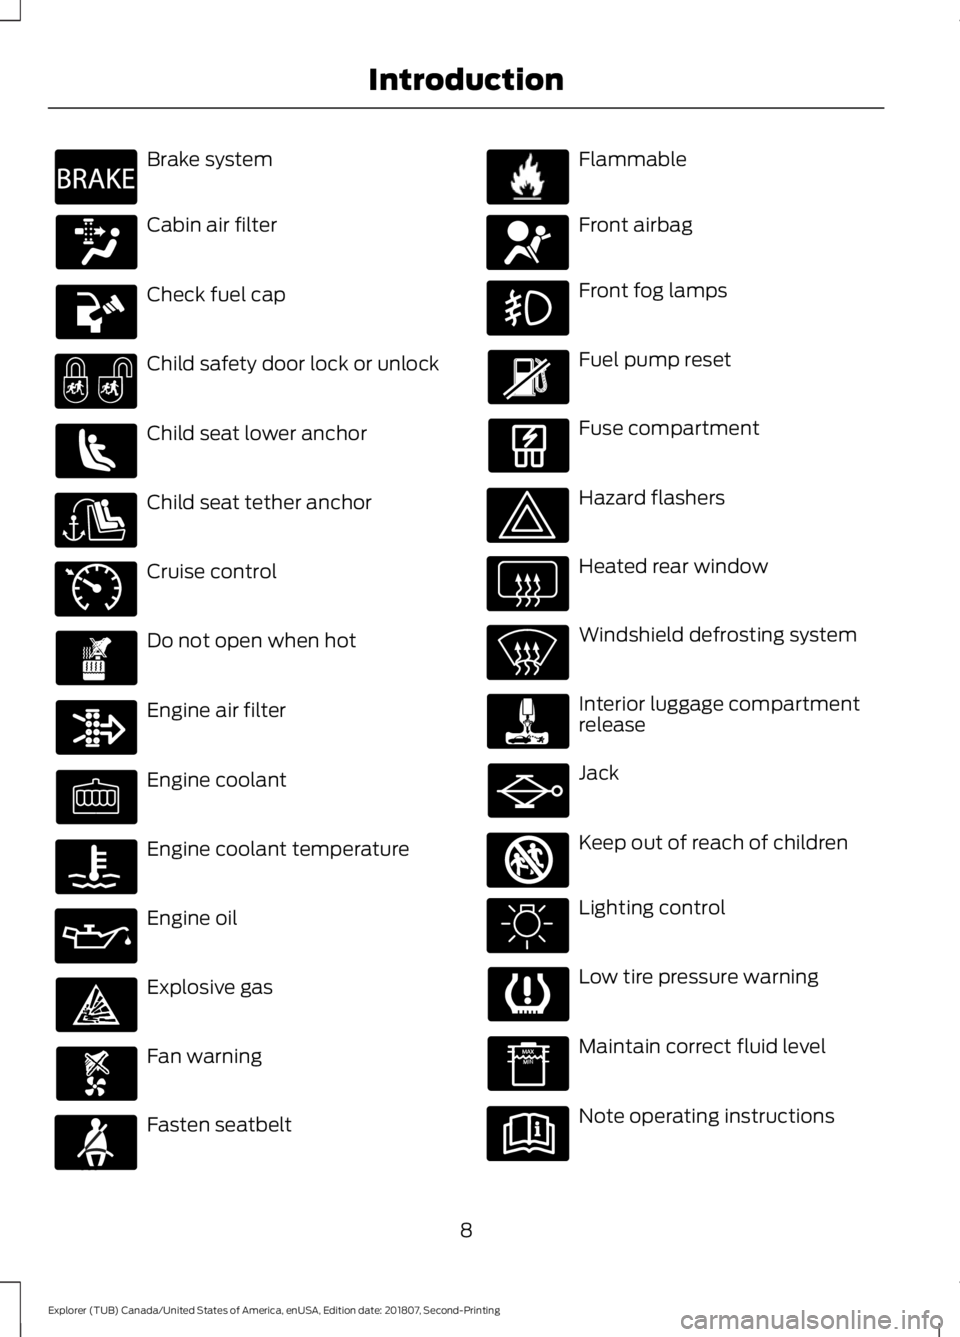
Brake system
Cabin air filter
Check fuel cap
Child safety door lock or unlock
Child seat lower anchor
Child seat tether anchor
Cruise control
Do not open when hot
Engine air filter
Engine coolant
Engine coolant temperature
Engine oil
Explosive gas
Fan warning
Fasten seatbelt Flammable
Front airbag
Front fog lamps
Fuel pump reset
Fuse compartment
Hazard flashers
Heated rear window
Windshield defrosting system
Interior luggage compartment
release
Jack
Keep out of reach of children
Lighting control
Low tire pressure warning
Maintain correct fluid level
Note operating instructions
8
Explorer (TUB) Canada/United States of America, enUSA, Edition date: 201807, Second-Printing IntroductionE270480 E71340 E71880 E231160 E67017 E161353
Page 60 of 571
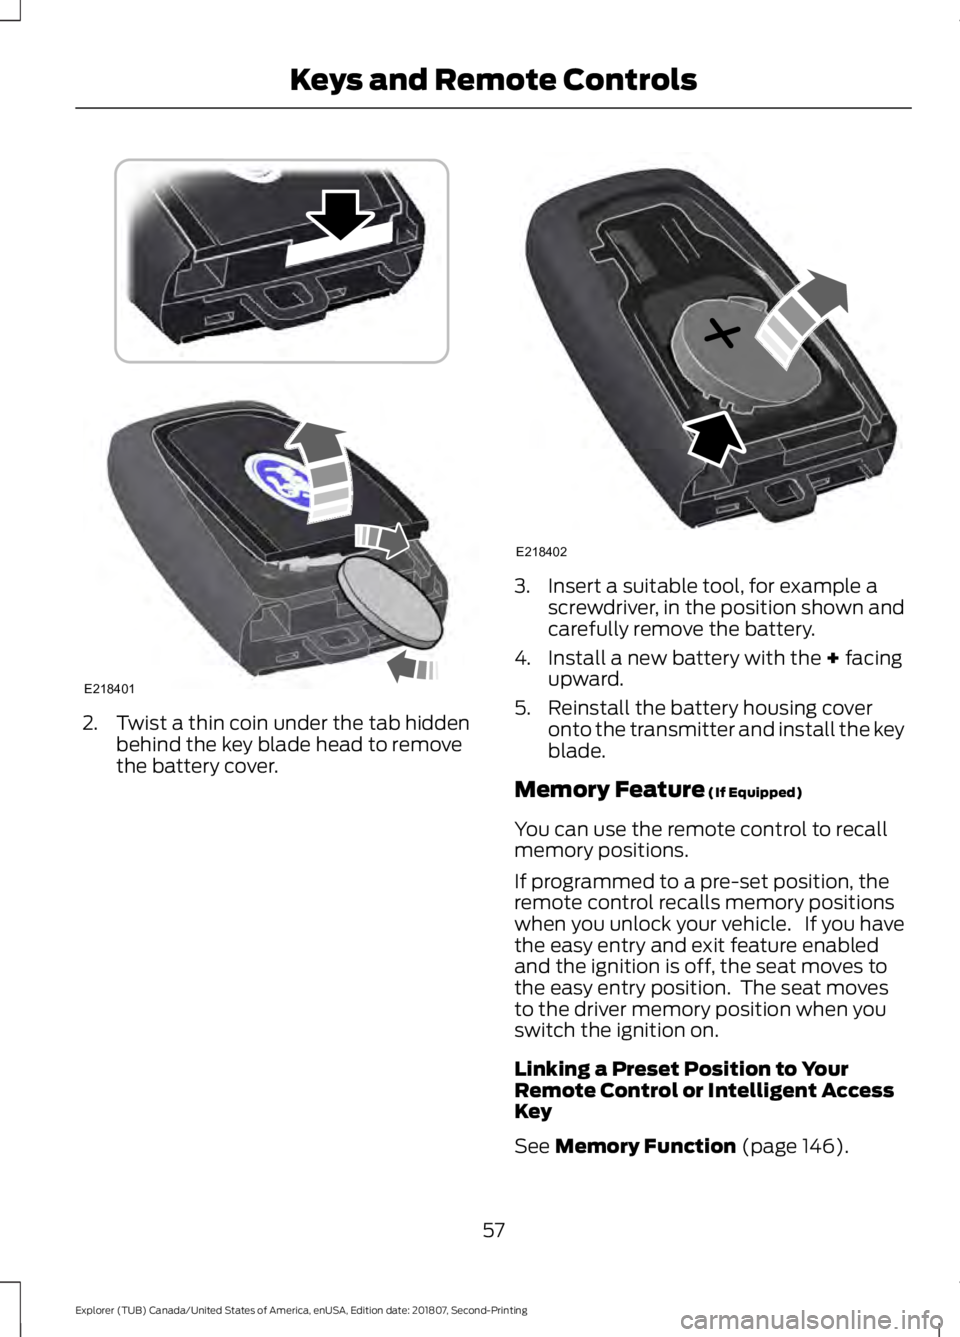
2. Twist a thin coin under the tab hidden
behind the key blade head to remove
the battery cover. 3. Insert a suitable tool, for example a
screwdriver, in the position shown and
carefully remove the battery.
4. Install a new battery with the + facing
upward.
5. Reinstall the battery housing cover onto the transmitter and install the key
blade.
Memory Feature
(If Equipped)
You can use the remote control to recall
memory positions.
If programmed to a pre-set position, the
remote control recalls memory positions
when you unlock your vehicle. If you have
the easy entry and exit feature enabled
and the ignition is off, the seat moves to
the easy entry position. The seat moves
to the driver memory position when you
switch the ignition on.
Linking a Preset Position to Your
Remote Control or Intelligent Access
Key
See
Memory Function (page 146).
57
Explorer (TUB) Canada/United States of America, enUSA, Edition date: 201807, Second-Printing Keys and Remote ControlsE218401 E218402
Page 67 of 571
Potential causes
Condition
· Purchase a new key or transmitter from
your authorized dealer.
I lost the only admin key.
· Program a spare key or transmitter. You
may need to see your authorized dealer.
See Passive Anti-Theft System (page
75).
I lost a key.
· The MyKey user is not using the MyKey.
MyKey distances do not accumulate.
· An admin key holder cleared the MyKeys
and created new MyKeys.
· The key system has been reset.
64
Explorer (TUB) Canada/United States of America, enUSA, Edition date: 201807, Second-Printing MyKey
™
Page 81 of 571
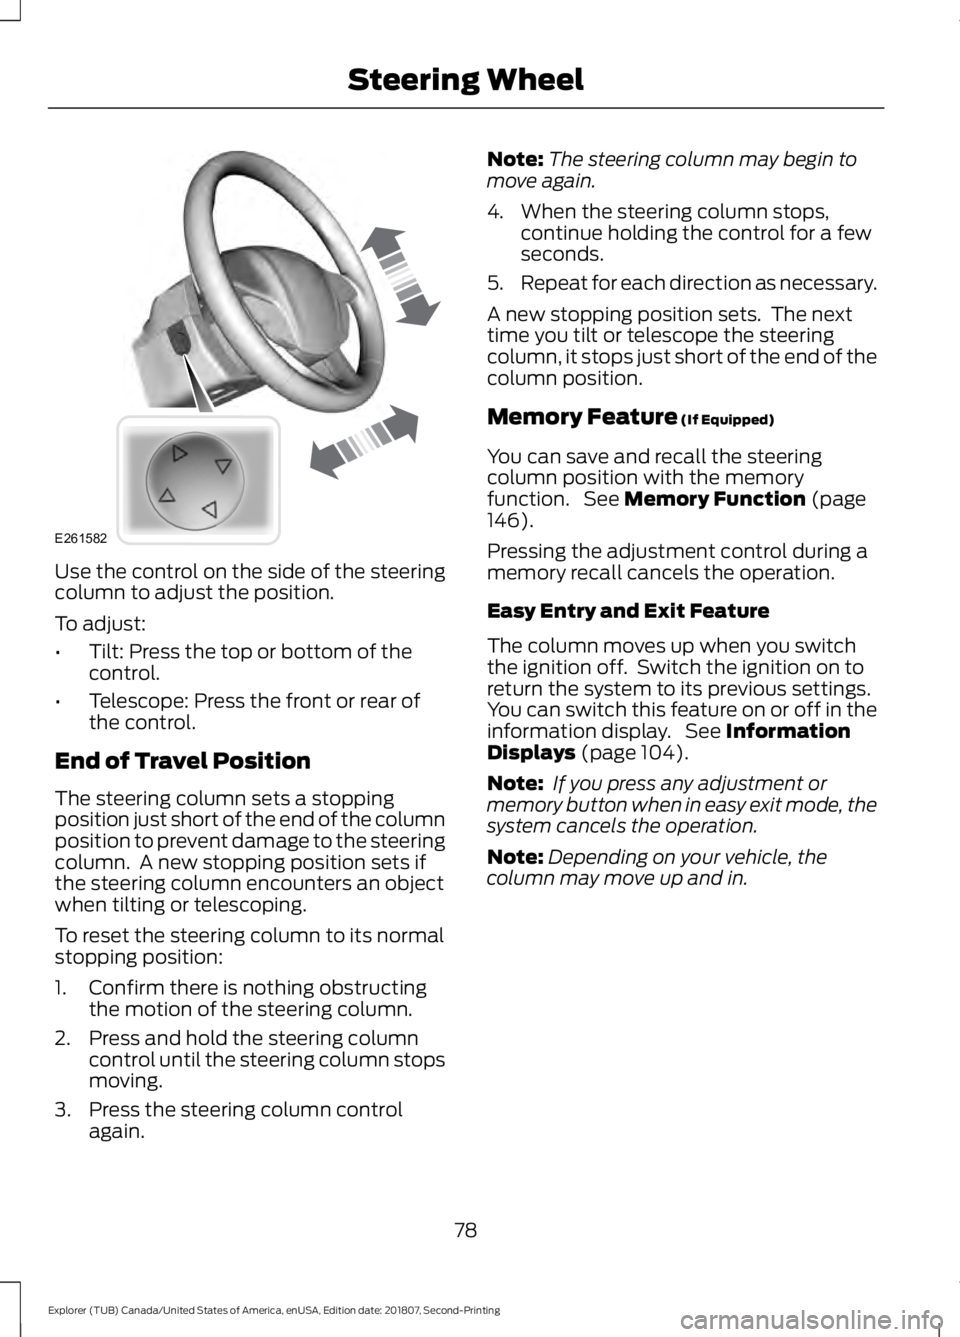
Use the control on the side of the steering
column to adjust the position.
To adjust:
•
Tilt: Press the top or bottom of the
control.
• Telescope: Press the front or rear of
the control.
End of Travel Position
The steering column sets a stopping
position just short of the end of the column
position to prevent damage to the steering
column. A new stopping position sets if
the steering column encounters an object
when tilting or telescoping.
To reset the steering column to its normal
stopping position:
1. Confirm there is nothing obstructing the motion of the steering column.
2. Press and hold the steering column control until the steering column stops
moving.
3. Press the steering column control again. Note:
The steering column may begin to
move again.
4. When the steering column stops, continue holding the control for a few
seconds.
5. Repeat for each direction as necessary.
A new stopping position sets. The next
time you tilt or telescope the steering
column, it stops just short of the end of the
column position.
Memory Feature (If Equipped)
You can save and recall the steering
column position with the memory
function. See
Memory Function (page
146).
Pressing the adjustment control during a
memory recall cancels the operation.
Easy Entry and Exit Feature
The column moves up when you switch
the ignition off. Switch the ignition on to
return the system to its previous settings.
You can switch this feature on or off in the
information display. See
Information
Displays (page 104).
Note: If you press any adjustment or
memory button when in easy exit mode, the
system cancels the operation.
Note: Depending on your vehicle, the
column may move up and in.
78
Explorer (TUB) Canada/United States of America, enUSA, Edition date: 201807, Second-Printing Steering WheelE261582
Page 82 of 571
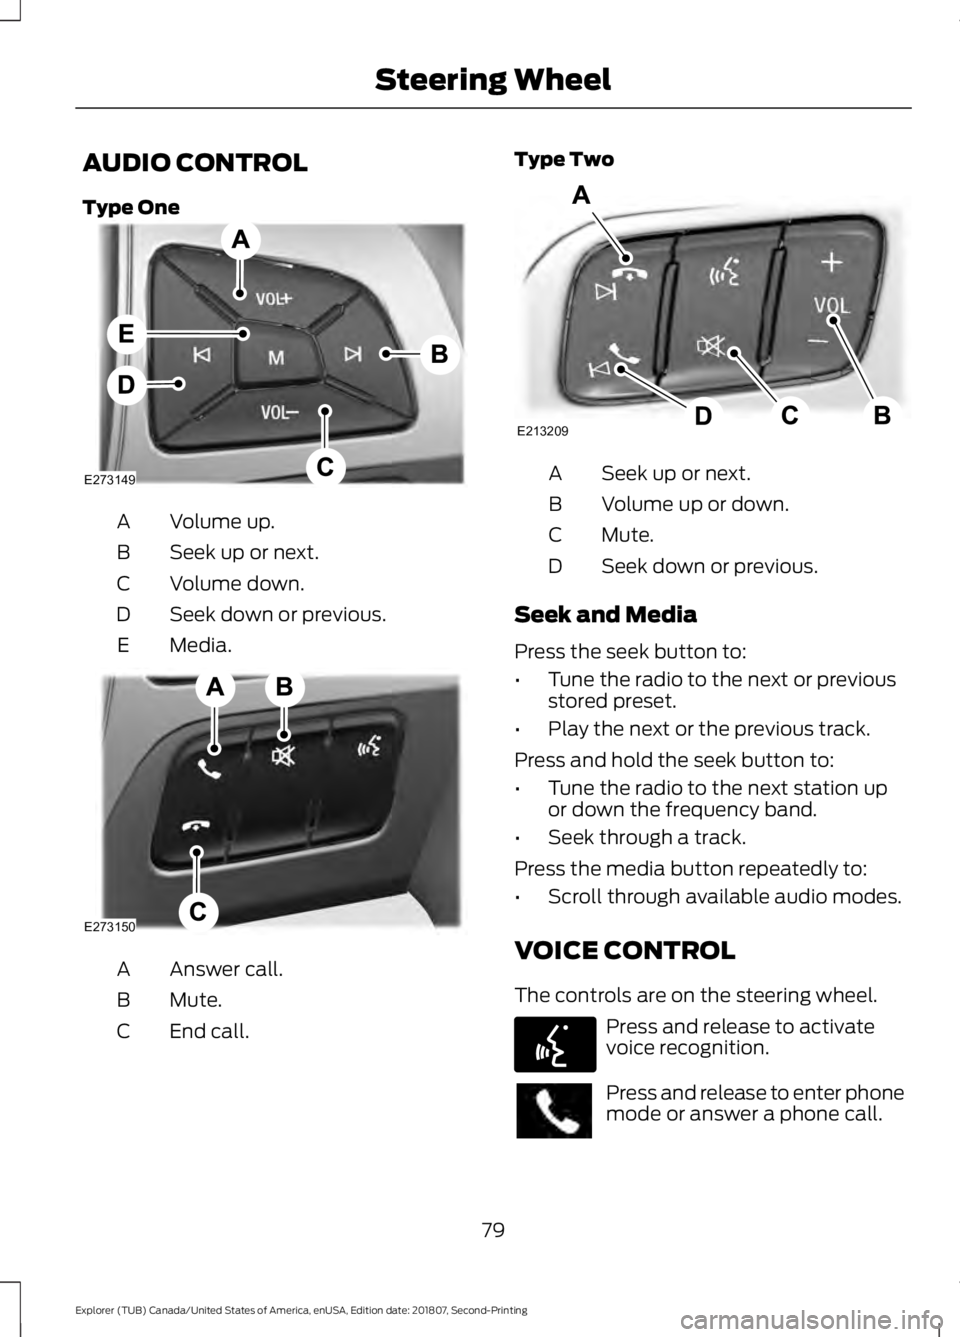
AUDIO CONTROL
Type One
Volume up.
A
Seek up or next.
B
Volume down.
C
Seek down or previous.
D
Media.
E Answer call.
A
Mute.
B
End call.
C Type Two
Seek up or next.
A
Volume up or down.
B
Mute.
C
Seek down or previous.
D
Seek and Media
Press the seek button to:
• Tune the radio to the next or previous
stored preset.
• Play the next or the previous track.
Press and hold the seek button to:
• Tune the radio to the next station up
or down the frequency band.
• Seek through a track.
Press the media button repeatedly to:
• Scroll through available audio modes.
VOICE CONTROL
The controls are on the steering wheel. Press and release to activate
voice recognition.
Press and release to enter phone
mode or answer a phone call.
79
Explorer (TUB) Canada/United States of America, enUSA, Edition date: 201807, Second-Printing Steering WheelE273149 E273150 E213209 E142599
Page 93 of 571
POWER WINDOWS
WARNING: Do not leave children
unattended in your vehicle and do not
let them play with the power windows.
Failure to follow this instruction could
result in personal injury. WARNING:
When closing the
power windows, verify they are free of
obstruction and make sure that children
and pets are not in the proximity of the
window openings. Note:
You may hear a pulsing noise when
just one of the windows is open. Lower the
opposite window slightly to reduce this
noise.
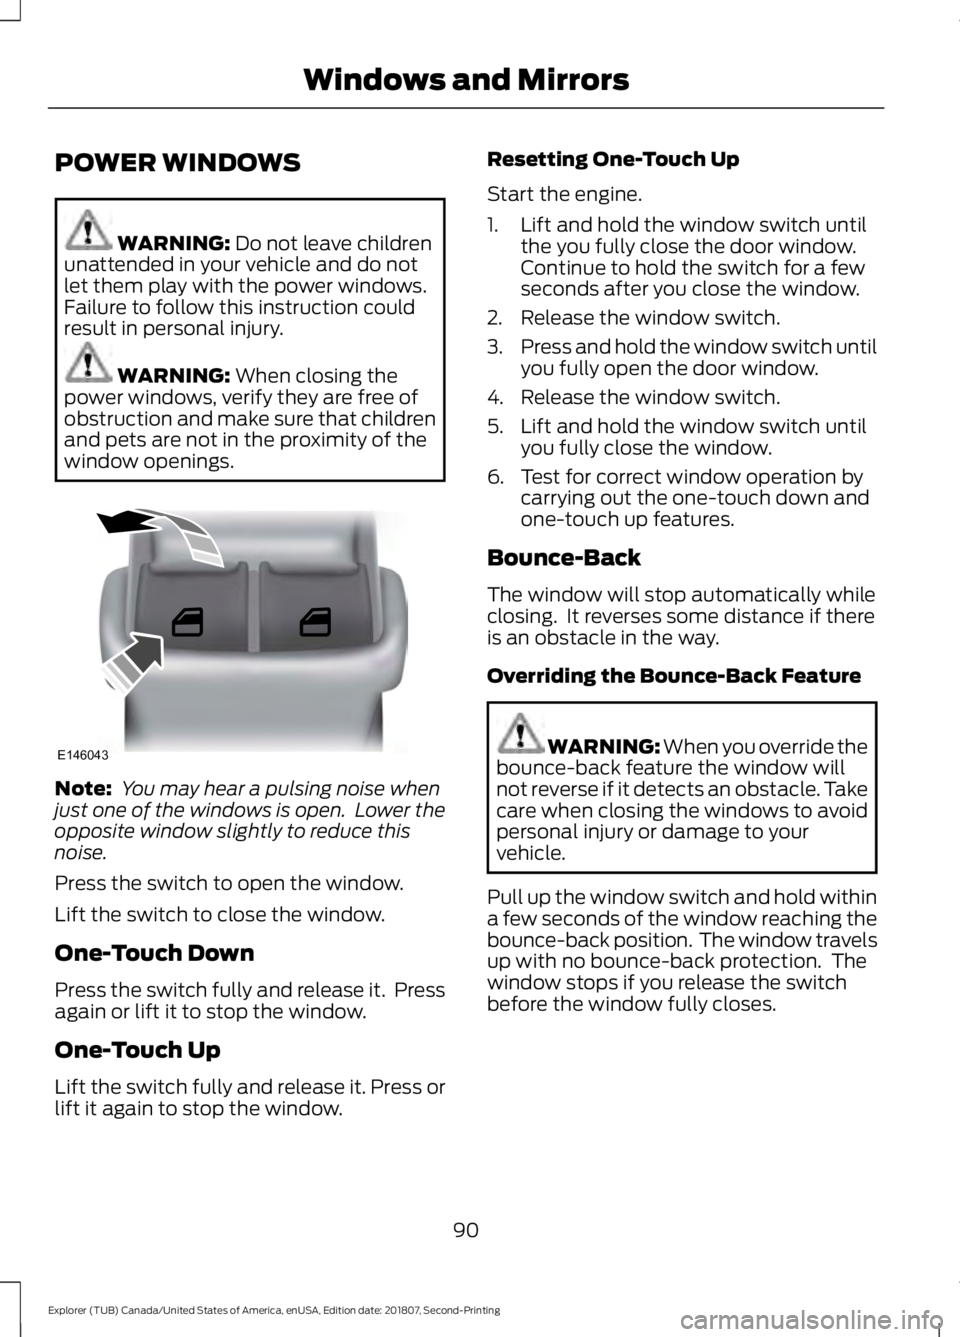
Press the switch to open the window.
Lift the switch to close the window.
One-Touch Down
Press the switch fully and release it. Press
again or lift it to stop the window.
One-Touch Up
Lift the switch fully and release it. Press or
lift it again to stop the window. Resetting One-Touch Up
Start the engine.
1. Lift and hold the window switch until
the you fully close the door window.
Continue to hold the switch for a few
seconds after you close the window.
2. Release the window switch.
3. Press and hold the window switch until
you fully open the door window.
4. Release the window switch.
5. Lift and hold the window switch until you fully close the window.
6. Test for correct window operation by carrying out the one-touch down and
one-touch up features.
Bounce-Back
The window will stop automatically while
closing. It reverses some distance if there
is an obstacle in the way.
Overriding the Bounce-Back Feature WARNING: When you override the
bounce-back feature the window will
not reverse if it detects an obstacle. Take
care when closing the windows to avoid
personal injury or damage to your
vehicle.
Pull up the window switch and hold within
a few seconds of the window reaching the
bounce-back position. The window travels
up with no bounce-back protection. The
window stops if you release the switch
before the window fully closes.
90
Explorer (TUB) Canada/United States of America, enUSA, Edition date: 201807, Second-Printing Windows and MirrorsE146043
Page 95 of 571
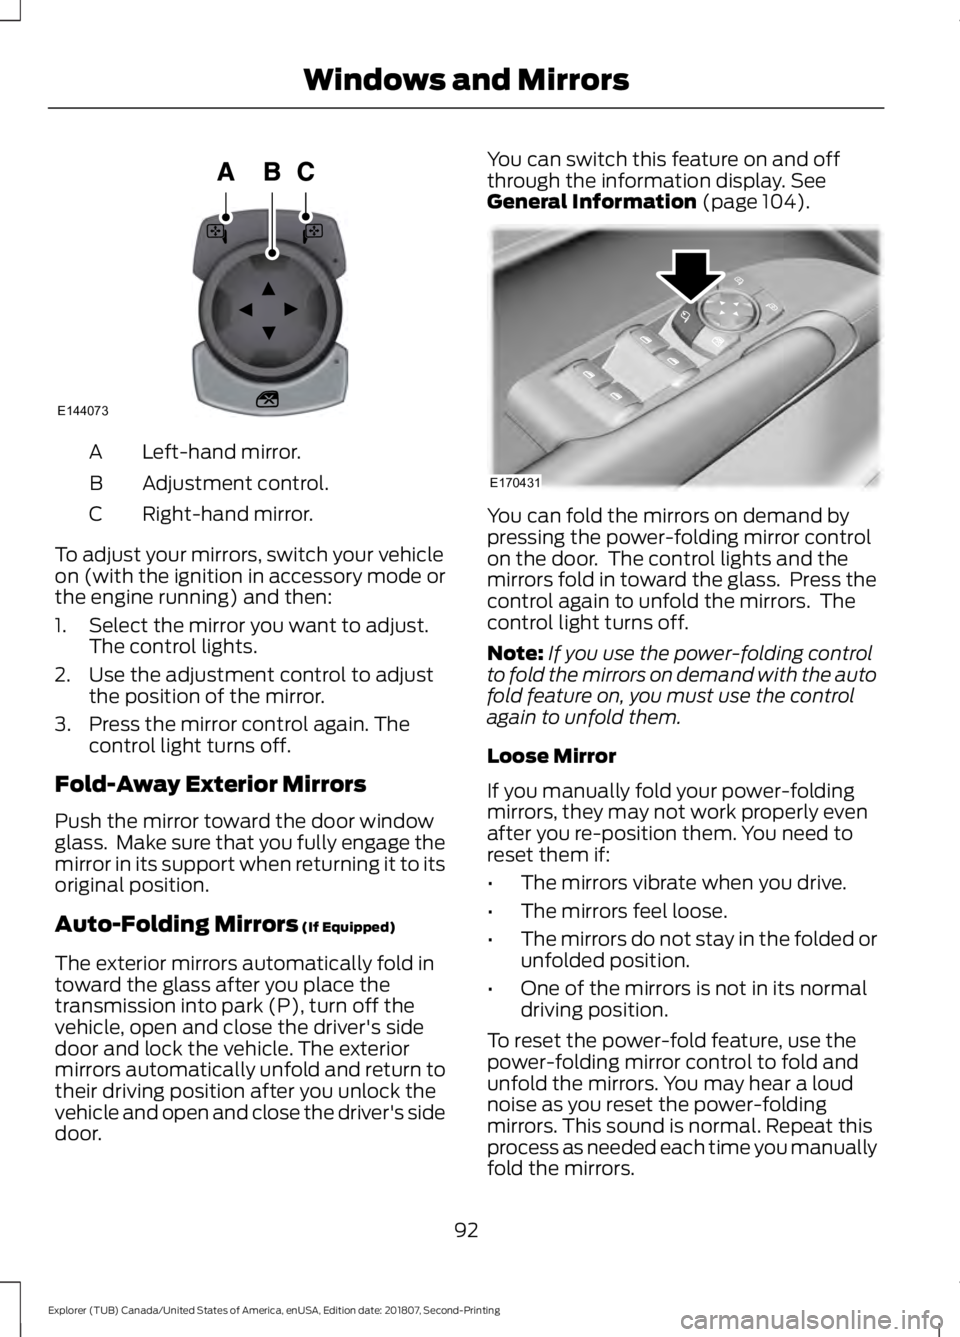
Left-hand mirror.
A
Adjustment control.
B
Right-hand mirror.
C
To adjust your mirrors, switch your vehicle
on (with the ignition in accessory mode or
the engine running) and then:
1. Select the mirror you want to adjust. The control lights.
2. Use the adjustment control to adjust the position of the mirror.
3. Press the mirror control again. The control light turns off.
Fold-Away Exterior Mirrors
Push the mirror toward the door window
glass. Make sure that you fully engage the
mirror in its support when returning it to its
original position.
Auto-Folding Mirrors (If Equipped)
The exterior mirrors automatically fold in
toward the glass after you place the
transmission into park (P), turn off the
vehicle, open and close the driver's side
door and lock the vehicle. The exterior
mirrors automatically unfold and return to
their driving position after you unlock the
vehicle and open and close the driver's side
door. You can switch this feature on and off
through the information display.
See
General Information (page 104). You can fold the mirrors on demand by
pressing the power-folding mirror control
on the door. The control lights and the
mirrors fold in toward the glass. Press the
control again to unfold the mirrors. The
control light turns off.
Note:
If you use the power-folding control
to fold the mirrors on demand with the auto
fold feature on, you must use the control
again to unfold them.
Loose Mirror
If you manually fold your power-folding
mirrors, they may not work properly even
after you re-position them. You need to
reset them if:
• The mirrors vibrate when you drive.
• The mirrors feel loose.
• The mirrors do not stay in the folded or
unfolded position.
• One of the mirrors is not in its normal
driving position.
To reset the power-fold feature, use the
power-folding mirror control to fold and
unfold the mirrors. You may hear a loud
noise as you reset the power-folding
mirrors. This sound is normal. Repeat this
process as needed each time you manually
fold the mirrors.
92
Explorer (TUB) Canada/United States of America, enUSA, Edition date: 201807, Second-Printing Windows and MirrorsE144073 E170431
Page 108 of 571
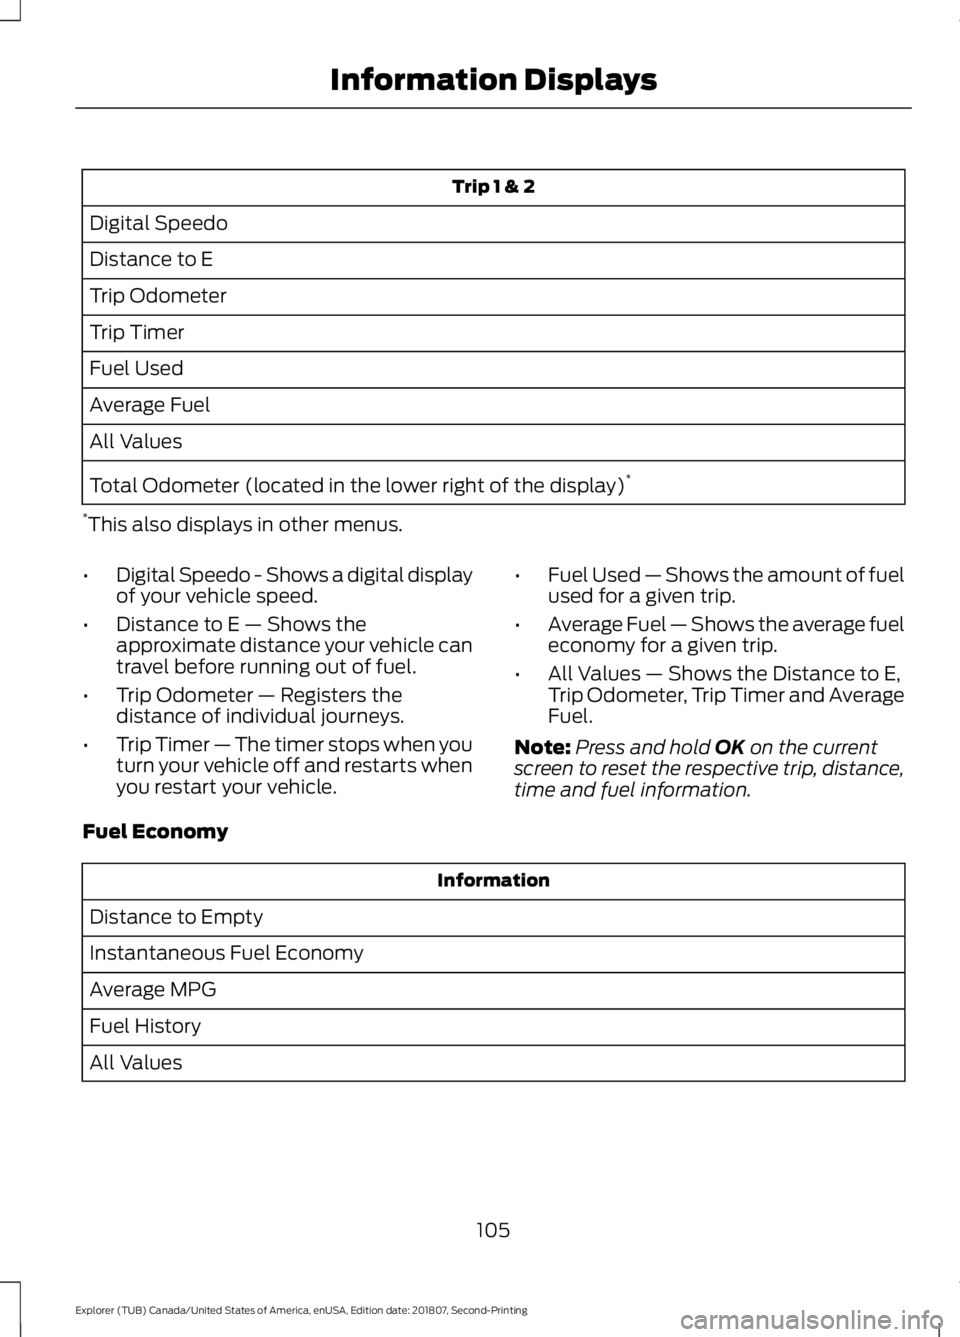
Trip 1 & 2
Digital Speedo
Distance to E
Trip Odometer
Trip Timer
Fuel Used
Average Fuel
All Values
Total Odometer (located in the lower right of the display) *
* This also displays in other menus.
• Digital Speedo - Shows a digital display
of your vehicle speed.
• Distance to E — Shows the
approximate distance your vehicle can
travel before running out of fuel.
• Trip Odometer — Registers the
distance of individual journeys.
• Trip Timer — The timer stops when you
turn your vehicle off and restarts when
you restart your vehicle. •
Fuel Used — Shows the amount of fuel
used for a given trip.
• Average Fuel — Shows the average fuel
economy for a given trip.
• All Values — Shows the Distance to E,
Trip Odometer, Trip Timer and Average
Fuel.
Note: Press and hold OK on the current
screen to reset the respective trip, distance,
time and fuel information.
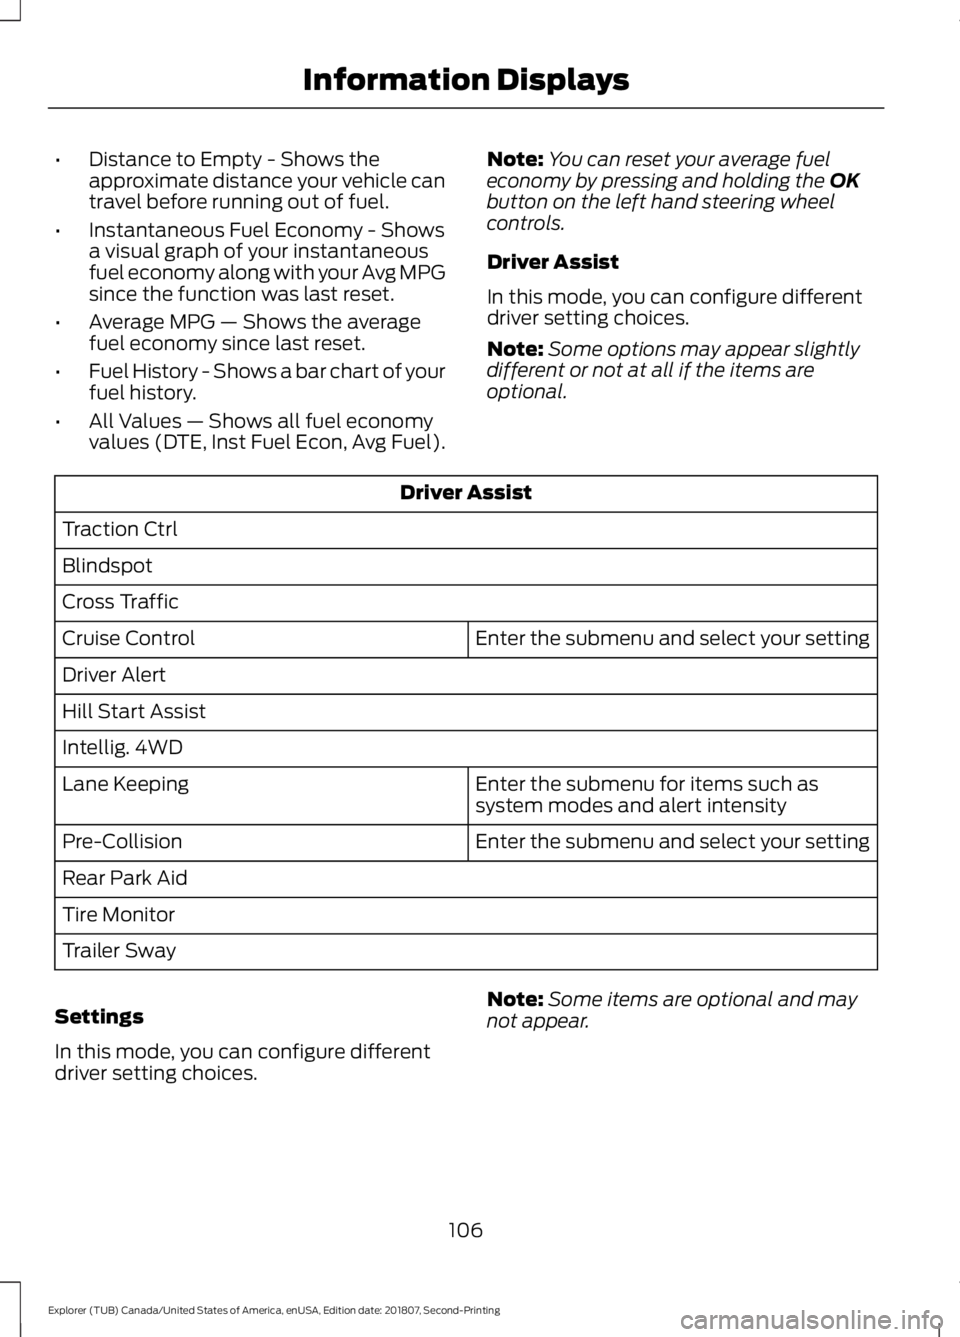
Fuel Economy Information
Distance to Empty
Instantaneous Fuel Economy
Average MPG
Fuel History
All Values
105
Explorer (TUB) Canada/United States of America, enUSA, Edition date: 201807, Second-Printing Information Displays
Page 109 of 571
•
Distance to Empty - Shows the
approximate distance your vehicle can
travel before running out of fuel.
• Instantaneous Fuel Economy - Shows
a visual graph of your instantaneous
fuel economy along with your Avg MPG
since the function was last reset.
• Average MPG — Shows the average
fuel economy since last reset.
• Fuel History - Shows a bar chart of your
fuel history.
• All Values — Shows all fuel economy
values (DTE, Inst Fuel Econ, Avg Fuel). Note:
You can reset your average fuel
economy by pressing and holding the OK
button on the left hand steering wheel
controls.
Driver Assist
In this mode, you can configure different
driver setting choices.
Note: Some options may appear slightly
different or not at all if the items are
optional. Driver Assist
Traction Ctrl
Blindspot
Cross Traffic Enter the submenu and select your setting
Cruise Control
Driver Alert
Hill Start Assist
Intellig. 4WD
Enter the submenu for items such as
system modes and alert intensity
Lane Keeping
Enter the submenu and select your setting
Pre-Collision
Rear Park Aid
Tire Monitor
Trailer Sway
Settings
In this mode, you can configure different
driver setting choices. Note:
Some items are optional and may
not appear.
106
Explorer (TUB) Canada/United States of America, enUSA, Edition date: 201807, Second-Printing Information Displays