clock FORD F-150 2021 Owners Manual
[x] Cancel search | Manufacturer: FORD, Model Year: 2021, Model line: F-150, Model: FORD F-150 2021Pages: 796, PDF Size: 13.89 MB
Page 21 of 796
Cooling System Capacity and
Specification - 5.0L ................................601
Cooling System Capacity and Specification - 3.5L Ecoboost™,
Raptor, Police Responder ...................
602
Fuel Tank Capacity - Gasoline, Excluding: Hybrid Electric Vehicle (HEV) ...........
603
Fuel Tank Capacity - Diesel ...................
604
Fuel Tank Capacity - Gasoline, Hybrid Electric Vehicle (HEV) .........................
605
Fuel Tank Capacity - Raptor ..................
606
Air Conditioning System Capacity and Specification - 2.7L EcoBoost™ .......
607
Air Conditioning System Capacity and Specification - 3.0L Diesel .................
608
Air Conditioning System Capacity and Specification - 3.3L ...............................
609
Air Conditioning System Capacity and Specification - 3.5L Ecoboost™ .......
610
Air Conditioning System Capacity and Specification - 3.5L, Hybrid Electric
Vehicle (HEV) ............................................
611
Air Conditioning System Capacity and Specification - 5.0L ................................
612
Washer Fluid Specification ......................
612
Diesel Exhaust Fluid Capacity and Specification .............................................
613
Brake Fluid Specification ..........................
613
Transfer Case Fluid Capacity and Specification - 4x4 .................................
614
Transfer Case Fluid Capacity and Specification - Raptor ...........................
615
Front Axle Fluid Capacity and Specification - 4x4 .................................
616
Rear Axle Fluid Capacity and Specification .............................................
616
Rear Axle Fluid Capacity and Specification - Raptor ............................
617
Rear Axle Fluid Capacity and Specification - Police Responder ......
618
Vehicle Identification
Vehicle Identification Number ...............
619Connected Vehicle
What Is a Connected Vehicle
................
620
Connected Vehicle Requirements .......
620
Connected Vehicle Limitations .............
620
Connecting the Vehicle to a Mobile Network .....................................................
620
Connecting the Vehicle to a Wi-Fi Network .....................................................
620
Connected Vehicle – Troubleshooting ........................................................................\
.
621
Vehicle Wi-Fi Hotspot
Creating a Vehicle Wi-Fi Hotspot .........
624
Changing the Vehicle Wi-Fi Hotspot Name or Password ................................
624
Audio System
Audio System Precautions .....................
626
Identifying the Audio Unit .......................
626
Switching the Audio Unit On and Off ........................................................................\
626
Selecting the Audio Source ....................
626
Playing or Pausing the Audio Source ........................................................................\
626
Adjusting the Volume ................................
627
Switching Shuffle Mode On and Off ........................................................................\
627
Switching Repeat Mode On and Off ........................................................................\
627
Setting a Memory Preset .........................
627
Muting the Audio .........................................
627
Adjusting the Sound Settings ................
627
Setting the Clock and Date ....................
628
AM/FM Radio ...............................................
628
Switching the Display On and Off .......
629
Digital Radio .................................................
629
Satellite Radio .............................................
630
Audio System – Troubleshooting .........
633
Center Display Overview
Center Display Precautions .....................
637
17
F-150 (TFD) Canada/United States of America, enUSA, Edition date: 202104, Second-Printing Table of Contents
Page 66 of 796
If the booster seat slides on the vehicle
seat upon which it is being used, placing a
rubberized mesh sold as shelf or carpet
liner under the booster seat may improve
this condition. Do not use any item thicker
than this under the booster seat. Check
with the booster seat manufacturer's
instructions.
CHILD SAFETY LOCKS (IF
EQUIPPED) WARNING:
You cannot open the
rear doors from inside if you have put the
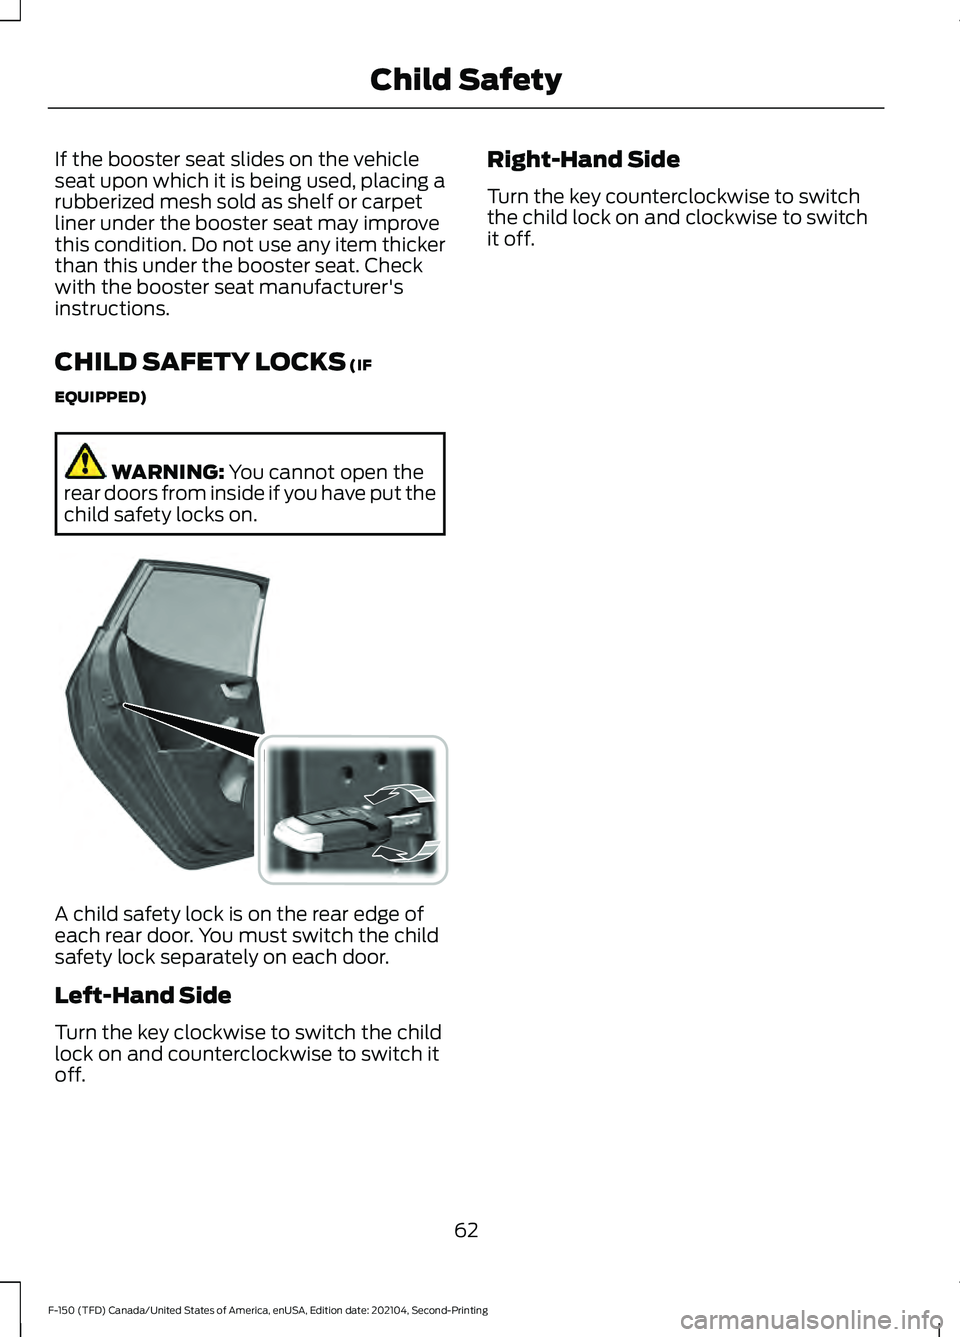
child safety locks on. A child safety lock is on the rear edge of
each rear door. You must switch the child
safety lock separately on each door.
Left-Hand Side
Turn the key clockwise to switch the child
lock on and counterclockwise to switch it
off. Right-Hand Side
Turn the key counterclockwise to switch
the child lock on and clockwise to switch
it off.
62
F-150 (TFD) Canada/United States of America, enUSA, Edition date: 202104, Second-Printing Child Safety E238364
Page 121 of 796
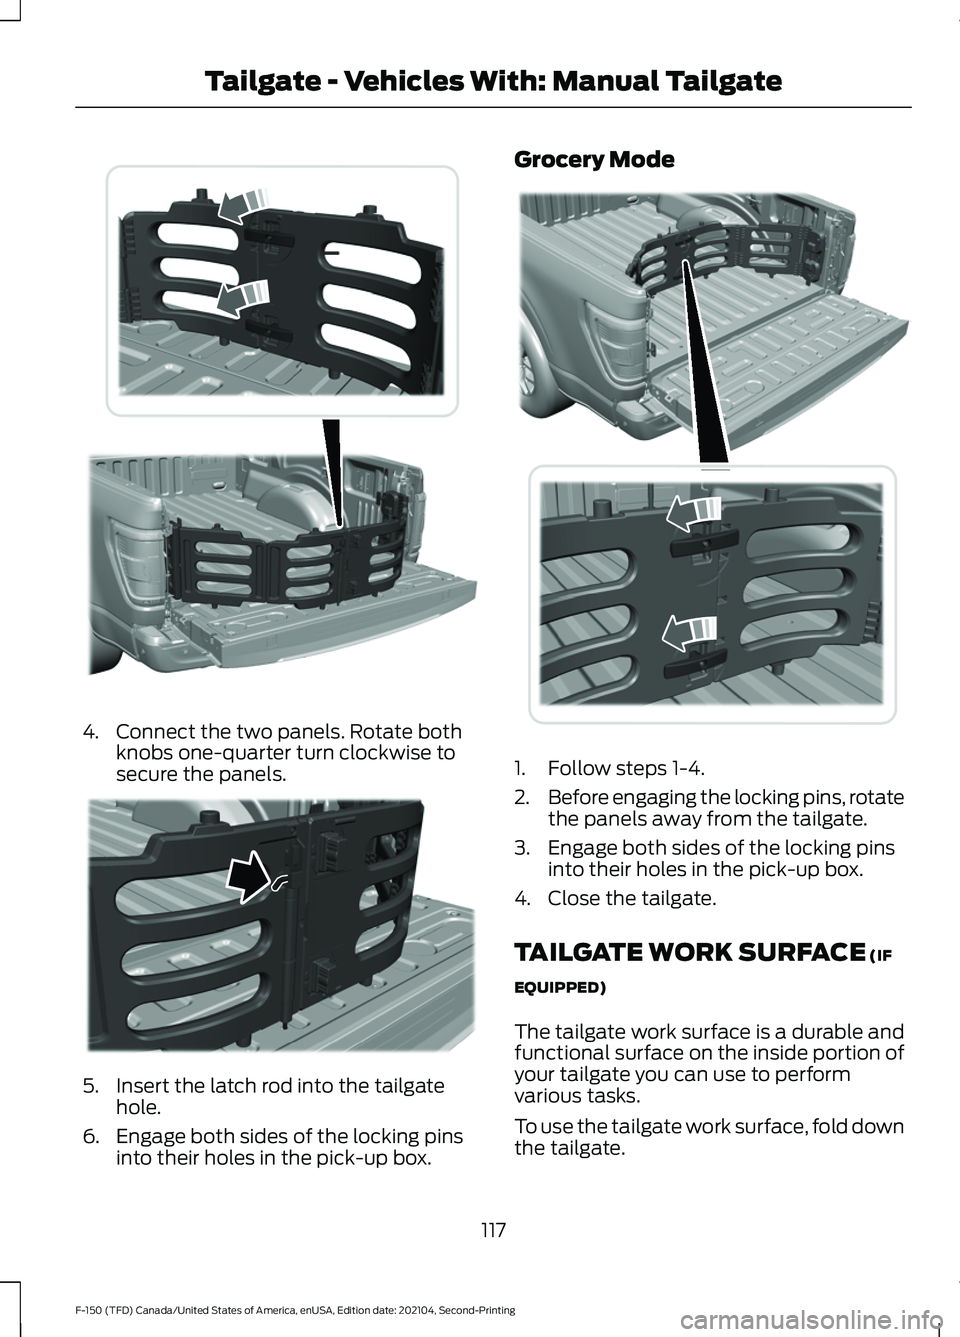
4. Connect the two panels. Rotate both
knobs one-quarter turn clockwise to
secure the panels. 5. Insert the latch rod into the tailgate
hole.
6. Engage both sides of the locking pins into their holes in the pick-up box. Grocery Mode
1. Follow steps 1-4.
2.
Before engaging the locking pins, rotate
the panels away from the tailgate.
3. Engage both sides of the locking pins into their holes in the pick-up box.
4. Close the tailgate.
TAILGATE WORK SURFACE (IF
EQUIPPED)
The tailgate work surface is a durable and
functional surface on the inside portion of
your tailgate you can use to perform
various tasks.
To use the tailgate work surface, fold down
the tailgate.
117
F-150 (TFD) Canada/United States of America, enUSA, Edition date: 202104, Second-Printing Tailgate - Vehicles With: Manual TailgateE311524 E311520 E311519
Page 128 of 796
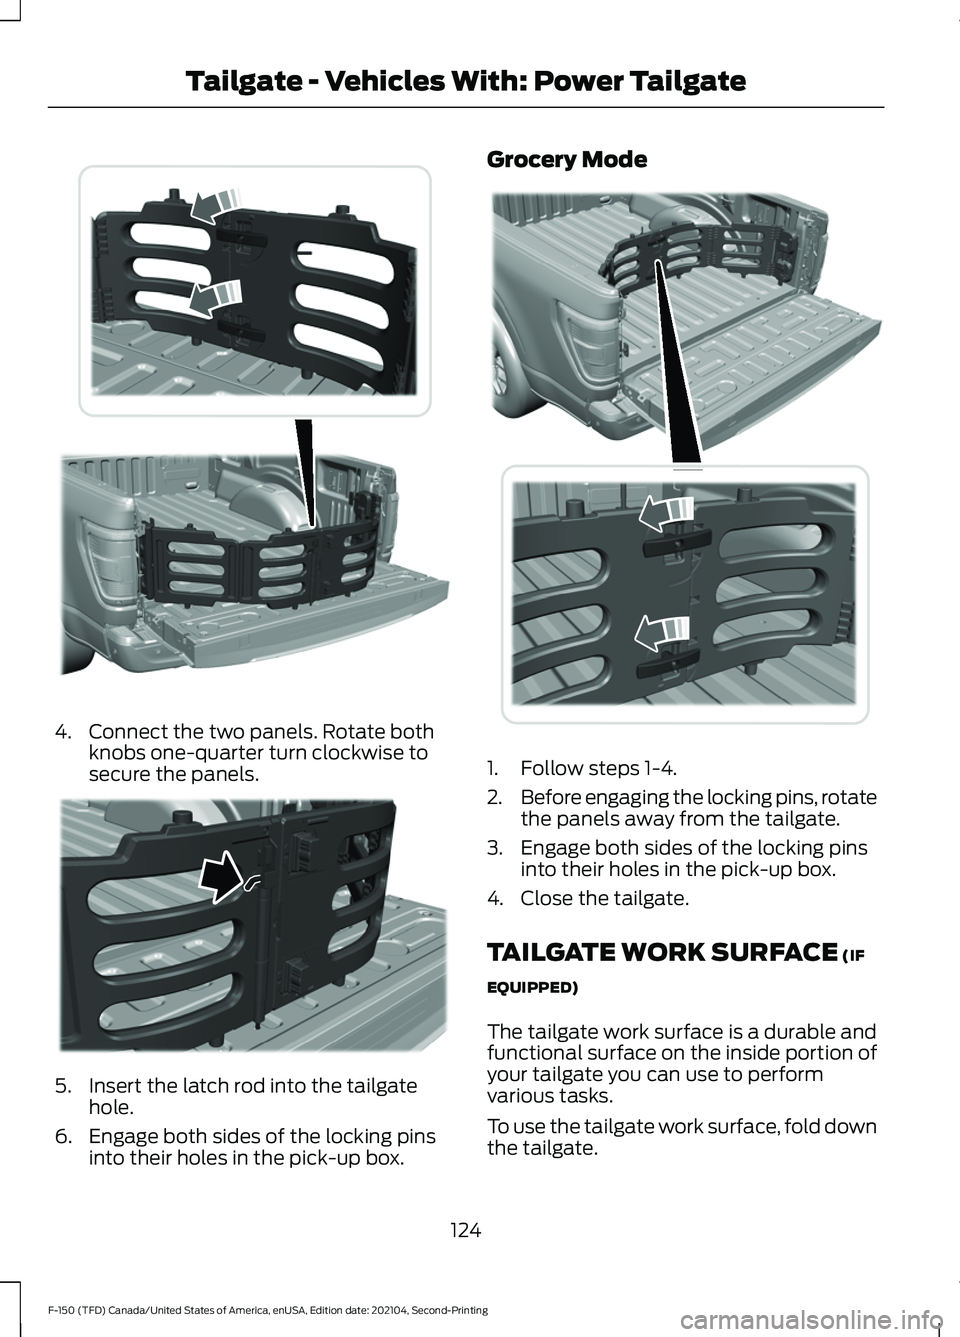
4. Connect the two panels. Rotate both
knobs one-quarter turn clockwise to
secure the panels. 5. Insert the latch rod into the tailgate
hole.
6. Engage both sides of the locking pins into their holes in the pick-up box. Grocery Mode
1. Follow steps 1-4.
2.
Before engaging the locking pins, rotate
the panels away from the tailgate.
3. Engage both sides of the locking pins into their holes in the pick-up box.
4. Close the tailgate.
TAILGATE WORK SURFACE (IF
EQUIPPED)
The tailgate work surface is a durable and
functional surface on the inside portion of
your tailgate you can use to perform
various tasks.
To use the tailgate work surface, fold down
the tailgate.
124
F-150 (TFD) Canada/United States of America, enUSA, Edition date: 202104, Second-Printing Tailgate - Vehicles With: Power TailgateE311524 E311520 E311519
Page 135 of 796
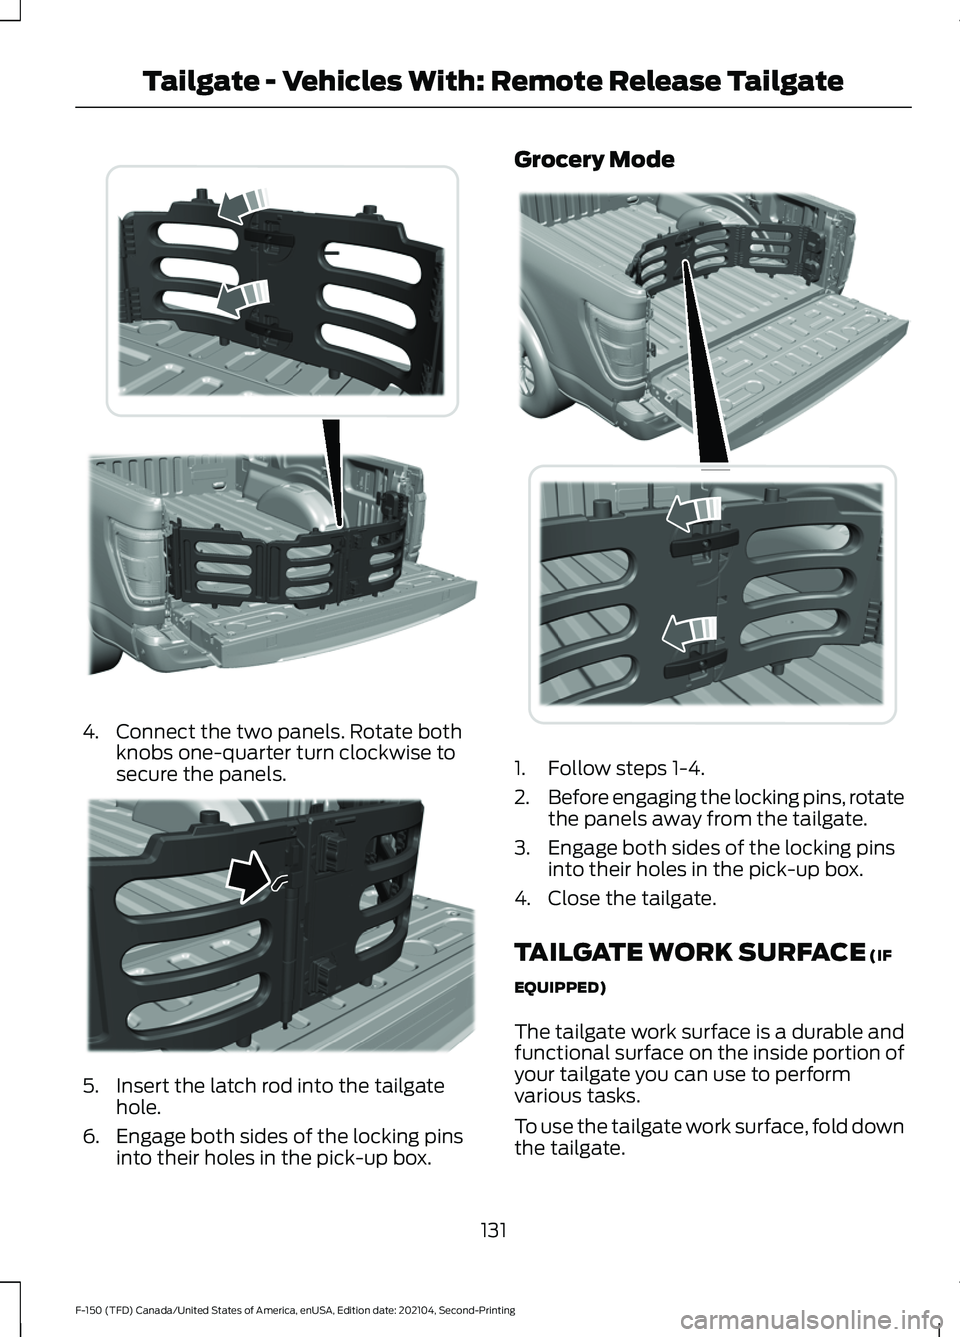
4. Connect the two panels. Rotate both
knobs one-quarter turn clockwise to
secure the panels. 5. Insert the latch rod into the tailgate
hole.
6. Engage both sides of the locking pins into their holes in the pick-up box. Grocery Mode
1. Follow steps 1-4.
2.
Before engaging the locking pins, rotate
the panels away from the tailgate.
3. Engage both sides of the locking pins into their holes in the pick-up box.
4. Close the tailgate.
TAILGATE WORK SURFACE (IF
EQUIPPED)
The tailgate work surface is a durable and
functional surface on the inside portion of
your tailgate you can use to perform
various tasks.
To use the tailgate work surface, fold down
the tailgate.
131
F-150 (TFD) Canada/United States of America, enUSA, Edition date: 202104, Second-Printing Tailgate - Vehicles With: Remote Release TailgateE311524 E311520 E311519
Page 195 of 796
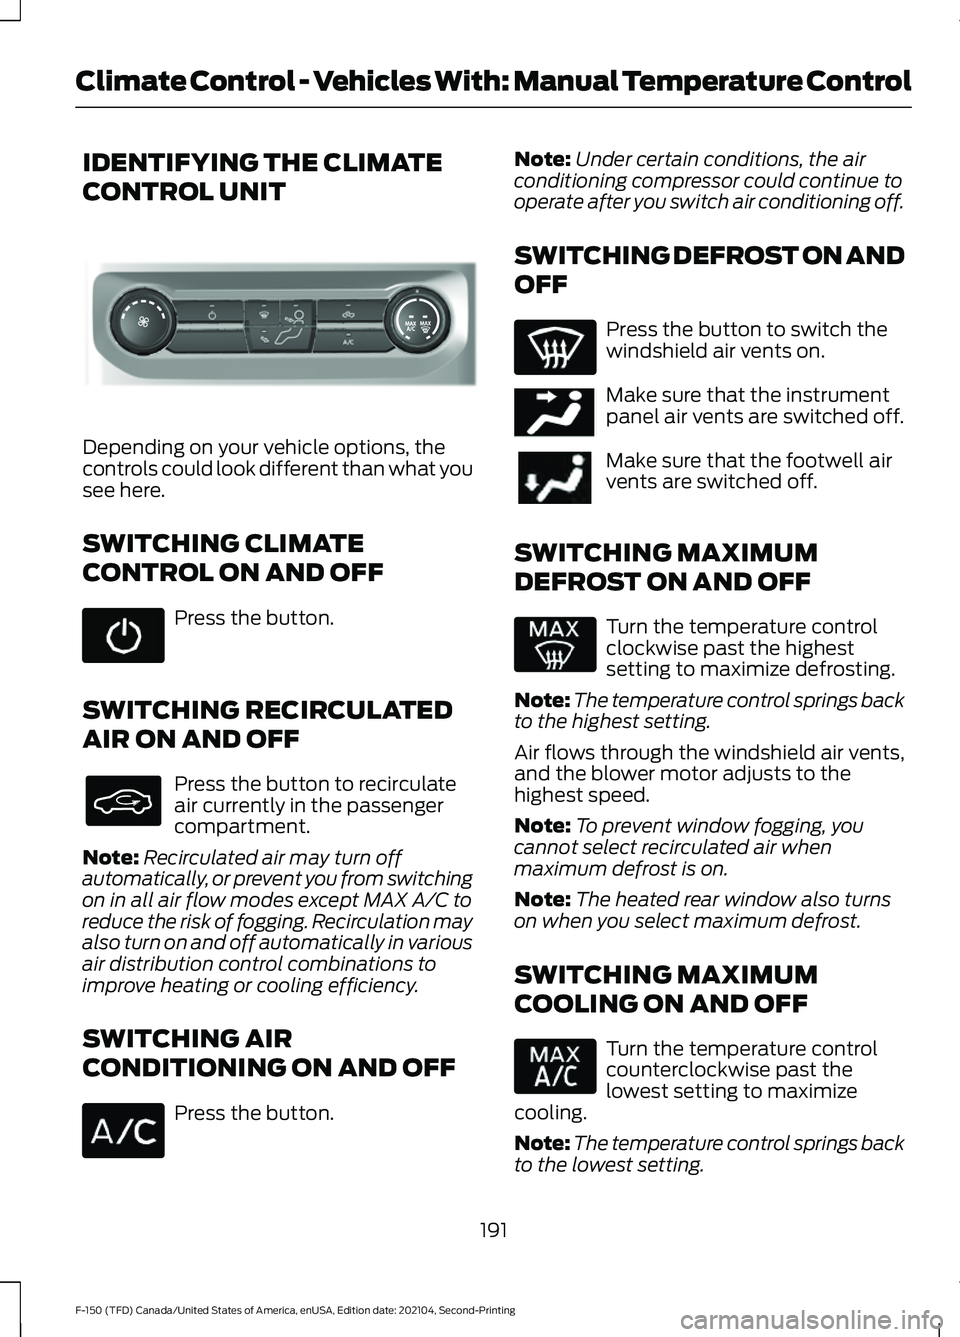
IDENTIFYING THE CLIMATE
CONTROL UNIT
Depending on your vehicle options, the
controls could look different than what you
see here.
SWITCHING CLIMATE
CONTROL ON AND OFF
Press the button.
SWITCHING RECIRCULATED
AIR ON AND OFF Press the button to recirculate
air currently in the passenger
compartment.
Note: Recirculated air may turn off
automatically, or prevent you from switching
on in all air flow modes except MAX A/C to
reduce the risk of fogging. Recirculation may
also turn on and off automatically in various
air distribution control combinations to
improve heating or cooling efficiency.
SWITCHING AIR
CONDITIONING ON AND OFF Press the button. Note:
Under certain conditions, the air
conditioning compressor could continue to
operate after you switch air conditioning off.
SWITCHING DEFROST ON AND
OFF Press the button to switch the
windshield air vents on.
Make sure that the instrument
panel air vents are switched off.
Make sure that the footwell air
vents are switched off.
SWITCHING MAXIMUM
DEFROST ON AND OFF Turn the temperature control
clockwise past the highest
setting to maximize defrosting.
Note: The temperature control springs back
to the highest setting.
Air flows through the windshield air vents,
and the blower motor adjusts to the
highest speed.
Note: To prevent window fogging, you
cannot select recirculated air when
maximum defrost is on.
Note: The heated rear window also turns
on when you select maximum defrost.
SWITCHING MAXIMUM
COOLING ON AND OFF Turn the temperature control
counterclockwise past the
lowest setting to maximize
cooling.
Note: The temperature control springs back
to the lowest setting.
191
F-150 (TFD) Canada/United States of America, enUSA, Edition date: 202104, Second-Printing Climate Control - Vehicles With: Manual Temperature ControlE308141 E244097
Page 196 of 796
Note:
When you switch maximum cooling
off, air conditioning remains on.
SWITCHING THE HEATED
REAR WINDOW ON AND OFF Press the button to clear the rear
window of thin ice and fog. The
heated rear window turns off
after a short period of time.
Note: Do not use harsh chemicals, razor
blades or other sharp objects to clean or
remove decals from the inside of the heated
rear window as this could cause damage to
the heated rear window grid lines not
covered by the vehicle Warranty.
SETTING THE BLOWER MOTOR
SPEED Note:
Lights on the control illuminate to
indicate the blower motor speed.
Note: When you switch the blower motor
off, air conditioning turns off and the
windows could fog up.
SWITCHING THE HEATED
MIRRORS ON AND OFF Press the button. SETTING THE TEMPERATURE
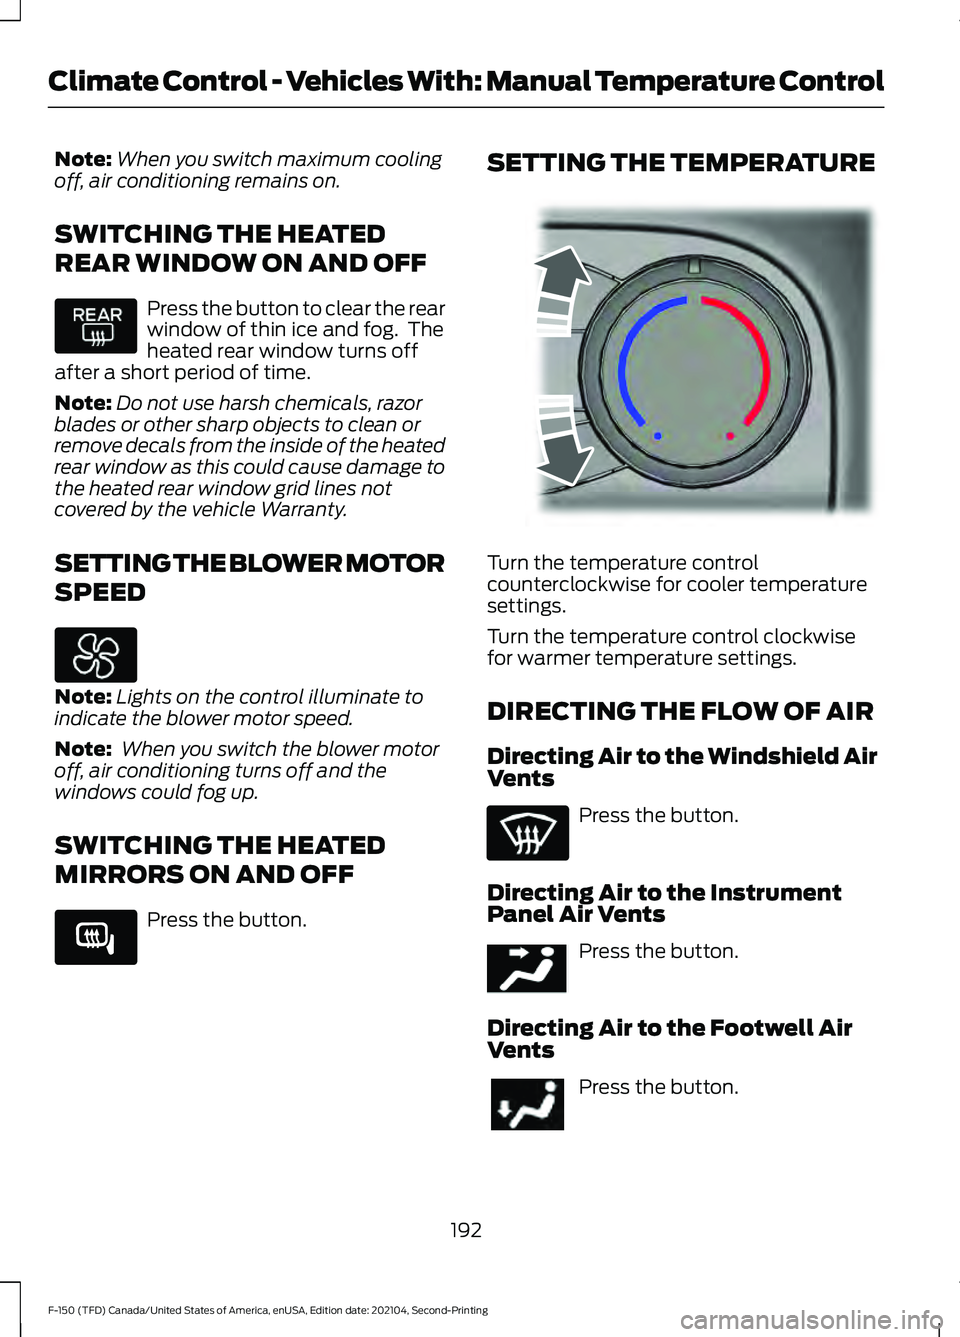
Turn the temperature control
counterclockwise for cooler temperature
settings.
Turn the temperature control clockwise
for warmer temperature settings.
DIRECTING THE FLOW OF AIR
Directing Air to the Windshield Air
Vents
Press the button.
Directing Air to the Instrument
Panel Air Vents Press the button.
Directing Air to the Footwell Air
Vents Press the button.
192
F-150 (TFD) Canada/United States of America, enUSA, Edition date: 202104, Second-Printing Climate Control - Vehicles With: Manual Temperature Control E266189 E244106 E244097
Page 280 of 796
Note:
The diesel exhaust fluid tank has a
blue filler cap.
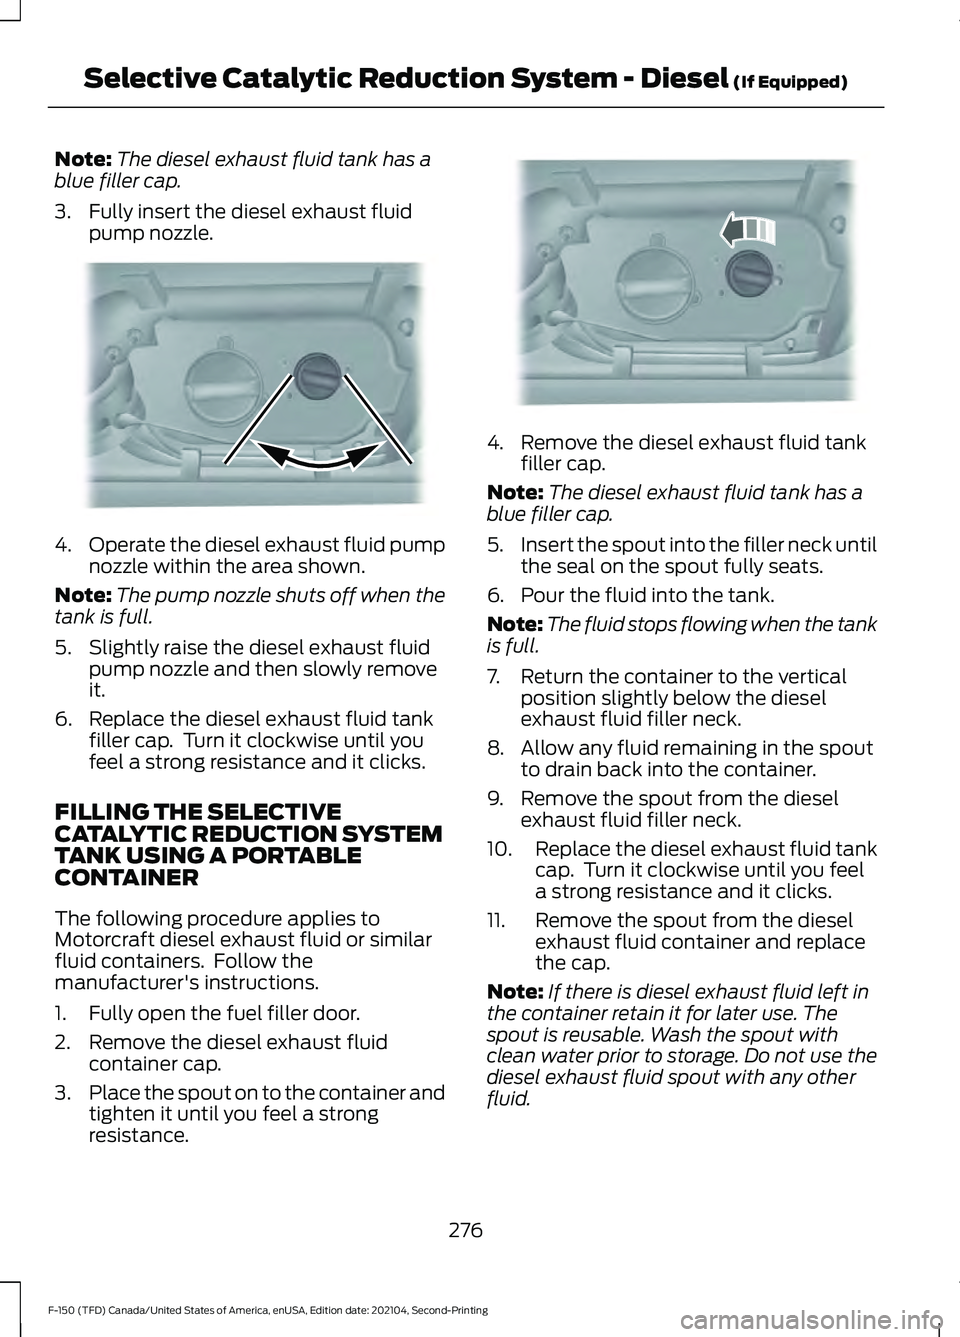
3. Fully insert the diesel exhaust fluid pump nozzle. 4.
Operate the diesel exhaust fluid pump
nozzle within the area shown.
Note: The pump nozzle shuts off when the
tank is full.
5. Slightly raise the diesel exhaust fluid pump nozzle and then slowly remove
it.
6. Replace the diesel exhaust fluid tank filler cap. Turn it clockwise until you
feel a strong resistance and it clicks.
FILLING THE SELECTIVE
CATALYTIC REDUCTION SYSTEM
TANK USING A PORTABLE
CONTAINER
The following procedure applies to
Motorcraft diesel exhaust fluid or similar
fluid containers. Follow the
manufacturer's instructions.
1. Fully open the fuel filler door.
2. Remove the diesel exhaust fluid container cap.
3. Place the spout on to the container and
tighten it until you feel a strong
resistance. 4. Remove the diesel exhaust fluid tank
filler cap.
Note: The diesel exhaust fluid tank has a
blue filler cap.
5. Insert the spout into the filler neck until
the seal on the spout fully seats.
6. Pour the fluid into the tank.
Note: The fluid stops flowing when the tank
is full.
7. Return the container to the vertical position slightly below the diesel
exhaust fluid filler neck.
8. Allow any fluid remaining in the spout to drain back into the container.
9. Remove the spout from the diesel exhaust fluid filler neck.
10. Replace the diesel exhaust fluid tank
cap. Turn it clockwise until you feel
a strong resistance and it clicks.
11. Remove the spout from the diesel exhaust fluid container and replace
the cap.
Note: If there is diesel exhaust fluid left in
the container retain it for later use. The
spout is reusable. Wash the spout with
clean water prior to storage. Do not use the
diesel exhaust fluid spout with any other
fluid.
276
F-150 (TFD) Canada/United States of America, enUSA, Edition date: 202104, Second-Printing Selective Catalytic Reduction System - Diesel (If Equipped)E328783 E328788
Page 423 of 796
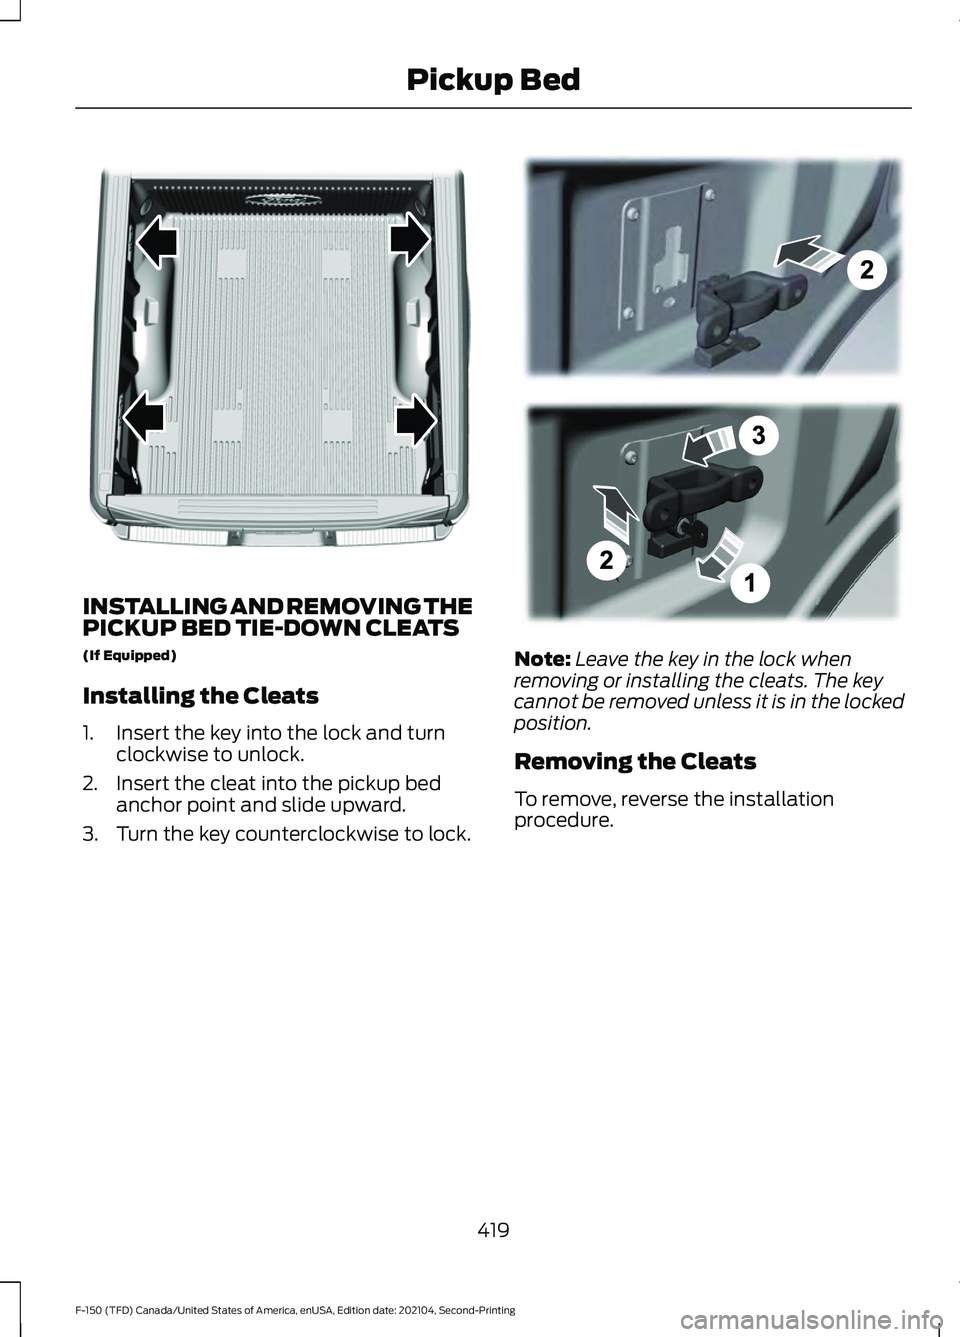
INSTALLING AND REMOVING THE
PICKUP BED TIE-DOWN CLEATS
(If Equipped)
Installing the Cleats
1. Insert the key into the lock and turn
clockwise to unlock.
2. Insert the cleat into the pickup bed anchor point and slide upward.
3. Turn the key counterclockwise to lock. Note:
Leave the key in the lock when
removing or installing the cleats. The key
cannot be removed unless it is in the locked
position.
Removing the Cleats
To remove, reverse the installation
procedure.
419
F-150 (TFD) Canada/United States of America, enUSA, Edition date: 202104, Second-Printing Pickup BedE327579 E327575
Page 454 of 796
Note:
The touchscreen shows if you are
going too slow or fast. Calibration pauses if
the speed is outside the required range of
2 –9 mph (4– 15 km/h).
Note: You need to complete at least a 90°
turn, and longer trailers could require a 180°
turn. Camera trailer tracking requires the
system to locate the hitch ball as well as
determine the trailer length. Some trailers
could require you to drive straight then turn
multiple times before calibration completes.
The touchscreen provides instructions and
notifies you when calibration completes.
Note: For best results, do not calibrate the
system at night when calibrating the system
with the sticker.
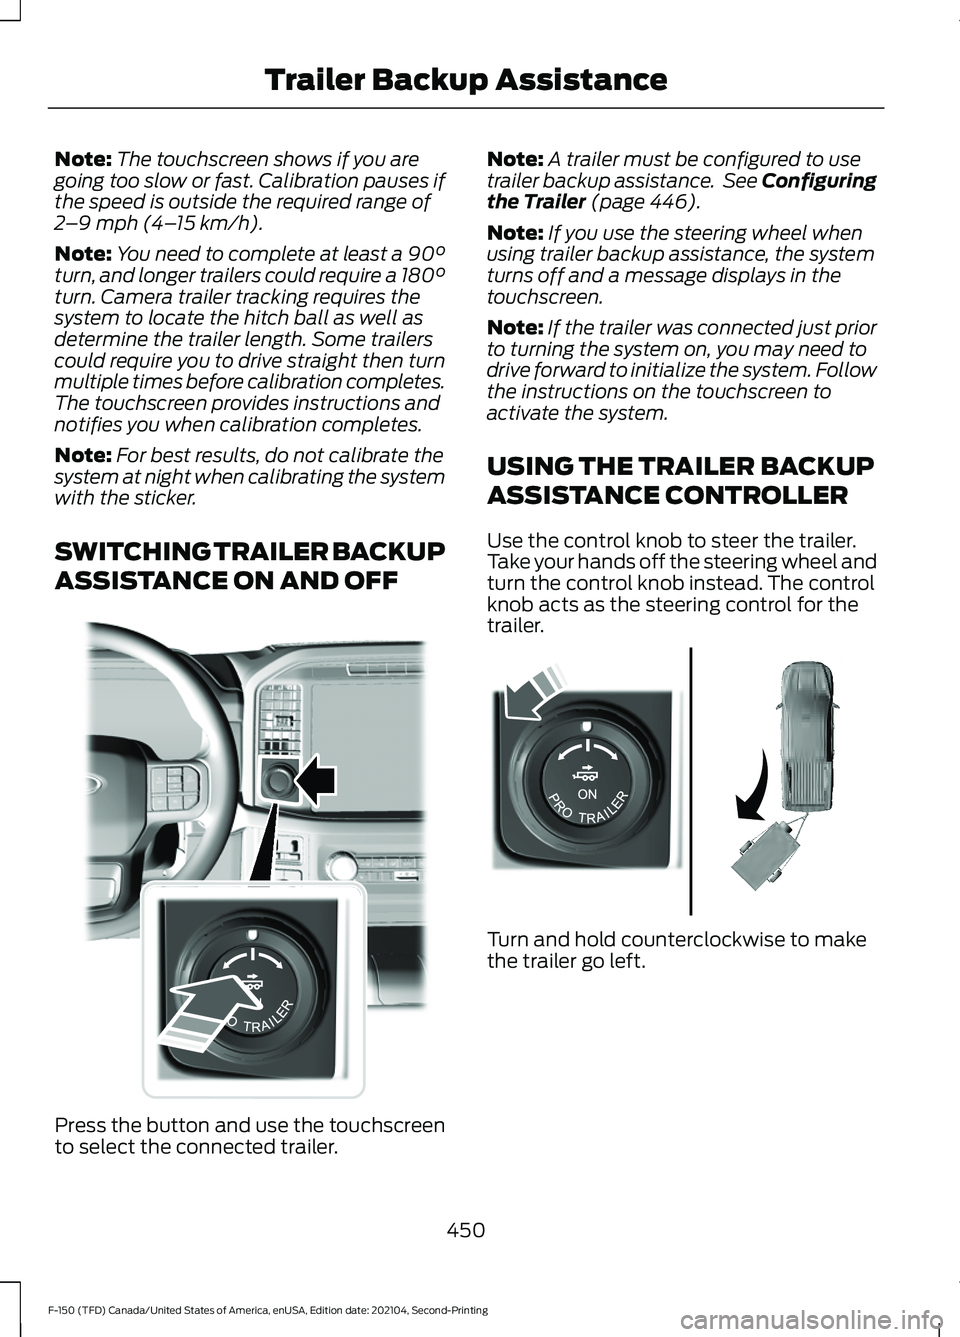
SWITCHING TRAILER BACKUP
ASSISTANCE ON AND OFF Press the button and use the touchscreen
to select the connected trailer. Note:
A trailer must be configured to use
trailer backup assistance. See Configuring
the Trailer (page 446).
Note: If you use the steering wheel when
using trailer backup assistance, the system
turns off and a message displays in the
touchscreen.
Note: If the trailer was connected just prior
to turning the system on, you may need to
drive forward to initialize the system. Follow
the instructions on the touchscreen to
activate the system.
USING THE TRAILER BACKUP
ASSISTANCE CONTROLLER
Use the control knob to steer the trailer.
Take your hands off the steering wheel and
turn the control knob instead. The control
knob acts as the steering control for the
trailer. Turn and hold counterclockwise to make
the trailer go left.
450
F-150 (TFD) Canada/United States of America, enUSA, Edition date: 202104, Second-Printing Trailer Backup AssistanceE310335 E313025