fuel FORD F-350 2020 Workshop Manual
[x] Cancel search | Manufacturer: FORD, Model Year: 2020, Model line: F-350, Model: FORD F-350 2020Pages: 631, PDF Size: 9.62 MB
Page 198 of 631
•
Avoid spilling diesel exhaust fluid on
painted surfaces, carpeting or plastic
components. Immediately wipe away
any diesel exhaust fluid that has spilled
with a damp cloth and water. If it has
already crystallized, use warm water
and a sponge.
• Store diesel exhaust fluid out of direct
sunlight and in temperatures between
23°F (-5°C) and 68°F (20°C).
• Diesel exhaust fluid freezes below 12°F
(-11°C)
.
• Do not store the diesel exhaust fluid
bottle in your vehicle. If it leaks it could
cause damage to interior components
or release an ammonia odor inside your
vehicle.
• Diesel exhaust fluid is non-flammable,
non-toxic, colorless and water-soluble
liquid.
• The system has a diesel exhaust fluid
quality sensor. Dilution of diesel
exhaust fluid or use of any other liquid
in the SCR system leads to a diesel
exhaust fluid system fault, eventually
leading to the vehicle only operating in
idle-only mode.
• Do not dilute diesel exhaust fluid with
water or any other liquid.
• An ammonia odor may be smelled
when the cap is removed or during
refill. Refill diesel exhaust fluid in a well
ventilated area. Typical Diesel Exhaust Fluid Usage
When Using the Power Take Off (PTO) Continuous PTO use—Minimal PTO use
0–7,800 mi (0– 12,550 km)
Contaminated Diesel Exhaust
Fluid or Inoperative Selective
Catalytic Reduction System
Selective catalytic reduction systems are
sensitive to contamination of the diesel
exhaust fluid. Maintaining the purity of the
fluid is important to avoid system
malfunctions. If you remove or drain the
diesel exhaust fluid tank, do not use the
same fluid to refill the tank. The system
has a sensor to monitor fluid quality. A warning lamp illuminates and
a message appears in the
information display if the system
becomes contaminated or inoperative.
Continued driving without replacing diesel
exhaust fluid or having the selective
catalytic reduction system repaired results
in the following actions as required by the
California Air Resources Board (CARB) and
U.S. Environmental Protection Agency
(EPA):
• Within a preset distance to empty,
speed is limited upon vehicle restart.
Prior to this occurring a message
appears in the information display.
• Further vehicle operation without
replacing contaminated diesel exhaust
fluid causes the engine to enter an
idle-only condition. This only occurs
upon vehicle refueling, vehicle idling in
park for 1 hour, or engine shutdown for
10 minutes or more and is indicated by
a message in the information display
indicating required actions to resume
normal operation.
195
Super Duty (TFE), enUSA, Edition date: 201909, Third-Printing- Engine Emission ControlE163176
Page 199 of 631
Note:
For vehicle speed limiting or idle-only
condition, normal vehicle operation resumes
when you repair the contaminated system.
To service a contaminated or inoperative
system, see an authorized dealer.
DIESEL PARTICULATE FILTER
The filter forms part of the emissions
reduction system on your vehicle. It filters
harmful diesel particulates (soot) from the
exhaust gas.
Regeneration WARNING: Do not park or idle your
vehicle over dry leaves, dry grass or other
combustible materials. The regeneration
process creates very high exhaust gas
temperatures and the exhaust will
radiate a considerable amount of heat
during and after regeneration and after
you have switched the engine off. This is
a potential fire hazard.
Note: Avoid running out of fuel.
Note: During regeneration at low speed or
engine idle, you may smell a hot metallic
odor and could notice a clicking metallic
sound. This is due to high temperatures
reached during regeneration and is normal.
Note: Changes in the engine or exhaust
sound may be heard during the regeneration
process.
The diesel particulate filter on your vehicle
requires periodic regeneration to maintain
its correct function. Your vehicle will carry
out this process automatically. If your journeys meet one of the following
conditions:
•
You drive only short distances.
• You frequently switch the ignition on
and off.
• Your journeys contain a high level of
acceleration and deceleration.
You must carry out occasional trips with
the following conditions to assist the
regeneration process:
• Drive your vehicle in more favorable
conditions, which you will find at higher
vehicle speeds in normal driving, on a
main road or freeway for a minimum
of 20 minutes. This drive may include
short stops that will not affect the
regeneration process.
• Avoid prolonged idling and always
observe speed limits and road
conditions.
• Do not switch the ignition off.
• Select a suitable gear to ideally
maintain engine speed between 1500
and 3000 RPM.
Oxidation Catalytic Converter and
Diesel Particulate Filter System
(If
Equipped) WARNING:
The normal operating
temperature of the exhaust system is
very high. Never work around or attempt
to repair any part of the exhaust system
until it has cooled. Use special care when
working around the diesel oxidation
catalytic converter or the diesel
particulate filter. The diesel oxidation
catalytic converter and the diesel
particulate filter heat up to very high
temperatures after only a short period
of engine operation and remain hot after
you switch the engine off.
196
Super Duty (TFE), enUSA, Edition date: 201909, Third-Printing- Engine Emission Control
Page 201 of 631
shows a cleaning exhaust filter message,
which is the normal regeneration process.
You can also choose operator commanded
regeneration to clean the exhaust system
at this point. See Information Messages
(page 120).
If you are not able to drive in a manner that
allows effective automatic active
regeneration or you choose to perform
regeneration of the diesel particulate filter
while at idle, then operator commanded
regeneration would need to be performed.
Operator Commanded Regeneration
(If Equipped)
If your vehicle is operated with significant
stationary operation, low speed drive
cycles less than
25 mph (40 km/h), short
drive cycles, a drive time is less than 10 -
15 minutes or the vehicle does not fully
warm up, passive and active regeneration
may not sufficiently clean the diesel
particulate filter system. Operator
commanded regeneration allows you to
manually start regeneration of the diesel
particulate filter at idle to clean the filter.
If you are not sure whether your vehicle has
this feature, contact an authorized dealer.
When to Carry Out Operator Commanded
Regeneration
You can use the operator commanded
regeneration feature when a message
appears in the information display and you
are not able to drive in a manner that
allows effective automatic active
regeneration or if you choose to manually
start the regeneration of the diesel
particulate filter manually while the vehicle
is idle. See
Information Messages (page
120). Operator Commanded Regeneration
Precautions and Safe Exhaust Position WARNING:
Do not park or idle your
vehicle over dry leaves, dry grass or other
combustible materials. The regeneration
process creates very high exhaust gas
temperatures and the exhaust will
radiate a considerable amount of heat
during and after regeneration and after
you have switched the engine off. This is
a potential fire hazard. WARNING:
Stay clear of the
exhaust tailpipe during regeneration. Hot
exhaust gases can burn you badly.
Make sure that the louvers located at the
tip of the exhaust are clear of any
obstructions as they are used to introduce
fresh air into the tailpipe to cool the
exhaust gases as they leave the exhaust
system.
Before you start operator commanded
regeneration, do the following:
• Shift into park (P) and apply the
parking brake, on stable, level ground.
• Park your vehicle outside of any
structure.
• Park your vehicle
10– 15 ft (3–5 m)
away from any obstructions and away
from materials that can easily combust
or melt, for example paper, leaves,
petroleum products, fuels, plastics and
other dry organic material.
• Make sure there is a minimum of 1/8
tank of fuel.
• Make sure all fluids are at proper levels.
198
Super Duty (TFE), enUSA, Edition date: 201909, Third-Printing- Engine Emission Control
Page 204 of 631
AUTOMATIC TRANSMISSION
WARNING: Apply the parking
brake, shift into park (P), switch the
ignition off and remove the key before
you leave your vehicle. Failure to follow
this instruction could result in personal
injury or death. WARNING:
When your vehicle is
stationary, keep the brake pedal fully
pressed when shifting gears. Failure to
follow this instruction could result in
personal injury, death or property
damage.
Note: You may not be able to shift out of
park (P) unless the intelligent access key is
inside your vehicle.
Understanding the Shift Positions
of Your Automatic Transmission
(If Equipped)
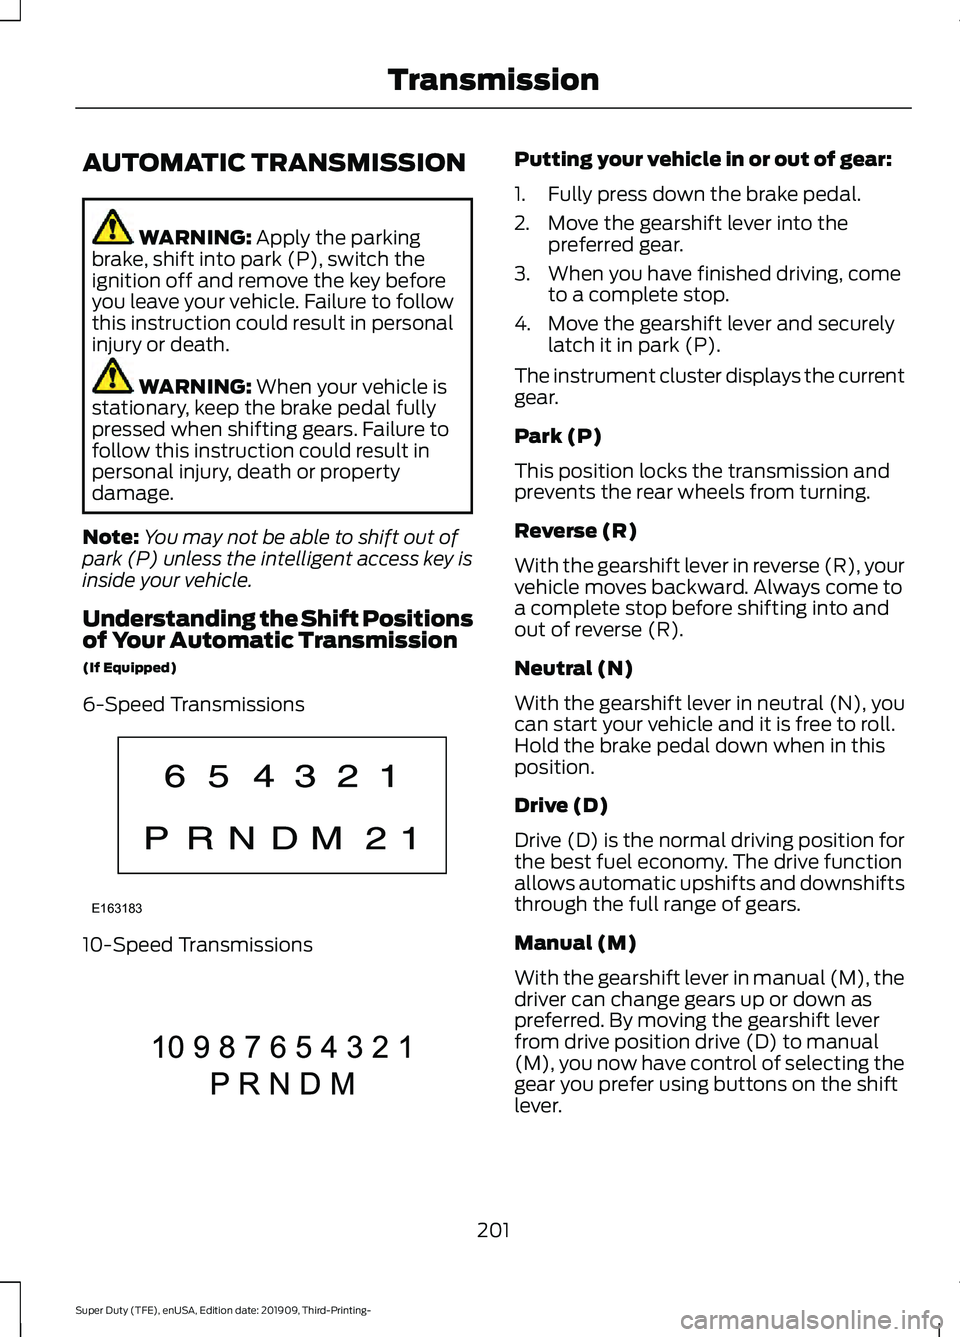
6-Speed Transmissions 10-Speed Transmissions Putting your vehicle in or out of gear:
1. Fully press down the brake pedal.
2. Move the gearshift lever into the
preferred gear.
3. When you have finished driving, come to a complete stop.
4. Move the gearshift lever and securely latch it in park (P).
The instrument cluster displays the current
gear.
Park (P)
This position locks the transmission and
prevents the rear wheels from turning.
Reverse (R)
With the gearshift lever in reverse (R), your
vehicle moves backward. Always come to
a complete stop before shifting into and
out of reverse (R).
Neutral (N)
With the gearshift lever in neutral (N), you
can start your vehicle and it is free to roll.
Hold the brake pedal down when in this
position.
Drive (D)
Drive (D) is the normal driving position for
the best fuel economy. The drive function
allows automatic upshifts and downshifts
through the full range of gears.
Manual (M)
With the gearshift lever in manual (M), the
driver can change gears up or down as
preferred. By moving the gearshift lever
from drive position drive (D) to manual
(M), you now have control of selecting the
gear you prefer using buttons on the shift
lever.
201
Super Duty (TFE), enUSA, Edition date: 201909, Third-Printing- TransmissionE163183 E308145
Page 206 of 631
All available gears display with the current
gear indicated. Press the – button again to
lock out gears beginning with the highest
gear, for example, press the – button twice
to lock out 6th and 5th gears. Only the
available gears display, and the
transmission shifts between the available
gears. Press the + button to unlock gears
to allow the transmission to shift to higher
gears. The transmission shifts within the
gear range you select.
Manual (M)
Moving the gearshift lever to the manual
(M) position allows you to manually select
the gear you prefer. Only the current gear
displays. Use the buttons on the gearshift
lever to manually select gears. Press the
+ button to upshift or the – button to
downshift. Return the transmission to a
different gearshift position to deactivate
manual control.
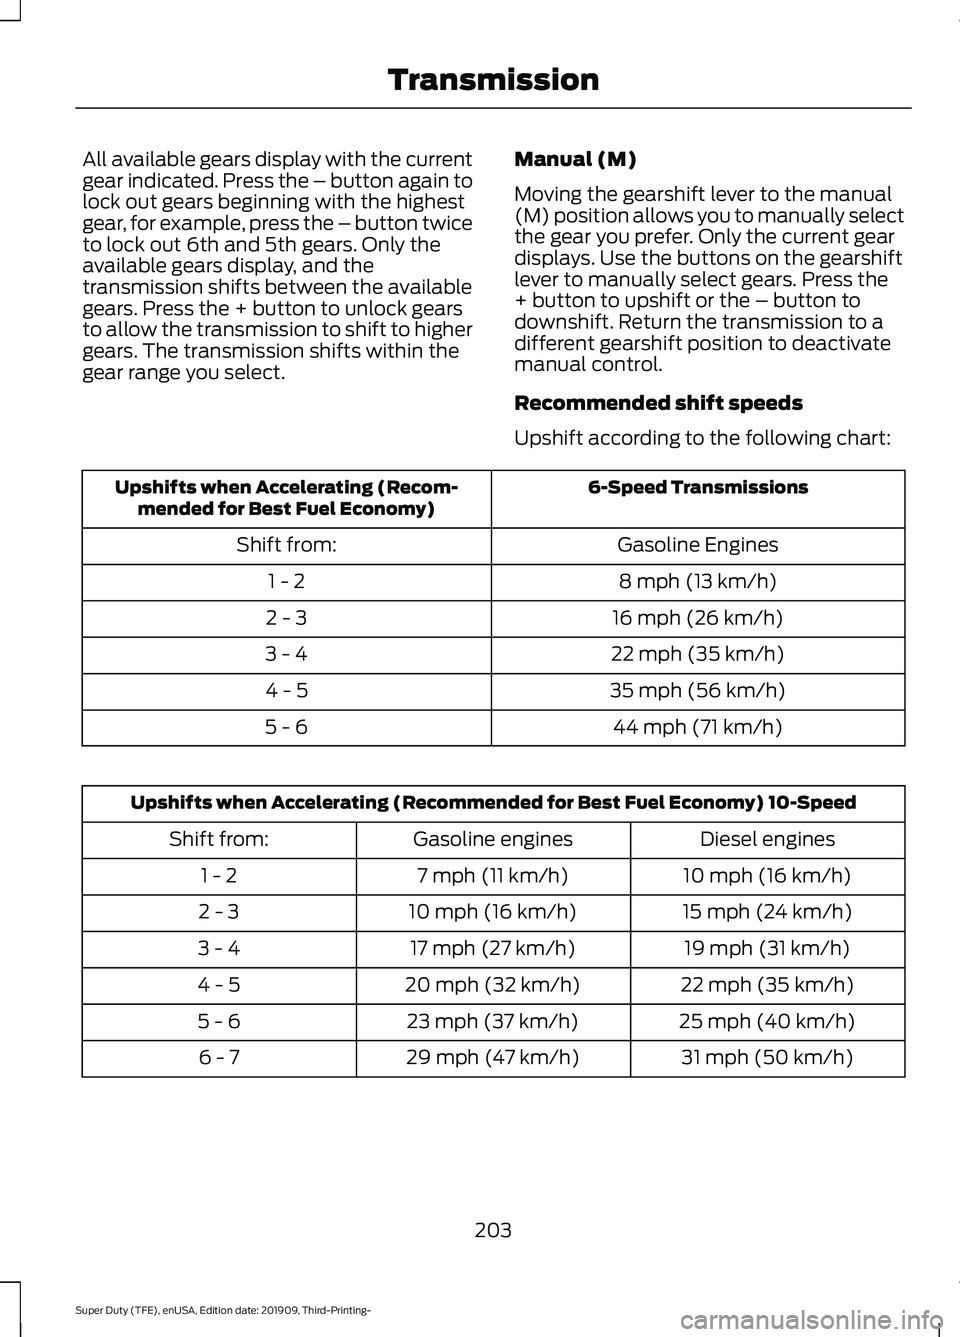
Recommended shift speeds
Upshift according to the following chart: 6-Speed Transmissions
Upshifts when Accelerating (Recom-
mended for Best Fuel Economy)
Gasoline Engines
Shift from:
8 mph (13 km/h)
1 - 2
16 mph (26 km/h)
2 - 3
22 mph (35 km/h)
3 - 4
35 mph (56 km/h)
4 - 5
44 mph (71 km/h)
5 - 6 Upshifts when Accelerating (Recommended for Best Fuel Economy) 10-Speed
Diesel engines
Gasoline engines
Shift from:
10 mph (16 km/h)
7 mph (11 km/h)
1 - 2
15 mph (24 km/h)
10 mph (16 km/h)
2 - 3
19 mph (31 km/h)
17 mph (27 km/h)
3 - 4
22 mph (35 km/h)
20 mph (32 km/h)
4 - 5
25 mph (40 km/h)
23 mph (37 km/h)
5 - 6
31 mph (50 km/h)
29 mph (47 km/h)
6 - 7
203
Super Duty (TFE), enUSA, Edition date: 201909, Third-Printing- Transmission
Page 207 of 631
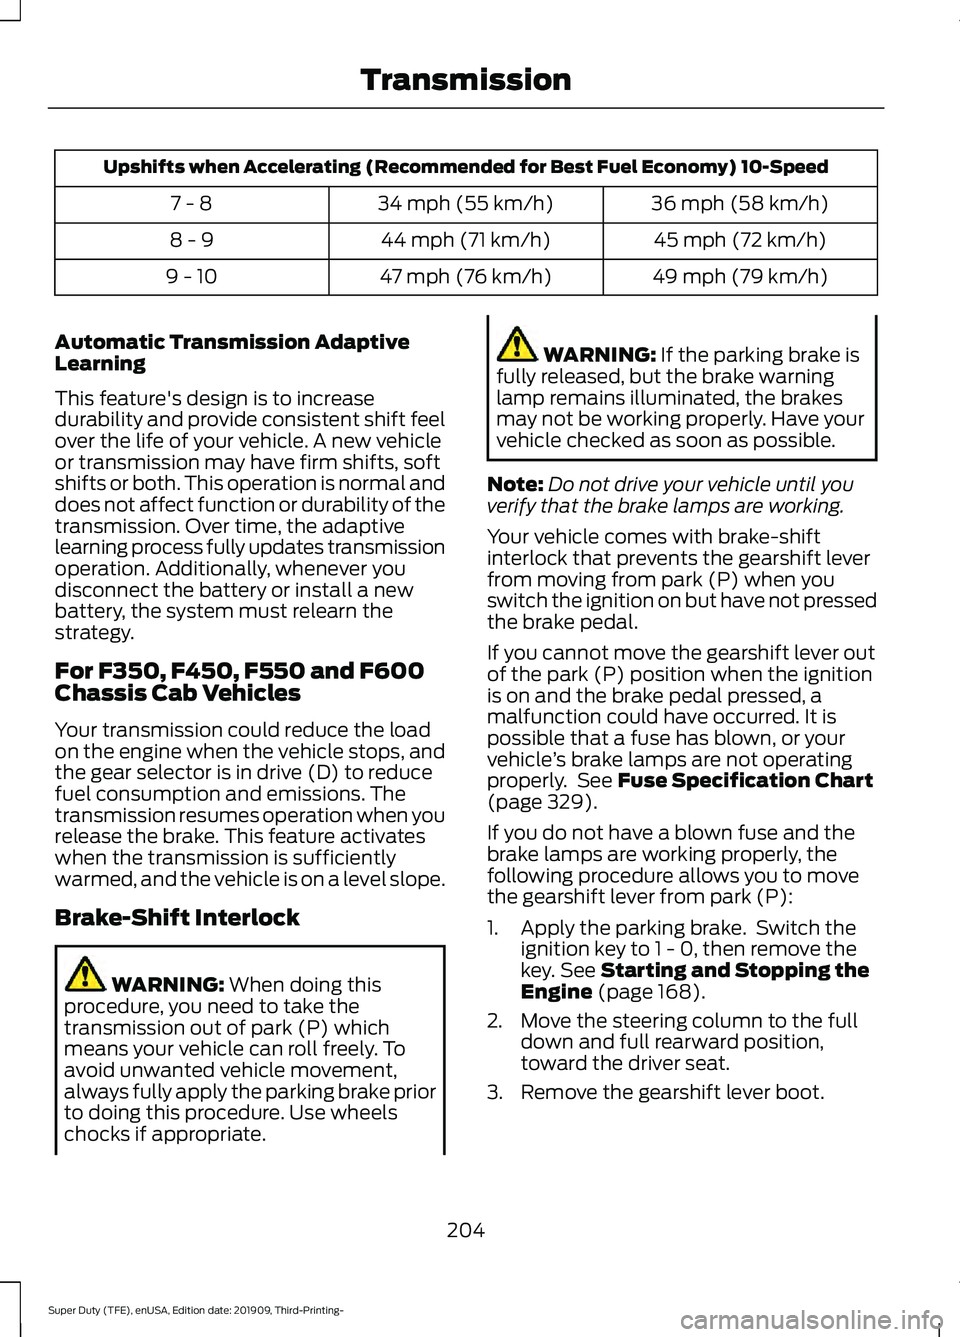
Upshifts when Accelerating (Recommended for Best Fuel Economy) 10-Speed
36 mph (58 km/h)
34 mph (55 km/h)
7 - 8
45 mph (72 km/h)
44 mph (71 km/h)
8 - 9
49 mph (79 km/h)
47 mph (76 km/h)
9 - 10
Automatic Transmission Adaptive
Learning
This feature's design is to increase
durability and provide consistent shift feel
over the life of your vehicle. A new vehicle
or transmission may have firm shifts, soft
shifts or both. This operation is normal and
does not affect function or durability of the
transmission. Over time, the adaptive
learning process fully updates transmission
operation. Additionally, whenever you
disconnect the battery or install a new
battery, the system must relearn the
strategy.
For F350, F450, F550 and F600
Chassis Cab Vehicles
Your transmission could reduce the load
on the engine when the vehicle stops, and
the gear selector is in drive (D) to reduce
fuel consumption and emissions. The
transmission resumes operation when you
release the brake. This feature activates
when the transmission is sufficiently
warmed, and the vehicle is on a level slope.
Brake-Shift Interlock WARNING: When doing this
procedure, you need to take the
transmission out of park (P) which
means your vehicle can roll freely. To
avoid unwanted vehicle movement,
always fully apply the parking brake prior
to doing this procedure. Use wheels
chocks if appropriate. WARNING:
If the parking brake is
fully released, but the brake warning
lamp remains illuminated, the brakes
may not be working properly. Have your
vehicle checked as soon as possible.
Note: Do not drive your vehicle until you
verify that the brake lamps are working.
Your vehicle comes with brake-shift
interlock that prevents the gearshift lever
from moving from park (P) when you
switch the ignition on but have not pressed
the brake pedal.
If you cannot move the gearshift lever out
of the park (P) position when the ignition
is on and the brake pedal pressed, a
malfunction could have occurred. It is
possible that a fuse has blown, or your
vehicle ’s brake lamps are not operating
properly. See
Fuse Specification Chart
(page 329).
If you do not have a blown fuse and the
brake lamps are working properly, the
following procedure allows you to move
the gearshift lever from park (P):
1. Apply the parking brake. Switch the ignition key to 1 - 0, then remove the
key.
See Starting and Stopping the
Engine (page 168).
2. Move the steering column to the full down and full rearward position,
toward the driver seat.
3. Remove the gearshift lever boot.
204
Super Duty (TFE), enUSA, Edition date: 201909, Third-Printing- Transmission
Page 210 of 631
USING FOUR-WHEEL DRIVE
Note:
For important information regarding
the safe operation of this type of vehicle,
see General Information in the Wheels and
Tires chapter.
Note: Do not use 4H or 4L mode on dry,
hard surfaced roads. Doing so can produce
excessive noise, increase tire wear and may
damage drive components. 4X4 mode is
only intended for consistently slippery or
loose surfaces. Use of 4L mode on these
surfaces may produce some noise, such as
occasional clunks, but will not damage drive
components.
Note: If 4X4 low is selected while the
vehicle is moving above 3 mph (5 km/h),
the 4WD system will not perform a shift.
This is normal and should be no reason for
concern. Refer to Shifting to or from 4L (4X4
Low) for proper operation.
Note: You can switch on and switch off the
electronic locking differential by pulling the
4WD control (4WD vehicles) or turning the
electronic locking differential control (2WD
vehicles). See
Electronic Locking
Differential (page 215).
Electronic Shift-On-the-Fly
(ESOF) 4WD system
(If Equipped)
Note: If 4X4 Low is selected while the
vehicle is moving above
3 mph (5 km/h),
the 4WD system will not perform a shift.
This is normal and should be no reason for
concern. Refer to Shifting to or from 4L (4X4
Low) for proper system operation.
Note: Auto-manual hub locks can be
manually locked by rotating the hub lock
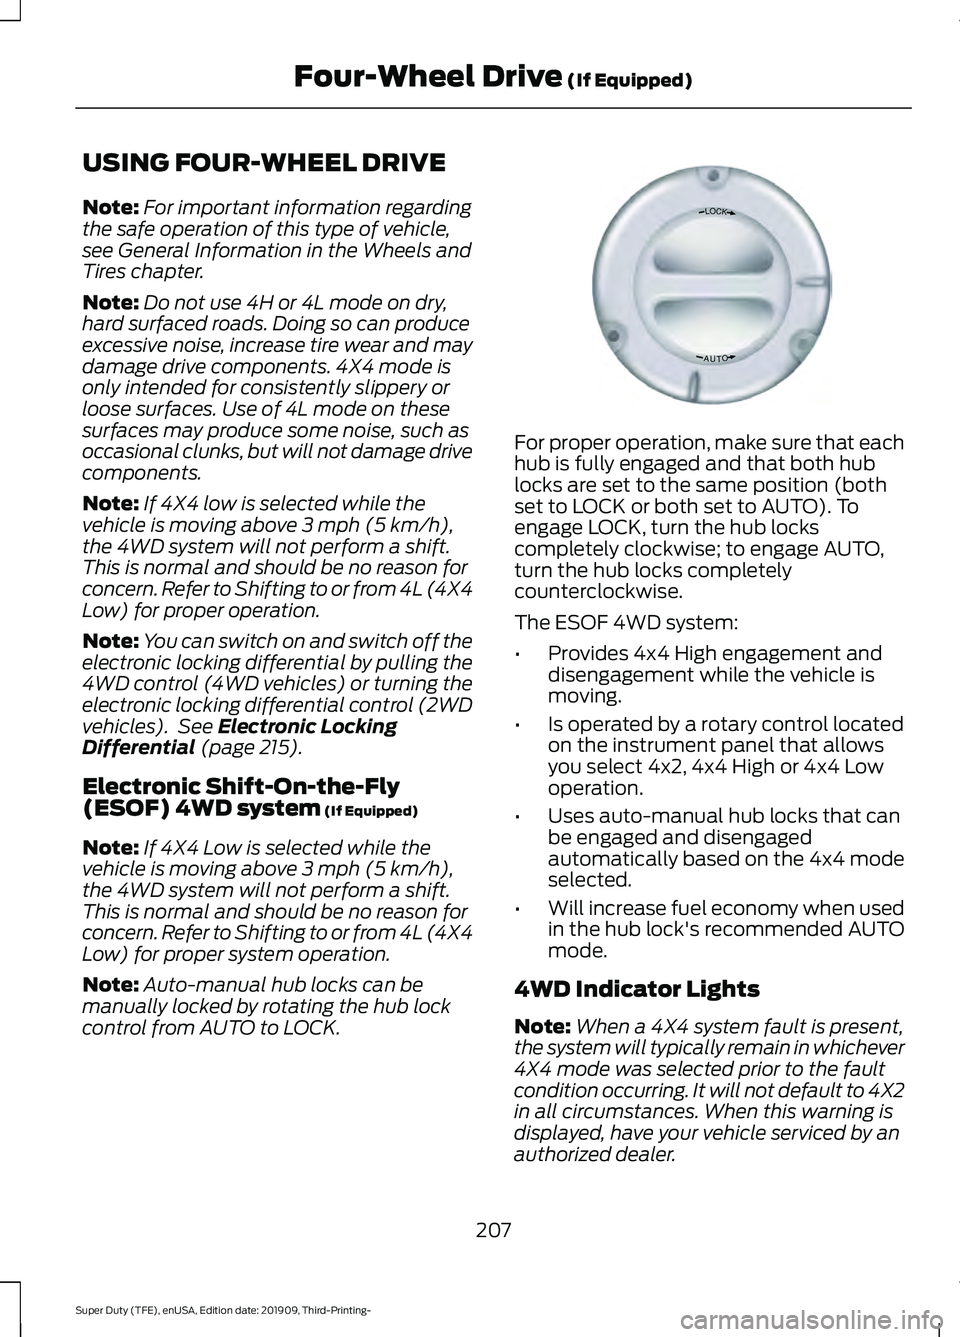
control from AUTO to LOCK. For proper operation, make sure that each
hub is fully engaged and that both hub
locks are set to the same position (both
set to LOCK or both set to AUTO). To
engage LOCK, turn the hub locks
completely clockwise; to engage AUTO,
turn the hub locks completely
counterclockwise.
The ESOF 4WD system:
•
Provides 4x4 High engagement and
disengagement while the vehicle is
moving.
• Is operated by a rotary control located
on the instrument panel that allows
you select 4x2, 4x4 High or 4x4 Low
operation.
• Uses auto-manual hub locks that can
be engaged and disengaged
automatically based on the 4x4 mode
selected.
• Will increase fuel economy when used
in the hub lock's recommended AUTO
mode.
4WD Indicator Lights
Note: When a 4X4 system fault is present,
the system will typically remain in whichever
4X4 mode was selected prior to the fault
condition occurring. It will not default to 4X2
in all circumstances. When this warning is
displayed, have your vehicle serviced by an
authorized dealer.
207
Super Duty (TFE), enUSA, Edition date: 201909, Third-Printing- Four-Wheel Drive
(If Equipped)LOC K
OTUAE339076
Page 211 of 631
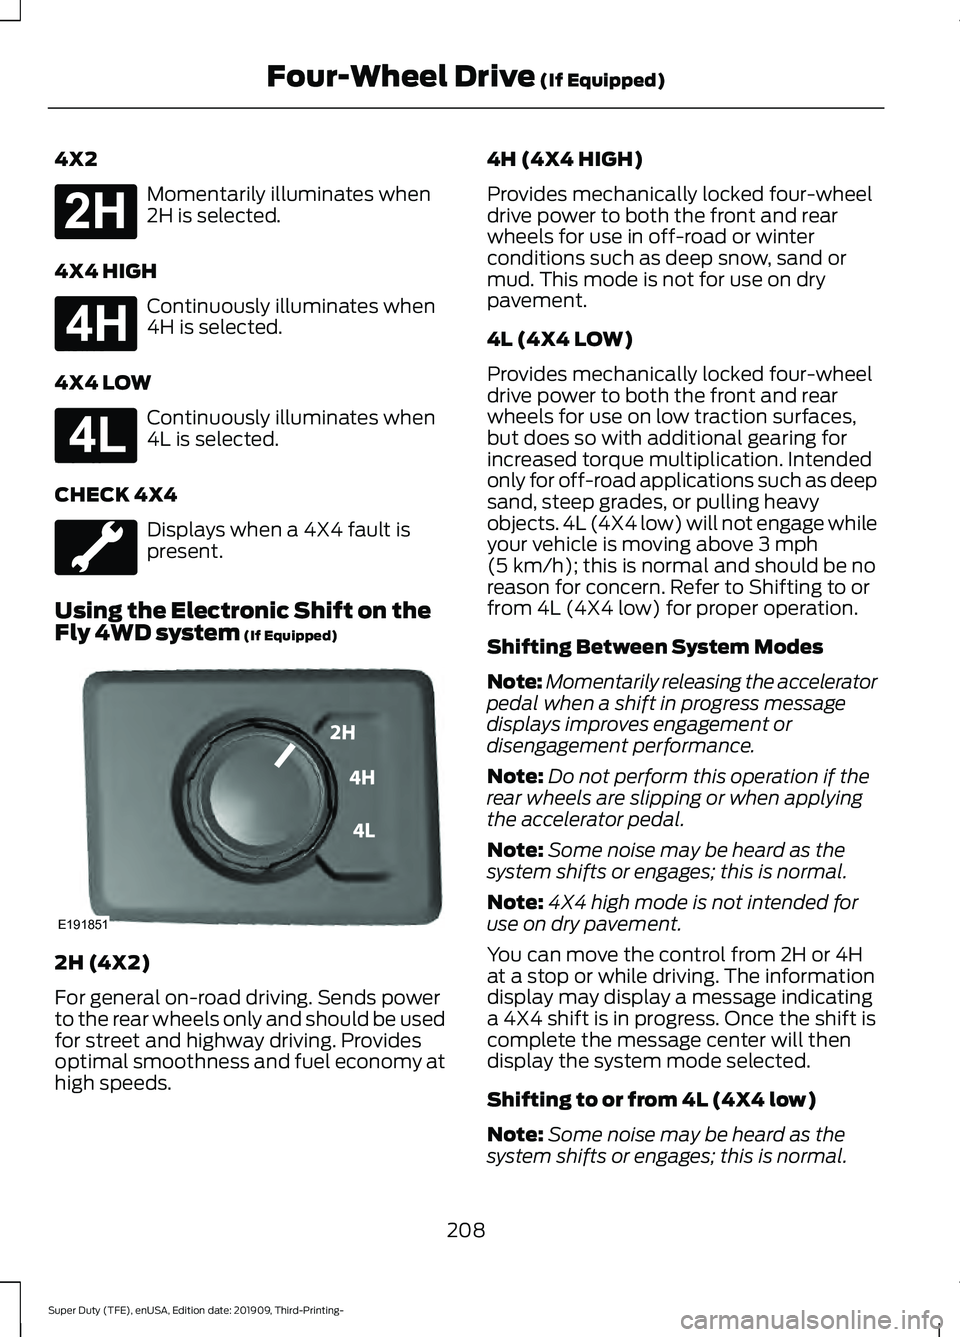
4X2
Momentarily illuminates when
2H is selected.
4X4 HIGH Continuously illuminates when
4H is selected.
4X4 LOW Continuously illuminates when
4L is selected.
CHECK 4X4 Displays when a 4X4 fault is
present.
Using the Electronic Shift on the
Fly 4WD system (If Equipped) 2H (4X2)
For general on-road driving. Sends power
to the rear wheels only and should be used
for street and highway driving. Provides
optimal smoothness and fuel economy at
high speeds. 4H (4X4 HIGH)
Provides mechanically locked four-wheel
drive power to both the front and rear
wheels for use in off-road or winter
conditions such as deep snow, sand or
mud. This mode is not for use on dry
pavement.
4L (4X4 LOW)
Provides mechanically locked four-wheel
drive power to both the front and rear
wheels for use on low traction surfaces,
but does so with additional gearing for
increased torque multiplication. Intended
only for off-road applications such as deep
sand, steep grades, or pulling heavy
objects. 4L (4X4 low) will not engage while
your vehicle is moving above
3 mph
(5 km/h); this is normal and should be no
reason for concern. Refer to Shifting to or
from 4L (4X4 low) for proper operation.
Shifting Between System Modes
Note: Momentarily releasing the accelerator
pedal when a shift in progress message
displays improves engagement or
disengagement performance.
Note: Do not perform this operation if the
rear wheels are slipping or when applying
the accelerator pedal.
Note: Some noise may be heard as the
system shifts or engages; this is normal.
Note: 4X4 high mode is not intended for
use on dry pavement.
You can move the control from 2H or 4H
at a stop or while driving. The information
display may display a message indicating
a 4X4 shift is in progress. Once the shift is
complete the message center will then
display the system mode selected.
Shifting to or from 4L (4X4 low)
Note: Some noise may be heard as the
system shifts or engages; this is normal.
208
Super Duty (TFE), enUSA, Edition date: 201909, Third-Printing- Four-Wheel Drive
(If Equipped)E181778 E181779 E181780 E191851
Page 266 of 631
•
Electronic stability control and traction
control maintains your vehicle control
in adverse conditions or
high-performance driving.
• Electronic throttle control enhances
the powertrain response to your inputs.
• Transmission controls are optimized
with shift schedules tuned to each
terrain.
Using the System
The system tailors your vehicle
configuration for each mode you select.
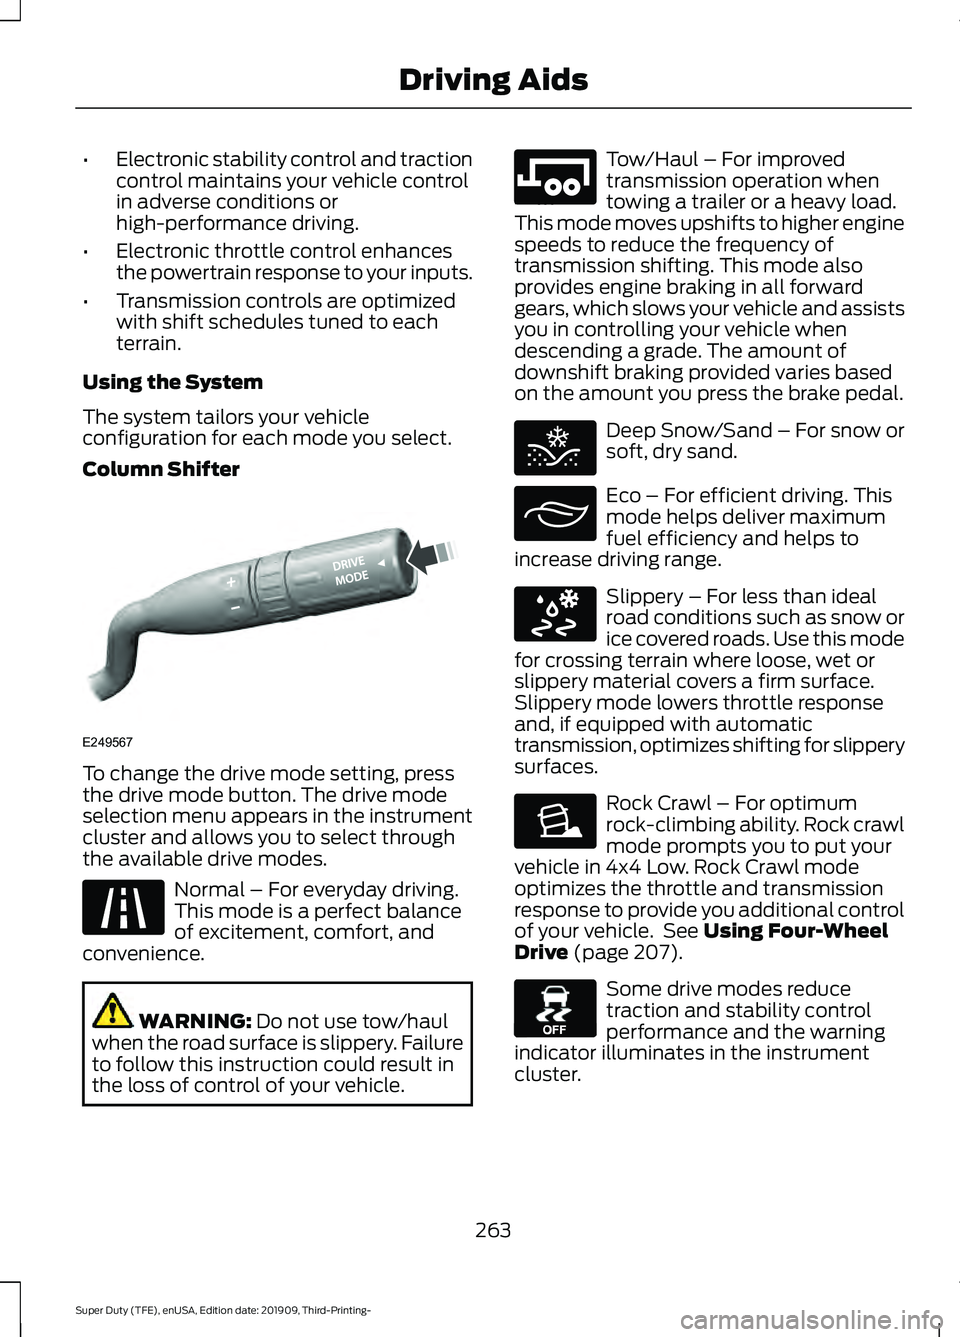
Column Shifter To change the drive mode setting, press
the drive mode button. The drive mode
selection menu appears in the instrument
cluster and allows you to select through
the available drive modes.
Normal – For everyday driving.
This mode is a perfect balance
of excitement, comfort, and
convenience. WARNING: Do not use tow/haul
when the road surface is slippery. Failure
to follow this instruction could result in
the loss of control of your vehicle. Tow/Haul – For improved
transmission operation when
towing a trailer or a heavy load.
This mode moves upshifts to higher engine
speeds to reduce the frequency of
transmission shifting. This mode also
provides engine braking in all forward
gears, which slows your vehicle and assists
you in controlling your vehicle when
descending a grade. The amount of
downshift braking provided varies based
on the amount you press the brake pedal. Deep Snow/Sand – For snow or
soft, dry sand.
Eco – For efficient driving. This
mode helps deliver maximum
fuel efficiency and helps to
increase driving range. Slippery – For less than ideal
road conditions such as snow or
ice covered roads. Use this mode
for crossing terrain where loose, wet or
slippery material covers a firm surface.
Slippery mode lowers throttle response
and, if equipped with automatic
transmission, optimizes shifting for slippery
surfaces. Rock Crawl – For optimum
rock-climbing ability. Rock crawl
mode prompts you to put your
vehicle in 4x4 Low. Rock Crawl mode
optimizes the throttle and transmission
response to provide you additional control
of your vehicle. See
Using Four-Wheel
Drive (page 207). Some drive modes reduce
traction and stability control
performance and the warning
indicator illuminates in the instrument
cluster.
263
Super Duty (TFE), enUSA, Edition date: 201909, Third-Printing- Driving AidsE249567 E225310 E246592 E295420 E295413 E295414 E225315 E130458
Page 294 of 631
Note:
Exceeding this limitation
may significantly reduce the
performance of your towing
vehicle. Selecting a trailer with a
low aerodynamic drag and rounded
front design helps optimize
performance and fuel economy.
Note: Your vehicle could have
reduced performance when
operating at high altitudes and
when heavily loaded or towing a
trailer. When driving at elevation,
in order to match driving
performance as perceived at sea
level, reduce gross vehicle weight
and gross combination weight by
2% per 1,000 ft (300 m) elevation. Note:
Certain states require
electric trailer brakes for trailers
over a specified weight. Be sure to
check state regulations for this
specified weight. The maximum
trailer weights listed may be limited
to this specified weight, as your
vehicle's electrical system may not
include the wiring connector
needed to use electric trailer
brakes.
Your vehicle may tow a trailer
provided the maximum trailer
weight is less than or equal to the
maximum trailer weight
calculated using the formula
following the chart. Pickup and box delete
MaximumGCWR
Rear axle ratio
Engine
Vehicle
19,500 lb
(8,845 kg)
3.73
6.2L gas
F-250 22,000 lb
(9,979 kg)
4.30
23,500 lb
(10,659 kg)
3.31
6.7L diesel
30,000 lb
(13,607 kg)
3.31, 3.55
6.7L diesel 1
21,800 lb
(9,888 kg)
3.55
7.3L gas 26,000 lb
(11,793 kg)
4.30
19,500 lb
(8,845 kg)
3.73
6.2L gas
F-350 single
rear wheel
291
Super Duty (TFE), enUSA, Edition date: 201909, Third-Printing- Towing