fuel cap FORD F SERIES MOTORHOME AND COMMERCIAL CHASSIS 2004 11.G Owners Manual
[x] Cancel search | Manufacturer: FORD, Model Year: 2004, Model line: F SERIES MOTORHOME AND COMMERCIAL CHASSIS, Model: FORD F SERIES MOTORHOME AND COMMERCIAL CHASSIS 2004 11.GPages: 120, PDF Size: 2.21 MB
Page 2 of 120
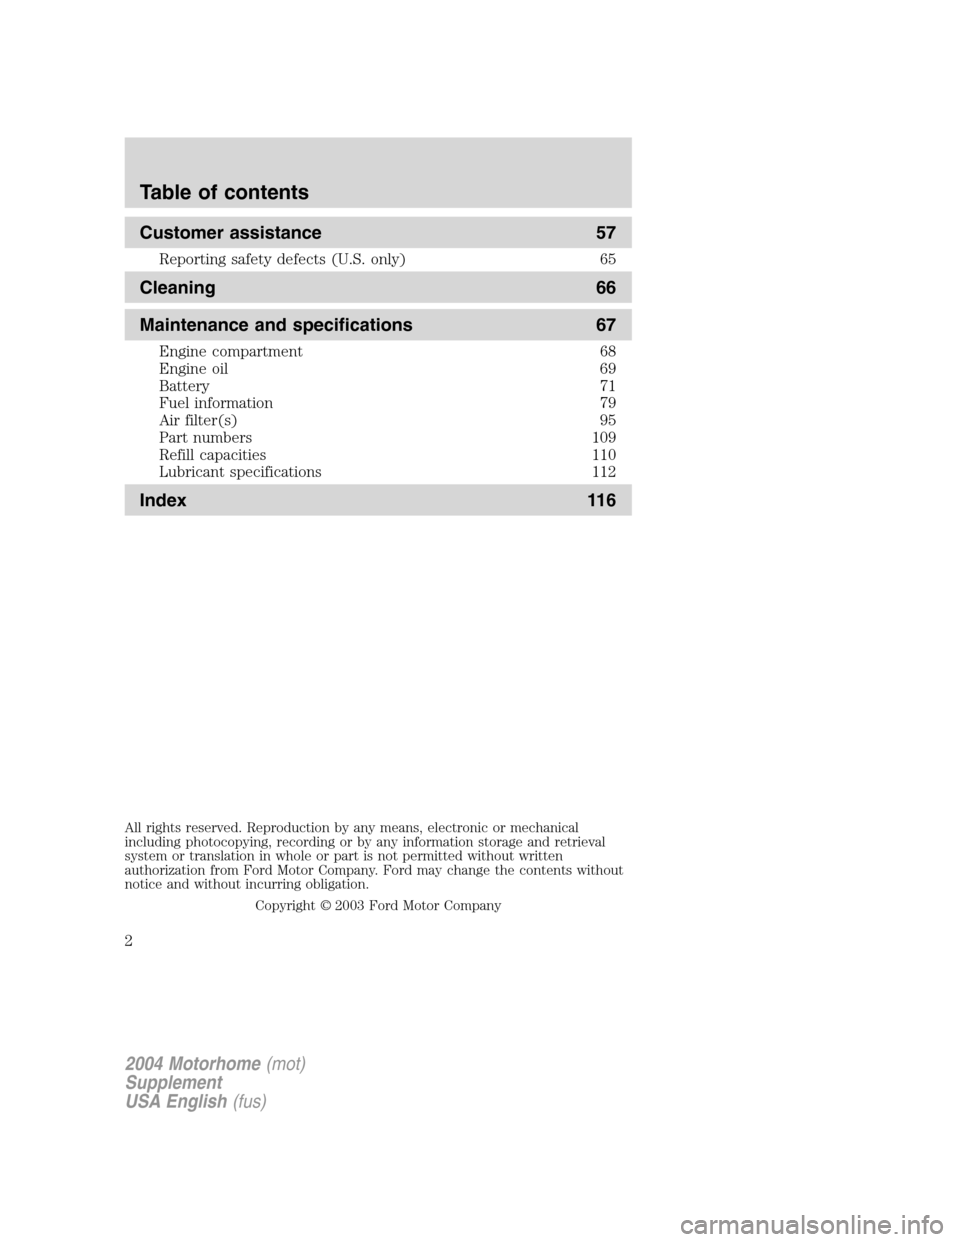
Customer assistance 57
Reporting safety defects (U.S. only) 65
Cleaning 66
Maintenance and specifications 67
Engine compartment 68
Engine oil 69
Battery 71
Fuel information 79
Air filter(s) 95
Part numbers 109
Refill capacities 110
Lubricant specifications 112
Index 116
All rights reserved. Reproduction by any means, electronic or mechanical
including photocopying, recording or by any information storage and retrieval
system or translation in whole or part is not permitted without written
authorization from Ford Motor Company. Ford may change the contents without
notice and without incurring obligation.
Copyright © 2003 Ford Motor Company
2004 Motorhome(mot)
Supplement
USA English(fus)
Table of contents
2
Page 7 of 120
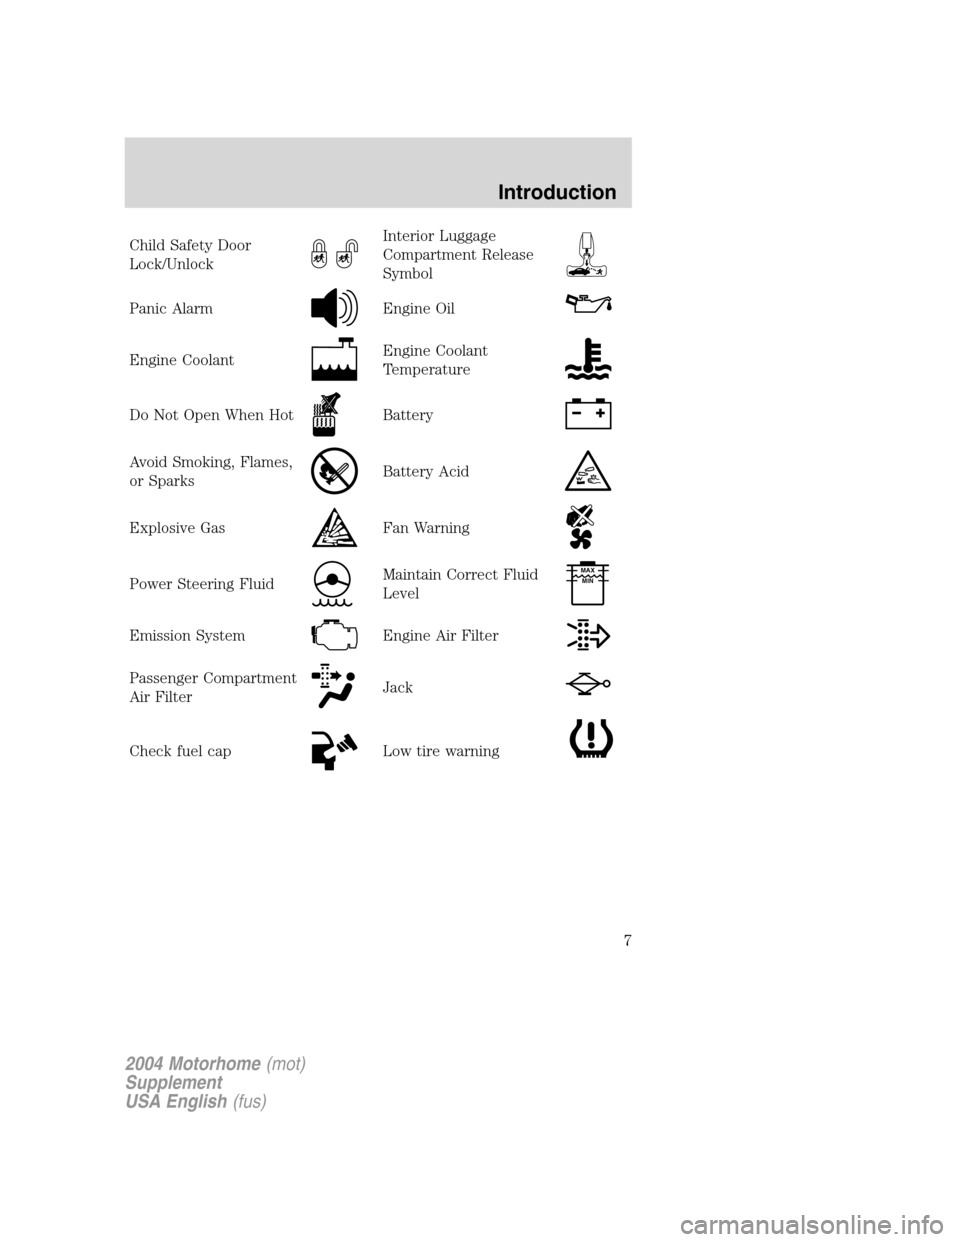
Child Safety Door
Lock/UnlockInterior Luggage
Compartment Release
Symbol
Panic AlarmEngine Oil
Engine CoolantEngine Coolant
Temperature
Do Not Open When HotBattery
Avoid Smoking, Flames,
or SparksBattery Acid
Explosive GasFan Warning
Power Steering FluidMaintain Correct Fluid
LevelMAX
MIN
Emission SystemEngine Air Filter
Passenger Compartment
Air FilterJack
Check fuel capLow tire warning
2004 Motorhome(mot)
Supplement
USA English(fus)
Introduction
7
Page 33 of 120
Calculating the load your vehicle can carry/tow
1.
Use the appropriate maximum gross combined weight rating (GCWR)
chart to find the maximum GCWR for your type engine and rear axle ratio.
2. Weigh your vehicle as you customarily operate the vehicle without
cargo. To obtain correct weights, try taking your vehicle to a shipping
company or an inspection station for trucks.
3. Subtract your loaded vehicle weight from the maximum GCWR on the
following charts. This is the maximum combined cargo and trailer weight
your vehicle can carry/tow and must fall below the maximum shown
under maximum trailer weight on the chart. Refer to the definition of
Maximum Trailer Weight below Vehicle Loading in this chapter to
determine the maximum trailer weight permitted for a loaded vehicle.
Vehicle Loading – with and without a trailer
This section will guide you in the proper loading of your vehicle and/or
trailer, to keep your loaded vehicle weight within its design rating
capability, with or without a trailer. Properly loading your vehicle will
provide maximum return of vehicle design performance. Before loading
your vehicle, familiarize yourself with the following terms for determining
your vehicle’s weight ratings, with or without a trailer, from the vehicle’s
Safety Certification Label and Tire and Load Information Label:
Base Curb Weight–is the weight of the vehicle including a full tank of
fuel and all standard equipment. It does not include passengers, cargo, or
optional equipment.
Vehicle Curb Weight–is the weight of your new vehicle when you
picked it up from your dealer plus any aftermarket equipment.
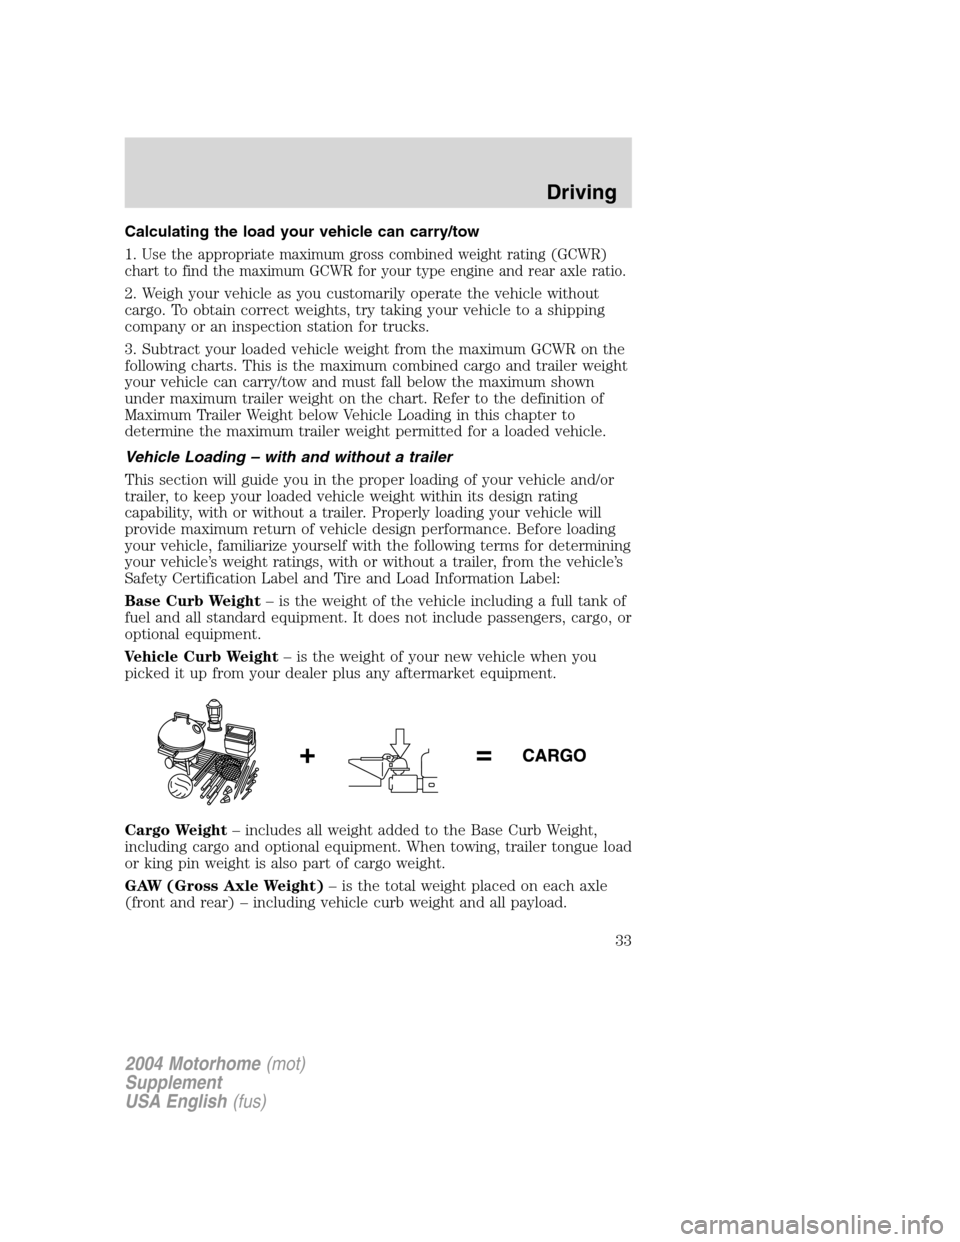
Cargo Weight–includes all weight added to the Base Curb Weight,
including cargo and optional equipment. When towing, trailer tongue load
or king pin weight is also part of cargo weight.
GAW (Gross Axle Weight)–is the total weight placed on each axle
(front and rear)–including vehicle curb weight and all payload.
2004 Motorhome(mot)
Supplement
USA English(fus)
Driving
33
Page 46 of 120
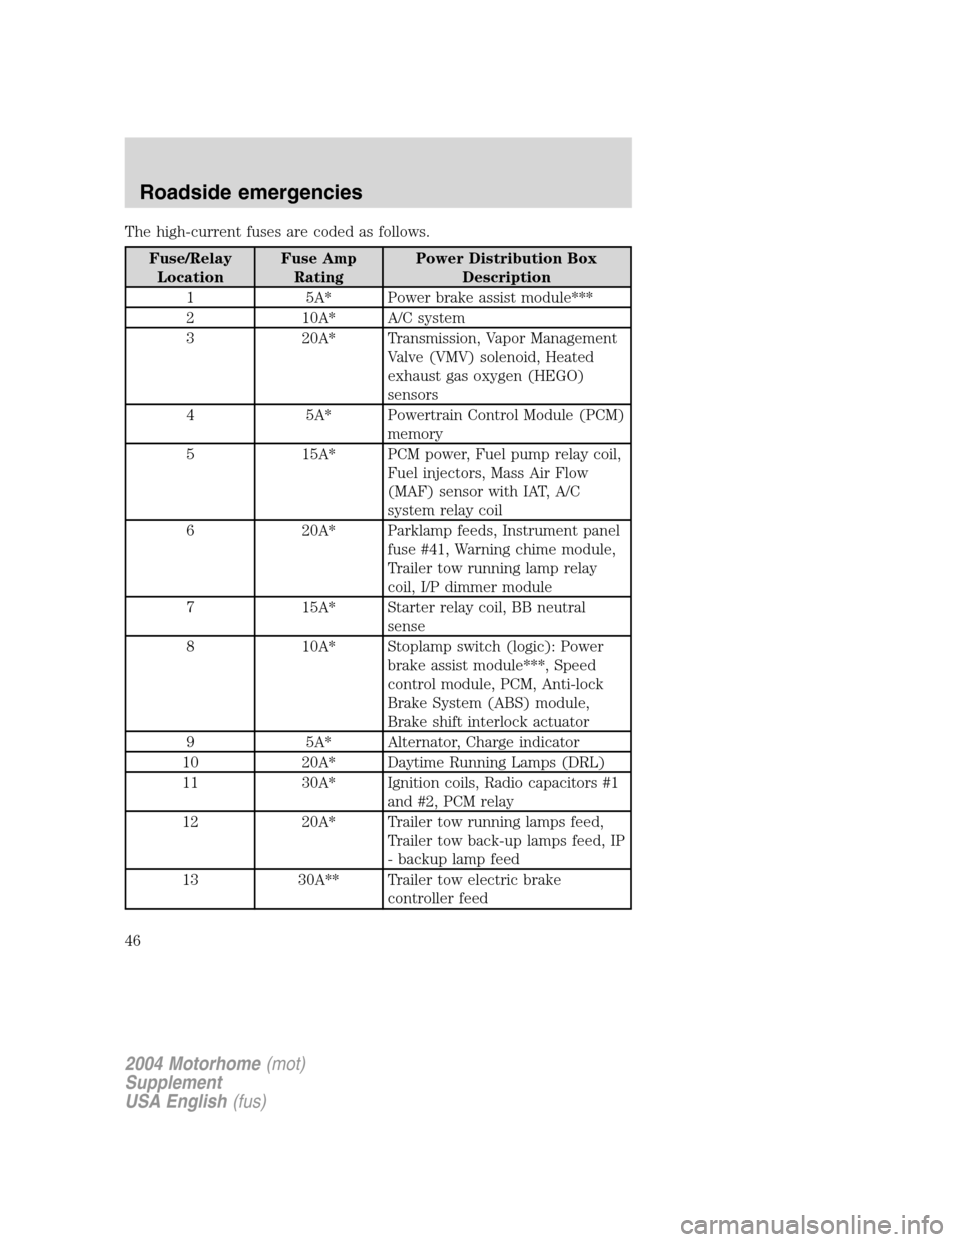
The high-current fuses are coded as follows.
Fuse/Relay
LocationFuse Amp
RatingPower Distribution Box
Description
1 5A* Power brake assist module***
2 10A* A/C system
3 20A* Transmission, Vapor Management
Valve (VMV) solenoid, Heated
exhaust gas oxygen (HEGO)
sensors
4 5A* Powertrain Control Module (PCM)
memory
5 15A* PCM power, Fuel pump relay coil,
Fuel injectors, Mass Air Flow
(MAF) sensor with IAT, A/C
system relay coil
6 20A* Parklamp feeds, Instrument panel
fuse #41, Warning chime module,
Trailer tow running lamp relay
coil, I/P dimmer module
7 15A* Starter relay coil, BB neutral
sense
8 10A* Stoplamp switch (logic): Power
brake assist module***, Speed
control module, PCM, Anti-lock
Brake System (ABS) module,
Brake shift interlock actuator
9 5A* Alternator, Charge indicator
10 20A* Daytime Running Lamps (DRL)
11 30A* Ignition coils, Radio capacitors #1
and #2, PCM relay
12 20A* Trailer tow running lamps feed,
Trailer tow back-up lamps feed, IP
- backup lamp feed
13 30A** Trailer tow electric brake
controller feed
2004 Motorhome(mot)
Supplement
USA English(fus)
Roadside emergencies
46
Page 70 of 120
2. If the engine oil level is not within the MIN and MAX ranges, add only
certified engine oil of the recommended viscosity. Remove the engine oil
filler cap and use a funnel to pour the engine oil into the opening.
3. Recheck the engine oil level. Make sure the oil level is not above the
MAX mark on the engine oil level indicator (dipstick).
4. Install the indicator and ensure it is fully seated.
5. Fully install the engine oil filler cap by turning the filler cap clockwise
until three clicks can be heard.
To avoid possible oil loss, DO NOT operate the vehicle with the
engine oil level indicator and/or the engine oil filler cap removed.
Engine oil and filter recommendations
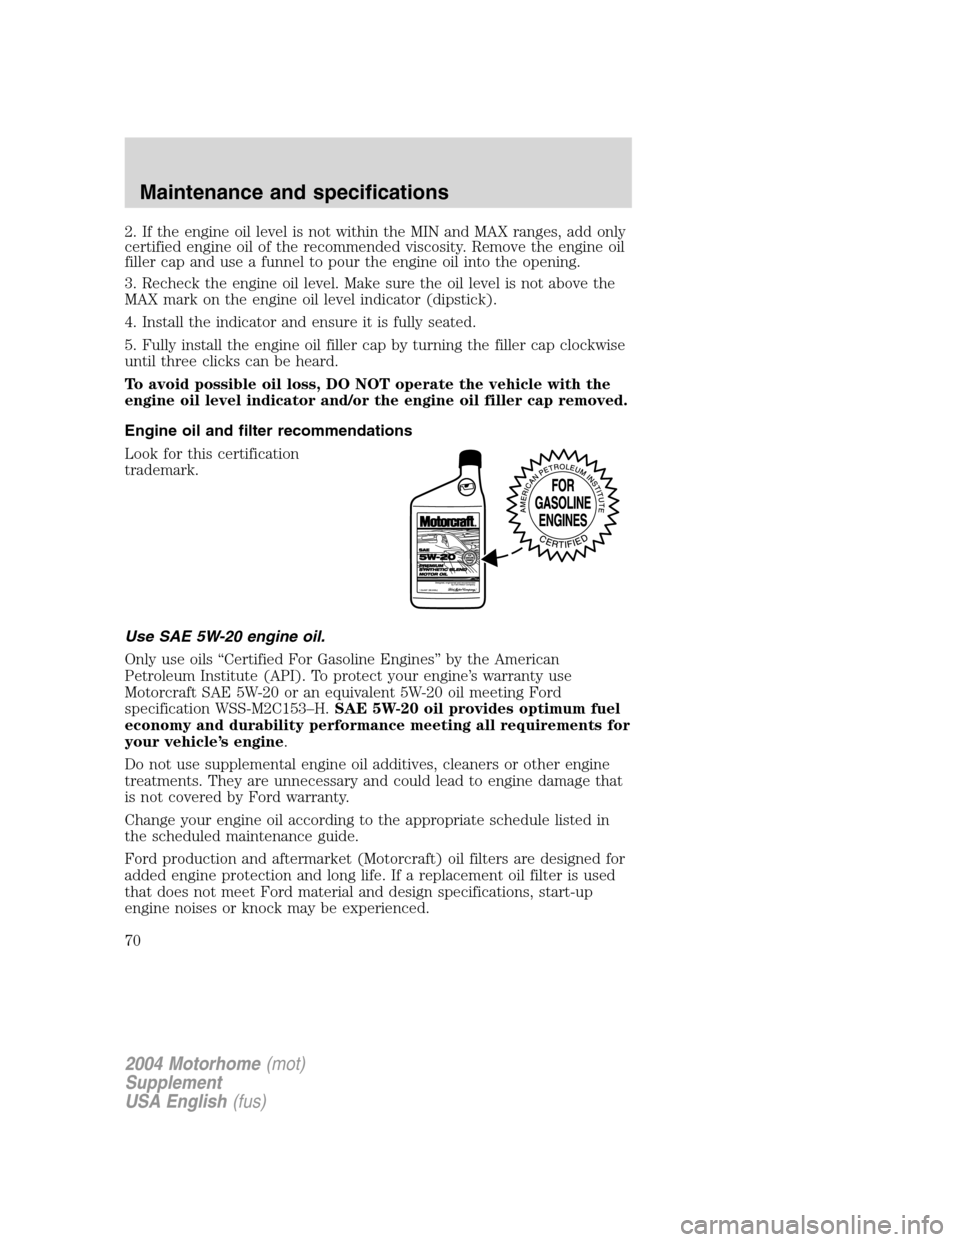
Look for this certification
trademark.
Use SAE 5W-20 engine oil.
Only use oils“Certified For Gasoline Engines”by the American
Petroleum Institute (API). To protect your engine’s warranty use
Motorcraft SAE 5W-20 or an equivalent 5W-20 oil meeting Ford
specification WSS-M2C153–H.SAE 5W-20 oil provides optimum fuel
economy and durability performance meeting all requirements for
your vehicle’s engine.
Do not use supplemental engine oil additives, cleaners or other engine
treatments. They are unnecessary and could lead to engine damage that
is not covered by Ford warranty.
Change your engine oil according to the appropriate schedule listed in
the scheduled maintenance guide.
Ford production and aftermarket (Motorcraft) oil filters are designed for
added engine protection and long life. If a replacement oil filter is used
that does not meet Ford material and design specifications, start-up
engine noises or knock may be experienced.
2004 Motorhome(mot)
Supplement
USA English(fus)
Maintenance and specifications
70
Page 72 of 120
When lifting a plastic-cased battery, excessive pressure on the
end walls could cause acid to flow through the vent caps,
resulting in personal injury and/or damage to the vehicle or battery.
Lift the battery with a battery carrier or with your hands on opposite
corners.
Keep batteries out of reach of children. Batteries contain sulfuric
acid. Avoid contact with skin, eyes or clothing. Shield your eyes
when working near the battery to protect against possible splashing of
acid solution. In case of acid contact with skin or eyes, flush
immediately with water for a minimum of 15 minutes and get prompt
medical attention. If acid is swallowed, call a physician immediately.
Battery posts, terminals and related accessories contain lead and
lead compounds.Wash hands after handling.
To account for customer driving habits and conditions, your automatic
transmission (4R100) electronically controls the shift quality by using an
adaptive learning strategy. The adaptive learning strategy is maintained
by power from the battery. When the battery is disconnected or a new
battery is installed, the transmission must relearn its adaptive strategy.
Optimal shifting will resume within a few hundred kilometers (miles) of
operation.
If the shift quality does not improve within a few hundred
kilometers (miles) of operation, or if the downshifts and other
throttle conditions do not function normally or after a long
deceleration period, see your dealer or a qualified service
technician as soon as possible.
Because your vehicle’s engine is also electronically controlled by a
computer, some control conditions are maintained by power from the
battery. When the battery is disconnected or a new battery is installed,
the engine must relearn its idle and fuel trim strategy for optimum
driveability and performance. To begin this process:
1. With the vehicle at a complete stop, set the parking brake.
2. Put the gearshift in P (Park), turn off all accessories and start the
engine.
3. Run the engine until it reaches normal operating temperature.
4. Allow the engine to idle for at least one minute.
2004 Motorhome(mot)
Supplement
USA English(fus)
Maintenance and specifications
72
Page 79 of 120
Driving the vehicle without repairing the engine problem
increases the chance of engine damage. Take your vehicle to a
service facility as soon as possible.
WHAT YOU SHOULD KNOW ABOUT AUTOMOTIVE FUELS
Important safety precautions
Do not overfill the fuel tank. The pressure in an overfilled tank
may cause leakage and lead to fuel spray and fire.
The fuel system may be under pressure. If the fuel filler cap is
venting vapor or if you hear a hissing sound, wait until it stops
before completely removing the fuel filler cap. Otherwise, fuel may
spray out and injure you or others.
If you do not use the proper fuel filler cap, excessive pressure or
vacuum in the fuel tank may damage the fuel system or cause
the fuel cap to disengage in a collision, which may result in possible
personal injury.
Automotive fuels can cause serious injury or death if misused or
mishandled.
Gasoline may contain benzene, which is a cancer-causing agent.
Observe the following guidelines when handling automotive fuel:
•Extinguish all smoking materials
and any open flames before
fueling your vehicle.
•Always turn off the vehicle before
fueling.
•Automotive fuels can be harmful
or fatal if swallowed. Fuel such as gasoline is highly toxic and if
swallowed can cause death or permanent injury. If fuel is swallowed,
call a physician immediately, even if no symptoms are immediately
apparent. The toxic effects of fuel may not be visible for hours.
2004 Motorhome(mot)
Supplement
USA English(fus)
Maintenance and specifications
79
Page 83 of 120
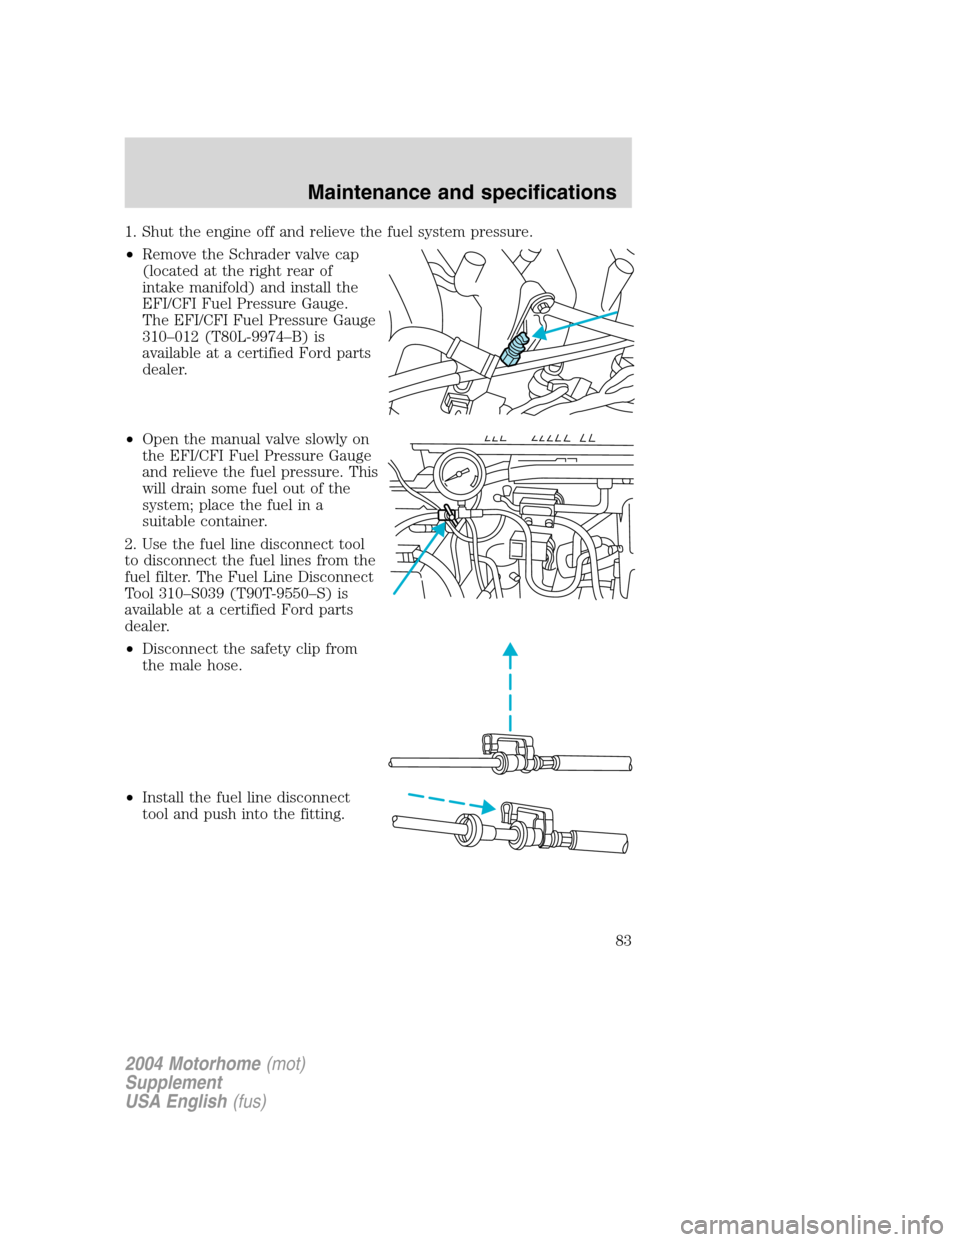
1. Shut the engine off and relieve the fuel system pressure.
•Remove the Schrader valve cap
(located at the right rear of
intake manifold) and install the
EFI/CFI Fuel Pressure Gauge.
The EFI/CFI Fuel Pressure Gauge
310–012 (T80L-9974–B) is
available at a certified Ford parts
dealer.
•Open the manual valve slowly on
the EFI/CFI Fuel Pressure Gauge
and relieve the fuel pressure. This
will drain some fuel out of the
system; place the fuel in a
suitable container.
2. Use the fuel line disconnect tool
to disconnect the fuel lines from the
fuel filter. The Fuel Line Disconnect
Tool 310–S039 (T90T-9550–S) is
available at a certified Ford parts
dealer.
•Disconnect the safety clip from
the male hose.
•Install the fuel line disconnect
tool and push into the fitting.
2004 Motorhome(mot)
Supplement
USA English(fus)
Maintenance and specifications
83
Page 84 of 120
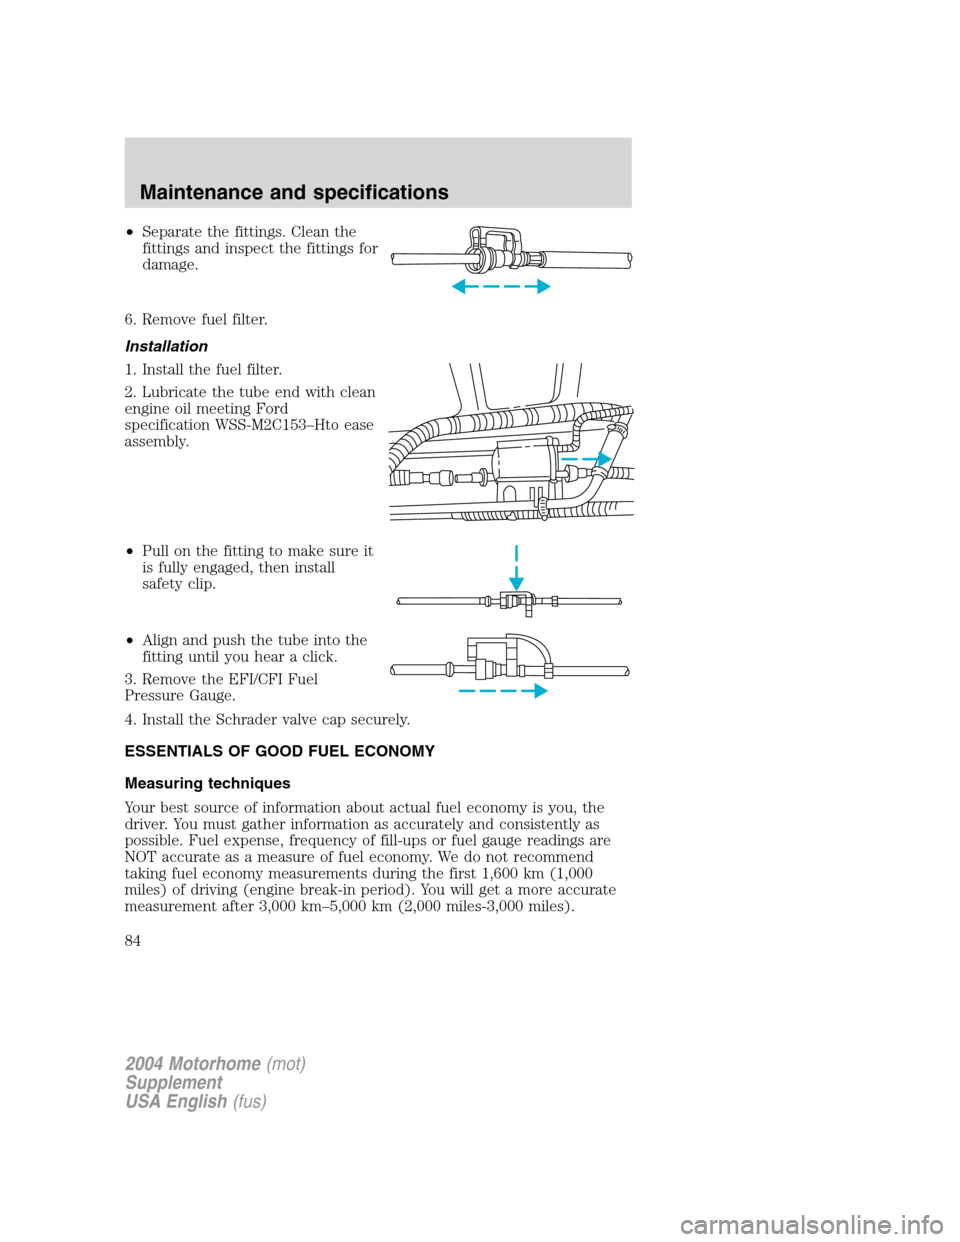
•Separate the fittings. Clean the
fittings and inspect the fittings for
damage.
6. Remove fuel filter.
Installation
1. Install the fuel filter.
2. Lubricate the tube end with clean
engine oil meeting Ford
specification WSS-M2C153–Hto ease
assembly.
•Pull on the fitting to make sure it
is fully engaged, then install
safety clip.
•Align and push the tube into the
fitting until you hear a click.
3. Remove the EFI/CFI Fuel
Pressure Gauge.
4. Install the Schrader valve cap securely.
ESSENTIALS OF GOOD FUEL ECONOMY
Measuring techniques
Your best source of information about actual fuel economy is you, the
driver. You must gather information as accurately and consistently as
possible. Fuel expense, frequency of fill-ups or fuel gauge readings are
NOT accurate as a measure of fuel economy. We do not recommend
taking fuel economy measurements during the first 1,600 km (1,000
miles) of driving (engine break-in period). You will get a more accurate
measurement after 3,000 km–5,000 km (2,000 miles-3,000 miles).
2004 Motorhome(mot)
Supplement
USA English(fus)
Maintenance and specifications
84
Page 85 of 120
Filling the tank
The advertised fuel capacity of the fuel tank on your vehicle is equal to
the rated refill capacity of the fuel tank as listed in theRefill capacities
section of this chapter.
The advertised capacity is the amount of the indicated capacity and the
empty reserve combined. Indicated capacity is the difference in the
amount of fuel in a full tank and a tank when the fuel gauge indicates
empty. Empty reserve is the small amount of fuel remaining in the fuel
tank after the fuel gauge indicates empty.
The amount of usable fuel in the empty reserve varies and should
not be relied upon to increase driving range. When refueling your
vehicle after the fuel gauge indicates empty, you might not be
able to refuel the full amount of the advertised capacity of the
fuel tank due to the empty reserve still present in the tank.
For consistent results when filling the fuel tank:
•Turn the engine/ignition switch to the off position prior to refueling,
an error in the reading will result if the engine is left running.
•Use the same filling rate setting (low—medium—high) each time
the tank is filled.
•Allow no more than 2 automatic click-offs when filling.
•Always use fuel with the recommended octane rating.
•Use a known quality gasoline, preferably a national brand.
•Use the same side of the same pump and have the vehicle facing the
same direction each time you fill up.
•Have the vehicle loading and distribution the same every time.
Your results will be most accurate if your filling method is consistent.
Calculating fuel economy
1. Fill the fuel tank completely and record the initial odometer reading
(in kilometers or miles).
2. Each time you fill the tank, record the amount of fuel added (in liters
or gallons).
3. After at least three to five tank fill-ups, fill the fuel tank and record
the current odometer reading.
4. Subtract your initial odometer reading from the current odometer
reading.
2004 Motorhome(mot)
Supplement
USA English(fus)
Maintenance and specifications
85