headlamp FORD F150 2002 10.G User Guide
[x] Cancel search | Manufacturer: FORD, Model Year: 2002, Model line: F150, Model: FORD F150 2002 10.GPages: 320, PDF Size: 2.95 MB
Page 71 of 320
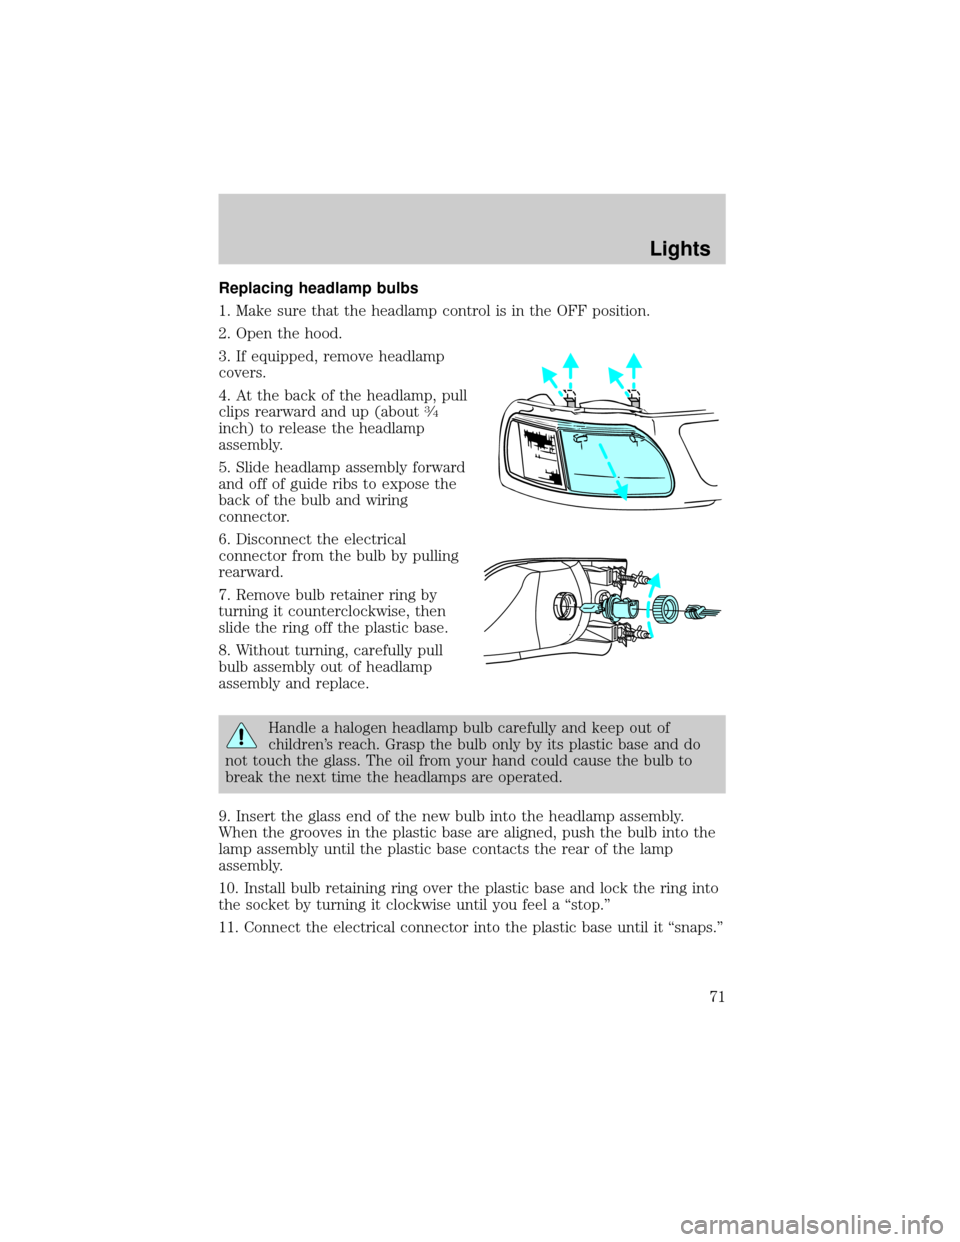
Replacing headlamp bulbs
1. Make sure that the headlamp control is in the OFF position.
2. Open the hood.
3. If equipped, remove headlamp
covers.
4. At the back of the headlamp, pull
clips rearward and up (about
3¤4
inch) to release the headlamp
assembly.
5. Slide headlamp assembly forward
and off of guide ribs to expose the
back of the bulb and wiring
connector.
6. Disconnect the electrical
connector from the bulb by pulling
rearward.
7. Remove bulb retainer ring by
turning it counterclockwise, then
slide the ring off the plastic base.
8. Without turning, carefully pull
bulb assembly out of headlamp
assembly and replace.
Handle a halogen headlamp bulb carefully and keep out of
children's reach. Grasp the bulb only by its plastic base and do
not touch the glass. The oil from your hand could cause the bulb to
break the next time the headlamps are operated.
9. Insert the glass end of the new bulb into the headlamp assembly.
When the grooves in the plastic base are aligned, push the bulb into the
lamp assembly until the plastic base contacts the rear of the lamp
assembly.
10. Install bulb retaining ring over the plastic base and lock the ring into
the socket by turning it clockwise until you feel a ªstop.º
11. Connect the electrical connector into the plastic base until it ªsnaps.º
Lights
71
Page 72 of 320
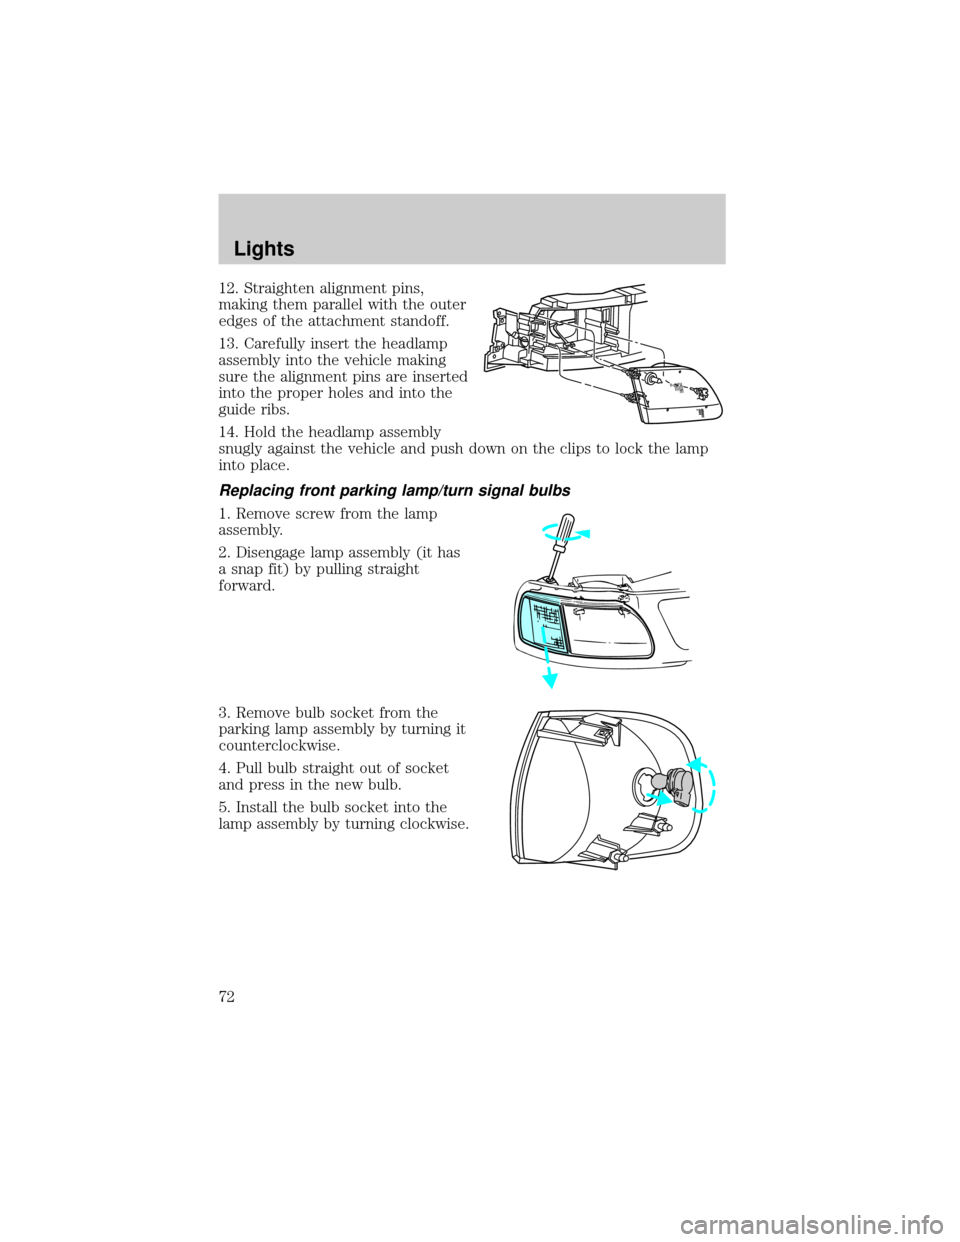
12. Straighten alignment pins,
making them parallel with the outer
edges of the attachment standoff.
13. Carefully insert the headlamp
assembly into the vehicle making
sure the alignment pins are inserted
into the proper holes and into the
guide ribs.
14. Hold the headlamp assembly
snugly against the vehicle and push down on the clips to lock the lamp
into place.
Replacing front parking lamp/turn signal bulbs
1. Remove screw from the lamp
assembly.
2. Disengage lamp assembly (it has
a snap fit) by pulling straight
forward.
3. Remove bulb socket from the
parking lamp assembly by turning it
counterclockwise.
4. Pull bulb straight out of socket
and press in the new bulb.
5. Install the bulb socket into the
lamp assembly by turning clockwise.
Lights
72
Page 142 of 320
Reasons given... Consider...
ªI have an air bagº Air bags offer greater protection when
used with safety belts. Frontal airbags
are not designed to inflate in rear and
side crashes or rollovers.
ªI'd rather be thrown clearº Not a good idea.Peoplewho are
ejected are 40 times more likely
to DIE.Safety belts help prevent
ejection, WE CAN'T ªPICK OUR
CRASHº.
Do not sit on top of a buckled safety belt to avoid the Belt
Minder chime. Sitting on the safety belt will increase the risk of
injury in an accident. To disable (one-time) or deactivate the Belt
Minder feature please follow the directions stated below.
One time disable
Any time the safety belt is buckled and then unbuckled during an
ignition ON cycle, BeltMinder will be disabled for that ignition cycle only.
Deactivating/activating the BeltMinder feature
Read steps1-9thoroughly before proceeding with the
deactivation/activation programming procedure.
The BeltMinder feature can be deactivated/activated by performing the
following procedure:
Before following the procedure, make sure that:
²The parking brake is set.
²The gearshift is in P (Park) (automatic transmission) or the neutral
position (manual transmission).
²The ignition switch is in the OFF position.
²All vehicle doors are closed.
²The driver's safety belt is unbuckled.
²The parklamps/headlamps are in OFF position (If vehicle is equipped
with Autolamps, this will not affect the procedure).
Seating and Safety Restraints
142
Page 143 of 320
To reduce the risk of injury, do not deactivate/activate the Belt
Minder feature while driving the vehicle.
1. Turn the ignition switch to the RUN (or ON) position. (DO NOT
START THE ENGINE.)
2. Wait until the safety belt warning light turns off. (Approximately 1±2
minutes.)
²Steps 3±5 must be completed within 60 seconds or the procedure will
have to be repeated.
3. Buckle then unbuckle the safety belt three times, ending with the
safety belt unbuckled. This can be done before or during BeltMinder
warning activation.
4. Turn on the parklamps/headlamps, turn off the parklamps/headlamps.
5. Buckle then unbuckle the safety belt three times, ending with the
safety belt unbuckled.
²After step 5 the safety belt warning light will be turned on for three
seconds.
6. Within seven seconds of the safety belt warning light turning off,
buckle then unbuckle the safety belt.
²This will disable BeltMinder if it is currently enabled, or enable
BeltMinder if it is currently disabled.
7. Confirmation of disabling BeltMinder is provided by the safety belt
warning light flashing four times per second for three seconds.
8. Confirmation of enabling BeltMinder is provided by:
²The safety belt warning light flashing four times per second for three
seconds.
²Followed by three seconds with the safety belt warning light off.
²Once again, the safety belt warning light will flash four times per
second for three seconds.
9. After receiving confirmation, the deactivation/activation procedure is
complete.
Seating and Safety Restraints
143
Page 166 of 320
Do not start your vehicle in a closed garage or in other enclosed
areas. Exhaust fumes can be toxic. Always open the garage door
before you start the engine. SeeGuarding against exhaust fumesin
this chapter for more instructions.
If you smell exhaust fumes inside your vehicle, have your dealer
inspect your vehicle immediately. Do not drive if you smell
exhaust fumes.
Important safety precautions
A computer system controls the engine's idle revolutions per minute
(RPM). When the engine starts, the idle RPM runs faster to warm the
engine. If the engine idle speed does not slow down automatically, have
the vehicle checked. Do not allow the vehicle to idle for more than 10
minutes at high engine RPM.
Before starting the vehicle:
1. Make sure all vehicle occupants have buckled their safety belts. For
more information on safety belts and their proper usage, refer to the
Seating and safety restraintschapter.
2. Make sure the headlamps and vehicle accessories are off.
If starting a vehicle with an automatic transmission:
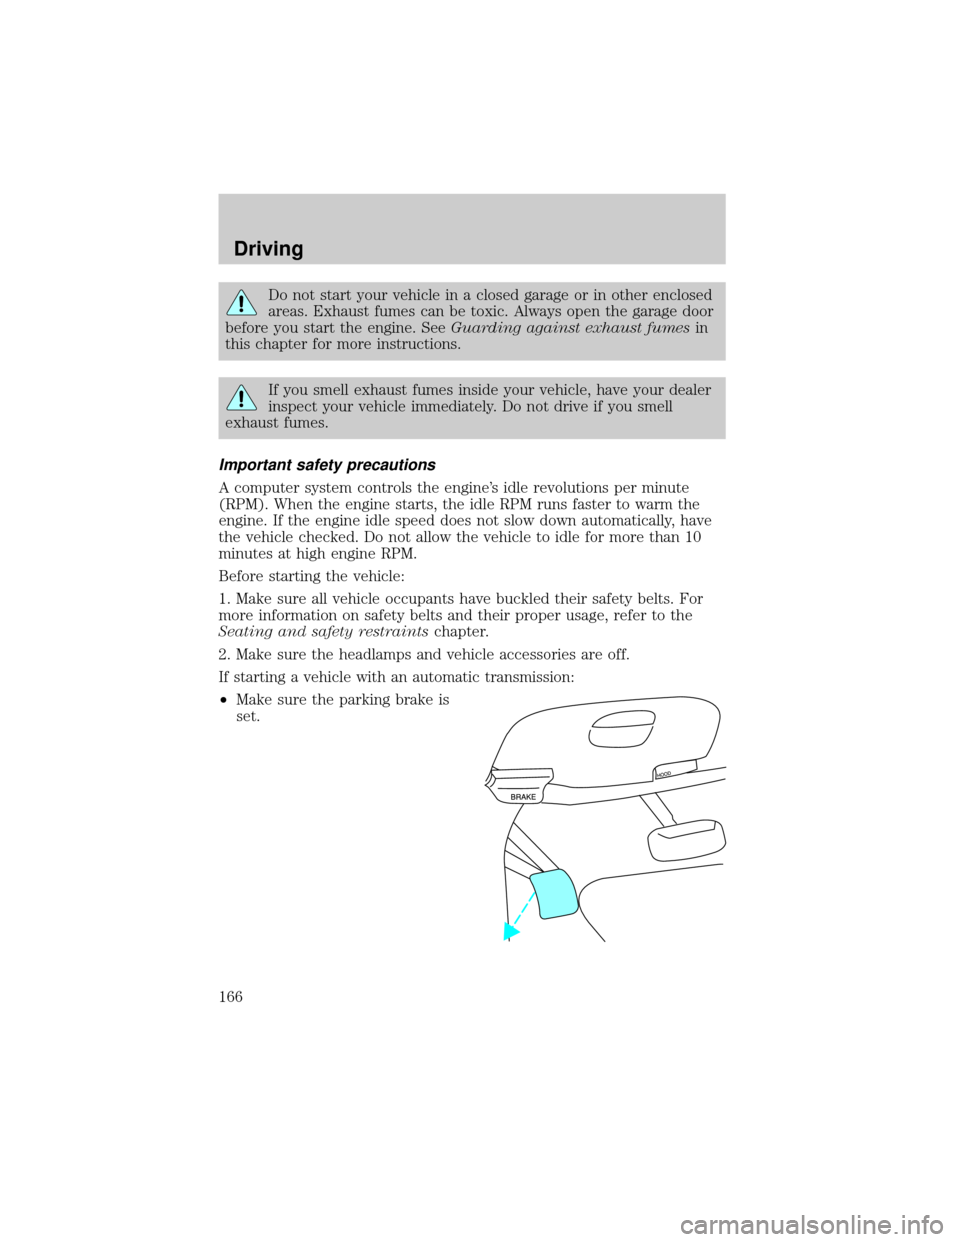
²Make sure the parking brake is
set.
Driving
166
Page 215 of 320
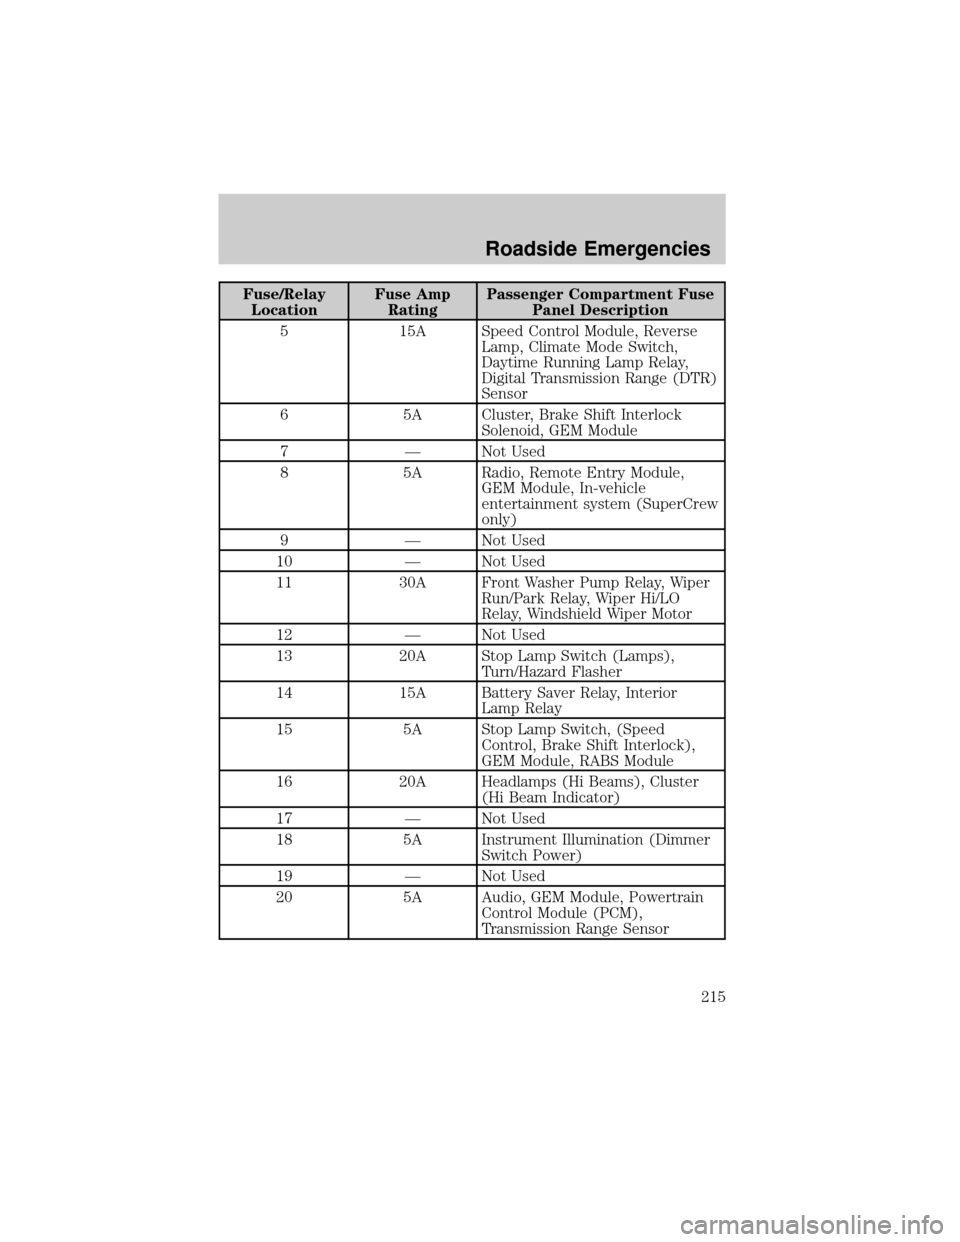
Fuse/Relay
LocationFuse Amp
RatingPassenger Compartment Fuse
Panel Description
5 15A Speed Control Module, Reverse
Lamp, Climate Mode Switch,
Daytime Running Lamp Relay,
Digital Transmission Range (DTR)
Sensor
6 5A Cluster, Brake Shift Interlock
Solenoid, GEM Module
7 Ð Not Used
8 5A Radio, Remote Entry Module,
GEM Module, In-vehicle
entertainment system (SuperCrew
only)
9 Ð Not Used
10 Ð Not Used
11 30A Front Washer Pump Relay, Wiper
Run/Park Relay, Wiper Hi/LO
Relay, Windshield Wiper Motor
12 Ð Not Used
13 20A Stop Lamp Switch (Lamps),
Turn/Hazard Flasher
14 15A Battery Saver Relay, Interior
Lamp Relay
15 5A Stop Lamp Switch, (Speed
Control, Brake Shift Interlock),
GEM Module, RABS Module
16 20A Headlamps (Hi Beams), Cluster
(Hi Beam Indicator)
17 Ð Not Used
18 5A Instrument Illumination (Dimmer
Switch Power)
19 Ð Not Used
20 5A Audio, GEM Module, Powertrain
Control Module (PCM),
Transmission Range Sensor
Roadside Emergencies
215
Page 216 of 320
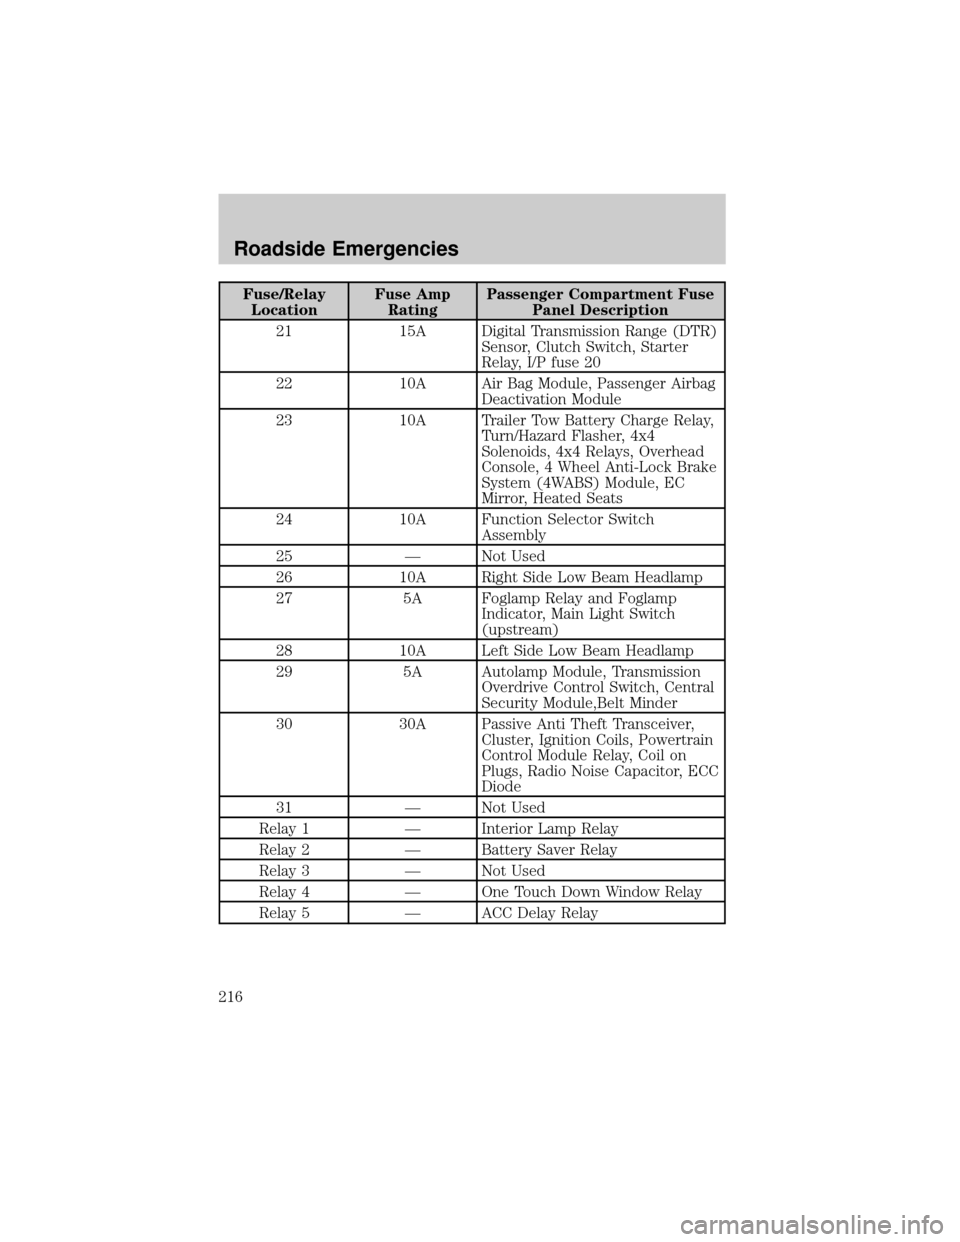
Fuse/Relay
LocationFuse Amp
RatingPassenger Compartment Fuse
Panel Description
21 15A Digital Transmission Range (DTR)
Sensor, Clutch Switch, Starter
Relay, I/P fuse 20
22 10A Air Bag Module, Passenger Airbag
Deactivation Module
23 10A Trailer Tow Battery Charge Relay,
Turn/Hazard Flasher, 4x4
Solenoids, 4x4 Relays, Overhead
Console, 4 Wheel Anti-Lock Brake
System (4WABS) Module, EC
Mirror, Heated Seats
24 10A Function Selector Switch
Assembly
25 Ð Not Used
26 10A Right Side Low Beam Headlamp
27 5A Foglamp Relay and Foglamp
Indicator, Main Light Switch
(upstream)
28 10A Left Side Low Beam Headlamp
29 5A Autolamp Module, Transmission
Overdrive Control Switch, Central
Security Module,Belt Minder
30 30A Passive Anti Theft Transceiver,
Cluster, Ignition Coils, Powertrain
Control Module Relay, Coil on
Plugs, Radio Noise Capacitor, ECC
Diode
31 Ð Not Used
Relay 1 Ð Interior Lamp Relay
Relay 2 Ð Battery Saver Relay
Relay 3 Ð Not Used
Relay 4 Ð One Touch Down Window Relay
Relay 5 Ð ACC Delay Relay
Roadside Emergencies
216
Page 218 of 320
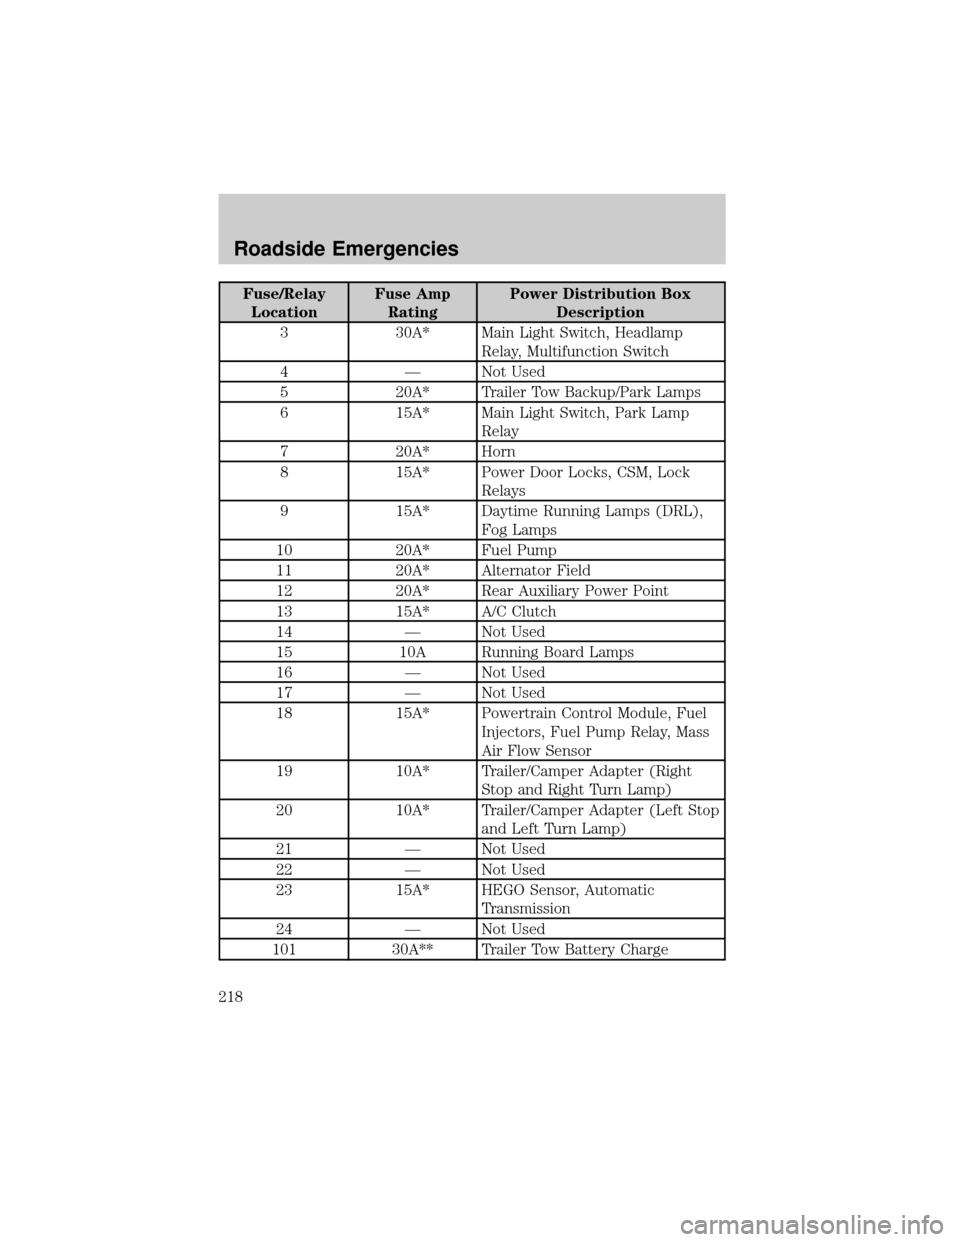
Fuse/Relay
LocationFuse Amp
RatingPower Distribution Box
Description
3 30A* Main Light Switch, Headlamp
Relay, Multifunction Switch
4 Ð Not Used
5 20A* Trailer Tow Backup/Park Lamps
6 15A* Main Light Switch, Park Lamp
Relay
7 20A* Horn
8 15A* Power Door Locks, CSM, Lock
Relays
9 15A* Daytime Running Lamps (DRL),
Fog Lamps
10 20A* Fuel Pump
11 20A* Alternator Field
12 20A* Rear Auxiliary Power Point
13 15A* A/C Clutch
14 Ð Not Used
15 10A Running Board Lamps
16 Ð Not Used
17 Ð Not Used
18 15A* Powertrain Control Module, Fuel
Injectors, Fuel Pump Relay, Mass
Air Flow Sensor
19 10A* Trailer/Camper Adapter (Right
Stop and Right Turn Lamp)
20 10A* Trailer/Camper Adapter (Left Stop
and Left Turn Lamp)
21 Ð Not Used
22 Ð Not Used
23 15A* HEGO Sensor, Automatic
Transmission
24 Ð Not Used
101 30A** Trailer Tow Battery Charge
Roadside Emergencies
218
Page 309 of 320

FORD ACCESSORIES FOR YOUR VEHICLE
A wide selection of genuine Ford accessories are available for your
vehicle through your local authorized Ford, Lincoln, Mercury or Ford of
Canada dealer. These quality accessories have been specifically
engineered to fulfill your automotive needs; they are custom designed to
complement the style and aerodynamic appearance of your vehicle. In
addition, each accessory is made from high quality materials and meets
or exceeds Ford's rigorous engineering and safety specifications. Ford
Motor Company will repair or replace any properly dealer-installed Ford
accessory found to be defective in factory-supplied materials or
workmanship during the warranty period, as well as any component
damaged by the defective accessory. The accessory will be warranted for
whichever provides you the greatest benefit:
²12 months or 20 000 km (12 000 miles) (whichever occurs first), or
²The remainder of your new vehicle limited warranty.
This means that genuine Ford accessories purchased along with your
new vehicle and installed by the dealer are covered for the full length of
your New Vehicle's Limited Warranty Ð 3 years or 60 000 km (36 000 miles)
(whichever occurs first). Contact your dealer for details and a copy of
the warranty.
Not all accessories are available for all models.
Vehicle Security
Styled wheel locks
Vehicle security systems
Comfort and convenience
Air conditioner
Air filtration systems
Automatic Headlamp System with Daytime Running Lights (DRL)
Cargo organizers (interior)
Cargo storage bin (regular cab)
Cargo trays (interior)
Celluar phone holder
Dash trim (wood grain)
Engine block heaters
Manual sliding rear window
Accessories
309
Page 316 of 320

tachometer ................................19
trip odometer ............................19
GAWR (Gross Axle
Weight Rating) ..........................197
calculating ...............................199
definition .................................197
driving with a heavy load ......197
location ....................................197
GVWR (Gross Vehicle
Weight Rating) ..........................197
calculating .......................197, 199
definition .................................197
driving with a heavy load ......197
location ....................................197
H
Hazard flashers .........................211
Head restraints .........................120
Headlamps ...................................65
aiming ........................................67
autolamp system .......................65
bulb specifications ....................70
daytime running lights .............66
flash to pass ..............................66
high beam ...........................14, 66
replacing bulbs .........................71
turning on and off ....................65
warning chime ..........................15
Heating ........................................59
heater only system ...................54
heating and air conditioning
system .......................................55
HomeLink universal
transceiver
(see Garage door opener) ...93±96
Hood ..........................................254I
Ignition .......................165, 301±302
removing the key ....................184
Infant seats
(see Safety seats) .....................155
Inspection/maintenance
(I/M) testing ..............................281
Instrument panel
cleaning ...................................248
cluster ................................10, 248
lighting up panel
and interior ...............................67
J
Jack ............................................220
positioning ...............................220
storage .....................................220
Jump-starting your vehicle ......226
K
Keyless entry system
autolock ...................................113
locking and unlocking
doors ........................................115
programming entry code .......114
Keys ...................................116±118
key in ignition chime ...............15
positions of the ignition .........165
removing from the ignition ....184
L
Lamps
autolamp system .......................65
bulb replacement
specifications chart ..................70
cargo lamps ...............................67
Index
316