lock FORD F150 2002 10.G User Guide
[x] Cancel search | Manufacturer: FORD, Model Year: 2002, Model line: F150, Model: FORD F150 2002 10.GPages: 320, PDF Size: 2.95 MB
Page 55 of 320

Operating tips
²In humid weather, place the climate control system in DEF before
driving. This will reduce fogging on your windshield. Once the
windshield has been cleared, select any desired position.
²To reduce humidity buildup inside the vehicle, do not drive with the
climate control system in the OFF position.
²Under normal weather conditions, your vehicle's climate control
system should be left in any position other than OFF position when
the vehicle is parked. This allows the vehicle to ªbreatheº through the
outside air inlet duct.
²Under snowy or dirty weather conditions, your vehicle's climate
control system should be left in the OFF position when the vehicle is
parked. This allows the climate control system to be free from
contamination of outside pollutants.
²Do not place objects under the front seat which may interfere with
the airflow to the rear seats.
²Remove any snow, ice, or leaves from the air intake area (at the base
of the windshield and underneath the hood).
²Do not place objects over the defroster outlets. These objects may
block airflow and reduce your visibility through the windshield. Avoid
placing small objects on top of the instrument panel. These objects
can fall into the defroster outlets and block airflow, in addition to,
damaging your climate control system.
Do not place objects on top of the instrument panel, as these
objects may become projectiles in instances of sudden impact or
a sudden stop.
MANUAL HEATING AND AIR CONDITIONING SYSTEM
(IF EQUIPPED)
HI
COOL WARM
OFFPANEL
A/CFLOOR
DEFFLR
& DEFMAX
A/C
PANEL &
FLOORLO
Climate Controls
55
Page 58 of 320

²Under normal weather conditions, your vehicle's climate control
system should be left in any position other than the MAX A/C or OFF
when the vehicle is parked. This allows the vehicle to ªbreatheº
through the outside air inlet duct.
²Under snowy or dirty weather conditions, your vehicle's climate
control system should be left in the OFF position when the vehicle is
parked. This allows the climate control system to be free from
contamination of outside pollutants.
²If your vehicle has been parked with the windows closed during warm
weather conditions, the air conditioner will perform more efficiently in
cooling the vehicle if driven for two or three minutes with the
windows open. This will force most of the hot, stale air out of the
vehicle. Once the vehicle has been ªaired outº, operate the climate
control system as desired.
²Do not put objects under the front seat which may interfere with the
airflow to the rear seats (if equipped).
²Remove any snow, ice or leaves from the air intake area (at the
bottom of the windshield and underneath the hood).
²Do not place objects over the defroster outlets. These objects can
block airflow and reduce visibility through your windshield. Avoid
placing small objects on top of the instrument panel. These objects
may fall down into the defroster outlets and block airflow, in addition
to, damaging the climate control system.
To aid in side window defogging/demisting in cold weather conditions:
1. Select the position that distributes air through the Panel and Floor.
2. Set the temperature control to full heat.
3. Set the fan speed to full fan.
4. Direct the outer panel vents towards the side windows.
5. To increase airflow to the outer panel vents, close the central panel
vents.
Do not place objects on top of the instrument panel as these
objects may become projectiles in a collision or sudden stop.
Climate Controls
58
Page 64 of 320
²Under snowy or dirty weather conditions, your vehicle's climate
control system should be left in the OFF position when the vehicle is
parked. This allows the climate control system to be free from
contamination of outside pollutants.
²If your vehicle has been parked with the windows closed during warm
weather conditions, the air conditioner will perform more efficiently in
cooling the vehicle if driven for two or three minutes with the
windows open. This will force most of the hot, stale air out of the
vehicle. Once the vehicle has been ªaired outº, operate the climate
control system as desired.
²Don't put objects under the front seat that will interfere with the
airflow to the rear seats.
²Remove any snow, ice or leaves from the air intake area at the base of
the windshield.
²Do not place objects over the defroster outlets. These objects can
block airflow and reduce your ability to see through your windshield.
Avoid placing small objects on top of the instrument panel. These
objects may fall down into the defroster outlets and block airflow, in
addition to damaging the climate control system.
To aid in side window defogging/demisting in cold weather conditions:
1. Select PNL²FLR
2. Set the temperature control to full heat
3. Set the fan speed control to HI
4. Direct the outer panel vents towards the side windows.
To increase airflow to the outer panel vents, close the central panel
vents.
Do not place objects on top of the instrument panel, as these
objects may become projectiles in a collision or sudden stop.
Climate Controls
64
Page 65 of 320

HEADLAMP CONTROL
Rotate the headlamp control to the
first position to turn on the parking
lamps. Rotate to the second position
to also turn on the headlamps.
Autolamp control (if equipped)
The autolamp system provides light
sensitive automatic on-off control of
the exterior lights normally
controlled by the headlamp control.
The autolamp system also keeps the
lights on for approximately 20
seconds after the ignition switch is
turned to OFF.
²To turn autolamps on, rotate the
control counterclockwise.
²To turn autolamps off, rotate the control clockwise to OFF.
²Foglamps are not controlled by the autolamps. In order to turn on the
foglamps, you must turn the lamp switch to the
position and
pull toward you for foglamps.
Foglamp control (if equipped)
The headlamp control also operates
the foglamps. The foglamps can be
turned on only when the headlamp
control is in the
position and
the high beams are not turned on.
Pull headlamp control towards you
to turn foglamps on. The foglamp
indicator light
will illuminate.
A
A
A
Lights
65
Page 71 of 320
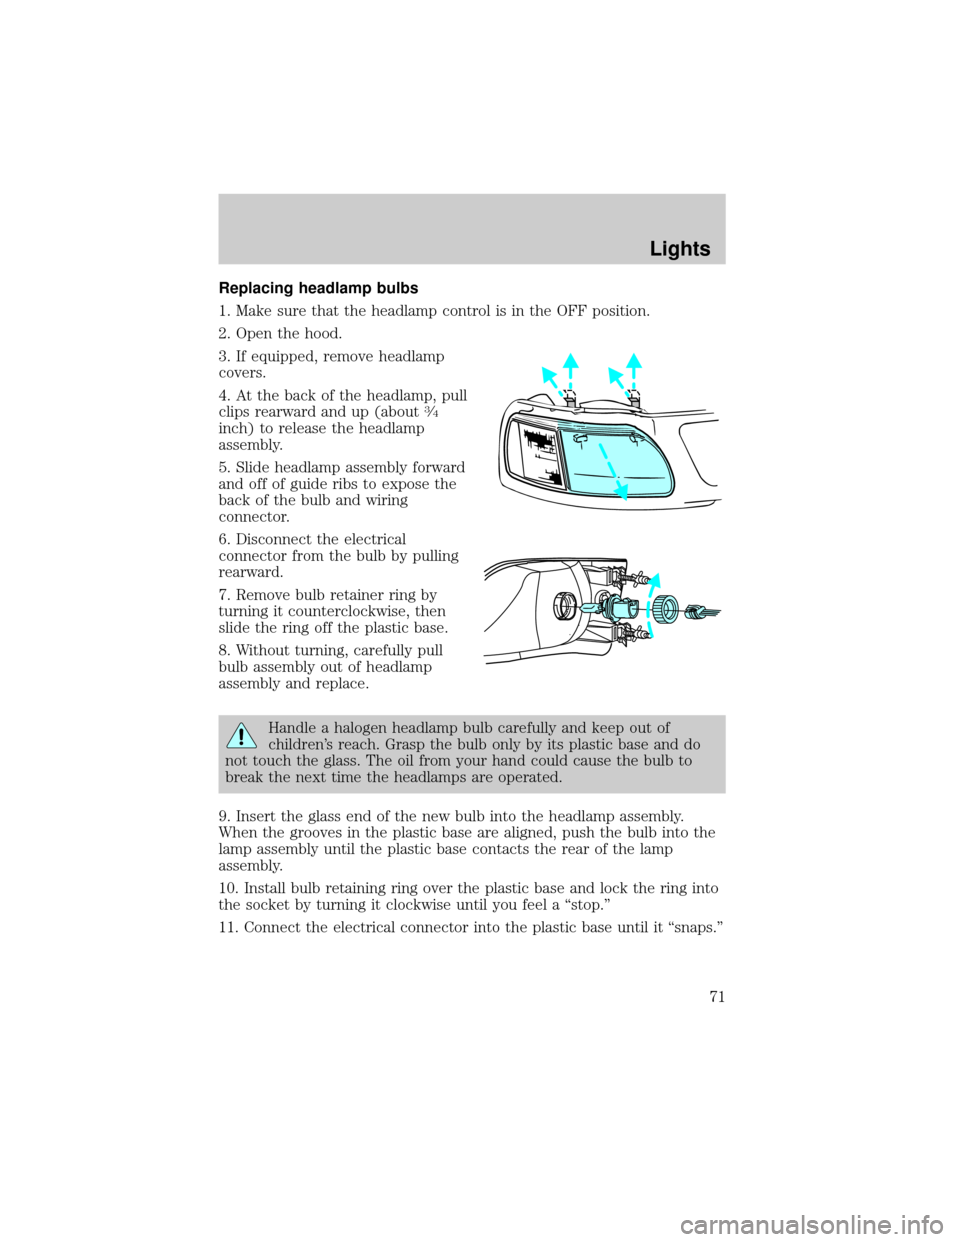
Replacing headlamp bulbs
1. Make sure that the headlamp control is in the OFF position.
2. Open the hood.
3. If equipped, remove headlamp
covers.
4. At the back of the headlamp, pull
clips rearward and up (about
3¤4
inch) to release the headlamp
assembly.
5. Slide headlamp assembly forward
and off of guide ribs to expose the
back of the bulb and wiring
connector.
6. Disconnect the electrical
connector from the bulb by pulling
rearward.
7. Remove bulb retainer ring by
turning it counterclockwise, then
slide the ring off the plastic base.
8. Without turning, carefully pull
bulb assembly out of headlamp
assembly and replace.
Handle a halogen headlamp bulb carefully and keep out of
children's reach. Grasp the bulb only by its plastic base and do
not touch the glass. The oil from your hand could cause the bulb to
break the next time the headlamps are operated.
9. Insert the glass end of the new bulb into the headlamp assembly.
When the grooves in the plastic base are aligned, push the bulb into the
lamp assembly until the plastic base contacts the rear of the lamp
assembly.
10. Install bulb retaining ring over the plastic base and lock the ring into
the socket by turning it clockwise until you feel a ªstop.º
11. Connect the electrical connector into the plastic base until it ªsnaps.º
Lights
71
Page 72 of 320
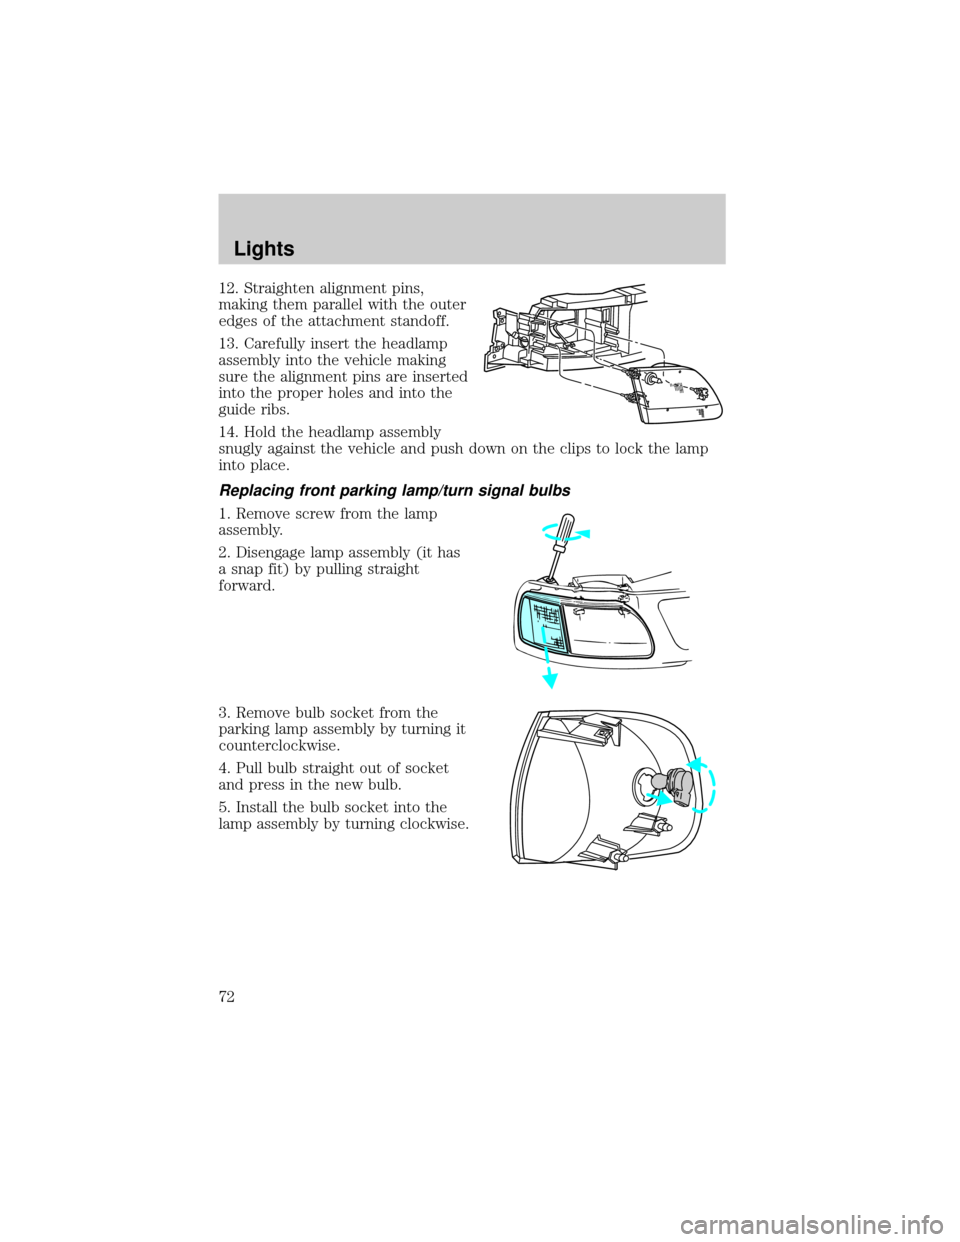
12. Straighten alignment pins,
making them parallel with the outer
edges of the attachment standoff.
13. Carefully insert the headlamp
assembly into the vehicle making
sure the alignment pins are inserted
into the proper holes and into the
guide ribs.
14. Hold the headlamp assembly
snugly against the vehicle and push down on the clips to lock the lamp
into place.
Replacing front parking lamp/turn signal bulbs
1. Remove screw from the lamp
assembly.
2. Disengage lamp assembly (it has
a snap fit) by pulling straight
forward.
3. Remove bulb socket from the
parking lamp assembly by turning it
counterclockwise.
4. Pull bulb straight out of socket
and press in the new bulb.
5. Install the bulb socket into the
lamp assembly by turning clockwise.
Lights
72
Page 73 of 320
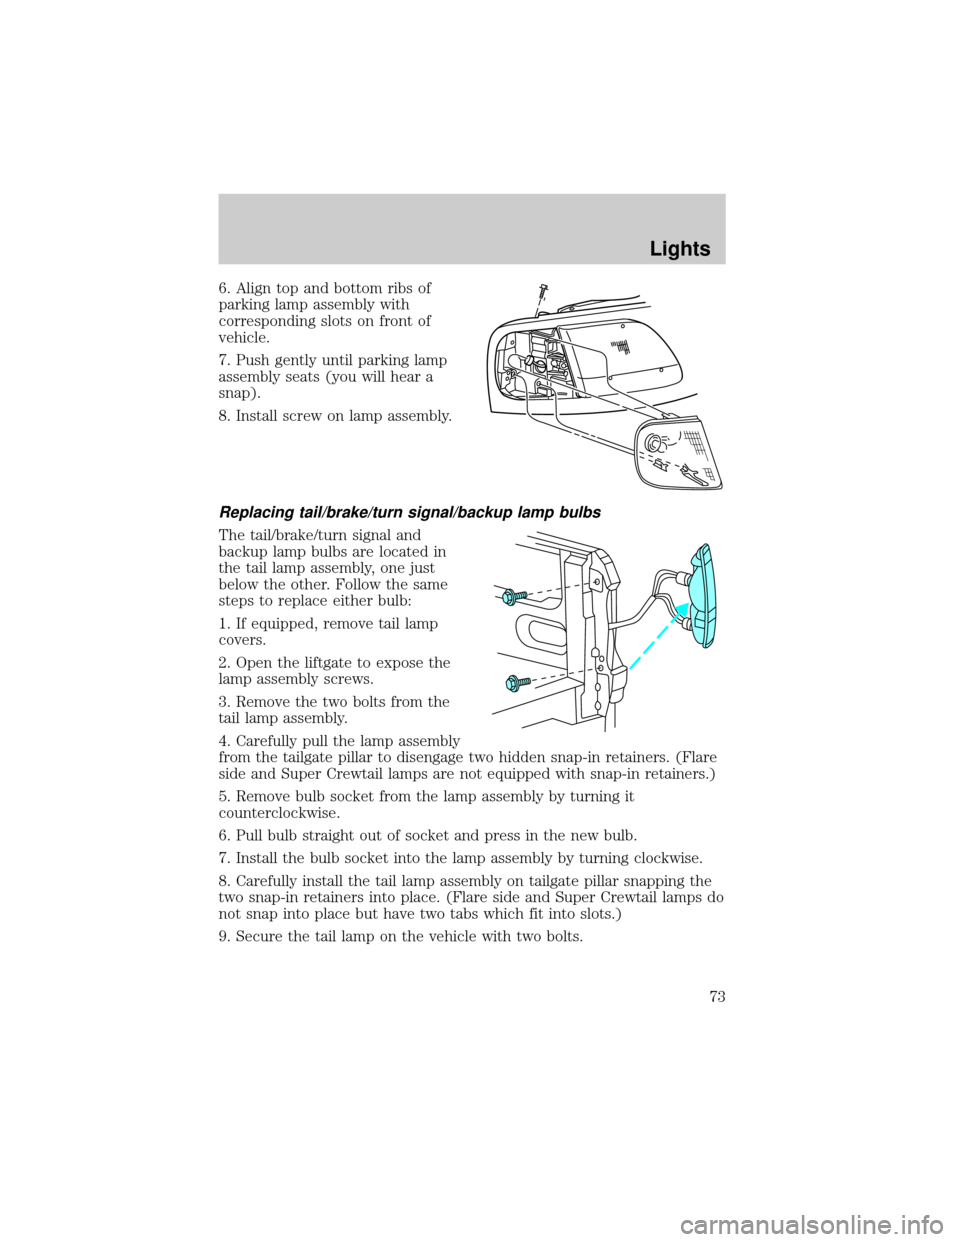
6. Align top and bottom ribs of
parking lamp assembly with
corresponding slots on front of
vehicle.
7. Push gently until parking lamp
assembly seats (you will hear a
snap).
8. Install screw on lamp assembly.
Replacing tail/brake/turn signal/backup lamp bulbs
The tail/brake/turn signal and
backup lamp bulbs are located in
the tail lamp assembly, one just
below the other. Follow the same
steps to replace either bulb:
1. If equipped, remove tail lamp
covers.
2. Open the liftgate to expose the
lamp assembly screws.
3. Remove the two bolts from the
tail lamp assembly.
4. Carefully pull the lamp assembly
from the tailgate pillar to disengage two hidden snap-in retainers. (Flare
side and Super Crewtail lamps are not equipped with snap-in retainers.)
5. Remove bulb socket from the lamp assembly by turning it
counterclockwise.
6. Pull bulb straight out of socket and press in the new bulb.
7. Install the bulb socket into the lamp assembly by turning clockwise.
8. Carefully install the tail lamp assembly on tailgate pillar snapping the
two snap-in retainers into place. (Flare side and Super Crewtail lamps do
not snap into place but have two tabs which fit into slots.)
9. Secure the tail lamp on the vehicle with two bolts.
Lights
73
Page 74 of 320

Replacing high-mount brake and cargo lamp bulbs
To remove the lamp assembly:
1. Remove the two screws and move
the lamp assembly away from the
vehicle to expose the bulb sockets.
2. Remove the bulb socket by
rotating counterclockwise and
pulling it out of the lamp assembly.
3. Pull the bulb straight out of the
socket and push in the new bulb.
To install the lamp assembly:
1. Install the bulb into the lamp
assembly and rotate clockwise.
2. Install the lamp assembly on the vehicle with two screws.
Replacing foglamp bulbs (if equipped)
1. Remove the bulb socket from the
foglamp by turning
counterclockwise.
2. Disconnect the electrical
connector from the foglamp bulb.
3. Connect the new foglamp bulb to the electrical connector.
4. Install the bulb socket in the foglamp by turning clockwise.
Replacing signal mirror lamp bulbs (if equipped)
For bulb replacement, see a dealer or qualified technician.
Lights
74
Page 75 of 320

Replacing license plate lamp bulbs
The license plate bulbs are located
behind the rear bumper. To change
the license plate lamp bulbs:
1. Reach behind the rear bumper to
locate the bulb.
2. Twist the bulb socket
counterclockwise and carefully pull
to remove it from the lamp
assembly.
3. Pull out the old bulb from the
socket and push in the new bulb.
4. Install the bulb socket in lamp assembly by turning it clockwise.
Replacing running board lamp bulbs (if equipped)
The running board bulbs are located
behind the running board. To
change the running board lamp
bulbs:
1. Reach behind the running board
to locate the bulb.
2. Twist the bulb socket
counterclockwise and carefully pull
to remove it from the lamp assembly.
3. Pull out the old bulb from the socket and push in the new bulb.
4. Install the bulb socket in lamp assembly by turning it clockwise.
Lights
75
Page 77 of 320

Changing the wiper blades
To replace the wiper blades:
1. Pull the wiper arm away from the
windshield and lock into the service
position.
2. Turn the blade at an angle from
the wiper arm. Push the lock pin
manually to release the blade and
pull the wiper blade down toward
the windshield to remove it from the
arm.
3. Attach the new wiper to the
wiper arm and press it into place
until a click is heard.
TILT STEERING WHEEL (IF EQUIPPED)
Pull the tilt steering control toward
you to move the steering wheel up
or down. Hold the control while
adjusting the wheel to the desired
position, then release the control to
lock the steering wheel in position.
Driver Controls
77