oil FORD F150 2002 10.G Owners Manual
[x] Cancel search | Manufacturer: FORD, Model Year: 2002, Model line: F150, Model: FORD F150 2002 10.GPages: 320, PDF Size: 2.95 MB
Page 3 of 320
Maintenance and Specifications 253
Hood 254
Engine compartment 255
Engine oil 258
Battery 263
Fuel information 271
Air filter(s) 289
Part numbers 294
Refill capacities 295
Lubricant specifications 299
Engine data 301
Vehicle dimensions 302
Accessories 309
Index 313
All rights reserved. Reproduction by any means, electronic or mechanical
including photocopying, recording or by any information storage and retrieval
system or translation in whole or part is not permitted without written
authorization from Ford Motor Company. Ford may change the contents without
notice and without incurring obligation.
Copyright 2001 Ford Motor Company
Table of Contents
3
Page 9 of 320
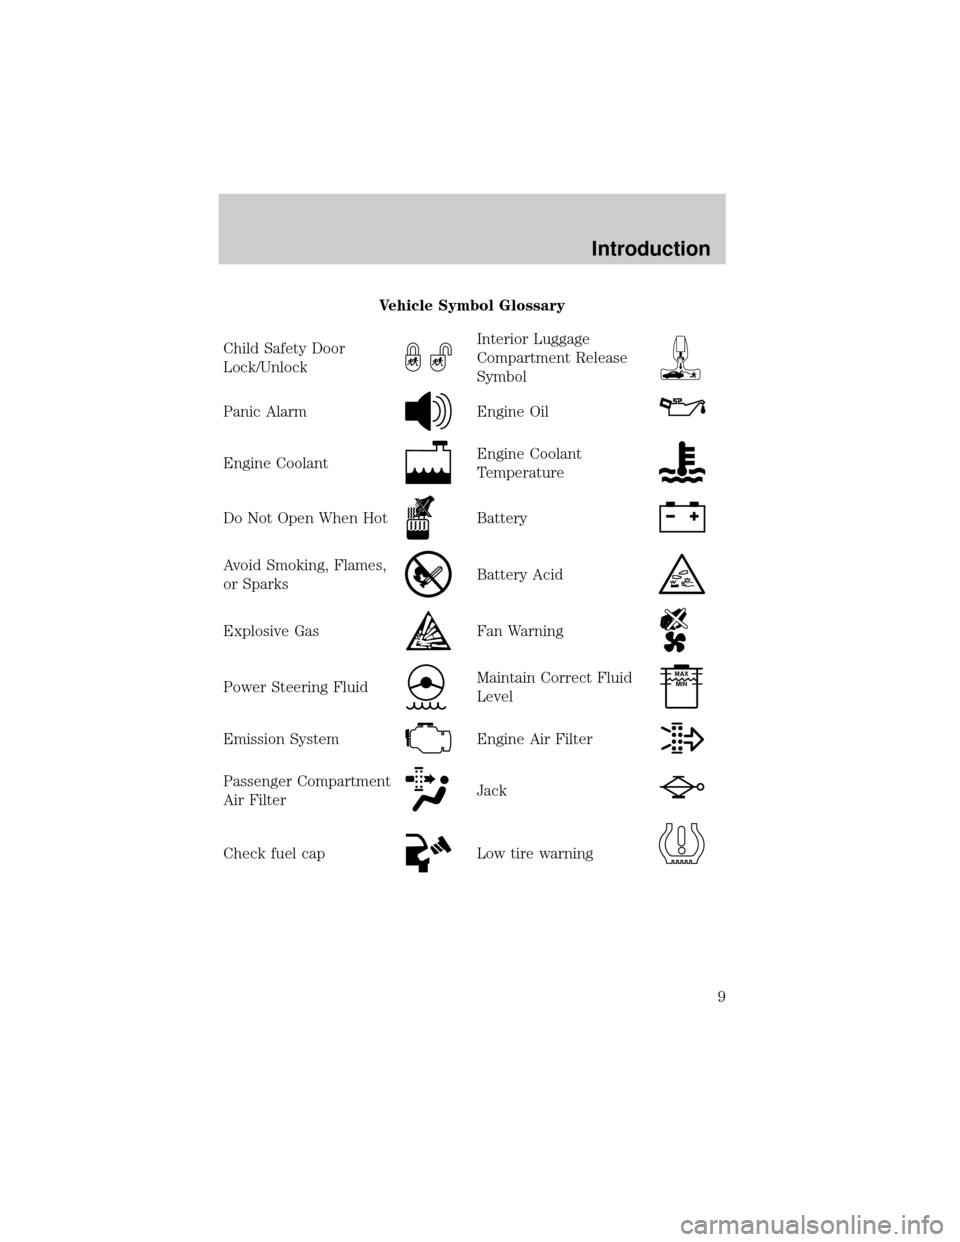
Vehicle Symbol Glossary
Child Safety Door
Lock/Unlock
Interior Luggage
Compartment Release
Symbol
Panic AlarmEngine Oil
Engine CoolantEngine Coolant
Temperature
Do Not Open When HotBattery
Avoid Smoking, Flames,
or SparksBattery Acid
Explosive GasFan Warning
Power Steering FluidMaintain Correct Fluid
LevelMAX
MIN
Emission SystemEngine Air Filter
Passenger Compartment
Air FilterJack
Check fuel capLow tire warning
Introduction
9
Page 13 of 320
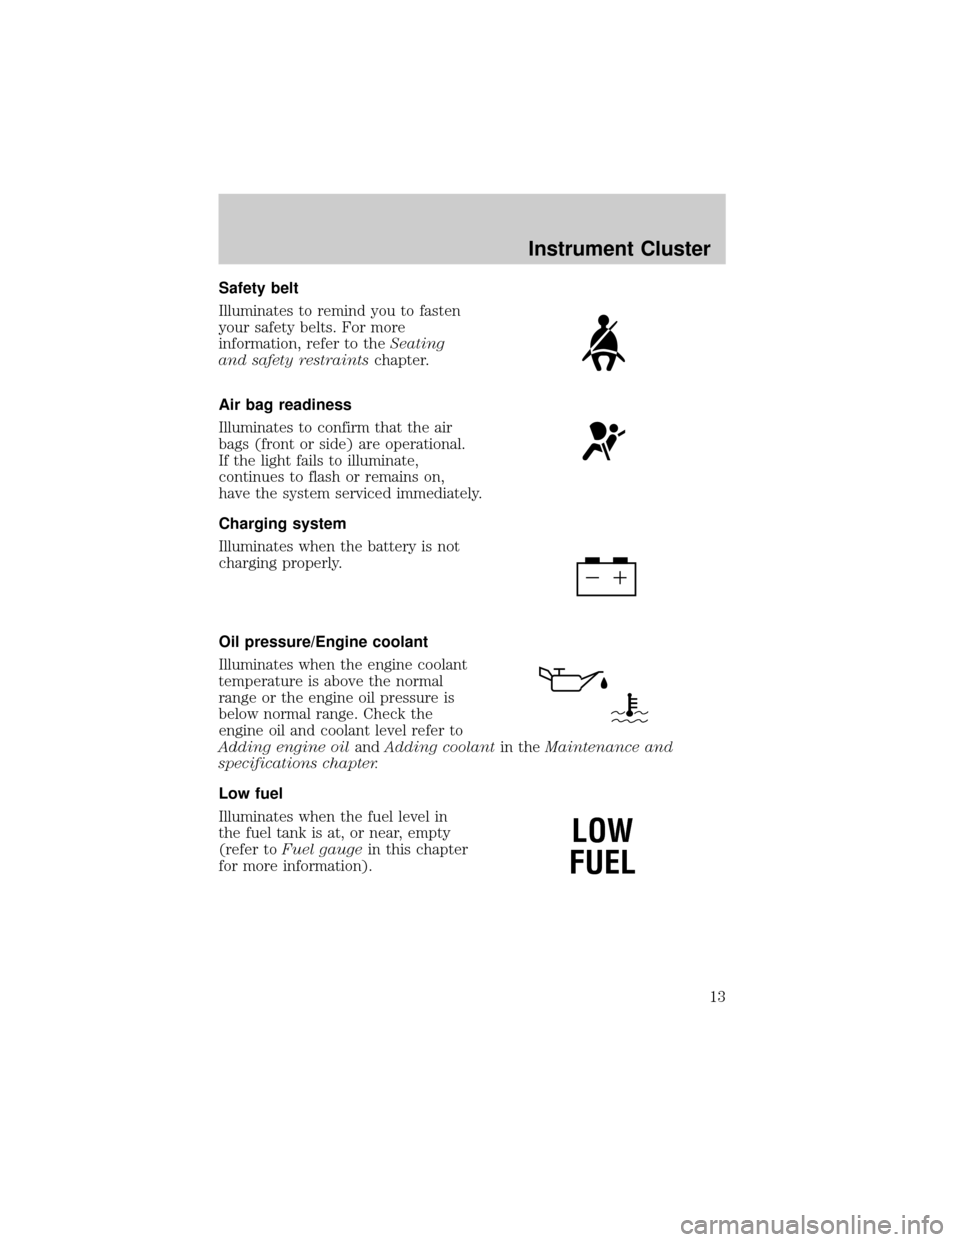
Safety belt
Illuminates to remind you to fasten
your safety belts. For more
information, refer to theSeating
and safety restraintschapter.
Air bag readiness
Illuminates to confirm that the air
bags (front or side) are operational.
If the light fails to illuminate,
continues to flash or remains on,
have the system serviced immediately.
Charging system
Illuminates when the battery is not
charging properly.
Oil pressure/Engine coolant
Illuminates when the engine coolant
temperature is above the normal
range or the engine oil pressure is
below normal range. Check the
engine oil and coolant level refer to
Adding engine oilandAdding coolantin theMaintenance and
specifications chapter.
Low fuel
Illuminates when the fuel level in
the fuel tank is at, or near, empty
(refer toFuel gaugein this chapter
for more information).
LOW
FUEL
Instrument Cluster
13
Page 17 of 320
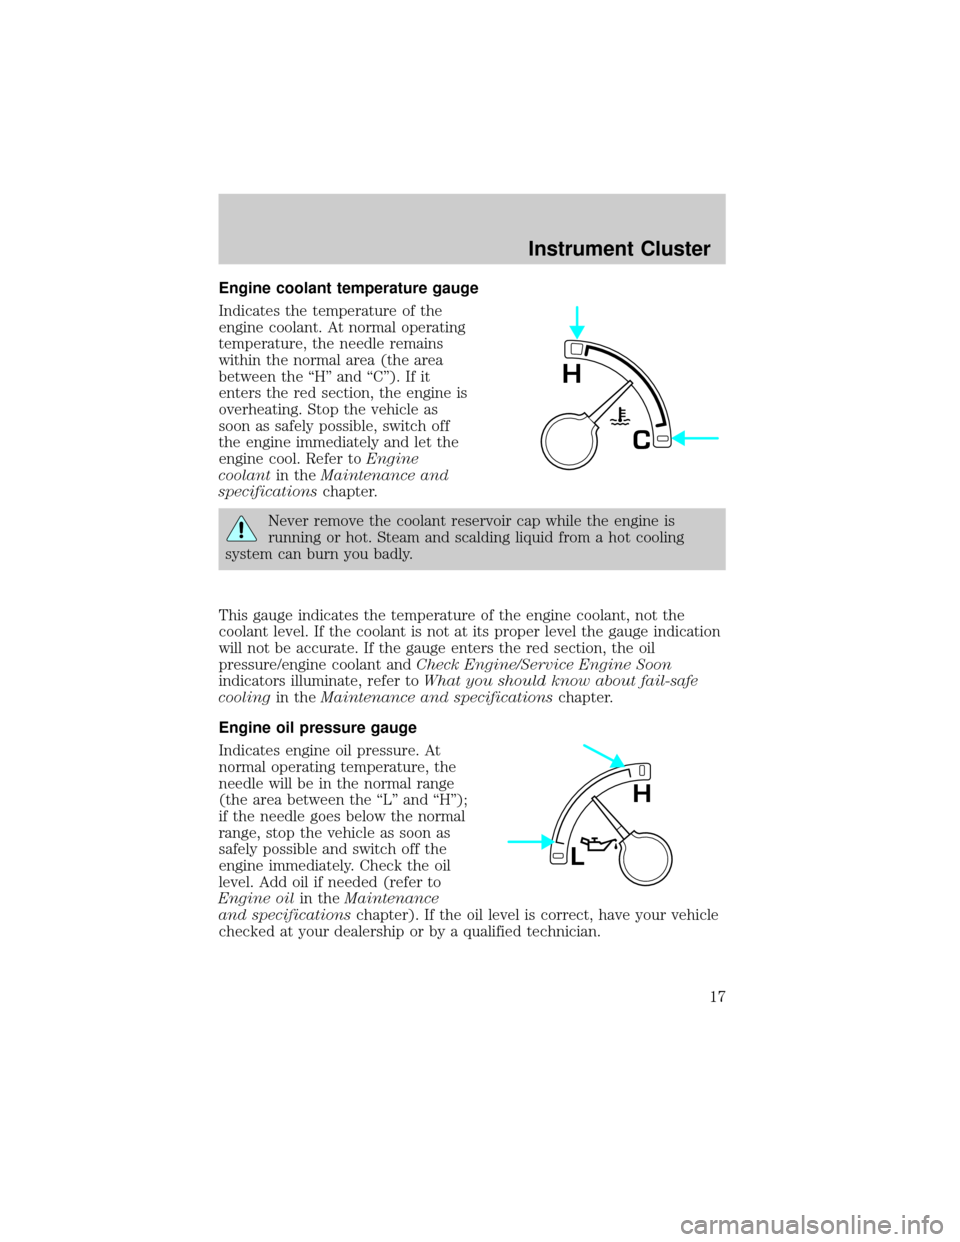
Engine coolant temperature gauge
Indicates the temperature of the
engine coolant. At normal operating
temperature, the needle remains
within the normal area (the area
between the ªHº and ªCº). If it
enters the red section, the engine is
overheating. Stop the vehicle as
soon as safely possible, switch off
the engine immediately and let the
engine cool. Refer toEngine
coolantin theMaintenance and
specificationschapter.
Never remove the coolant reservoir cap while the engine is
running or hot. Steam and scalding liquid from a hot cooling
system can burn you badly.
This gauge indicates the temperature of the engine coolant, not the
coolant level. If the coolant is not at its proper level the gauge indication
will not be accurate. If the gauge enters the red section, the oil
pressure/engine coolant andCheck Engine/Service Engine Soon
indicators illuminate, refer toWhat you should know about fail-safe
coolingin theMaintenance and specificationschapter.
Engine oil pressure gauge
Indicates engine oil pressure. At
normal operating temperature, the
needle will be in the normal range
(the area between the ªLº and ªHº);
if the needle goes below the normal
range, stop the vehicle as soon as
safely possible and switch off the
engine immediately. Check the oil
level. Add oil if needed (refer to
Engine oilin theMaintenance
and specificationschapter). If the oil level is correct, have your vehicle
checked at your dealership or by a qualified technician.
C
H
L
H
Instrument Cluster
17
Page 71 of 320
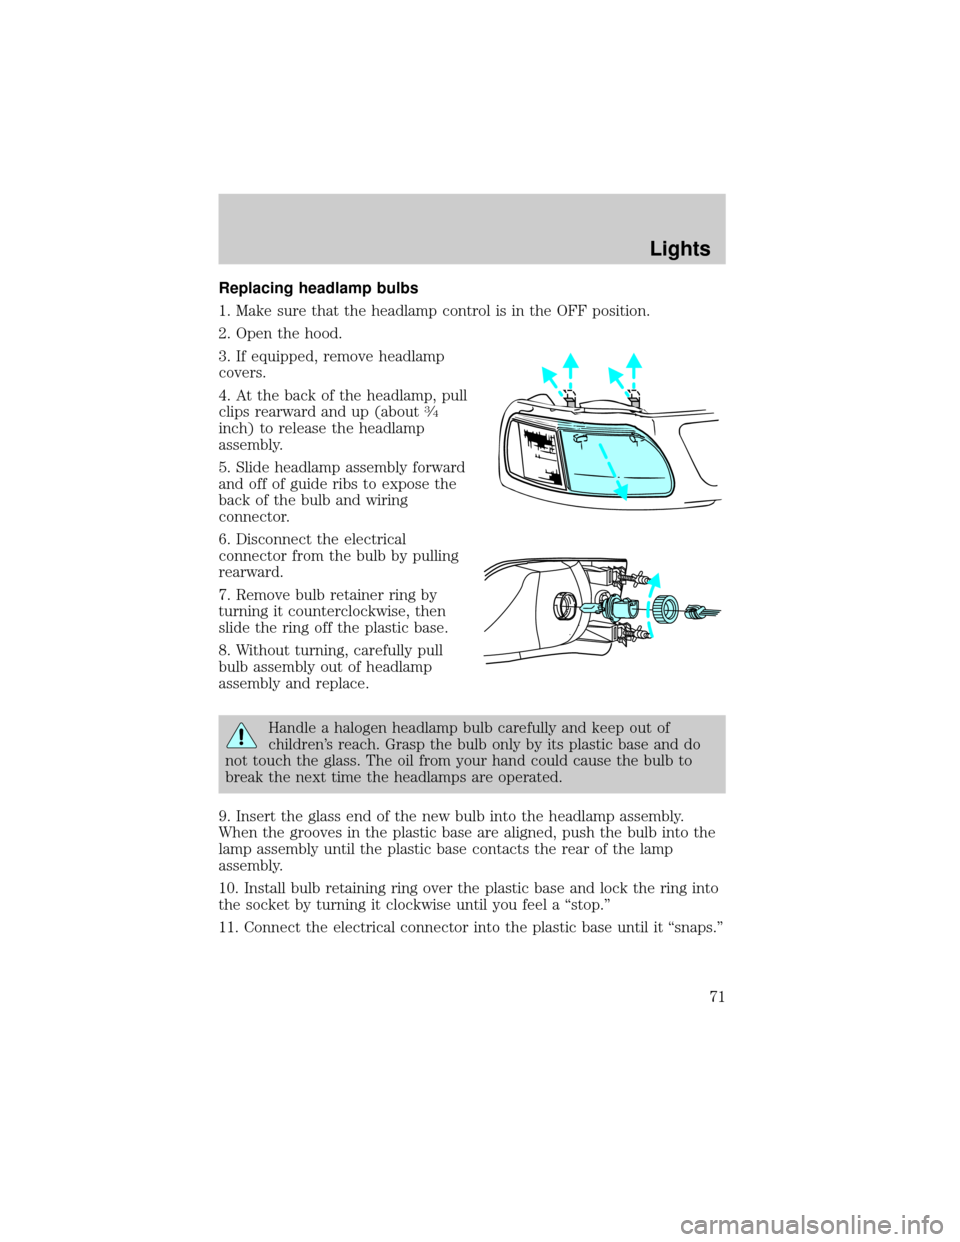
Replacing headlamp bulbs
1. Make sure that the headlamp control is in the OFF position.
2. Open the hood.
3. If equipped, remove headlamp
covers.
4. At the back of the headlamp, pull
clips rearward and up (about
3¤4
inch) to release the headlamp
assembly.
5. Slide headlamp assembly forward
and off of guide ribs to expose the
back of the bulb and wiring
connector.
6. Disconnect the electrical
connector from the bulb by pulling
rearward.
7. Remove bulb retainer ring by
turning it counterclockwise, then
slide the ring off the plastic base.
8. Without turning, carefully pull
bulb assembly out of headlamp
assembly and replace.
Handle a halogen headlamp bulb carefully and keep out of
children's reach. Grasp the bulb only by its plastic base and do
not touch the glass. The oil from your hand could cause the bulb to
break the next time the headlamps are operated.
9. Insert the glass end of the new bulb into the headlamp assembly.
When the grooves in the plastic base are aligned, push the bulb into the
lamp assembly until the plastic base contacts the rear of the lamp
assembly.
10. Install bulb retaining ring over the plastic base and lock the ring into
the socket by turning it clockwise until you feel a ªstop.º
11. Connect the electrical connector into the plastic base until it ªsnaps.º
Lights
71
Page 207 of 320
Installing the snowplow
Removing the blocker beam without installing snowplow
attachment hardware may affect air bag deployment in a crash.
Do not operate the truck unless either the blocker beam or snowplow
attachment hardware is installed on the vehicle.
Read the following instructions before installing a snowplow:
²Front GAWR must not exceed 63% of the GVW. Add ballast weight to
the back of the vehicle, if necessary. Refer to the Safety Compliance
Certification Label to find Front GAWR.
²The Front Axle Accessory Reserve Capacity and the Total Accessory
Reserve Capacity listed on the bottom right of the Safety Compliance
Certification Label will determine whether or not the addition of a
snowplow will overload your vehicle.
²The weight of the snowplow and supporting components distributed to
the front axle must not exceed the front accessory reserve capacity.
²The total weight of the snowplow and aftermarket equipment must
not exceed the Total Accessory Reserve Capacity.
²The weight of the installed snowplow and aftermarket equipment must
not load the vehicle beyond the GAWR (front/rear) and GVWR listed
on the Safety Compliance Certification Label.
²The total weight of the snowplow and aftermarket equipment must be
considered part of the payload and must not exceed the Gross
Combined Weight Rating (GCWR) for towing.
²Federal and most local regulations require additional exterior lamps
for snowplow-equipped vehicles. Consult your dealer for additional
information.
²After installing a snowplow to the vehicle, ensure the vehicle's front
toe alignment and front ride height are within specification (reset if
required). These specifications are located in the vehicle's Workshop
Manual. Adherence to the toe, tire pressures and ride height
specification is important for proper tire wear, ride, handling and
headlight aim. Also, maintain the engine oil and transmission fluid
change intervals following the severe duty schedule.
Do not exceed the GVWR or the GAWR specified on the
certification label.
Driving
207
Page 216 of 320
Fuse/Relay
LocationFuse Amp
RatingPassenger Compartment Fuse
Panel Description
21 15A Digital Transmission Range (DTR)
Sensor, Clutch Switch, Starter
Relay, I/P fuse 20
22 10A Air Bag Module, Passenger Airbag
Deactivation Module
23 10A Trailer Tow Battery Charge Relay,
Turn/Hazard Flasher, 4x4
Solenoids, 4x4 Relays, Overhead
Console, 4 Wheel Anti-Lock Brake
System (4WABS) Module, EC
Mirror, Heated Seats
24 10A Function Selector Switch
Assembly
25 Ð Not Used
26 10A Right Side Low Beam Headlamp
27 5A Foglamp Relay and Foglamp
Indicator, Main Light Switch
(upstream)
28 10A Left Side Low Beam Headlamp
29 5A Autolamp Module, Transmission
Overdrive Control Switch, Central
Security Module,Belt Minder
30 30A Passive Anti Theft Transceiver,
Cluster, Ignition Coils, Powertrain
Control Module Relay, Coil on
Plugs, Radio Noise Capacitor, ECC
Diode
31 Ð Not Used
Relay 1 Ð Interior Lamp Relay
Relay 2 Ð Battery Saver Relay
Relay 3 Ð Not Used
Relay 4 Ð One Touch Down Window Relay
Relay 5 Ð ACC Delay Relay
Roadside Emergencies
216
Page 244 of 320

REPAIRING PAINT CHIPS
Remove particles such as bird droppings, tree sap, insect deposits, tar
spots, road salt and industrial fallout before repairing paint chips.
Minor scratches or paint damage from road debris may be repaired using
the Ultra Touch Prep and Finishing Kit (F7AZ-19K507±BA), which is
available at your authorized Ford, Lincoln or Mercury dealer. This kit
contains:
²Lacquer Touch-Up Paint (ALBZ-19500±XXXXA)
²Exterior Acrylic Spray Lacquer (ALAZ-19500±XXXXA)
Please note that the part numbers (shown as XXXX above) will vary with
your vehicle's specific coloring.Carefully observe the application
instructions on the products.
CLEANING THE WHEEL RIMS AND COVERS
Aluminum wheel rims or covers are coated with a clearcoat paint
finish.
Some automatic car washes may cause damage to the finish on your
wheel rims or covers. Chemical-strength cleaners, or cleaning chemicals,
in combination with brush agitation to remove brake dust and dirt, could
wear away the clearcoat finish over time.
Do not use hydrofluoric acid-based or high caustic-based wheel
cleaners, steel wool, fuels or strong household detergents for
soiled wheel rims and covers.
Never apply any cleaning chemical to hot or warm wheel rims or covers.
Clean wheel rims and covers with Detail Wash (ZC-3±A), which is
available from your authorized Ford, Lincoln or Mercury dealer. Spray
cleaner on cool wheel rims or covers and allow to set for 2±5 minutes.
Agitate the area with a sponge and rinse off with plenty of water.
Use Extra Strength Tar and Road Oil Removal (B7A-19520±AA),
available from your authorized Ford, Lincoln or Mercury dealer, in order
to remove tar and grease from wheel rims and covers.
CLEANING THE ENGINE
Engines are more efficient when they are clean because grease and dirt
buildup keep the engine warmer than normal. When washing:
²The engine must be cool to the touch before spraying with water.
Cleaning
244
Page 246 of 320
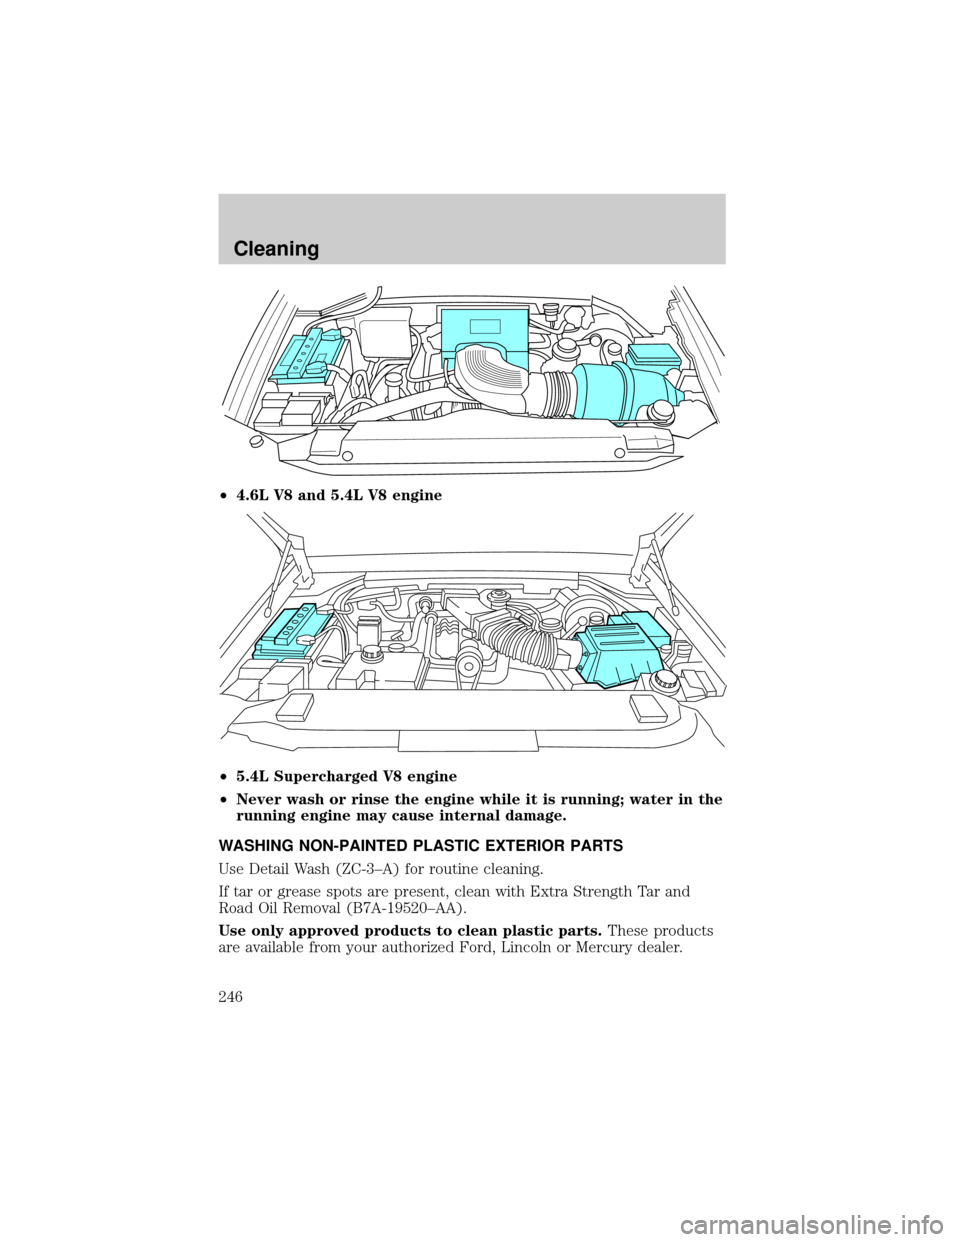
²4.6L V8 and 5.4L V8 engine
²5.4L Supercharged V8 engine
²Never wash or rinse the engine while it is running; water in the
running engine may cause internal damage.
WASHING NON-PAINTED PLASTIC EXTERIOR PARTS
Use Detail Wash (ZC-3±A) for routine cleaning.
If tar or grease spots are present, clean with Extra Strength Tar and
Road Oil Removal (B7A-19520±AA).
Use only approved products to clean plastic parts.These products
are available from your authorized Ford, Lincoln or Mercury dealer.
Cleaning
246
Page 247 of 320

WASHING THE EXTERIOR LAMPS
In order to avoid scratching the plastic lamps, do not use dry
paper towels, non-approved chemical solvents or abrasive
cleaners.
Use a soft cloth and a solution of Triple Clean (EOAZ-19526±AA), mixed
properly with water, in order to remove bug residue. If tar or grease
spots are present, clean with Extra Strength Tar and Road Oil Removal
(B7A-19520±AA).
WASHING MIRRORS, MIRROR HOUSINGS AND REFLECTIVE
SURFACES
Do not clean mirrors, mirror housings or reflective surfaces with
abrasive materials or a dry cloth.
Use a soft cloth and Detail Wash (ZC-3±A) mixed with water in order to
clean the mirror housing. Use Glass Cleaner (E4AZ-19C507±AA) in order
to clean the reflective mirror surface.
Use care when removing ice from outside mirrors as you may damage
the reflective surface.
CLEANING THE WINDSHIELD, WIPER BLADES AND REAR
WINDOW
If the wiper does not wipe properly, substances on the windshield, rear
window or the wiper blades may be the cause. These may include hot
wax treatments used by commercial car washes, tree sap, or other
organic contamination.
Do not clean the windshield or rear window glass with abrasives,
as they may cause scratches.
Do not use fuel, kerosene, or paint thinner to clean the windshield,
rear window or the wiper blades as damage may occur.
Clean the outside of the windshield or rear window with a non-abrasive
cleaner such as Ultra Clear Spray Glass Cleaner (E4AZ-19C507±AA),
available from your authorized Ford, Lincoln or Mercury dealer. If after
cleaning the glass surface, the water sheets from the glass (e.g., does not
bead), then the window is clean.
The windshield, rear window and wiper blades should be cleaned
regularly. Wiper blades can be cleaned with isopropyl (rubbing) alcohol
or windshield washer solution. Be sure to replace wiper blades when
they appear worn or do not function properly.
Cleaning
247