brake light FORD F150 2004 11.G Owners Manual
[x] Cancel search | Manufacturer: FORD, Model Year: 2004, Model line: F150, Model: FORD F150 2004 11.GPages: 280, PDF Size: 4.13 MB
Page 8 of 280
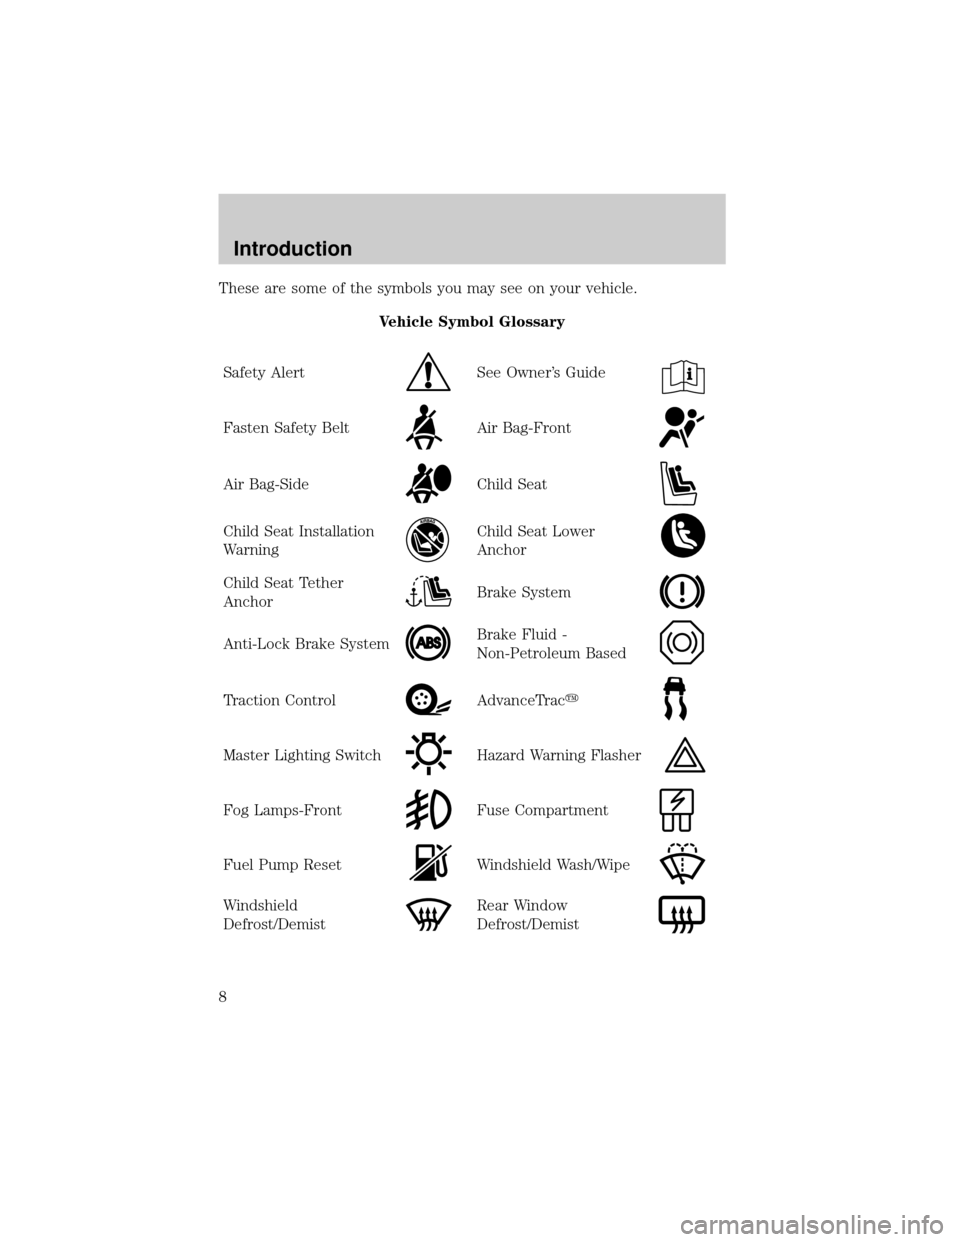
These are some of the symbols you may see on your vehicle.
Vehicle Symbol Glossary
Safety Alert
See Owner's Guide
Fasten Safety BeltAir Bag-Front
Air Bag-SideChild Seat
Child Seat Installation
WarningChild Seat Lower
Anchor
Child Seat Tether
AnchorBrake System
Anti-Lock Brake SystemBrake Fluid -
Non-Petroleum Based
Traction ControlAdvanceTracy
Master Lighting SwitchHazard Warning Flasher
Fog Lamps-FrontFuse Compartment
Fuel Pump ResetWindshield Wash/Wipe
Windshield
Defrost/DemistRear Window
Defrost/Demist
Introduction
8
Page 12 of 280
On vehicles equipped with a message center, ªENGINE FAILSAFE
MODEº will be displayed, refer toMessage Centerin theDriver
Controlschapter.
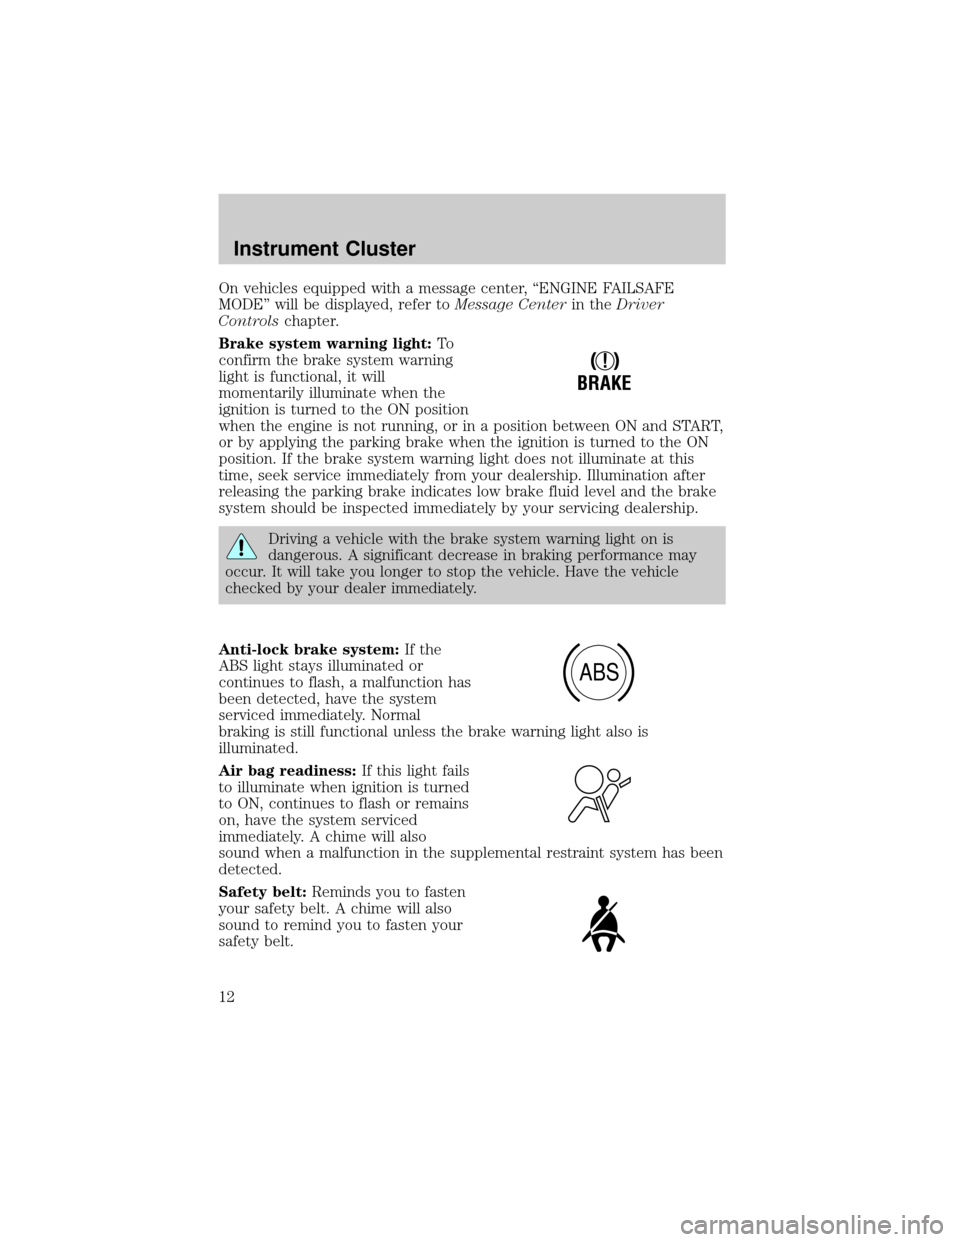
Brake system warning light:To
confirm the brake system warning
light is functional, it will
momentarily illuminate when the
ignition is turned to the ON position
when the engine is not running, or in a position between ON and START,
or by applying the parking brake when the ignition is turned to the ON
position. If the brake system warning light does not illuminate at this
time, seek service immediately from your dealership. Illumination after
releasing the parking brake indicates low brake fluid level and the brake
system should be inspected immediately by your servicing dealership.
Driving a vehicle with the brake system warning light on is
dangerous. A significant decrease in braking performance may
occur. It will take you longer to stop the vehicle. Have the vehicle
checked by your dealer immediately.
Anti-lock brake system:If the
ABS light stays illuminated or
continues to flash, a malfunction has
been detected, have the system
serviced immediately. Normal
braking is still functional unless the brake warning light also is
illuminated.
Air bag readiness:If this light fails
to illuminate when ignition is turned
to ON, continues to flash or remains
on, have the system serviced
immediately. A chime will also
sound when a malfunction in the supplemental restraint system has been
detected.
Safety belt:Reminds you to fasten
your safety belt. A chime will also
sound to remind you to fasten your
safety belt.
!
BRAKE
ABS
Instrument Cluster
12
Page 47 of 280
BULBS
Replacing exterior bulbs
Check the operation of all the bulbs frequently.
Using the right bulbs
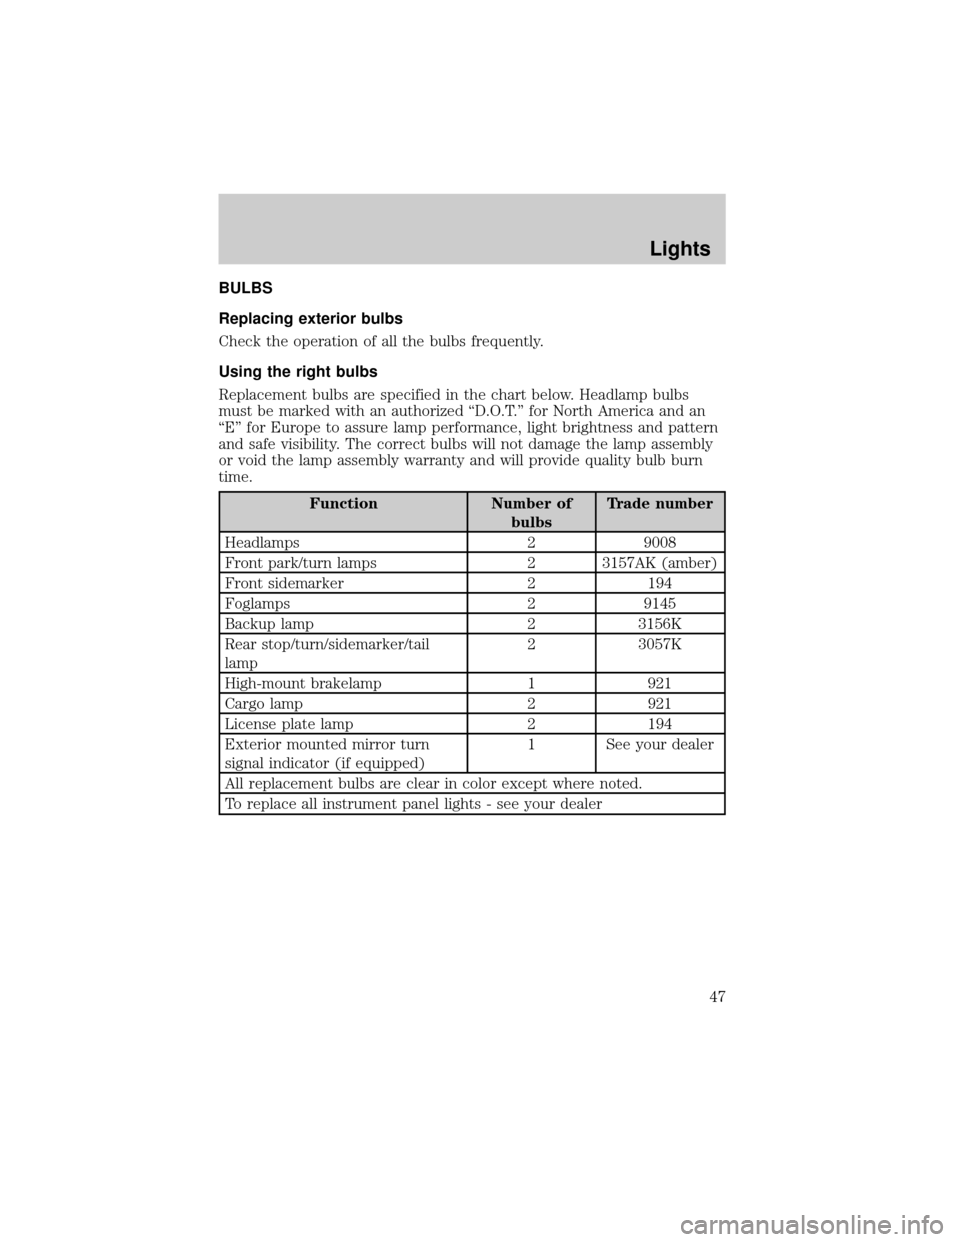
Replacement bulbs are specified in the chart below. Headlamp bulbs
must be marked with an authorized ªD.O.T.º for North America and an
ªEº for Europe to assure lamp performance, light brightness and pattern
and safe visibility. The correct bulbs will not damage the lamp assembly
or void the lamp assembly warranty and will provide quality bulb burn
time.
Function Number of
bulbsTrade number
Headlamps 2 9008
Front park/turn lamps 2 3157AK (amber)
Front sidemarker 2 194
Foglamps 2 9145
Backup lamp 2 3156K
Rear stop/turn/sidemarker/tail
lamp2 3057K
High-mount brakelamp 1 921
Cargo lamp 2 921
License plate lamp 2 194
Exterior mounted mirror turn
signal indicator (if equipped)1 See your dealer
All replacement bulbs are clear in color except where noted.
To replace all instrument panel lights - see your dealer
Lights
47
Page 49 of 280
Replacing front parking lamp/turn signal/sidemarker bulbs
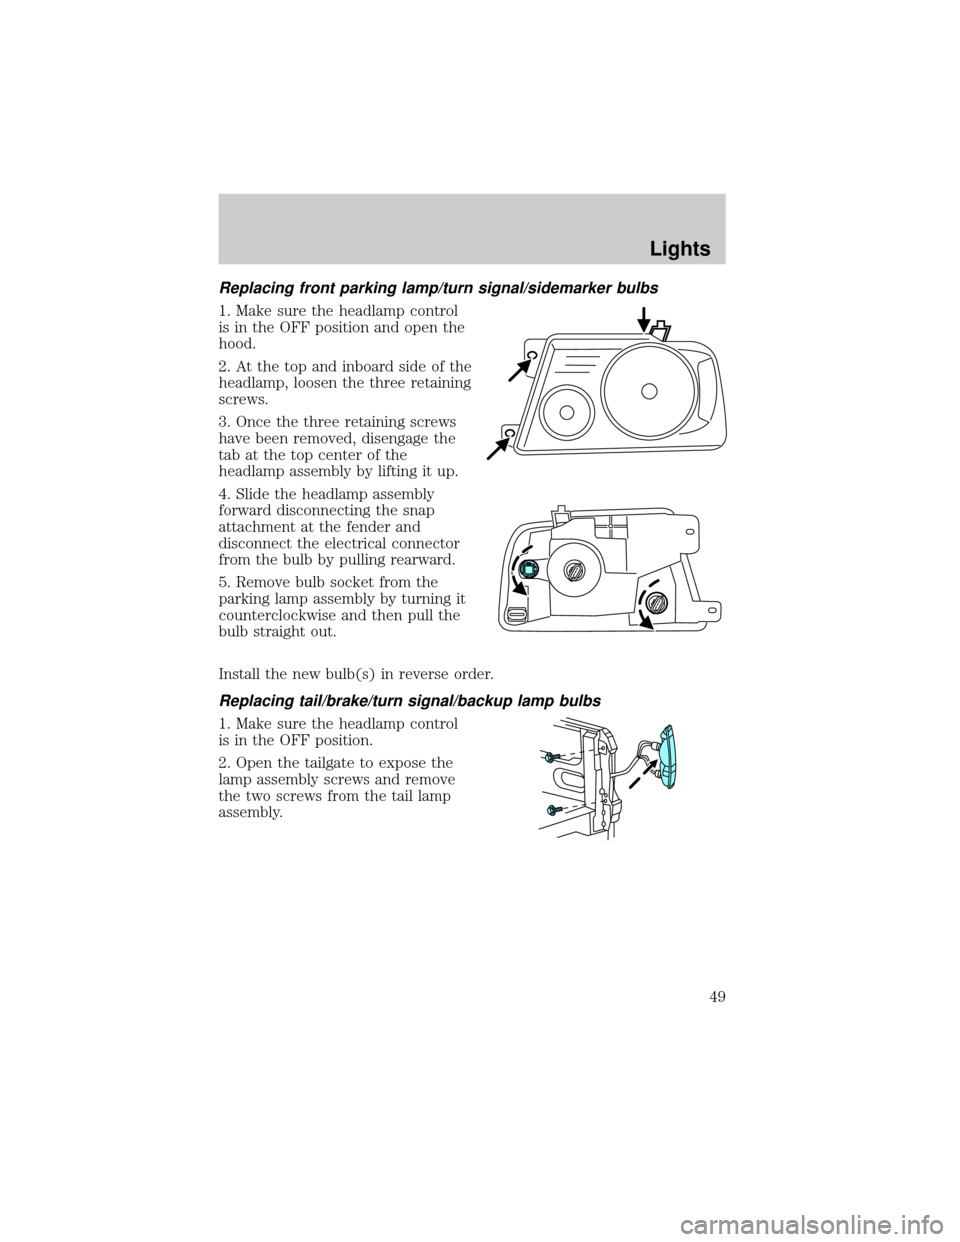
1. Make sure the headlamp control
is in the OFF position and open the
hood.
2. At the top and inboard side of the
headlamp, loosen the three retaining
screws.
3. Once the three retaining screws
have been removed, disengage the
tab at the top center of the
headlamp assembly by lifting it up.
4. Slide the headlamp assembly
forward disconnecting the snap
attachment at the fender and
disconnect the electrical connector
from the bulb by pulling rearward.
5. Remove bulb socket from the
parking lamp assembly by turning it
counterclockwise and then pull the
bulb straight out.
Install the new bulb(s) in reverse order.
Replacing tail/brake/turn signal/backup lamp bulbs
1. Make sure the headlamp control
is in the OFF position.
2. Open the tailgate to expose the
lamp assembly screws and remove
the two screws from the tail lamp
assembly.
Lights
49
Page 50 of 280
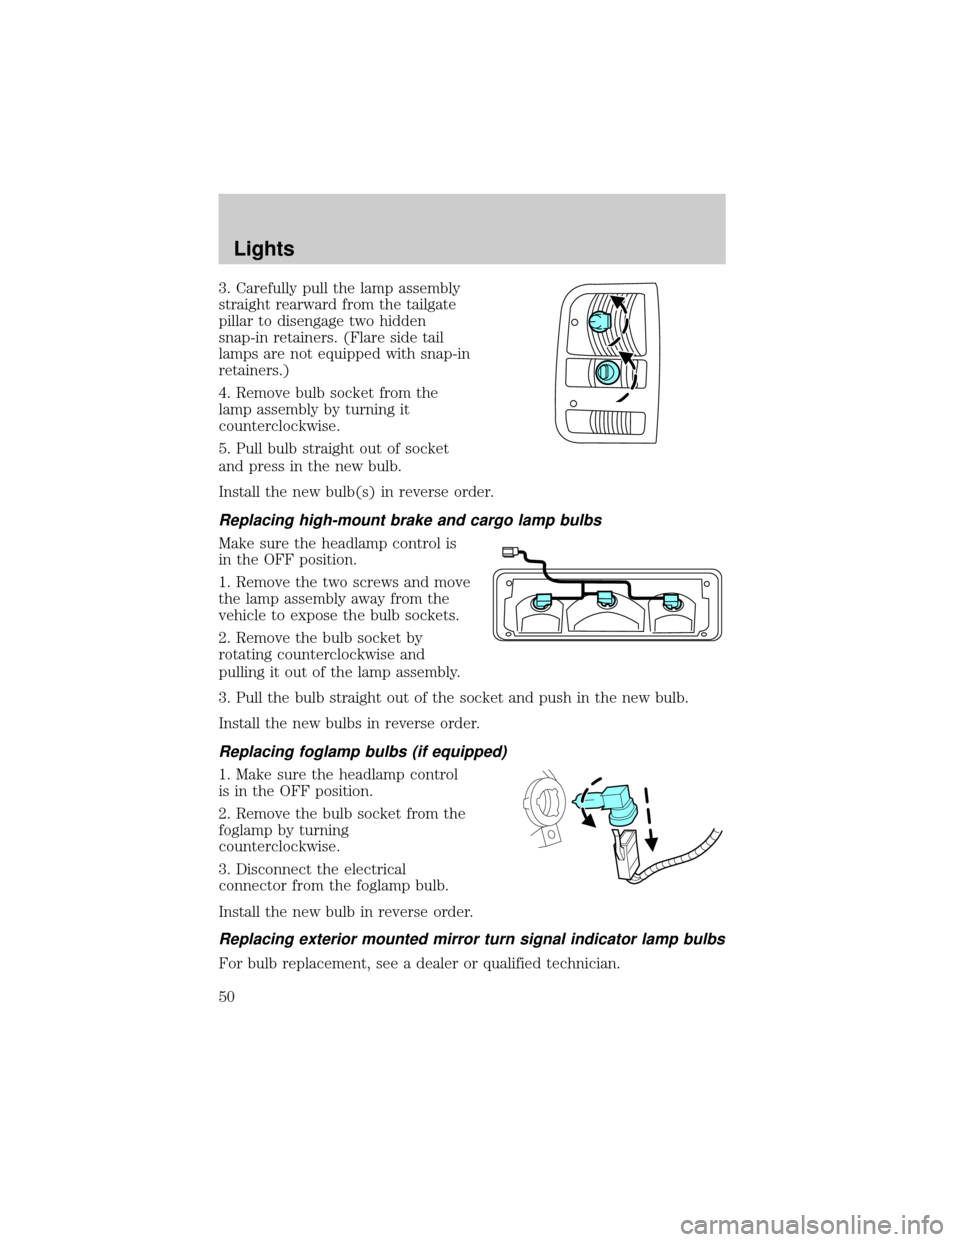
3. Carefully pull the lamp assembly
straight rearward from the tailgate
pillar to disengage two hidden
snap-in retainers. (Flare side tail
lamps are not equipped with snap-in
retainers.)
4. Remove bulb socket from the
lamp assembly by turning it
counterclockwise.
5. Pull bulb straight out of socket
and press in the new bulb.
Install the new bulb(s) in reverse order.
Replacing high-mount brake and cargo lamp bulbs
Make sure the headlamp control is
in the OFF position.
1. Remove the two screws and move
the lamp assembly away from the
vehicle to expose the bulb sockets.
2. Remove the bulb socket by
rotating counterclockwise and
pulling it out of the lamp assembly.
3. Pull the bulb straight out of the socket and push in the new bulb.
Install the new bulbs in reverse order.
Replacing foglamp bulbs (if equipped)
1. Make sure the headlamp control
is in the OFF position.
2. Remove the bulb socket from the
foglamp by turning
counterclockwise.
3. Disconnect the electrical
connector from the foglamp bulb.
Install the new bulb in reverse order.
Replacing exterior mounted mirror turn signal indicator lamp bulbs
For bulb replacement, see a dealer or qualified technician.
Lights
50
Page 62 of 280
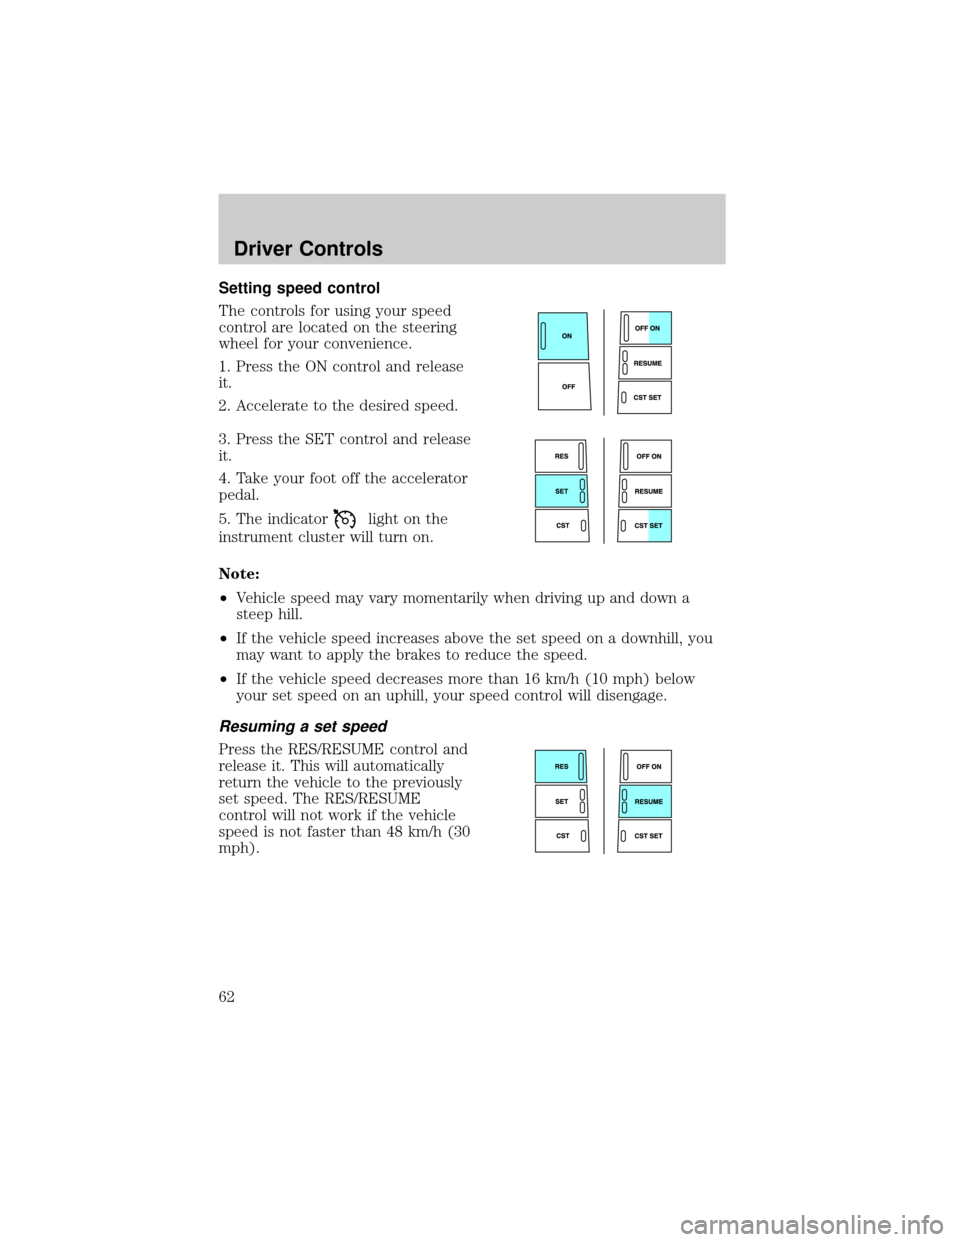
Setting speed control
The controls for using your speed
control are located on the steering
wheel for your convenience.
1. Press the ON control and release
it.
2. Accelerate to the desired speed.
3. Press the SET control and release
it.
4. Take your foot off the accelerator
pedal.
5. The indicator
light on the
instrument cluster will turn on.
Note:
²Vehicle speed may vary momentarily when driving up and down a
steep hill.
²If the vehicle speed increases above the set speed on a downhill, you
may want to apply the brakes to reduce the speed.
²If the vehicle speed decreases more than 16 km/h (10 mph) below
your set speed on an uphill, your speed control will disengage.
Resuming a set speed
Press the RES/RESUME control and
release it. This will automatically
return the vehicle to the previously
set speed. The RES/RESUME
control will not work if the vehicle
speed is not faster than 48 km/h (30
mph).
Driver Controls
62
Page 116 of 280
Deactivating/activating the driver/passenger BeltMinder feature
The driver and front passenger BeltMinder are
deactivated/activated independently. When deactivating/activating
one seating position, do not buckle the other position as this will
terminate the process.
Read steps1-4thoroughly before proceeding with the
deactivation/activation programming procedure.
The driver and front passenger BeltMinder features can be
deactivated/activated by performing the following procedure:
Before following the procedure, make sure that:
²The parking brake is set
²The gearshift is in P (Park) (automatic transmission)
²The ignition switch is in the OFF position
²The driver and front passenger safety belts are unbuckled
To reduce the risk of injury, do not deactivate/activate the Belt
Minder feature while driving the vehicle.
1. Turn the ignition switch to the RUN (or ON) position. (DO NOT
START THE ENGINE)
2. Wait until the safety belt warning light turns off. (Approximately 1
minute)
²Step 3 must be completed within 50 seconds after the safety belt
warning light turns off.
3. For the seating position being disabled, buckle then unbuckle the
safety belt 9 times, ending in the unbuckled state. (Step 3 must be
completed within 50 seconds after the safety belt warning light turns
off.)
²After step 3, the restraint system warning light (airbag light) will be
turned on for three seconds.
4. Within 10 seconds of the light turning on, buckle then unbuckle the
safety belt.
²This will disable the BeltMinder feature for that seating position if it is
currently enabled. As confirmation, the restraint system warning light
will flash 4 times per second for 3 seconds.
²This will enable the BeltMinder feature for that seating position if it is
currently disabled. As confirmation, the restraint system warning light
Seating and Safety Restraints
116
Page 149 of 280

BRAKES
Occasional brake noise is normal. If a metal-to-metal, continuous grinding
or continuous squeal sound is present, the brake linings may be worn-out
and should be inspected by a qualified service technician. If the vehicle
has continuous vibration or shudder in the steering wheel while braking,
the vehicle should be inspected by a qualified service technician.
Four-wheel anti-lock brake system (ABS)
Your vehicle is equipped with an Anti-lock Braking System (ABS). This
system helps you maintain steering control during emergency stops by
keeping the brakes from locking. Noise from the ABS pump motor and
brake pedal pulsation may be observed during ABS braking; this is
normal and should be no reason for concern.
Using ABS
When hard braking is required, apply continuous force on the brake
pedal; do not pump the brake pedal since this will reduce the
effectiveness of the ABS and will increase your vehicle's stopping
distance. The ABS will be activated immediately, allowing you to retain
full steering control during hard braking and on slippery surfaces.
However, the ABS does not decrease stopping distance.
ABS warning lampABS
TheABSlamp in the instrument cluster momentarily illuminates when
the ignition is turned to ON. If the light does not illuminate during start
up, remains on or flashes, the ABS may be disabled and may need to be
serviced.
Even when the ABS is disabled,
normal braking is still effective. (If
your BRAKE warning lamp
illuminates with the parking brake
released, have your brake system
serviced immediately.)
!
BRAKE
Driving
149
Page 154 of 280
Always set the parking brake fully and make sure the gearshift is
latched in P (Park). Turn the ignition to the LOCK position and
remove the key whenever you leave your vehicle.
If the parking brake is fully released, but the brake warning lamp
remains illuminated, the brakes may not be working properly.
See your dealer or a qualified service technician.
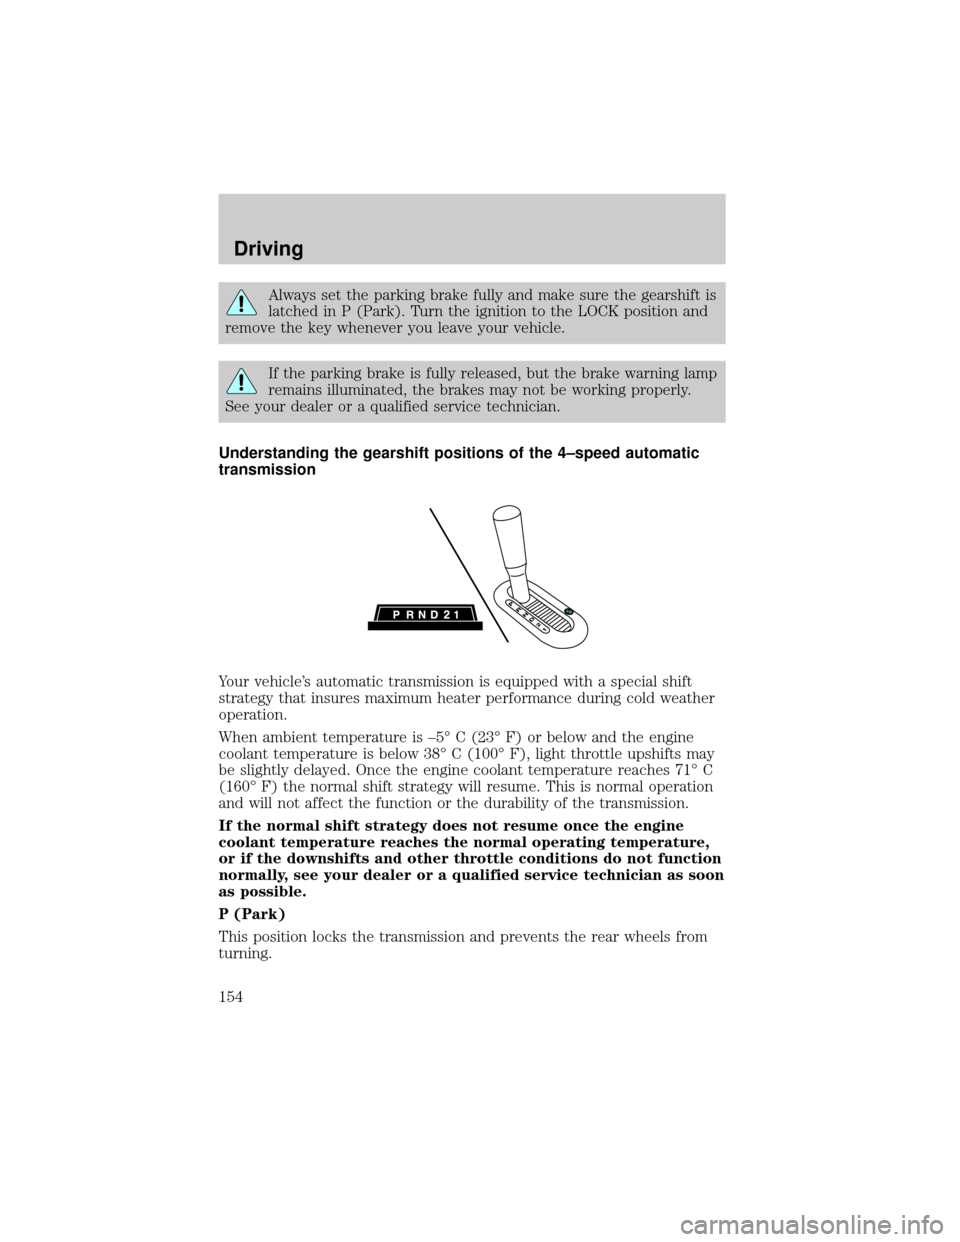
Understanding the gearshift positions of the 4±speed automatic
transmission
Your vehicle's automatic transmission is equipped with a special shift
strategy that insures maximum heater performance during cold weather
operation.
When ambient temperature is ±5É C (23É F) or below and the engine
coolant temperature is below 38É C (100É F), light throttle upshifts may
be slightly delayed. Once the engine coolant temperature reaches 71É C
(160É F) the normal shift strategy will resume. This is normal operation
and will not affect the function or the durability of the transmission.
If the normal shift strategy does not resume once the engine
coolant temperature reaches the normal operating temperature,
or if the downshifts and other throttle conditions do not function
normally, see your dealer or a qualified service technician as soon
as possible.
P (Park)
This position locks the transmission and prevents the rear wheels from
turning.
Driving
154
Page 162 of 280

Shifting between 2H (2WD High) and 4H (4WD High)
²Move the 4WD control between 2H and 4H at any forward speed up to
88 km/h (55 mph).
Note:Do not perform this operation at speeds above 72 km/h (45 mph)
if the outside temperature is below 0ÉC (32ÉF).
Note:Do not perform this operation if the rear wheels are slipping.
Note:Some noise may be heard as the system shifts or engages; this is
normal.
Shifting to/from 4L (4WD Low)
1. Bring the vehicle to a complete stop
2. Depress the brake
3. On vehicles equipped with an automatic transmission, place the
transmission in N (Neutral); on vehicles equipped with a manual
transmission, depress the clutch.
4. Move the 4WD control to the desired position.
²If shifting into 4L (4WD Low), wait for the 4X4 LOW light in the
instrument cluster to turnonindicating the shift is complete.
²If shifting out of 4L (4WD Low), wait for the 4X4 LOW light in the
instrument cluster turn turnoffindicating the shift is complete.
Note:Some noise may be heard as the system shifts or engages; this is
normal.
Driving off-road with truck and utility vehicles
4WD vehicles are specially equipped for driving on sand, snow, mud and
rough terrain and have operating characteristics that are somewhat
different from conventional vehicles, both on and off the road.
How your vehicle differs from other vehicles
Truck and utility vehicles can differ from some other vehicles. Your
vehicle may be higher to allow it to travel over rough terrain without
getting hung up or damaging underbody components.
The differences that make your vehicle so versatile also make it handle
differently than an ordinary passenger car.
Maintain steering wheel control at all times, especially in rough terrain.
Since sudden changes in terrain can result in abrupt steering wheel
motion, make sure you grip the steering wheel from the outside. Do not
grip the spokes.
Driving
162