cooling FORD F150 2004 11.G Owners Manual
[x] Cancel search | Manufacturer: FORD, Model Year: 2004, Model line: F150, Model: FORD F150 2004 11.GPages: 280, PDF Size: 4.13 MB
Page 34 of 280
4.Recirculated air: Used to manually enable or disable
recirculated air operation. When activated, recirculates air in the cabin
thereby reducing the amount of time to cool down or warn up the
interior of the vehicle. May also help reduce undesired odors from
reaching the interior of the vehicle. Engages automatically with MAX A/C
or can be engaged manually in any mode except Defrost. Recirculation
may turn off automatically in all airflow selections except MAX A/C.
5.A/C (if equipped):Press to activate/deactivate air conditioning. Use
with recirculated air to improve cooling performance. Engages
automatically in MAX A/C, Defrost and Floor/Defrost.
6.Fan speed adjustment:Controls the volume of air circulated in the
vehicle.
OPERATING TIPS
²To reduce fog build up on the windshield during humid weather, place
the air flow selector in the
position.
²Do not put objects under the front seats that will interfere with the
airflow to the back seats.
²To reduce humidity build-up inside the vehicle, do not drive in
recirculated air mode without the A/C running.
²Remove any snow, ice or leaves from the air intake area at the base of
the windshield.
To aid in side window defogging/demisting in cold weather:
1. Select
2. Select A/C
3. Adjust the temperature control to maintain comfort.
4. Set the fan speed to the highest setting.
5. Direct the outer instrument panel vents towards the side windows
To increase airflow to the outer instrument panel vents, close the vents
located in the middle of the instrument panel.
Do not place objects on top of the instrument panel as these
objects may become projectiles in a collision or sudden stop.
Climate Controls
34
Page 36 of 280
MAX A/C:For maximum cooling performance, press, A/C,,
and set the temperature to 60ÉF and the highest blower setting.
1.
Defrost: Distributes outside air through the windshield defroster
ducts and the demister outlets. Can be used to clear ice or fog from the
windshield. The system will automatically provide outside air to reduce
window fogging.
2.
Fan speed control:Press to increase () or decrease () the
fan speed.
3. A.
RRear defrost:Press to defrost the rear window. Refer to
Rear Window Defrostfor more information. If vehicle is equipped with
both Rear Defrost and Heated Mirrors, the same control will activate
both.
3. B.
Heated mirrors (if equipped):Press to activate/deactivate.
This feature will remove ice and snow from the side view mirrors.
4.
Recirculation control:Press to activate/deactivate air
recirculation in the cabin. Recirculated air may reduce the amount of
time to cool down the interior of the vehicle and may also help reduce
undesired odors from reaching the interior of the vehicle. Recirculation
can be engaged manually in any other airflow selection except Defrost.
Recirculation may turn off automatically in all airflow selections.
5.A/C control:Press to activate/deactivate air conditioning. Use with
recirculated air to improve cooling performance. Engages automatically
in AUTO, Defrost and Floor/Defrost.
6.
:Distributes air through the windshield defroster ducts, demister
outlets, and the front and rear seat floor ducts. The system will
automatically provide outside air to reduce window fogging.
7.
:Distributes air through the floor and rear seat floor ducts. The
system will automatically provide outside air to reduce window fogging.
8.
:Distributes air through the instrument panel, center console
registers (if equipped), and the front and rear seat floor ducts.
9.
:Distributes air through the instrument panel and center console
registers (if equipped).
10.Manual override controls:Allows you to manually select where
airflow is directed. To return to full automatic control, press AUTO.
11.OFF:Outside air is shut out and the fan will not operate.
12.Temperature control:Controls the temperature in the cabin of the
vehicle. Press to increase/decrease the temperature.
Climate Controls
36
Page 38 of 280
If your vehicle is equipped with a mini message center, refer toMini
message center electronic compass temperature displayin the Driver
Controls Chapter.
MAX A/C:For maximum cooling performance, press
, A/C,,
and set the temperature to 60ÉF and the highest blower setting.
1.
Defrost: Distributes outside air through the windshield defroster
ducts and the demister outlets. Can be used to clear ice or fog from the
windshield. The system will automatically provide outside air to reduce
window fogging.
2.
Fan speed control:Press to increase () or decrease () the
fan speed.
3. A.
RRear defrost:Press to defrost the rear window. Refer to
Rear Window Defrostfor more information. If your vehicle is equipped
with both Rear Defrost and Heated Mirrors, the same button will activate
both.
3. B.
Heated mirrors (if equipped):Press to activate/deactivate.
This feature will remove ice and snow from the side view mirrors.
4.
Passenger heated seat control:Press to heat the passenger
seat. Press once to activate high heat (two indicator lights). Press again
to activate low heat (one indicator light). Press again to deactivate the
passenger heated seat.
5.
:Distributes air through the windshield defroster ducts, demister
outlets, and the front and rear seat floor ducts. The system will
automatically provide outside air to reduce window fogging.
6.
:Distributes air through the floor and rear seat floor ducts. The
system will automatically provide outside air to reduce window fogging.
7.
:Distributes air through the instrument panel, center console
registers (if equipped), and the front and rear seat floor ducts.
8.
:Distributes air through the instrument panel and center console
registers (if equipped).
9.
Driver heated seat control:Press to heat the driver seat. Press
once to activate high heat (two indicator lights). Press again to activate
low heat (one indicator light). Press again to deactivate the driver
heated seat.
10.Manual override controls:Allows you to manually select where
airflow is directed. To return to full automatic control, press AUTO.
Climate Controls
38
Page 39 of 280
11.Recirculation control:Press to activate/deactivate air
recirculation in the cabin. Recirculated air may reduce the amount of
time to cool down the interior of the vehicle and may also help reduce
undesired odors from reaching the interior of the vehicle. Recirculation
can be engaged manually in any other airflow selection except Defrost.
Recirculation may turn off automatically in all airflow selections.
12.A/C control:Press to activate/deactivate air conditioning. Use with
recirculated air to improve cooling performance. Engages automatically
in AUTO, Defrost and Floor/Defrost.
13.OFF:Outside air is shut out and the fan will not operate.
14.Temperature control:Press to increase/decrease the temperature
in the vehicle cabin.
15.Auto:Press to engage automatic temperature control. Select the
desired temperature using the temperature control. The system will
automatically determine fan speed, airflow location, A/C on or off, and
outside or recirculated air, to heat or cool the vehicle to reach the
desired temperature.
OPERATING TIPS
²To reduce fog build up on the windshield during humid weather, place
the air flow selector in the
position.
²Do not put objects under the front seats that will interfere with the
airflow to the back seats.
²To reduce humidity build-up inside the vehicle, do not drive in
recirculated air mode without the A/C running.
²Remove any snow, ice or leaves from the air intake area at the base of
the windshield.
To aid in side window defogging/demisting in cold weather:
1. Select
2. Select A/C
3. Adjust the temperature control to maintain comfort.
4. Set the fan speed to the highest setting.
5. Direct the outer instrument panel vents towards the side windows
To increase airflow to the outer instrument panel vents, close the vents
located in the middle of the instrument panel.
Climate Controls
39
Page 181 of 280

If it is necessary to relocate the trailer hitch ball position, a
frame-mounted trailer hitch must be installed.
Driving while you tow
When towing a trailer:
²Turn off the speed control. The speed control may shut off
automatically when you are towing on long, steep grades.
²Consult your local motor vehicle speed regulations for towing a trailer.
²To eliminate excessive shifting, use a lower gear. This will also assist
in transmission cooling. (For additional information, refer to the
Understanding the positions of the 4±speed automatic
transmissionsection in this chapter.
²Anticipate stops and brake gradually.
²Do not exceed the GCWR rating or transmission damage may occur.
Servicing after towing
If you tow a trailer for long distances, your vehicle will require more
frequent service intervals. Refer to your scheduled maintenance guide for
more information.
Trailer towing tips
²Practice turning, stopping and backing up before starting on a trip to
get the feel of the vehicle trailer combination. When turning, make
wider turns so the trailer wheels will clear curbs and other obstacles.
²Allow more distance for stopping with a trailer attached.
²The trailer tongue weight should be 10±15% of the loaded trailer
weight.
²After you have traveled 80 km (50 miles), thoroughly check your
hitch, electrical connections and trailer wheel lug nuts.
²To aid in engine/transmission cooling and A/C efficiency during hot
weather while stopped in traffic, place the gearshift lever in P (Park)
(automatic transmission) or N (Neutral) (manual transmissions).
²Vehicles with trailers should not be parked on a grade. If you must
park on a grade, place wheel chocks under the trailer's wheels.
Launching or retrieving a boat
Disconnect the wiring to the trailer before backing the trailer
into the water. Reconnect the wiring to the trailer after the
trailer is removed from the water.
Driving
181
Page 202 of 280
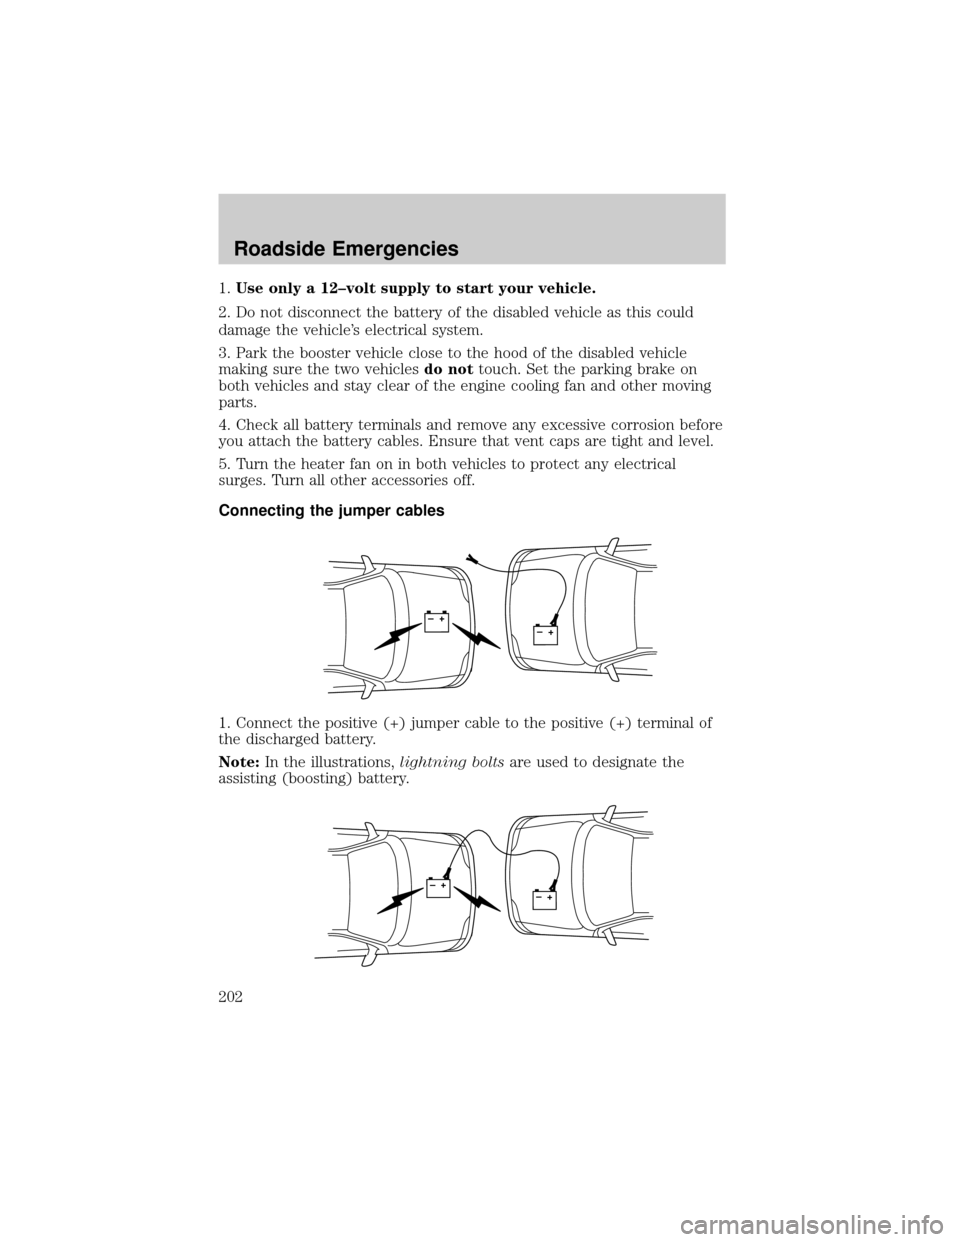
1.Use only a 12±volt supply to start your vehicle.
2. Do not disconnect the battery of the disabled vehicle as this could
damage the vehicle's electrical system.
3. Park the booster vehicle close to the hood of the disabled vehicle
making sure the two vehiclesdo nottouch. Set the parking brake on
both vehicles and stay clear of the engine cooling fan and other moving
parts.
4. Check all battery terminals and remove any excessive corrosion before
you attach the battery cables. Ensure that vent caps are tight and level.
5. Turn the heater fan on in both vehicles to protect any electrical
surges. Turn all other accessories off.
Connecting the jumper cables
1. Connect the positive (+) jumper cable to the positive (+) terminal of
the discharged battery.
Note:In the illustrations,lightning boltsare used to designate the
assisting (boosting) battery.
+–+–
+–+–
Roadside Emergencies
202
Page 226 of 280
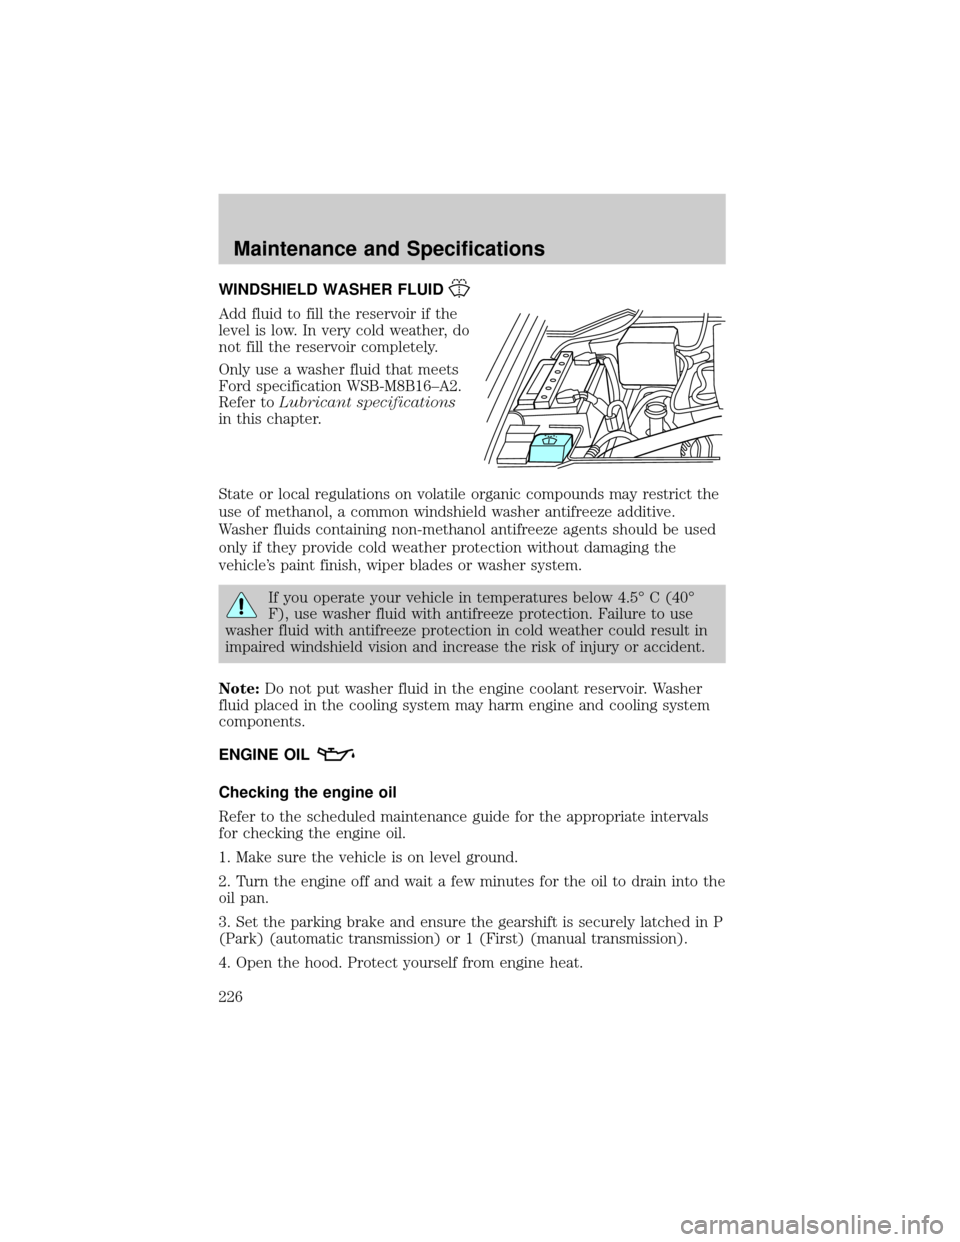
WINDSHIELD WASHER FLUID
Add fluid to fill the reservoir if the
level is low. In very cold weather, do
not fill the reservoir completely.
Only use a washer fluid that meets
Ford specification WSB-M8B16±A2.
Refer toLubricant specifications
in this chapter.
State or local regulations on volatile organic compounds may restrict the
use of methanol, a common windshield washer antifreeze additive.
Washer fluids containing non-methanol antifreeze agents should be used
only if they provide cold weather protection without damaging the
vehicle's paint finish, wiper blades or washer system.
If you operate your vehicle in temperatures below 4.5É C (40É
F), use washer fluid with antifreeze protection. Failure to use
washer fluid with antifreeze protection in cold weather could result in
impaired windshield vision and increase the risk of injury or accident.
Note:Do not put washer fluid in the engine coolant reservoir. Washer
fluid placed in the cooling system may harm engine and cooling system
components.
ENGINE OIL
Checking the engine oil
Refer to the scheduled maintenance guide for the appropriate intervals
for checking the engine oil.
1. Make sure the vehicle is on level ground.
2. Turn the engine off and wait a few minutes for the oil to drain into the
oil pan.
3. Set the parking brake and ensure the gearshift is securely latched in P
(Park) (automatic transmission) or 1 (First) (manual transmission).
4. Open the hood. Protect yourself from engine heat.
Maintenance and Specifications
226
Page 233 of 280
Do not add engine coolant when the engine is hot. Steam and
scalding liquids released from a hot cooling system can burn you
badly. Also, you can be burned if you spill coolant on hot engine parts.
Do not put engine coolant in the windshield washer fluid
container. If sprayed on the windshield, engine coolant could
make it difficult to see through the windshield.
²Add Motorcraft Premium Gold Engine Coolant
(yellow-colored), VC-7±A (VC-7±B in Oregon), meeting Ford
Specification WSS-M97B51±A1.
Note:Use of Motorcraft Cooling System Stop Leak Pellets, VC-6, may
darken the color of Motorcraft Premium Gold Engine Coolant from
yellow to golden tan.
²Do not add/mix an orange-colored, extended life coolant such
as Motorcraft Speciality Orange Engine Coolant, VC-2 (US) or
CXC-209 (Canada), meeting Ford specification WSS-M97B44±D
with the factory-filled coolant.Mixing Motorcraft Speciality Orange
Engine Coolant or any orange-colored extended life product with your
factory filled coolant can result in degraded corrosion protection.
²A large amount of water without engine coolant may be added, in case
of emergency, to reach a vehicle service location. In this instance, the
cooling system must be drained and refilled with a 50/50 mixture of
engine coolant and distilled water as soon as possible. Water alone
(without engine coolant) can cause engine damage from corrosion,
overheating or freezing.
²Do not use alcohol, methanol, brine or any engine coolants
mixed with alcohol or methanol antifreeze (coolant).Alcohol
and other liquids can cause engine damage from overheating or
freezing.
²Do not add extra inhibitors or additives to the coolant.These
can be harmful and compromise the corrosion protection of the engine
coolant.
Add the proper mixture of coolant and water to the ªcold fullº level.
Follow these steps to add engine coolant.
To reduce the risk of personal injury, make sure the engine is
cool before unscrewing the coolant pressure relief cap. The
cooling system is under pressure; steam and hot liquid can come out
forcefully when the cap is loosened slightly.
Maintenance and Specifications
233
Page 234 of 280
1. Before you begin, turn the engine off and let it cool.
2. When the engine is cool, wrap a thick cloth around the coolant
pressure relief cap on the coolant reservoir (an opaque plastic bottle).
Slowly turn cap counterclockwise (left) until pressure begins to release.
3. Step back while the pressure releases.
4. When you are sure that all the pressure has been released, use the
cloth to turn it counterclockwise and remove the cap.
5. Fill the coolant reservoir slowly with the proper coolant mixture (see
above), to within the ªcold fill rangeº or the ªcold fullº level on the
reservoir.
6. Replace the cap. Turn until tightly installed. Turn cap until click is
heard/felt to ensure it is tightly installed.
After any coolant has been added, check the coolant concentration, refer
toChecking Engine Coolantsection. If the concentration is not 50/50
(protection to ±34É F/±36É C), drain some coolant and adjust the
concentration. It may take several drains and additions to obtain a 50/50
coolant concentration.
Whenever coolant has been added, the coolant level in the coolant
reservoir should be checked the next few times you drive the vehicle. If
necessary, add enough 50/50 concentration of engine coolant and
distilled water to bring the liquid level to the proper level.
If you have to add more than 1.0 liter (1.0 quart) of engine coolant per
month, have your dealer check the engine cooling system. Your cooling
system may have a leak. Operating an engine with a low level of coolant
can result in engine overheating and possible engine damage.
Recycled engine coolant
Ford Motor Company does NOT recommend the use of recycled engine
coolant in vehicles originally equipped with Motorcraft Premium Gold
Engine Coolant since a Ford-approved recycling process is not yet
available.
Used engine coolant should be disposed of in an appropriate
manner. Follow your community's regulations and standards for recycling
and disposing of automotive fluids.
Coolant refill capacity
To find out how much fluid your vehicle's cooling system can hold, refer
toRefill capacitiesin this chapter.
Maintenance and Specifications
234
Page 235 of 280
![FORD F150 2004 11.G Owners Manual Fill your engine coolant reservoir as outlined inAdding engine coolant
in this chapter.
Severe climates
If you drive in extremely cold climates (less than ±36É C [±34É F]):
²It may be necessary t FORD F150 2004 11.G Owners Manual Fill your engine coolant reservoir as outlined inAdding engine coolant
in this chapter.
Severe climates
If you drive in extremely cold climates (less than ±36É C [±34É F]):
²It may be necessary t](/img/11/5030/w960_5030-234.png)
Fill your engine coolant reservoir as outlined inAdding engine coolant
in this chapter.
Severe climates
If you drive in extremely cold climates (less than ±36É C [±34É F]):
²It may be necessary to increase the coolant concentration
above 50%.
²NEVER increase the coolant concentration above 60%.
²Increased engine coolant concentrations above 60% will
decrease the overheat protection characteristics of the engine
coolant and may cause engine damage.
²Refer to the chart on the coolant container to ensure the
coolant concentration in your vehicle will provide adequate
freeze protection at the temperatures in which you drive in the
winter months.
If you drive in extremely hot climates:
²It is still necessary to maintain the coolant concentration
above 40%.
²NEVER decrease the coolant concentration below 40%.
²Decreased engine coolant concentrations below 40% will
decrease the corrosion protection characteristics of the engine
coolant and may cause engine damage.
²Decreased engine coolant concentrations below 40% will
decrease the freeze protection characteristics of the engine
coolant and may cause engine damage.
²Refer to the chart on the coolant container to ensure the
coolant concentration in your vehicle will provide adequate
protection at the temperatures in which you drive.
Vehicles driven year-round in non-extreme climates should use a 50/50
mixture of engine coolant and distilled water for optimum cooling system
and engine protection.
What you should know about fail-safe cooling (if equipped)
If the engine coolant supply is depleted, this feature allows the vehicle to
be driven temporarily before incremental component damage is incurred.
The ªfail-safeº distance depends on ambient temperatures, vehicle load
and terrain.
Maintenance and Specifications
235