climate control FORD F150 2014 12.G User Guide
[x] Cancel search | Manufacturer: FORD, Model Year: 2014, Model line: F150, Model: FORD F150 2014 12.GPages: 472, PDF Size: 4.62 MB
Page 115 of 472
Recommended Settings for Cooling
Vehicle with automatic climate control
Vehicle with manual climate control
Press the AUTO button.
Adjust the fan speed to the center
setting.
1
Adjust the temperature control to the
desired setting. Use 72°F (22°C) as a
starting point, then adjust the setting as
necessary.
Adjust the temperature control to the
midway point of the cold settings.
2
Select the instrument panel air vents
using the air distribution buttons.
3
Side Window Defogging in Cold Weather Vehicle With Automatic Climate Control
Vehicle With Manual Climate Control
Press the defrost button.
Select the instrument panel and footwell
air vents positions through the air distri-
bution control.
1
Adjust the temperature control to the
desired setting. Use 72°F (22°C) as a
starting point, then adjust the setting as
necessary.
Press the
A/C button.
2
Adjust the temperature control to the
desired setting.
3
Adjust the fan speed to the highest
setting.
4
Direct the instrument panel side air vents
toward the side windows.
5
Close the instrument panel center vents.
6
HEATED WINDOWS AND
MIRRORS
Heated Rear Window
(If Equipped)
Note: The engine must be running to use
this feature. Note:
If your vehicle is equipped with a
sliding rear window, the feature does not
operate when you open the window.
Press the button to clear the rear window
of thin ice and fog. Press the button again
within 10 minutes to switch it off. It
switches off automatically after 10
minutes, or when you switch the ignition
off.
112
F150 (TF6) , enUSA Climate Control
Page 116 of 472
Do not use razor blades or other sharp
objects to clean the inside of the rear
window or to remove decals from the
inside of the rear window. This may
cause damage to the heated grid lines.
Your warranty does not cover this
damage.
Heated Exterior Mirror (If Equipped)
Note: Do not remove ice from the mirrors
with a scraper or attempt to readjust the
mirror glass that has frozen in place. These
actions could cause damage to the glass
and mirrors.
Note: Do not clean the housing or glass of
any mirror with harsh abrasives, fuel or other
petroleum-based cleaning products.
The heated mirrors remove ice, mist and
fog when you switch on the heated rear
window.
REMOTE START
(IF EQUIPPED)
The remote start feature allows you to
pre-condition the interior of your vehicle.
The climate control system works to
achieve comfort according to your previous
settings.
Note: You cannot adjust the system during
remote start operation.
Turn the ignition on to return the system
to its previous settings. You can now make
adjustments normally, but you need to turn
certain vehicle-dependent features back
on, such as:
• Heated seats.
• Cooled seats.
• Heated steering wheel.
• Heated mirrors.
• Heated rear window. You can adjust the default remote start
settings using the information display
controls. See
Information Displays
(page 87).
Automatic Settings
In hot weather, the system is set to 72°F
(22°C). The cooled seats are set to high
(if available, and selected to AUTO in the
information display).
In moderate weather, the system either
heats or cools (based on previous
settings). The rear defroster, heated
mirrors and heated seats do not
automatically switch on.
In cold weather, the system is set to 72°F
(22°C). The heated seats are set to high
(if available, and selected to AUTO in the
information display). The rear defroster
and heated mirrors automatically switch
on.
113
F150 (TF6) , enUSA Climate Control
Page 140 of 472
Do not crank the engine for more than 10
seconds at a time as starter damage may
occur. If the engine fails to start, turn the
key to off and wait 30 seconds before
trying again.
Do not use starting fluid such as ether in
the air intake system. Such fluid could
cause immediate explosive damage to the
engine and possible personal injury.
If you should experience cold weather
starting problems on E85 ethanol, and
neither an alternative brand of E85 ethanol
nor an engine block heater is available, the
addition of unleaded gasoline to your tank
improves cold starting performance. Your
vehicle is designed to operate on E85
ethanol alone, unleaded gasoline alone, or
any mixture of the two.
If the Engine Fails to Start Using the
Preceding Instructions (Flexible Fuel
Vehicles Only)
1. Press and hold down the accelerator
one-third to one-half the way to the
floor, then crank the engine.
2. When the engine starts, release the key, then gradually release the
accelerator pedal as the engine speeds
up. If the engine still fails to start,
repeat Step 1.
Guarding Against Exhaust Fumes WARNING
If you smell exhaust fumes inside
your vehicle, have your vehicle
checked by your authorized dealer
immediately. Do not drive your vehicle if
you smell exhaust fumes. Carbon
monoxide is present in exhaust fumes.
Take precautions to avoid its dangerous
effects. Important Ventilating Information
If you stop your vehicle and the leave the
engine idling for long periods of time, we
recommend that you do one of the
following:
•
Open the windows at least 1 inch (2.5
centimeters)
• Set your climate control to outside air.
ENGINE BLOCK HEATER (IF
EQUIPPED) WARNINGS
Failure to follow engine block heater
instructions could result in property
damage or serious personal injury.
Do not use your heater with
ungrounded electrical systems or
two-pronged adapters. There is a risk
of electrical shock. Note:
The heater is most effective when
outdoor temperatures are below 0°F
(-18°C).
The heater acts as a starting aid by
warming the engine coolant. This allows
the climate control system to respond
quickly. The equipment includes a heater
element (installed in the engine block) and
a wire harness. You can connect the
system to a grounded 120-volt AC
electrical source.
We recommend that you do the following
for a safe and correct operation:
• Use a 16-gauge outdoor extension cord
that is product certified by
Underwriter ’s Laboratory (UL) or
Canadian Standards Association
(CSA). This extension cord must be
suitable for use outdoors, in cold
137
F150 (TF6) , enUSA Starting and Stopping the Engine
Page 211 of 472
Ford Motor Company produces a towing
manual for all authorized tow truck
operators. Have your tow truck operator
refer to this manual for proper hook-up
and towing procedures for your vehicle.
It is acceptable to have your two-wheel
drive vehicle towed with the front wheels
on the ground (without dollies) and the
rear wheels off the ground.
We recommend towing a four-wheel drive
vehicle with all wheels off the ground, such
as using a wheel lift and dollies or flatbed
equipment.
TOWING THE VEHICLE ON
FOUR WHEELS
Emergency Towing
If your vehicle becomes inoperable
(without access to wheel dollies,
car-hauling trailer, or flatbed transport
vehicle), it can be flat-towed (all wheels
on the ground, regardless of the powertrain
and transmission configuration) under the
following conditions:
•
Your vehicle is facing forward for
towing in a forward direction.
• Place the transmission in position N. If
you cannot move the transmission into
N
, you may need to override it. See
Transmission (page 147).
• Maximum speed is 35 mph (56 km/h).
• Maximum distance is 50 miles (80
kilometers).
Recreational Towing
Note: Put your climate control system in
recirculated air mode to prevent exhaust
fumes from entering your vehicle. See
Climate Control
(page 106). Follow these guidelines if you have a need
for recreational towing, such as towing
your vehicle behind a motorhome. We
designed these guidelines to prevent
damage to your transmission.
Two-wheel Drive Vehicles
You cannot tow a two-wheel drive vehicle
with any wheels on the ground as vehicle
or transmission damage may occur. You
must tow your vehicle with all four wheels
off the ground, such as when using a
car-hauling trailer.
Four-wheel Drive Vehicles
You can only tow a four-wheel drive
vehicle with all wheels on the ground by
placing the transfer case in its neutral
position and engaging the
four-wheel-down towing feature. Perform
the steps outlined in the following section
after positioning your vehicle behind the
tow vehicle and properly securing them
together.
Four-wheel-down Towing
1.
Turn the ignition to the on position. Do
not start the engine.
2. Press and hold the brake pedal.
3. Rotate the four-wheel drive switch to 2H
.
4. Shift the transmission to position
N.
5. Rotate the four-wheel drive switch from
2H to 4L and back to 2H five
times within seven seconds.
Note: If completed successfully, the
information display shows NEUTRAL TOW
LEAVE IN N or NEUTRAL TOW ENABLED
LEAVE TRANSMISSION IN NEUTRAL
.
This indicates that your vehicle is safe to
tow with all wheels on the ground
Note: If you do not see the message in the
display, you must perform the procedure
again from the beginning.
208
F150 (TF6) , enUSA Towing
Page 235 of 472
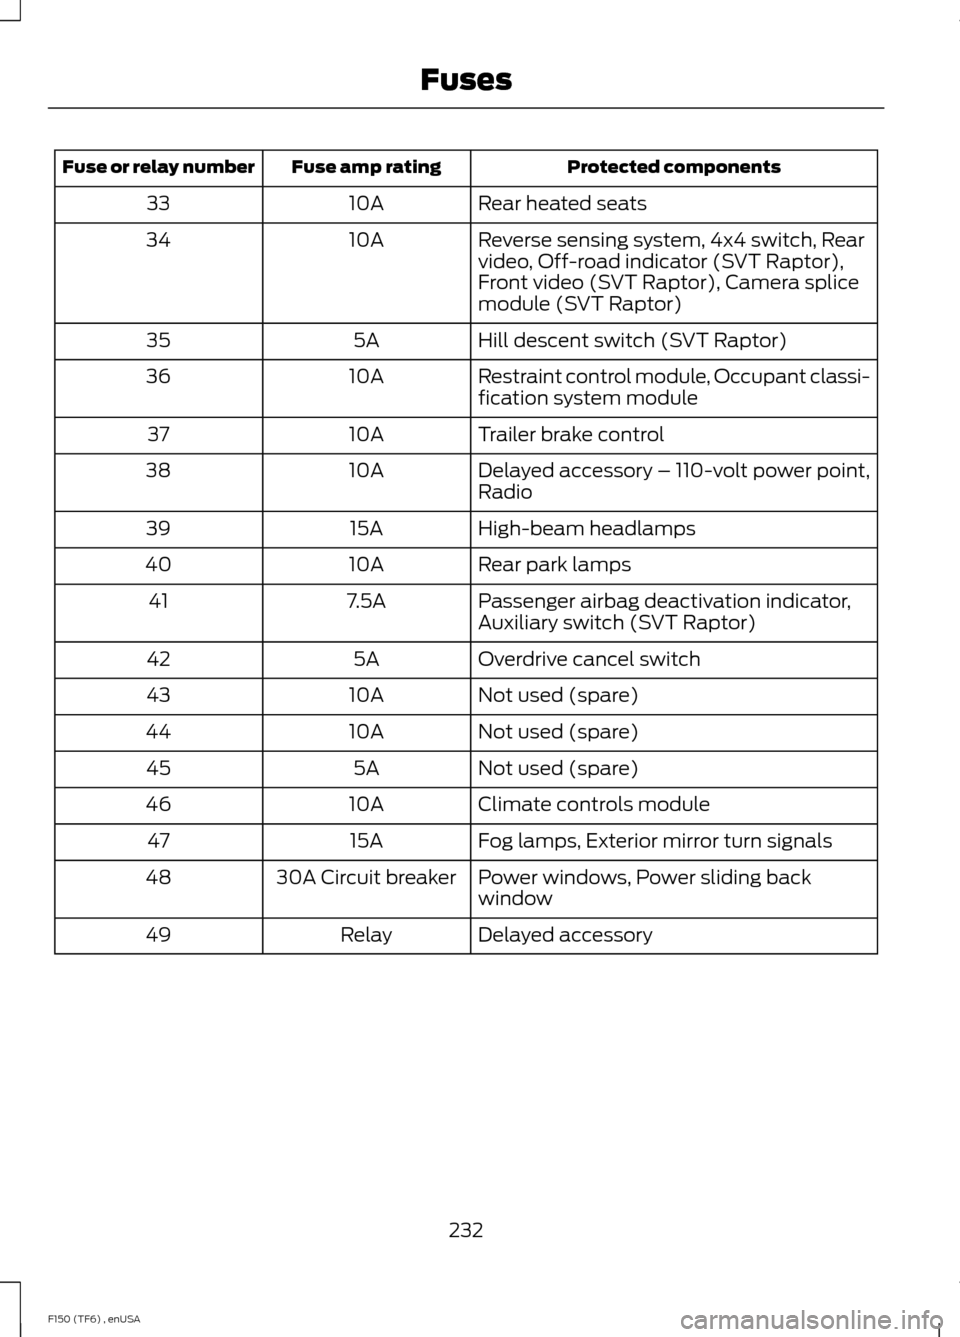
Protected components
Fuse amp rating
Fuse or relay number
Rear heated seats
10A
33
Reverse sensing system, 4x4 switch, Rear
video, Off-road indicator (SVT Raptor),
Front video (SVT Raptor), Camera splice
module (SVT Raptor)
10A
34
Hill descent switch (SVT Raptor)
5A
35
Restraint control module, Occupant classi-
fication system module
10A
36
Trailer brake control
10A
37
Delayed accessory – 110-volt power point,
Radio
10A
38
High-beam headlamps
15A
39
Rear park lamps
10A
40
Passenger airbag deactivation indicator,
Auxiliary switch (SVT Raptor)
7.5A
41
Overdrive cancel switch
5A
42
Not used (spare)
10A
43
Not used (spare)
10A
44
Not used (spare)
5A
45
Climate controls module
10A
46
Fog lamps, Exterior mirror turn signals
15A
47
Power windows, Power sliding back
window
30A Circuit breaker
48
Delayed accessory
Relay
49
232
F150 (TF6) , enUSA Fuses
Page 251 of 472
6. Release the parking brake. With your
foot on the brake pedal and with the
air conditioning on, put your vehicle in
D (Drive) and allow the engine to idle
for at least one minute.
• If you do not allow the engine to
relearn its idle trim, the idle quality
of your vehicle may be adversely
affected until the idle trim is
eventually relearned.
7. Drive your vehicle to complete the relearning process
•Your vehicle may need to be driven
10 miles (16 kilometers) or more to
relearn the idle and fuel trim
strategy along with the ethanol
content for flexible fuel vehicles.
• For flexible fuel vehicles, if you are
operating on E85, you may
experience poor starts or an
inability to start the engine and
driveability problems until the fuel
trim and ethanol content have been
relearned.
If the battery has been disconnected or a
new battery has been installed, the clock
and radio settings must be reset once the
battery is reconnected.
Always dispose of automotive
batteries in a responsible manner.
Follow your local authorized standards
for disposal. Call your local authorized
recycling center to find out more about
recycling automotive batteries.
Battery Management System (If
Equipped)
The battery management system (BMS)
monitors battery conditions and takes
actions to extend battery life. If excessive
battery drain is detected, the system may
temporarily disable certain electrical
features to protect the battery. Those
electrical accessories affected include the
rear defrost, heated/cooled seats, climate control fan, heated steering wheel, audio
and navigation system. A message may be
shown in the information displays to alert
the driver that battery protection actions
are active. These messages are only for
notification that an action is taking place,
and not intended to indicate an electrical
problem or that the battery requires
replacement.
Electrical accessory installation
To ensure proper operation of the Battery
Management System, any electrical
devices that are added to your vehicle
should not have their ground connection
made directly at the negative battery post.
A connection at the negative battery post
can cause inaccurate measurements of
the battery condition and potential
incorrect system operation.
Note:
Electrical or electronic accessories
added to your vehicle by the dealer or the
owner, may adversely affect battery
performance and durability, and may affect
the performance of other electrical systems
in your vehicle.
When a battery replacement is required,
the battery should only be replaced with
a Ford-recommended replacement battery
that matches the electrical requirements
of your vehicle. After battery replacement,
or in some cases after charging the battery
with the external charger, the Battery
Management System requires eight hours
of vehicle sleep time (key off with doors
closed) to relearn the new battery state of
charge. Prior to relearning the state of
charge, the Battery Management System
may disable electrical features (to protect
the battery) earlier than normal.
248
F150 (TF6) , enUSA Maintenance
Page 271 of 472
As a result of the above dimensional
differences, Sport utility vehicles and
trucks often will have a higher center of
gravity and a greater difference in center
of gravity between the loaded and
unloaded condition. These differences that
make your vehicle so versatile also make
it handle differently than an ordinary
passenger car.
TIRE CARE
Information About Uniform
Tire Quality Grading
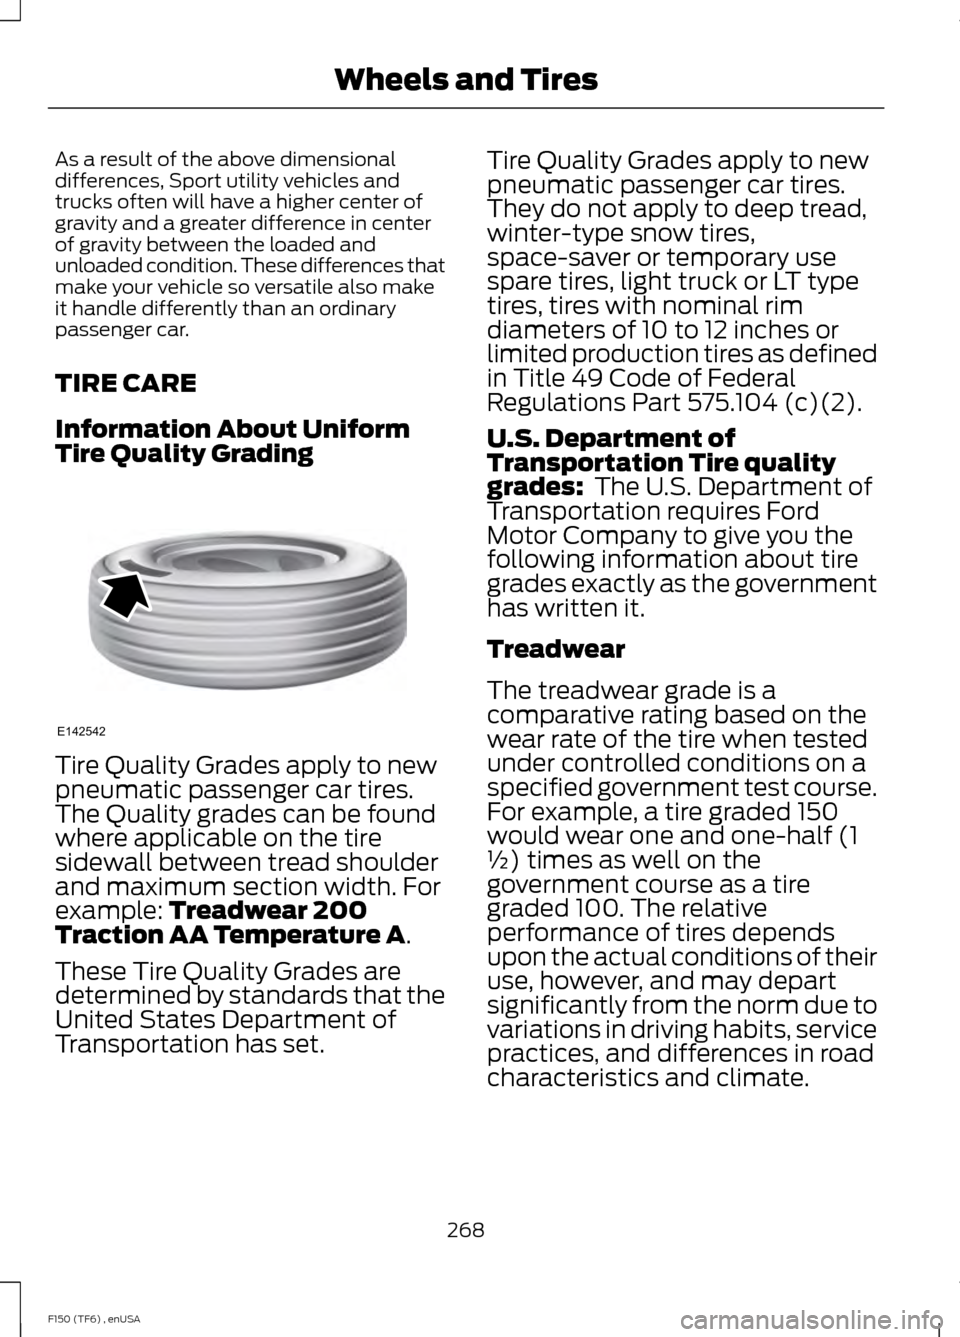
Tire Quality Grades apply to new
pneumatic passenger car tires.
The Quality grades can be found
where applicable on the tire
sidewall between tread shoulder
and maximum section width. For
example: Treadwear 200
Traction AA Temperature A.
These Tire Quality Grades are
determined by standards that the
United States Department of
Transportation has set. Tire Quality Grades apply to new
pneumatic passenger car tires.
They do not apply to deep tread,
winter-type snow tires,
space-saver or temporary use
spare tires, light truck or LT type
tires, tires with nominal rim
diameters of 10 to 12 inches or
limited production tires as defined
in Title 49 Code of Federal
Regulations Part 575.104 (c)(2).
U.S. Department of
Transportation Tire quality
grades:
The U.S. Department of
Transportation requires Ford
Motor Company to give you the
following information about tire
grades exactly as the government
has written it.
Treadwear
The treadwear grade is a
comparative rating based on the
wear rate of the tire when tested
under controlled conditions on a
specified government test course.
For example, a tire graded 150
would wear one and one-half (1
½) times as well on the
government course as a tire
graded 100. The relative
performance of tires depends
upon the actual conditions of their
use, however, and may depart
significantly from the norm due to
variations in driving habits, service
practices, and differences in road
characteristics and climate.
268
F150 (TF6) , enUSA Wheels and TiresE142542
Page 286 of 472
USING SNOW CHAINS
WARNING
Snow tires must be the same size,
load index, speed rating as those
originally provided by Ford. Use of
any tire or wheel not recommended by
Ford can affect the safety and
performance of your vehicle, which could
result in an increased risk of loss of vehicle
control, vehicle rollover, personal injury and
death. Additionally, the use of
non-recommended tires and wheels could
cause steering, suspension, axle, transfer
case or power transfer unit failure. Note:
The suspension insulation and
bumpers will help prevent vehicle damage.
Do not remove these components from your
vehicle when using snow tires and chains.
Note: Do not place chains on the following
tires sizes: P265/60R18, P275/65R18,
LT275/65R18, LT315/70R17, P275/55R20,
and P275/45R22.
The tires on your vehicle have all-weather
treads to provide traction in rain and snow.
However, in some climates, you may need
to use snow tires and cables. If you need
to use cables, it is recommended that steel
wheels (of the same size and
specifications) be used, as cables may chip
aluminum wheels.
Follow these guidelines when using snow
tires and chains:
• If possible, avoid fully loading your
vehicle
• Use only SAE Class S chains.
• Install chains securely, verifying that
the chains do not touch any wiring,
brake lines or fuel lines. •
Drive cautiously. If you hear the chains
rub or bang against your vehicle, stop
and retighten the chains. If this does
not work, remove the chains to prevent
damage to your vehicle.
• Remove the tire chains when they are
no longer needed. Do not use tire
chains on dry roads.
If you have any questions regarding snow
chains or cables, please contact your
authorized dealer.
TIRE PRESSURE MONITORING
SYSTEM WARNING
The tire pressure monitoring system
is not a substitute for manually
checking tire pressure. The tire
pressure should be checked periodically
(at least monthly) using a tire gauge, see
Inflating your tires in this chapter. Failure
to properly maintain your tire pressure
could increase the risk of tire failure, loss
of control, vehicle rollover and personal
injury. Each tire, including the spare (if
provided), should be checked
monthly when cold and inflated
to the inflation pressure
recommended by the vehicle manufacturer
on the vehicle placard or tire inflation
pressure label. (If your vehicle has tires of
a different size than the size indicated on
the vehicle placard or tire inflation pressure
label, you should determine the proper tire
inflation pressure for those tires.)
As an added safety feature, your vehicle
has been equipped with a Tire Pressure
Monitoring System (TPMS) that
illuminates a low tire pressure telltale
when one or more of your tires is
significantly under-inflated. Accordingly,
283
F150 (TF6) , enUSA Wheels and Tires
Page 362 of 472
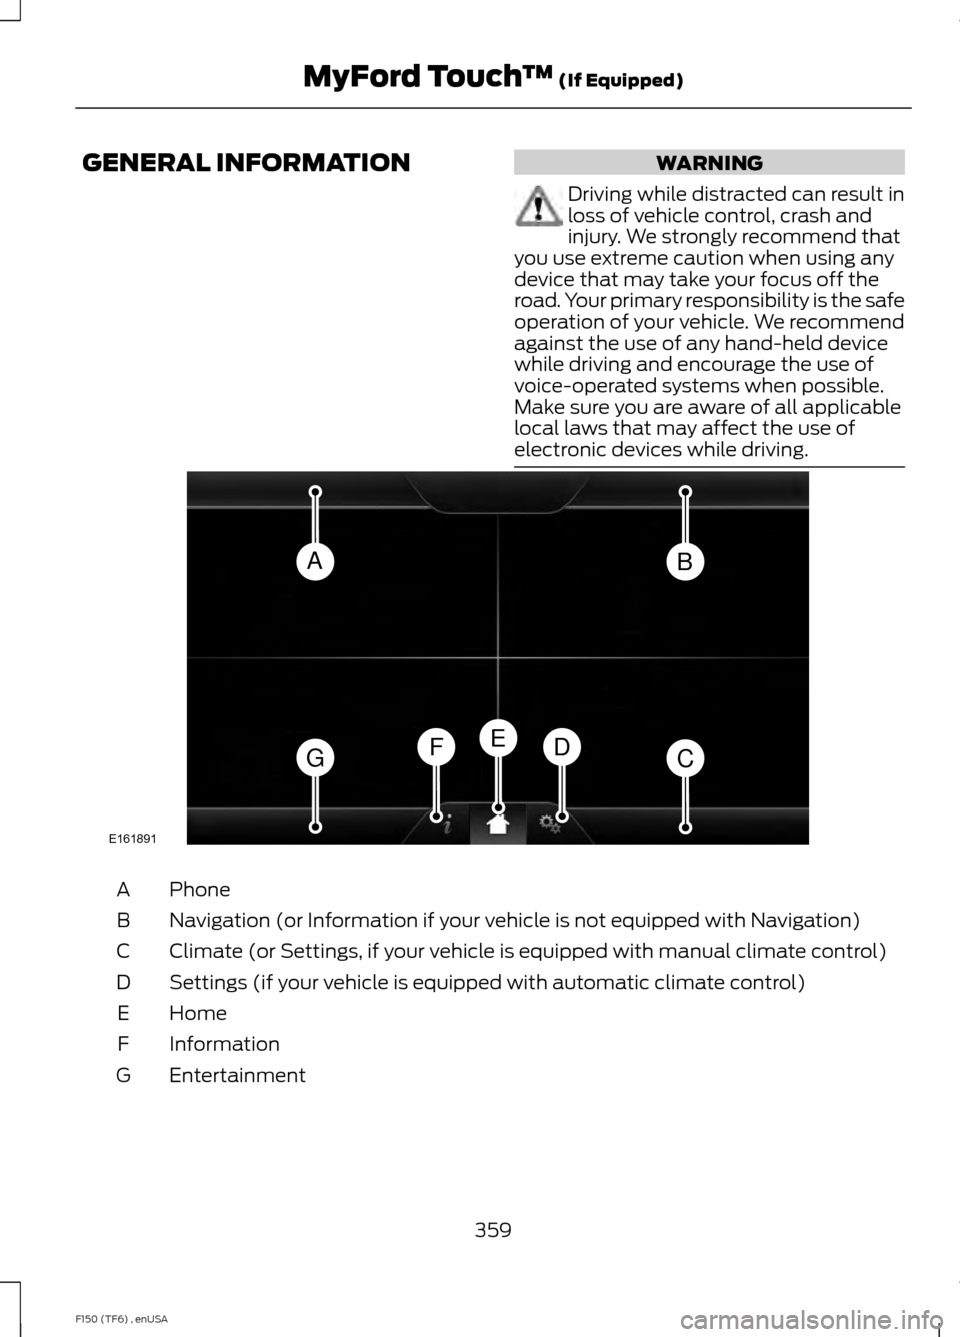
GENERAL INFORMATION WARNING
Driving while distracted can result in
loss of vehicle control, crash and
injury. We strongly recommend that
you use extreme caution when using any
device that may take your focus off the
road. Your primary responsibility is the safe
operation of your vehicle. We recommend
against the use of any hand-held device
while driving and encourage the use of
voice-operated systems when possible.
Make sure you are aware of all applicable
local laws that may affect the use of
electronic devices while driving. Phone
A
Navigation (or Information if your vehicle is not equipped with Navigation)
B
Climate (or Settings, if your vehicle is equipped with manual climate control)
C
Settings (if your vehicle is equipped with automatic climate control)
D
Home
E
Information
F
Entertainment
G
359
F150 (TF6) , enUSA MyFord Touch
™ (If Equipped)AB
GCDFE
E161891
Page 363 of 472
This system uses a four-corner strategy to
provide quick access to several vehicle
features and settings. The touchscreen
provides easy interaction with your cellular
phone, multimedia, climate control and
navigation system. The corners display any
active modes within those menus, such as
phone status or the climate temperature.
Note:
Some features are not available while
your vehicle is moving.
Note: Your system is equipped with a
feature that allows you to access and
control audio features for 30 minutes after
you switch the ignition off (and no doors
open).
PHONE
Press to select any of the following:
• Phone
• Quick Dial
• Phonebook
• History
• Messaging
• Settings
NAVIGATION
Press to select any of the following:
• My Home
• Favorites
• Previous Destinations
• Point of Interest
• Emergency
• Street Address
• Intersection
• City Center
• Map
• Edit Route
• Cancel Route
CLIMATE Press to select any of the following:
•
Driver Settings
• Recirculated Air
• Auto
• Dual
• Passenger Settings
• A/C
• Defrost SETTINGS
Press to select any of the following:
• Clock
• Display
• Sound
• Vehicle
• Settings
• Help HOME
Press to access your home
screen. Depending on your
vehicle ’s option package and software,
your screens may vary in appearance from
the descriptions in this section. Your
features may also be limited depending on
your market. Check with an authorized
dealer for availability. INFORMATION
Press to select any of the following:
• Services
• Travel Link
• Alerts
• Calendar
• Apps
ENTERTAINMENT
360
F150 (TF6) , enUSA MyFord Touch
™ (If Equipped)E142607 E142613 E142608