check oil FORD F150 2014 12.G Owners Manual
[x] Cancel search | Manufacturer: FORD, Model Year: 2014, Model line: F150, Model: FORD F150 2014 12.GPages: 472, PDF Size: 4.62 MB
Page 7 of 472
Fuses
Fuse Specification Chart...........................225
Changing a Fuse
...........................................233
Maintenance
General Information
...................................235
Opening and Closing the Hood..............235
Under Hood Overview -
3.5L
Ecoboost™................................................236
Under Hood Overview - 3.7L....................237
Under Hood Overview - 5.0L..................238
Under Hood Overview -
6.2L...................239
Engine Oil Dipstick
......................................240
Engine Oil Check..........................................240
Engine Coolant Check
................................241
Automatic Transmission Fluid Check...........................................................245
Transfer Case Fluid Check........................245
Brake Fluid Check........................................246
Power Steering Fluid Check....................246
Washer Fluid Check
....................................246
Fuel Filter
........................................................246
Changing the 12V Battery.........................246
Checking the Wiper Blades
.....................249
Changing the Wiper Blades.....................249
Adjusting the Headlamps........................249
Removing a Headlamp
...............................251
Changing a Bulb...........................................252
Bulb Specification Chart...........................254
Changing the Engine Air Filter -
3.5L
Ecoboost™................................................256
Changing the Engine Air Filter -
3.7L/
5.0L/6.2L.....................................................257
Vehicle Care
General Information...................................259
Cleaning Products.......................................259
Cleaning the Exterior
..................................259
Waxing............................................................260
Cleaning the Engine
...................................260 Cleaning the Windows and Wiper
Blades...........................................................261
Cleaning the Interior....................................261
Cleaning the Instrument Panel and Instrument Cluster Lens........................261
Cleaning Leather Seats.............................262
Repairing Minor Paint Damage
..............263
Cleaning the Alloy Wheels.......................264
Vehicle Storage............................................264
Wheels and Tires
General Information...................................266
Tire Care
..........................................................268
Using Snow Chains
.....................................283
Tire Pressure Monitoring System...........283
Changing a Road Wheel...........................289
Technical Specifications
...........................294
Capacities and Specific- ations
Engine Specifications................................296
Motorcraft Parts
..........................................298
Vehicle Identification Number
...............298
Vehicle Certification Label.......................299
Transmission Code Designation...........300
Technical Specifications
............................301
Audio System
General Information...................................306
Audio unit - Vehicles With: AM/FM.......307
Audio unit -
Vehicles With: AM/FM/CD/
SYNC/Satellite Radio...........................308
Audio unit -
Vehicles With: AM/FM/CD/
SYNC/Satellite Radio.............................312
Audio unit - Vehicles With: Sony AM/FM/ CD...................................................................315
Digital Radio...................................................316
Satellite Radio
...............................................318
Audio Input Jack............................................321
USB Port
..........................................................322
Media Hub......................................................322
4
F150 (TF6) , enUSA Table of Contents
Page 11 of 472
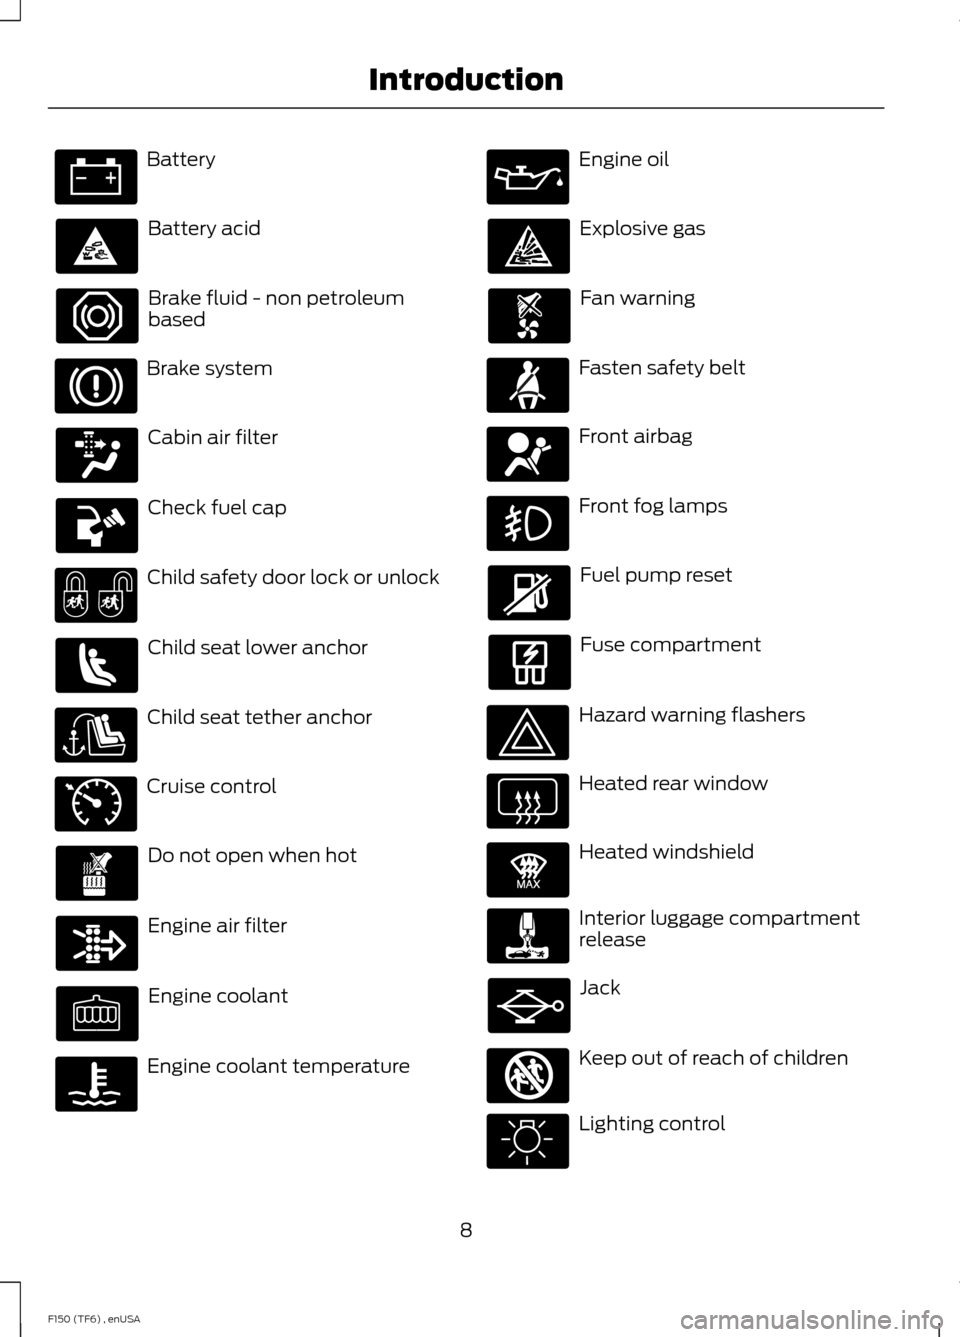
Battery
Battery acid
Brake fluid - non petroleum
based
Brake system
Cabin air filter
Check fuel cap
Child safety door lock or unlock
Child seat lower anchor
Child seat tether anchor
Cruise control
Do not open when hot
Engine air filter
Engine coolant
Engine coolant temperature Engine oil
Explosive gas
Fan warning
Fasten safety belt
Front airbag
Front fog lamps
Fuel pump reset
Fuse compartment
Hazard warning flashers
Heated rear window
Heated windshield
Interior luggage compartment
release
Jack
Keep out of reach of children
Lighting control
8
F150 (TF6) , enUSA Introduction E71340 E91392 E161353
Page 85 of 472
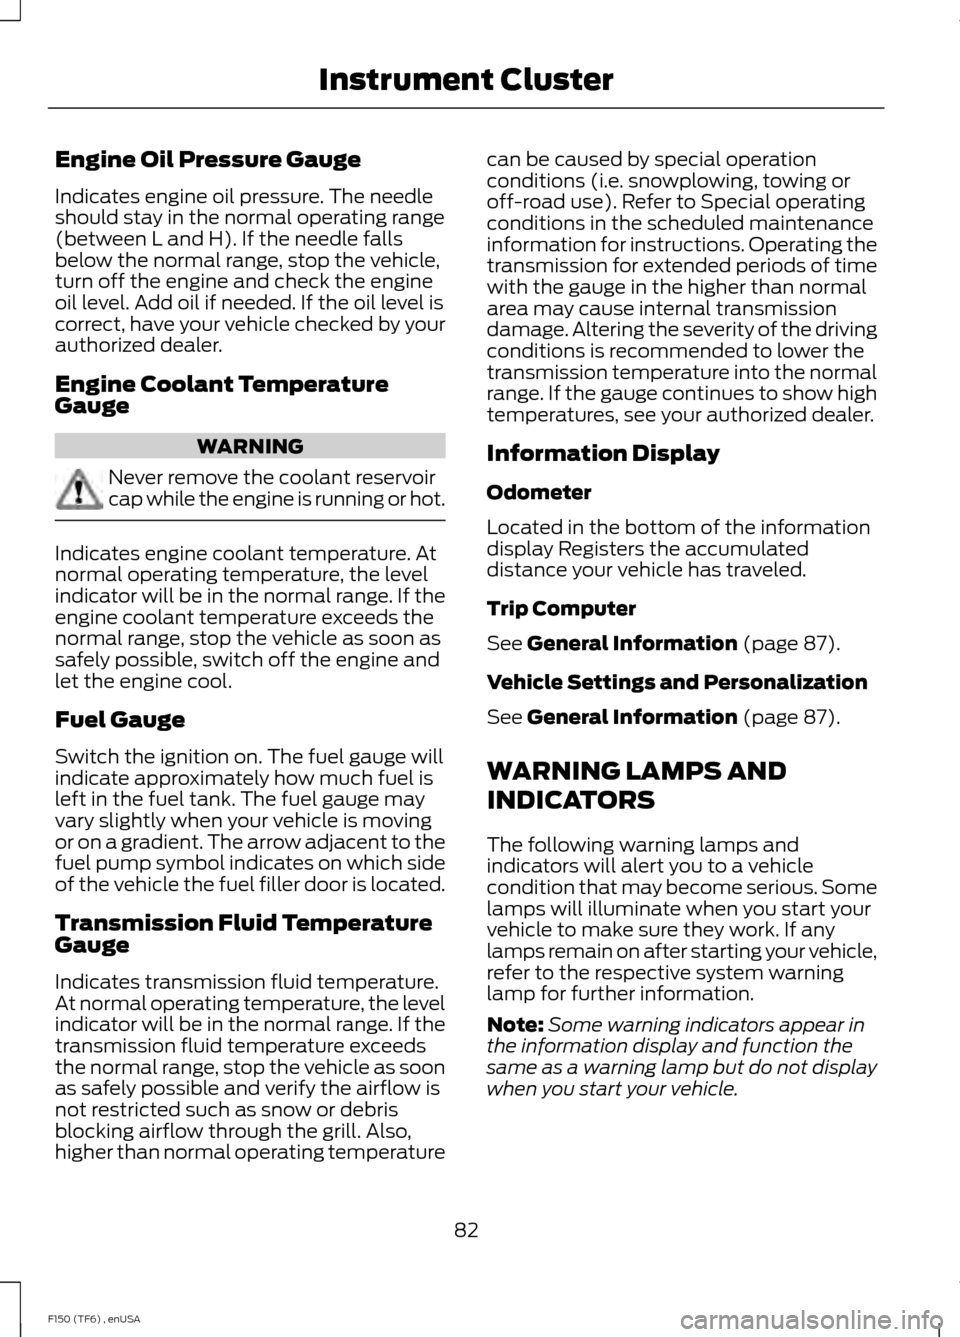
Engine Oil Pressure Gauge
Indicates engine oil pressure. The needle
should stay in the normal operating range
(between L and H). If the needle falls
below the normal range, stop the vehicle,
turn off the engine and check the engine
oil level. Add oil if needed. If the oil level is
correct, have your vehicle checked by your
authorized dealer.
Engine Coolant Temperature
Gauge
WARNING
Never remove the coolant reservoir
cap while the engine is running or hot.
Indicates engine coolant temperature. At
normal operating temperature, the level
indicator will be in the normal range. If the
engine coolant temperature exceeds the
normal range, stop the vehicle as soon as
safely possible, switch off the engine and
let the engine cool.
Fuel Gauge
Switch the ignition on. The fuel gauge will
indicate approximately how much fuel is
left in the fuel tank. The fuel gauge may
vary slightly when your vehicle is moving
or on a gradient. The arrow adjacent to the
fuel pump symbol indicates on which side
of the vehicle the fuel filler door is located.
Transmission Fluid Temperature
Gauge
Indicates transmission fluid temperature.
At normal operating temperature, the level
indicator will be in the normal range. If the
transmission fluid temperature exceeds
the normal range, stop the vehicle as soon
as safely possible and verify the airflow is
not restricted such as snow or debris
blocking airflow through the grill. Also,
higher than normal operating temperature can be caused by special operation
conditions (i.e. snowplowing, towing or
off-road use). Refer to Special operating
conditions in the scheduled maintenance
information for instructions. Operating the
transmission for extended periods of time
with the gauge in the higher than normal
area may cause internal transmission
damage. Altering the severity of the driving
conditions is recommended to lower the
transmission temperature into the normal
range. If the gauge continues to show high
temperatures, see your authorized dealer.
Information Display
Odometer
Located in the bottom of the information
display Registers the accumulated
distance your vehicle has traveled.
Trip Computer
See General Information (page 87).
Vehicle Settings and Personalization
See
General Information (page 87).
WARNING LAMPS AND
INDICATORS
The following warning lamps and
indicators will alert you to a vehicle
condition that may become serious. Some
lamps will illuminate when you start your
vehicle to make sure they work. If any
lamps remain on after starting your vehicle,
refer to the respective system warning
lamp for further information.
Note: Some warning indicators appear in
the information display and function the
same as a warning lamp but do not display
when you start your vehicle.
82
F150 (TF6) , enUSA Instrument Cluster
Page 86 of 472
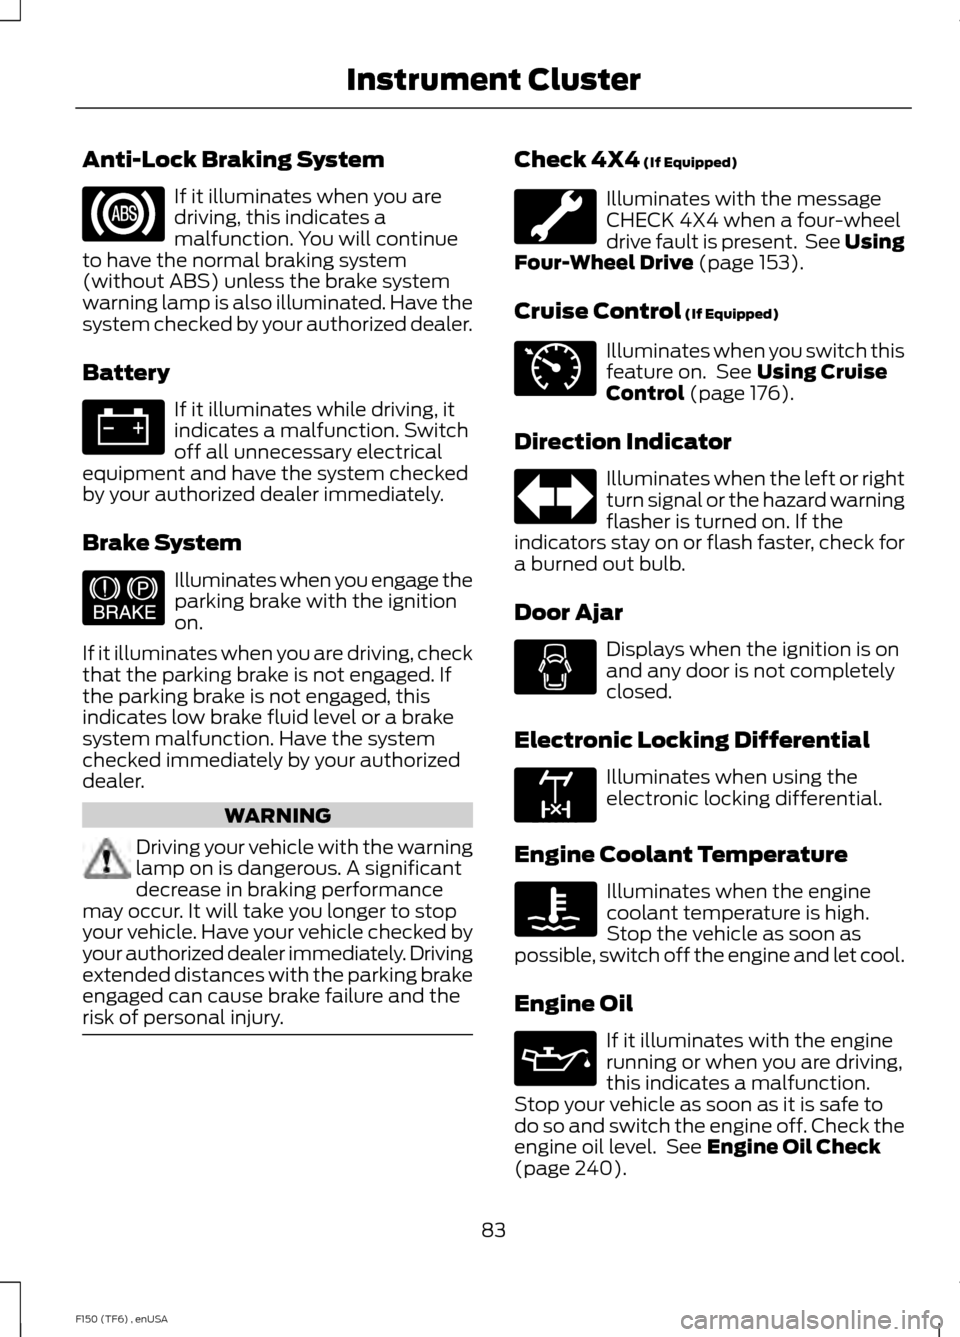
Anti-Lock Braking System
If it illuminates when you are
driving, this indicates a
malfunction. You will continue
to have the normal braking system
(without ABS) unless the brake system
warning lamp is also illuminated. Have the
system checked by your authorized dealer.
Battery If it illuminates while driving, it
indicates a malfunction. Switch
off all unnecessary electrical
equipment and have the system checked
by your authorized dealer immediately.
Brake System Illuminates when you engage the
parking brake with the ignition
on.
If it illuminates when you are driving, check
that the parking brake is not engaged. If
the parking brake is not engaged, this
indicates low brake fluid level or a brake
system malfunction. Have the system
checked immediately by your authorized
dealer. WARNING
Driving your vehicle with the warning
lamp on is dangerous. A significant
decrease in braking performance
may occur. It will take you longer to stop
your vehicle. Have your vehicle checked by
your authorized dealer immediately. Driving
extended distances with the parking brake
engaged can cause brake failure and the
risk of personal injury. Check 4X4 (If Equipped)
Illuminates with the message
CHECK 4X4 when a four-wheel
drive fault is present. See Using
Four-Wheel Drive
(page 153).
Cruise Control
(If Equipped) Illuminates when you switch this
feature on. See
Using Cruise
Control (page 176).
Direction Indicator Illuminates when the left or right
turn signal or the hazard warning
flasher is turned on. If the
indicators stay on or flash faster, check for
a burned out bulb.
Door Ajar Displays when the ignition is on
and any door is not completely
closed.
Electronic Locking Differential Illuminates when using the
electronic locking differential.
Engine Coolant Temperature Illuminates when the engine
coolant temperature is high.
Stop the vehicle as soon as
possible, switch off the engine and let cool.
Engine Oil If it illuminates with the engine
running or when you are driving,
this indicates a malfunction.
Stop your vehicle as soon as it is safe to
do so and switch the engine off. Check the
engine oil level. See
Engine Oil Check
(page 240).
83
F150 (TF6) , enUSA Instrument Cluster E144522 E71340 E163170
Page 92 of 472

Note:
Some options may appear slightly
different or not at all if the items are
optional. Note:
When returning to the SETUP menu
and a non-English language has been
selected, HOLD RESET FOR ENGLISH will
be displayed to change back to English.
Press and hold the RESET button to change
back to English. SETUP
XXX% OIL LIFE
press the RESET button
RESET FOR SYSTEM
CHECK
DOOR STATUS
BRAKE SYSTEM
FUEL LEVEL LOW
TBC GAIN = XX.X or NO
TRAILER
TBC GAIN = XX.X or
OUTPUT = //////
MYKEY DISTANCE
MYKEY(S) PROGRAMMED
ADMIN KEYS
PROGRAMMED
HOLD RESET=NEW
OIL LIFE XXX%
English or Metric
press the RESET button
UNITS
0 to 180 seconds
AUTOLAMP (SEC)
ON or OFF
AUTOLOCK
ON or OFF
AUTOUNLOCK
ON or OFF
COURTESY WIPE
ON or OFF
EASY ENTRY EXIT
ON or OFF
REAR PARK AID
ON or OFF
TRAILER SWAY
CREATE MYKEY, MYKEY SETUP or CLEAR MYKEY
ON or OFF
press the RESET button
RESET FOR REMOTE
START
5, 10, 15 minutes
89
F150 (TF6) , enUSA Information Displays
Page 93 of 472
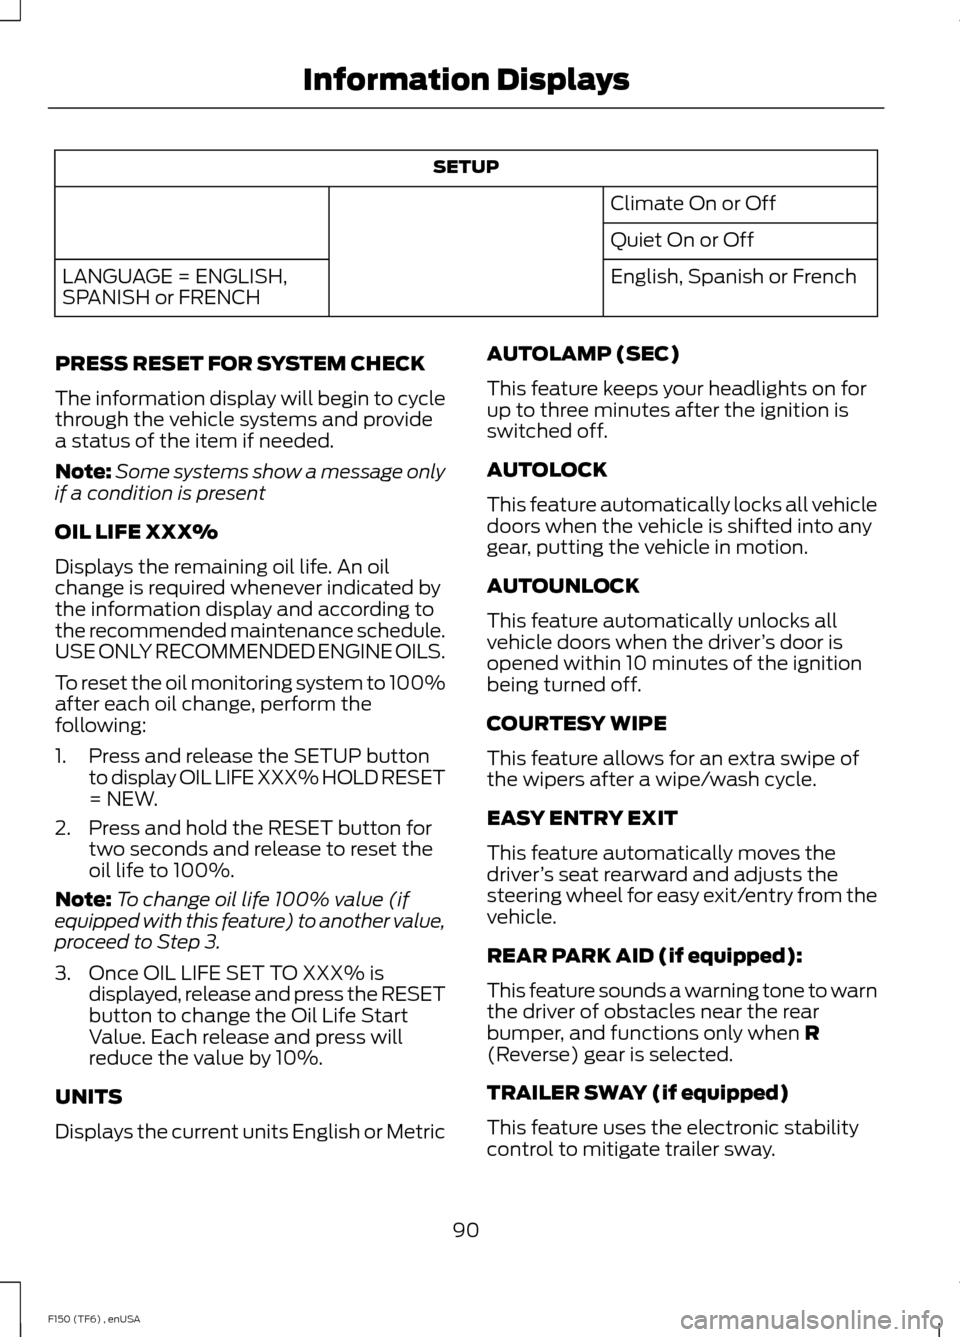
SETUP
Climate On or Off
Quiet On or Off
English, Spanish or French
LANGUAGE = ENGLISH,
SPANISH or FRENCH
PRESS RESET FOR SYSTEM CHECK
The information display will begin to cycle
through the vehicle systems and provide
a status of the item if needed.
Note: Some systems show a message only
if a condition is present
OIL LIFE XXX%
Displays the remaining oil life. An oil
change is required whenever indicated by
the information display and according to
the recommended maintenance schedule.
USE ONLY RECOMMENDED ENGINE OILS.
To reset the oil monitoring system to 100%
after each oil change, perform the
following:
1. Press and release the SETUP button to display OIL LIFE XXX% HOLD RESET
= NEW.
2. Press and hold the RESET button for two seconds and release to reset the
oil life to 100%.
Note: To change oil life 100% value (if
equipped with this feature) to another value,
proceed to Step 3.
3. Once OIL LIFE SET TO XXX% is displayed, release and press the RESET
button to change the Oil Life Start
Value. Each release and press will
reduce the value by 10%.
UNITS
Displays the current units English or Metric AUTOLAMP (SEC)
This feature keeps your headlights on for
up to three minutes after the ignition is
switched off.
AUTOLOCK
This feature automatically locks all vehicle
doors when the vehicle is shifted into any
gear, putting the vehicle in motion.
AUTOUNLOCK
This feature automatically unlocks all
vehicle doors when the driver
’s door is
opened within 10 minutes of the ignition
being turned off.
COURTESY WIPE
This feature allows for an extra swipe of
the wipers after a wipe/wash cycle.
EASY ENTRY EXIT
This feature automatically moves the
driver ’s seat rearward and adjusts the
steering wheel for easy exit/entry from the
vehicle.
REAR PARK AID (if equipped):
This feature sounds a warning tone to warn
the driver of obstacles near the rear
bumper, and functions only when R
(Reverse) gear is selected.
TRAILER SWAY (if equipped)
This feature uses the electronic stability
control to mitigate trailer sway.
90
F150 (TF6) , enUSA Information Displays
Page 104 of 472
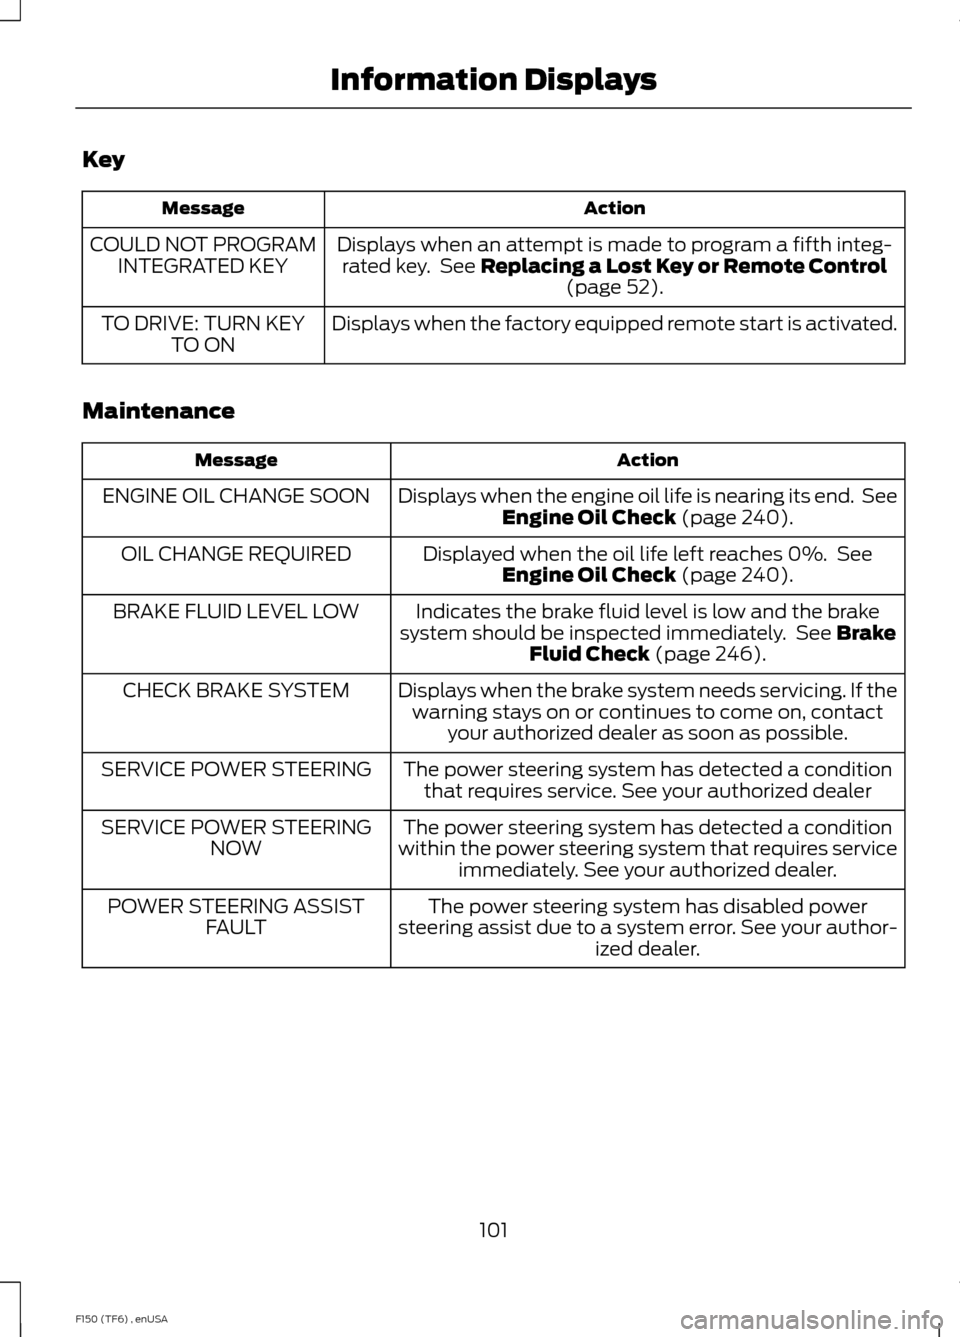
Key
Action
Message
Displays when an attempt is made to program a fifth integ-rated key. See Replacing a Lost Key or Remote Control (page 52).
COULD NOT PROGRAM
INTEGRATED KEY
Displays when the factory equipped remote start is activated.
TO DRIVE: TURN KEY
TO ON
Maintenance Action
Message
Displays when the engine oil life is nearing its end. SeeEngine Oil Check
(page 240).
ENGINE OIL CHANGE SOON
Displayed when the oil life left reaches 0%. SeeEngine Oil Check
(page 240).
OIL CHANGE REQUIRED
Indicates the brake fluid level is low and the brake
system should be inspected immediately. See
Brake
Fluid Check (page 246).
BRAKE FLUID LEVEL LOW
Displays when the brake system needs servicing. If thewarning stays on or continues to come on, contact your authorized dealer as soon as possible.
CHECK BRAKE SYSTEM
The power steering system has detected a conditionthat requires service. See your authorized dealer
SERVICE POWER STEERING
The power steering system has detected a condition
within the power steering system that requires service immediately. See your authorized dealer.
SERVICE POWER STEERING
NOW
The power steering system has disabled power
steering assist due to a system error. See your author- ized dealer.
POWER STEERING ASSIST
FAULT
101
F150 (TF6) , enUSA Information Displays
Page 243 of 472
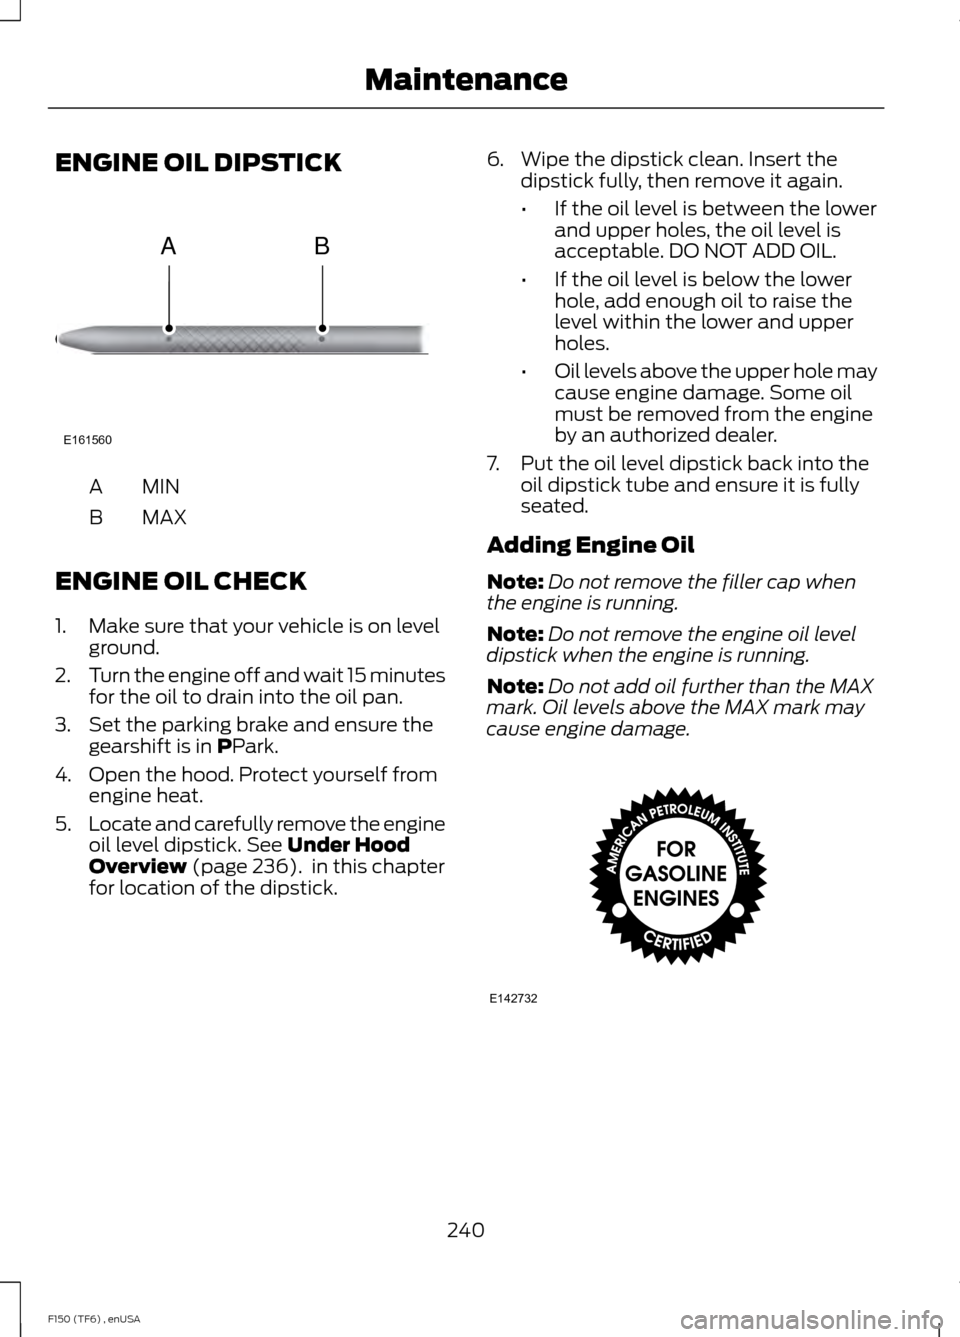
ENGINE OIL DIPSTICK
MINA
MAX
B
ENGINE OIL CHECK
1. Make sure that your vehicle is on level ground.
2. Turn the engine off and wait 15 minutes
for the oil to drain into the oil pan.
3. Set the parking brake and ensure the gearshift is in PPark.
4. Open the hood. Protect yourself from engine heat.
5. Locate and carefully remove the engine
oil level dipstick.
See Under Hood
Overview (page 236). in this chapter
for location of the dipstick. 6. Wipe the dipstick clean. Insert the
dipstick fully, then remove it again.
•If the oil level is between the lower
and upper holes, the oil level is
acceptable. DO NOT ADD OIL.
• If the oil level is below the lower
hole, add enough oil to raise the
level within the lower and upper
holes.
• Oil levels above the upper hole may
cause engine damage. Some oil
must be removed from the engine
by an authorized dealer.
7. Put the oil level dipstick back into the oil dipstick tube and ensure it is fully
seated.
Adding Engine Oil
Note: Do not remove the filler cap when
the engine is running.
Note: Do not remove the engine oil level
dipstick when the engine is running.
Note: Do not add oil further than the MAX
mark. Oil levels above the MAX mark may
cause engine damage. 240
F150 (TF6) , enUSA MaintenanceE161560
AB E142732
Page 244 of 472
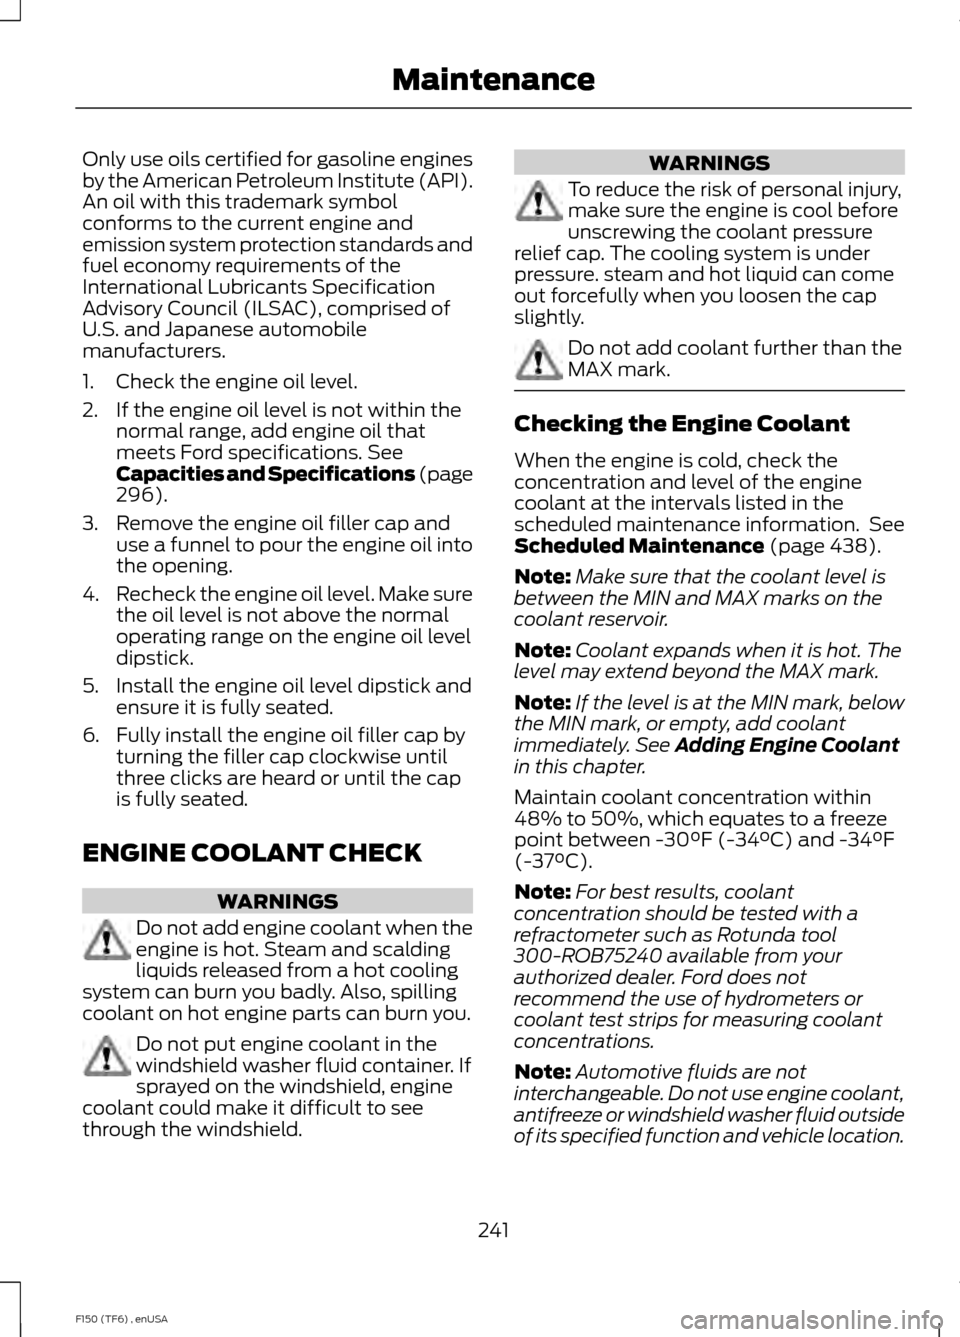
Only use oils certified for gasoline engines
by the American Petroleum Institute (API).
An oil with this trademark symbol
conforms to the current engine and
emission system protection standards and
fuel economy requirements of the
International Lubricants Specification
Advisory Council (ILSAC), comprised of
U.S. and Japanese automobile
manufacturers.
1. Check the engine oil level.
2. If the engine oil level is not within the
normal range, add engine oil that
meets Ford specifications. See
Capacities and Specifications (page
296
).
3. Remove the engine oil filler cap and use a funnel to pour the engine oil into
the opening.
4. Recheck the engine oil level. Make sure
the oil level is not above the normal
operating range on the engine oil level
dipstick.
5. Install the engine oil level dipstick and ensure it is fully seated.
6. Fully install the engine oil filler cap by turning the filler cap clockwise until
three clicks are heard or until the cap
is fully seated.
ENGINE COOLANT CHECK WARNINGS
Do not add engine coolant when the
engine is hot. Steam and scalding
liquids released from a hot cooling
system can burn you badly. Also, spilling
coolant on hot engine parts can burn you. Do not put engine coolant in the
windshield washer fluid container. If
sprayed on the windshield, engine
coolant could make it difficult to see
through the windshield. WARNINGS
To reduce the risk of personal injury,
make sure the engine is cool before
unscrewing the coolant pressure
relief cap. The cooling system is under
pressure. steam and hot liquid can come
out forcefully when you loosen the cap
slightly. Do not add coolant further than the
MAX mark.
Checking the Engine Coolant
When the engine is cold, check the
concentration and level of the engine
coolant at the intervals listed in the
scheduled maintenance information. See
Scheduled Maintenance
(page 438).
Note: Make sure that the coolant level is
between the MIN and MAX marks on the
coolant reservoir.
Note: Coolant expands when it is hot. The
level may extend beyond the MAX mark.
Note: If the level is at the MIN mark, below
the MIN mark, or empty, add coolant
immediately. See
Adding Engine Coolant
in this chapter.
Maintain coolant concentration within
48% to 50%, which equates to a freeze
point between -30°F (-34°C) and -34°F
(-37°C).
Note: For best results, coolant
concentration should be tested with a
refractometer such as Rotunda tool
300-ROB75240 available from your
authorized dealer. Ford does not
recommend the use of hydrometers or
coolant test strips for measuring coolant
concentrations.
Note: Automotive fluids are not
interchangeable. Do not use engine coolant,
antifreeze or windshield washer fluid outside
of its specified function and vehicle location.
241
F150 (TF6) , enUSA Maintenance
Page 265 of 472
Clean the instrument panel and cluster
lens with a clean, damp, white cotton
cloth, then use a clean and dry white
cotton cloth to dry these areas.
•
Avoid cleaners or polishes that increase
the gloss of the upper portion of the
instrument panel. The dull finish in this
area helps protect you from
undesirable windshield reflection.
• Be certain to wash or wipe your hands
clean if you have been in contact with
certain products such as insect
repellent and suntan lotion in order to
avoid possible damage to the interior
painted surfaces.
• Do not use household or glass cleaners
as these may damage the finish of the
instrument panel, interior trim and
cluster lens.
• Do not allow air fresheners and hand
sanitizers to spill onto interior surfaces.
If a spill occurs, wipe off immediately.
Damage may not be covered by your
warranty.
If a staining liquid like coffee or juice has
been spilled on the instrument panel or on
interior trim surfaces, clean as follows:
1. Wipe up spilled liquid using a clean, white, cotton cloth.
2. Wipe the surface with a damp, clean, white cotton cloth. For more thorough
cleaning, use a mild soap and water
solution. If the spot cannot be
completely cleaned by this method,
the area may be cleaned using a
commercially available cleaning
product designed for automotive
interiors.
3. If necessary, apply more soap and water solution or cleaning product to
a clean, white, cotton cloth and press
the cloth onto the soiled area. Allow
this to set at room temperature for 30
minutes. 4.
Remove the soaked cloth and if it is not
soiled badly, use this cloth to clean the
area by using a rubbing motion for 60
seconds.
5. Following this, wipe area dry with a clean, white, cotton cloth.
CLEANING LEATHER SEATS (IF
EQUIPPED)
WITHOUT THE KING RANCH
EDITION
For routine cleaning, wipe the surface with
a soft, damp cloth. For more thorough
cleaning, wipe the surface with a mild soap
and water solution. Dry the area with a soft
cloth.
If you cannot completely clean the leather
using a mild soap and water solution, you
can try a commercially available leather
cleaning product designed for automotive
interiors.
Note: To check for compatibility, first test
any cleaner or stain remover on an
inconspicuous part of the leather.
You should:
• remove dust and loose dirt with a
vacuum cleaner
• clean spills and stains as quickly as
possible
• Check for compatibility, first test any
cleaner or stain remover on an
inconspicuous part of the leather.
Do not use the following products as these
may damage the leather:
• oil/petroleum-based leather
conditioners
• household cleaners
262
F150 (TF6) , enUSA Vehicle Care