steering FORD F150 2014 12.G Quick Reference Guide
[x] Cancel search | Manufacturer: FORD, Model Year: 2014, Model line: F150, Model: FORD F150 2014 12.GPages: 10, PDF Size: 9 MB
Page 2 of 10

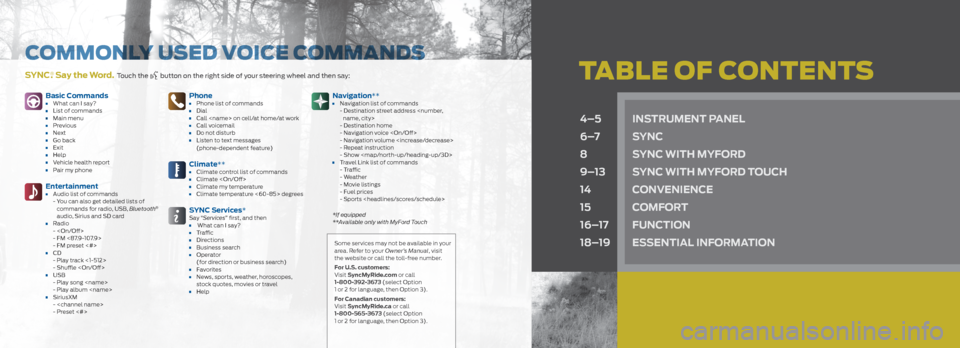
tabLE oF CoNtENtSSYnC®. Say the Word. Touch the button on the right side of your steering wheel and then say:
4–5 inS trUment panel
6–7 SYnC
8 SYnC With mYFord
9–13 SYnC With mYFord t oUCh
14 ConvenienCe
15 ComFort
16–17 FUnC tion
18–19 eSSential inF ormation
Basic Commands• What can I say?• List of commands• Main menu• Previous• Next• Go back• Exit• Help• Vehicle health report• Pair my phone
entertainment• Audio list of commands
- You can also get detailed lists of
commands for radio, USB, Bluetooth
®
audio, Sirius and SD card
• Radio -
- FM <87.9-107.9>
- FM preset <#>
• CD- Play track <1-512>
- Shuffle
• USB - Play song
- Play album
• SiriusXM-
- Preset <#>
phone• Phone list of commands• Dial• Call
(phone-dependent feature)
Climate**• Climate control list of commands• Climate
SYnC Services*Say “ Services” first, and then • What can I say?• Traffic• Directions• Business search• Operator
(for direction or business search)
• Favorites• News, sports, weather, horoscopes,
stock quotes, movies or travel
• Help
navigation**• Navigation list of commands
- Destination street address
- Destination home
- Navigation voice
- Navigation volume
- Repeat instruction
- Show
Page 3 of 10

1
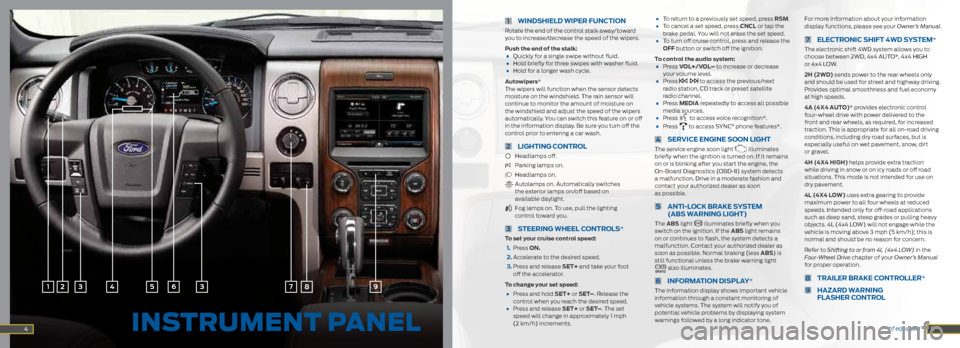
Wind Shield Wiper FUnC tion
Rotate the end of the control stalk away/toward
you to increase/decrease the speed of the wipers.
push the end of the stalk:
• Quickly for a single swipe without fluid.• Hold briefly for three swipes with washer fluid.• Hold for a longer wash cycle.
a utowipers*
The wipers will function when the sensor detects
moisture on the windshield. The rain sensor will
continue to monitor the amount of moisture on
the windshield and adjust the speed of the wipers
automatically. You can switch this feature on or off
in the information display. Be sure you turn off the
control prior to entering a car wash.
2
lighting Control
Headlamps off.
Parking lamps on.
Headlamps on.
Autolamps on. Automatically switches
the exterior lamps on/off based on
available daylight.
Fog lamps on. To use, pull the lighting
control toward you.
3
Steering Wheel C ontrolS*
to set your cruise control speed:
1. Press on.
2. Accelerate to the desired speed.
3. Press and release Set+ and take your foot
off the accelerator.
t o change your set speed:
• Press and hold Set+ or Set –. Release the
control when you reach the desired speed.
• Press and release Set+ or Set –. The set
speed will change in approximately 1 mph
(2 km/h) increments.
• To return to a previously set speed, press rS m.• To cancel a set speed, press CnCl or tap the
brake pedal. You will not erase the set speed.
• To turn off cruise control, press and release the
oFF button or switch off the ignition.
t o control the audio system:
• Press vol+/vol – to increase or decrease
your volume level.
• Press to access the previous/next
radio station, CD track or preset satellite
radio channel.
• Press media repeatedly to access all possible
media sources.
• Press to access voice recognition*.• Press to access SYNC® phone features*.
4
ServiCe engine S oon light
The service engine soon light illuminates
briefly when the ignition is turned on. If it remains
on or is blinking after you start the engine, the
On-Board Diagnostics (OBD-II) system detects
a malfunction. Drive in a moderate fashion and
contact your authorized dealer as soon
as possible.
5 anti-loCK BraKe SYS
tem
( aBS W arning light)
The aBS light illuminates briefly when you
switch on the ignition. If the aBS light remains
on or continues to flash, the system detects a
malfunction. Contact your authorized dealer as
soon as possible. Normal braking (less aBS) is
still functional unless the brake warning light
also illuminates.
6
inF ormation diSpla Y*
The information display shows important vehicle
information through a constant monitoring of
vehicle systems. The system will notify you of
potential vehicle problems by displaying system
warnings followed by a long indicator tone. For more information about your information
display functions, please see your Owner’s Manual.
7
ele
CtroniC ShiFt 4Wd SYS tem*
The electronic shift 4WD system allows you to
choose between 2WD, 4x4 AUTO*, 4x4 HIGH
or 4x4 LOW.
2h (2Wd) sends power to the rear wheels only
and should be used for street and highway driving.
Provides optimal smoothness and fuel economy
at high speeds.
4a (4x4 a Uto)* provides electronic control
four-wheel drive with power delivered to the
front and rear wheels, as required, for increased
traction. This is appropriate for all on-road driving
conditions, including dry road surfaces, but is
especially useful on wet pavement, snow, dirt
or gravel.
4h (4x4 high) helps provide extra traction
while driving in snow or on icy roads or off road
situations. This mode is not intended for use on
dry pavement.
4l (4x4 lo W) uses extra gearing to provide
maximum power to all four wheels at reduced
speeds. Intended only for off-road applications
such as deep sand, steep grades or pulling heavy
objects. 4L (4x4 LOW) will not engage while the
vehicle is moving above 3 mph (5 km/h); this is
normal and should be no reason for concern.
Refer to Shifting to or from 4L (4x4 LOW) in the
Four-Wheel Drive chapter of your Owner’s Manual
for proper operation.
8 trailer BraKe C
ontroller*
9 ha
Zard Warning
Fla Sher C ontrol
4 *if equipped
2133678945
INS
tRUmENt paNEL 5
Page 8 of 10

14
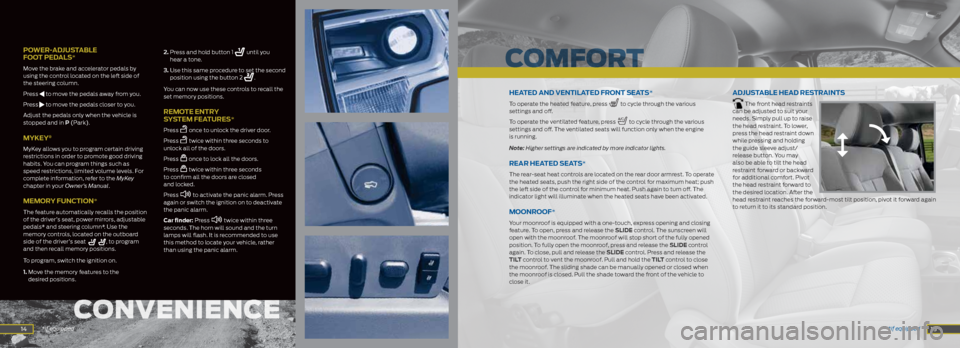
poWer -adjUS taBle
F oot pedal S*
Move the brake and accelerator pedals by
using the control located on the left side of
the steering column.
Press
to move the pedals away from you.
Press
to move the pedals closer to you.
Adjust the pedals only when the vehicle is
stopped and in p (Park).
mYKeY®
MyKey allows you to program certain driving
restrictions in order to promote good driving
habits. You can program things such as
speed restrictions, limited volume levels. For
complete information, refer to the MyKey
chapter in your Owner’s Manual.
memor Y FUnCtion*
The feature automatically recalls the position
of the driver’s seat, power mirrors, adjustable
pedals* and steering column*. Use the
memory controls, located on the outboard
side of the driver’s seat
, to program
and then recall memory positions.
To program, switch the ignition on.
1. Move the memory features to the
desired positions. 2.
Press and hold button 1
until you
hear a tone.
3. Use this same procedure to set the second
position using the button 2
.
You can now use these controls to recall the
set memory positions.
remote entr Y
SYS tem FeatUre S*
Press once to unlock the driver door.
Press
twice within three seconds to
unlock all of the doors.
Press
once to lock all the doors.
Press
twice within three seconds
to confirm all the doors are closed
and locked.
Press
to activate the panic alarm. Press
again or switch the ignition on to deactivate
the panic alarm.
Car finder: P ress
twice within three
seconds. The horn will sound and the turn
lamps will flash. It is recommended to use
this method to locate your vehicle, rather
than using the panic alarm.
15
heated and ventilated Front Seat S*
To operate the heated feature, press to cycle through the various
settings and off.
To operate the ventilated feature, press
to cycle through the various
settings and off. The ventilated seats will function only when the engine
is running.
Note: Higher settings are indicated by more indicator lights.
rear heated Seat S*
The rear-seat heat controls are located on the rear door armrest. To operate
the heated seats, push the right side of the control for maximum heat; push
the left side of the control for minimum heat. Push again to turn off. The
indicator light will illuminate when the heated seats have been activated.
moonrooF*
Your moonroof is equipped with a one-touch, express opening and closing
feature. To open, press and release the Slide control. The sunscreen will
open with the moonroof. The moonroof will stop short of the fully opened
position. To fully open the moonroof, press and release the Slide control
again. To close, pull and release the Slide control. Press and release the
tilt control to vent the moonroof. Pull and hold the tilt control to close
the moonroof. The sliding shade can be manually opened or closed when
the moonroof is closed. Pull the shade toward the front of the vehicle to
close it.
adjUStaBle head re Straint S
The front head restraints
can be adjusted to suit your
needs. Simply pull up to raise
the head restraint. To lower,
press the head restraint down
while pressing and holding
the guide sleeve adjust/
release button. You may
also be able to tilt the head
restraint forward or backward
for additional comfort. Pivot
the head restraint forward to
the desired location. After the
head restraint reaches the forward-most tilt position, pivot it forward again
to return it to its standard position.
*if equipped
*if equipped
ConvenienCe
ComFort