lights FORD F150 2015 13.G Owners Manual
[x] Cancel search | Manufacturer: FORD, Model Year: 2015, Model line: F150, Model: FORD F150 2015 13.GPages: 549, PDF Size: 5.97 MB
Page 49 of 549
The Personal Safety System provides an
improved overall level of frontal crash
protection to front seat occupants and is
designed to help further reduce the risk of
airbag-related injuries. The system is able
to analyze different occupant conditions
and crash severity before activating the
appropriate safety devices to help better
protect a range of occupants in a variety
of frontal crash situations.
The Vehicle Personal Safety System
consists of:
•
Driver and passenger dual-stage airbag
supplemental restraints.
• Front seat outboard safety belts with
pretensioners, energy management
retractors and safety belt usage
sensors.
• Driver seat position sensor.
• Front passenger sensing system.
• Passenger airbag off and on indicator
lamp.
• Front crash severity sensors.
• Restraints control module with impact
and safing sensors.
• Restraint system warning light and
backup tone.
• The electrical wiring for the airbags,
crash sensors, safety belt
pretensioners, front safety belt usage
sensors, driver seat position sensor,
front passenger sensing system and
indicator lights. How Does the Personal Safety
System Work?
The Personal Safety System can adapt the
deployment strategy of the safety devices
according to crash severity and occupant
conditions. A collection of crash and
occupant sensors provides information to
the restraints control module. During a
crash, the restraints control module may
deploy the safety belt pretensioners, one
or both stages of the dual-stage airbags
based on crash severity and occupant
conditions.
46
F-150 (), enUSA, First Printing Personal Safety System
™
Page 71 of 549
When you lock your vehicle using the
power door lock control (with the door
open, vehicle in park and ignition off), your
vehicle will search for an intelligent access
key in the passenger compartment after
you close the door. If your vehicle finds a
key, all of the doors will immediately
unlock.
In order to override the smart unlock
feature and intentionally lock the
intelligent access key inside your vehicle,
you can lock your vehicle after all doors
are closed by using the keyless entry
keypad, pressing the lock button on
another intelligent access key or touching
the locking area on the handle with another
intelligent access key in your hand.
When you open one of the front doors and
lock your vehicle using the power door lock
control, all doors will lock then unlock if
the ignition is on.
Autolock and Autounlock (If Equipped)
The autolock feature locks all the doors
when your doors are closed, the ignition is
on, and your vehicle reaches a speed
greater than
12 mph (20 km/h).
When your doors autolock while driving,
stopping the vehicle then switching the
ignition off or to accessory and opening
the driver door unlocks all your doors. This
autounlock feature remains active for 10
minutes after stopping.
Note: The doors do not autounlock if you
have electronically locked them before
opening the driver door.
Enabling or Disabling
You can enable or disable these features
independently of each other using the
information display. An authorized dealer
can also help you enable or disable these
features. See General Information (page
105
). Illuminated Entry
The interior lamps and select exterior
lamps illuminate when you unlock the
doors with the remote entry system.
The illuminated entry system turns off the
lights if:
•
The ignition is on.
• You press the remote control lock
button.
• After 25 seconds of illumination.
The dome lamp does not turn on if the
control is set to the off position.
The lights do not turn off if:
• You switch them on with the dimmer
control.
• Any door is open.
Battery Saver
The battery saver turns off the interior
lamps 30 minutes after you switch off the
ignition if a door is open and the dome
lamp switch is on. It turns off the interior
lamps after 10 minutes if the dome lamp
switch is off.
Accessory Mode Battery Saver for
Intelligent Access Keys (If Equipped)
If you leave the ignition on after leaving
your vehicle, it turns off 15 minutes after
you close all of the doors.
KEYLESS ENTRY
(If Equipped)
SECURICODE™ KEYLESS ENTRY
KEYPAD
The keypad is located near the driver
window. It is invisible until touched and
then it illuminates so you can see and
touch the appropriate buttons.
68
F-150 (), enUSA, First Printing Locks
Page 88 of 549
DAYTIME RUNNING LAMPS (If
Equipped) WARNING
The daytime running lamps system
does not activate the rear lamps and
may not provide adequate lighting
during low visibility driving conditions. Also,
the autolamps switch position may not
activate the headlamps in all low visibility
conditions, such as daytime fog. Make sure
the headlamps are switched to auto or on,
as appropriate, during all low visibility
conditions. Failure to do so may result in a
crash. Type 1 - Conventional (Non-
Configurable)
The daytime running lamps turn on when:
1. The ignition is switched to the on
position.
2. The transmission is not in park (P) for vehicles with automatic transmissions
or the parking brake is released for
vehicles with manual transmissions.
3. The lighting control is in the off, parking
lamp or autolamps positions.
4. The headlamps are off.
Type 2 - Configurable
Switch the daytime running lamps on or
off using the information display controls.
See
Information Displays (page 105).
The daytime running lamps turn on when:
1. They are switched on in the information
display. See
Information Displays
(page 105).
2. The ignition is switched to the on position. 3. The transmission is not in park (P) for
vehicles with automatic transmissions
or the parking brake is released for
vehicles with manual transmissions.
4. The lighting control is in the autolamps
position.
5. The headlamps are off.
The other lighting control switch positions
do not activate the daytime running lamps,
and you can use them to temporarily
override autolamp control.
When switched off in the information
display, the daytime running lamps are off
in all lighting control switch positions.
AUTOMATIC HIGH BEAM
CONTROL
(If Equipped)
The system automatically turns on the high
beams if it is dark enough and no other
traffic is present. When it detects the
headlights of an approaching vehicle, the
tail lamps of the preceding vehicle or street
lighting, the system turns off the high
beams before they distract other drivers.
The low beams remain on.
Note: If it appears that automatic high
beam is not functioning properly, check the
windshield in front of the camera for a
blockage. A clear view of the road is required
for proper system operation. Make sure that
authorized personnel repair any windshield
damage in the area of the camera's field of
view.
Note: If the system detects a blockage such
as bird droppings, bug splatter, snow or ice,
and you do not observe changes, the system
may go into low beam mode until you clear
the blockage. A message may also appear
in the information display noting the front
camera is blocked.
85
F-150 (), enUSA, First Printing Lighting
Page 94 of 549
Window Lock (If Equipped)
Press the control to lock or unlock the rear
window controls.
Power Sliding Back Window
(If
Equipped) WARNINGS
When operating the power sliding
back window, you must make sure
all rear seat occupants and cargo are
not in the proximity of the back window. Do not leave children unattended in
your vehicle and do not let them play
with the power sliding back window.
They may seriously injure themselves. The control is on the overhead console. Press and hold the control to open the
window. Pull and hold the control to close
the window.
Accessory Delay
(If Equipped)
You can use the window switches for
several minutes after you switch the
ignition off or until you open either front
door.
EXTERIOR MIRRORS
Power Exterior Mirrors
(If Equipped) WARNING
Do not adjust the mirrors when your
vehicle is moving.
Left-hand mirror.
A
Adjustment control.
B
Right-hand mirror.
C
To adjust your mirrors, switch your vehicle
on (with the ignition in accessory mode or
the engine running) and then:
1. Select the mirror you want to adjust. The control lights.
2. Use the adjustment control to adjust the position of the mirror.
3. Press the mirror control again. The control light turns off.
91
F-150 (), enUSA, First Printing Windows and MirrorsE176216 E176217 E144073
Page 96 of 549
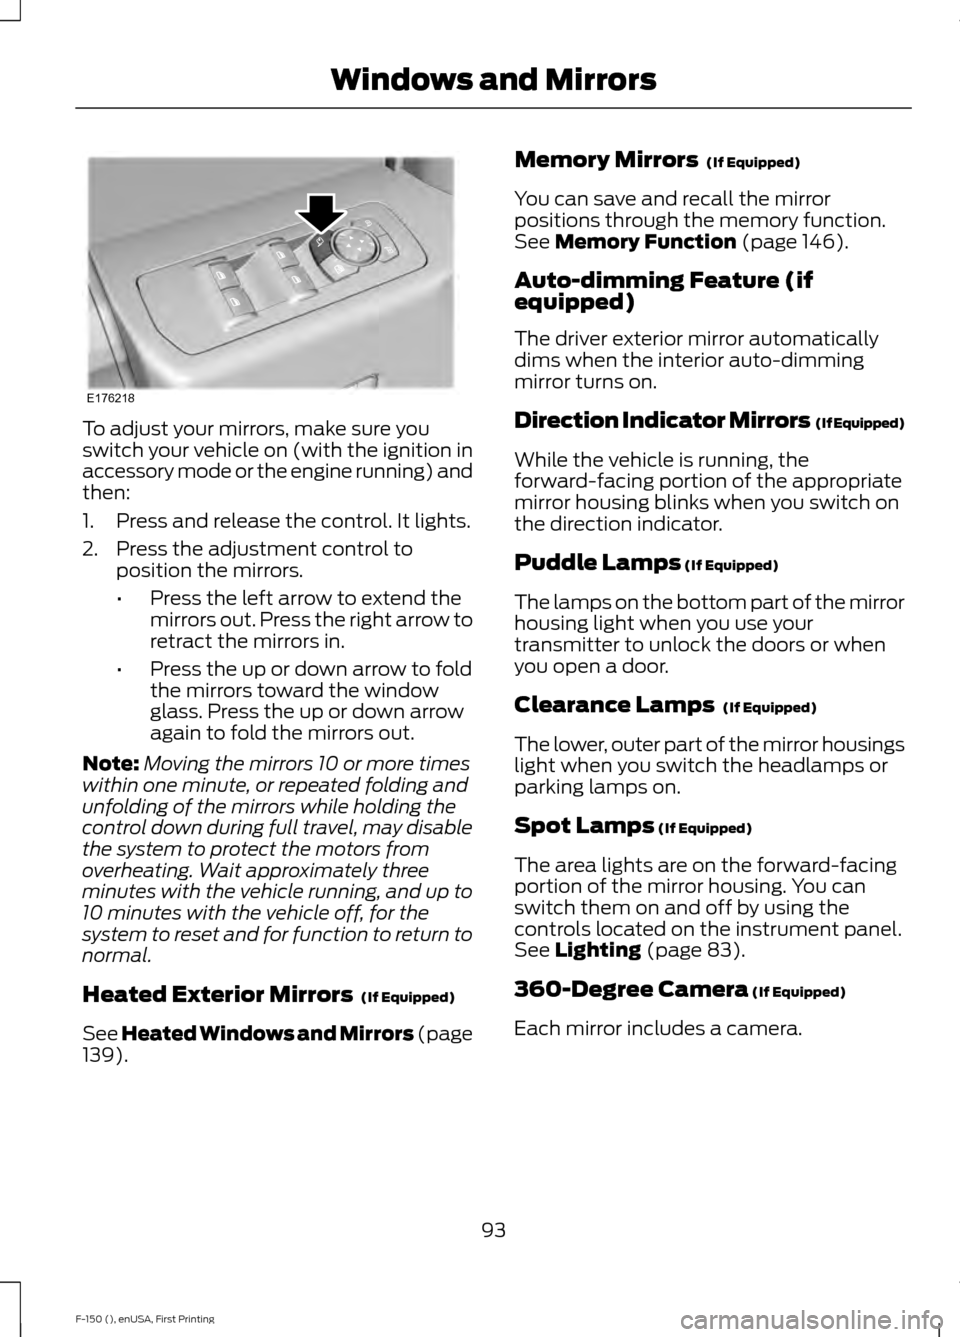
To adjust your mirrors, make sure you
switch your vehicle on (with the ignition in
accessory mode or the engine running) and
then:
1. Press and release the control. It lights.
2. Press the adjustment control to
position the mirrors.
•Press the left arrow to extend the
mirrors out. Press the right arrow to
retract the mirrors in.
• Press the up or down arrow to fold
the mirrors toward the window
glass. Press the up or down arrow
again to fold the mirrors out.
Note: Moving the mirrors 10 or more times
within one minute, or repeated folding and
unfolding of the mirrors while holding the
control down during full travel, may disable
the system to protect the motors from
overheating. Wait approximately three
minutes with the vehicle running, and up to
10 minutes with the vehicle off, for the
system to reset and for function to return to
normal.
Heated Exterior Mirrors (If Equipped)
See Heated Windows and Mirrors (page
139
). Memory Mirrors
(If Equipped)
You can save and recall the mirror
positions through the memory function.
See
Memory Function (page 146).
Auto-dimming Feature (if
equipped)
The driver exterior mirror automatically
dims when the interior auto-dimming
mirror turns on.
Direction Indicator Mirrors (If Equipped)
While the vehicle is running, the
forward-facing portion of the appropriate
mirror housing blinks when you switch on
the direction indicator.
Puddle Lamps
(If Equipped)
The lamps on the bottom part of the mirror
housing light when you use your
transmitter to unlock the doors or when
you open a door.
Clearance Lamps
(If Equipped)
The lower, outer part of the mirror housings
light when you switch the headlamps or
parking lamps on.
Spot Lamps
(If Equipped)
The area lights are on the forward-facing
portion of the mirror housing. You can
switch them on and off by using the
controls located on the instrument panel.
See
Lighting (page 83).
360-Degree Camera
(If Equipped)
Each mirror includes a camera.
93
F-150 (), enUSA, First Printing Windows and MirrorsE176218
Page 98 of 549
The mirror will dim automatically to reduce
glare when bright lights are detected from
behind your vehicle. It will automatically
return to normal reflection when you select
reverse gear to make sure you have a clear
view when backing up.
SUN VISORS
Rotate the sun visor toward the side
window and extend it rearward for extra
shade.
Illuminated Vanity Mirror (If Equipped)
Lift the cover to switch the lamp on. MOONROOF
(If Equipped) WARNINGS
Do not let children play with the
moonroof or leave them unattended
in the vehicle. They may seriously
hurt themselves. When closing the moonroof, you
should verify that it is free of
obstructions and make sure that
children and pets are not in the proximity
of the roof opening. The moonroof controls are located on the
overhead console and have a one-touch
open and close feature. To stop its
movement during one-touch operation,
press the control a second time.
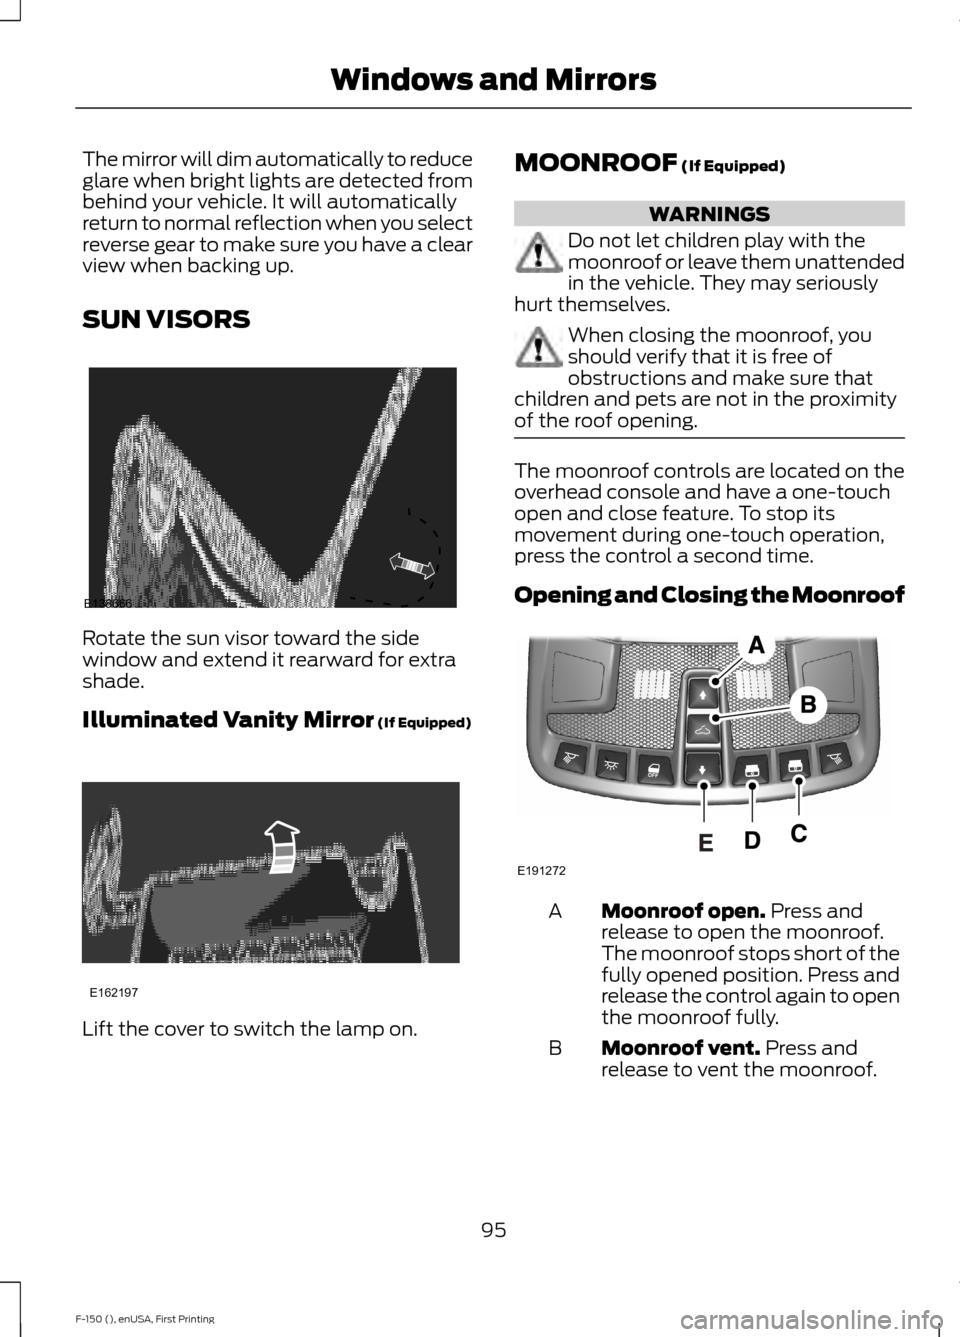
Opening and Closing the Moonroof
Moonroof open.
Press and
release to open the moonroof.
The moonroof stops short of the
fully opened position. Press and
release the control again to open
the moonroof fully.
A
Moonroof vent.
Press and
release to vent the moonroof.
B
95
F-150 (), enUSA, First Printing Windows and MirrorsE138666 E162197 E191272
Page 110 of 549
Driver Assist
Note:
Use the arrow buttons to configure different driver setting choices. Driver Assist
Engine Hours XXXXXX
Engine Hour
Driver Assist
Engine Idle Hours XXXXXX
Vehicle graphic with tire pres-
sures
Tire Pressure
Rear Park Aid - check enabled or uncheck disabled
Electric
Trlr Brake
Elect.ov.Hydro.
Trailer Sway Control - check enabled or uncheck disabled
Note: Some items are optional and may not appear.
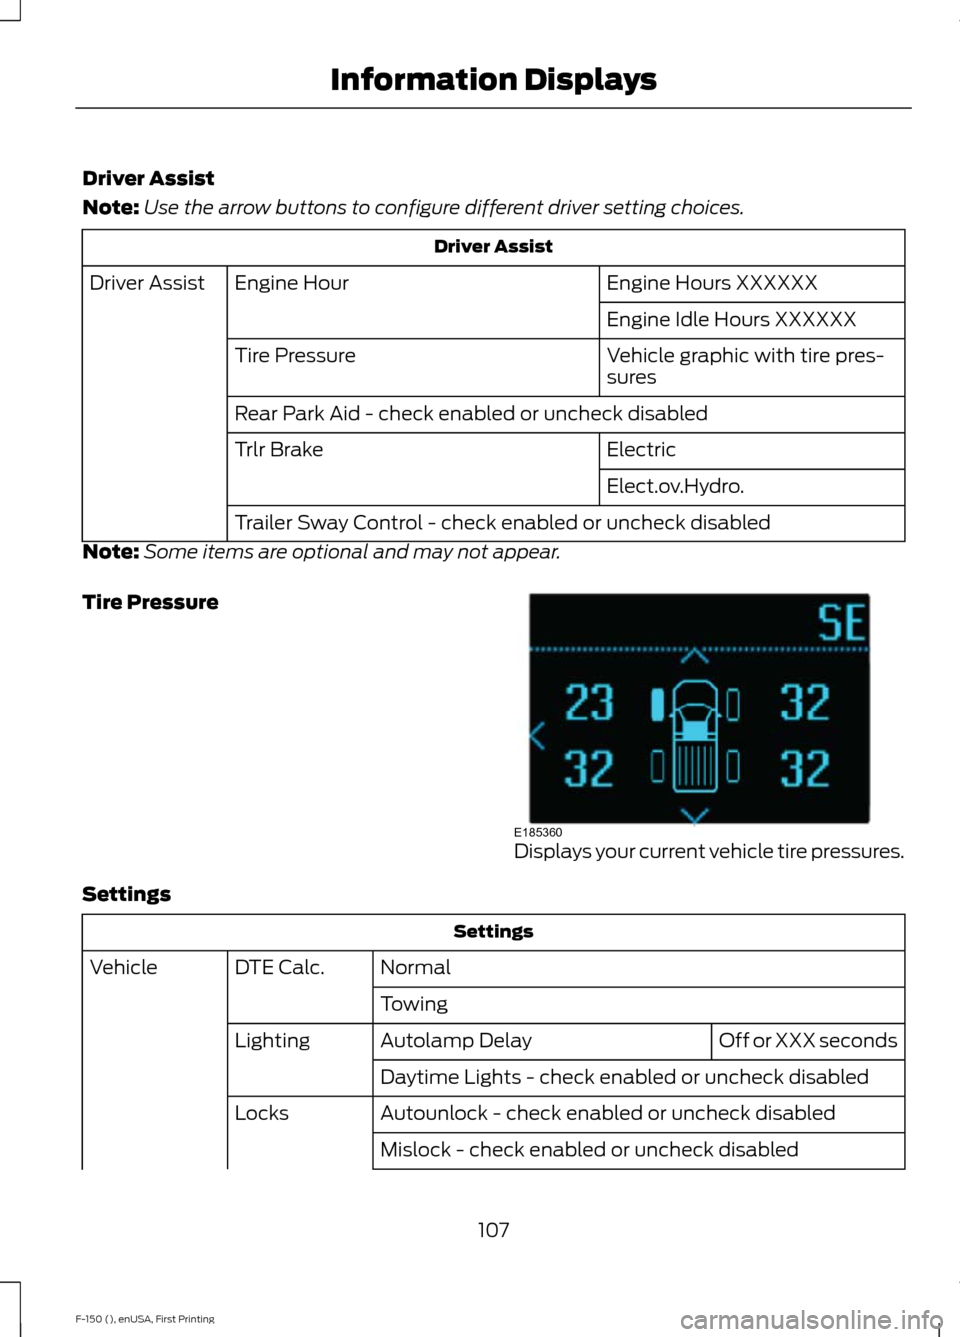
Tire Pressure Displays your current vehicle tire pressures.
Settings Settings
Normal
DTE Calc.
Vehicle
Towing Off or XXX seconds
Autolamp Delay
Lighting
Daytime Lights - check enabled or uncheck disabled
Autounlock - check enabled or uncheck disabled
Locks
Mislock - check enabled or uncheck disabled
107
F-150 (), enUSA, First Printing Information DisplaysE185360
Page 115 of 549
Settings
Settings
Blindspot - check enabled or uncheck disabled
Cross Traffic Alert - check enabled or uncheck disabled
Park Aid - check enabled or uncheck disabled Normal
DTE Calcula-
tion
Towing
Easy Entry/Exit - check enabled or uncheck disabled Off or XXX seconds
Autolamp
Delay
Lighting
Daytime Lights - check enabled or uncheck
disabled
Autolock - check enabled or uncheck
disabled
Locks
Autounlock - check enabled or uncheck
disabledDrivers Door or All Doors
Remote
Unlock
Vehicle
Auto or Last setting
Climate
Control
Remote Start
Auto or Off
Seats
5, 10 or 15 minutes
Duration
System - check enabled or uncheck
disabled
Courtesy Wipe or Rain Sensing - check
enabled or uncheck disabled
Wipers
Advanced
Settings
Hold OK to Create MyKey
Create MyKey
MyKey
Always On or User Selectable
911 Assist
Always On or User Selectable
Do Not
Disturb
Always On or User Selectable
AdvanceTrac
112
F-150 (), enUSA, First Printing Information Displays
Page 121 of 549
Off Road
Pitch, steering angle, roll, Elocker and 4X4
Power Distribution
Settings Use the arrow buttons to
configure different driver setting
choices.
Note:
Some items are optional and may
not appear. Settings
Auto High Beam - check enabled or uncheck disabled
Blindspot - check enabled or uncheck disabled
Cross Traffic Alert - check enabled or uncheck disabled
Driver Alert - check enabled or uncheck disabled
Rear Park Aid - check enabled or uncheck disabled High, Normal or Low
Sensitivity
Collision
Warn
On or Off
Warn
Adaptive or Normal
Cruise
Control
Alert only, Aid only or both
Mode
Lane keeping
Sys
High, Normal or Low
Intensity
Normal or Towing
DTE Calcula-
tion
Auto Engine Off - check enabled or uncheck disabled
Vehicle
Easy Entry/Exit - check enabled or uncheck disabled Off or XXX
seconds
Autolamp Delay
Lighting
Daytime Lights - check enabled or
uncheck disabled
Autounlock - check enabled or uncheck
disabled
Locks
118
F-150 (), enUSA, First Printing Information DisplaysE176098
Page 151 of 549
Press the heated seat symbol to cycle
through the various heat settings and off.
More indicator lights indicate warmer
settings.
Rear Heated Seats (If Equipped)
WARNING
People who are unable to feel pain
to the skin because of advanced age,
chronic illness, diabetes, spinal cord
injury, medication, alcohol use, exhaustion,
or other physical conditions, must exercise
care when using the seat heater. The seat
heater may cause burns even at low
temperatures, especially if used for long
periods of time. Do not place anything on
the seat that insulates against heat, such
as a blanket or cushion, because this may
cause the seat heater to overheat. Do not
puncture the seat with pins, needles, or
other pointed objects because this may
damage the heating element which may
cause the seat heater to overheat. An
overheated seat may cause serious
personal injury. Do not do the following:
•
Place heavy objects on the seat.
• Operate the heated seat if water or any
other liquid spills on the seat. Allow the
seat to dry thoroughly.
• Operate the heated seats unless the
engine is running. Doing so can cause
the battery to lose charge. The rear seat heat controls are located on
the rear of the center console.
Press the heated seat symbol to cycle
through the various heat settings and off.
More indicator lights indicate warmer
settings.
The heated seat module resets at every
ignition run cycle. While the ignition is in
the on position, press the heated seat
switch to enable heating mode. When
activated, they turn off automatically when
you switch off the engine.
CLIMATE CONTROLLED SEATS
(If Equipped)
Heated Seats
148
F-150 (), enUSA, First Printing SeatsE146322 E146322