battery FORD F250 1998 Owners Manual
[x] Cancel search | Manufacturer: FORD, Model Year: 1998, Model line: F250, Model: FORD F250 1998Pages: 219, PDF Size: 1.65 MB
Page 10 of 219

High beams
Illuminates when the high beam
headlamps are turned on.
Anti-theft system (if equipped)
Refer toPerimeter alarm system
in theControls and features
chapter.
Charging system
Momentarily illuminates when the
ignition is turned ON and the
engine is off. The light also
illuminates when the battery is not
charging properly, requiring
electrical system service.
Oil pressure/Engine coolant
This light will come on when the
key is in the ON position and the:
²engine coolant temperature is
very high
²engine oil pressure is low
The light serves as a notice that a
system needs your attention and to
check the engine coolant
temperature gauge and the engine
oil pressure gauge.
Refer toEngine coolant
temperature gaugeandEngine
THEFT
Instrumentation
10
ProCarManuals.com
Page 16 of 219

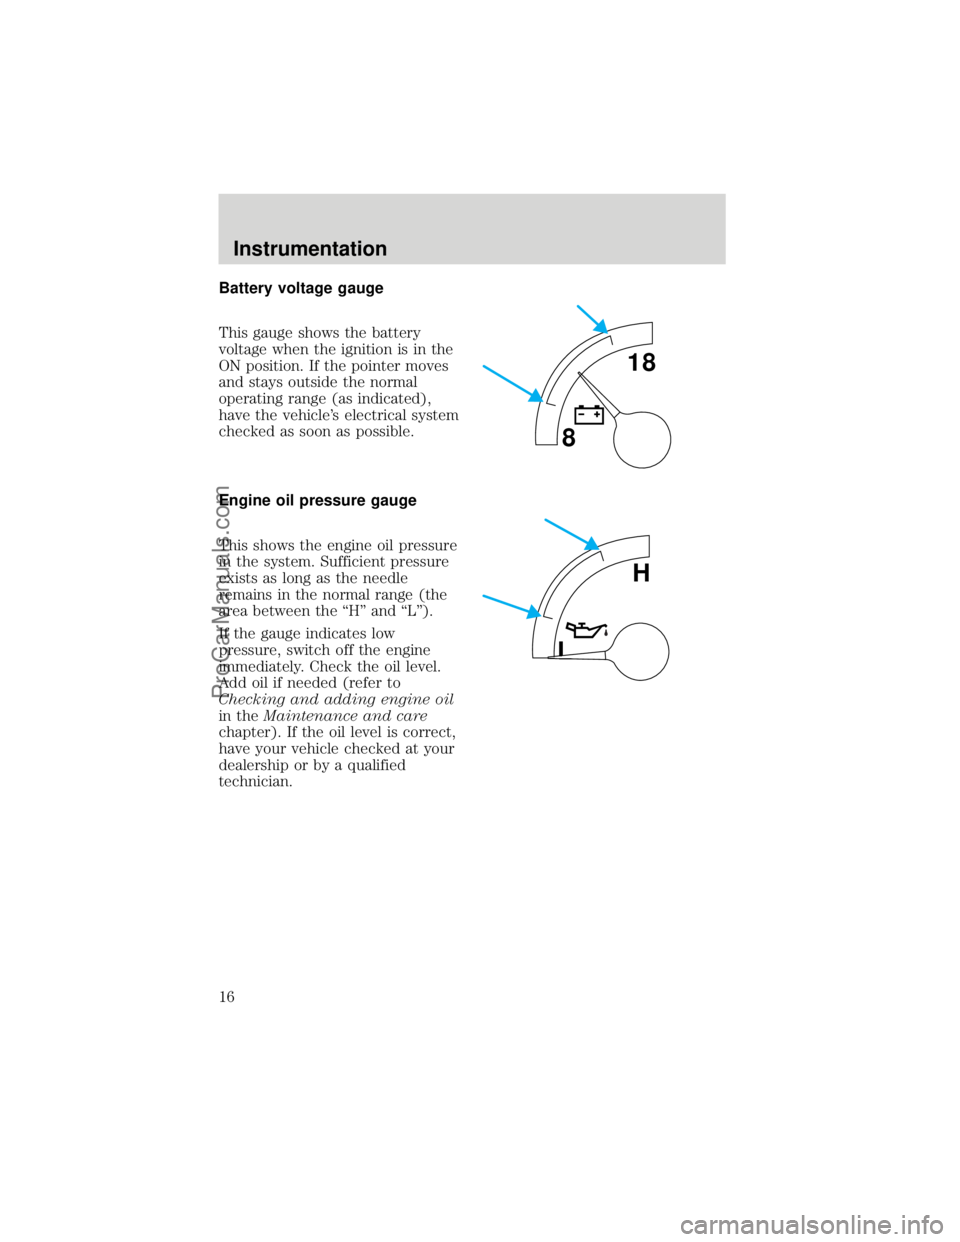
Battery voltage gauge
This gauge shows the battery
voltage when the ignition is in the
ON position. If the pointer moves
and stays outside the normal
operating range (as indicated),
have the vehicle's electrical system
checked as soon as possible.
Engine oil pressure gauge
This shows the engine oil pressure
in the system. Sufficient pressure
exists as long as the needle
remains in the normal range (the
area between the ªHº and ªLº).
If the gauge indicates low
pressure, switch off the engine
immediately. Check the oil level.
Add oil if needed (refer to
Checking and adding engine oil
in theMaintenance and care
chapter). If the oil level is correct,
have your vehicle checked at your
dealership or by a qualified
technician.
818
L
H
Instrumentation
16
ProCarManuals.com
Page 45 of 219

2. Press the power door unlock
control three times.
3. Turn the ignition key from ON
to OFF.
4. Press the power door unlock
control three times.
5. Turn the ignition back to ON.
The horn will chirp.
6. Press the unlock control, then
press the lock control. The horn
will chirp once if autolock was
deactivated or twice (one short
and one long chirp) if autolock was
activated.
7. Turn the ignition to OFF. The
horn will chirp once to confirm the
procedure is complete.
Replacing the battery
The transmitter is powered by one
coin type three-volt lithium battery
CR2032 or equivalent. Typical
operating range will allow you to
be up to 10 meters (33 feet) away
from your vehicle. A decrease in
operating range can be caused by:
²battery weakness due to time
and use
²weather conditions
²nearby radio towers
²structures around the vehicle
²other vehicles parked next to
the vehicle
To replace the battery:
1. Twist a thin coin between the
two halves of the transmitter near
Controls and features
45
ProCarManuals.com
Page 46 of 219

the key ring. DO NOT TAKE THE
FRONT PART OF THE
TRANSMITTER APART.
2. Place the positive (+) side of
new battery in the same
orientation. Refer to the diagram
inside the transmitter unit.
3. Snap the two halves back
together.
Replacing lost transmitters
Take all your vehicle's transmitters
to your dealer for reprogramming
if:
²a transmitter is lost or
²you want to purchase additional
transmitters (up to four may be
programmed).
To reprogram the transmitters,
place the key in the ignition and
switch from OFF to ON five times
in rapid succession (within 10
seconds). After doors lock/unlock,
press any button on all
transmitters (up to four). When
completed, switch the ignition to
OFF.
All transmitters must be
programmed at the same time.
Reprogramming transmitters
To reprogram all transmitters,
place the key in the ignition and
switch from OFF to ON eight times
in a row (within 10 seconds). After
doors lock/unlock, press any
button on all transmitters (up to
Controls and features
46
ProCarManuals.com
Page 47 of 219

four). When completed, switch the
ignition to OFF.
All transmitters must be
reprogrammed at the same time.
Illuminated entry
The interior lamps illuminate when
the remote entry system is used to
unlock the door(s) or sound the
personal alarm.
The system automatically turns off
after 25 seconds or when the
ignition is turned to the START or
ACC position. The dome lamp
switch (if equipped) mustnotbe
set to the OFF position for the
illuminated entry system to
operate.
The inside lights will not turn off
if:
²they have been turned on with
the dimmer control or
²any door is open.
Battery saver will shut off the
interior lamps 40 minutes after the
last door is closed.
Controls and features
47
ProCarManuals.com
Page 136 of 219

Fuse/Relay Location Fuse Amp Rating Description
14 15A Battery Saver Relay,
Interior Lamp Relay
15 5A Generic Electronic
Module (GEM)
16 20A Instrument Cluster
(W/O DRL), Daytime
Running Lamps (DRL)
Module, Hi-Beam
Headlamps (Power
supplied through
Multi-Function
Switch)
17 Ð Not Used
18 5A Park Lamp Relay,
Trailer Electronic
Brake Controller, Main
Light Switch, Trailer
Tow Run Relay, Front
Park/Turn Lamps,
License Lamps,
Stop/Park/Turn Lamps,
Tail/Side Marker
Lamps (Power
supplied through Main
Light Switch)
19 10A Instrument Cluster,
Air Bag Diagnostic
Monitor
20 5A Powertrain Control
Module (PCM),
Generic Electronic
Module (GEM)/Central
Timer Module (CTM)
Roadside emergencies
136
ProCarManuals.com
Page 137 of 219

Fuse/Relay Location Fuse Amp Rating Description
21 15A Clutch Pedal Position
(CPP) Switch (W/O
RAP), Starter
Interrupt Relay
(W/RAP)
22 10A Air Bag Diagnostic
Monitor, Passive
De-Activation (PAD)
Module
23 10A Trailer tow Battery
Charge Relay, 4X4
Hub Solenoid, 4X2
Hub Solenoid, Flasher
Relay, Shift on the Fly
Relay
24 10A Blower Relay
25 5A 4 Wheel Anti-Lock
Brake System
(4WABS) Module,
4WABS Relay
26 10A Daytime Running
Lamps (DRL) Module,
Right Headlamp
27 5A Main Light Switch,
Fog Lamp Relay
28 10A Left Headlamp
29 5A Autolamp Module,
Instrument Cluster,
Transmission Control
Switch (TCS), Brake
Warning
Resistor/Diode
Assembly (W/RABS)
Roadside emergencies
137
ProCarManuals.com
Page 138 of 219

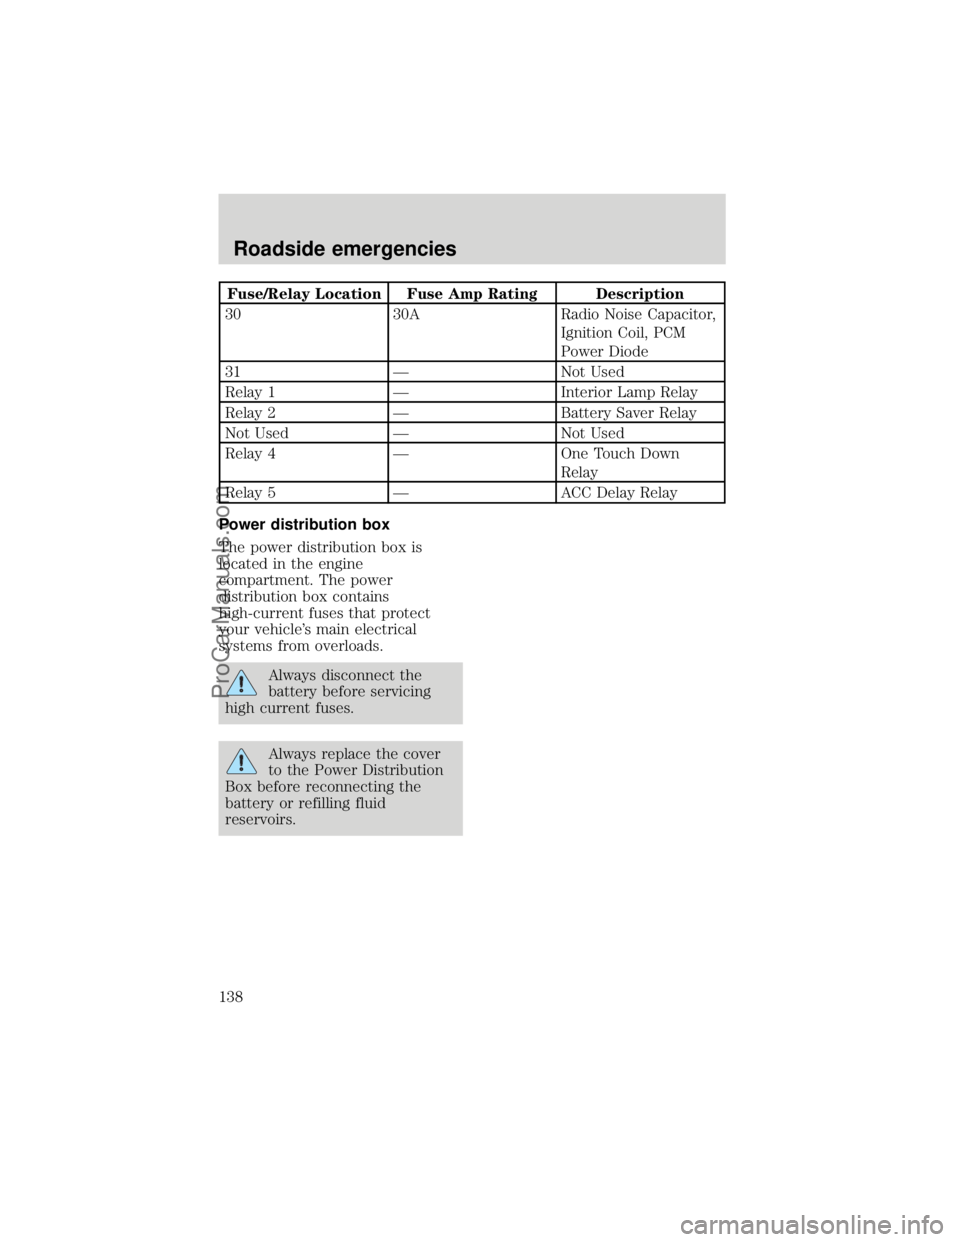
Fuse/Relay Location Fuse Amp Rating Description
30 30A Radio Noise Capacitor,
Ignition Coil, PCM
Power Diode
31 Ð Not Used
Relay 1 Ð Interior Lamp Relay
Relay 2 Ð Battery Saver Relay
Not Used Ð Not Used
Relay 4 Ð One Touch Down
Relay
Relay 5 Ð ACC Delay Relay
Power distribution box
The power distribution box is
located in the engine
compartment. The power
distribution box contains
high-current fuses that protect
your vehicle's main electrical
systems from overloads.
Always disconnect the
battery before servicing
high current fuses.
Always replace the cover
to the Power Distribution
Box before reconnecting the
battery or refilling fluid
reservoirs.
Roadside emergencies
138
ProCarManuals.com
Page 140 of 219

Fuse/Relay Location Fuse Amp Rating Description
4 15A* Rear Air Suspension
(RAS)
5 20A* Horn Relay
6 15A* Radio, Premium Sound
Amplifier, CD Changer
7 15A* Main Light Switch,
Park Lamp Relay
8 30A* Main Light Switch,
Headlamp Relay,
Multi-Function Switch
9 15A* Daytime Running
Lamps (DRL) Module,
Fog Lamp Relay
10 25A* Auxiliary Power
Socket
11 Ð Not Used
12 Ð Not Used
13 Ð Not Used
14 60A**/20A** 4 Wheel Anti-Lock
Brake System
(4WABS)
Module/Ignition Switch
(W/RABS Only)
15 50A** Rear Air Suspension
Compressor
16 40A** Trailer Tow Battery
Charge Relay, Engine
Fuse Module (Fuse 2)
17 30A** Shift on the Fly Relay,
Transfer Case Shift
Relay
18 30A** Power Seat Control
Switch
19 20A** Fuel Pump Relay
Roadside emergencies
140
ProCarManuals.com
Page 141 of 219

Fuse/Relay Location Fuse Amp Rating Description
20 50A** Ignition Switch
21 50A** Ignition Switch
22 50A** Junction Box
Fuse/Relay Panel
Battery Feed
23 40A** Blower Relay
24 30A** PCM Power Relay,
Engine Fuse Module
(Fuse 1)
25 30A** Junction Box
Fuse/Relay Panel, ACC
Delay Relay
26 Ð Not Used
27 Ð Not Used
28 30A** Trailer Electronic
Brake Controller
29 Ð Not Used
*Mini fuses **Maxi
fuses
CHANGING THE TIRES
If you get a flat tire while driving,
do not apply the brake heavily.
Instead, gradually decrease your
speed. Hold the steering wheel
firmly and slowly move to a safe
place on the side of the road.
Spare tire information
Your vehicle is equipped with a
spare tire that may be used as a
spare or a regular tire. The spare
tire is not equipped with wheel
trim. The wheel trim from the
original wheel/tire may be used on
the spare.
Roadside emergencies
141
ProCarManuals.com