FORD F250 SUPER DUTY 2015 Owners Manual
Manufacturer: FORD, Model Year: 2015, Model line: F250 SUPER DUTY, Model: FORD F250 SUPER DUTY 2015Pages: 470, PDF Size: 18.27 MB
Page 171 of 470
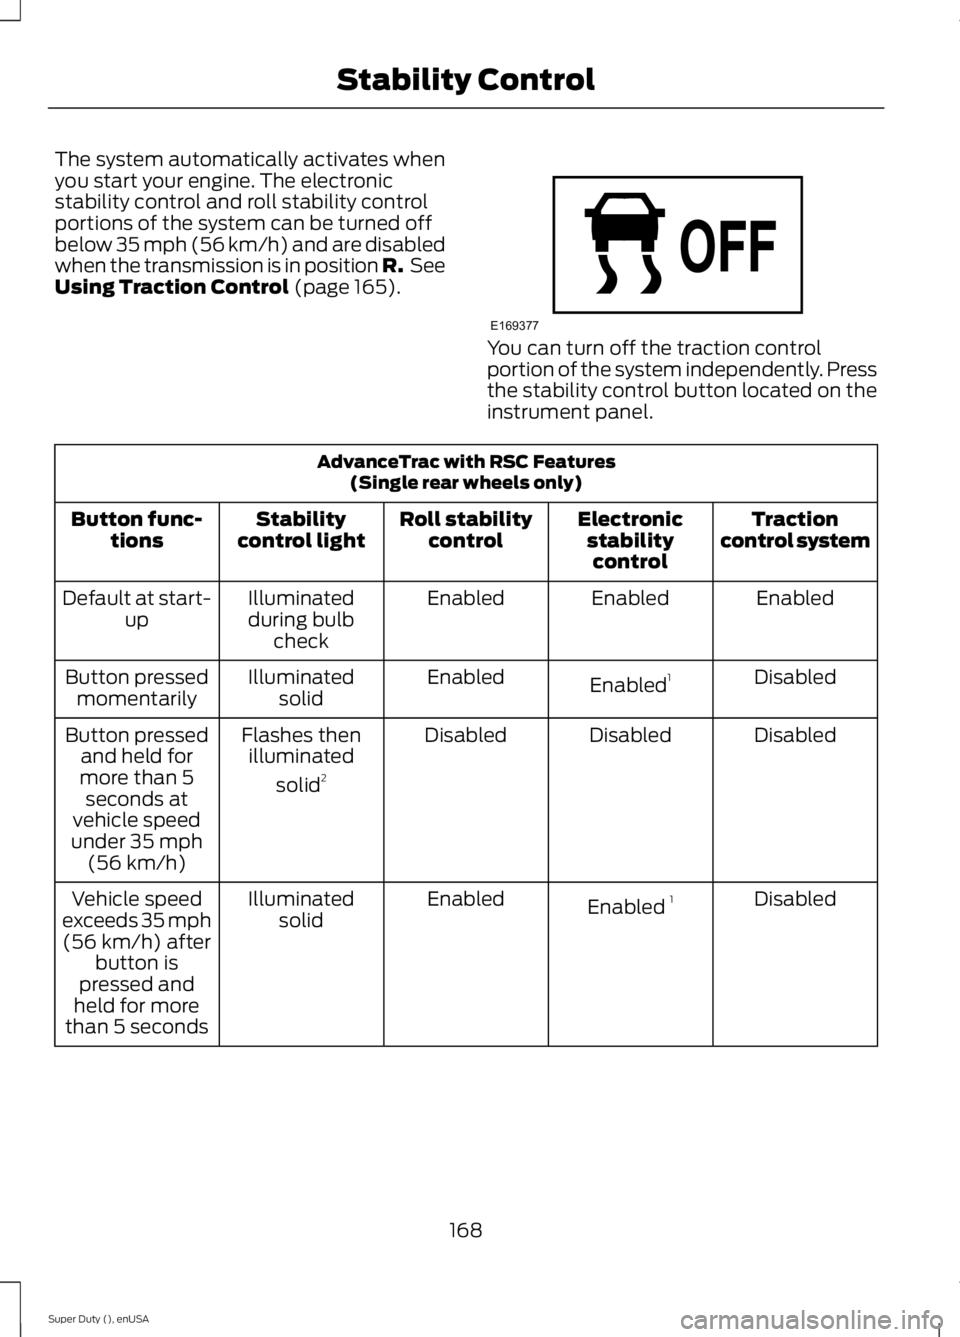
The system automatically activates whenyou start your engine. The electronicstability control and roll stability controlportions of the system can be turned offbelow 35 mph (56 km/h) and are disabledwhen the transmission is in position R. SeeUsing Traction Control (page 165).
You can turn off the traction controlportion of the system independently. Pressthe stability control button located on theinstrument panel.
AdvanceTrac with RSC Features(Single rear wheels only)
Tractioncontrol systemElectronicstabilitycontrol
Roll stabilitycontrolStabilitycontrol lightButton func-tions
EnabledEnabledEnabledIlluminatedduring bulbcheck
Default at start-up
DisabledEnabled1EnabledIlluminatedsolidButton pressedmomentarily
DisabledDisabledDisabledFlashes thenilluminated
solid2
Button pressedand held formore than 5seconds atvehicle speedunder 35 mph(56 km/h)
DisabledEnabled 1EnabledIlluminatedsolidVehicle speedexceeds 35 mph(56 km/h) afterbutton ispressed andheld for morethan 5 seconds
168
Super Duty (), enUSA
Stability ControlE169377
Page 172 of 470
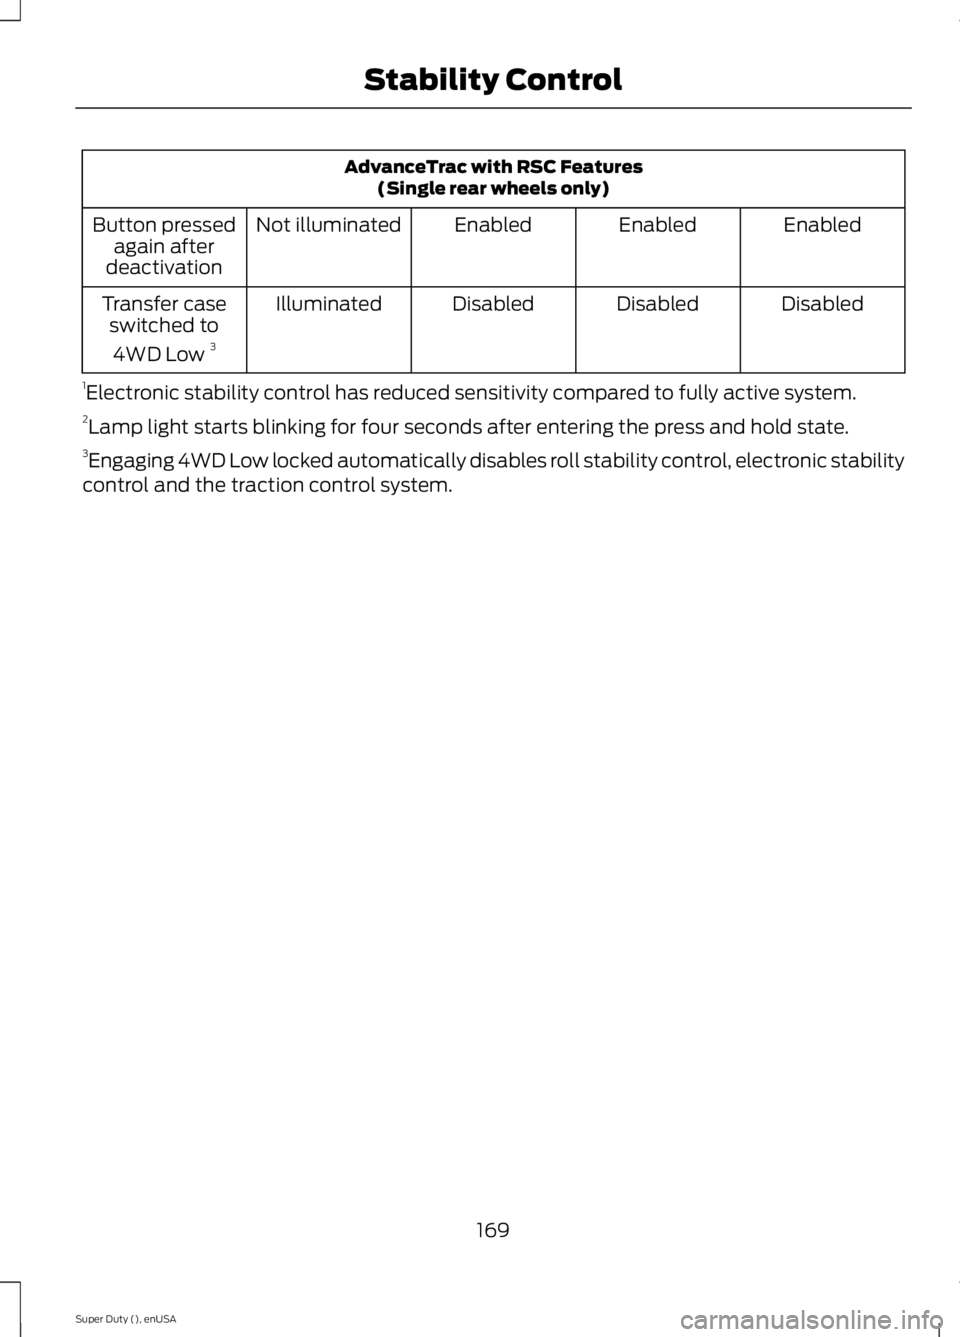
AdvanceTrac with RSC Features(Single rear wheels only)
EnabledEnabledEnabledNot illuminatedButton pressedagain afterdeactivation
DisabledDisabledDisabledIlluminatedTransfer caseswitched to
4WD Low 3
1Electronic stability control has reduced sensitivity compared to fully active system.2Lamp light starts blinking for four seconds after entering the press and hold state.3Engaging 4WD Low locked automatically disables roll stability control, electronic stabilitycontrol and the traction control system.
169
Super Duty (), enUSA
Stability Control
Page 173 of 470
PRINCIPLE OF OPERATION
WARNINGS
Hill descent control cannot controldescent in all surface conditions andcircumstances, such as ice orextremely steep grades. Hill descentcontrol is a driver assist system and cannotsubstitute for good judgment by the driver.Failure to do so may result in loss of vehiclecontrol, crash or serious injury.
Hill descent control does not providehill hold at zero miles per hour (0kilometers per hour). When stopped,the parking brake must be applied or thevehicle must be placed in P (Park) or itmay roll away.
Hill descent control allows the driver to setand maintain vehicle speed whiledescending steep grades in various surfaceconditions.
Hill descent control can maintain vehiclespeeds on downhill grades between 2 mph(3 km/h) and 12 mph (20 km/h). Above 20mph (32 km/h), the system remainsarmed, but descent speed cannot be setor maintained.
Hill descent control requires a coolingdown interval after a period of sustaineduse. The amount of time that the featurecan remain active before cooling varieswith conditions. The system will provide awarning in the message center and a chimewill sound when the system is about todisengage for cooling. At this time,manually apply the brakes as needed tomaintain descent speed.
USING HILL DESCENT
CONTROL
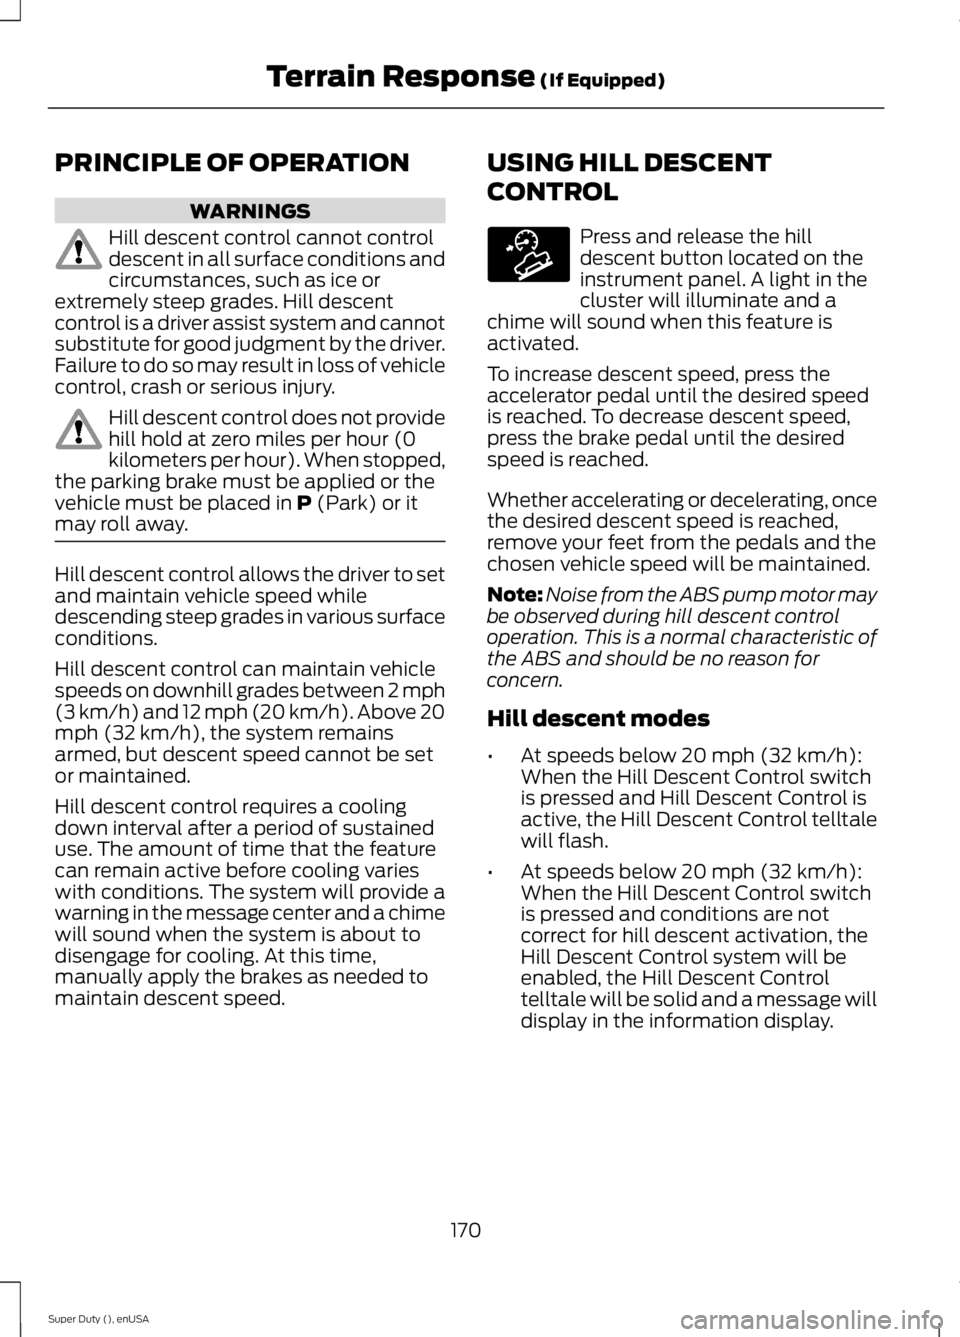
Press and release the hilldescent button located on theinstrument panel. A light in thecluster will illuminate and achime will sound when this feature isactivated.
To increase descent speed, press theaccelerator pedal until the desired speedis reached. To decrease descent speed,press the brake pedal until the desiredspeed is reached.
Whether accelerating or decelerating, oncethe desired descent speed is reached,remove your feet from the pedals and thechosen vehicle speed will be maintained.
Note:Noise from the ABS pump motor maybe observed during hill descent controloperation. This is a normal characteristic ofthe ABS and should be no reason forconcern.
Hill descent modes
•At speeds below 20 mph (32 km/h):When the Hill Descent Control switchis pressed and Hill Descent Control isactive, the Hill Descent Control telltalewill flash.
•At speeds below 20 mph (32 km/h):When the Hill Descent Control switchis pressed and conditions are notcorrect for hill descent activation, theHill Descent Control system will beenabled, the Hill Descent Controltelltale will be solid and a message willdisplay in the information display.
170
Super Duty (), enUSA
Terrain Response (If Equipped)E163957
Page 174 of 470
•At speeds above 20 mph (32 km/h):When the Hill Descent Control switchis pressed, the Hill Descent Controlsystem will be enabled, the telltale inthe cluster will not be illuminated anda message will be displayed in theinformation display.
Refer to the Information Displays foradditional Hill Descent Control messages.See Information Messages (page 92).
171
Super Duty (), enUSA
Terrain Response (If Equipped)
Page 175 of 470
PARKING AID (IF EQUIPPED)
WARNINGS
To help avoid personal injury, pleaseread and understand the limitationsof the system as contained in thissection. Sensing is only an aid for some(generally large and fixed) objects whenmoving in reverse on a flat surface atparking speeds. Traffic control systems,inclement weather, air brakes, and externalmotors and fans may also affect thefunction of the sensing system; this mayinclude reduced performance or a falseactivation.
To help avoid personal injury, alwaysuse caution when in R (Reverse) andwhen using the sensing system.
This system is not designed toprevent contact with small or movingobjects. The system is designed toprovide a warning to assist the driver indetecting large stationary objects to avoiddamaging the vehicle. The system may notdetect smaller objects, particularly thoseclose to the ground.
Certain add-on devices such as largetrailer hitches, bike or surfboard racksand any device that may block thenormal detection zone of the system, maycreate false beeps.
Note:Keep the sensors, located on thebumper or fascia, free from snow, ice andlarge accumulations of dirt. If the sensorsare covered, the system’s accuracy can beaffected. Do not clean the sensors withsharp objects.
Note:If your vehicle sustains damage tothe bumper or fascia, leaving it misalignedor bent, the sensing zone may be alteredcausing inaccurate measurement ofobstacles or false alarms.
Note:If your vehicle is equipped withMyKey™, it is possible to prevent turningthe sensing system off. See MyKey™ (page50).
Note:If your vehicle is equipped with a fullyintegrated electronic trailer brake controller(TBC) and a trailer with electric trailerbrakes is connected to your vehicle, the RSSwill be disabled. When the vehicle is shiftedinto reverse, the information display willremain in the Rear Park Aid Off selection.For more information on the TBC, SeeTrailer Sway Control (page 190).
The sensing system warns the driver ofobstacles within a certain range of thebumper area. The system turns onautomatically whenever the ignition isswitched on.
When receiving a detection warning, theradio volume is reduced to apredetermined level. After the warninggoes away, the radio volume returns to theprevious level.
Rear Sensing System
The rear sensors are only active when thetransmission is in R (Reverse). As thevehicle moves closer to the obstacle, therate of the audible warning increases.When the obstacle is fewer than 12 inches(30 centimeters) away, the warningsounds continuously. If a stationary orreceding object is detected farther than 12inches (30 centimeters) from the side ofthe vehicle, the tone sounds for only threeseconds. Once the system detects anobject approaching, the warning soundsagain.
172
Super Duty (), enUSA
Parking Aids
Page 176 of 470
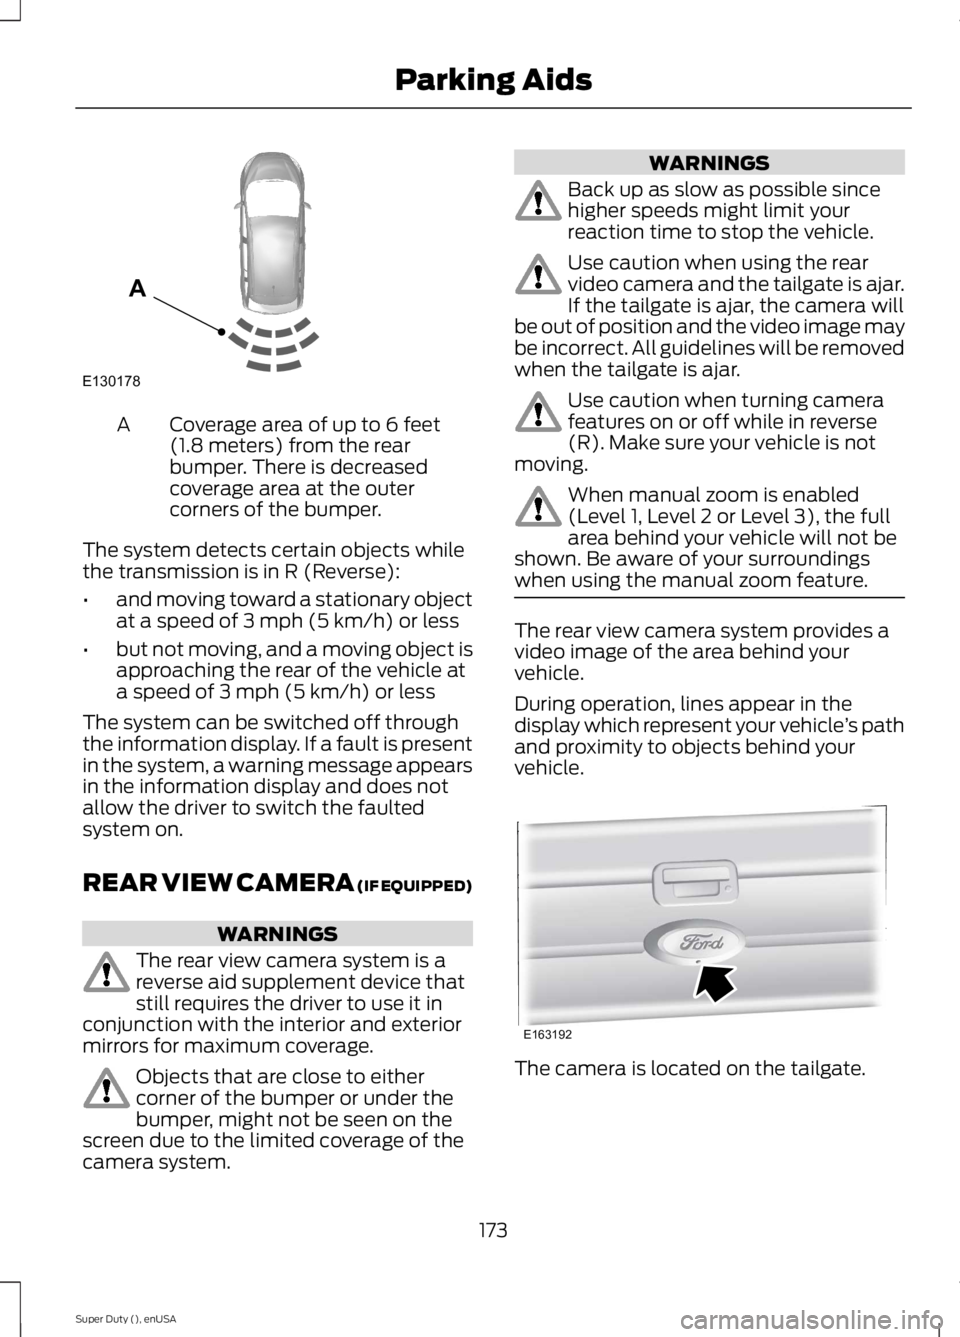
Coverage area of up to 6 feet(1.8 meters) from the rearbumper. There is decreasedcoverage area at the outercorners of the bumper.
A
The system detects certain objects whilethe transmission is in R (Reverse):
•and moving toward a stationary objectat a speed of 3 mph (5 km/h) or less
•but not moving, and a moving object isapproaching the rear of the vehicle ata speed of 3 mph (5 km/h) or less
The system can be switched off throughthe information display. If a fault is presentin the system, a warning message appearsin the information display and does notallow the driver to switch the faultedsystem on.
REAR VIEW CAMERA (IF EQUIPPED)
WARNINGS
The rear view camera system is areverse aid supplement device thatstill requires the driver to use it inconjunction with the interior and exteriormirrors for maximum coverage.
Objects that are close to eithercorner of the bumper or under thebumper, might not be seen on thescreen due to the limited coverage of thecamera system.
WARNINGS
Back up as slow as possible sincehigher speeds might limit yourreaction time to stop the vehicle.
Use caution when using the rearvideo camera and the tailgate is ajar.If the tailgate is ajar, the camera willbe out of position and the video image maybe incorrect. All guidelines will be removedwhen the tailgate is ajar.
Use caution when turning camerafeatures on or off while in reverse(R). Make sure your vehicle is notmoving.
When manual zoom is enabled(Level 1, Level 2 or Level 3), the fullarea behind your vehicle will not beshown. Be aware of your surroundingswhen using the manual zoom feature.
The rear view camera system provides avideo image of the area behind yourvehicle.
During operation, lines appear in thedisplay which represent your vehicle’s pathand proximity to objects behind yourvehicle.
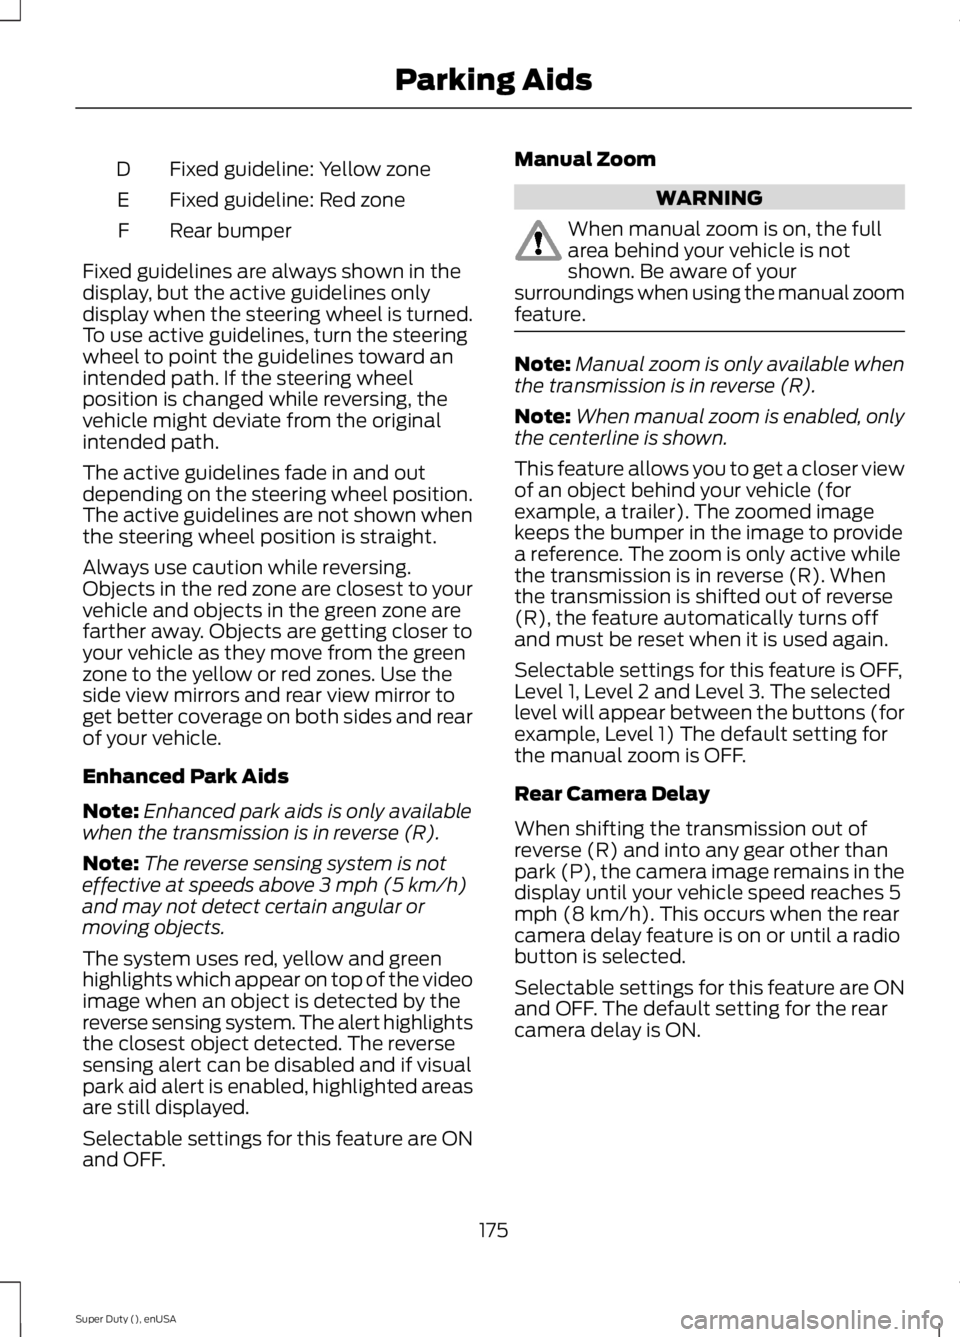
The camera is located on the tailgate.
173
Super Duty (), enUSA
Parking AidsE130178
A E163192
Page 177 of 470
Using the Rear View CameraSystem
The rear view camera system displayswhat is behind your vehicle when you placethe transmission in reverse (R).
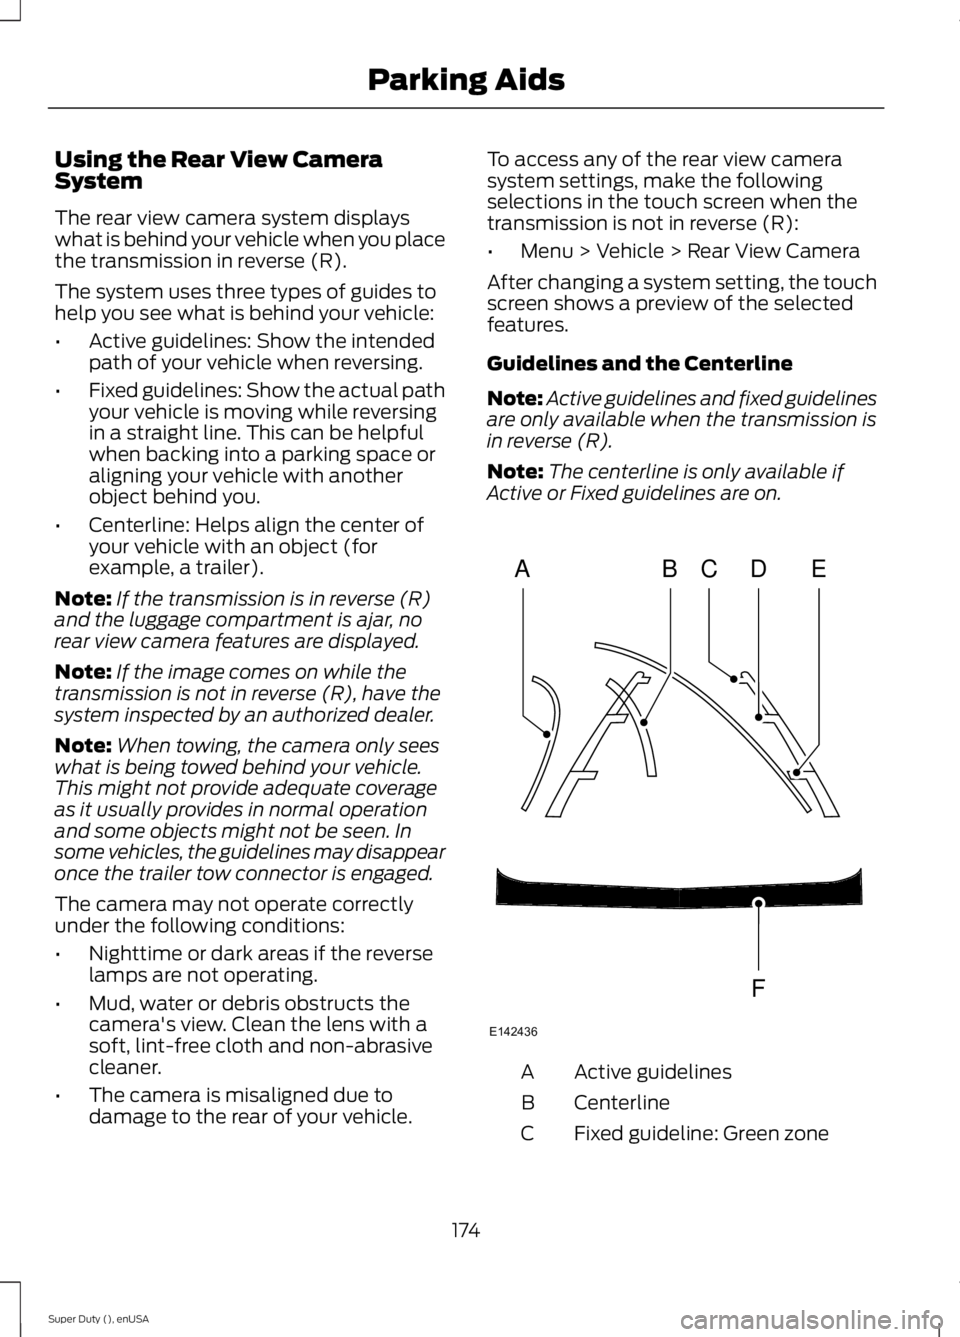
The system uses three types of guides tohelp you see what is behind your vehicle:
•Active guidelines: Show the intendedpath of your vehicle when reversing.
•Fixed guidelines: Show the actual pathyour vehicle is moving while reversingin a straight line. This can be helpfulwhen backing into a parking space oraligning your vehicle with anotherobject behind you.
•Centerline: Helps align the center ofyour vehicle with an object (forexample, a trailer).
Note:If the transmission is in reverse (R)and the luggage compartment is ajar, norear view camera features are displayed.
Note:If the image comes on while thetransmission is not in reverse (R), have thesystem inspected by an authorized dealer.
Note:When towing, the camera only seeswhat is being towed behind your vehicle.This might not provide adequate coverageas it usually provides in normal operationand some objects might not be seen. Insome vehicles, the guidelines may disappearonce the trailer tow connector is engaged.
The camera may not operate correctlyunder the following conditions:
•Nighttime or dark areas if the reverselamps are not operating.
•Mud, water or debris obstructs thecamera's view. Clean the lens with asoft, lint-free cloth and non-abrasivecleaner.
•The camera is misaligned due todamage to the rear of your vehicle.
To access any of the rear view camerasystem settings, make the followingselections in the touch screen when thetransmission is not in reverse (R):
•Menu > Vehicle > Rear View Camera
After changing a system setting, the touchscreen shows a preview of the selectedfeatures.
Guidelines and the Centerline
Note:Active guidelines and fixed guidelinesare only available when the transmission isin reverse (R).
Note:The centerline is only available ifActive or Fixed guidelines are on.
Active guidelinesA
CenterlineB
Fixed guideline: Green zoneC
174
Super Duty (), enUSA
Parking AidsABCD
F
E
E142436
Page 178 of 470
Fixed guideline: Yellow zoneD
Fixed guideline: Red zoneE
Rear bumperF
Fixed guidelines are always shown in thedisplay, but the active guidelines onlydisplay when the steering wheel is turned.To use active guidelines, turn the steeringwheel to point the guidelines toward anintended path. If the steering wheelposition is changed while reversing, thevehicle might deviate from the originalintended path.
The active guidelines fade in and outdepending on the steering wheel position.The active guidelines are not shown whenthe steering wheel position is straight.
Always use caution while reversing.Objects in the red zone are closest to yourvehicle and objects in the green zone arefarther away. Objects are getting closer toyour vehicle as they move from the greenzone to the yellow or red zones. Use theside view mirrors and rear view mirror toget better coverage on both sides and rearof your vehicle.
Enhanced Park Aids
Note:Enhanced park aids is only availablewhen the transmission is in reverse (R).
Note:The reverse sensing system is noteffective at speeds above 3 mph (5 km/h)and may not detect certain angular ormoving objects.
The system uses red, yellow and greenhighlights which appear on top of the videoimage when an object is detected by thereverse sensing system. The alert highlightsthe closest object detected. The reversesensing alert can be disabled and if visualpark aid alert is enabled, highlighted areasare still displayed.
Selectable settings for this feature are ONand OFF.
Manual Zoom
WARNING
When manual zoom is on, the fullarea behind your vehicle is notshown. Be aware of yoursurroundings when using the manual zoomfeature.
Note:Manual zoom is only available whenthe transmission is in reverse (R).
Note:When manual zoom is enabled, onlythe centerline is shown.
This feature allows you to get a closer viewof an object behind your vehicle (forexample, a trailer). The zoomed imagekeeps the bumper in the image to providea reference. The zoom is only active whilethe transmission is in reverse (R). Whenthe transmission is shifted out of reverse(R), the feature automatically turns offand must be reset when it is used again.
Selectable settings for this feature is OFF,Level 1, Level 2 and Level 3. The selectedlevel will appear between the buttons (forexample, Level 1) The default setting forthe manual zoom is OFF.
Rear Camera Delay
When shifting the transmission out ofreverse (R) and into any gear other thanpark (P), the camera image remains in thedisplay until your vehicle speed reaches 5mph (8 km/h). This occurs when the rearcamera delay feature is on or until a radiobutton is selected.
Selectable settings for this feature are ONand OFF. The default setting for the rearcamera delay is ON.
175
Super Duty (), enUSA
Parking Aids
Page 179 of 470
PRINCIPLE OF OPERATION
Cruise control lets you maintain a setspeed without keeping your foot on theaccelerator pedal. You can use cruisecontrol when your vehicle speed is greaterthan 20 mph (30 km/h).
USING CRUISE CONTROL
WARNINGS
Do not use cruise control in heavytraffic, on winding roads or when theroad surface is slippery. This couldresult in loss of vehicle control, seriousinjury or death.
When you are going downhill, yourvehicle speed may increase abovethe set speed. The system will notapply the brakes. Change down a gear toassist the system in maintaining the setspeed. Failure to do so could result in lossof vehicle control, serious injury or death.
Note:Cruise control will disengage if thevehicle speed decreases more than 10 mph(16 km/h) below your set speed whiledriving uphill.
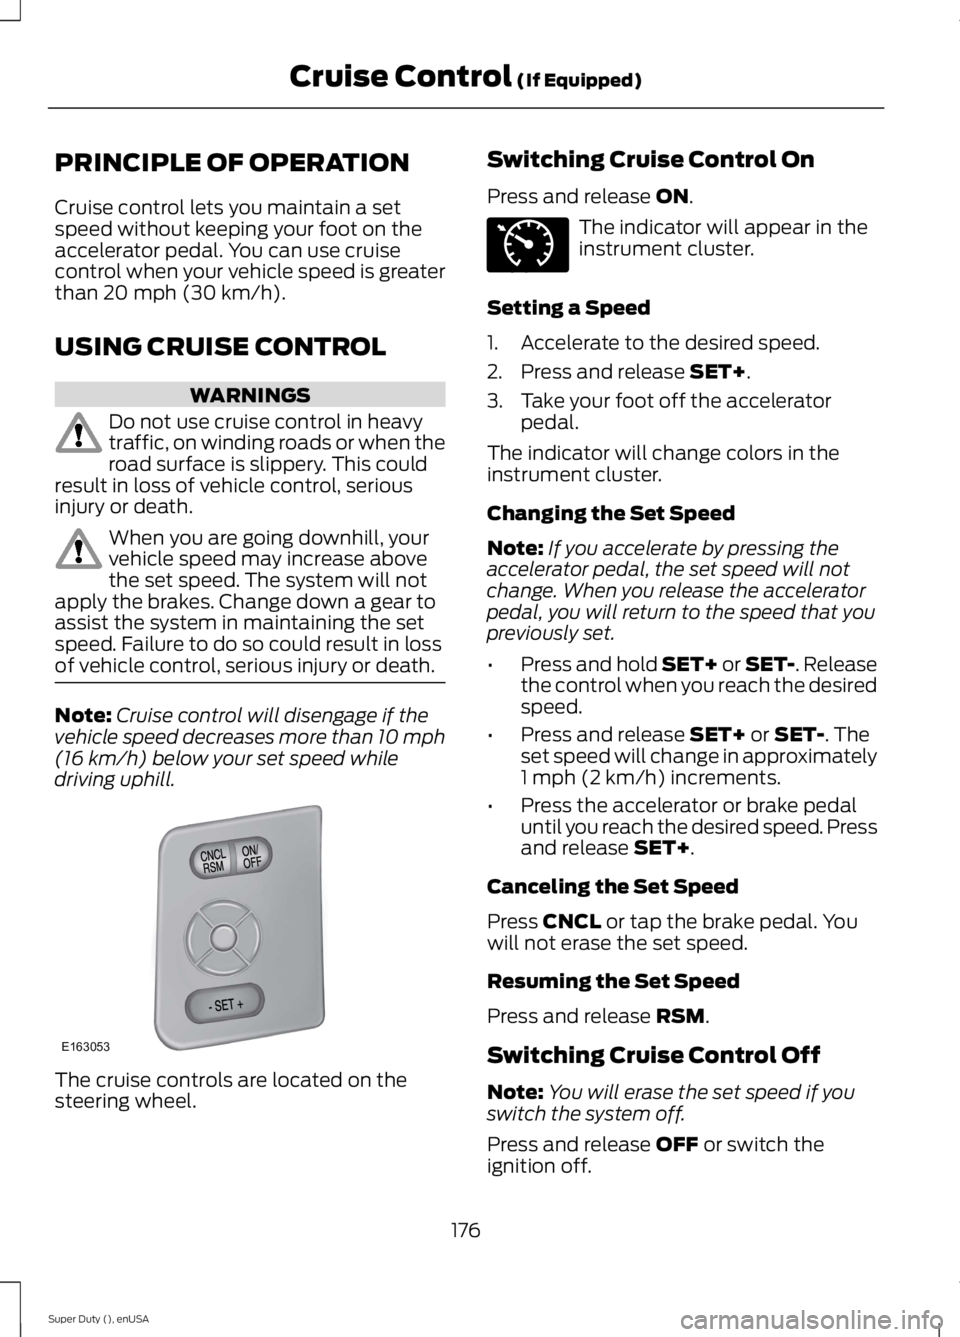
The cruise controls are located on thesteering wheel.
Switching Cruise Control On
Press and release ON.
The indicator will appear in theinstrument cluster.
Setting a Speed
1. Accelerate to the desired speed.
2. Press and release SET+.
3. Take your foot off the acceleratorpedal.
The indicator will change colors in theinstrument cluster.
Changing the Set Speed
Note:If you accelerate by pressing theaccelerator pedal, the set speed will notchange. When you release the acceleratorpedal, you will return to the speed that youpreviously set.
•Press and hold SET+ or SET-. Releasethe control when you reach the desiredspeed.
•Press and release SET+ or SET-. Theset speed will change in approximately1 mph (2 km/h) increments.
•Press the accelerator or brake pedaluntil you reach the desired speed. Pressand release SET+.
Canceling the Set Speed
Press CNCL or tap the brake pedal. Youwill not erase the set speed.
Resuming the Set Speed
Press and release RSM.
Switching Cruise Control Off
Note:You will erase the set speed if youswitch the system off.
Press and release OFF or switch theignition off.
176
Super Duty (), enUSA
Cruise Control (If Equipped)E163053 E71340
Page 180 of 470
STEERING
To help prevent damage to the powersteering system:
•Never hold the steering wheel at itsfurthest turning points (until it stops)for more than three to five secondswhen the engine is running.
•Do not operate the vehicle with a lowpower steering pump fluid level (belowthe MIN mark on the reservoir).
•Some noise is normal during operation.If excessive, check for low powersteering pump fluid level beforeseeking service by your dealer.
•Heavy or uneven efforts may be causedby low power steering fluid. Check forlow power steering pump fluid levelbefore seeking service by your dealer.
•Do not fill the power steering pumpreservoir above the MAX mark on thereservoir, as this may result in leaksfrom the reservoir.
If the power steering system breaks down(or if the engine is turned off), you cansteer the vehicle manually, but it takesmore effort.
If the steering wanders or pulls, check for:
•an improperly inflated tire
•uneven tire wear
•loose or worn suspension components
•loose or worn steering components
•improper vehicle alignment
If any steering components are serviced orreplaced, install new fasteners (many arecoated with thread adhesive or haveprevailing torque features which may notbe re-used). Never re-use a bolt or nut.Torque fasteners to specifications.
A high crown in the road or high crosswindsmay also make the steering seem towander or pull.
177
Super Duty (), enUSA
Driving Aids