FORD F250 SUPER DUTY 2015 Owners Manual
Manufacturer: FORD, Model Year: 2015, Model line: F250 SUPER DUTY, Model: FORD F250 SUPER DUTY 2015Pages: 470, PDF Size: 18.27 MB
Page 201 of 470
Trailer Brakes
WARNING
Do not connect a trailer'shydraulic brake systemdirectly to your vehicle's brakesystem. Your vehicle may not haveenough braking power and yourchances of having a collisiongreatly increase.
Electric brakes and manual,automatic or surge-type trailerbrakes are safe if you install themproperly and adjust them to themanufacturer's specifications. Thetrailer brakes must meet local andfederal regulations.
The rating for the tow vehicle'sbraking system operation is atthe gross vehicle weight rating,not the gross combined weightrating.
Separate functioning brakesystems are required for safecontrol of towed vehicles andtrailers weighing more than1500 pounds (680 kilograms)when loaded.
Integrated Trailer BrakeController (If Equipped)
WARNING
The Ford trailer brakecontroller has been verifiedto be compatible with trailershaving electric-actuated drumbrakes (one to four axles) andsome electric-over-hydraulicbrakes. It will not activatehydraulic surge-style trailerbrakes. It is the responsibility ofthe customer to ensure that thetrailer brakes are adjustedappropriately, functioningnormally and all electricconnections are properly made.Failure to do so may result in lossof vehicle control, crash or serious
injury.
When used properly, the trailerbrake controller assists in smoothand effective trailer braking bypowering the trailer’s electric orelectric-over-hydraulic brakeswith a proportional output basedon the towing vehicle’s brakepressure.
198
Super Duty (), enUSA
TowingB
A
E163166
Page 202 of 470
You can adjust the amount ofinitial trailer brake output byselecting one of three settingsthrough the message center.
Ford has tested the trailer brakecontroller to be compatible withseveral major brands ofelectric-over-hydraulic trailerbrakes. Contact an authorizeddealer for information on whichbrands you can use.
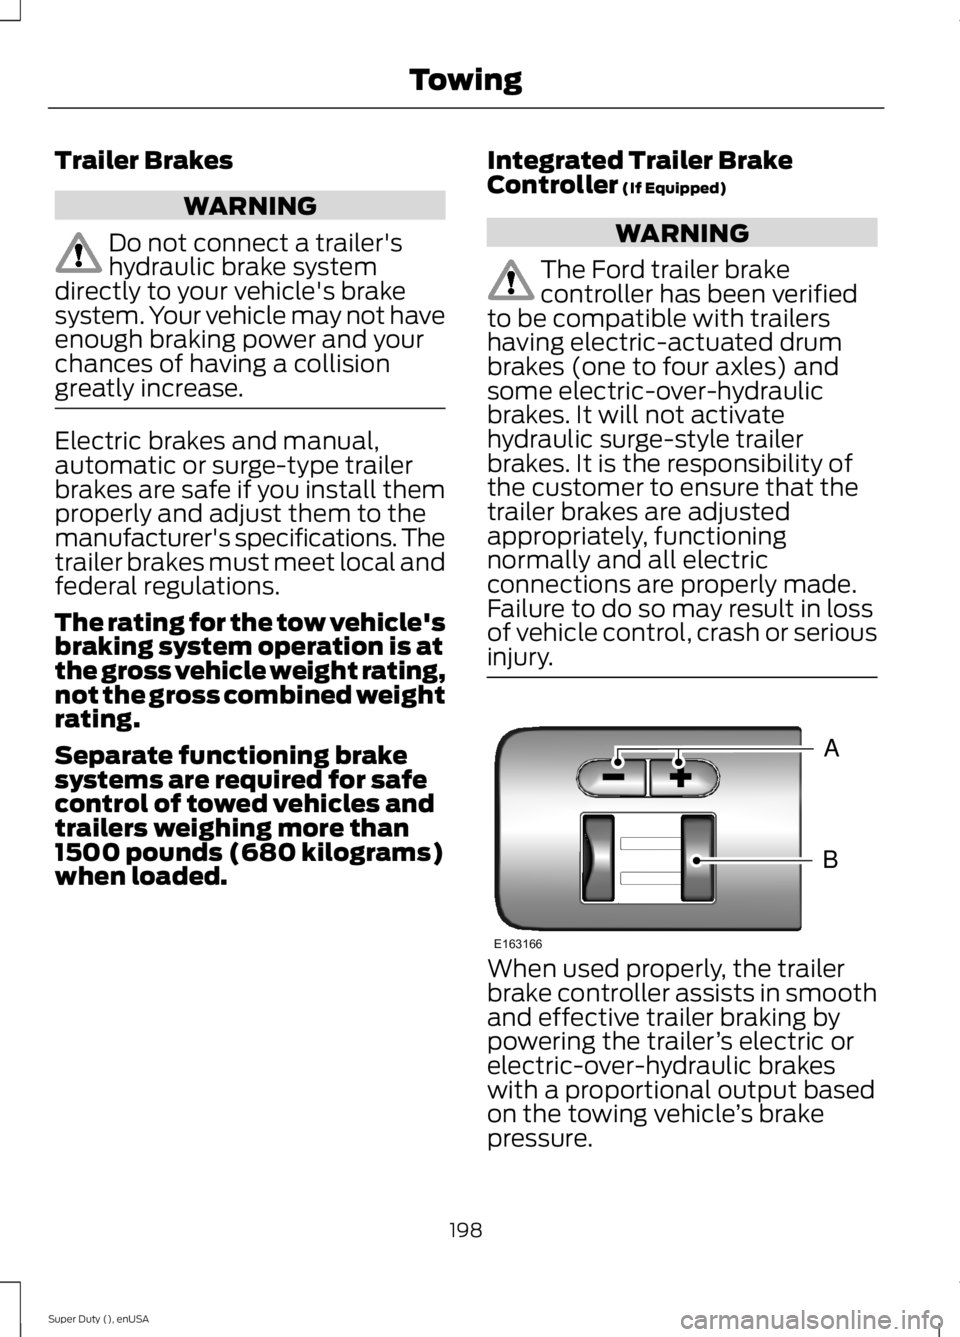
The controller user interfaceconsists of the following:
A: + and - (Gain adjustmentbuttons): Pressing these buttonsadjusts the controller's poweroutput to the trailer brakes in 0.5increments. You can increase thegain setting to 10.0 (maximumtrailer braking) or decrease it to 0(no trailer braking). Pressing andholding a button raises or lowersthe setting continuously. The gainsetting displays in the messagecenter as follows: TBC GAIN =XX.X.
B: Manual control lever: Slide thecontrol lever to the left to switchon the trailer's electric brakesindependent of the tow vehicle's.See the following Procedure foradjusting gain section forinstructions on proper use of thisfeature. If you use the manualcontrol while the brake is alsoapplied, the greater of the twoinputs determines the power sentto the trailer brakes.
•Stop lamps: Using the manualcontrol lever lights both thetrailer brake lamps and yourvehicle brake lamps except thecenter high-mount stop lamp,if you make the properelectrical connection to thetrailer. Pressing your vehiclebrake pedal also lights bothtrailer and vehicle brake lamps.
The controller shows gain setting,output bar graph, and trailerconnectivity status in theinformation display. They appearin the information display asfollows:
•TBC GAIN = XX.X NOTRAILER: Shows the currentgain setting during a givenignition cycle and when
adjusting the gain. This alsodisplays if you use the manualcontrol lever or make gainadjustments with no trailerconnected.
•TBC GAIN = XX.XOUTPUT=/ / / / / /: Displayswhen you push your vehicle'sbrake pedal, or upon use of themanual control. Bar indicatorslight in the information displayto indicate the amount ofpower going to the trailerbrakes relative to the brakepedal or manual control input.One bar indicates the leastamount of output; six barsindicate maximum output.
199
Super Duty (), enUSA
Towing
Page 203 of 470
•TRAILER CONNECTED:Displays when the systemsenses a correct trailer wiringconnection during a givenignition cycle.
•TRAILER DISCONNECTED:Displays, accompanied by asingle audible time, when thesystem senses a trailerconnection and then adisconnection, eitherintentional or unintentional,during a given ignition cycle. Italso displays if a truck ortrailer-wiring fault occurscausing the trailer to appeardisconnected. This messagecan also display if you use themanual control lever without atrailer connected.
Procedure for Adjusting Gain
Note:Only perform this procedurein a traffic-free environment atspeeds of approximately 20-25mph (30-40 km/h).
The gain setting sets the trailerbrake controller for the specifictowing condition. You shouldchange the setting as towingconditions change. Changes totowing conditions include trailerload, vehicle load, road conditionsand weather.
The gain should be set to providethe maximum trailer brakingassistance while making sure thetrailer wheels do not lock whenusing the brakes. Locked trailerwheels may lead to trailerinstability.
1.Make sure the trailer brakes arein good working condition,functioning normally andproperly adjusted. See yourtrailer dealer if necessary.
2.Hook up the trailer and makethe electrical connectionsaccording to the trailermanufacturer's instructions.
3.When you plug in a trailer withelectric orelectric-over-hydraulic brakes,TRAILER CONNECTEDappears in the informationdisplay.
4.Use the gain adjustment (+ and-) buttons to increase ordecrease the gain setting to thedesired starting point. A gainsetting of 6.0 is a good startingpoint for heavier loads.
5.In a traffic-free environment,tow the trailer on a dry, levelsurface at a speed of 20-25mph (30-40 km/h) andsqueeze the manual controllever completely.
6.If the trailer wheels lock up,indicated by squealing tires,reduce the gain setting. If thetrailer wheels turn freely,
increase the gain setting.Repeat Steps 5 and 6 until the
200
Super Duty (), enUSA
Towing
Page 204 of 470
gain setting is at a point justbelow trailer wheel lock-up. Iftowing a heavier trailer, trailerwheel lock-up may not beattainable even with themaximum gain setting of 10.
Initial Output Setting
The trailer brake controller letsyou customize how aggressivelythe trailer brakes engage. Thedefault value is set to “Light”. Werecommend this setting for themajority of trailers. If you are usingan EOH trailer with a high settingvoltage, or if you prefer to feelmore brake feedback from thetrailer, then select “Medium” or“Heavy”.
Trailer Brake Effort Setting
The trailer brake controller allowsthe user to customize howaggressively the trailer brakesengage. The default value is "Low"and is the recommended settingfor most trailers. If your trailer'sbrakes require more initial voltage,or if you prefer more aggressivetrailer braking, then select eitherthe "Medium" or the "High"setting.
Information Display WarningMessages
Note:An authorized dealer candiagnose the trailer brake controllerto determine exactly which trailerfault has occurred. However, yourFord warranty does not cover thisdiagnosis if the fault is with thetrailer.
TRAILER BRAKE MODULEFAULT
Displays in response to faultssensed by the trailer brakecontroller, accompanied by asingle tone. If this messageappears, contact an authorizeddealer as soon as possible fordiagnosis and repair. Thecontroller may still function, but
with degraded performance.
WIRING FAULT ON TRAILER
Displays when there is a shortcircuit on the electric brake outputwire.
If this message displays,accompanied by a single tone,with no trailer connected, theproblem is with your vehicle wiringbetween the trailer brakecontroller and the 7-pin connectorat the bumper.
201
Super Duty (), enUSA
Towing
Page 205 of 470
If the message only displays witha trailer connected, the problemis with the trailer wiring. Consultyour trailer dealer for assistance.This can be a short to ground(such as a chaffed wire), short tovoltage (such as a pulled pin ontrailer emergency breakawaybattery) or the trailer brakes maybe drawing too much current.
Points to Remember
Note:Do not attempt removal ofthe trailer brake controller withoutconsulting the Workshop Manual.Damage to the unit may result.
•Adjust gain setting before usingthe trailer brake controller forthe first time.
•Adjust gain setting, using theprocedure above, wheneverroad, weather and trailer orvehicle loading conditionschange from when the gainwas initially set.
•Only use the manual controllever for proper adjustment ofthe gain during trailer setup.Misuse, such as applicationduring trailer sway, could causeinstability of trailer or towvehicle.
•Avoid towing in adverseweather conditions. The trailerbrake controller does notprovide anti-lock control of thetrailer wheels. Trailer wheelscan lock up on slipperysurfaces, resulting in reducedstability of trailer and towvehicle.
•The trailer brake controller isequipped with a feature thatreduces output at vehiclespeeds below 11 mph (18 km/h)so trailer and vehicle braking isnot jerky or harsh. This featureis only available when applyingthe brakes using your vehicle'sbrake pedal, not the controller.
•The controller interacts withthe brake control system andpowertrain control system ofyour vehicle to provide the bestperformance on different roadconditions.
•Your vehicle's brake systemand the trailer brake systemwork independently of eachother. Changing the gainsetting on the controller doesnot affect the operation of yourvehicle's brakes whether youattach a trailer or not.
202
Super Duty (), enUSA
Towing
Page 206 of 470
•When you switch the engineoff, the controller output isdisabled and the display andmodule shut down. Thecontroller module and displayturn on when you switch theignition on.
•The trailer brake controller isonly a factory-installed ordealer-installed item. Ford isnot responsible for warranty orperformance of the controllerdue to misuse or customerinstallation.
Trailer Lamps
WARNING
Never connect any trailerlamp wiring to the vehicle'stail lamp wiring; this may damagethe electrical system resulting infire. Contact your authorizeddealer as soon as possible forassistance in proper trailer towwiring installation. Additionalelectrical equipment may berequired.
Trailer lamps are required on mosttowed vehicles. Make sure allrunning lights, brake lights, turnsignals and hazard lights areworking.
Using a Step Bumper (IfEquipped)
The rear bumper is equipped withan integral hitch and only requiresa ball with a one-inch (25.4millimeter) shank diameter. Thebumper has a 5000-pound (2268kilogram) trailer weight and a500-pound (227 kilogram) tongueweight capacity
If it is necessary to relocate thehitch ball position, you must installa frame-mounted trailer hitch.
Before Towing a Trailer
Practice turning, stopping andbacking up to get the feel of yourvehicle-trailer combination beforestarting on a trip. When turning,
make wider turns so the trailerwheels clear curbs and otherobstacles.
When Towing a Trailer
•Do not drive faster than 70mph (113 km/h) during the first500 miles (800 kilometers).
•Do not make full-throttlestarts.
•Check your hitch, electricalconnections and trailer wheel
lug nuts thoroughly after youhave traveled 50 miles (80kilometers).
203
Super Duty (), enUSA
Towing
Page 207 of 470
•When stopped in congested orheavy traffic during hotweather, place the gearshift inposition P to aid engine andtransmission cooling and tohelp A/C performance.
•Turn off the speed control withheavy loads or in hilly terrain.The speed control may turn offautomatically when you aretowing on long, steep grades.
•Shift to a lower gear whendriving down a long or steephill. Do not apply the brakescontinuously, as they mayoverheat and become lesseffective.
•If your transmission is equippedwith a Grade Assist orTow/Haul feature, use thisfeature when towing. Thisprovides engine braking andhelps eliminate excessivetransmission shifting foroptimum fuel economy andtransmission cooling.
•If your vehicle is equipped withAdvanceTrac with RSC, thissystem may turn on duringtypical cornering maneuverswith a heavily loaded trailer.This is normal. Turning thecorner at a slower speed whiletowing may reduce thistendency.
•If you are towing a trailerfrequently in hot weather, hillyconditions, at the grosscombined weight rating (or anycombination of these factors),consider refilling your rear axlewith synthetic gear lubricant (ifthe axle is not already filledwith it). See Capacities andSpecifications (page 301).
•Allow more distance forstopping with a trailerattached. Anticipate stops andbrake gradually.
•Avoid parking on a grade.However, if you must park on agrade:
1. Turn the steering wheel topoint your vehicle tires awayfrom traffic flow.
2.Set your vehicle parking brake.
3.Place the automatictransmission in position P.
4.Place wheel chocks in frontand back of the trailer wheels.(Chocks not included withvehicle.)
Your vehicle may be equippedwith a temporary or conventionalspare tire. A "temporary" spare tireis different in size (diameter orwidth), tread-type (All-Season orAll Terrain) or is from a differentmanufacturer than the road tireson your vehicle. Consultinformation on the tire label orSafety Compliance label forlimitations when using.
204
Super Duty (), enUSA
Towing
Page 208 of 470
Launching or Retrieving a Boator Personal Watercraft (PWC)
Note:Disconnect the wiring to thetrailer before backing the trailerinto the water.
Note:Reconnect the wiring to thetrailer after you remove the trailerfrom the water.
When backing down a rampduring boat launching or retrieval:
•Do not allow the static waterlevel to rise above the bottomedge of the rear bumper.
•Do not allow waves to breakhigher than 6 inches (15centimeters) above the bottomedge of the rear bumper.
Exceeding these limits may allowwater to enter vehiclecomponents:
•Causing internal damage to thecomponents.
•Affecting driveability,emissions, and reliability.
Replace the rear axle lubricantanytime the rear axle has beensubmerged in water. Water mayhave contaminated the rear axlelubricant, which is not normallychecked or changed unless a leakis suspected or other axle repair isrequired.
TOWING POINTS
WARNINGS
Using recovery hooks is dangerousand should only be done by a personfamiliar with proper vehicle recoverysafety practices. Improper use of recoveryhooks may cause hook failure or separationfrom the vehicle and could result in seriousinjury or death.
Always slowly remove the slack fromthe recovery strap prior to pulling.Failure to do so can introducesignificantly higher loads which can causethe recovery hooks to break off, or therecovery strap to fail which can causeserious injury or death.
Never link two straps together witha clevis pin. These heavy metalobjects could become projectiles ifthe strap breaks and can cause seriousinjury or death.
Your vehicle comes equipped withframe-mounted front recovery hooks.These hooks should never have a loadapplied to them greater than the grossvehicle weight rating of your vehicle.
Before using recovery hooks:
•Make sure all attaching points aresecure and capable of withstandingthe applied load.
•Never use chains, cables or tow strapswith metal hook ends.
•Only use recovery straps that have aminimum breaking strength two tothree times the gross vehicle weight ofthe stuck vehicle.
•Make sure the recovery strap is in goodcondition and free of visible cuts, tearsor damage.
205
Super Duty (), enUSA
Towing
Page 209 of 470
•Use a damper device such as a tarp,heavy blanket or piece of carpetdraped over the recovery strap to helpabsorb the energy in the event thestrap breaks.
•Make sure the stuck vehicle is notloaded heavier than its gross vehicleweight rating specified on thecertification label.
•Always align the tow vehicle and stuckvehicle in a straight line (within 10degrees).
•Keep bystanders to the sides of thevehicle, at a distance of at least twicethe length of the recovery strap. Thishelps avoid injury from the hazard of arecovery hook or strap breaking, or avehicle lurching into their path.
TRANSPORTING THE VEHICLE
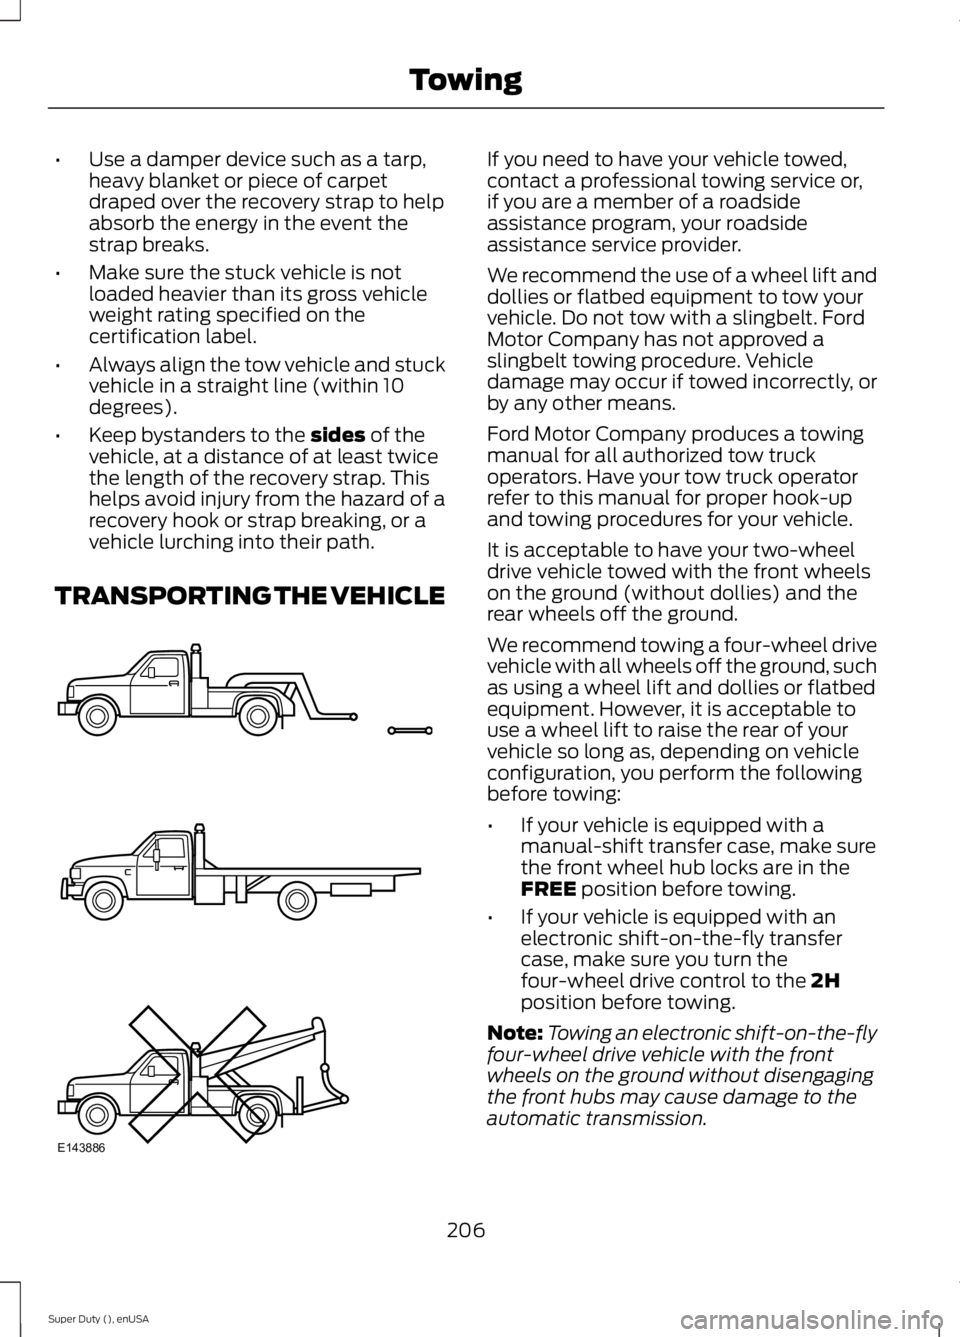
If you need to have your vehicle towed,contact a professional towing service or,if you are a member of a roadsideassistance program, your roadsideassistance service provider.
We recommend the use of a wheel lift anddollies or flatbed equipment to tow yourvehicle. Do not tow with a slingbelt. FordMotor Company has not approved aslingbelt towing procedure. Vehicledamage may occur if towed incorrectly, orby any other means.
Ford Motor Company produces a towingmanual for all authorized tow truckoperators. Have your tow truck operatorrefer to this manual for proper hook-upand towing procedures for your vehicle.
It is acceptable to have your two-wheeldrive vehicle towed with the front wheelson the ground (without dollies) and therear wheels off the ground.
We recommend towing a four-wheel drivevehicle with all wheels off the ground, suchas using a wheel lift and dollies or flatbedequipment. However, it is acceptable touse a wheel lift to raise the rear of yourvehicle so long as, depending on vehicleconfiguration, you perform the followingbefore towing:
•If your vehicle is equipped with amanual-shift transfer case, make surethe front wheel hub locks are in theFREE position before towing.
•If your vehicle is equipped with anelectronic shift-on-the-fly transfercase, make sure you turn thefour-wheel drive control to the 2Hposition before towing.
Note:Towing an electronic shift-on-the-flyfour-wheel drive vehicle with the frontwheels on the ground without disengagingthe front hubs may cause damage to theautomatic transmission.
206
Super Duty (), enUSA
TowingE143886
Page 210 of 470
Note:Towing a two-wheel drive vehicle oran electronic shift-on-the-fly four-wheeldrive vehicle with the rear wheels on theground for more than 50 miles (80 km) orfaster than 35 mph (56 km/h) may causedamage to the automatic transmission.
Note:Using wheel lift equipment to tow adual rear wheel vehicle requires removingan outer rear wheel before towing.
TOWING THE VEHICLE ON
FOUR WHEELS
Emergency Towing
If your vehicle becomes inoperable(without access to wheel dollies,car-hauling trailer, or flatbed transportvehicle), it can be flat-towed (all wheelson the ground, regardless of the powertrainand transmission configuration) under thefollowing conditions:
•Your vehicle is facing forward fortowing in a forward direction.
•Place the transmission in position N. Ifyou cannot move the transmission intoN, you may need to override it. SeeTransmission (page 144).
•Maximum speed is 35 mph (56 km/h).
•Maximum distance is 50 miles (80kilometers).
Recreational Towing
Note:Put your climate control system inrecirculated air mode to prevent exhaustfumes from entering your vehicle. SeeClimate Control (page 103).
Follow these guidelines if you have a needfor recreational towing, such as towingyour vehicle behind a motorhome. Wedesigned these guidelines to preventdamage to your transmission.
Two-wheel Drive Vehicles andFour-wheel Drive Vehicles Equippedwith an Electronic-shift Transfer Case
Do not tow your vehicle with any wheelson the ground, as vehicle or transmissiondamage may occur. It is recommended totow your vehicle with all four (4) wheelsoff the ground, such as when using acar-hauling trailer. Otherwise, you cannottow your vehicle.
Four-wheel Drive Vehicles Equippedwith a Manual-shift Transfer Case
1. Put the transmission in position N.
2. Put the transfer case in position N.
3.Put the hub locks in the FREE position.Always make sure that both hub locksare set to the same position.
207
Super Duty (), enUSA
Towing