light FORD F250 SUPER DUTY 2015 Owner's Guide
[x] Cancel search | Manufacturer: FORD, Model Year: 2015, Model line: F250 SUPER DUTY, Model: FORD F250 SUPER DUTY 2015Pages: 470, PDF Size: 18.27 MB
Page 93 of 470
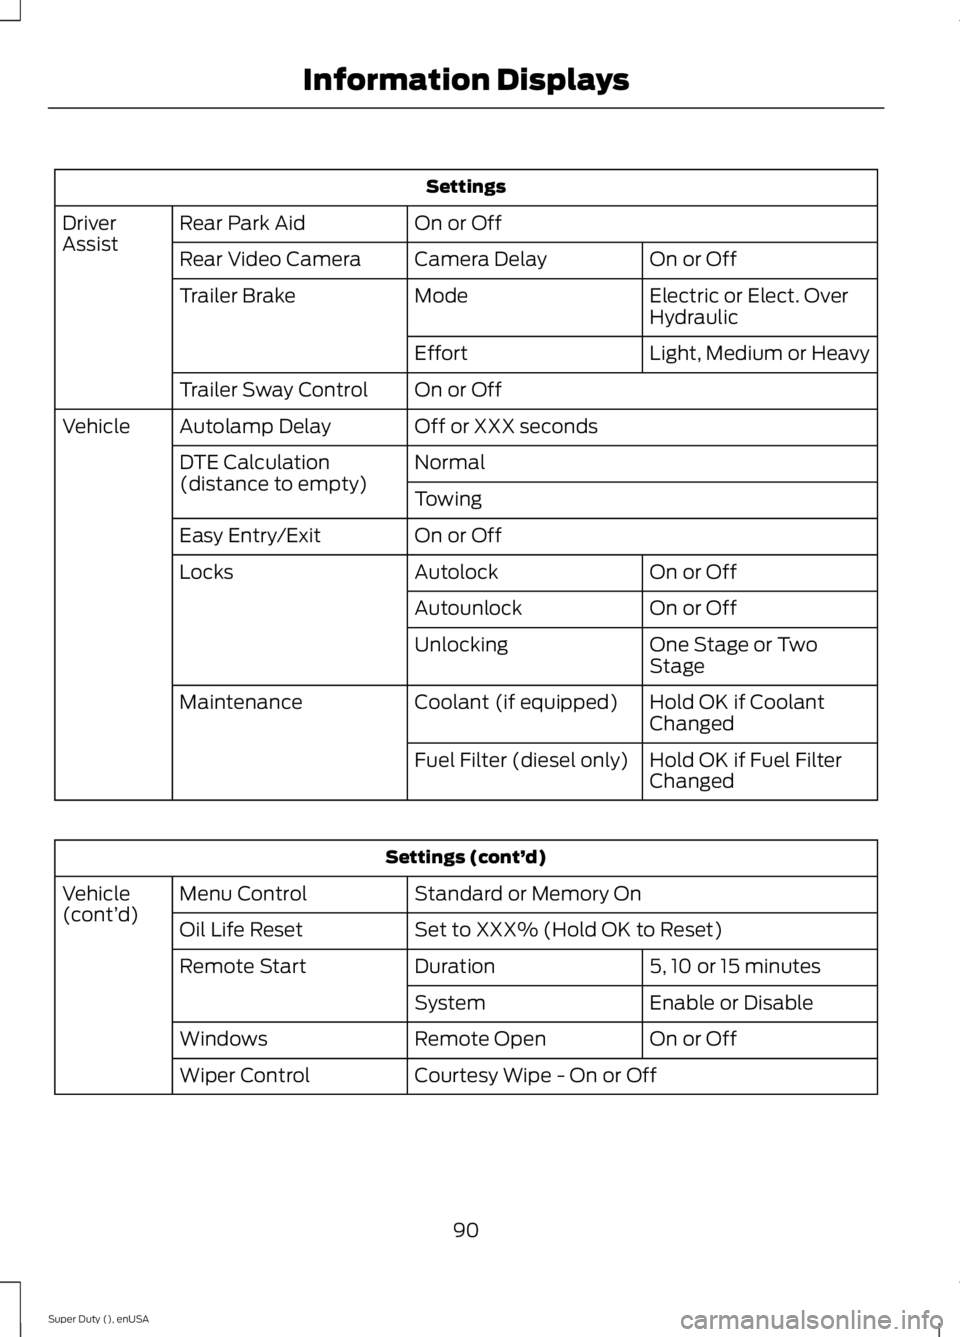
Settings
On or OffRear Park AidDriverAssistOn or OffCamera DelayRear Video Camera
Electric or Elect. OverHydraulicModeTrailer Brake
Light, Medium or HeavyEffort
On or OffTrailer Sway Control
Off or XXX secondsAutolamp DelayVehicle
NormalDTE Calculation(distance to empty)Towing
On or OffEasy Entry/Exit
On or OffAutolockLocks
On or OffAutounlock
One Stage or TwoStageUnlocking
Hold OK if CoolantChangedCoolant (if equipped)Maintenance
Hold OK if Fuel FilterChangedFuel Filter (diesel only)
Settings (cont’d)
Standard or Memory OnMenu ControlVehicle(cont’d)Set to XXX% (Hold OK to Reset)Oil Life Reset
5, 10 or 15 minutesDurationRemote Start
Enable or DisableSystem
On or OffRemote OpenWindows
Courtesy Wipe - On or OffWiper Control
90
Super Duty (), enUSA
Information Displays
Page 94 of 470
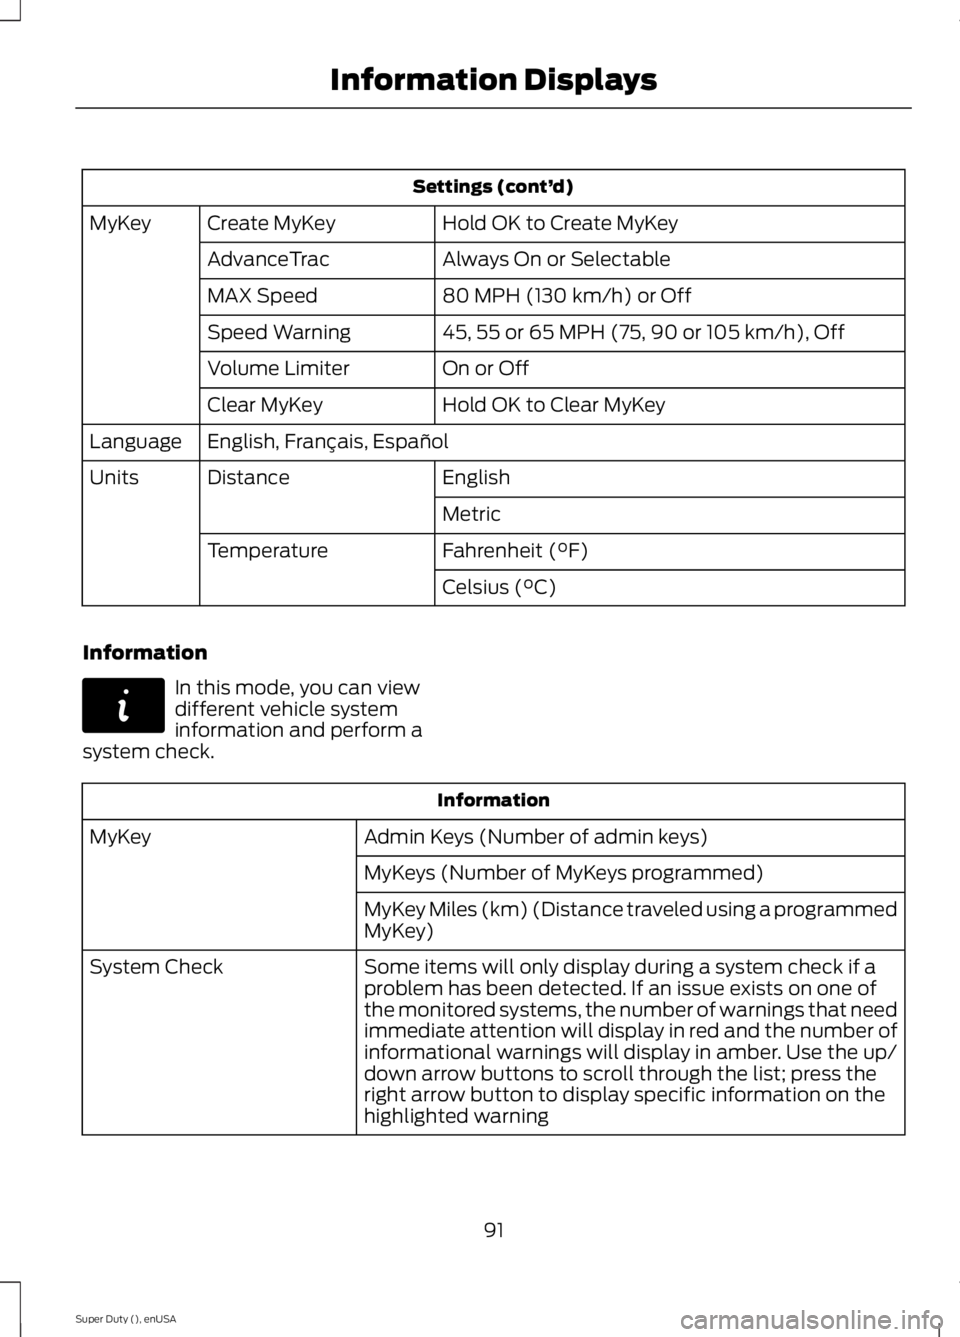
Settings (cont’d)
Hold OK to Create MyKeyCreate MyKeyMyKey
Always On or SelectableAdvanceTrac
80 MPH (130 km/h) or OffMAX Speed
45, 55 or 65 MPH (75, 90 or 105 km/h), OffSpeed Warning
On or OffVolume Limiter
Hold OK to Clear MyKeyClear MyKey
English, Français, EspañolLanguage
EnglishDistanceUnits
Metric
Fahrenheit (°F)Temperature
Celsius (°C)
Information
In this mode, you can viewdifferent vehicle systeminformation and perform asystem check.
Information
Admin Keys (Number of admin keys)MyKey
MyKeys (Number of MyKeys programmed)
MyKey Miles (km) (Distance traveled using a programmedMyKey)
Some items will only display during a system check if aproblem has been detected. If an issue exists on one ofthe monitored systems, the number of warnings that needimmediate attention will display in red and the number ofinformational warnings will display in amber. Use the up/down arrow buttons to scroll through the list; press theright arrow button to display specific information on thehighlighted warning
System Check
91
Super Duty (), enUSA
Information DisplaysE144642
Page 96 of 470
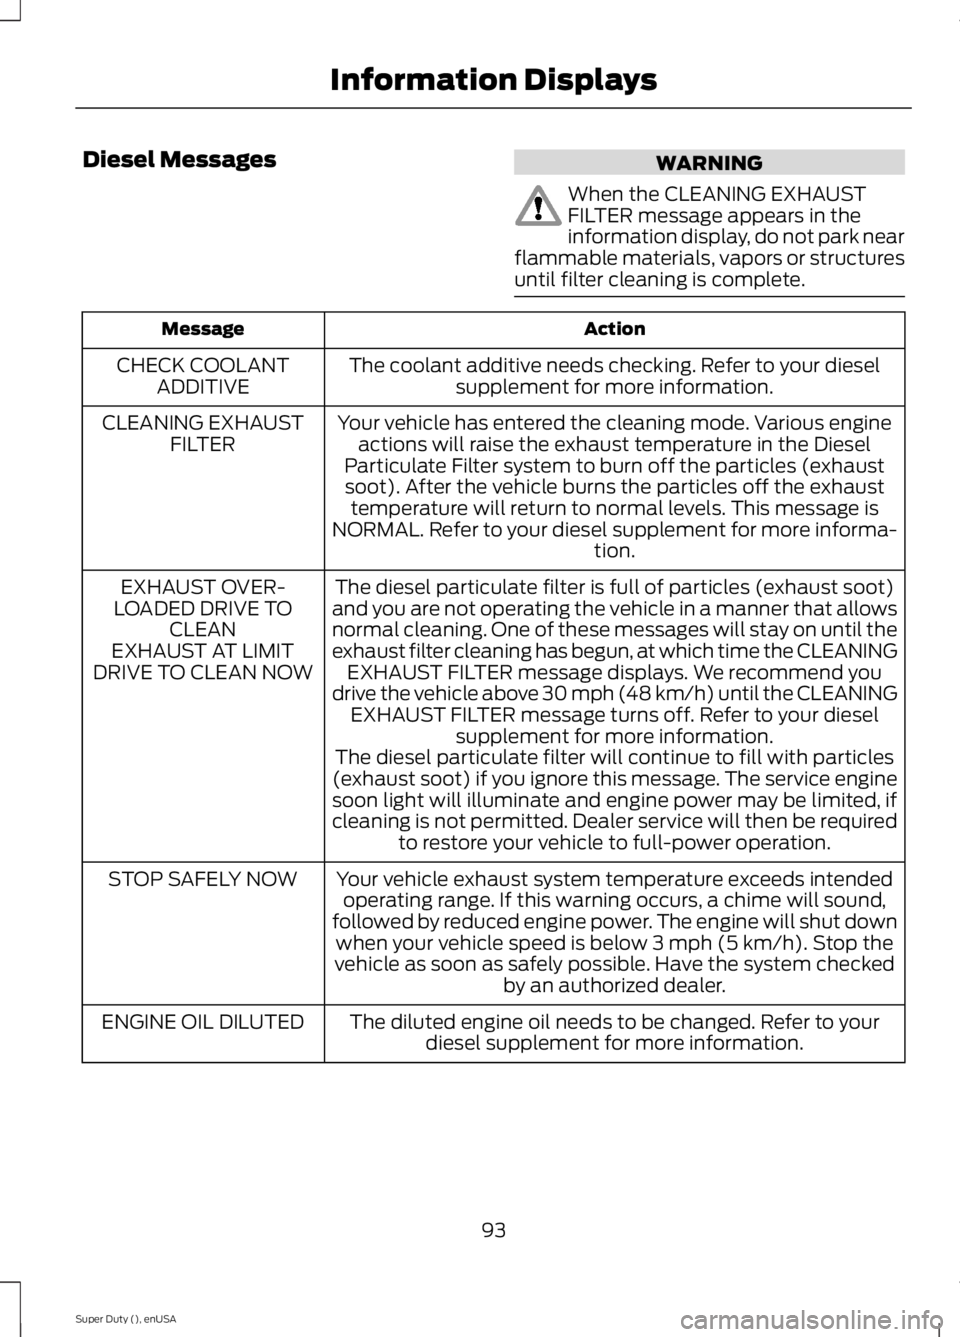
Diesel MessagesWARNING
When the CLEANING EXHAUSTFILTER message appears in theinformation display, do not park nearflammable materials, vapors or structuresuntil filter cleaning is complete.
ActionMessage
The coolant additive needs checking. Refer to your dieselsupplement for more information.CHECK COOLANTADDITIVE
Your vehicle has entered the cleaning mode. Various engineactions will raise the exhaust temperature in the DieselParticulate Filter system to burn off the particles (exhaustsoot). After the vehicle burns the particles off the exhausttemperature will return to normal levels. This message isNORMAL. Refer to your diesel supplement for more informa-tion.
CLEANING EXHAUSTFILTER
The diesel particulate filter is full of particles (exhaust soot)and you are not operating the vehicle in a manner that allowsnormal cleaning. One of these messages will stay on until theexhaust filter cleaning has begun, at which time the CLEANINGEXHAUST FILTER message displays. We recommend youdrive the vehicle above 30 mph (48 km/h) until the CLEANINGEXHAUST FILTER message turns off. Refer to your dieselsupplement for more information.
EXHAUST OVER-LOADED DRIVE TOCLEANEXHAUST AT LIMITDRIVE TO CLEAN NOW
The diesel particulate filter will continue to fill with particles(exhaust soot) if you ignore this message. The service enginesoon light will illuminate and engine power may be limited, ifcleaning is not permitted. Dealer service will then be requiredto restore your vehicle to full-power operation.
Your vehicle exhaust system temperature exceeds intendedoperating range. If this warning occurs, a chime will sound,followed by reduced engine power. The engine will shut downwhen your vehicle speed is below 3 mph (5 km/h). Stop thevehicle as soon as safely possible. Have the system checkedby an authorized dealer.
STOP SAFELY NOW
The diluted engine oil needs to be changed. Refer to yourdiesel supplement for more information.ENGINE OIL DILUTED
93
Super Duty (), enUSA
Information Displays
Page 109 of 470
HINTS ON CONTROLLING THE
INTERIOR CLIMATE
General Hints
Note:Prolonged use of recirculated air maycause the windows to fog up.
Note:You may feel a small amount of airfrom the footwell air vents regardless of theair distribution setting.
Note:To reduce humidity build-up insideyour vehicle, do not drive with the systemswitched off or with recirculated air alwaysswitched on.
Note:Do not place objects under the frontseats as this may interfere with the airflowto the rear seats.
Note:Remove any snow, ice or leaves fromthe air intake area at the base of thewindshield.
Note:To improve the time to reach comfortin hot weather, drive with the windowsslightly open for 2-3 minutes after start-upor until your vehicle airs out.
Manual Climate Control
Note:To reduce fogging of the windshieldduring humid weather, adjust the airdistribution control to the windshield airvents position.
Automatic Climate Control
Note:Adjusting the settings when yourvehicle interior is extremely hot or cold isnot necessary. The system automaticallyadjusts to heat or cool the cabin to yourselected temperature as quickly as possible.For the system to function efficiently, theinstrument panel and side air vents shouldbe fully open.
Note:If you select AUTO during coldoutside temperatures, the system directsairflow to the windshield and side windowvents. In addition, the fan may run at aslower speed until the engine warms up.
Note:If you select AUTO during hot outsidetemperatures, or when the inside of thevehicle is hot, the system automatically usesrecirculated air to maximize interior cooling.When the interior reaches the selectedtemperature, the system automaticallyswitches to using outside air.
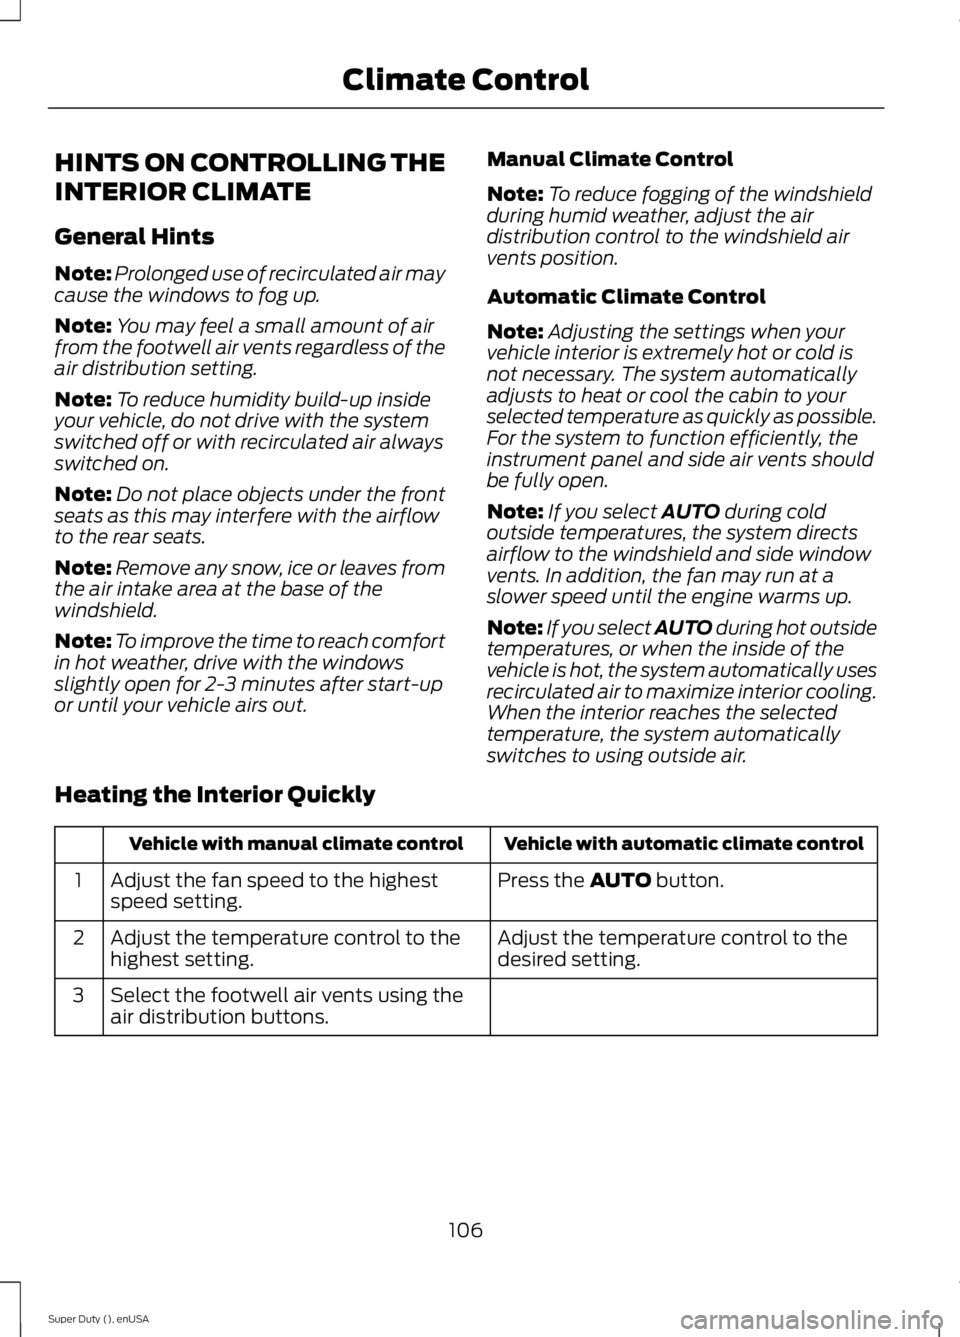
Heating the Interior Quickly
Vehicle with automatic climate controlVehicle with manual climate control
Press the AUTO button.Adjust the fan speed to the highestspeed setting.1
Adjust the temperature control to thedesired setting.Adjust the temperature control to thehighest setting.2
Select the footwell air vents using theair distribution buttons.3
106
Super Duty (), enUSA
Climate Control
Page 113 of 470
SITTING IN THE CORRECT
POSITION
WARNINGS
Sitting improperly, out of position orwith the seat back reclined too farcan take weight off the seat cushionand affect the decision of the passengersensing system, resulting in serious injuryor death in the event of a crash. Always situpright against your seat back, with yourfeet on the floor.
Do not recline the seat back as thiscan cause the occupant to slideunder the safety belt, resulting inserious injury in the event of a crash.
Do not place objects higher than theseat back to reduce the risk ofserious injury in the event of a crashor during heavy braking.
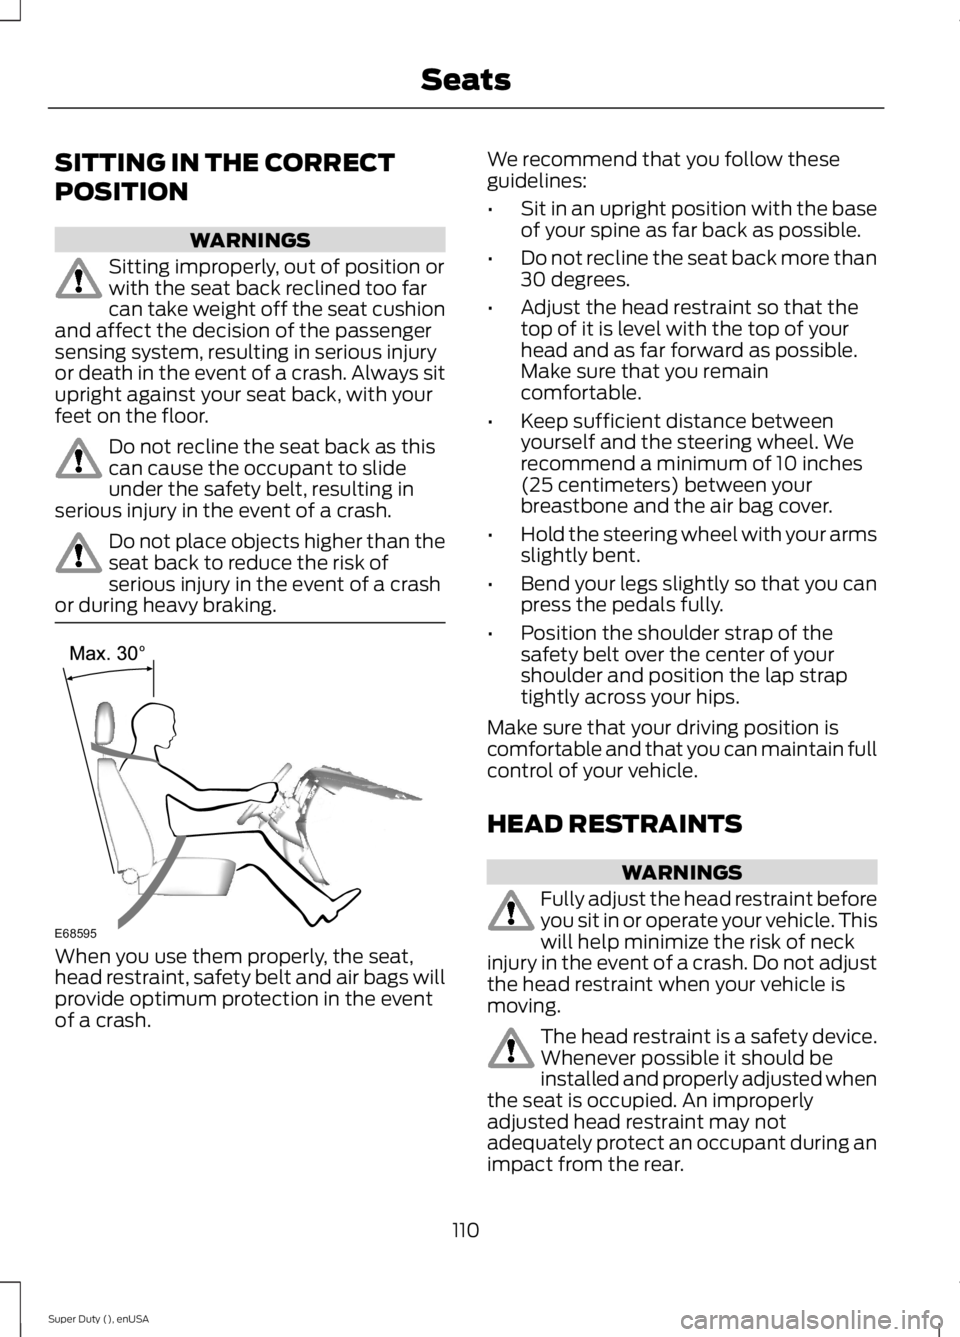
When you use them properly, the seat,head restraint, safety belt and air bags willprovide optimum protection in the eventof a crash.
We recommend that you follow theseguidelines:
•Sit in an upright position with the baseof your spine as far back as possible.
•Do not recline the seat back more than30 degrees.
•Adjust the head restraint so that thetop of it is level with the top of yourhead and as far forward as possible.Make sure that you remaincomfortable.
•Keep sufficient distance betweenyourself and the steering wheel. Werecommend a minimum of 10 inches(25 centimeters) between yourbreastbone and the air bag cover.
•Hold the steering wheel with your armsslightly bent.
•Bend your legs slightly so that you canpress the pedals fully.
•Position the shoulder strap of thesafety belt over the center of yourshoulder and position the lap straptightly across your hips.
Make sure that your driving position iscomfortable and that you can maintain fullcontrol of your vehicle.
HEAD RESTRAINTS
WARNINGS
Fully adjust the head restraint beforeyou sit in or operate your vehicle. Thiswill help minimize the risk of neckinjury in the event of a crash. Do not adjustthe head restraint when your vehicle ismoving.
The head restraint is a safety device.Whenever possible it should beinstalled and properly adjusted whenthe seat is occupied. An improperlyadjusted head restraint may notadequately protect an occupant during animpact from the rear.
110
Super Duty (), enUSA
SeatsE68595
Page 120 of 470
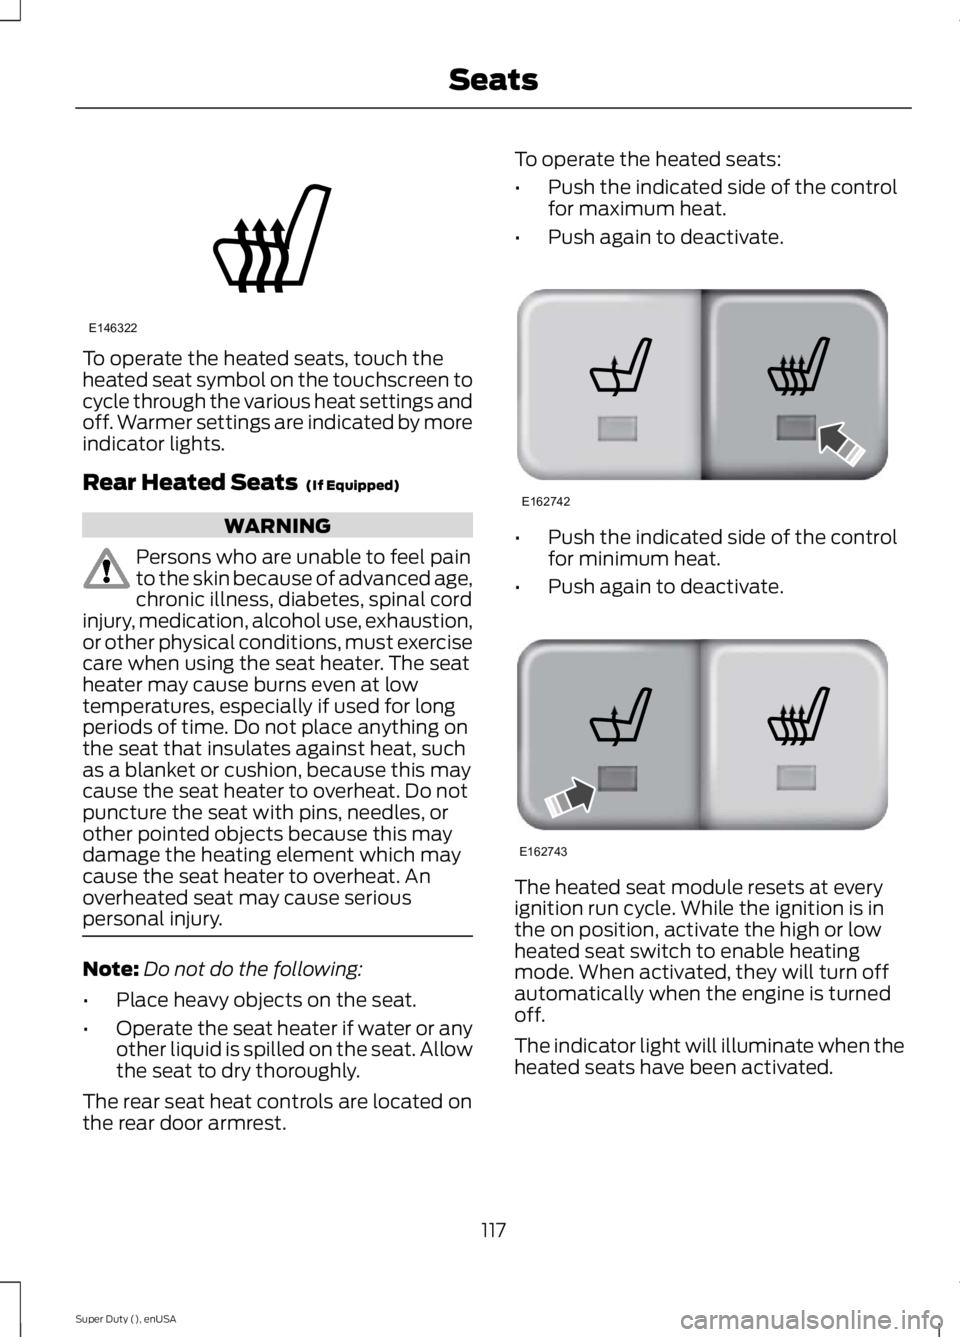
To operate the heated seats, touch theheated seat symbol on the touchscreen tocycle through the various heat settings andoff. Warmer settings are indicated by moreindicator lights.
Rear Heated Seats (If Equipped)
WARNING
Persons who are unable to feel painto the skin because of advanced age,chronic illness, diabetes, spinal cordinjury, medication, alcohol use, exhaustion,or other physical conditions, must exercisecare when using the seat heater. The seatheater may cause burns even at lowtemperatures, especially if used for longperiods of time. Do not place anything onthe seat that insulates against heat, suchas a blanket or cushion, because this maycause the seat heater to overheat. Do notpuncture the seat with pins, needles, orother pointed objects because this maydamage the heating element which maycause the seat heater to overheat. Anoverheated seat may cause seriouspersonal injury.
Note:Do not do the following:
•Place heavy objects on the seat.
•Operate the seat heater if water or anyother liquid is spilled on the seat. Allowthe seat to dry thoroughly.
The rear seat heat controls are located onthe rear door armrest.
To operate the heated seats:
•Push the indicated side of the controlfor maximum heat.
•Push again to deactivate.
•Push the indicated side of the controlfor minimum heat.
•Push again to deactivate.
The heated seat module resets at everyignition run cycle. While the ignition is inthe on position, activate the high or lowheated seat switch to enable heatingmode. When activated, they will turn offautomatically when the engine is turnedoff.
The indicator light will illuminate when theheated seats have been activated.
117
Super Duty (), enUSA
SeatsE146322 E162742 E162743
Page 121 of 470
CLIMATE CONTROLLED SEATS
Heated Seats (If Equipped)
WARNING
People who are unable to feel painto their skin because of advancedage, chronic illness, diabetes, spinalcord injury, medication, alcohol use,exhaustion or other physical conditions,must exercise care when using the heatedseat. The heated seat may cause burnseven at low temperatures, especially ifused for long periods of time. Do not placeanything on the seat that insulates againstheat, such as a blanket or cushion. Thismay cause the heated seat to overheat.Do not puncture the seat with pins, needlesor other pointed objects. This may damagethe heating element which may cause theheated seat to overheat. An overheatedseat may cause serious personal injury.
Do not do the following:
•Place heavy objects on the seat.
•Operate the heated seat if water or anyother liquid is spilled on the seat. Allowthe seat to dry thoroughly.
•Operate the heated seats unless theengine is running. Doing so can causethe battery to lose charge.
To operate the heated seats, touch theheated seat symbol on the touchscreen tocycle through the various heat settings andoff. Warmer settings are indicated by moreindicator lights.
Cooled Seats (If Equipped)
The cooled seats will only function whenthe engine is running.
To operate the cooled seats, press thecooled seat symbol to cycle through thevarious cooling settings and off. Coolersettings are indicated by more indicatorlights.
If the engine falls below 350 RPM whilethe cooled seats are on, the feature willturn itself off. You will need to reactivateit.
Heated and Cooled Seats Air FilterReplacement (If Equipped)
The heated and cooled seat systemincludes air filters. You must replace themperiodically.
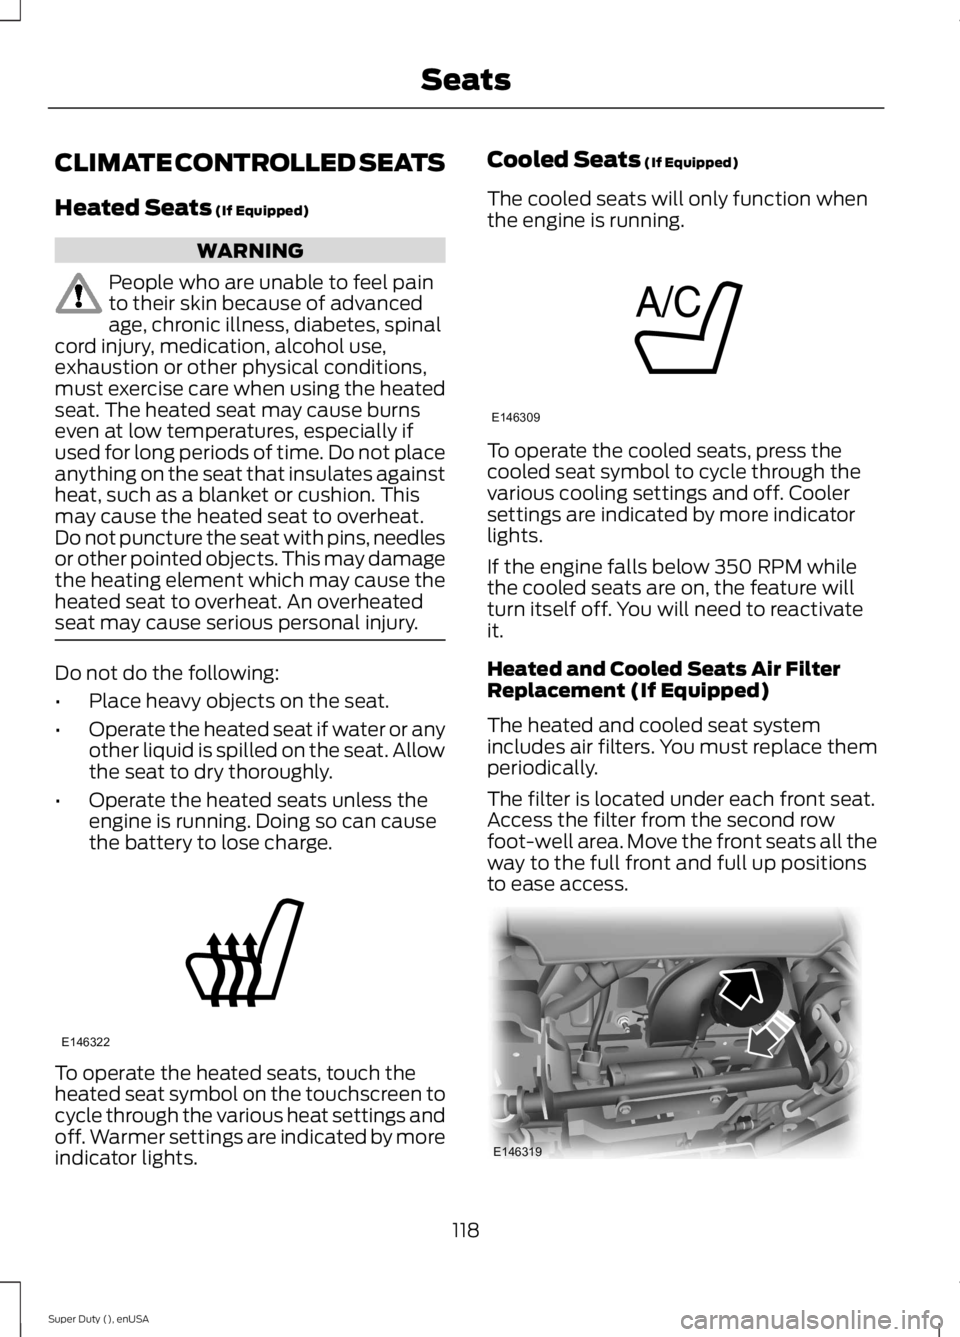
The filter is located under each front seat.Access the filter from the second rowfoot-well area. Move the front seats all theway to the full front and full up positionsto ease access.
118
Super Duty (), enUSA
SeatsE146322 E146309 E146319
Page 125 of 470
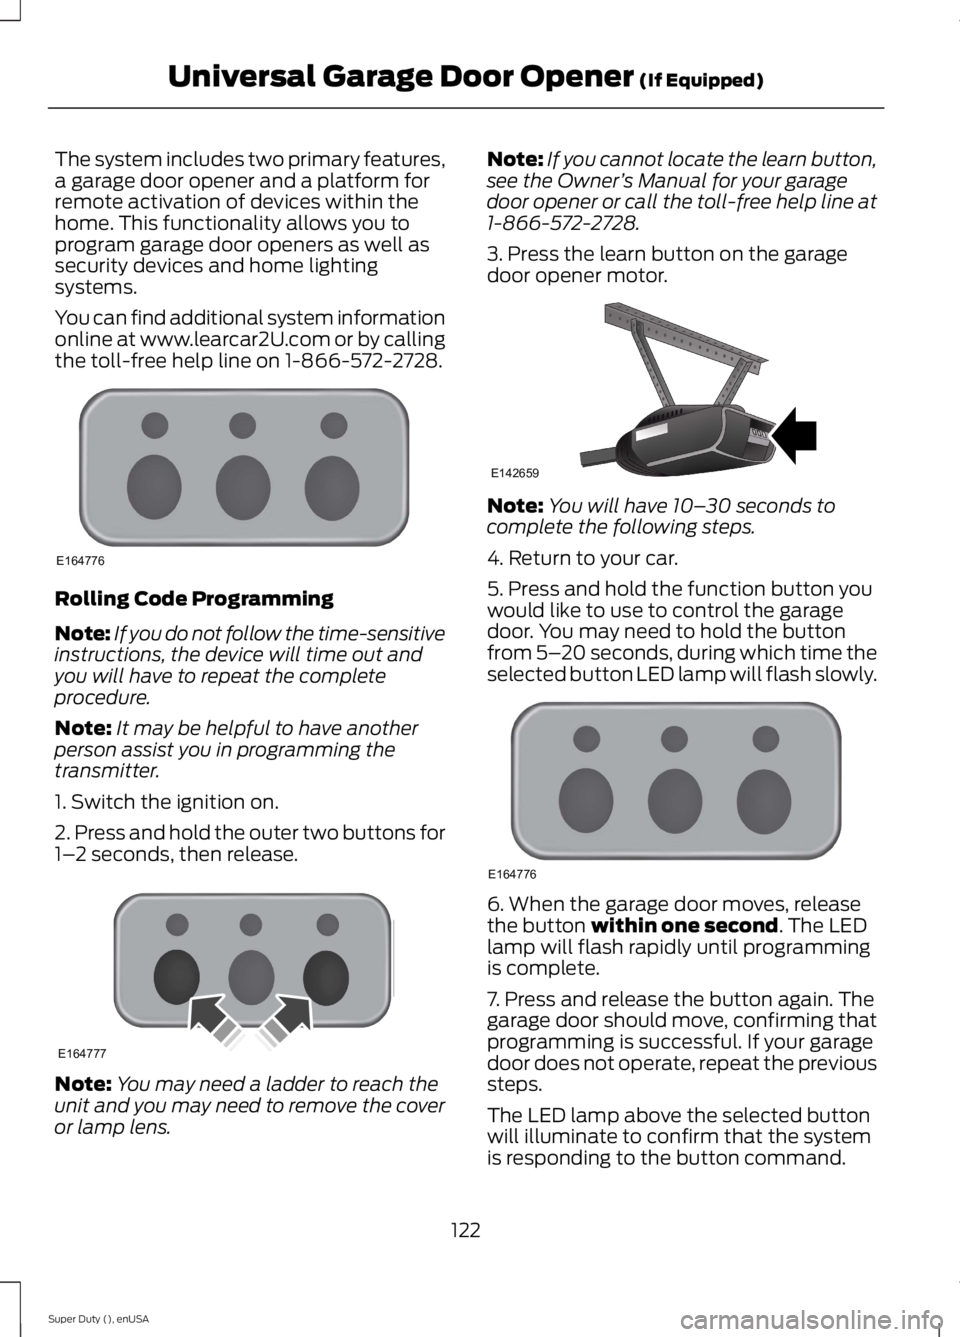
The system includes two primary features,a garage door opener and a platform forremote activation of devices within thehome. This functionality allows you toprogram garage door openers as well assecurity devices and home lightingsystems.
You can find additional system informationonline at www.learcar2U.com or by callingthe toll-free help line on 1-866-572-2728.
Rolling Code Programming
Note:If you do not follow the time-sensitiveinstructions, the device will time out andyou will have to repeat the completeprocedure.
Note:It may be helpful to have anotherperson assist you in programming thetransmitter.
1. Switch the ignition on.
2. Press and hold the outer two buttons for1–2 seconds, then release.
Note:You may need a ladder to reach theunit and you may need to remove the coveror lamp lens.
Note:If you cannot locate the learn button,see the Owner’s Manual for your garagedoor opener or call the toll-free help line at1-866-572-2728.
3. Press the learn button on the garagedoor opener motor.
Note:You will have 10–30 seconds tocomplete the following steps.
4. Return to your car.
5. Press and hold the function button youwould like to use to control the garagedoor. You may need to hold the buttonfrom 5–20 seconds, during which time theselected button LED lamp will flash slowly.
6. When the garage door moves, releasethe button within one second. The LEDlamp will flash rapidly until programmingis complete.
7. Press and release the button again. Thegarage door should move, confirming thatprogramming is successful. If your garagedoor does not operate, repeat the previoussteps.
The LED lamp above the selected buttonwill illuminate to confirm that the systemis responding to the button command.
122
Super Duty (), enUSA
Universal Garage Door Opener (If Equipped)E164776 E164777 E142659 E164776
Page 127 of 470
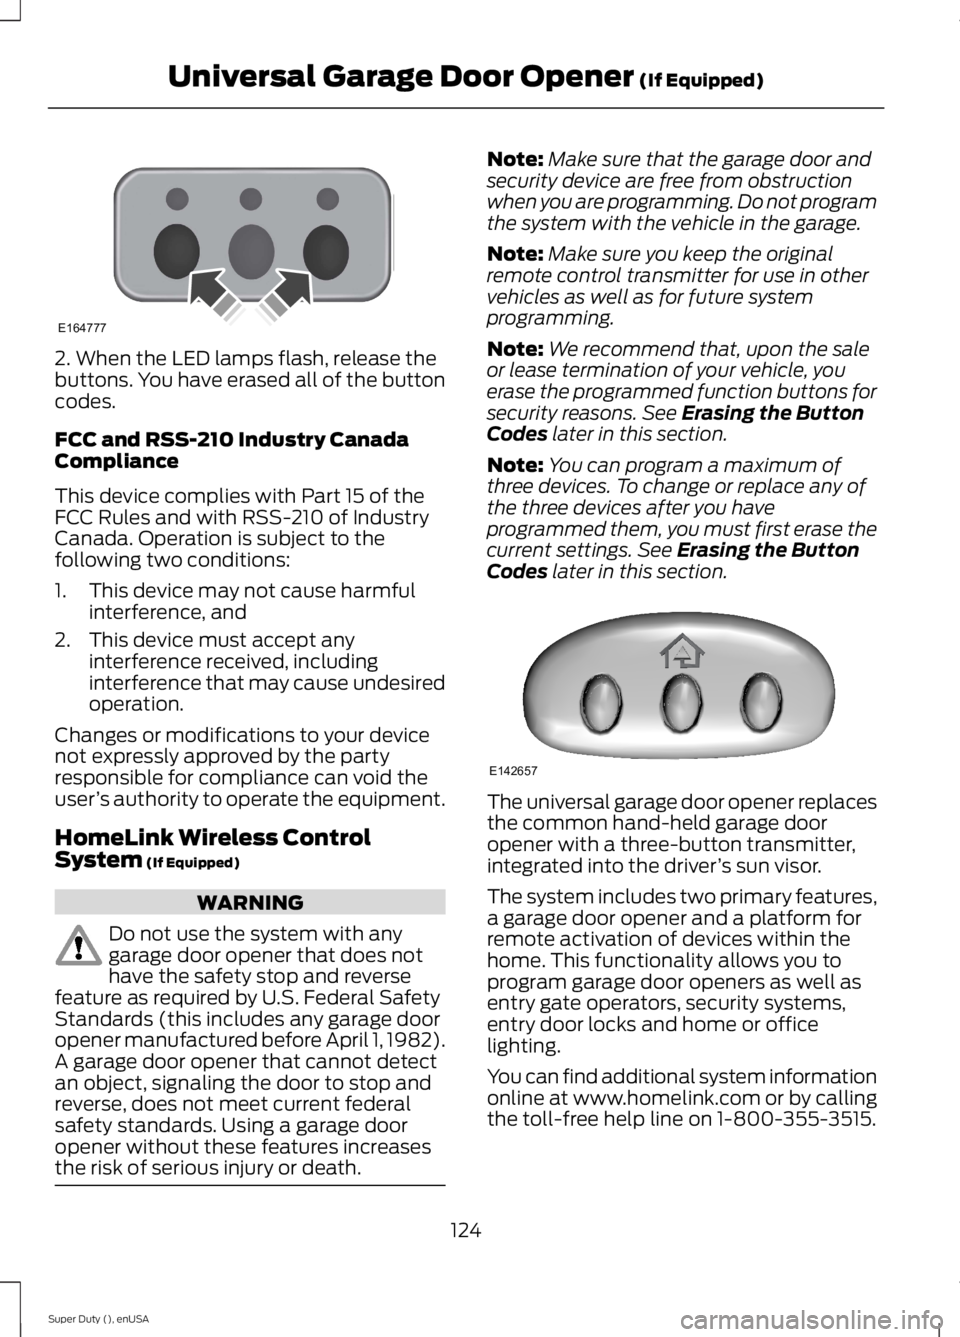
2. When the LED lamps flash, release thebuttons. You have erased all of the buttoncodes.
FCC and RSS-210 Industry CanadaCompliance
This device complies with Part 15 of theFCC Rules and with RSS-210 of IndustryCanada. Operation is subject to thefollowing two conditions:
1. This device may not cause harmfulinterference, and
2. This device must accept anyinterference received, includinginterference that may cause undesiredoperation.
Changes or modifications to your devicenot expressly approved by the partyresponsible for compliance can void theuser’s authority to operate the equipment.
HomeLink Wireless ControlSystem (If Equipped)
WARNING
Do not use the system with anygarage door opener that does nothave the safety stop and reversefeature as required by U.S. Federal SafetyStandards (this includes any garage dooropener manufactured before April 1, 1982).A garage door opener that cannot detectan object, signaling the door to stop andreverse, does not meet current federalsafety standards. Using a garage dooropener without these features increasesthe risk of serious injury or death.
Note:Make sure that the garage door andsecurity device are free from obstructionwhen you are programming. Do not programthe system with the vehicle in the garage.
Note:Make sure you keep the originalremote control transmitter for use in othervehicles as well as for future systemprogramming.
Note:We recommend that, upon the saleor lease termination of your vehicle, youerase the programmed function buttons forsecurity reasons. See Erasing the ButtonCodes later in this section.
Note:You can program a maximum ofthree devices. To change or replace any ofthe three devices after you haveprogrammed them, you must first erase thecurrent settings. See Erasing the ButtonCodes later in this section.
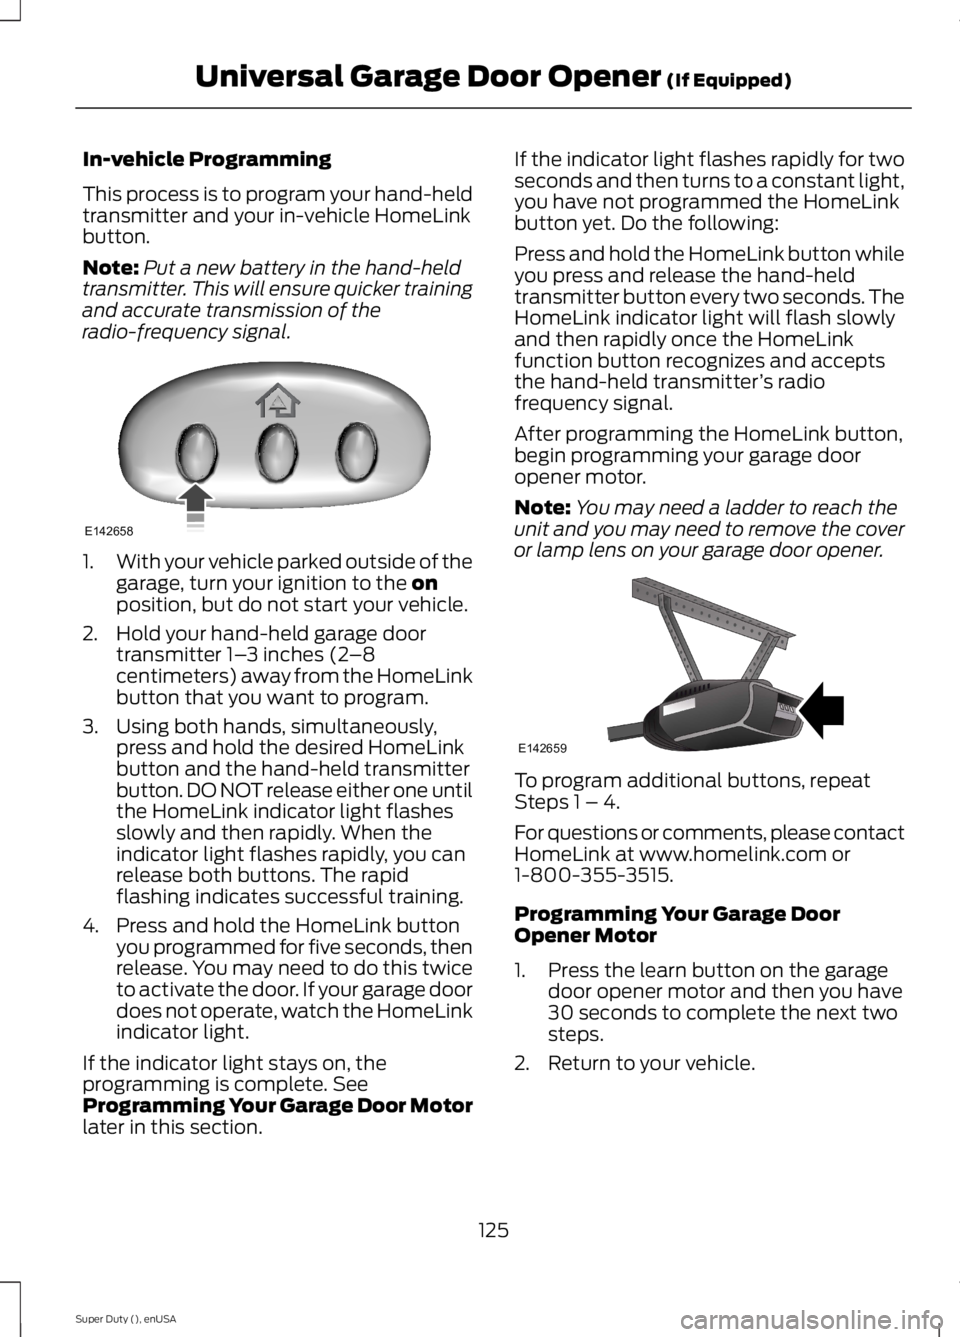
The universal garage door opener replacesthe common hand-held garage dooropener with a three-button transmitter,integrated into the driver’s sun visor.
The system includes two primary features,a garage door opener and a platform forremote activation of devices within thehome. This functionality allows you toprogram garage door openers as well asentry gate operators, security systems,entry door locks and home or officelighting.
You can find additional system informationonline at www.homelink.com or by callingthe toll-free help line on 1-800-355-3515.
124
Super Duty (), enUSA
Universal Garage Door Opener (If Equipped)E164777 E142657
Page 128 of 470
In-vehicle Programming
This process is to program your hand-heldtransmitter and your in-vehicle HomeLinkbutton.
Note:Put a new battery in the hand-heldtransmitter. This will ensure quicker trainingand accurate transmission of theradio-frequency signal.
1.With your vehicle parked outside of thegarage, turn your ignition to the onposition, but do not start your vehicle.
2. Hold your hand-held garage doortransmitter 1–3 inches (2–8centimeters) away from the HomeLinkbutton that you want to program.
3. Using both hands, simultaneously,press and hold the desired HomeLinkbutton and the hand-held transmitterbutton. DO NOT release either one untilthe HomeLink indicator light flashesslowly and then rapidly. When theindicator light flashes rapidly, you canrelease both buttons. The rapidflashing indicates successful training.
4. Press and hold the HomeLink buttonyou programmed for five seconds, thenrelease. You may need to do this twiceto activate the door. If your garage doordoes not operate, watch the HomeLinkindicator light.
If the indicator light stays on, theprogramming is complete. SeeProgramming Your Garage Door Motorlater in this section.
If the indicator light flashes rapidly for twoseconds and then turns to a constant light,you have not programmed the HomeLinkbutton yet. Do the following:
Press and hold the HomeLink button whileyou press and release the hand-heldtransmitter button every two seconds. TheHomeLink indicator light will flash slowlyand then rapidly once the HomeLinkfunction button recognizes and acceptsthe hand-held transmitter’s radiofrequency signal.
After programming the HomeLink button,begin programming your garage dooropener motor.
Note:You may need a ladder to reach theunit and you may need to remove the coveror lamp lens on your garage door opener.
To program additional buttons, repeatSteps 1 – 4.
For questions or comments, please contactHomeLink at www.homelink.com or1-800-355-3515.
Programming Your Garage DoorOpener Motor
1. Press the learn button on the garagedoor opener motor and then you have30 seconds to complete the next twosteps.
2. Return to your vehicle.
125
Super Duty (), enUSA
Universal Garage Door Opener (If Equipped)E142658 E142659