center console FORD F250 SUPER DUTY 2020 Owners Manual
[x] Cancel search | Manufacturer: FORD, Model Year: 2020, Model line: F250 SUPER DUTY, Model: FORD F250 SUPER DUTY 2020Pages: 633, PDF Size: 9.18 MB
Page 6 of 633
Remote Start
.................................................147
Interior Air Quality
What Is the Cabin Air Filter ......................
149
Locating the Cabin Air Filter ....................
149
Replacing the Cabin Air Filter .................
149
Seats
Sitting in the Correct Position .................
150
Head Restraints ...........................................
150
Manual Seats ................................................
152
Power Seats ...................................................
153
Memory Function ........................................
156
Rear Seats .......................................................
157
Heated Seats ................................................
159
Ventilated Seats ..........................................
160
Rear Occupant Alert System
What is the Rear Occupant Alert System ........................................................................\
..
161
How Does the Rear Occupant Alert System Work ..............................................
161
Rear Occupant Alert System Precautions ........................................................................\
..
161
Rear Occupant Alert System Limitations ........................................................................\
..
161
Switching Rear Occupant Alert System On and Off - Vehicles With: SYNC
........................................................................\
..
161
Switching Rear Occupant Alert System On and Off - Vehicles With: SYNC 3
........................................................................\
..
161
Rear Occupant Alert System Indicators - Vehicles With: SYNC ...........................
162
Rear Occupant Alert System Indicators - Vehicles With: SYNC 3 ........................
162
Rear Occupant Alert System Audible Warnings .....................................................
162
Garage Door Opener
Universal Garage Door Opener ..............
163Auxiliary Power Points
Auxiliary Power Points
...............................
167
Wireless Accessory Charging ..................
168
Storage Compartments
Center Console ...............................................
171
Overhead Console ........................................
171
Under Seat Storage ......................................
171
Starting and Stopping the Engine
General Information ...................................
174
Ignition Switch ..............................................
174
Keyless Starting ............................................
175
Starting a Gasoline Engine - 6.2L/7.3L ........................................................................\
.
175
Starting a Diesel Engine - 6.7L Diesel ........................................................................\
..
177
Switching Off the Engine - 6.7L Diesel ........................................................................\
.
182
Engine Idle Shutdown ................................
182
Engine Block Heater ...................................
182
Fuel and Refueling
Safety Precautions .....................................
184
Fuel Quality - E85 .......................................
185
Fuel Quality - Gasoline .............................
186
Fuel Quality - Diesel ...................................
187
Running Out of Fuel ...................................
189
Refueling - Gasoline ...................................
189
Refueling - Diesel ........................................
190
Fuel Consumption .......................................
193
Engine Emission Control
Emission Law ................................................
194
Catalytic Converter .....................................
195
Selective Catalytic Reductant System - Diesel ............................................................
197
Diesel Particulate Filter ............................
202
3
Super Duty (TFE) Canada/United States of America, enUSA, Edition date: 201909, Second-Printing Table of Contents
Page 81 of 633
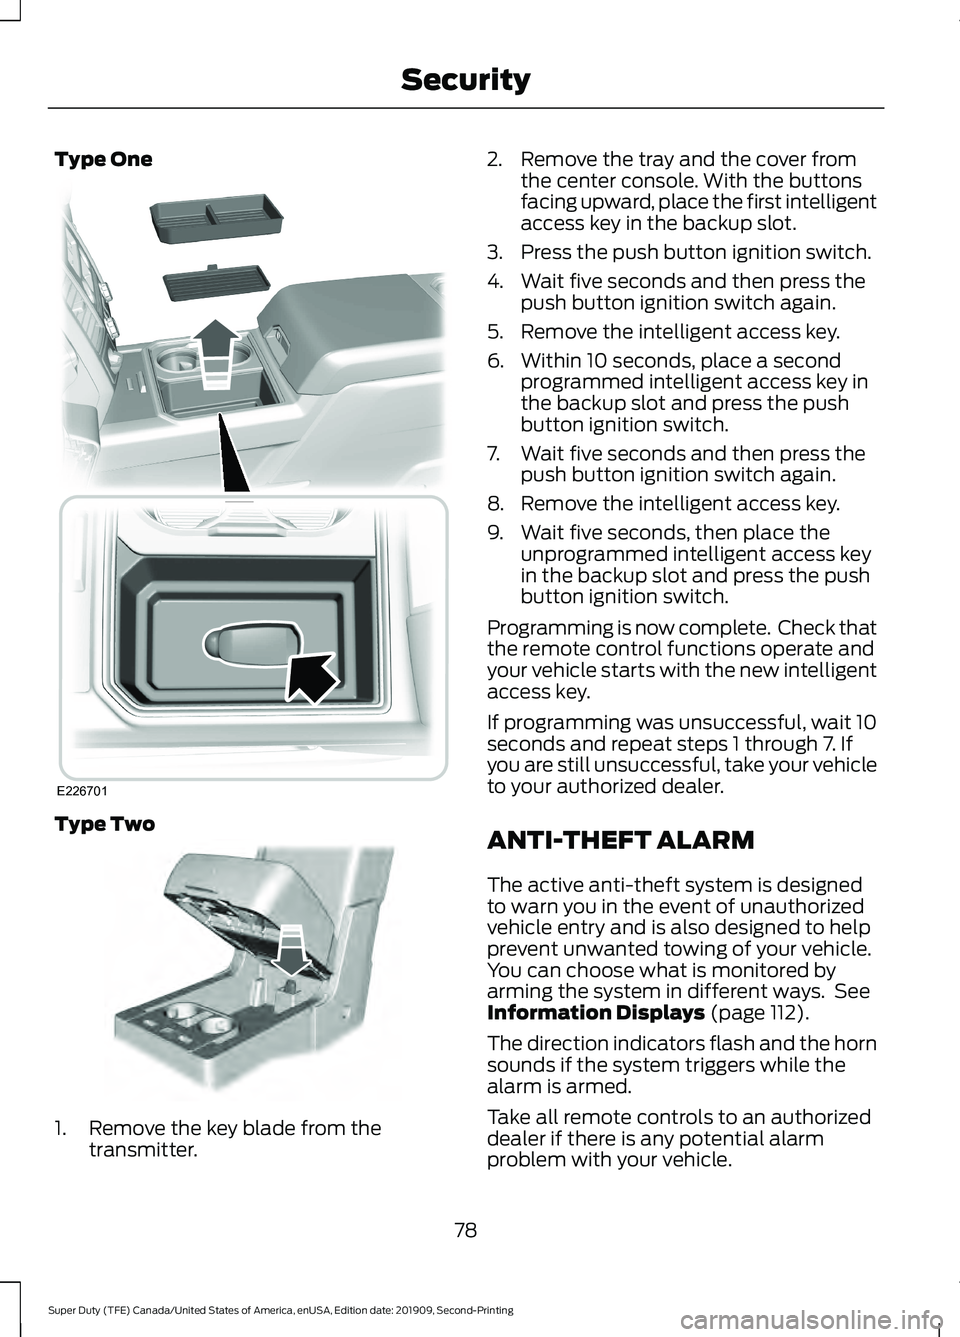
Type One
Type Two
1. Remove the key blade from the
transmitter. 2. Remove the tray and the cover from
the center console. With the buttons
facing upward, place the first intelligent
access key in the backup slot.
3. Press the push button ignition switch.
4. Wait five seconds and then press the push button ignition switch again.
5. Remove the intelligent access key.
6. Within 10 seconds, place a second programmed intelligent access key in
the backup slot and press the push
button ignition switch.
7. Wait five seconds and then press the push button ignition switch again.
8. Remove the intelligent access key.
9. Wait five seconds, then place the unprogrammed intelligent access key
in the backup slot and press the push
button ignition switch.
Programming is now complete. Check that
the remote control functions operate and
your vehicle starts with the new intelligent
access key.
If programming was unsuccessful, wait 10
seconds and repeat steps 1 through 7. If
you are still unsuccessful, take your vehicle
to your authorized dealer.
ANTI-THEFT ALARM
The active anti-theft system is designed
to warn you in the event of unauthorized
vehicle entry and is also designed to help
prevent unwanted towing of your vehicle.
You can choose what is monitored by
arming the system in different ways. See
Information Displays (page 112).
The direction indicators flash and the horn
sounds if the system triggers while the
alarm is armed.
Take all remote controls to an authorized
dealer if there is any potential alarm
problem with your vehicle.
78
Super Duty (TFE) Canada/United States of America, enUSA, Edition date: 201909, Second-Printing SecurityE226701 E269950
Page 104 of 633
Blind Spot Information System (If
Equipped)
See
Blind Spot Information System
(page 253).
INTERIOR MIRROR WARNING:
Do not adjust the
mirrors when your vehicle is moving. This
could result in the loss of control of your
vehicle, serious personal injury or death.
Note: Do not clean the mirror housing or
glass with harsh abrasives, fuel or other
petroleum-based cleaning products.
You can adjust the interior mirror to your
preference. Some mirrors also have a
second pivot point. This lets you move the
mirror hear up or down and from side to
side.
Manual Dimming Mirror
Pull the tab below the mirror toward you
to reduce the effect of bright light from
behind.
Auto-Dimming Mirror
(If Equipped)
Note: Do not block the sensors on the front
and back of the mirror. A rear center
passenger or raised rear center head
restraint may also block light from reaching
the sensor.
The mirror dims to reduce glare when
bright lights are detected from behind your
vehicle. It automatically returns to normal
reflection when you shift the transmission
into reverse (R) to make sure you have a
clear view when backing up. SLIDING WINDOWS
(IF EQUIPPED)
Power Sliding Back Window
(If
Equipped) WARNING:
When operating the
power sliding back window, you must
make sure all rear seat occupants and
cargo are not in the proximity of the back
window. WARNING:
Do not leave children
unattended in your vehicle and do not
let them play with the power sliding back
window. They may seriously injure
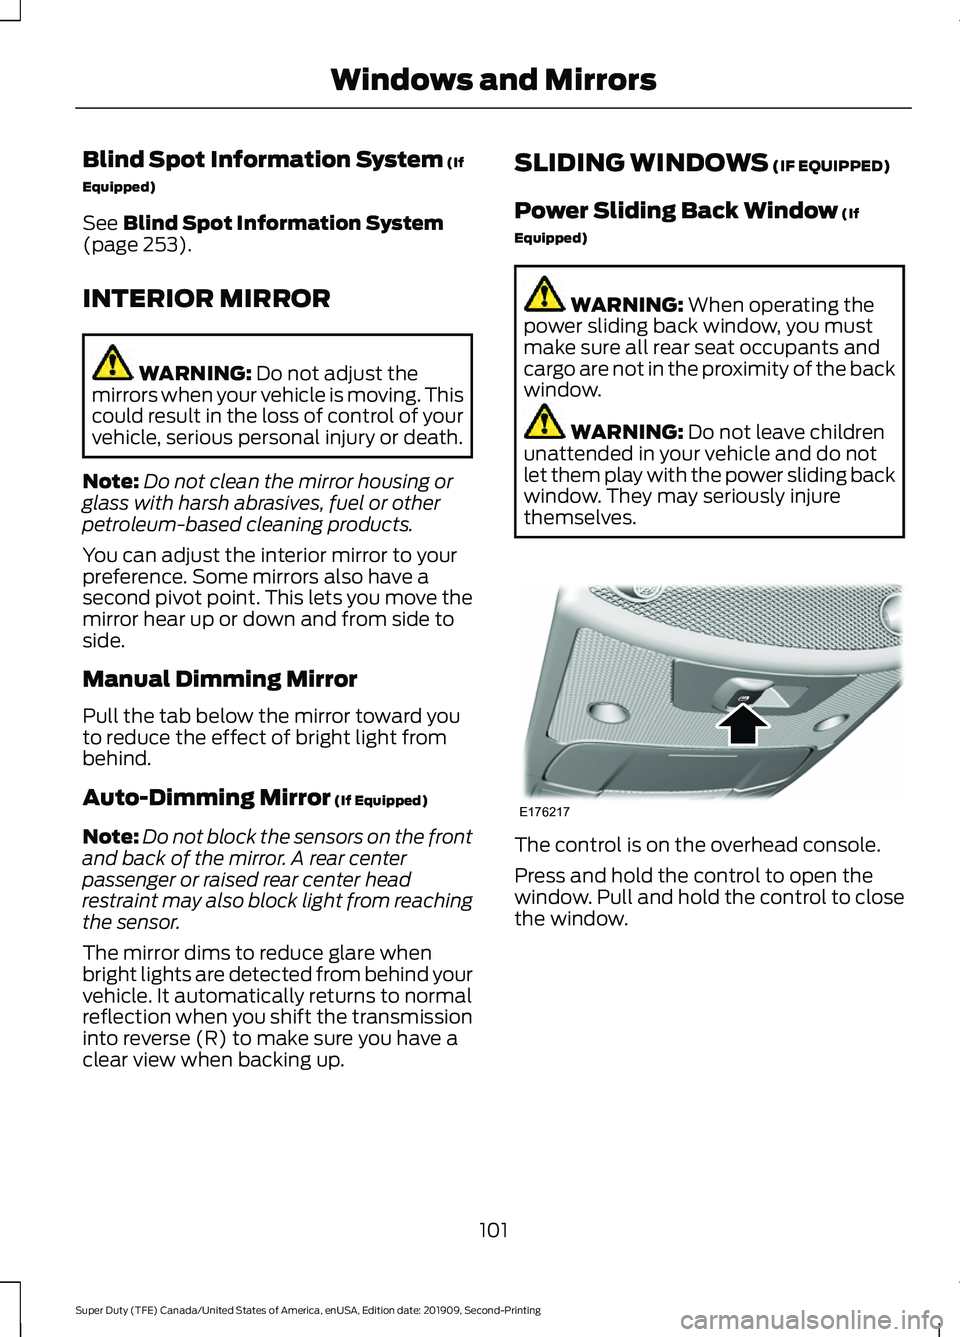
themselves. The control is on the overhead console.
Press and hold the control to open the
window. Pull and hold the control to close
the window.
101
Super Duty (TFE) Canada/United States of America, enUSA, Edition date: 201909, Second-Printing Windows and MirrorsE176217
Page 162 of 633
Use your vehicle key to lock the storage
space. See Keys and Remote Controls
(page 55).
HEATED SEATS
(IF EQUIPPED) WARNING: People who are unable
to feel pain to their skin because of
advanced age, chronic illness, diabetes,
spinal cord injury, medication, alcohol
use, exhaustion or other physical
conditions, must exercise care when
using the heated seat. The heated seat
may cause burns even at low
temperatures, especially if used for long
periods of time. Do not place anything
on the seat that insulates against heat,
such as a blanket or cushion. This may
cause the heated seat to overheat. Do
not puncture the seat with pins, needles
or other pointed objects. This may
damage the heating element which may
cause the heated seat to overheat. An
overheated seat may cause serious
personal injury.
Do not do the following:
• Place heavy objects on the seat.
• Operate the heated seat if water or any
other liquid spills on the seat. Allow the
seat to dry thoroughly.
Note: The engine must be running to use
this feature. Press the heated seat symbol to cycle
through the various heat settings and off.
More indicator lights indicate warmer
settings.
Note:
The heated seats may remain on
after you remote start your vehicle, based
on your remote start settings. The heated
seats may also turn on when you start your
vehicle if they were on when you switched
your vehicle off.
Rear Heated Seats
(If Equipped) WARNING: People who are unable
to feel pain to their skin because of
advanced age, chronic illness, diabetes,
spinal cord injury, medication, alcohol
use, exhaustion or other physical
conditions, must exercise care when
using the heated seat. The heated seat
may cause burns even at low
temperatures, especially if used for long
periods of time. Do not place anything
on the seat that insulates against heat,
such as a blanket or cushion. This may
cause the heated seat to overheat. Do
not puncture the seat with pins, needles
or other pointed objects. This may
damage the heating element which may
cause the heated seat to overheat. An
overheated seat may cause serious
personal injury.
Do not do the following:
• Place heavy objects on the seat.
• Operate the heated seat if water or any
other liquid spills on the seat. Allow the
seat to dry thoroughly.
Note: The engine must be running to use
this feature.
The rear seat heat controls are on the rear
of the center console.
159
Super Duty (TFE) Canada/United States of America, enUSA, Edition date: 201909, Second-Printing SeatsE146322
Page 170 of 633

12 V DC Power Point
WARNING: Do not plug optional
electrical accessories into the cigar
lighter socket. Incorrect use of the cigar
lighter can cause damage not covered
by the vehicle warranty, and can result
in fire or serious injury.
Note: When you switch the ignition on, you
can use the socket to power
12 V appliances
with a maximum current rating of 20 A20
amps.
Note: Do not plug in any device that
supplies power to the vehicle through the
power points, this may result in damage to
vehicle systems.
Note: Do not hang any accessory from the
accessory plug.
Note: Do not use the power point over the
vehicle capacity of 12 V DC 240 W or a fuse
may blow.
Note: Always keep the power point caps
closed when not in use.
Do not insert objects other than an
accessory plug into the power point. This
damages the power point and may blow
the fuse.
Run the vehicle for full capacity use of the
power point.
To prevent the battery from running out of
charge:
• Do not use the power point longer than
necessary when the engine is off.
• Do not leave devices plugged in
overnight or when you park your vehicle
for extended periods. 110 V 400 Watt AC Power Point
(If
Equipped) WARNING:
Do not keep electrical
devices plugged in the power point
whenever the device is not in use. Do not
use any extension cord with the 110 volt
AC power point, since it will defeat the
safety protection design. Doing so may
cause the power point to overload due
to powering multiple devices that can
reach beyond the 400 watt load limit
and could result in fire or serious injury.
Note: This feature works only when you
have the ignition switched on.
Note: This feature has a maximum output
of 400 watts when the vehicle is in park (P).
Note: While in drive (D), the maximum
outlet output is 300 watts.
Note: When powering electric devices that
require more than 10 watts in vehicles
equipped with keyless start, the engine must
remain running. If the engine is turned off or
you switch the ignition to accessory mode,
plugged in devices will not be charged.
You can use the power point for electric
devices that require up to 400 watts. It is
on the instrument panel, and the rear of
the center console. 167
Super Duty (TFE) Canada/United States of America, enUSA, Edition date: 201909, Second-Printing Auxiliary Power PointsE191617
Page 171 of 633
When the indicator light on the power point
is:
•
On: The power point is working, the
ignition is on and a device is plugged
in.
• Off: The power point is off, the ignition
is off or no device is plugged in.
• Flashing: The power point is in fault
mode.
The power outlet temporarily turns off
power when in fault mode if the device
exceeds the 400 watt limit. Unplug your
device and switch the ignition off. Switch
the ignition back on, but do not plug your
device back in. Let the system cool off and
switch the ignition off to reset the fault
mode. Switch the ignition back on and
make sure the indicator light remains on.
You can use the 400 watt power outlet for
these types of electric devices:
• Electric hand drills.
• Rechargeable power tools.
• Video games.
• Laptops.
• Televisions.
Note: Max 400W - when the vehicle is
parked and 300W - when the vehicle is
driving.
Do not use the power point for certain
electric devices, including:
• Cathode-ray, tube-type televisions.
• Motor loads, such as vacuum cleaners,
electric saws and other electric power
tools or compressor-driven
refrigerators.
• Measuring devices, which process
precise data, such as medical
equipment or measuring equipment.
• Other appliances requiring an
extremely stable power supply such as
microcomputer-controlled electric
blankets or touch-sensor lamps. Locations
Note:
Timed power points remain on for 30
minutes if the vehicle is in accessory mode.
If you switch the vehicle off, the timed
power points remain on for 75 minutes.
Power points may be in the following
locations:
• On the instrument panel.
• Inside the center console.
• On the rear of the center console.
• In the seat bin.
WIRELESS ACCESSORY
CHARGING (IF EQUIPPED) WARNING:
Wireless charging
devices can affect the operation of
implanted medical devices, including
cardiac pacemakers. If you have any
implanted medical devices, we
recommend that you consult with your
physician. WARNING:
Changes or
modifications not expressively approved
by the party responsible for compliance
could void the user's authority to operate
the equipment. The term "IC:" before the
radio certification number only signifies
that Industry Canada technical
specifications were met.
Note: Devices without built-in Qi wireless
charging receivers require an additional Qi
receiver or sleeve.
Note: For compatible devices with built-in
Qi wireless charging capability, the charging
performance may be affected if your device
is in a case. It may be necessary to remove
the case to wirelessly charge your device.
168
Super Duty (TFE) Canada/United States of America, enUSA, Edition date: 201909, Second-Printing Auxiliary Power Points
Page 172 of 633
The system supports one Qi wireless
charging compatible device on the
charging area.
Keep the charging area clean and remove
foreign objects prior to charging a device.
Do not place items with a magnetic strip,
for example passports, parking tickets or
credit cards, near the charging area when
charging a device. Damage may occur to
the magnetic strip.
Do not place metal objects, for example
remote controls, coins and candy
wrappers, on or near the charging area
when charging a device. Metal objects may
heat up and degrade the charging
performance.
Note:
The device controls the rate of
charge, or charging power. During charging,
the device and the charger may heat up, this
is normal. If the battery gets hotter than
usual, the charger may stop charging. The charging area is on the
center console or lower
instrument panel. See Center
Console (page 171).
You can charge a device if the vehicle is
on, when in accessory mode, or anytime
SYNC is on.
To begin charging, place the device on the
center of the charging surface with the
charging side down. The charging stops
after your device reaches a full charge.
Note: If the system detects a foreign object
or if the device is misaligned on the charging
area, a message appears in the display.
Note: Software and firmware updates may
affect device compatibility, including the
use of unofficial software or firmware. You
should verify charging functionality with your
specific devices when in your vehicle. Description
Behavior
Message
This message appears whenwireless charging begins.
Message on screen display
or pop-up window.
Wireless Charger Active
The system stops chargingyour device if the system detects the phone is
misaligned, or a foreign
metal object is on the char- ging surface.
Pop-up window.
Charging Terminated
Phone misaligned or object
between phone and charger
detected. Correct the condi- tion to resume charging.
FCC ID: L2C0066T
169
Super Duty (TFE) Canada/United States of America, enUSA, Edition date: 201909, Second-Printing Auxiliary Power PointsE297549
Page 174 of 633
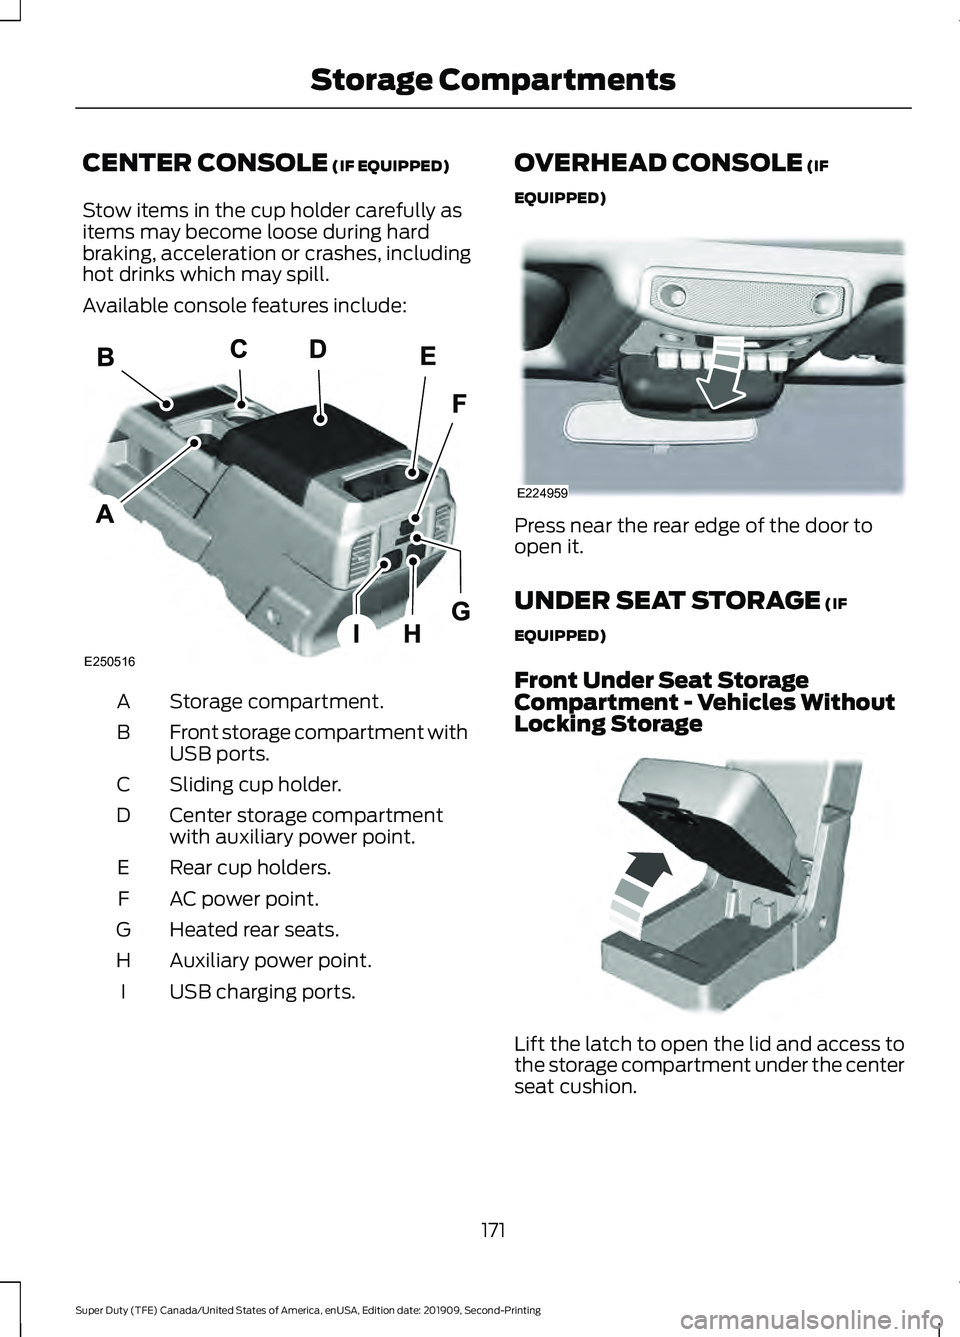
CENTER CONSOLE (IF EQUIPPED)
Stow items in the cup holder carefully as
items may become loose during hard
braking, acceleration or crashes, including
hot drinks which may spill.
Available console features include: Storage compartment.
A
Front storage compartment with
USB ports.
B
Sliding cup holder.
C
Center storage compartment
with auxiliary power point.
D
Rear cup holders.
E
AC power point.
F
Heated rear seats.
G
Auxiliary power point.
H
USB charging ports.
I OVERHEAD CONSOLE (IF
EQUIPPED) Press near the rear edge of the door to
open it.
UNDER SEAT STORAGE
(IF
EQUIPPED)
Front Under Seat Storage
Compartment - Vehicles Without
Locking Storage Lift the latch to open the lid and access to
the storage compartment under the center
seat cushion.
171
Super Duty (TFE) Canada/United States of America, enUSA, Edition date: 201909, Second-Printing Storage CompartmentsE250516 E224959 E306120
Page 230 of 633
PRINCIPLE OF OPERATION
WARNING: Vehicle modifications
involving braking system, aftermarket
roof racks, suspension, steering system,
tire construction and wheel and tire size
may change the handling characteristics
of your vehicle and may adversely affect
the performance of the electronic
stability control system. In addition,
installing any stereo loudspeakers may
interfere with and adversely affect the
electronic stability control system. Install
any aftermarket stereo loudspeaker as
far as possible from the front center
console, the tunnel, and the front seats
in order to minimize the risk of interfering
with the electronic stability control
sensors. Reducing the effectiveness of
the electronic stability control system
could lead to an increased risk of loss of
vehicle control, vehicle rollover, personal
injury and death. WARNING:
Remember that even
advanced technology cannot defy the
laws of physics. It’ s always possible to
lose control of a vehicle due to
inappropriate driver input for the
conditions. Aggressive driving on any
road condition can cause you to lose
control of your vehicle increasing the risk
of personal injury or property damage.
Activation of the electronic stability
control system is an indication that at
least some of the tires have exceeded
their ability to grip the road; this could
reduce the operator ’s ability to control
the vehicle potentially resulting in a loss
of vehicle control, vehicle rollover,
personal injury and death. If your
electronic stability control system
activates, SLOW DOWN.
The system automatically turns on each
time you switch the ignition on. If a fault occurs in either the stability
control or the traction control system, you
may experience the following conditions:
•
The stability and traction control light
illuminates steadily.
• The stability control and traction
control systems do not enhance your
vehicle's ability to maintain traction of
the wheels.
• The Adaptive Steering system (if
equipped) automatically changes the
steering function to a fixed steering
ratio. See
Steering (page 261).
If a driving condition activates either the
stability control or the traction control
system you may experience the following
conditions:
• The stability and traction control light
flashes.
• Your vehicle slows down.
• Reduced engine power.
• A vibration in the brake pedal.
• The brake pedal is stiffer than usual.
• If the driving condition is severe and
your foot is not on the brake, the brake
pedal may move as the system applies
higher brake force.
The stability control system has several
features built into it to help you maintain
control of your vehicle:
Electronic Stability Control
The system enhances your vehicle ’s ability
to prevent skids or lateral slides by
applying brakes to one or more of the
wheels individually and, if necessary,
reducing engine power.
227
Super Duty (TFE) Canada/United States of America, enUSA, Edition date: 201909, Second-Printing Stability Control
Page 254 of 633
When you switch the system on and it
detects an unintentional drift out of your
lane is likely to occur, the system notifies
or assists you to stay in your lane through
the steering system and information
display. The system provides an audible
warning and by vibrating the steering
wheel.
Switching the System On and Off
Note:
The system on or off setting is stored
until it is manually changed, unless a MyKey
is detected. If the system detects a MyKey,
it defaults to on and the mode is set to alert.
Note: If a MyKey is detected, pressing the
button does not affect the on or off status
of the system. You can only change the
mode and intensity settings. Press the button to switch the
system on or off. The button is
above the audio unit or on the
center console.
System Settings
The system sensitivity and intensity can
be adjusted through the display screen.
See General Information (page 112). The
system remembers the last selection. You
do not need to readjust the setting each
time you turn on your vehicle.
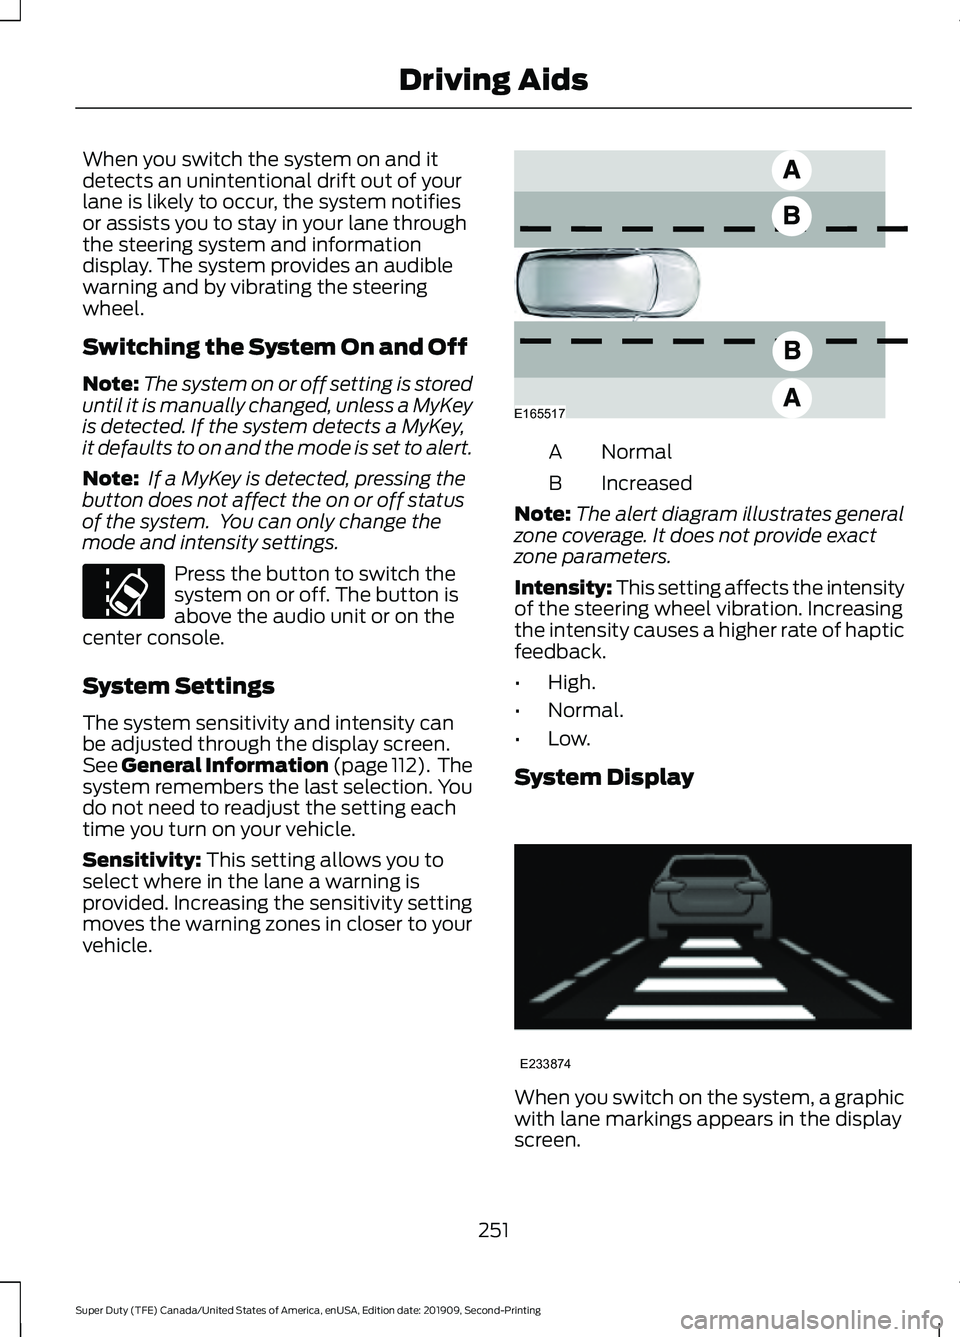
Sensitivity: This setting allows you to
select where in the lane a warning is
provided. Increasing the sensitivity setting
moves the warning zones in closer to your
vehicle. Normal
A
Increased
B
Note: The alert diagram illustrates general
zone coverage. It does not provide exact
zone parameters.
Intensity: This setting affects the intensity
of the steering wheel vibration. Increasing
the intensity causes a higher rate of haptic
feedback.
• High.
• Normal.
• Low.
System Display When you switch on the system, a graphic
with lane markings appears in the display
screen.
251
Super Duty (TFE) Canada/United States of America, enUSA, Edition date: 201909, Second-Printing Driving AidsE173233 E165517 E233874