display FORD F450 2015 Repair Manual
[x] Cancel search | Manufacturer: FORD, Model Year: 2015, Model line: F450, Model: FORD F450 2015Pages: 485, PDF Size: 5.35 MB
Page 248 of 485
6. Release the parking brake. With your
foot on the brake pedal and with the
A/C on, put the vehicle in D and allow
the engine to idle for at least one
minute.
• If you do not allow the engine to
relearn its idle trim, the idle quality
of your vehicle may be adversely
affected until the idle trim is
eventually relearned.
7. Drive the vehicle to complete the relearning process
•The vehicle may need to be driven
10 mi (16 km) or more to relearn the
idle and fuel trim strategy along
with the ethanol content for flexible
fuel vehicles.
• For flexible fuel vehicles, if you are
operating on E85, you may
experience poor starts or an
inability to start the engine and
driveability problems until the fuel
trim and ethanol content have been
relearned.
If the battery has been disconnected or a
new battery has been installed, the clock
and radio settings must be reset once the
battery is reconnected.
Always dispose of automotive
batteries in a responsible manner.
Follow your local authorized standards
for disposal. Call your local authorized
recycling center to find out more about
recycling automotive batteries.
Battery Management System (If
Equipped)
The battery management system (BMS)
monitors battery conditions and takes
actions to extend battery life. If excessive
battery drain is detected, the system may
temporarily disable certain electrical
features to protect the battery. Those
electrical accessories affected include the
rear defrost, heated/cooled seats, climate control fan, heated steering wheel, audio
and navigation system. A message may be
shown in the information displays to alert
the driver that battery protection actions
are active. These messages are only for
notification that an action is taking place,
and not intended to indicate an electrical
problem or that the battery requires
replacement.
Electrical accessory installation
To ensure proper operation of the BMS,
any electrical devices that are added to
the vehicle should not have their ground
connection made directly at the negative
battery post. A connection at the negative
battery post can cause inaccurate
measurements of the battery condition
and potential incorrect system operation.
Note:
Electrical or electronic accessories
added to the vehicle by the dealer or the
owner may adversely affect battery
performance and durability, and may also
affect the performance of other electrical
systems in the vehicle.
When a battery replacement is required,
the battery should only be replaced with
a Ford recommended replacement battery
which matches the electrical requirements
of the vehicle. After battery replacement,
or in some cases after charging the battery
with the external charger, the BMS requires
eight hours of vehicle sleep time (key off
with doors closed) to relearn the new
battery state of charge. Prior to relearning
the state of charge, the BMS may disable
electrical features (to protect the battery)
earlier than normal.
245
Super Duty (), enUSA Maintenance
Page 290 of 485
•
To reduce the chances of interference
from another vehicle, perform the
system reset procedure at least three
feet (one meter) away from another
Ford Motor Company vehicle
undergoing the system reset procedure
at the same time.
• Do not wait more than two minutes
between resetting each tire sensor or
the system will time-out and the entire
procedure will have to be repeated on
all four wheels.
• A double horn will sound indicating the
need to repeat the procedure.
Performing the System Reset Procedure
Read the entire procedure before
attempting.
1. Drive the vehicle above 20 mph (32 km/h) for at least two minutes, then
park in a safe location where you can
easily get to all four tires and have
access to an air pump.
2. Place the ignition in the off position and
keep the key in the ignition.
3. Cycle the ignition to the on position with the engine off.
4. Turn the hazard flashers on then off three times. You must accomplish this
within 10 seconds. If the reset mode
has been entered successfully, the horn
will sound once, the system indicator
will flash and a message is shown in
the information display. If this does not
occur, please try again starting at Step
2. If after repeated attempts to enter
the reset mode, the horn does not
sound, the system indicator does not
flash and no message is shown in the
information display, seek service from
your authorized dealer. 5. Train the tire pressure monitoring
system sensors in the tires using the
following system reset sequence
starting with the left front tire in the
following clockwise order: Left front
(driver's side front tire), Right front
(passenger's side front tire), Right rear
(passenger's side rear tire), Left rear
(driver's side rear tire).
6. Remove the valve cap from the valve stem on the left front tire. Decrease the
air pressure until the horn sounds.
Note: The single horn chirp confirms
that the sensor identification code has
been learned by the module for this
position. If a double horn is heard, the
reset procedure was unsuccessful, and
you must repeat it.
7. Remove the valve cap from the valve stem on the right front tire. Decrease
the air pressure until the horn sounds.
8. Remove the valve cap from the valve stem on the right rear tire. Decrease the
air pressure until the horn sounds.
9. Remove the valve cap from the valve stem on the left rear tire. Decrease the
air pressure until the horn sounds.
Training is complete after the horn
sounds for the last tire trained (driver's
side rear tire), the system indicator
stops flashing, and a message is shown
in the information display.
10. Turn the ignition off. If two short horn
beeps are heard, the reset procedure
was unsuccessful and you must
repeat it. If after repeating the
procedure and two short beeps are
heard when the ignition is turned to
off, seek assistance from your
authorized dealer.
287
Super Duty (), enUSA Wheels and Tires
Page 312 of 485
1
Add 8 oz. (236 ml) of Additive Friction Modifier XL-3 or equivalent meeting Ford
Specification EST-M2C118– A for complete refill of limited slip Ford axles. Ford design
rear axles contain a synthetic lubricant that does not require changing unless you submerge
the axle in water.
2 Ford recommends using Motorcraft (Ford) DOT 3 LV High Performance Motor Vehicle
Brake Fluid, Motorcraft (Ford) DOT 4 LV High Performance Motor Vehicle Brake Fluid or
equivalent meeting WSS-M6C65-A1 or WSS-M6C65-A2. Use of any fluid other than the
recommended fluid may cause degraded brake performance and not meet the Ford
performance standards. Keep brake fluid clean and dry. Contamination with dirt, water,
petroleum products or other materials may result in brake system damage and possible
failure.
3 Add the coolant type originally equipped in your vehicle.
4 Ford has designed your engine to use Motorcraft engine oils or equivalent oils that meet
Ford ’s specification. It is also acceptable to use an engine oil of recommended viscosity
grade that meets API SN requirements and displays the API Certification Mark for gasoline
engines.
5 Do not use oils labeled as API SN unless the label also display the API certification mark.
These oils do not meet the requirements of your vehicles engine and emissions system.
6 Do not use supplemental engine oil additives. They are unnecessary and could lead to
engine damage not covered by your Ford warranty.
7 Use the correct automatic transmission fluid. Transmission fluid requirements are
indicated on the dipstick blade or the dipstick handle. Check the container to verify the
fluid you are adding is of the correct type. Refer to your scheduled maintenance information
to determine the correct service interval.
Note: Automatic transmissions that require MERCON LV should only use MERCON LV fluid.
Use of any fluid other than the recommended fluid may cause transmission damage.
8 Indicates only approximate dry-fill capacity. Some applications may vary based on cooler
size and if equipped with an in-tank cooler. You should set the amount of transmission
fluid and fluid level by the indication on the dipstick’ s normal operating range.
9 Fill to the proper capacity according to dipstick Type A. For correct dipstick type, See
Automatic Transmission Fluid Check (page 240).
9 Fill to the proper capacity according to dipstick Type B. For correct dipstick type, See
Automatic Transmission Fluid Check
(page 240).
10 See the Warning below: WARNING
The air conditioning refrigerant system contains refrigerant R-134a under high
pressure. Opening the air conditioning refrigerant system can cause personal injury.
Have the air conditioning refrigerant system serviced only by qualified personnel.
309
Super Duty (), enUSA Capacities and Specifications
Page 314 of 485
•
MP3 folder mode represents a folder
structure consisting of one level of
folders. The CD player numbers all MP3
tracks on the disc (noted by the .mp3
file extension) and all folders
containing MP3 files, from F001
(folder) T001 (track) to F253 T255.
• Creating discs with only one level of
folders helps with navigation through
the disc files.
If you are burning your own MP3 discs, it is
important to understand how the system
reads the structures you create. While
various files may be present, (files with
extensions other than mp3), only files with
the .mp3 extension are played; other files
are ignored by the system. This enables
you to use the same MP3 disc for a variety
of tasks on your work computer, home
computer and your in-vehicle system. In track mode, the system displays and
plays the structure as if it were only one
level deep (all .mp3 files play, regardless
of being in a specific folder). In folder
mode, the system only plays the .mp3 files
in the current folder.
AUDIO UNIT - VEHICLES WITH:
AM/FM WARNING
Driving while distracted can result in
loss of vehicle control, crash and
injury. We strongly recommend that
you use extreme caution when using any
device that may take your focus off the
road. Your primary responsibility is the safe
operation of your vehicle. We recommend
against the use of any hand-held device
while driving and encourage the use of
voice-operated systems when possible.
Make sure you are aware of all applicable
local laws that may affect the use of
electronic devices while driving. 311
Super Duty (), enUSA Audio SystemE163157
Page 315 of 485
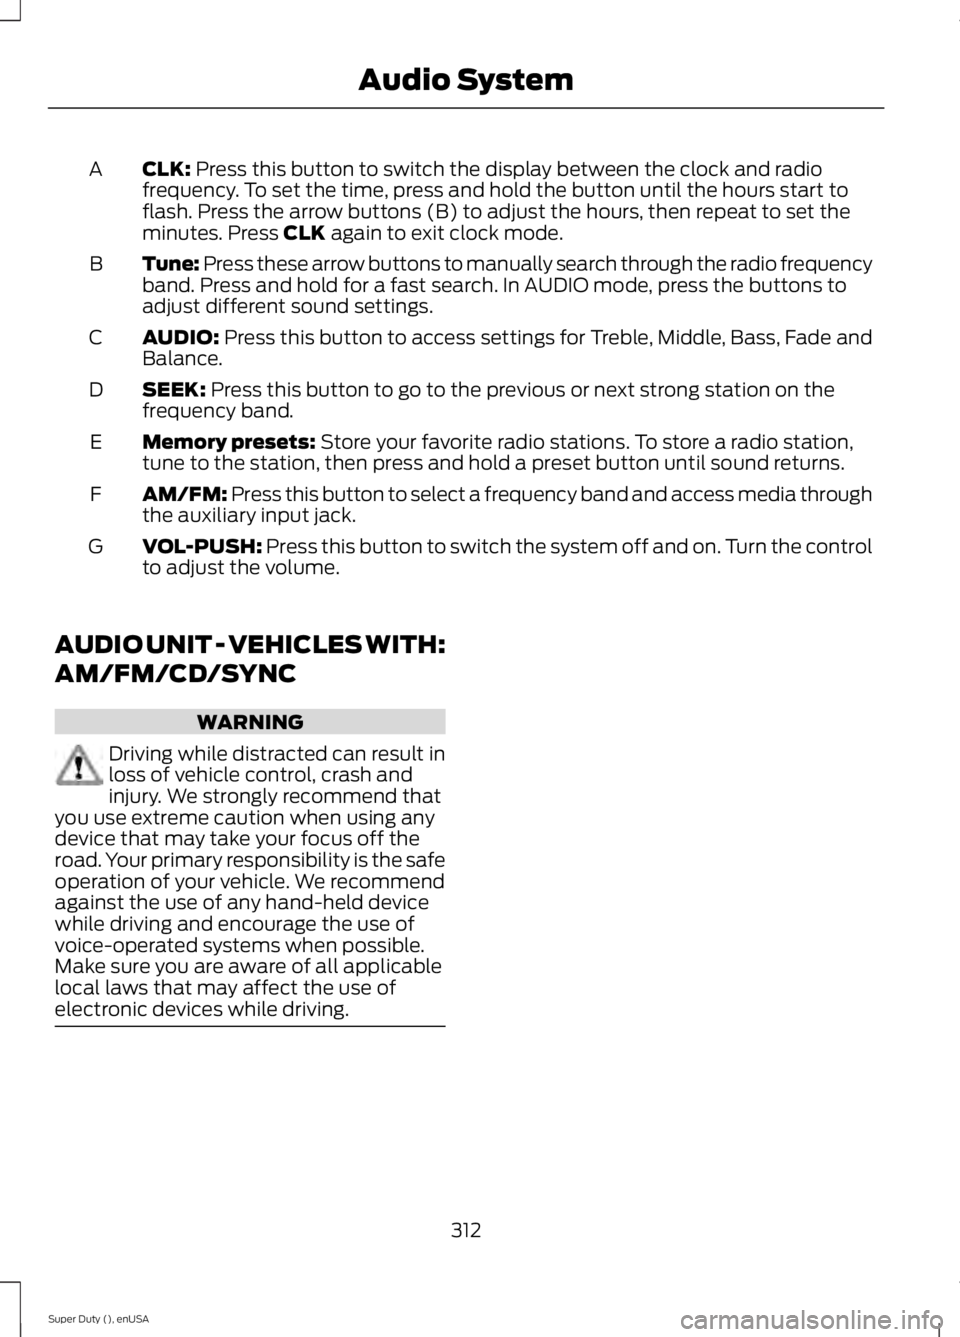
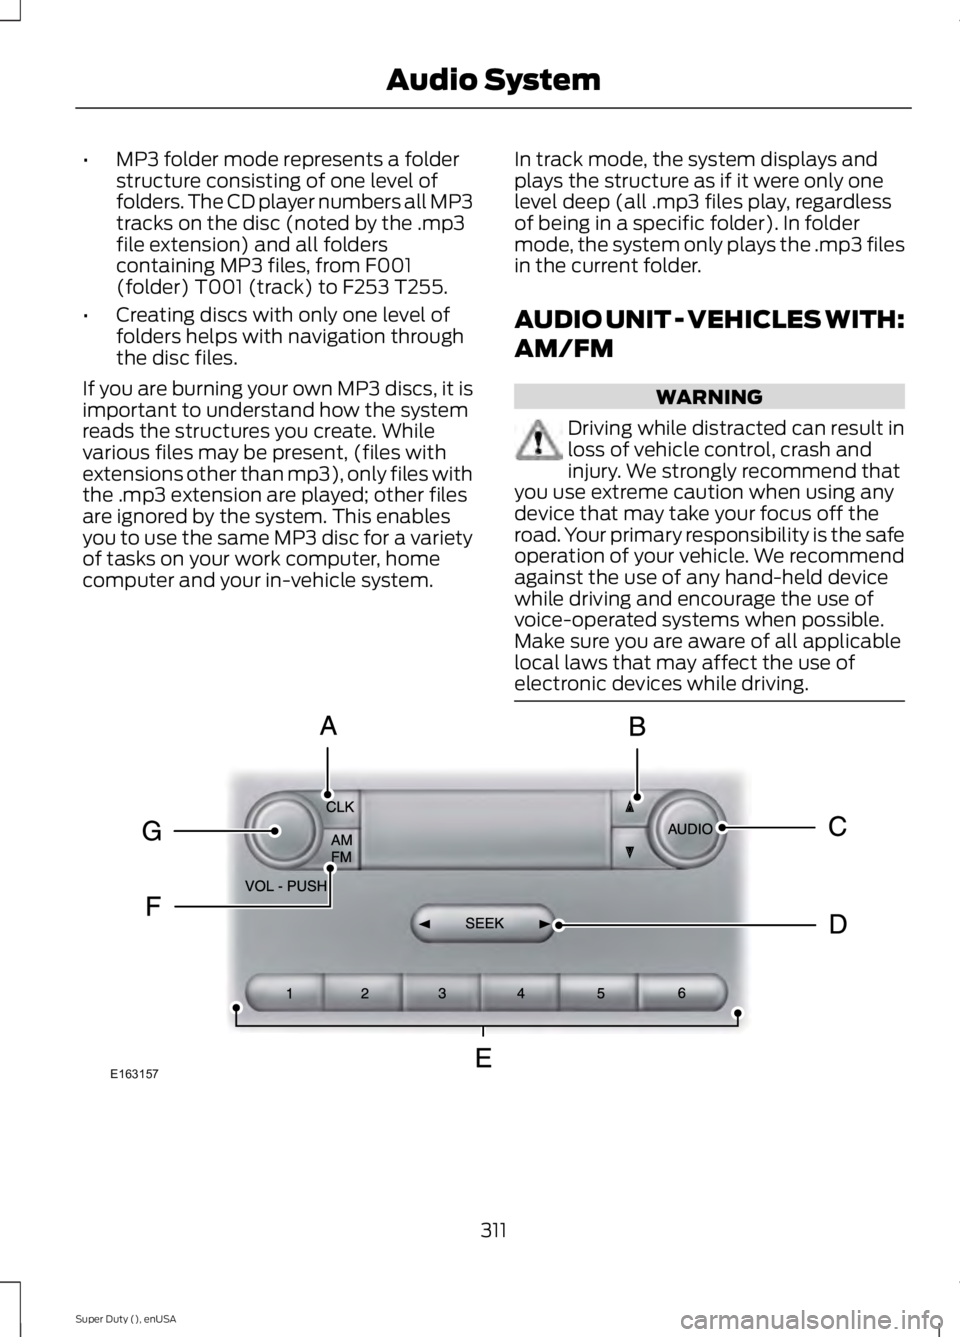
CLK: Press this button to switch the display between the clock and radio
frequency. To set the time, press and hold the button until the hours start to
flash. Press the arrow buttons (B) to adjust the hours, then repeat to set the
minutes. Press
CLK again to exit clock mode.
A
Tune: Press these arrow buttons to manually search through the radio frequency
band. Press and hold for a fast search. In AUDIO mode, press the buttons to
adjust different sound settings.
B
AUDIO:
Press this button to access settings for Treble, Middle, Bass, Fade and
Balance.
C
SEEK:
Press this button to go to the previous or next strong station on the
frequency band.
D
Memory presets:
Store your favorite radio stations. To store a radio station,
tune to the station, then press and hold a preset button until sound returns.
E
AM/FM: Press this button to select a frequency band and access media through
the auxiliary input jack.
F
VOL-PUSH:
Press this button to switch the system off and on. Turn the control
to adjust the volume.
G
AUDIO UNIT - VEHICLES WITH:
AM/FM/CD/SYNC WARNING
Driving while distracted can result in
loss of vehicle control, crash and
injury. We strongly recommend that
you use extreme caution when using any
device that may take your focus off the
road. Your primary responsibility is the safe
operation of your vehicle. We recommend
against the use of any hand-held device
while driving and encourage the use of
voice-operated systems when possible.
Make sure you are aware of all applicable
local laws that may affect the use of
electronic devices while driving. 312
Super Duty (), enUSA Audio System
Page 316 of 485
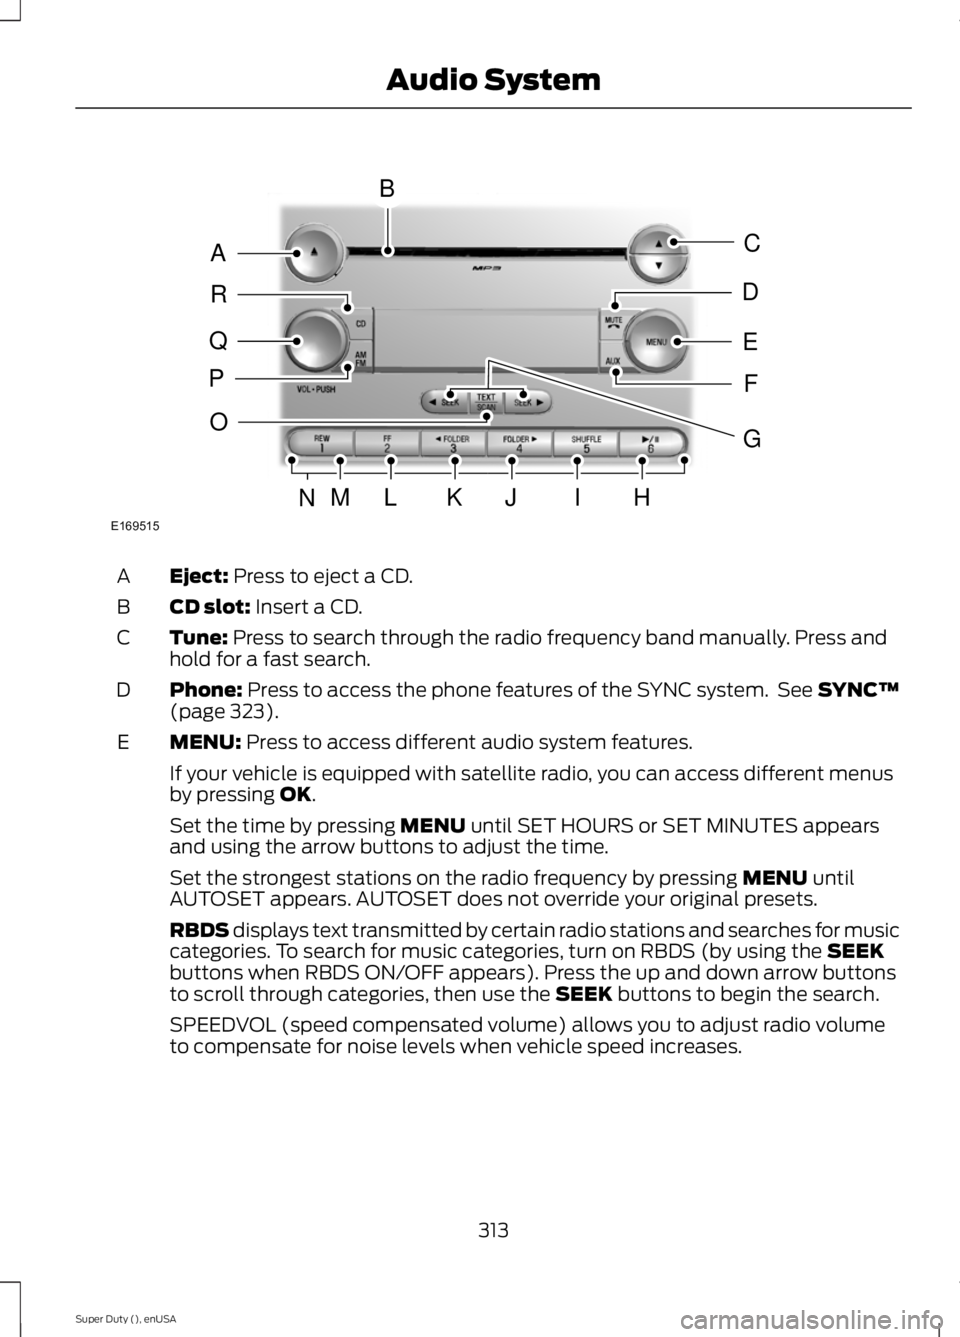
Eject: Press to eject a CD.
A
CD slot:
Insert a CD.
B
Tune:
Press to search through the radio frequency band manually. Press and
hold for a fast search.
C
Phone:
Press to access the phone features of the SYNC system. See SYNC™
(page 323).
D
MENU:
Press to access different audio system features.
E
If your vehicle is equipped with satellite radio, you can access different menus
by pressing
OK.
Set the time by pressing
MENU until SET HOURS or SET MINUTES appears
and using the arrow buttons to adjust the time.
Set the strongest stations on the radio frequency by pressing
MENU until
AUTOSET appears. AUTOSET does not override your original presets.
RBDS displays text transmitted by certain radio stations and searches for music
categories. To search for music categories, turn on RBDS (by using the
SEEK
buttons when RBDS ON/OFF appears). Press the up and down arrow buttons
to scroll through categories, then use the
SEEK buttons to begin the search.
SPEEDVOL (speed compensated volume) allows you to adjust radio volume
to compensate for noise levels when vehicle speed increases.
313
Super Duty (), enUSA Audio SystemE169515
B
A
Q
R
P
C
E
D
F
O
MLKJIHN
G
Page 317 of 485
Track/Folder is only available on MP3 files when in CD mode. In track mode,
pressing the SEEK arrows allows you to scroll through all the tracks on the disc.
In folder mode, pressing the
SEEK arrows allows you to scroll through all the
tracks within the selected folder. Press the FOLDER buttons to access other
folders.
COMPRESS
(Compression) is only available in CD and MP3 modes. Switching
compression on brings the soft and loud passages together for a more consistent
listening level. Use the SEEK buttons and up and down arrow buttons to switch
it on and off.
AUX:
Press to access the media features of the SYNC system. See SYNC™
(page 323).
F
SEEK:
In radio mode, press and release these buttons to go to the next (or
previous) preset radio station or disc track. In CD and MP3 modes, press these
buttons to select the next (or previous) track, or press and hold to advance (or
reverse) within the same track.
G
Play, Pause and OK:
Play and Pause allow you to play or pause a track when
listening to a CD. OK allows you to confirm commands with phone and media
features of the SYNC system. See SYNC™ (page 323).
H
SHUFFLE:
Play music on the selected CD or MP3 folder in random order.
I
FOLDER >:
Press to access the next folder on an MP3 disc.
J
< FOLDER:
Press to access the previous folder on an MP3 disc.
K
FF:
Press to fast forward in a CD track or MP3 file manually.
L
REW:
Press to rewind in a CD track or MP3 file manually.
M
Memory presets:
Store your favorite radio stations. To store a radio station,
tune to the station, then press and hold a preset button until sound returns.
N
TEXT/SCAN:
In radio, CD and MP3 modes, press and hold to hear a brief
sampling of radio stations, CD tracks or MP3 files. In CD and MP3 modes, press
and release to display track title, artist name and disc title. In text mode,
sometimes the display requires additional text to show. When the < / > indicator
is on, press TEXT and then use the SEEK buttons to view the additional display
text.
O
AM/FM:
Press to select a frequency band.
P
VOL-PUSH:
Press to switch the system off and on. Turn it to adjust the volume.
Q
CD:
Press to enter CD or MP3 mode.
R
314
Super Duty (), enUSA Audio System
Page 322 of 485
Note:
This receiver includes the eCos
real-time operating system. eCos is
published under the eCos License.
Satellite Radio Reception Factors Potential satellite radio reception issues
For optimal reception performance, keep the antenna
clear of snow and ice build-up and keep luggage and other
material as far away from the antenna as possible.
Antenna obstructions
Hills, mountains, tall buildings, bridges, tunnels, freeway
overpasses, parking garages, dense tree foliage and
thunderstorms can interfere with your reception.
Terrain
When you pass a ground-based broadcast-repeating
tower, a stronger signal may overtake a weaker one and
the audio system may mute.
Station overload
Your display may show ACQUIRING . . . to indicate the
interference and the audio system may mute.
Satellite radio signal interfer-
ence
SIRIUS® Satellite Radio Service
Note: SIRIUS reserves the unrestricted right
to change, rearrange, add or delete
programming including canceling, moving
or adding particular channels, and its prices,
at any time, with or without notice to you.
Ford Motor Company shall not be
responsible for any such programming
changes. SIRIUS satellite radio is a
subscription-based satellite radio service
that broadcasts a variety of music, sports,
news, weather, traffic and entertainment
programming. Your factory-installed
SIRIUS satellite radio system includes
hardware and a limited subscription term,
which begins on the date of sale or lease
of your vehicle. See an authorized dealer
for availability.
For more information on extended
subscription terms (a service fee is
required), the online media player and a
complete list of SIRIUS satellite radio
channels, and other features, please visit
www.siriusxm.com in the United States,
www.sirius.ca in Canada, or call SIRIUS at
1-888-539-7474.
Satellite Radio Electronic Serial
Number (ESN)
You need your ESN to activate, modify or
track your satellite radio account. When in
satellite radio mode, press Options.
319
Super Duty (), enUSA Audio SystemE142593
Page 324 of 485
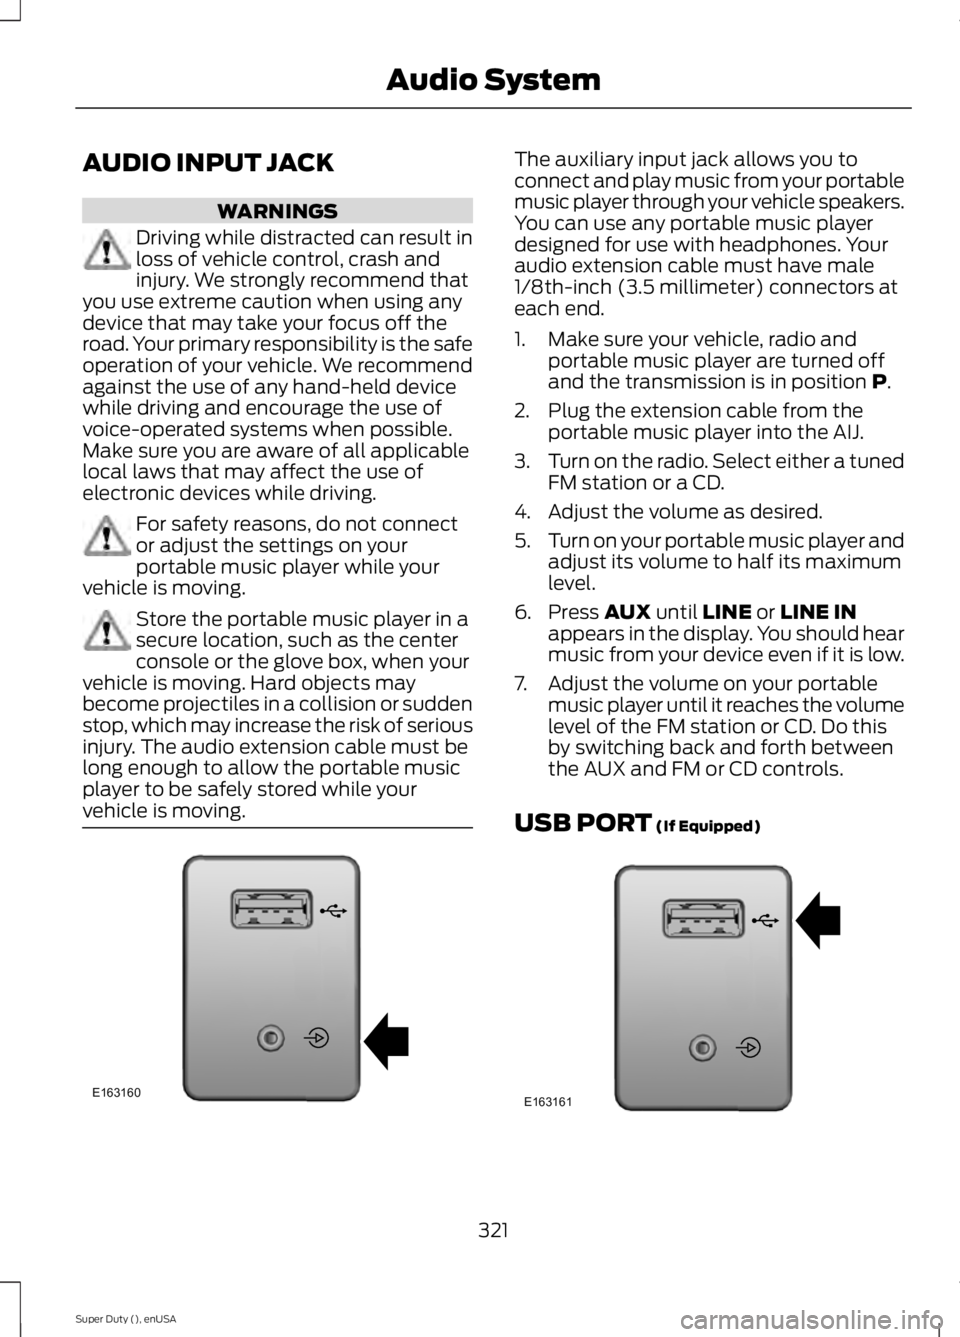
AUDIO INPUT JACK
WARNINGS
Driving while distracted can result in
loss of vehicle control, crash and
injury. We strongly recommend that
you use extreme caution when using any
device that may take your focus off the
road. Your primary responsibility is the safe
operation of your vehicle. We recommend
against the use of any hand-held device
while driving and encourage the use of
voice-operated systems when possible.
Make sure you are aware of all applicable
local laws that may affect the use of
electronic devices while driving. For safety reasons, do not connect
or adjust the settings on your
portable music player while your
vehicle is moving. Store the portable music player in a
secure location, such as the center
console or the glove box, when your
vehicle is moving. Hard objects may
become projectiles in a collision or sudden
stop, which may increase the risk of serious
injury. The audio extension cable must be
long enough to allow the portable music
player to be safely stored while your
vehicle is moving. The auxiliary input jack allows you to
connect and play music from your portable
music player through your vehicle speakers.
You can use any portable music player
designed for use with headphones. Your
audio extension cable must have male
1/8th-inch (3.5 millimeter) connectors at
each end.
1. Make sure your vehicle, radio and
portable music player are turned off
and the transmission is in position P.
2. Plug the extension cable from the portable music player into the AIJ.
3. Turn on the radio. Select either a tuned
FM station or a CD.
4. Adjust the volume as desired.
5. Turn on your portable music player and
adjust its volume to half its maximum
level.
6. Press
AUX until LINE or LINE IN
appears in the display. You should hear
music from your device even if it is low.
7. Adjust the volume on your portable music player until it reaches the volume
level of the FM station or CD. Do this
by switching back and forth between
the AUX and FM or CD controls.
USB PORT
(If Equipped) 321
Super Duty (), enUSA Audio SystemE163160 E163161
Page 328 of 485
System data cannot be accessed without
special equipment and access to the
vehicle's SYNC module. Ford Motor
Company and Ford of Canada will not
access the system data for any purpose
other than as described absent consent, a
court order, or where required by law
enforcement, other government
authorities, or other third parties acting
with lawful authority. Other parties may
seek to access the information
independently of Ford Motor Company and
Ford of Canada. For further privacy
information, see the sections on 911 Assist,
Vehicle Health Report, and Traffic,
Directions and Information.
USING VOICE RECOGNITION
This system helps you control many
features using voice commands. This
allows you to keep your hands on the
wheel and focus on what is in front of you.
Initiating a Voice Session Push the voice icon. A tone
sounds and Listening appears in
the display. Say any of the
following: If You Want To
Say
Stream audio from your phone.
"Bluetooth audio"
Cancel the requested action.
"Cancel"
Access the device connected to the auxiliary input jack.
"Line in"
Access mobile applications.
"Mobile apps" *
Make calls.
"Phone"
Access the SYNC Services portal.
"Services" *
Return to the main menu.
"SYNC"
Access the device connected to your USB port.
"USB"
Run a vehicle health report.
"Vehicle health report" *
Adjust the level of voice interaction and feedback.
"Voice settings"
Hear a list of voice commands available in the current
mode.
"Help"
* This is an optional feature and available in the United States only.
325
Super Duty (), enUSA SYNC™ (If Equipped)E142599