weight FORD F450 SUPER DUTY 2017 Owners Manual
[x] Cancel search | Manufacturer: FORD, Model Year: 2017, Model line: F450 SUPER DUTY, Model: FORD F450 SUPER DUTY 2017Pages: 642, PDF Size: 12.35 MB
Page 7 of 642
Bed Ramps....................................................265
Towing
Towing a Trailer............................................268
Trailer Reversing Aids.................................269
Trailer Sway Control....................................277
Recommended Towing Weights............277
Essential Towing Checks...........................281
Towing the Vehicle on Four Wheels......289
Driving Hints
Breaking-In.....................................................292
Economical Driving.....................................292
Driving Through Water...............................293
Floor Mats.......................................................293
Snowplowing................................................294
Roadside Emergencies
Roadside Assistance..................................297
Hazard Flashers...........................................298
Fuel Shutoff - 6.2L/6.8L...........................298
Fuel Shutoff - 6.7L Diesel.........................298
Jump Starting the Vehicle........................299
Post-Crash Alert System..........................302
Transporting the Vehicle...........................302
Towing Points...............................................303
Customer Assistance
Getting the Services You Need..............305
In California (U.S. Only)............................306
The Better Business Bureau (BBB) AutoLine Program (U.S. Only)......................307
Utilizing the Mediation/ArbitrationProgram (Canada Only)......................308
Getting Assistance Outside the U.S. andCanada.......................................................308
Ordering Additional Owner'sLiterature....................................................309
Reporting Safety Defects (U.S.Only).............................................................310
Reporting Safety Defects (CanadaOnly).............................................................310
Fuses
Fuse Specification Chart............................312
Changing a Fuse..........................................320
Maintenance
General Information....................................322
Opening and Closing the Hood..............322
Under Hood Overview - 6.2L...................323
Under Hood Overview - 6.7L Diesel......324
Under Hood Overview - 6.8L..................326
Engine Oil Dipstick - 6.2L/6.8L...............327
Engine Oil Dipstick - 6.7L Diesel.............327
Engine Oil Check - 6.2L/6.8L...................327
Engine Oil Check - 6.7L Diesel................328
Changing the Engine Oil and OilFilter..............................................................329
Changing the Coalescer FilterElement......................................................330
Oil Change Indicator Reset.......................331
Engine Coolant Check - 6.2L/6.8L........332
Engine Coolant Check - 6.7L Diesel......336
Automatic Transmission FluidCheck...........................................................340
Transfer Case Fluid Check........................343
Brake Fluid Check........................................343
Power Steering Fluid Check....................344
Washer Fluid Check....................................344
Draining the Fuel Filter Water Trap - 6.7LDiesel...........................................................345
Fuel Filter - 6.2L/6.8L................................346
Changing the 12V Battery.........................346
Checking the Wiper Blades.....................348
Changing the Wiper Blades.....................348
Adjusting the Headlamps........................349
Changing a Bulb..........................................350
Bulb Specification Chart...........................353
Changing the Engine Air Filter - 6.2L/6.8L...............................................................356
4
Super Duty (TFE) Canada/United States of America, enUSA, Edition date: 201710, Second Printing
Table of Contents
Page 20 of 642
GENERAL INFORMATION
See the following sections for directionson how to properly use safety restraintsfor children.
WARNINGS
Always make sure your child issecured properly in a device that isappropriate for their height, age andweight. Child safety restraints must bebought separately from your vehicle.Failure to follow these instructions andguidelines may result in an increased riskof serious injury or death to your child.
All children are shaped differently.The National Highway Traffic SafetyAdministration and other safetyorganizations, base their recommendationsfor child restraints on probable child height,age and weight thresholds, or on theminimum requirements of the law. Werecommend that you check with a NHTSACertified Child Passenger Safety
WARNINGS
Technician (CPST) to make sure that youproperly install the child restraint in yourvehicle and that you consult yourpediatrician to make sure you have a childrestraint appropriate for your child. Tolocate a child restraint fitting station andCPST, contact NHTSA toll free at1-888-327-4236 or go towww.nhtsa.dot.gov. In Canada, contactTransport Canada toll free at1-800-333-0371 or go to www.tc.gc.ca tofind a Child Car Seat Clinic in your area.Failure to properly restrain children in childrestraints made especially for their height,age and weight, may result in an increasedrisk of serious injury or death to your child.
On hot days, the temperature insidethe vehicle can rise very quickly.Exposure of people or animals tothese high temperatures for even a shorttime can cause death or serious heatrelated injuries, including brain damage.Small children are particularly at risk.
17
Super Duty (TFE) Canada/United States of America, enUSA, Edition date: 201710, Second Printing
Child Safety
Page 21 of 642
Recommendations for Safety Restraints for Children
Recommended restrainttypeChild size, height, weight, or ageChild
Use a child safety seat(sometimes called aninfant carrier, convertibleseat, or toddler seat).
Children weighing 40 lb (18 kg) or less(generally age four or younger).Infants ortoddlers
Use a belt-positioningbooster seat.
Children who have outgrown or no longerproperly fit in a child safety seat (gener-ally children who are less than 4 ft. 9 in.(1.45 m) tall, are greater than age fourand less than age 12, and between 40 lb(18 kg) and 80 lb (36 kg) and upward to100 lb (45 kg) if recommended by yourchild restraint manufacturer).
Small children
Use a vehicle seatbelthaving the lap belt snugand low across the hips,shoulder belt centeredacross the shoulder andchest, and seatbackupright.
Children who have outgrown or no longerproperly fit in a belt-positioning boosterseat (generally children who are at least4 ft. 9 in. (1.45 m) tall or greater than80 lb (36 kg) or 100 lb (45 kg) if recom-mended by child restraint manufacturer).
Larger children
•You are required by law to properly usesafety seats for infants and toddlers inthe United States and Canada.
•Many states and provinces require thatsmall children use approved boosterseats until they reach age eight, aheight of 4 feet 9 inches (1.45 meters)tall, or 80 lb (36 kg). Check your localand state or provincial laws for specificrequirements about the safety ofchildren in your vehicle.
•When possible, always properlyrestrain children 12 years of age andunder in a rear seating position of yourvehicle. Accident statistics suggest thatchildren are safer when properlyrestrained in the rear seating positionsthan in a front seating position.
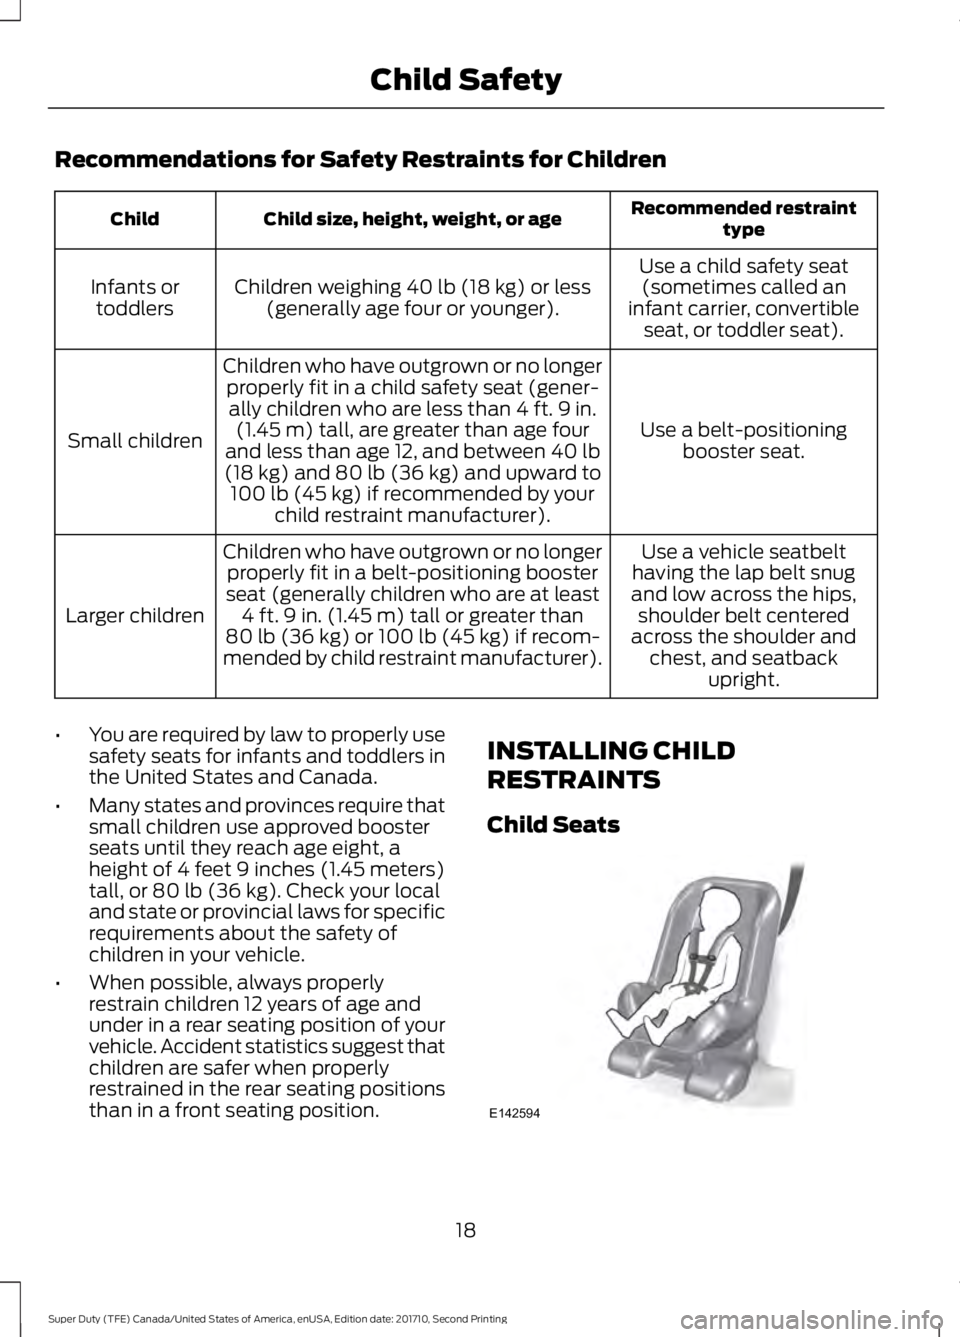
INSTALLING CHILD
RESTRAINTS
Child Seats
18
Super Duty (TFE) Canada/United States of America, enUSA, Edition date: 201710, Second Printing
Child SafetyE142594
Page 24 of 642
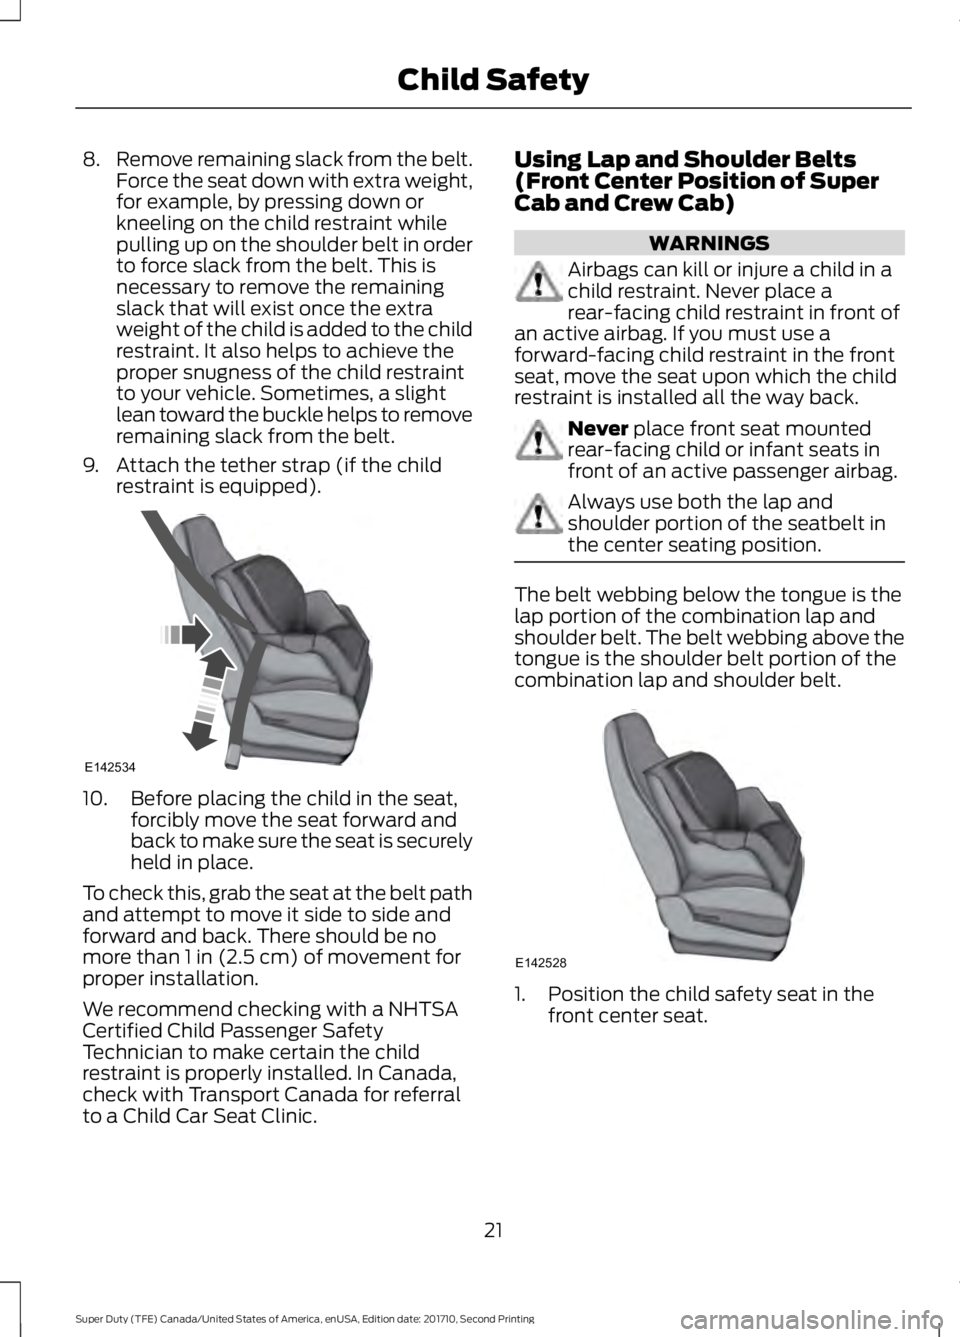
8.Remove remaining slack from the belt.Force the seat down with extra weight,for example, by pressing down orkneeling on the child restraint whilepulling up on the shoulder belt in orderto force slack from the belt. This isnecessary to remove the remainingslack that will exist once the extraweight of the child is added to the childrestraint. It also helps to achieve theproper snugness of the child restraintto your vehicle. Sometimes, a slightlean toward the buckle helps to removeremaining slack from the belt.
9. Attach the tether strap (if the childrestraint is equipped).
10. Before placing the child in the seat,forcibly move the seat forward andback to make sure the seat is securelyheld in place.
To check this, grab the seat at the belt pathand attempt to move it side to side andforward and back. There should be nomore than 1 in (2.5 cm) of movement forproper installation.
We recommend checking with a NHTSACertified Child Passenger SafetyTechnician to make certain the childrestraint is properly installed. In Canada,check with Transport Canada for referralto a Child Car Seat Clinic.
Using Lap and Shoulder Belts(Front Center Position of SuperCab and Crew Cab)
WARNINGS
Airbags can kill or injure a child in achild restraint. Never place arear-facing child restraint in front ofan active airbag. If you must use aforward-facing child restraint in the frontseat, move the seat upon which the childrestraint is installed all the way back.
Never place front seat mountedrear-facing child or infant seats infront of an active passenger airbag.
Always use both the lap andshoulder portion of the seatbelt inthe center seating position.
The belt webbing below the tongue is thelap portion of the combination lap andshoulder belt. The belt webbing above thetongue is the shoulder belt portion of thecombination lap and shoulder belt.
1. Position the child safety seat in thefront center seat.
21
Super Duty (TFE) Canada/United States of America, enUSA, Edition date: 201710, Second Printing
Child SafetyE142534 E142528
Page 27 of 642
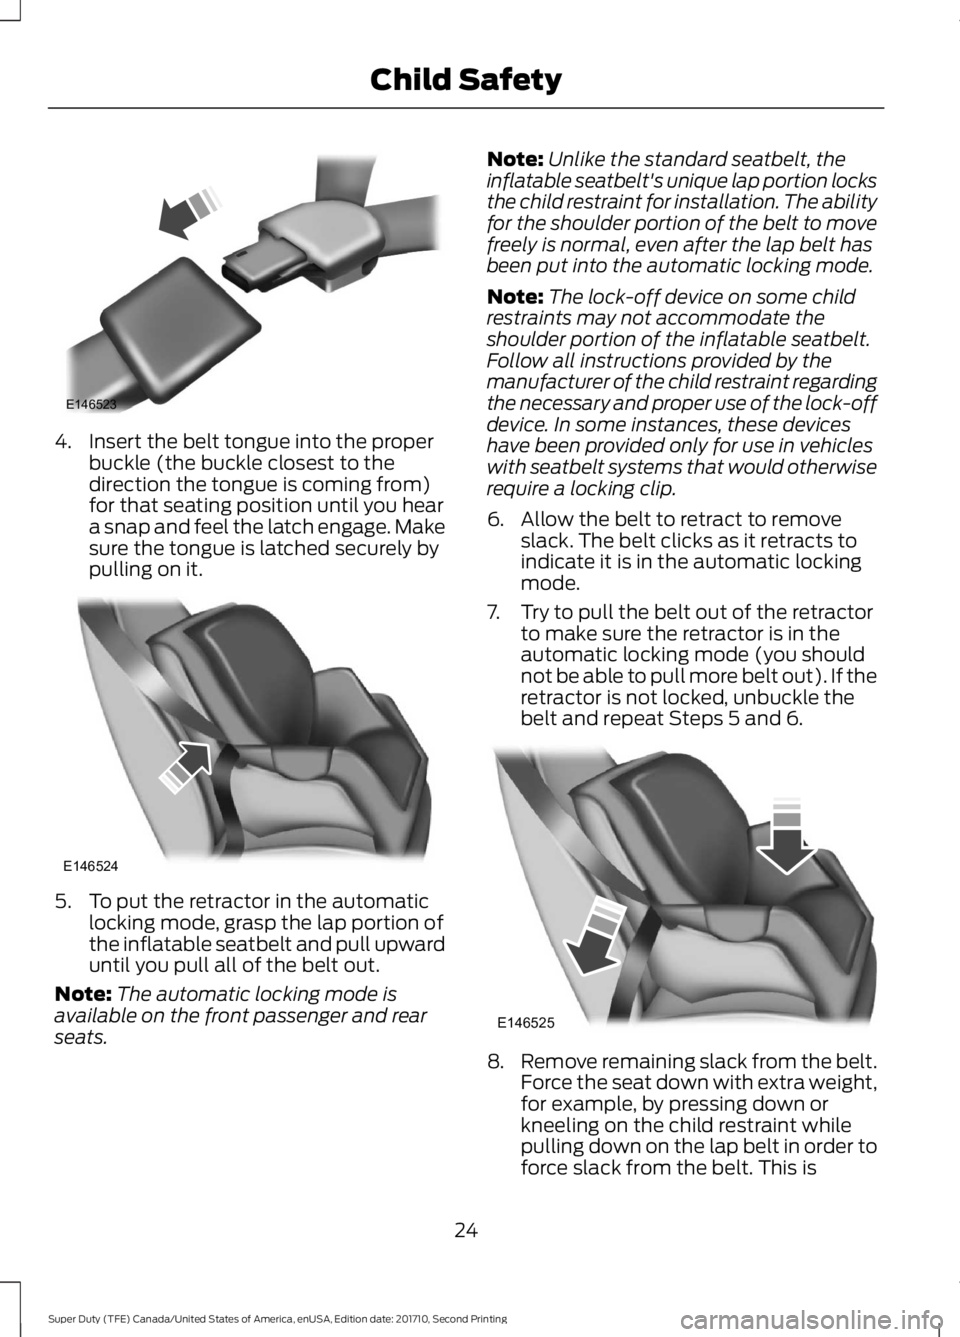
4. Insert the belt tongue into the properbuckle (the buckle closest to thedirection the tongue is coming from)for that seating position until you heara snap and feel the latch engage. Makesure the tongue is latched securely bypulling on it.
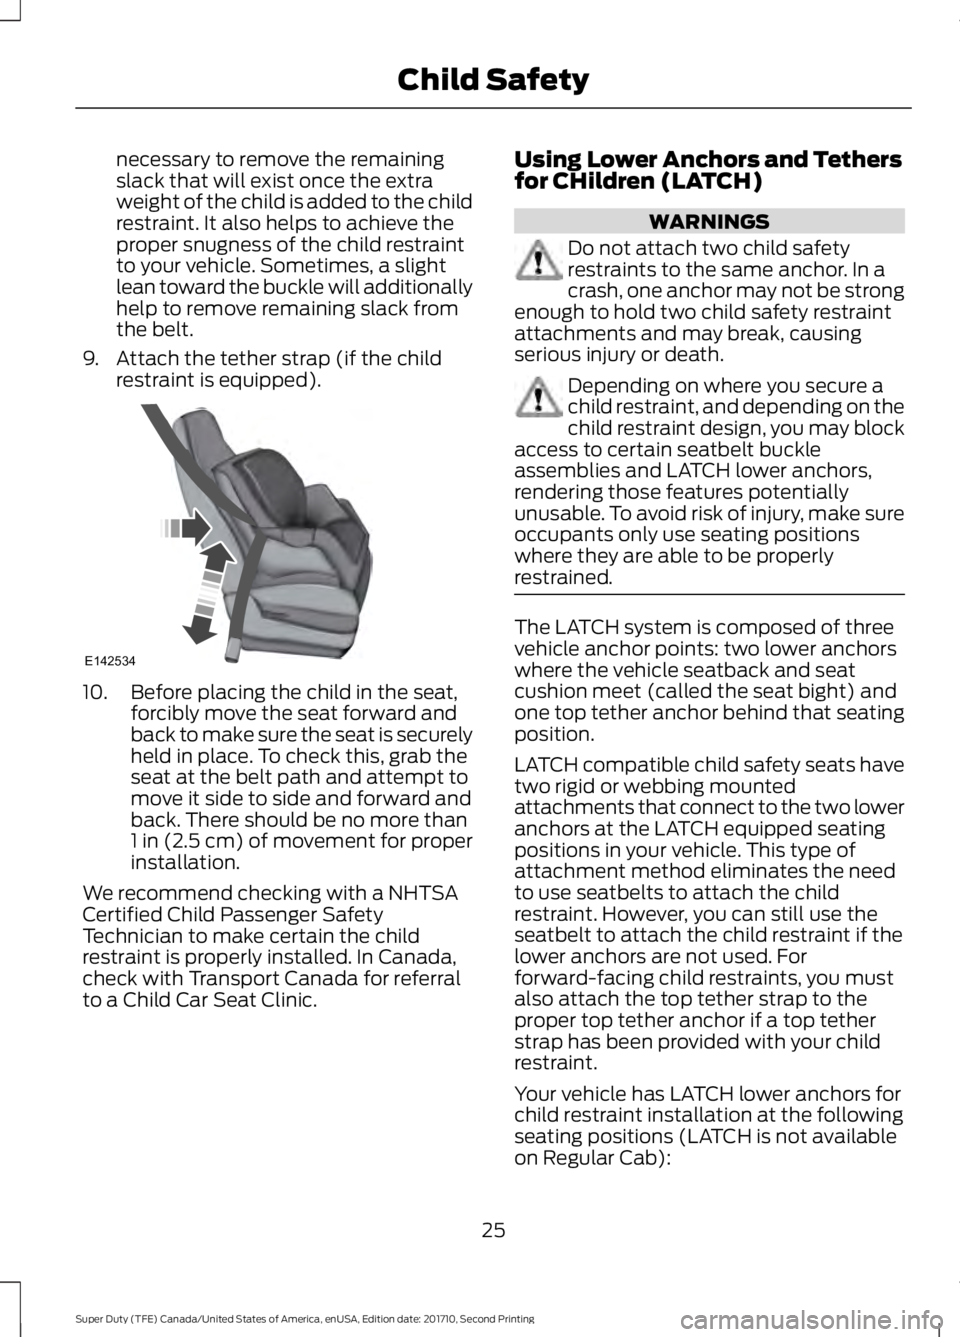
5. To put the retractor in the automaticlocking mode, grasp the lap portion ofthe inflatable seatbelt and pull upwarduntil you pull all of the belt out.
Note:The automatic locking mode isavailable on the front passenger and rearseats.
Note:Unlike the standard seatbelt, theinflatable seatbelt's unique lap portion locksthe child restraint for installation. The abilityfor the shoulder portion of the belt to movefreely is normal, even after the lap belt hasbeen put into the automatic locking mode.
Note:The lock-off device on some childrestraints may not accommodate theshoulder portion of the inflatable seatbelt.Follow all instructions provided by themanufacturer of the child restraint regardingthe necessary and proper use of the lock-offdevice. In some instances, these deviceshave been provided only for use in vehicleswith seatbelt systems that would otherwiserequire a locking clip.
6. Allow the belt to retract to removeslack. The belt clicks as it retracts toindicate it is in the automatic lockingmode.
7. Try to pull the belt out of the retractorto make sure the retractor is in theautomatic locking mode (you shouldnot be able to pull more belt out). If theretractor is not locked, unbuckle thebelt and repeat Steps 5 and 6.
8.Remove remaining slack from the belt.Force the seat down with extra weight,for example, by pressing down orkneeling on the child restraint whilepulling down on the lap belt in order toforce slack from the belt. This is
24
Super Duty (TFE) Canada/United States of America, enUSA, Edition date: 201710, Second Printing
Child SafetyE146523 E146524 E146525
Page 28 of 642
necessary to remove the remainingslack that will exist once the extraweight of the child is added to the childrestraint. It also helps to achieve theproper snugness of the child restraintto your vehicle. Sometimes, a slightlean toward the buckle will additionallyhelp to remove remaining slack fromthe belt.
9. Attach the tether strap (if the childrestraint is equipped).
10. Before placing the child in the seat,forcibly move the seat forward andback to make sure the seat is securelyheld in place. To check this, grab theseat at the belt path and attempt tomove it side to side and forward andback. There should be no more than1 in (2.5 cm) of movement for properinstallation.
We recommend checking with a NHTSACertified Child Passenger SafetyTechnician to make certain the childrestraint is properly installed. In Canada,check with Transport Canada for referralto a Child Car Seat Clinic.
Using Lower Anchors and Tethersfor CHildren (LATCH)
WARNINGS
Do not attach two child safetyrestraints to the same anchor. In acrash, one anchor may not be strongenough to hold two child safety restraintattachments and may break, causingserious injury or death.
Depending on where you secure achild restraint, and depending on thechild restraint design, you may blockaccess to certain seatbelt buckleassemblies and LATCH lower anchors,rendering those features potentiallyunusable. To avoid risk of injury, make sureoccupants only use seating positionswhere they are able to be properlyrestrained.
The LATCH system is composed of threevehicle anchor points: two lower anchorswhere the vehicle seatback and seatcushion meet (called the seat bight) andone top tether anchor behind that seatingposition.
LATCH compatible child safety seats havetwo rigid or webbing mountedattachments that connect to the two loweranchors at the LATCH equipped seatingpositions in your vehicle. This type ofattachment method eliminates the needto use seatbelts to attach the childrestraint. However, you can still use theseatbelt to attach the child restraint if thelower anchors are not used. Forforward-facing child restraints, you mustalso attach the top tether strap to theproper top tether anchor if a top tetherstrap has been provided with your childrestraint.
Your vehicle has LATCH lower anchors forchild restraint installation at the followingseating positions (LATCH is not availableon Regular Cab):
25
Super Duty (TFE) Canada/United States of America, enUSA, Edition date: 201710, Second Printing
Child SafetyE142534
Page 35 of 642
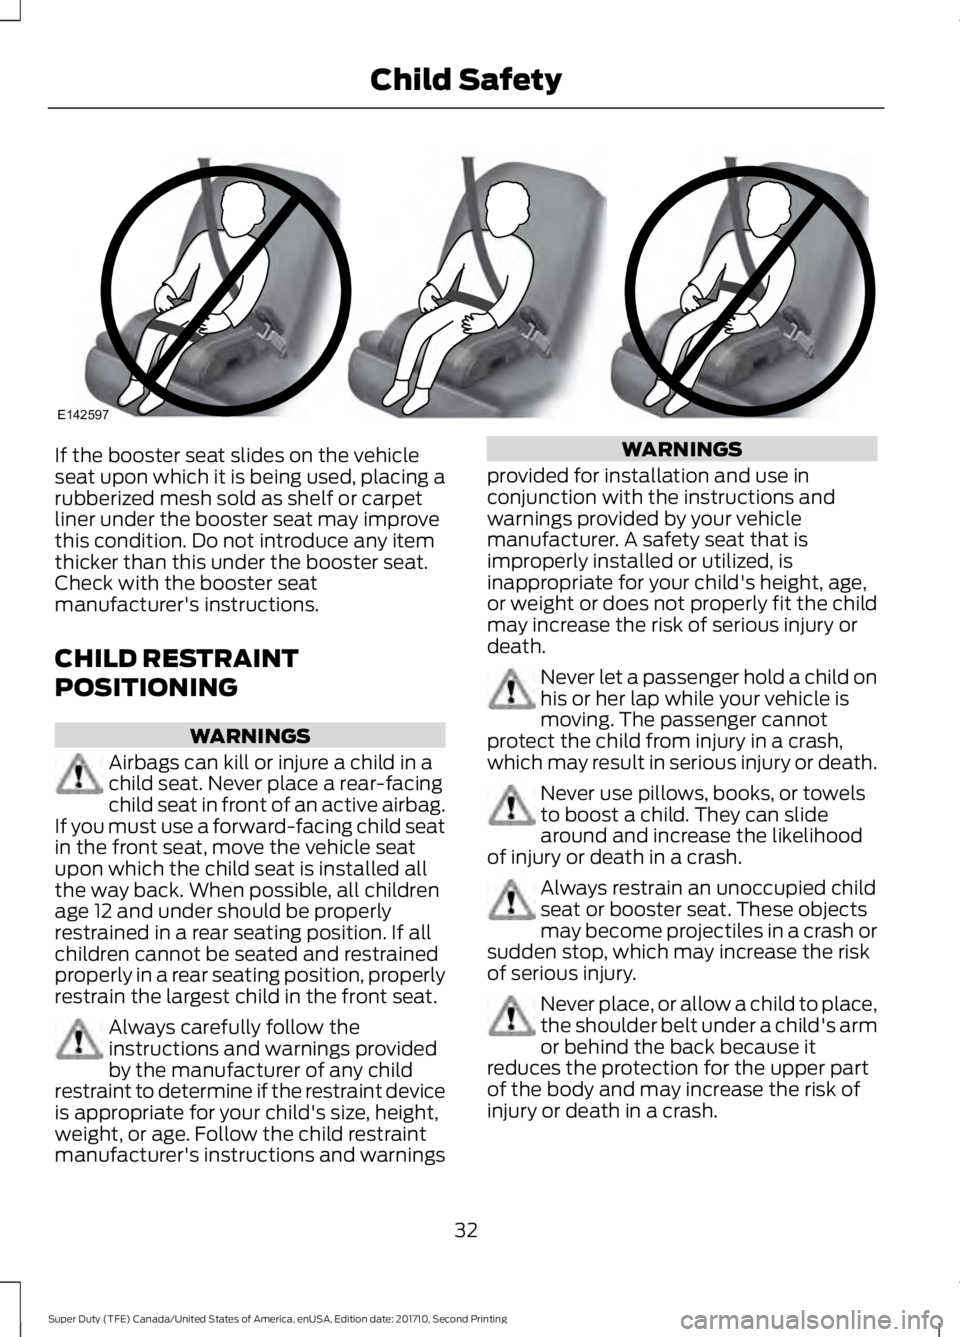
If the booster seat slides on the vehicleseat upon which it is being used, placing arubberized mesh sold as shelf or carpetliner under the booster seat may improvethis condition. Do not introduce any itemthicker than this under the booster seat.Check with the booster seatmanufacturer's instructions.
CHILD RESTRAINT
POSITIONING
WARNINGS
Airbags can kill or injure a child in achild seat. Never place a rear-facingchild seat in front of an active airbag.If you must use a forward-facing child seatin the front seat, move the vehicle seatupon which the child seat is installed allthe way back. When possible, all childrenage 12 and under should be properlyrestrained in a rear seating position. If allchildren cannot be seated and restrainedproperly in a rear seating position, properlyrestrain the largest child in the front seat.
Always carefully follow theinstructions and warnings providedby the manufacturer of any childrestraint to determine if the restraint deviceis appropriate for your child's size, height,weight, or age. Follow the child restraintmanufacturer's instructions and warnings
WARNINGS
provided for installation and use inconjunction with the instructions andwarnings provided by your vehiclemanufacturer. A safety seat that isimproperly installed or utilized, isinappropriate for your child's height, age,or weight or does not properly fit the childmay increase the risk of serious injury ordeath.
Never let a passenger hold a child onhis or her lap while your vehicle ismoving. The passenger cannotprotect the child from injury in a crash,which may result in serious injury or death.
Never use pillows, books, or towelsto boost a child. They can slidearound and increase the likelihoodof injury or death in a crash.
Always restrain an unoccupied childseat or booster seat. These objectsmay become projectiles in a crash orsudden stop, which may increase the riskof serious injury.
Never place, or allow a child to place,the shoulder belt under a child's armor behind the back because itreduces the protection for the upper partof the body and may increase the risk ofinjury or death in a crash.
32
Super Duty (TFE) Canada/United States of America, enUSA, Edition date: 201710, Second Printing
Child SafetyE142597
Page 36 of 642
WARNINGS
To avoid risk of injury, do not leave
WARNINGS
children or pets unattended in your vehicle.
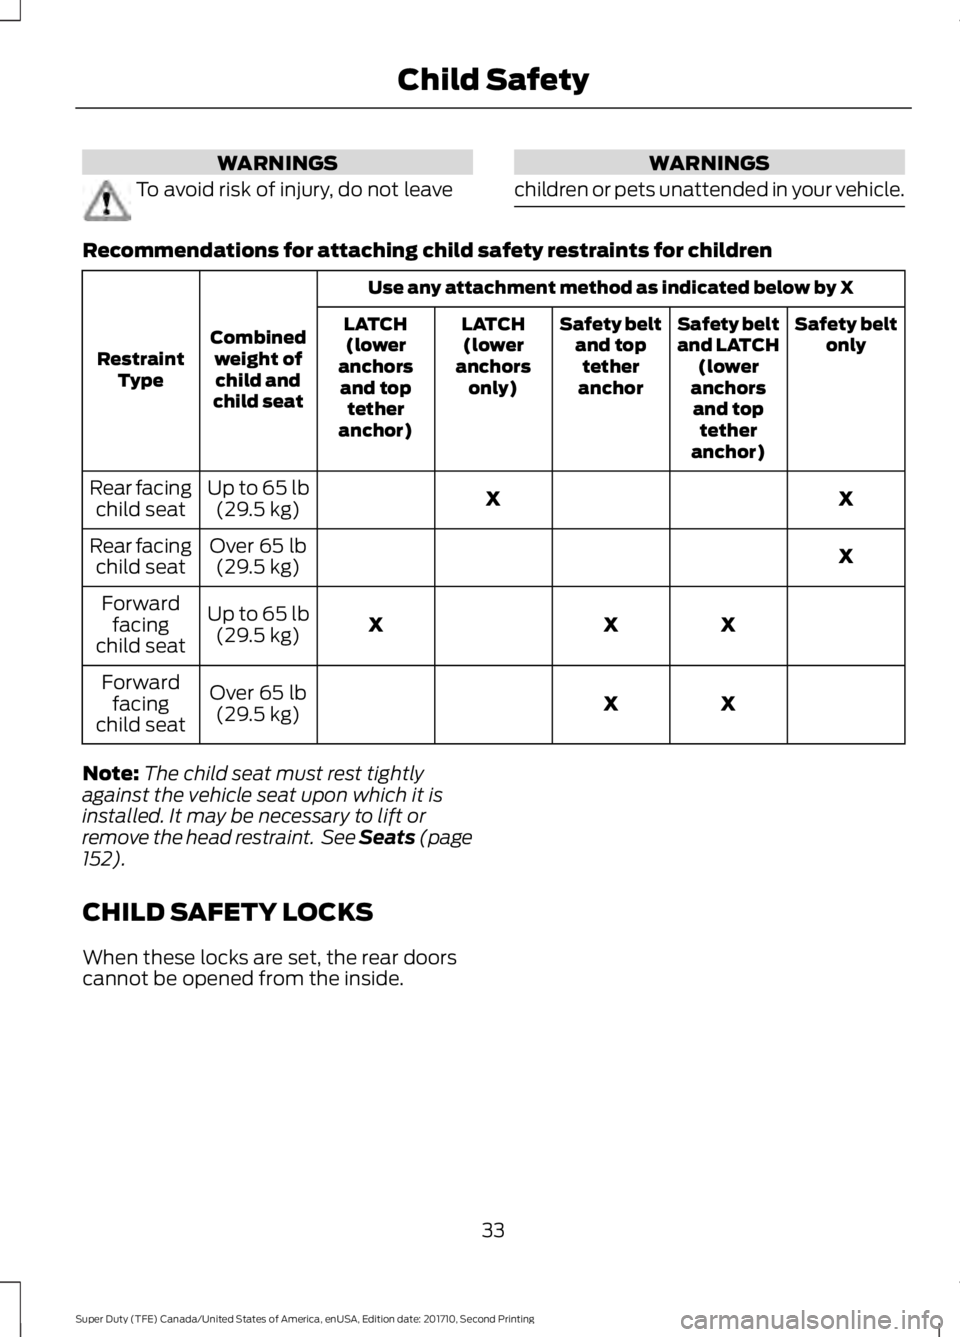
Recommendations for attaching child safety restraints for children
Use any attachment method as indicated below by X
Combinedweight ofchild andchild seat
RestraintType
Safety beltonlySafety beltand LATCH(loweranchorsand toptetheranchor)
Safety beltand toptetheranchor
LATCH(loweranchorsonly)
LATCH(loweranchorsand toptetheranchor)
XXUp to 65 lb(29.5 kg)Rear facingchild seat
XOver 65 lb(29.5 kg)Rear facingchild seat
XXXUp to 65 lb(29.5 kg)
Forwardfacingchild seat
XXOver 65 lb(29.5 kg)
Forwardfacingchild seat
Note:The child seat must rest tightlyagainst the vehicle seat upon which it isinstalled. It may be necessary to lift orremove the head restraint. See Seats (page152).
CHILD SAFETY LOCKS
When these locks are set, the rear doorscannot be opened from the inside.
33
Super Duty (TFE) Canada/United States of America, enUSA, Edition date: 201710, Second Printing
Child Safety
Page 155 of 642
SITTING IN THE CORRECT
POSITION
WARNINGS
Sitting improperly, out of position orwith the seatback reclined too farcan take weight off the seat cushionand affect the decision of the passengersensing system, resulting in serious injuryor death in the event of a crash. Always situpright against your seat back, with yourfeet on the floor.
Do not recline the seatback as thiscan cause the occupant to slideunder the safety belt, resulting inserious injury in the event of a crash.
Do not place objects higher than theseatback to reduce the risk of seriousinjury in the event of a crash or duringheavy braking.
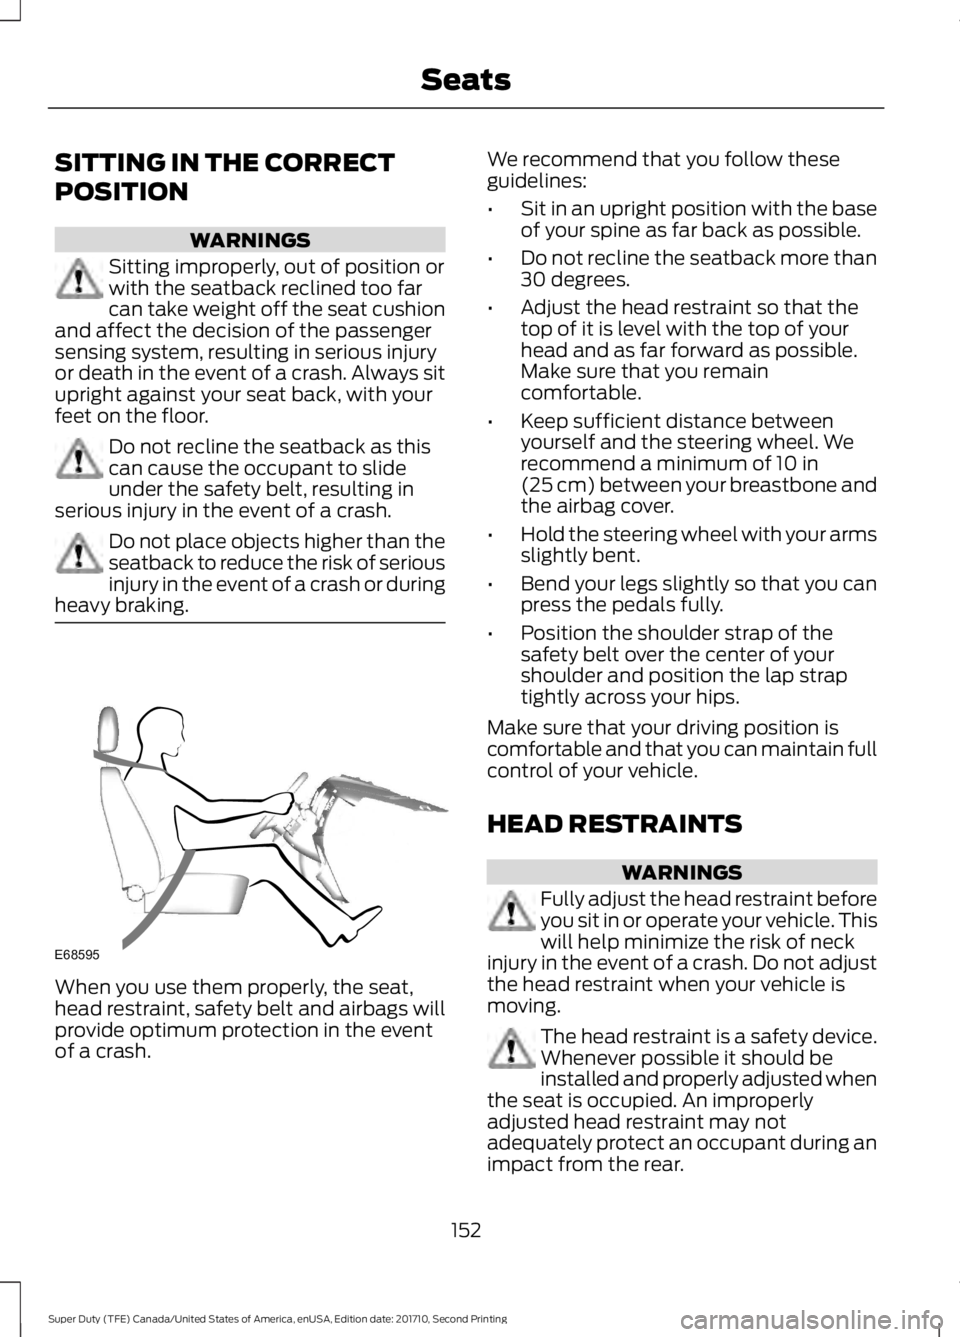
When you use them properly, the seat,head restraint, safety belt and airbags willprovide optimum protection in the eventof a crash.
We recommend that you follow theseguidelines:
•Sit in an upright position with the baseof your spine as far back as possible.
•Do not recline the seatback more than30 degrees.
•Adjust the head restraint so that thetop of it is level with the top of yourhead and as far forward as possible.Make sure that you remaincomfortable.
•Keep sufficient distance betweenyourself and the steering wheel. Werecommend a minimum of 10 in(25 cm) between your breastbone andthe airbag cover.
•Hold the steering wheel with your armsslightly bent.
•Bend your legs slightly so that you canpress the pedals fully.
•Position the shoulder strap of thesafety belt over the center of yourshoulder and position the lap straptightly across your hips.
Make sure that your driving position iscomfortable and that you can maintain fullcontrol of your vehicle.
HEAD RESTRAINTS
WARNINGS
Fully adjust the head restraint beforeyou sit in or operate your vehicle. Thiswill help minimize the risk of neckinjury in the event of a crash. Do not adjustthe head restraint when your vehicle ismoving.
The head restraint is a safety device.Whenever possible it should beinstalled and properly adjusted whenthe seat is occupied. An improperlyadjusted head restraint may notadequately protect an occupant during animpact from the rear.
152
Super Duty (TFE) Canada/United States of America, enUSA, Edition date: 201710, Second Printing
SeatsE68595
Page 199 of 642
Note:The amount of fuel in the emptyreserve varies and should not be relied uponto increase driving range.
Filling the Fuel Tank
For consistent results when refueling:
•Turn the ignition off before fueling; aninaccurate reading results if the engineis left running.
•Use the same fill rate(low-medium-high) each time the tankis filled.
•Allow no more than one automaticshut-off when refueling.
Results are most accurate when the fillingmethod is consistent.
Calculating Fuel Economy
Do not measure fuel economy during thefirst 1,000 mi (1,600 km) of driving (this isyour engine’s break-in period). A moreaccurate measurement is obtained after2,000 mi (3,200 km) to 3,000 mi(4,800 km). Also, fuel expense, frequencyof fill ups or fuel gauge readings are notaccurate ways to measure fuel economy.
1.Fill the fuel tank completely and recordthe initial odometer reading.
2. Each time you fill the fuel tank, recordthe amount of fuel added.
3. After at least three fill ups, fill the fueltank and record the current odometerreading.
4. Subtract your initial odometer readingfrom the current odometer reading.
To calculate L/100 km (liters per 100kilometers) fuel consumption, multiply theliters used by 100, then divide by kilometerstraveled. To calculate MPG (miles pergallon) fuel consumption, divide milestraveled by gallons used.
Keep a record for at least one month andrecord the type of driving (city or highway).This provides an accurate estimate of yourvehicle's fuel economy under currentdriving conditions. Keeping records duringsummer and winter will show howtemperature impacts fuel economy.
Conditions
•Heavily loading your vehicle reducesfuel economy.
•Carrying unnecessary weight in yourvehicle may reduce fuel economy.
•Adding certain accessories to yourvehicle such as bug deflectors, rollbarsor light bars, running boards and skiracks may reduce fuel economy.
•Using fuel blended with alcohol maylower fuel economy.
•Fuel economy may decrease with lowertemperatures.
•Fuel economy may decrease whendriving short distances.
•You will get better fuel economy whendriving on flat terrain than when drivingon hilly terrain.
EMISSION CONTROL SYSTEM
- GASOLINE
WARNINGS
Do not park, idle or drive your vehicleon dry grass or other dry groundcover. The emission system heats upthe engine compartment and exhaustsystem, creating the risk of fire.
Exhaust leaks may result in entry ofharmful and potentially lethal fumesinto the passenger compartment. Ifyou smell exhaust fumes inside yourvehicle, have your vehicle inspectedimmediately. Do not drive if you smellexhaust fumes.
196
Super Duty (TFE) Canada/United States of America, enUSA, Edition date: 201710, Second Printing
Fuel and Refueling