FORD F450 SUPER DUTY 2018 Owners Manual
Manufacturer: FORD, Model Year: 2018, Model line: F450 SUPER DUTY, Model: FORD F450 SUPER DUTY 2018Pages: 656, PDF Size: 9.34 MB
Page 251 of 656
If the system determines that its maximum
braking level will not be sufficient, an
audible warning sounds when the system
continues to brake. A red warning bar
displays on the windshield and you must
take immediate action.
Setting the Gap Distance
Note:
The gap setting is time dependent
and therefore the distance adjusts with your
vehicle speed.
Note: It is your responsibility to select a gap
appropriate to the driving conditions.
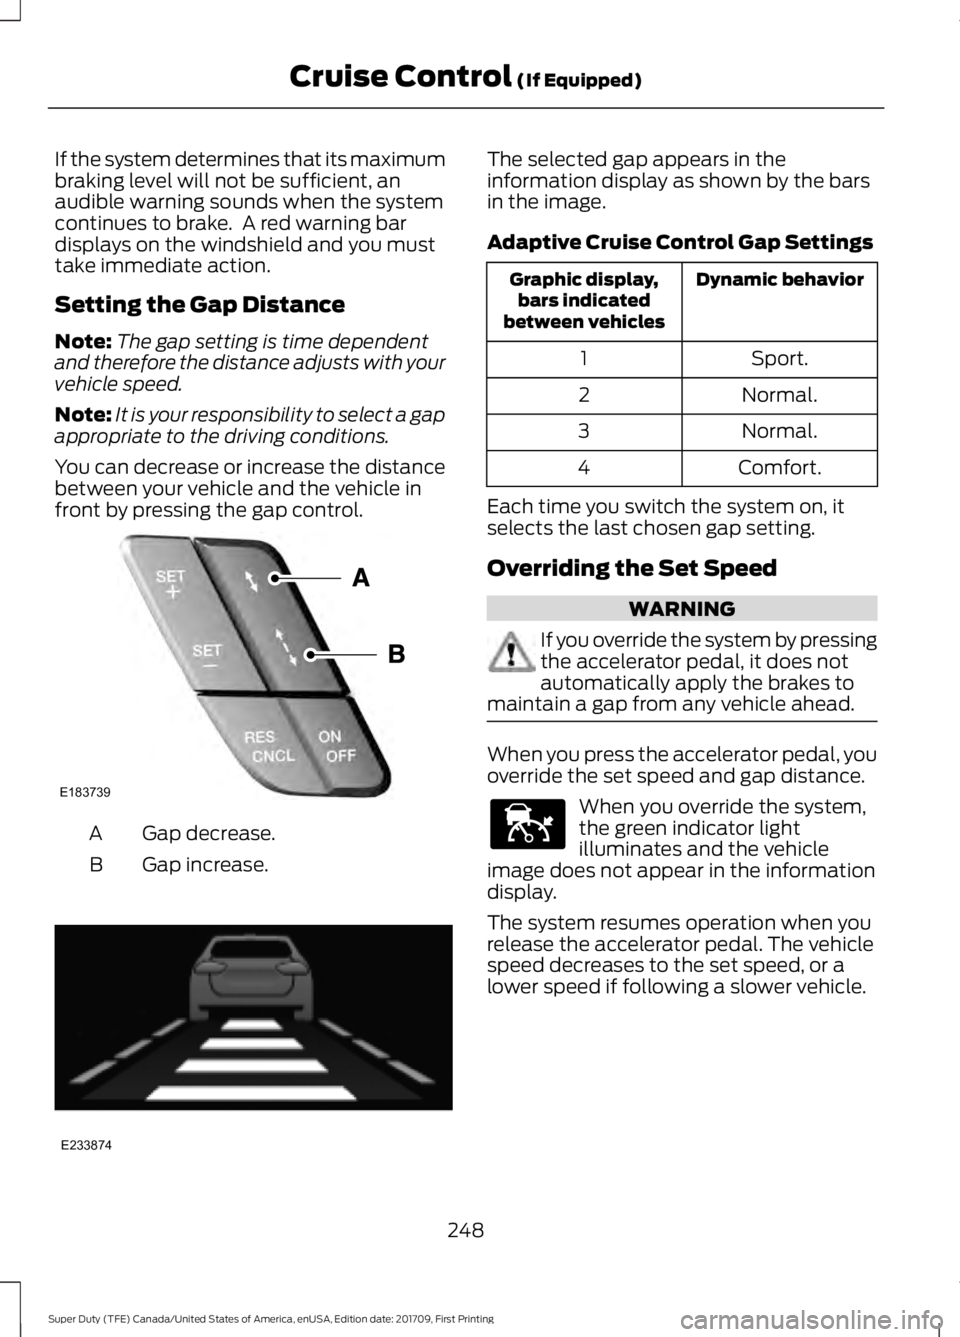
You can decrease or increase the distance
between your vehicle and the vehicle in
front by pressing the gap control. Gap decrease.
A
Gap increase.
B The selected gap appears in the
information display as shown by the bars
in the image.
Adaptive Cruise Control Gap Settings
Dynamic behavior
Graphic display,
bars indicated
between vehicles
Sport.
1
Normal.
2
Normal.
3
Comfort.
4
Each time you switch the system on, it
selects the last chosen gap setting.
Overriding the Set Speed WARNING
If you override the system by pressing
the accelerator pedal, it does not
automatically apply the brakes to
maintain a gap from any vehicle ahead. When you press the accelerator pedal, you
override the set speed and gap distance.
When you override the system,
the green indicator light
illuminates and the vehicle
image does not appear in the information
display.
The system resumes operation when you
release the accelerator pedal. The vehicle
speed decreases to the set speed, or a
lower speed if following a slower vehicle.
248
Super Duty (TFE) Canada/United States of America, enUSA, Edition date: 201709, First Printing Cruise Control (If Equipped)E183739 E233874 E144529
Page 252 of 656
Changing the Set Speed
•
Press SET+ or SET- to change the set
speed in small increments.
• Press the accelerator or brake pedal
until you reach the desired speed. Press
SET+
or SET-.
• Press and hold
SET+ or SET- to
change the set speed in large
increments. Release the control when
you reach the desired speed.
The system may apply the brakes to slow
the vehicle to the new set speed. The set
speed displays continuously in the
information display when the system is
active.
Canceling the Set Speed
Press
CNCL or tap the brake pedal. The
set speed does not erase.
Resuming the Set Speed
Note: Only use resume if you are aware of
the set speed and intend to return to it.
Press
RES. Your vehicle speed returns to
the previously set speed and gap setting.
The set speed displays continuously in the
information display when the system is
active.
Automatic Cancellation
Note: If the engine speed drops too low, an
audible warning sounds and a message
appears in the information display.
Automatic braking releases.
Hilly Condition and Trailer Tow
Usage
Note: An audible alarm sounds and the
system shuts down if it applies brakes for
an extended period of time. This allows the
brakes to cool. The system functions
normally again after the brakes cool. Note:
When towing with adaptive cruise
control, switch on Tow/Haul Mode and
Diesel Engine Brake.
Note: Tow/Haul mode increases the time
gaps and allows more distance for braking.
Select a lower gear when the system is
active in situations such as prolonged
downhill driving on steep grades, for
example in mountainous areas. The
system needs additional engine braking in
these situations to reduce the load on the
vehicle ’s regular brake system to prevent
it from overheating.
Switching Adaptive Cruise Control
Off
Note: You erase the set speed and gap
setting when you switch the system off.
Press
OFF when the system is in standby
mode, or switch the ignition off.
Detection Issues WARNINGS
On rare occasions, detection issues
can occur due to the road
infrastructures, for example bridges,
tunnels and safety barriers. In these cases,
the system may brake late or
unexpectedly. At all times, you are
responsible for controlling your vehicle,
supervising the system and intervening, if
required. If the system malfunctions, have your
vehicle checked as soon as possible.
The radar sensor has a limited field of view.
It may not detect vehicles at all or detect
a vehicle later than expected in some
situations. The lead vehicle graphic does
not illuminate if the system does not
detect a vehicle in front of you.
249
Super Duty (TFE) Canada/United States of America, enUSA, Edition date: 201709, First Printing Cruise Control
(If Equipped)
Page 253 of 656
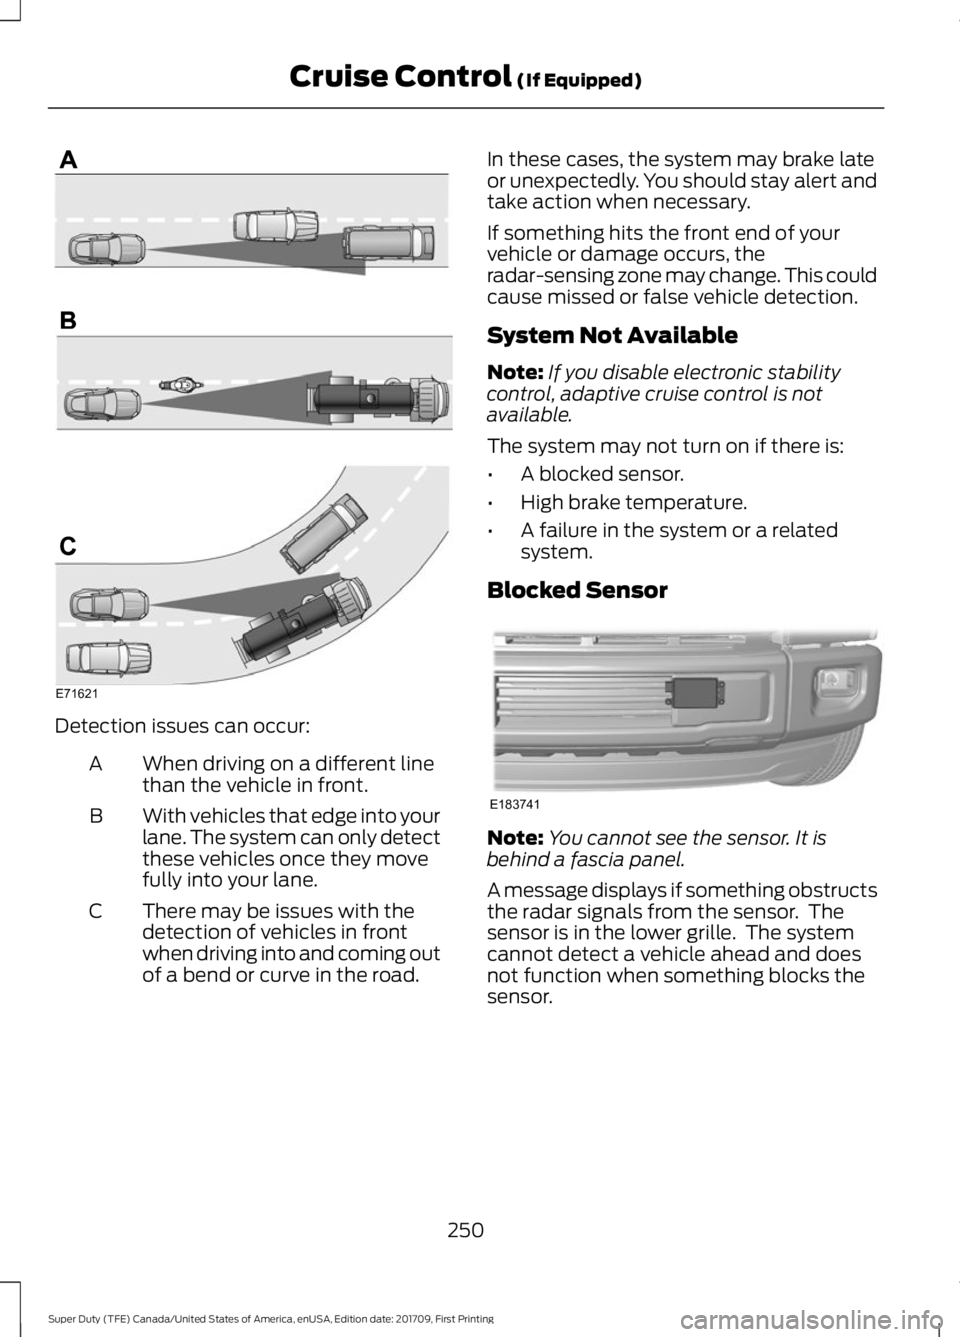
Detection issues can occur:
When driving on a different line
than the vehicle in front.
A
With vehicles that edge into your
lane. The system can only detect
these vehicles once they move
fully into your lane.
B
There may be issues with the
detection of vehicles in front
when driving into and coming out
of a bend or curve in the road.
C In these cases, the system may brake late
or unexpectedly. You should stay alert and
take action when necessary.
If something hits the front end of your
vehicle or damage occurs, the
radar-sensing zone may change. This could
cause missed or false vehicle detection.
System Not Available
Note:
If you disable electronic stability
control, adaptive cruise control is not
available.
The system may not turn on if there is:
• A blocked sensor.
• High brake temperature.
• A failure in the system or a related
system.
Blocked Sensor Note:
You cannot see the sensor. It is
behind a fascia panel.
A message displays if something obstructs
the radar signals from the sensor. The
sensor is in the lower grille. The system
cannot detect a vehicle ahead and does
not function when something blocks the
sensor.
250
Super Duty (TFE) Canada/United States of America, enUSA, Edition date: 201709, First Printing Cruise Control (If Equipped)E71621 E183741
Page 254 of 656
Possible Causes and Actions for This Message Displaying:
Action
Cause
Clean the grille surface in front of the radar
or remove the object causing the obstruc-
tion.
The surface of the radar is dirty or
obstructed.
Wait a short time. It may take several
minutes for the radar to detect that it is free
from obstruction.
The surface of the radar is clean but the
message remains in the display.
Do not use the system in these conditions
because it may not detect any vehicles
ahead.
Heavy rain or snow is interfering with the
radar signals.
Do not use the system in these conditions
because it may not detect any vehicles
ahead.
Water, snow or ice on the surface of the
road may interfere with the radar signals.
Wait a short time or switch to normal cruise
control.
You are in a desert or remote area with no
other vehicles and no roadside objects.
Due to the nature of radar technology, it is possible to get a blockage warning with no
actual block. This happens, for example, when driving in sparse rural or desert
environments. A false blocked condition either self clears, or clears after you restart your
vehicle.
Switching to Normal Cruise
Control WARNING
Normal cruise control will not brake
when your vehicle is approaching
slower vehicles. Always be aware of
which mode you have selected and apply
the brakes when necessary. You can change from adaptive cruise
control to normal cruise control through
the information display. The cruise control indicator light
replaces the adaptive cruise
control indicator light if you
select normal cruise control. The gap
setting does not display, and the system
does not respond to lead vehicles.
Automatic braking remains active to
maintain set speed.
251
Super Duty (TFE) Canada/United States of America, enUSA, Edition date: 201709, First Printing Cruise Control (If Equipped)E71340
Page 255 of 656
LANE KEEPING SYSTEM (If
Equipped) WARNING
The system is designed to aid the
driver. It is not intended to replace
your attention and judgment. You are
still responsible to drive with due care and
attention. Note:
The system works as long as the
camera can detect one lane marking at a
speed above
40 mph (64 km/h).
Note: The system may not function if the
camera is blocked or there is damage to the
windshield.
The Lane Keeping System automatically
detects and tracks the road lane markings
using a camera mounted behind the
interior review view mirror. The system
notifies you to stay in your lane when the
front camera detects an unintentional lane
change is likely to occur.
Switching the System On and Off
Note: The system on or off setting is stored
until it is manually changed, unless a MyKey
is detected. If the system detects a MyKey,
it defaults to on and the mode is set to alert.
Note: If a MyKey is detected, pressing the
button will not affect the on or off status of
the system. You can only change the mode
and intensity settings. Press the button located on the
center console to switch the
system on or off. System Settings
The system sensitivity and intensity can
be adjusted through the display screen.
See General Information (page 114
). The
system remembers the last selection. You
do not need to readjust the setting each
time you turn on your vehicle.
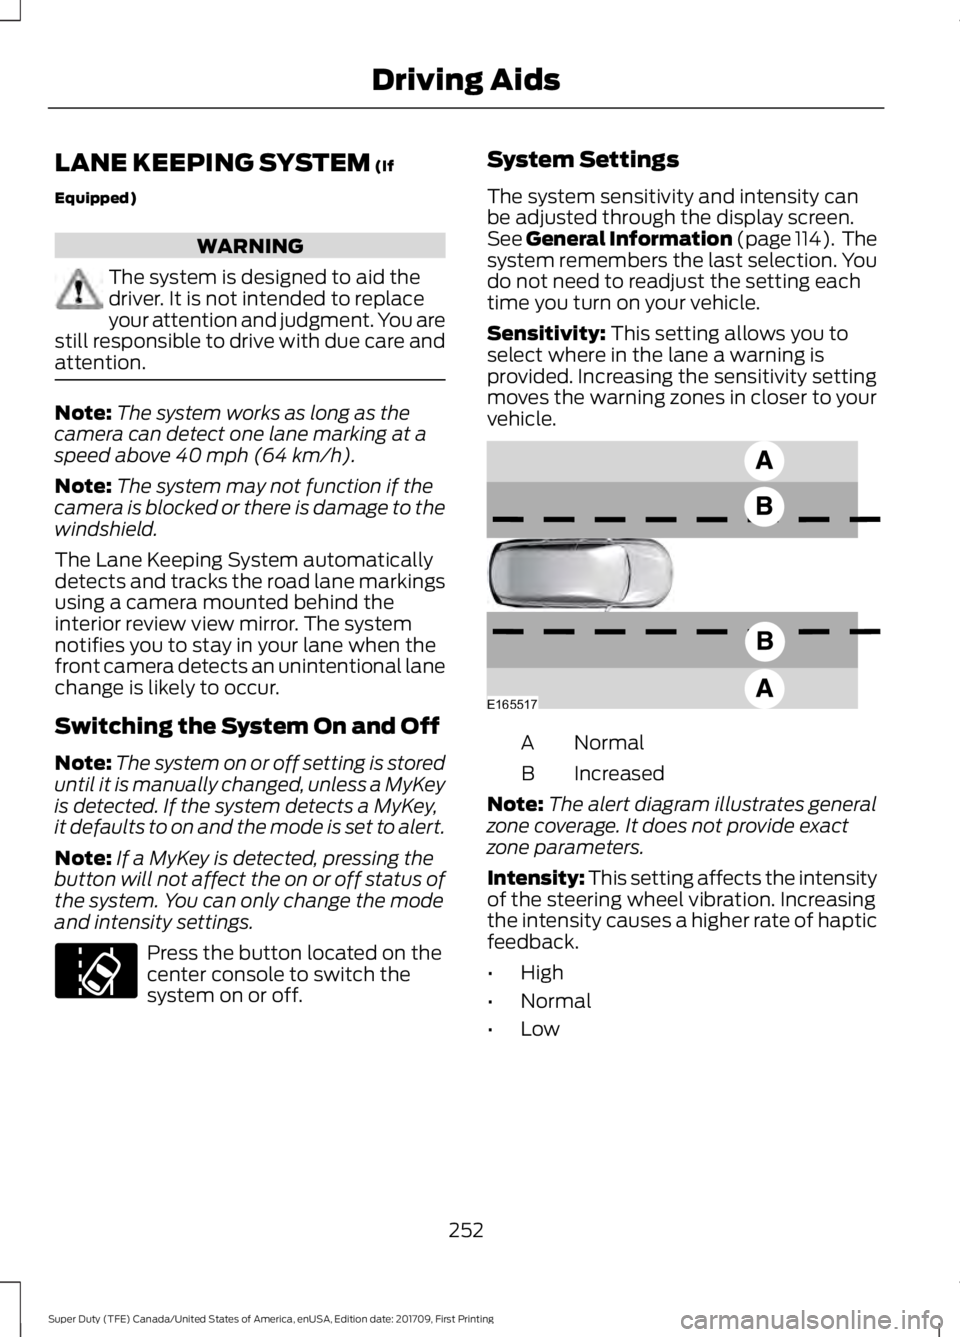
Sensitivity:
This setting allows you to
select where in the lane a warning is
provided. Increasing the sensitivity setting
moves the warning zones in closer to your
vehicle. Normal
A
Increased
B
Note: The alert diagram illustrates general
zone coverage. It does not provide exact
zone parameters.
Intensity: This setting affects the intensity
of the steering wheel vibration. Increasing
the intensity causes a higher rate of haptic
feedback.
• High
• Normal
• Low
252
Super Duty (TFE) Canada/United States of America, enUSA, Edition date: 201709, First Printing Driving AidsE173233 E165517
Page 256 of 656
System Display
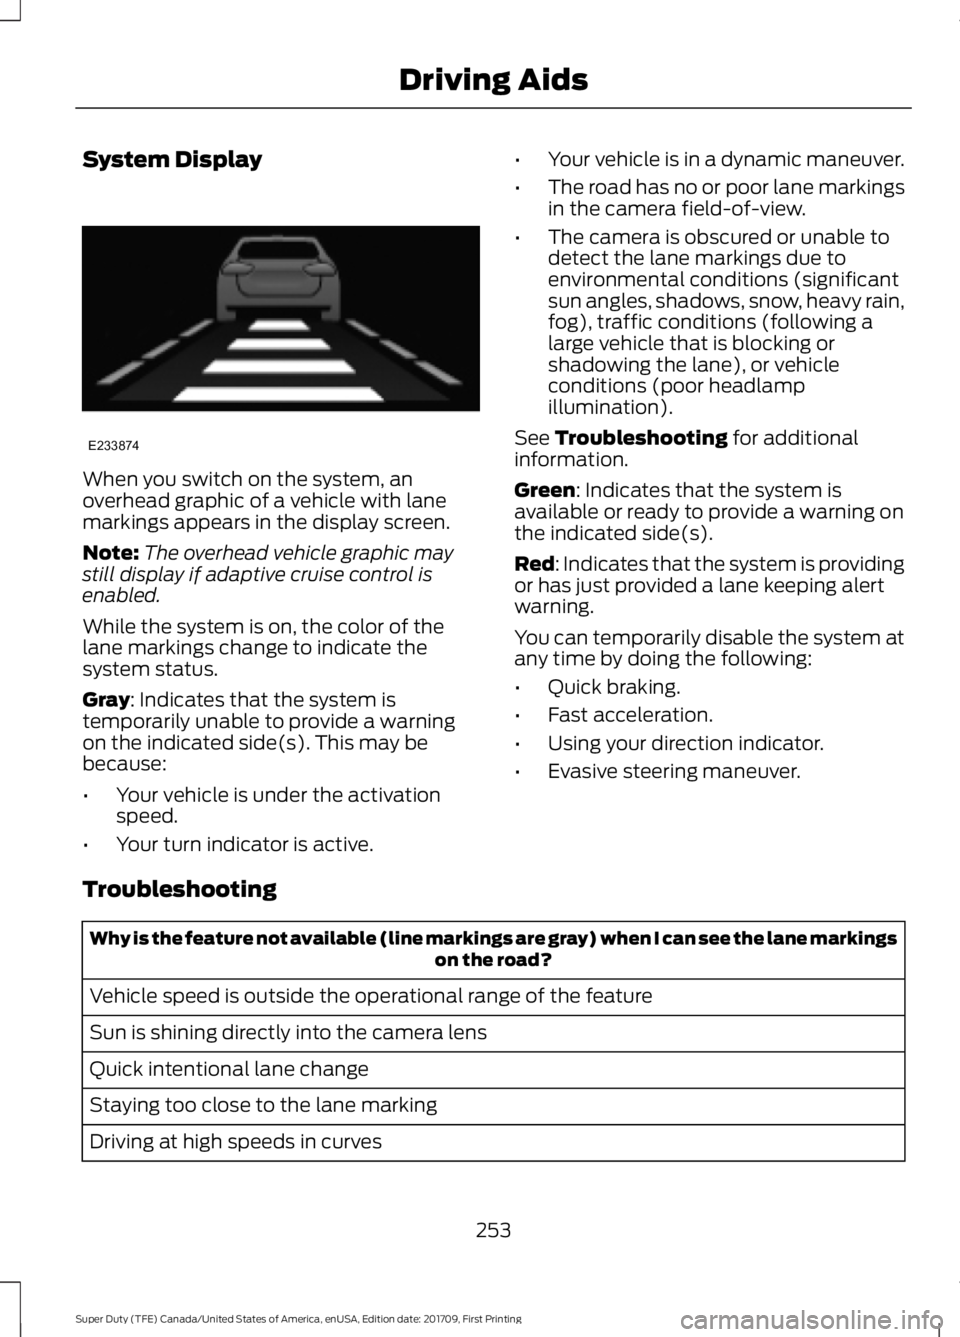
When you switch on the system, an
overhead graphic of a vehicle with lane
markings appears in the display screen.
Note:
The overhead vehicle graphic may
still display if adaptive cruise control is
enabled.
While the system is on, the color of the
lane markings change to indicate the
system status.
Gray: Indicates that the system is
temporarily unable to provide a warning
on the indicated side(s). This may be
because:
• Your vehicle is under the activation
speed.
• Your turn indicator is active. •
Your vehicle is in a dynamic maneuver.
• The road has no or poor lane markings
in the camera field-of-view.
• The camera is obscured or unable to
detect the lane markings due to
environmental conditions (significant
sun angles, shadows, snow, heavy rain,
fog), traffic conditions (following a
large vehicle that is blocking or
shadowing the lane), or vehicle
conditions (poor headlamp
illumination).
See
Troubleshooting for additional
information.
Green
: Indicates that the system is
available or ready to provide a warning on
the indicated side(s).
Red
: Indicates that the system is providing
or has just provided a lane keeping alert
warning.
You can temporarily disable the system at
any time by doing the following:
• Quick braking.
• Fast acceleration.
• Using your direction indicator.
• Evasive steering maneuver.
Troubleshooting Why is the feature not available (line markings are gray) when I can see the lane markings
on the road?
Vehicle speed is outside the operational range of the feature
Sun is shining directly into the camera lens
Quick intentional lane change
Staying too close to the lane marking
Driving at high speeds in curves
253
Super Duty (TFE) Canada/United States of America, enUSA, Edition date: 201709, First Printing Driving AidsE233874
Page 257 of 656
Why is the feature not available (line markings are gray) when I can see the lane markings
on the road?
Previous feature activation happened within the last one second
Ambiguous lane markings (mainly in construction zones)
Rapid transition from light to dark or vice versa
Sudden offset in lane markings
ABS or AdvanceTrac activation
Camera blockage due to dirt, grime, fog, frost or water on the windshield
Driving too close to the vehicle in front of you
Transitioning between no lane markings to lane markings or vice versa
Standing water on the road
Faint lane markings (partial yellow lane markings on concrete roads)
Lane width too narrow or too wide
Camera not calibrated after a windshield replacement
Driving on tight roads or on uneven roads
Vehicle accessories such as snow plows
BLIND SPOT INFORMATION
SYSTEM (If Equipped) WARNING
Do not use the blind spot information
system as a replacement for using
the interior and exterior mirrors or
looking over your shoulder before changing
lanes. The blind spot information system
is not a replacement for careful driving. 254
Super Duty (TFE) Canada/United States of America, enUSA, Edition date: 201709, First Printing Driving AidsE227388
Page 258 of 656
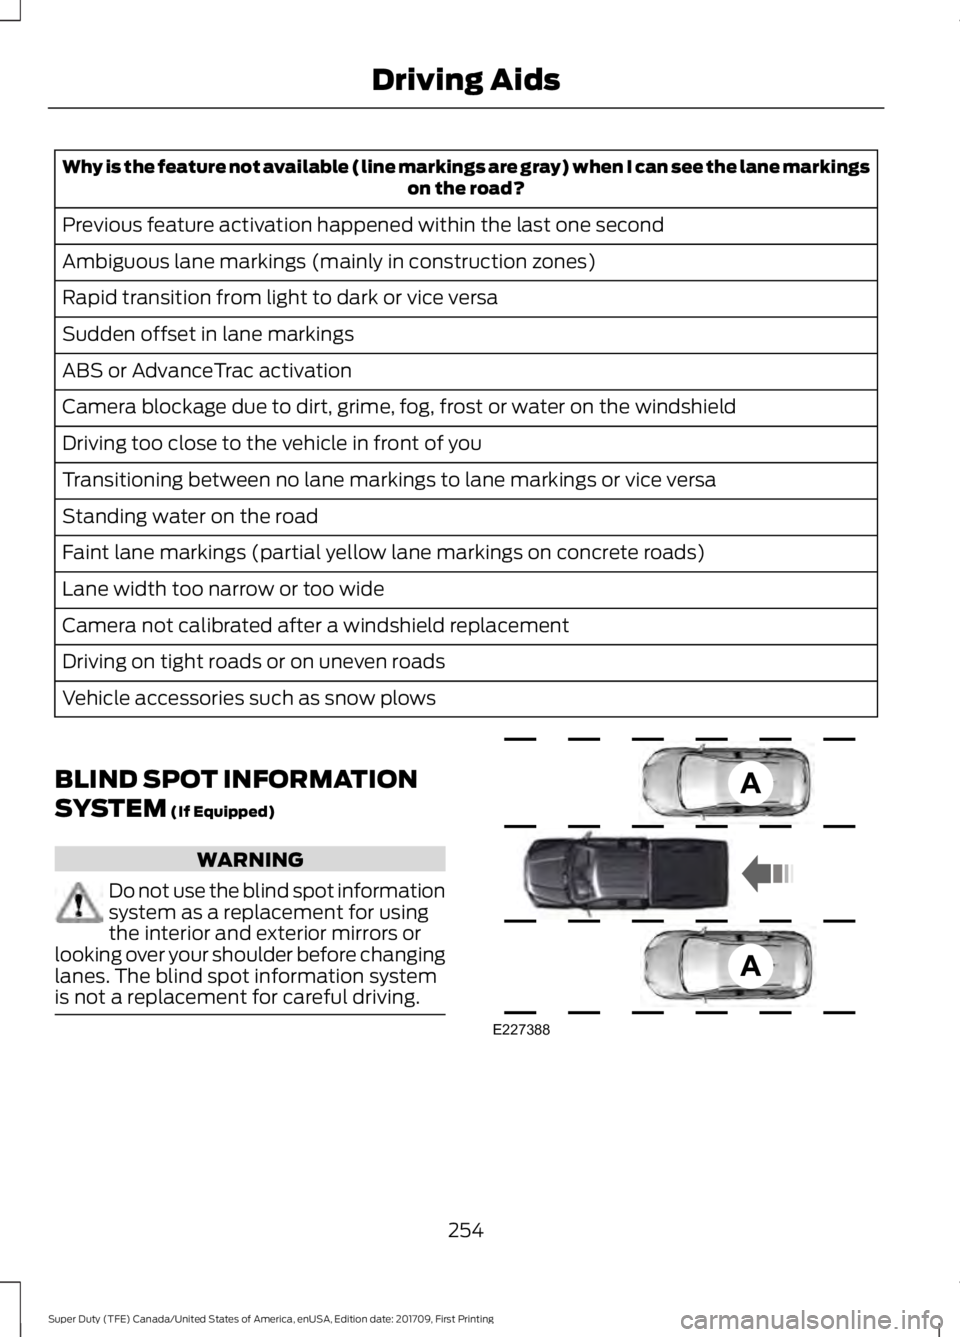
The Blind Spot Information System is
designed to aid you in detecting vehicles
that may have entered the blind spot zone
(A). The detection area is on both sides of
your vehicle, extending rearward from the
exterior mirrors to approximately 13 ft
(4 m) beyond the bumper. The system is
designed to alert you if certain vehicles
enter the blind spot zone while driving.
Note: The Blind Spot Information System
does not prevent contact with other vehicles
or objects; nor detect parked vehicles,
people, animals or infrastructure (fences,
guardrails, trees). It is only designed to alert
you to moving vehicles in the blind spot
zones.
Note: When a vehicle passes quickly
through the blind spot zone, typically fewer
than two seconds, the system does not
trigger.
Using the System
The Blind Spot Information System turns
on when you start the engine and you drive
your vehicle forward above
5 mph
(8 km/h).
For automatic transmissions, the Blind
Spot Information System remains on while
the transmission is in drive (D). If shifted
into reverse (R) or park (P) the Blind Spot
Information System turns off. Once shifted
back into drive (D), the Blind Spot
Information System turns back on when
you drive your vehicle above
5 mph
(8 km/h).
Note: For automatic transmissions, the
Blind Spot Information System does not
function in reverse (R) or park (P).
For manual transmissions, the Blind Spot
Information System is on for all gears
except reverse (R). System Lights and Messages
The Blind Spot Information System
illuminates an amber alert indicator in the
outside mirror on the side of your vehicle
the approaching vehicle is coming from.
When the Blind Spot Information System
is alerting on a vehicle and the
corresponding turn signal is ON, the Blind
Spot Information System alert indicator
flashes as an increased warning level.
The alert indicator dims when the system
detects nighttime darkness.
Note:
The alert indicator flashes in case of
an alert and the turn signal is set to that side
at the same time.
System Sensor Blockage 255
Super Duty (TFE) Canada/United States of America, enUSA, Edition date: 201709, First Printing Driving AidsE142442 E231384
Page 259 of 656
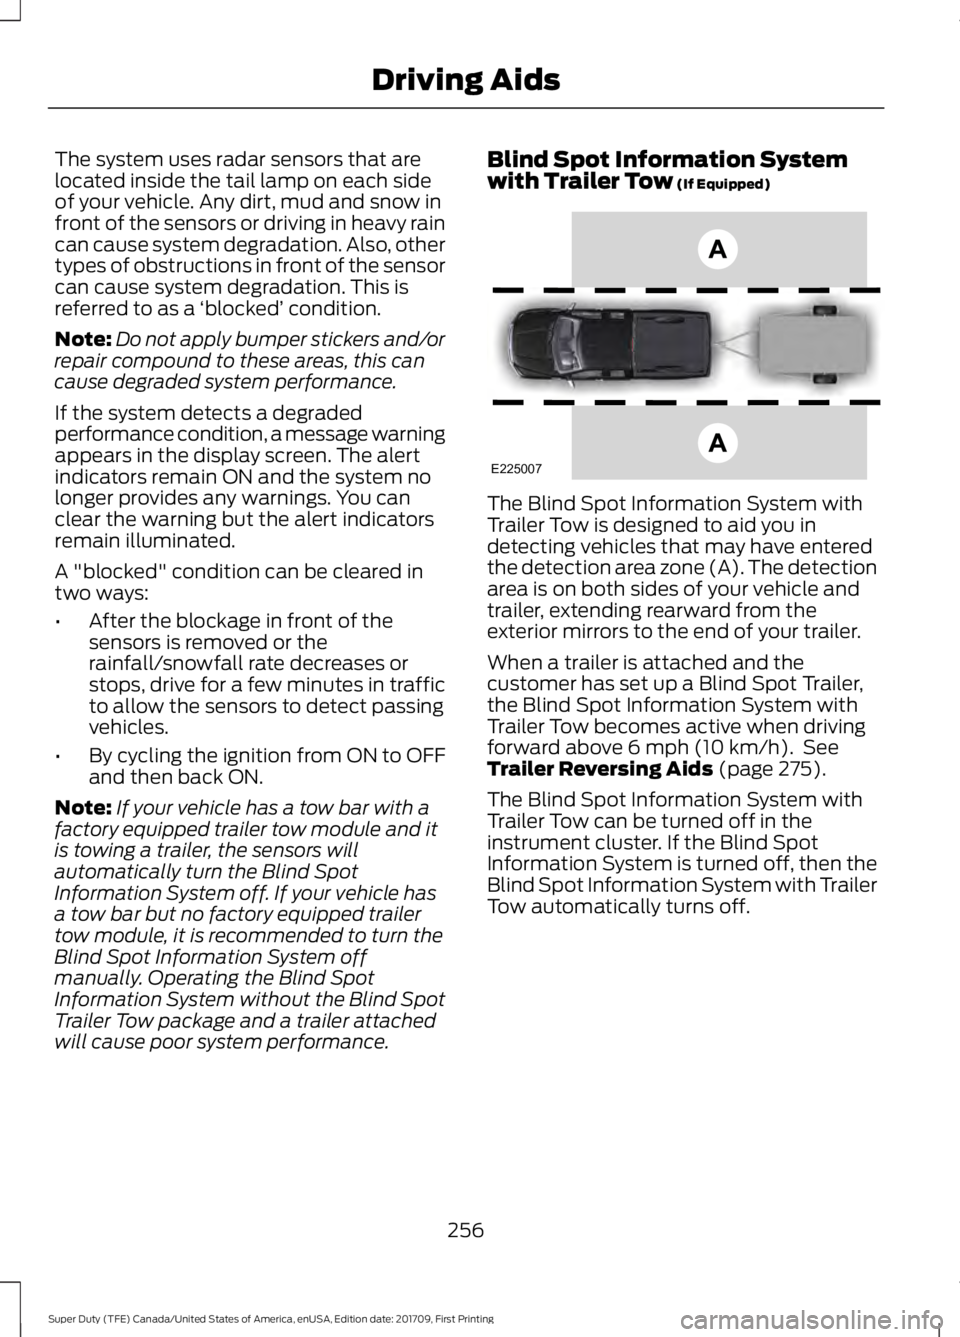
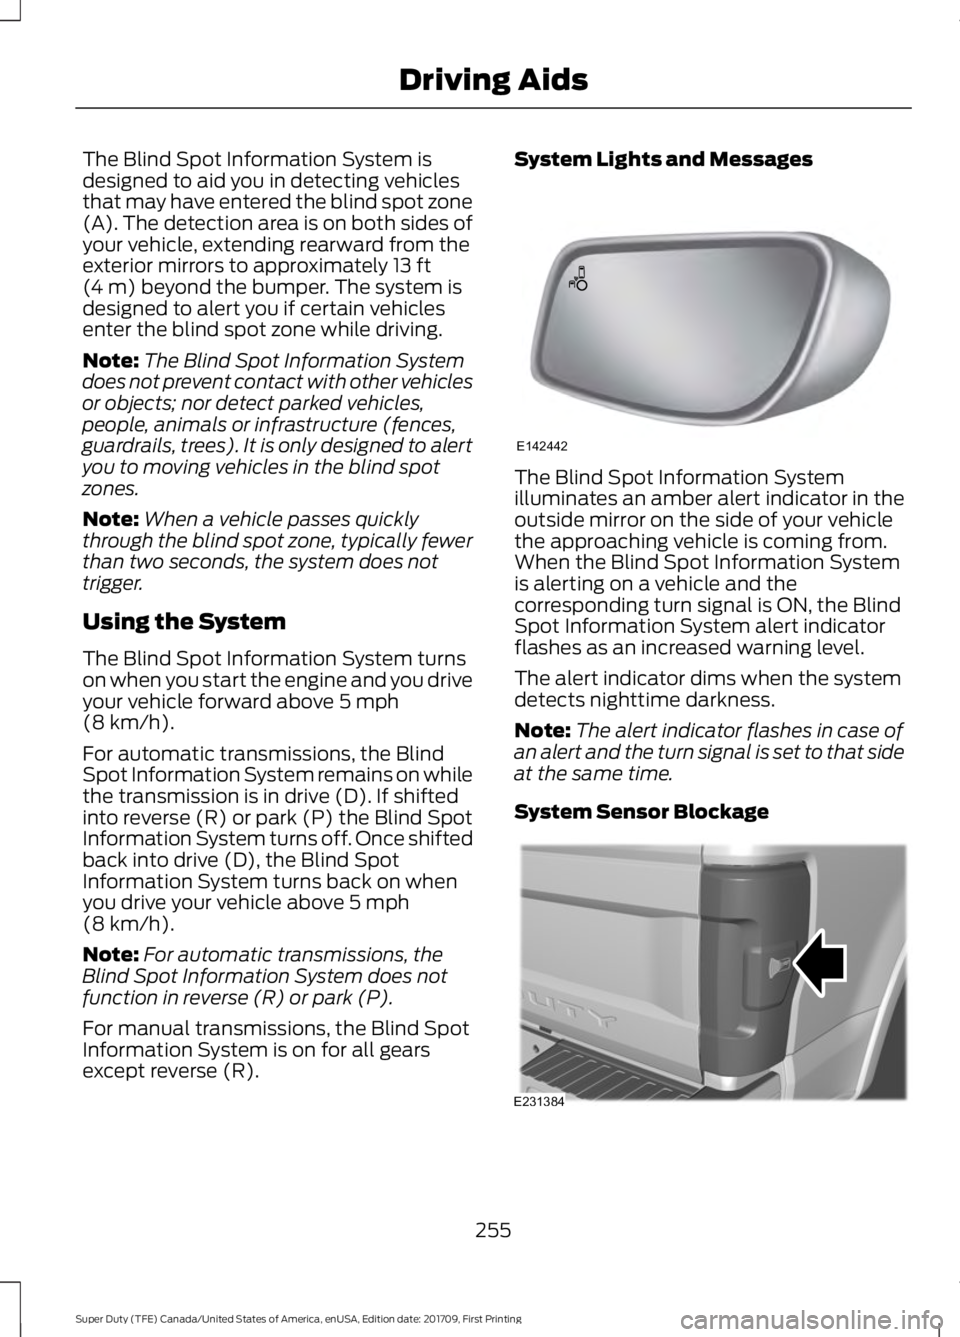
The system uses radar sensors that are
located inside the tail lamp on each side
of your vehicle. Any dirt, mud and snow in
front of the sensors or driving in heavy rain
can cause system degradation. Also, other
types of obstructions in front of the sensor
can cause system degradation. This is
referred to as a
‘blocked ’ condition.
Note: Do not apply bumper stickers and/or
repair compound to these areas, this can
cause degraded system performance.
If the system detects a degraded
performance condition, a message warning
appears in the display screen. The alert
indicators remain ON and the system no
longer provides any warnings. You can
clear the warning but the alert indicators
remain illuminated.
A "blocked" condition can be cleared in
two ways:
• After the blockage in front of the
sensors is removed or the
rainfall/snowfall rate decreases or
stops, drive for a few minutes in traffic
to allow the sensors to detect passing
vehicles.
• By cycling the ignition from ON to OFF
and then back ON.
Note: If your vehicle has a tow bar with a
factory equipped trailer tow module and it
is towing a trailer, the sensors will
automatically turn the Blind Spot
Information System off. If your vehicle has
a tow bar but no factory equipped trailer
tow module, it is recommended to turn the
Blind Spot Information System off
manually. Operating the Blind Spot
Information System without the Blind Spot
Trailer Tow package and a trailer attached
will cause poor system performance. Blind Spot Information System
with Trailer Tow (If Equipped)
The Blind Spot Information System with
Trailer Tow is designed to aid you in
detecting vehicles that may have entered
the detection area zone (A). The detection
area is on both sides of your vehicle and
trailer, extending rearward from the
exterior mirrors to the end of your trailer.
When a trailer is attached and the
customer has set up a Blind Spot Trailer,
the Blind Spot Information System with
Trailer Tow becomes active when driving
forward above
6 mph (10 km/h). See
Trailer Reversing Aids (page 275).
The Blind Spot Information System with
Trailer Tow can be turned off in the
instrument cluster. If the Blind Spot
Information System is turned off, then the
Blind Spot Information System with Trailer
Tow automatically turns off.
256
Super Duty (TFE) Canada/United States of America, enUSA, Edition date: 201709, First Printing Driving AidsE225007
Page 260 of 656
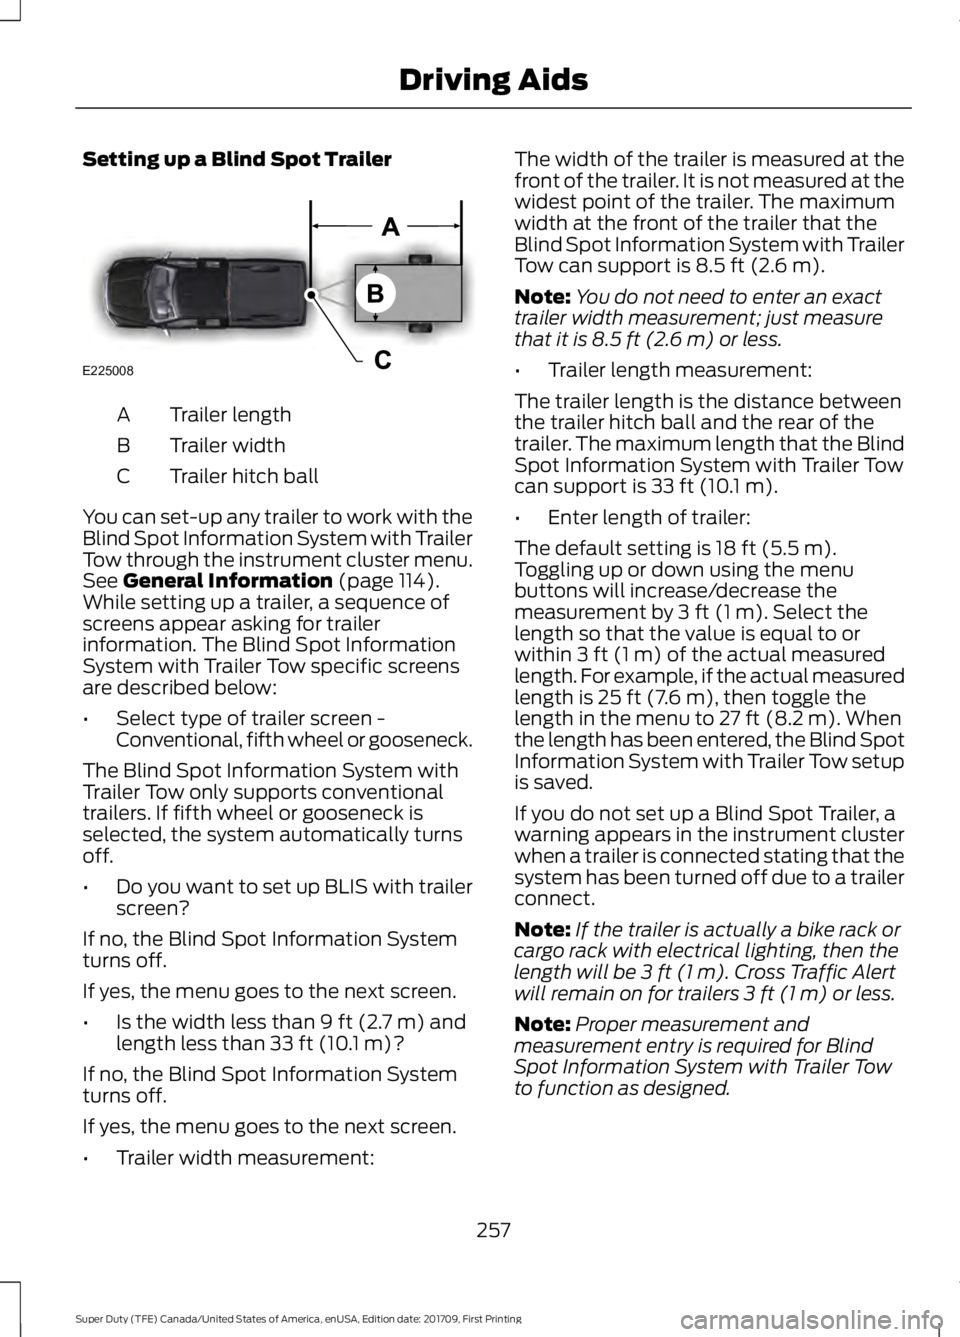
Setting up a Blind Spot Trailer
Trailer length
A
Trailer width
B
Trailer hitch ball
C
You can set-up any trailer to work with the
Blind Spot Information System with Trailer
Tow through the instrument cluster menu.
See General Information (page 114).
While setting up a trailer, a sequence of
screens appear asking for trailer
information. The Blind Spot Information
System with Trailer Tow specific screens
are described below:
• Select type of trailer screen -
Conventional, fifth wheel or gooseneck.
The Blind Spot Information System with
Trailer Tow only supports conventional
trailers. If fifth wheel or gooseneck is
selected, the system automatically turns
off.
• Do you want to set up BLIS with trailer
screen?
If no, the Blind Spot Information System
turns off.
If yes, the menu goes to the next screen.
• Is the width less than
9 ft (2.7 m) and
length less than 33 ft (10.1 m)?
If no, the Blind Spot Information System
turns off.
If yes, the menu goes to the next screen.
• Trailer width measurement: The width of the trailer is measured at the
front of the trailer. It is not measured at the
widest point of the trailer. The maximum
width at the front of the trailer that the
Blind Spot Information System with Trailer
Tow can support is
8.5 ft (2.6 m).
Note: You do not need to enter an exact
trailer width measurement; just measure
that it is
8.5 ft (2.6 m) or less.
• Trailer length measurement:
The trailer length is the distance between
the trailer hitch ball and the rear of the
trailer. The maximum length that the Blind
Spot Information System with Trailer Tow
can support is
33 ft (10.1 m).
• Enter length of trailer:
The default setting is
18 ft (5.5 m).
Toggling up or down using the menu
buttons will increase/decrease the
measurement by
3 ft (1 m). Select the
length so that the value is equal to or
within
3 ft (1 m) of the actual measured
length. For example, if the actual measured
length is
25 ft (7.6 m), then toggle the
length in the menu to 27 ft (8.2 m). When
the length has been entered, the Blind Spot
Information System with Trailer Tow setup
is saved.
If you do not set up a Blind Spot Trailer, a
warning appears in the instrument cluster
when a trailer is connected stating that the
system has been turned off due to a trailer
connect.
Note: If the trailer is actually a bike rack or
cargo rack with electrical lighting, then the
length will be
3 ft (1 m). Cross Traffic Alert
will remain on for trailers 3 ft (1 m) or less.
Note: Proper measurement and
measurement entry is required for Blind
Spot Information System with Trailer Tow
to function as designed.
257
Super Duty (TFE) Canada/United States of America, enUSA, Edition date: 201709, First Printing Driving AidsE225008