brake FORD F650 2004 11.G Repair Manual
[x] Cancel search | Manufacturer: FORD, Model Year: 2004, Model line: F650, Model: FORD F650 2004 11.GPages: 264, PDF Size: 1.47 MB
Page 142 of 264
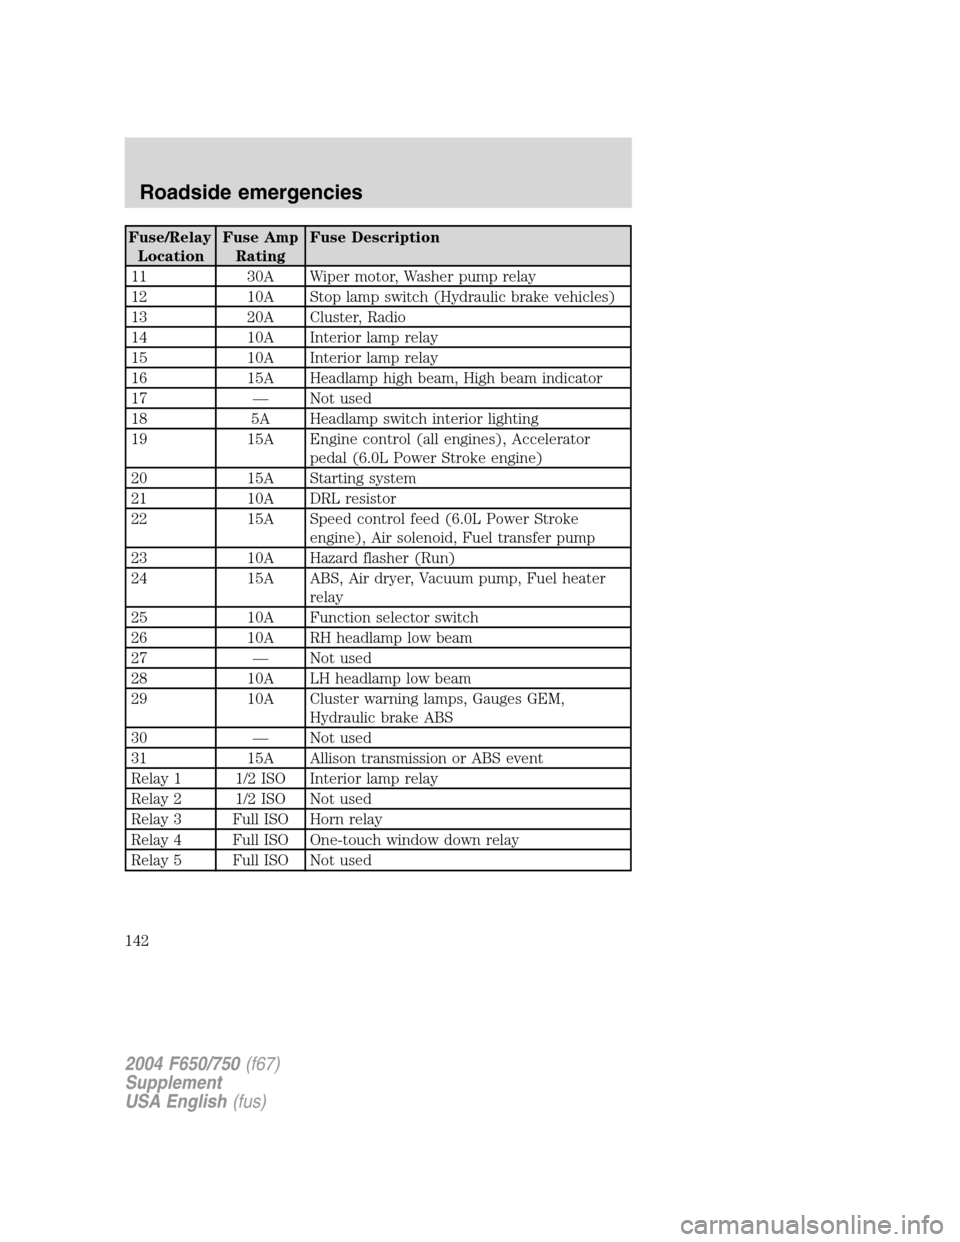
Fuse/Relay
LocationFuse Amp
RatingFuse Description
11 30A Wiper motor, Washer pump relay
12 10A Stop lamp switch (Hydraulic brake vehicles)
13 20A Cluster, Radio
14 10A Interior lamp relay
15 10A Interior lamp relay
16 15A Headlamp high beam, High beam indicator
17—Not used
18 5A Headlamp switch interior lighting
19 15A Engine control (all engines), Accelerator
pedal (6.0L Power Stroke engine)
20 15A Starting system
21 10A DRL resistor
22 15A Speed control feed (6.0L Power Stroke
engine), Air solenoid, Fuel transfer pump
23 10A Hazard flasher (Run)
24 15A ABS, Air dryer, Vacuum pump, Fuel heater
relay
25 10A Function selector switch
26 10A RH headlamp low beam
27—Not used
28 10A LH headlamp low beam
29 10A Cluster warning lamps, Gauges GEM,
Hydraulic brake ABS
30—Not used
31 15A Allison transmission or ABS event
Relay 1 1/2 ISO Interior lamp relay
Relay 2 1/2 ISO Not used
Relay 3 Full ISO Horn relay
Relay 4 Full ISO One-touch window down relay
Relay 5 Full ISO Not used
2004 F650/750(f67)
Supplement
USA English(fus)
Roadside emergencies
142
Page 146 of 264
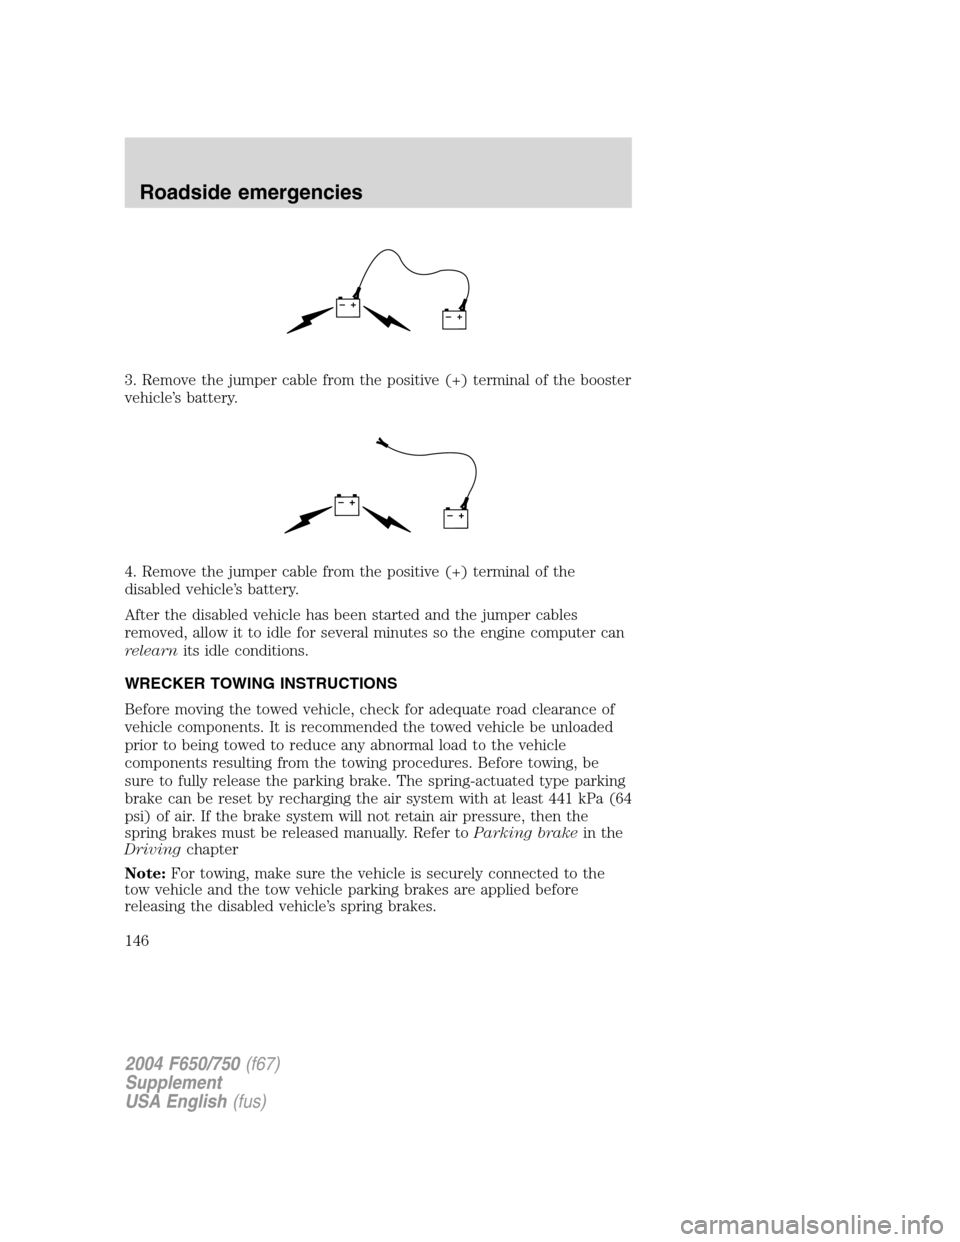
3. Remove the jumper cable from the positive (+) terminal of the booster
vehicle’s battery.
4. Remove the jumper cable from the positive (+) terminal of the
disabled vehicle’s battery.
After the disabled vehicle has been started and the jumper cables
removed, allow it to idle for several minutes so the engine computer can
relearnits idle conditions.
WRECKER TOWING INSTRUCTIONS
Before moving the towed vehicle, check for adequate road clearance of
vehicle components. It is recommended the towed vehicle be unloaded
prior to being towed to reduce any abnormal load to the vehicle
components resulting from the towing procedures. Before towing, be
sure to fully release the parking brake. The spring-actuated type parking
brake can be reset by recharging the air system with at least 441 kPa (64
psi) of air. If the brake system will not retain air pressure, then the
spring brakes must be released manually. Refer toParking brakein the
Drivingchapter
Note:For towing, make sure the vehicle is securely connected to the
tow vehicle and the tow vehicle parking brakes are applied before
releasing the disabled vehicle’s spring brakes.
+–+–
+–+–
2004 F650/750(f67)
Supplement
USA English(fus)
Roadside emergencies
146
Page 147 of 264
To reduce the risk of personal injury or property damage when
manually releasing the spring brakes, be sure to block the wheels
so the vehicle cannot move once the brakes are released.
Towing the vehicle with the front wheels suspended
When it is necessary to tow a vehicle with the front wheels suspended,
extra precautions must be taken to avoid transmission or differential
damage. Proceed as follows:
•Remove the axle shafts from the axle assembly to prevent the wheels
from driving the differential and the transmission.
•The wheel hub ends must be covered to prevent loss of axle lubricant
and entrance of other contaminants. If the axle shafts are not
removed, removal of the propeller shafts is required.
Note:To avoid transmission damage, vehicles should not be towed even
a short distance without suspending rear wheels or removing the axle
shaft or propeller shaft.
Note:In the event the chassis is equipped with a tandem axle and the
vehicle is to be towed from the front, the forward rear axle may be
raised to clear the road surface and secured to the frame by chains or
U-bolts, allowing only the rear rear axle to contact the road surface. Axle
shafts must be removed from the rear rear axle assembly. The wheel hub
ends must be covered to prevent loss of axle lubricant and entrance of
contaminants. Use extreme care in securing the chains or U-bolts to
avoid possible damage to the brake lines, hoses or other components.
Towing vehicles equipped with a driver-controlled differential lock
Note:If the vehicle must be towed to a service facility with the drive
axle wheels on the ground, it is necessary to remove the axle shafts
before the vehicle is towed.
2004 F650/750(f67)
Supplement
USA English(fus)
Roadside emergencies
147
Page 155 of 264
PAINT CHIPS
Your dealer has touch-up paint and sprays to match your vehicle’s color.
Take your color code (printed on a sticker in the driver’s door jam) to
your dealer to ensure you get the correct color.
•Remove particles such as bird droppings, tree sap, insect deposits, tar
spots, road salt and industrial fallout before repairing paint chips.
•Always read the instructions before using the products.
ALUMINUM WHEELS AND COVERS
Aluminum wheel rims or covers are coated with a clearcoat paint finish.
In order to maintain their shine:
•Clean with Motorcraft Wheel and Tire Cleaner (ZC-37–A), which is
available from your dealer.
•Never apply any cleaning chemical to hot or warm wheel rims or
covers.
•Some automatic car washes may cause damage to the finish on your
wheel rims or covers. Chemical-strength cleaners, or cleaning
chemicals, in combination with brush agitation to remove brake dust
and dirt, could wear away the clearcoat finish over time.
•Do not use hydrofluoric acid-based or high caustic-based wheel
cleaners, steel wool, fuels or strong household detergent.
•To remove tar and grease, use Ford Extra Strength Tar and Road Oil
Removal (B7A-19520–AA), available from your dealer.
ENGINE
Engines are more efficient when they are clean because grease and dirt
buildup keep the engine warmer than normal. When washing:
•Take care when using a power washer to clean the engine. The
high-pressure fluid could penetrate the sealed parts and cause
damage.
•Do not spray a hot engine with cold water to avoid cracking the
engine block or other engine components.
•Spray Motorcraft Engine Shampoo and Degreaser (ZC-20) on all parts
that require cleaning and pressure rinse clean.
•Never wash or rinse the engine while it is running; water in the
running engine may cause internal damage.
2004 F650/750(f67)
Supplement
USA English(fus)
Cleaning
155
Page 158 of 264
GENERAL SERVICING GUIDELINES AND PRECAUTIONS
As with any machine, care should be taken to avoid being injured when
performing maintenance, repairs or system checks. Improper or
incomplete service could result in the vehicle not working properly
which, in turn, may result in personal injury or damage to the vehicle or
equipment. It is the operator’s responsibility to see that the vehicle
receives proper care and maintenance. If you have any questions about
performing some service, have the service done by a qualified technician.
Servicing guidelines
When servicing your vehicle, always:
•turn off the ignition unless the particular procedure calls for the
engine to be running.
•set the parking brake or chock the wheels.
•use support stands, not a jack, whenever you must be under a raised
vehicle.
•do not smoke.
•wear safety glasses for eye protection.
•operate the engine in a well-ventilated area
•do not work on the brakes or the clutch unless the proper precautions
are taken to avoid inhaling friction material dust.
•do not wear loose-fitting clothing, hanging jewelry, watches or rings.
•avoid contact with hot metal parts. Allow the hot components to cool
before working with, or around them.
Quality service parts are available through your dealer. If dealer parts are
not used, the owner must make sure that the parts that are being used
are equivalent quality to dealer parts.
The use of inferior parts can adversely affect the quality and
reliability of your vehicle which, in turn, can result in property
damage, personal injury or death.
Note:To avoid damage to the vehicle’s electrical components, disconnect
the positive (+) and negative (-) battery cables prior to electric welding.
Attach the welder ground cable as close as possible to the part being
welded. If it is necessary to weld close to an electrical component, it is
recommended that the electronic component be temporarily removed.
Follow the periodic lubrication procedures and regular inspection
intervals as outlined. Have your dealer or service center inspect your
2004 F650/750(f67)
Supplement
USA English(fus)
Maintenance and specifications
Maintenance and specifications
158
Page 159 of 264
vehicle at least once a year. Remember that regular maintenance and
replacement of worn components will usually prevent serious problems
from developing later.
Making modifications to various parts, components and systems
of the vehicle, such as brake and steering systems can adversely
affect the quality, reliability and operation of your vehicle and could
result in property damage, personal injury or death. Such modifications
must be avoided.
The lubrication intervals present a good opportunity to inspect the
vehicle. It is suggested that the various points listed herein be checked
at the lubrication or other recommended intervals.
Failure to properly perform maintenance and servicing
procedures could result in vehicle damage, personal injury or
death.
If the owner/operator of the vehicle is a skilled technician and intends on
performing the vehicle maintenance and service, he is strongly urged to
purchase a service manual.
Take care when performing any maintenance, system check or
service on your vehicle. Some of the materials may also be
hazardous if used, serviced or handled improperly and could result in
property damage, personal injury or death.
Air conditioning system checks
Have your air conditioning system checked each spring. The refrigerant
charge, cleanliness of the condenser-evaporator cores and belt condition
is essential to air conditioning performance.
When the air conditioning system is being used daily, remove the fresh
air filter (if equipped) once each season and check for dirt, lint, etc.
Replace the filter if necessary. Vehicles operating in unusually dusty
conditions may require inspecting and replacing the fresh air filter more
often.
Front axle - general service information
Maintaining the front axle alignment to specifications is very important
and should only be performed by a qualified technician. Toe-in
adjustment is particularly important with radial tires.
2004 F650/750(f67)
Supplement
USA English(fus)
Maintenance and specifications
159
Page 160 of 264
Check to make sure that the axle mounting U-bolt nuts, attaching or
mounting bolts and nuts are securely tightened. Regularly check front
axle for damage, binding, worn parts and adequate lubrication.
At regular intervals, or during other scheduled maintenance, (tire
rotation/service, wheel bearing service, alignment, etc.) the kingpins
should be checked for excessive wear. Refer to the service manual for
proper procedures.
Toe-in setting - general inspection
Inspecting steer axle tires in the first 4,800–16,000 service km
(3,000–10,000 service miles) will generally show if tires are wearing
normally.
Rapid outside shoulder wear on both tires indicates too much toe-in.
Rapid inside shoulder wear on both tires indicates too much toe-out. In
P&D-type service, which includes school buses, left-to-right steer tire
tread life differentials up to 40% can be observed depending on routes
and other variables.
Follow the tire manufacturer’s recommended cold inflation pressure for
the tire size, load range (ply rating) and steer axle loading typical for
their operation (each steer axle tire will equal
1⁄2steer axle loading).
Special applications may warrant a setting based on past experience with
the type of tire operating loads and conditions. Radial tires are more
sensitive to toe-in setting than bias ply tires. While not insensitive to
vehicle alignment, fine tuning school bus alignment to line-haul truck
standards will not drastically improve tire tread life.
It is essential that correct toe-in and tire pressure be maintained for
optimum tire wear.
Rear axle - general inspection
Check to make sure that the axle mounting U-bolts, attaching or
mounting bolts and nuts are securely tightened. Refer toU-bolt nut
torque chartin this chapter. Regularly check the rear axle for damaged,
binding or worn parts.
NoSpin Detroit Locker positive locking differential
Vehicle equipped with this type differential have the operator’s manual
supplied with the vehicle. Refer to this manual for maintenance checks.
Brake system - general inspection
Your vehicle is equipped with non-asbestos brake linings. However,
exposure to excessive amounts of brake material (whether asbestos or
2004 F650/750(f67)
Supplement
USA English(fus)
Maintenance and specifications
160
Page 161 of 264
non-asbestos, fiberglass, mineral wool, aramid or carbon) may be a
potentially serious health hazard.
Avoid breathing brake lining fiber dust as it may be extremely
hazardous to your health. Always use of respirator during brake
maintenance.
Note:Persons handling brake linings should follow all precautions listed
below:
1. Always wear a respirator approved by the National Institute of
Occupational Studies of Health (NIOSH) or Mine Safety and Appliance
(MSA) during all brake service procedures. Wear the respirator from
removal of the wheels through assembly.
2.Neveruse compressed air or dry brushing to clean brake parts or
assemblies.
3. Clean brake parts and assemblies in open air. During assembly,
carefully place all parts on the floor to avoid getting dust in the air. Use
an industrial vacuum cleaner with a HEPA filter system to clean dust
from the brake drums, backing plates and other brake parts. After using
the vacuum, remove any remaining dust with a rag soaked in water and
wrung until nearly dry.
4.Neveruse compressed air or dry sweeping to clean the work area.
Use an industrial vacuum cleaner with a HEPA filter system and rags
soaked in water until wrung until nearly dry. Dispose of used rags with
care to avoid getting dust in the air. Use an approved respirator when
emptying vacuum cleaners and handling used rags.
5.Worker clean-up:Wash your hands before eating, drinking or
smoking. Vacuum your work clothes after use and then launder them
separately, without shaking them, to prevent fiber dust getting into the
air.
Air brakes - inspection and adjustment
A regular schedule for periodic cleaning, lubrication, adjustment and
inspection should be established based on the type of vehicle operation.
It is difficult to predetermine an exact maintenance interval (time or
mileage), since vehicles will be used in a wide variety of applications and
conditions. If you are uncertain of the proper schedule and procedures
for your vehicle, contact your dealer.
Periodic checking of push rod travel or brake adjustment is essential for
effective braking. Push rod travel should be checked every service
2004 F650/750(f67)
Supplement
USA English(fus)
Maintenance and specifications
161
Page 162 of 264
interval to determine if adjustment is necessary. Brake chamber push
rods on original equipment chambers now incorporate a stroke indicator
to aid in adjustment checks; an orange paint marker near the base of the
push rod. If the push rod is clean and the brakes require adjustment, the
orange marker can be seen protruding from the chamber when the
brakes are applied.
Slack adjusters should also be checked to ensure proper operation of the
adjuster mechanism at the six-month interval. Push rod travel should be
kept at a minimum without the brakes dragging.
Inspect the brake lining every maintenance interval. When brake lining or
blocks are worn to within 1.6 mm (1/16 in.) of rivets, brake lining must
be replaced. This inspection or adjustment should only be performed by
a qualified technician and must be in accordance with instructions
provided by the service manual.
Do not back off or disconnect the front brakes so that they are less
effective, letting the rear brakes do all the stopping of the vehicle. Do
not overlook the brakes on the trailer, either. Brake condition on the
trailer is just as important as the tractor. Proper brake balance on trucks
and tractor-trailers is essential for effective braking.
Once a year, the entire brake system must be inspected. Check the
following:
•Any rubber as it may deteriorate whenever used. Rubber brake
components should be inspected by a qualified technician and
replaced as necessary. Replacement intervals vary according to the
severity and length of vehicle service.
•Condition of brake drums, brake chambers and slack adjusters.
•System for air leaks.
•Hose or pipes for rust, damage and deterioration.
•Operation of service and parking brakes.
Some parts such as air brake chamber diaphragm, air compressor and air
cleaner should be inspected periodically and replaced if considered
unserviceable.
Air brakes - air dryer
Performance of desiccant or after-cooler type air dryers is dependent on
climatic conditions in which your vehicle is operating. Maintenance
schedules must be establishes for each specific operation.
The use of an air dryer on a vehicle does not eliminate the need to
periodically drain the air reservoirs.
2004 F650/750(f67)
Supplement
USA English(fus)
Maintenance and specifications
162
Page 163 of 264
Air brakes - desiccant air dryer
Inspect for moisture in the air system by opening reservoirs, drain cocks
or valves and checking for presence of water. The presence of small
amounts of water due to condensation is normal and should not be
considered as an indication that the dryer is not functioning properly.
The desiccant cartridge should be replaced or rebuilt when it has been
determined that the desiccant is contaminated and does not have
adequate water absorption capacity. The desiccant change interval may
vary; it is generally recommended that the desiccant be replaced every
12 months (yearly). If experience has shown that extended or shortened
life has resulted for a particular installation, then the yearly interval can
be increased or decreased accordingly.
Hydraulic brakes - general inspection and adjustment
A regular schedule for periodic cleaning, lubrication, adjustment and
inspection should be established based on the type of vehicle operation.
It is difficult to predetermine an exact maintenance interval (time or
mileage), since vehicles will be used in a wide variety of applications and
conditions. If you are uncertain of the proper schedule and procedures
for your vehicle, contact your dealer.
Inspect the brake lining every maintenance interval. Establish inspection
intervals that provide for lining replacement before damage to the disc
occurs. Excessive lining wear may expose the backing plate to the disc
causing scoring of the disc faces.
This inspection should be performed by a qualified technician and must
be in accordance with instructions provided by the service manual.
Note:Hydraulic brake system are power assisted. Braking capabilities
will be greatly reduced without engine assist.
Hydraulic brakes - fluid level
Fluid level should be at the bottom edge of the ring on each reservoir fill
port. Do not fill the master cylinder to the top of the reservoir.
Note:If brake fluid requires attention to maintain a proper master
cylinder level, this is an indication of either severe operation (pad wear)
or fluid system leakage. A more frequent and thorough brake inspection
will be required.
2004 F650/750(f67)
Supplement
USA English(fus)
Maintenance and specifications
163