maintenance schedule FORD F650/750 2023 Owner's Manual
[x] Cancel search | Manufacturer: FORD, Model Year: 2023, Model line: F650/750, Model: FORD F650/750 2023Pages: 378, PDF Size: 5.65 MB
Page 246 of 378
4. Check the coolant level. If the coolant
level is at or below the minimum mark,
add prediluted coolant immediately.
5. When the engine temperature cools,
you can re-start the engine. Have your
vehicle checked as soon as possible to
minimize engine damage.
Note: Driving your vehicle without repair
increases the chance of engine damage.
Engine Coolant Temperature
Management (If Equipped)
WARNING: To reduce the risk of
crash and injury, be prepared that the
vehicle speed may reduce and the
vehicle may not be able to accelerate
with full power until the coolant
temperature reduces.
If you tow a trailer with your vehicle, the
engine may temporarily reach a higher
temperature during severe operating
conditions, for example ascending a long
or steep grade in high ambient
temperatures.
At this time, you may notice the coolant
temperature gauge moves toward the red
zone and a message may appear in the
information display.
You may notice a reduction in vehicle
speed caused by reduced engine power in
order to manage the engine coolant
temperature. Your vehicle may enter this
mode if certain high-temperature and
high-load conditions take place. The
amount of speed reduction depends on
vehicle loading, grade and ambient
temperature. If this occurs, there is no
need to pull off the road. You can continue
to drive your vehicle.The air conditioning may turn on and off
during severe operating conditions to
protect the engine from overheating. When
the coolant temperature decreases to the
normal operating temperature, the air
conditioning turns on.
If the coolant temperature gauge moves
fully into the red zone, or if the coolant
temperature warning or service engine
soon messages appear in your information
display, do the following:
1. Pull off the road as soon as safely
possible and shift the transmission into
park (P).
2. Leave the engine running until the
coolant temperature gauge needle
returns to the normal position. After
several minutes, if the temperature
does not drop, follow the remaining
steps.
3. Switch the engine off and wait for it to
cool. Check the coolant level.
4. If the coolant level is at or below the
minimum mark, add prediluted coolant
immediately.
5. If the coolant level is normal, restart
the engine and continue.
AUTOMATIC TRANSMISSION
FLUID CHECK
The transmission does not consume fluid.
However, check the fluid level if the
transmission is not working properly, for
example if the transmission slips, shifts
slowly or if there are signs of fluid loss.
Replace the transmission fluid and filter
on your vehicle at the specified service
interval. See Scheduled Maintenance
(page 319).
Automatic transmission fluid expands
when warmed. To check the fluid level
consistently and accurately, do the
following:
242
Maintenance
Page 249 of 378
E170684
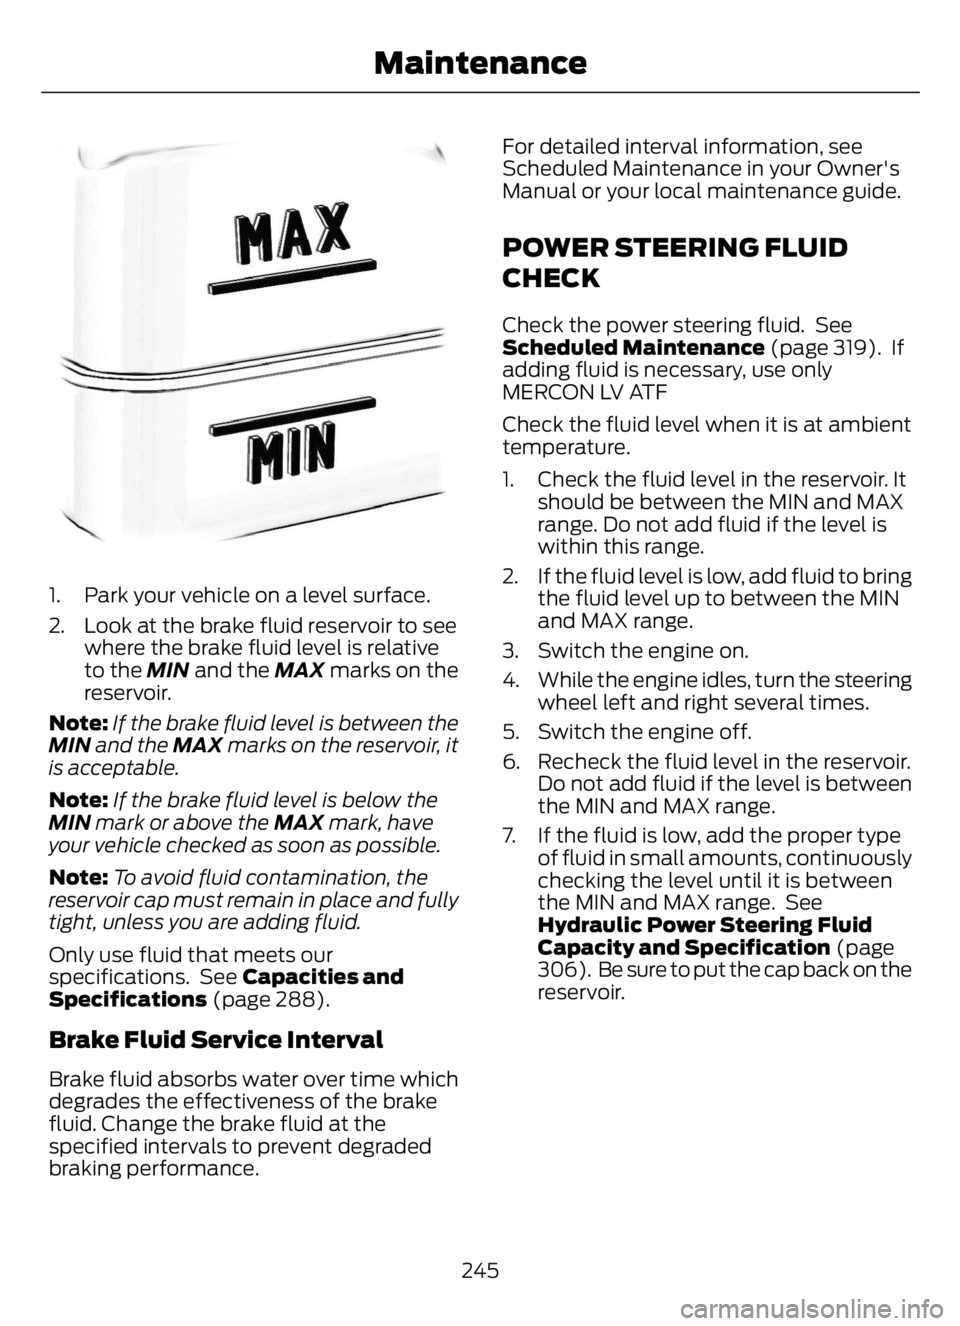
1. Park your vehicle on a level surface.
2. Look at the brake fluid reservoir to see
where the brake fluid level is relative
to the MIN and the MAX marks on the
reservoir.
Note:If the brake fluid level is between the
MIN and the MAX marks on the reservoir, it
is acceptable.
Note:If the brake fluid level is below the
MIN mark or above the MAX mark, have
your vehicle checked as soon as possible.
Note:To avoid fluid contamination, the
reservoir cap must remain in place and fully
tight, unless you are adding fluid.
Only use fluid that meets our
specifications. See Capacities and
Specifications (page 288).
Brake Fluid Service Interval
Brake fluid absorbs water over time which
degrades the effectiveness of the brake
fluid. Change the brake fluid at the
specified intervals to prevent degraded
braking performance.For detailed interval information, see
Scheduled Maintenance in your Owner's
Manual or your local maintenance guide.
POWER STEERING FLUID
CHECK
Check the power steering fluid. See
Scheduled Maintenance (page 319). If
adding fluid is necessary, use only
MERCON LV ATF
Check the fluid level when it is at ambient
temperature.
1. Check the fluid level in the reservoir. It
should be between the MIN and MAX
range. Do not add fluid if the level is
within this range.
2. If the fluid level is low, add fluid to bring
the fluid level up to between the MIN
and MAX range.
3. Switch the engine on.
4. While the engine idles, turn the steering
wheel left and right several times.
5. Switch the engine off.
6. Recheck the fluid level in the reservoir.
Do not add fluid if the level is between
the MIN and MAX range.
7. If the fluid is low, add the proper type
of fluid in small amounts, continuously
checking the level until it is between
the MIN and MAX range. See
Hydraulic Power Steering Fluid
Capacity and Specification (page
306). Be sure to put the cap back on the
reservoir.
245
Maintenance
Page 255 of 378
Brake Lamp, Rear Lamp, Rear
Direction Indicator, License Plate
Lamp and Reverse Lamp
E163828E163828
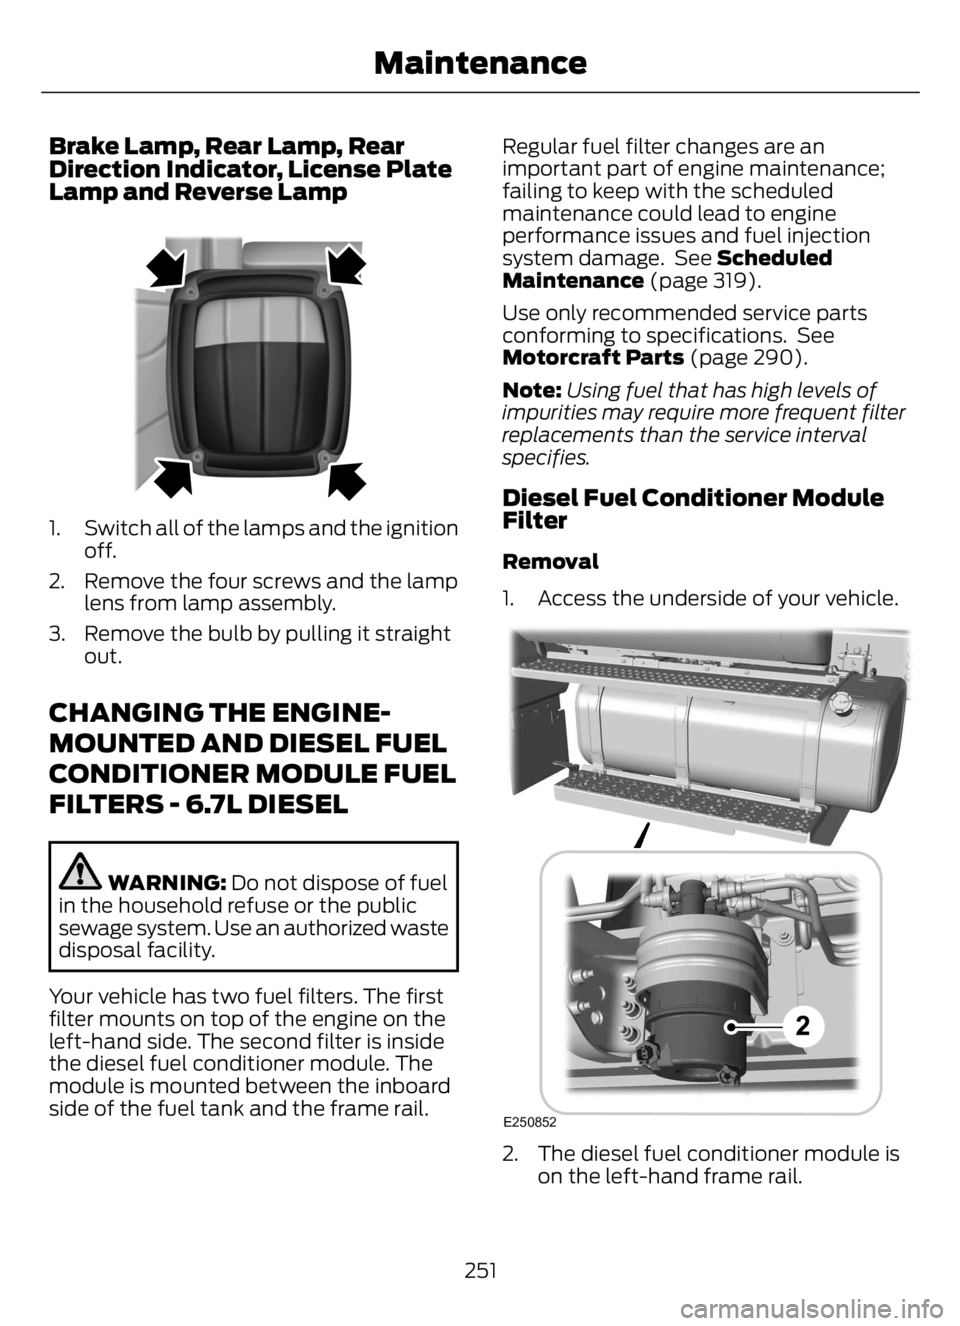
1. Switch all of the lamps and the ignition
off.
2. Remove the four screws and the lamp
lens from lamp assembly.
3. Remove the bulb by pulling it straight
out.
CHANGING THE ENGINE-
MOUNTED AND DIESEL FUEL
CONDITIONER MODULE FUEL
FILTERS - 6.7L DIESEL
WARNING: Do not dispose of fuel
in the household refuse or the public
sewage system. Use an authorized waste
disposal facility.
Your vehicle has two fuel filters. The first
filter mounts on top of the engine on the
left-hand side. The second filter is inside
the diesel fuel conditioner module. The
module is mounted between the inboard
side of the fuel tank and the frame rail.Regular fuel filter changes are an
important part of engine maintenance;
failing to keep with the scheduled
maintenance could lead to engine
performance issues and fuel injection
system damage. See Scheduled
Maintenance (page 319).
Use only recommended service parts
conforming to specifications. See
Motorcraft Parts (page 290).
Note:Using fuel that has high levels of
impurities may require more frequent filter
replacements than the service interval
specifies.
Diesel Fuel Conditioner Module
Filter
Removal
1. Access the underside of your vehicle.
E250852
2. The diesel fuel conditioner module is
on the left-hand frame rail.
251
Maintenance
Page 259 of 378
Before engine operation, remove any debris
blocking the core.
• Turbocharger-to-charge air cooler.
• Charge air cooler-to-intake manifold
pipe.
• Mounting bracket.
• Chassis-mounted charge air cooler
core.
Inspect air intake piping:
• Check for accumulation of salt
deposits (where applicable). If present,
disassemble and clean the complete
air intake piping system. If pitting is
evident on the intake piping, use
Motorcraft Silicone Gasket and Sealant
TA-30 to seal joints against leakage.
• Check for loose hoses and clamps.
• Check for ruptured or collapsed hoses.
• Check air cleaner housing for cracks.
EXHAUST SYSTEM
INSPECTION
Note:If your vehicle is equipped with a
catalytic converter or muffler, do not blend
waste oil with diesel fuel. Operate only on
ultra-low sulfur (less than 15 parts per
million sulfur) diesel fuel with a cetane
value of 45 or higher.
If your diesel engine is equipped with a
catalytic converter, it is important to review
the maintenance schedule to make sure
proper functioning of the catalytic
converter. Also, take precautions not to
damage the catalytic converter when
servicing your engine or storing your
vehicle.
BRAKE SYSTEM INSPECTION
WARNING: Always wear a
respirator approved by the National
Institute of Occupational Studies of
Health (NIOSH) or Mine Safety and
Appliance (MSA) during all brake service
procedures. Wear the respirator from
removal of the wheels through assembly.
Never use compressed air or dry brushing
to clean brake parts or assemblies.
Clean brake parts and assemblies in
open air. During assembly, carefully
place all parts on the floor to avoid
getting dust in the air. Use an industrial
vacuum cleaner with a HEPA filter
system to clean dust from the brake
drums, backing plates and other brake
parts. After using the vacuum, remove
any remaining dust with a rag soaked in
water and wrung until nearly dry.
Never use compressed air or dry
sweeping to clean the work area. Use an
industrial vacuum cleaner with a HEPA
filter system and rags soaked in water
and wrung until nearly dry. Dispose of
used rags with care to avoid getting dust
in the air. Use an approved respirator
when emptying vacuum cleaners and
handling used rags.
Worker clean-up: Wash your hands
before eating, drinking or smoking.
Vacuum your work clothes after use and
then launder them separately, without
shaking them, to prevent fiber dust
getting into the air.
Your vehicle is equipped with
non-asbestos brake linings. However,
exposure to excessive amounts of brake
material (whether asbestos or
non-asbestos, fiberglass, mineral wool,
aramid or carbon) may be a serious health
hazard.
255
Maintenance
Page 260 of 378
Air Brakes
WARNING: Do not manually adjust
the automatic slack adjusters to correct
excessive push rod stroke as it may result
in reduced brake effectiveness and a
vehicle crash. Excessive push rod stroke
indicates that a problem exists with the
automatic adjuster, with the installation
of the adjuster, or with foundation brake
components that manual adjustment
does not remedy. Seek service from a
qualified facility for excessive push rod
stroke.
Inspection and Adjustment
Establish a regular schedule for periodic
cleaning, lubrication and adjustment
inspection based on vehicle use. Exact
maintenance intervals are difficult to
predetermine due to vehicle applications
and operating conditions. If you are
uncertain of the proper schedule for your
vehicle, contact an authorized dealer.
Regular inspections should include:
• Periodic checking (every service
interval) of push rod travel or brake
adjustment. This is essential for
effective braking. Brake chamber push
rods on original equipment chambers
now incorporate an orange paint
marker near the base of the push rodas a stroke indicator to aid in
adjustment checks. If the push rod is
clean and the brakes are out of
adjustment, you can see the orange
marker protruding from the chamber
when the brakes are applied.
• Checking the brake lining (every service
interval). When brake linings or blocks
wear within 0.063 in (1.6 mm) they
must be replaced.
• Periodic checking (every service
interval) of the air compressor filter.
Check the filter minder and when the
indicator is near or on the red line
marked Service, replace the filter and
reset the service filter minder.
Do not back off or disconnect the front
brakes so that they are less effective,
letting the rear brakes do all the stopping
of your vehicle. Do not overlook the brakes
on the trailer either. Brake condition on the
trailer is just as important as the tractor.
Proper brake balance on trucks and
tractor-trailers is essential for effective
braking.
Once a year, inspect the entire brake
system:
• Rubber components for deterioration.
A qualified technician should inspect
these components and replace them
as necessary. Replacement intervals
vary according to the severity and
length of vehicle service.
• Condition of brake drums, brake
chambers and slack adjusters.
• System for air leaks.
• Hose or pipes for rust, damage and
deterioration.
• Operation of service and parking
brakes.
Periodically inspect parts such as air brake
chamber diaphragm, air compressor and
air cleaner. Replace any parts if you can
consider them unserviceable.
256
Maintenance
Page 261 of 378
Air Dryer
Climactic conditions affect performance
of desiccant or after-cooler type air dryers.
You must establish a maintenance
schedule for each specific operation.
The use of an air dryer on a vehicle does
not eliminate the need to drain the air
reservoirs periodically.
Inspect for moisture in the air system by
opening reservoirs, draincocks or valves
and checking for presence of water. The
presence of small amounts of water due
to condensation is normal and is not an
indication that the dryer is not functioning
properly.
Replace or rebuild the desiccant cartridge
when you determine that the desiccant is
contaminated and does not have adequate
water absorption capacity. The desiccant
change interval may vary. A general
recommendation is to replace the
desiccant every 12 months (yearly). If
experience has shown that extended or
shortened life has resulted for a particular
installation, then the yearly interval can be
increased or decreased accordingly.
Draining the Air Brake Reservoir
WARNING: Failure to drain air
brake reservoirs can result in a reduction
or loss of braking ability due to fluid
accumulation in the reservoir and/or
possible freeze-up during cold weather.
Completely drain all the air brake reservoirs
daily by opening the draincock at the ends
of the tanks. (Where accessible.
Pull-chains are used when the drains are
undercab or otherwise inaccessible.) Close
the draincock after draining. Manually drainany air tanks equipped with automatic
moisture ejector valves, as required, to
maintain a dry air system. Contact an
authorized dealer if you are unsure of the
air reservoir locations or the draining
procedure.
Hydraulic Brakes
Establish a regular schedule for periodic
cleaning, lubrication and adjustment
inspection based on vehicle use. Exact
maintenance intervals are difficult to
predetermine due to vehicle applications
and operating conditions. If you are
uncertain of the proper schedule for your
vehicle, contact an authorized dealer.
Regular inspections should include:
• Checking the brake lining (every service
interval). Establish inspection intervals
that provide for lining replacement
before damage to the disc occurs.
Excessive lining wear may expose the
backing plate to the disc causing
scoring of the disc faces. A qualified
technician should perform this
257
Maintenance
Page 262 of 378
inspection and keep to instructions
provided by the service manual.
Hydraulic brake systems are
power-assisted. There is a great
reduction in braking capabilities
without engine assist.
• Proper fluid level. The level should be
at the bottom edge of the ring on each
reservoir fill port. Do not fill the master
cylinder to the top of the reservoir. If
fluid level requires attention to
maintain a proper master cylinder level,
this is an indication of either severe
operation (pad wear) or fluid leakage.
A more frequent and thorough brake
inspection is required.
• Brake lines, hoses and fittings. Repair
or replace brake line tubes, hoses or
fittings as required. Inspect these
components every 4,000 mi
(6,000 km) for the following.
• Lines for kinks, dents, corrosion or
rupture.
• Hoses for abrasions, kinks, soft
spots or rupture, collapse, cracks,
twists or loose frame supports.
When replacing a hose, be sure
there is adequate clearance to the
hose to avoid an abrasion to the
new hose.
• All connections for leaks.
Driveline Parking Brake
WARNING: Use wheel chocks and
exercise caution when inspecting under
the vehicle. A vehicle roll-away could
result in property damage, personal injury
or death.
A qualified technician should adjust the
parking brake and keep to the instructions
in the service manual.
AXLE INSPECTION
Front Axle
Maintaining the front axle alignment to
specifications is very important. A qualified
technician should check and maintain the
alignment.
Regular inspections should include:
• Toe-in inspection and adjustment (if
necessary), particularly with radial
tires.
• Checking for proper tightness of axle
mounting U-bolt nuts, attaching or
mounting bolts and nuts.
• Checking the axle for damage, binding,
worn parts and adequate lubrication.
• Checking the kingpins for excessive
wear. Also, perform this check during
other scheduled maintenance, for
example as tire rotation or service,
wheel bearing service and alignment.
See the workshop manual for proper
procedures.
Toe-in
It is essential to maintain correct toe-in
and tire pressure for optimum tire wear.
Inspecting steer axle tires in the first
3,000–10,000 mi (5,000–16,000 km)
generally shows if tires are wearing
normally.
Rapid outside shoulder wear on both tires
indicates too much toe-in.
Rapid inside shoulder wear on both tires
indicates too much toe-out.
In P&D-type service, there can be a
left-to-right steer tire tread life differential
up to 40% depending on routes and other
variables.
258
Maintenance
Page 322 of 378
Less Cost to Properly Maintain Your
Vehicle
Ford Protect extended service plan also
offers a Premium Maintenance Plan that
covers all scheduled maintenance, and
selected wear items. The coverage is
prepaid, so you never have to worry about
the cost of your vehicle’s maintenance.
Covered maintenance includes:
• Windshield wiper blades.
• Spark plugs.
• The clutch disc (if equipped).
• Brake pads and linings.
• Shock absorbers.
• Struts.
• Engine belts.
• Engine coolant hoses, clamps and
O-rings.
• Diesel exhaust fluid replenishment (if
equipped).
• Cabin air filter replacement every
20,000 mi (32,000 km) (electric
vehicles only).
Interest Free Finance Options
Just a 5% down payment will provide you
with an affordable, no interest, no fee
payment program allowing you all the
security and benefits Ford Protect
extended service plan has to offer while
paying over time. You are pre-approved
with no credit check or hassles. To learn
more, call our Ford Protect extended
service plan specialists at 800-367-3377.
Ford Protect Extended Service Plan
P.O. Box 321067
Detroit, MI 48232Ford Protect Extended Service
Plan (CANADA ONLY)
You can get more protection for your
vehicle by purchasing a Ford Protect
extended service plan. Ford Protect
extended service plan is the only service
contract backed by Ford Motor Company
of Canada, Limited. Depending on the plan
you purchase, Ford Protect extended
service plan provides benefits such as:
• Rental reimbursement.
• Coverage for certain maintenance and
wear items.
• Protection against repair costs after
your New Vehicle Limited Warranty
Coverage expires.
• Roadside Assistance benefits.
There are several Ford Protect extended
service plans available in various time,
distance and deductible combinations.
Each plan is tailored to fit your own driving
needs, including reimbursement for towing
and rental. When you purchase Ford
Protect extended service plan, you receive
added peace-of-mind protection
throughout Canada, the United States and
Mexico, provided by a network of
participating authorized Ford Motor
Company dealers.
Note:Repairs performed outside of Canada
and the United States are not eligible for
Ford Protect extended service plan
coverage.
This information is subject to change. For
more information; visit your local Ford of
Canada dealer or www.ford.ca to find the
Ford Protect extended service plan that is
right for you.
318
Ford Protect
Page 323 of 378
GENERAL MAINTENANCE
INFORMATION
Why Maintain Your Vehicle?
Carefully following the maintenance
schedule helps protect against major repair
expenses resulting from neglect or
inadequate maintenance and may help to
increase the value of your vehicle when
you sell or trade it. Keep all receipts for
completed maintenance with your vehicle.
We have established regular maintenance
intervals for your vehicle based upon
rigorous testing. It is important that you
have your vehicle serviced at the proper
times. These intervals serve two purposes;
one is to maintain the reliability of your
vehicle and the second is to keep your cost
of owning your vehicle down.
It is your responsibility to have all
scheduled maintenance performed and to
make sure that the materials used meet
the specifications identified in this owner's
manual. See Motorcraft Parts (page 291).
Failure to perform scheduled maintenance
invalidates warranty coverage on parts
affected by the lack of maintenance.
Why Maintain Your Vehicle at Your
Dealership?
Factory-trained Technicians
Service technicians participate in extensive
factory-sponsored certification training to
help them become experts on the
operation of your vehicle. Ask your
dealership about the training and
certification their technicians have
received.Genuine Ford and Motorcraft
Replacement Parts
Dealerships stock Ford, Motorcraft and
Ford-authorized branded re-manufactured
replacement parts. These parts meet or
exceed our specifications. Parts installed
at your dealership carry a nationwide
12-month or 12,500 mi (20,000 km) parts
and labor limited warranty.
If you do not use Ford authorized parts they
may not meet our specifications and
depending on the part, it could affect
emissions compliance.
Convenience
Many dealerships have extended evening
and Saturday hours to make your service
visit more convenient and they offer one
stop shopping. They can perform any
services that are required on your vehicle,
from general maintenance to collision
repairs.
Note:Not all dealers have extended hours
or body shops. Please contact your dealer
for details.
Protecting Your Investment
Maintenance is an investment that pays
dividends in the form of improved
reliability, durability and resale value. To
maintain the proper performance of your
vehicle and its emission control systems,
make sure you have scheduled
maintenance performed at the designated
intervals.
Diesel Engine
Your vehicle is equipped with the
Intelligent Oil-Life Monitor system, which
displays a message in the information
display at the proper oil change interval.
This interval may be up to one year or
10,000 mi (16,000 km).
319
Scheduled Maintenance
Page 324 of 378
A message appears in the information
display when it is time for an oil change.
Make sure you perform the oil change
within two weeks or 500 mi (800 km) of
the message appearing. Make sure you
reset the Intelligent Oil-Life Monitor after
each oil change. See Instrument Cluster
(page 63).
If your information display resets
prematurely or becomes inoperative, you
should perform the oil change interval at
six months or 5,000 mi (8,000 km) from
your last oil change. Never exceed one year
or 10,000 mi (16,000 km) between oil
change intervals.
All Vehicles
Your vehicle is very sophisticated and built
with multiple, complex, performance
systems. Every manufacturer develops
these systems using different
specifications and performance features.
That is why it is important to rely upon your
dealership to properly diagnose and repair
your vehicle.
Ford Motor Company has recommended
maintenance intervals for various parts
and component systems based upon
engineering testing. Ford Motor Company
relies upon this testing to determine the
most appropriate mileage for replacement
of oils and fluids to protect your vehicle at
the lowest overall cost to you and
recommends against maintenance
schedules that deviate from the scheduled
maintenance information.
We strongly recommend the use of only
genuine Ford, Motorcraft or
Ford-authorized re-manufactured
replacement parts engineered for your
vehicle.Additives and Chemicals
This owner's manual and the Ford
Workshop Manual list the recommended
additives and chemicals for your vehicle.
We do not recommend using chemicals or
additives not approved by us as part of
your vehicle’s normal maintenance. Please
consult your warranty information.
Oils, Fluids and Flushing
In many cases, fluid discoloration is a
normal operating characteristic and, by
itself, does not necessarily indicate a
concern or that the fluid needs to be
changed. However, a qualified expert, such
as the factory-trained technicians at your
dealership, should inspect discolored fluids
that also show signs of overheating or
foreign material contamination
immediately.
Make sure to change your vehicle’s oils and
fluids at the specified intervals or in
conjunction with a repair. Flushing is a
viable way to change fluid for many vehicle
sub-systems during scheduled
maintenance. It is critical that systems are
flushed only with new fluid that is the same
as that required to fill and operate the
system or using a Ford-approved flushing
chemical.
Scheduled Maintenance Services
Maintenance service adjustments must
conform to specifications contained in this
manual, and those shown on the Important
Engine Information decal. Perform the
following services at scheduled intervals
because they essential to the life and
performance of your vehicle. Ford
recommends that you perform
maintenance on all designated items to
achieve best vehicle operation.
320
Scheduled Maintenance