light FORD F750 2002 10.G Owner's Manual
[x] Cancel search | Manufacturer: FORD, Model Year: 2002, Model line: F750, Model: FORD F750 2002 10.GPages: 256, PDF Size: 1.75 MB
Page 66 of 256
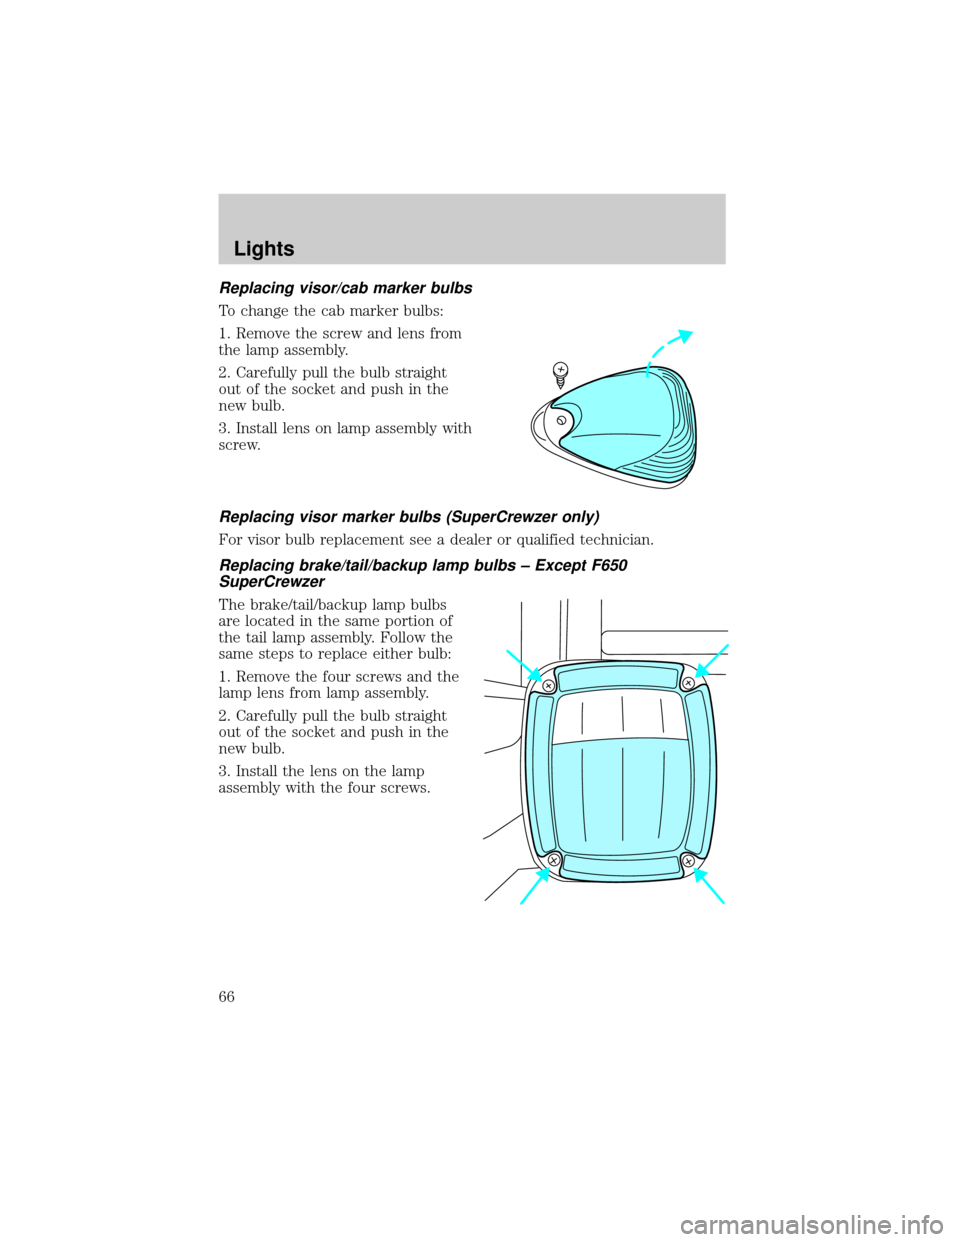
Replacing visor/cab marker bulbs
To change the cab marker bulbs:
1. Remove the screw and lens from
the lamp assembly.
2. Carefully pull the bulb straight
out of the socket and push in the
new bulb.
3. Install lens on lamp assembly with
screw.
Replacing visor marker bulbs (SuperCrewzer only)
For visor bulb replacement see a dealer or qualified technician.
Replacing brake/tail/backup lamp bulbs ± Except F650
SuperCrewzer
The brake/tail/backup lamp bulbs
are located in the same portion of
the tail lamp assembly. Follow the
same steps to replace either bulb:
1. Remove the four screws and the
lamp lens from lamp assembly.
2. Carefully pull the bulb straight
out of the socket and push in the
new bulb.
3. Install the lens on the lamp
assembly with the four screws.
Lights
66
Page 67 of 256
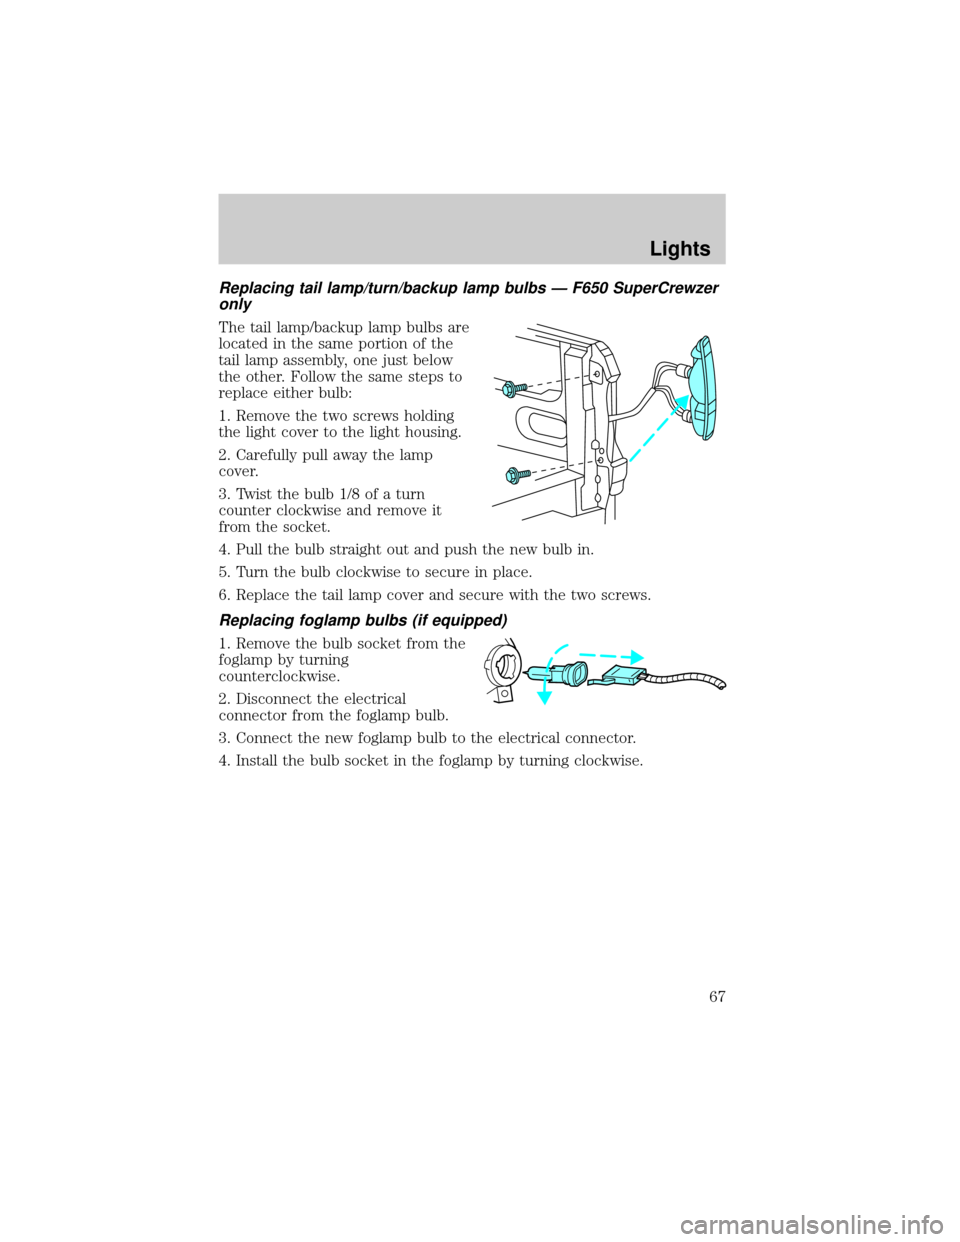
Replacing tail lamp/turn/backup lamp bulbs Ð F650 SuperCrewzer
only
The tail lamp/backup lamp bulbs are
located in the same portion of the
tail lamp assembly, one just below
the other. Follow the same steps to
replace either bulb:
1. Remove the two screws holding
the light cover to the light housing.
2. Carefully pull away the lamp
cover.
3. Twist the bulb 1/8 of a turn
counter clockwise and remove it
from the socket.
4. Pull the bulb straight out and push the new bulb in.
5. Turn the bulb clockwise to secure in place.
6. Replace the tail lamp cover and secure with the two screws.
Replacing foglamp bulbs (if equipped)
1. Remove the bulb socket from the
foglamp by turning
counterclockwise.
2. Disconnect the electrical
connector from the foglamp bulb.
3. Connect the new foglamp bulb to the electrical connector.
4. Install the bulb socket in the foglamp by turning clockwise.
Lights
67
Page 71 of 256

accuracy. Adjustments may need to be made to the zone and calibration
of the compass.
Usually, when something affects the compass readings, the compass will
correct itself after a few days of operating your vehicle in normal
conditions. If the compass still appears to be inaccurate, a manual
calibration may be necessary. Refer toCompass calibration
adjustment.
Most geographic areas (zones) have a magnetic north compass point that
varies slightly from the northerly direction on maps. This variation is four
degrees between adjacent zones and will become noticeable as the
vehicle crosses multiple zones. A correct zone setting will eliminate this
error. Refer toCompass zone adjustment.
Compass zone adjustment
1. Determine which magnetic zone
you are in for your geographic
location by referring to the zone
map.
2. Locate the controls on the
overhead console.
3. Turn ignition to the ON position.
1
2
3
4
5
6
7891011121314 15
Driver Controls
71
Page 72 of 256
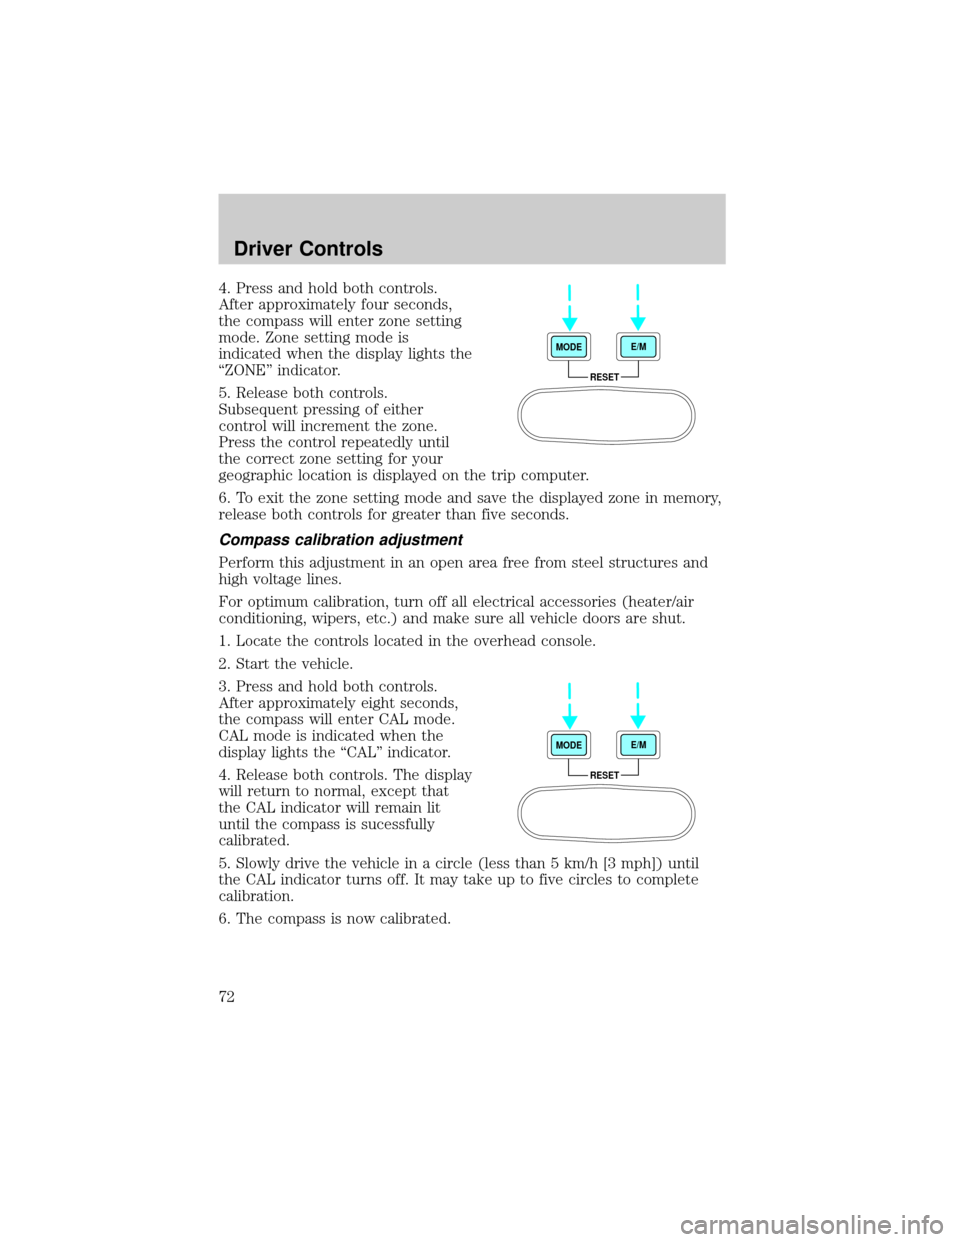
4. Press and hold both controls.
After approximately four seconds,
the compass will enter zone setting
mode. Zone setting mode is
indicated when the display lights the
ªZONEº indicator.
5. Release both controls.
Subsequent pressing of either
control will increment the zone.
Press the control repeatedly until
the correct zone setting for your
geographic location is displayed on the trip computer.
6. To exit the zone setting mode and save the displayed zone in memory,
release both controls for greater than five seconds.
Compass calibration adjustment
Perform this adjustment in an open area free from steel structures and
high voltage lines.
For optimum calibration, turn off all electrical accessories (heater/air
conditioning, wipers, etc.) and make sure all vehicle doors are shut.
1. Locate the controls located in the overhead console.
2. Start the vehicle.
3. Press and hold both controls.
After approximately eight seconds,
the compass will enter CAL mode.
CAL mode is indicated when the
display lights the ªCALº indicator.
4. Release both controls. The display
will return to normal, except that
the CAL indicator will remain lit
until the compass is sucessfully
calibrated.
5. Slowly drive the vehicle in a circle (less than 5 km/h [3 mph]) until
the CAL indicator turns off. It may take up to five circles to complete
calibration.
6. The compass is now calibrated.
RESET MODEE/M
RESET MODEE/M
Driver Controls
72
Page 73 of 256
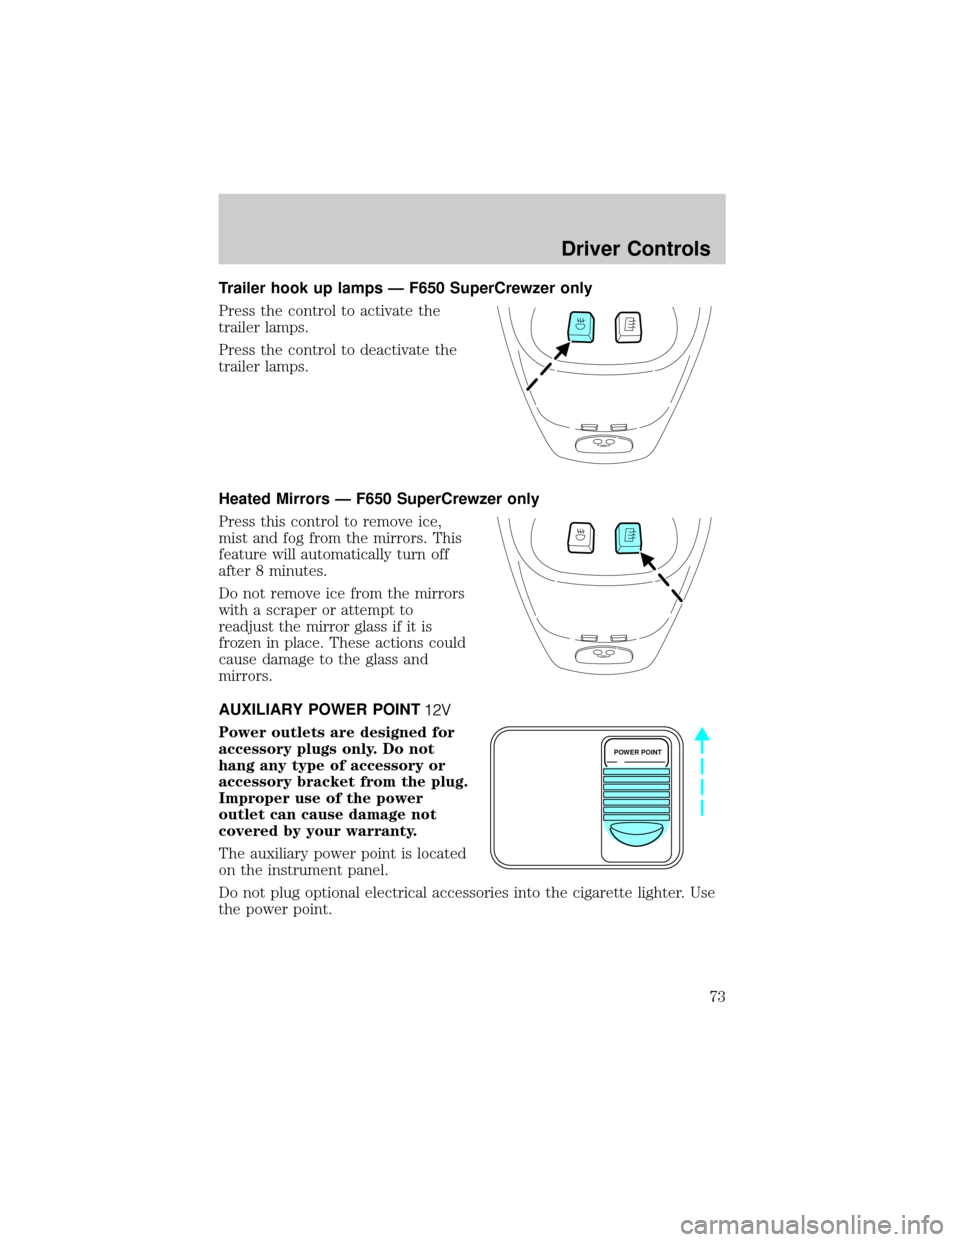
Trailer hook up lamps Ð F650 SuperCrewzer only
Press the control to activate the
trailer lamps.
Press the control to deactivate the
trailer lamps.
Heated Mirrors Ð F650 SuperCrewzer only
Press this control to remove ice,
mist and fog from the mirrors. This
feature will automatically turn off
after 8 minutes.
Do not remove ice from the mirrors
with a scraper or attempt to
readjust the mirror glass if it is
frozen in place. These actions could
cause damage to the glass and
mirrors.
AUXILIARY POWER POINT
Power outlets are designed for
accessory plugs only. Do not
hang any type of accessory or
accessory bracket from the plug.
Improper use of the power
outlet can cause damage not
covered by your warranty.
The auxiliary power point is located
on the instrument panel.
Do not plug optional electrical accessories into the cigarette lighter. Use
the power point.
POWER POINT
Driver Controls
73
Page 85 of 256
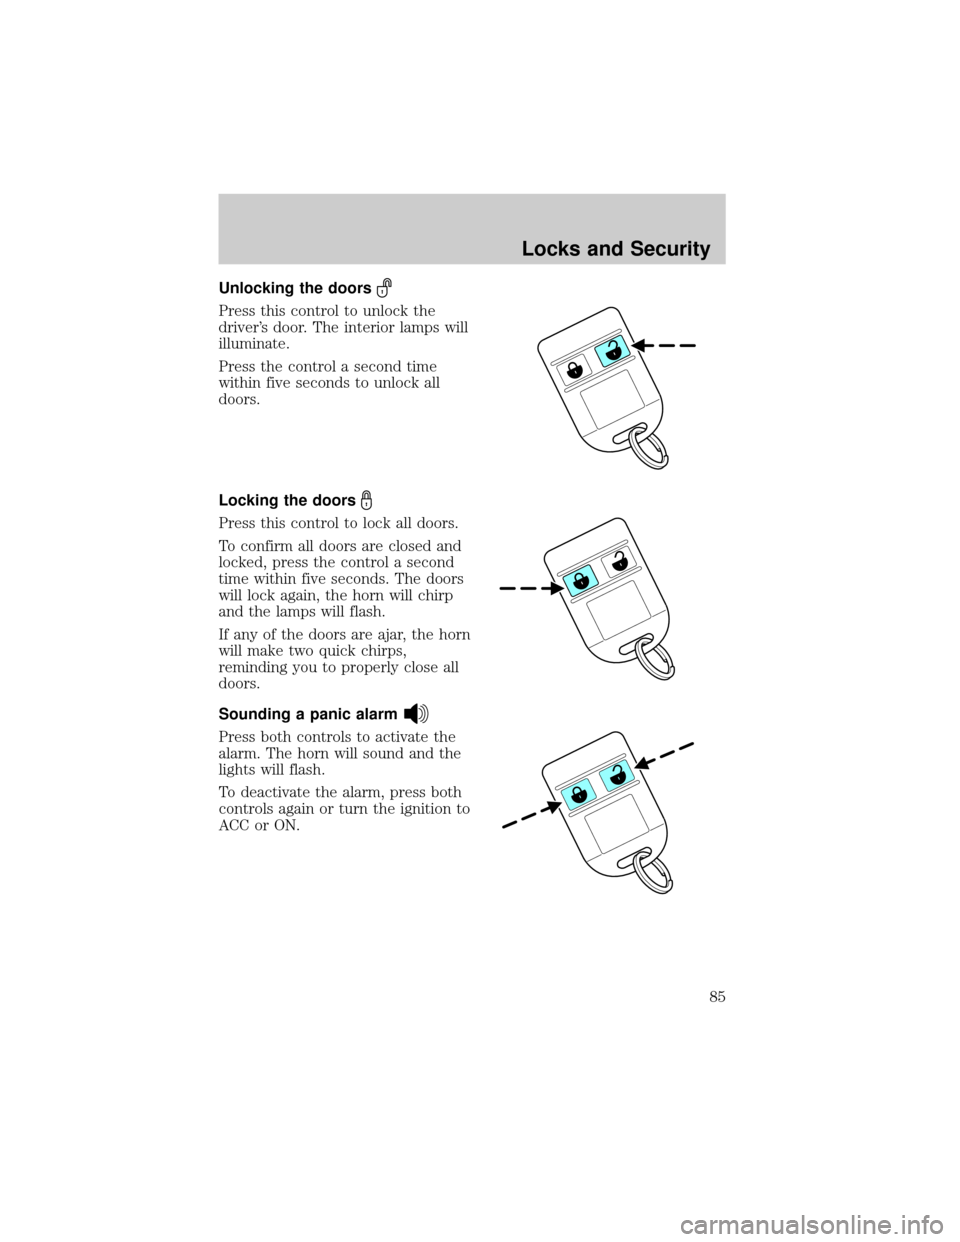
Unlocking the doors
Press this control to unlock the
driver's door. The interior lamps will
illuminate.
Press the control a second time
within five seconds to unlock all
doors.
Locking the doors
Press this control to lock all doors.
To confirm all doors are closed and
locked, press the control a second
time within five seconds. The doors
will lock again, the horn will chirp
and the lamps will flash.
If any of the doors are ajar, the horn
will make two quick chirps,
reminding you to properly close all
doors.
Sounding a panic alarm
Press both controls to activate the
alarm. The horn will sound and the
lights will flash.
To deactivate the alarm, press both
controls again or turn the ignition to
ACC or ON.
Locks and Security
85
Page 87 of 256
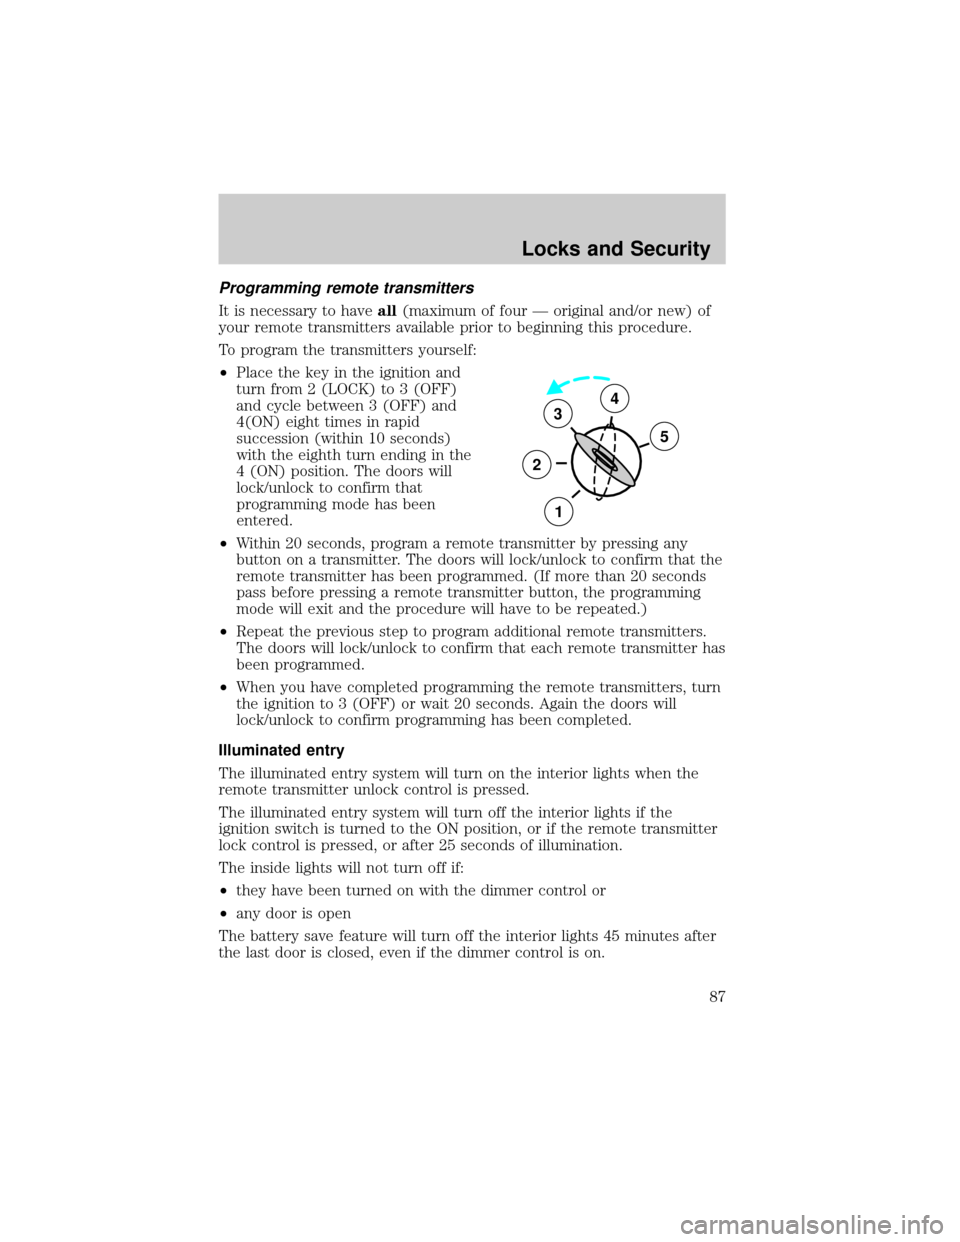
Programming remote transmitters
It is necessary to haveall(maximum of four Ð original and/or new) of
your remote transmitters available prior to beginning this procedure.
To program the transmitters yourself:
²Place the key in the ignition and
turn from 2 (LOCK) to 3 (OFF)
and cycle between 3 (OFF) and
4(ON) eight times in rapid
succession (within 10 seconds)
with the eighth turn ending in the
4 (ON) position. The doors will
lock/unlock to confirm that
programming mode has been
entered.
²Within 20 seconds, program a remote transmitter by pressing any
button on a transmitter. The doors will lock/unlock to confirm that the
remote transmitter has been programmed. (If more than 20 seconds
pass before pressing a remote transmitter button, the programming
mode will exit and the procedure will have to be repeated.)
²Repeat the previous step to program additional remote transmitters.
The doors will lock/unlock to confirm that each remote transmitter has
been programmed.
²When you have completed programming the remote transmitters, turn
the ignition to 3 (OFF) or wait 20 seconds. Again the doors will
lock/unlock to confirm programming has been completed.
Illuminated entry
The illuminated entry system will turn on the interior lights when the
remote transmitter unlock control is pressed.
The illuminated entry system will turn off the interior lights if the
ignition switch is turned to the ON position, or if the remote transmitter
lock control is pressed, or after 25 seconds of illumination.
The inside lights will not turn off if:
²they have been turned on with the dimmer control or
²any door is open
The battery save feature will turn off the interior lights 45 minutes after
the last door is closed, even if the dimmer control is on.
3
2
1
5
4
Locks and Security
87
Page 90 of 256
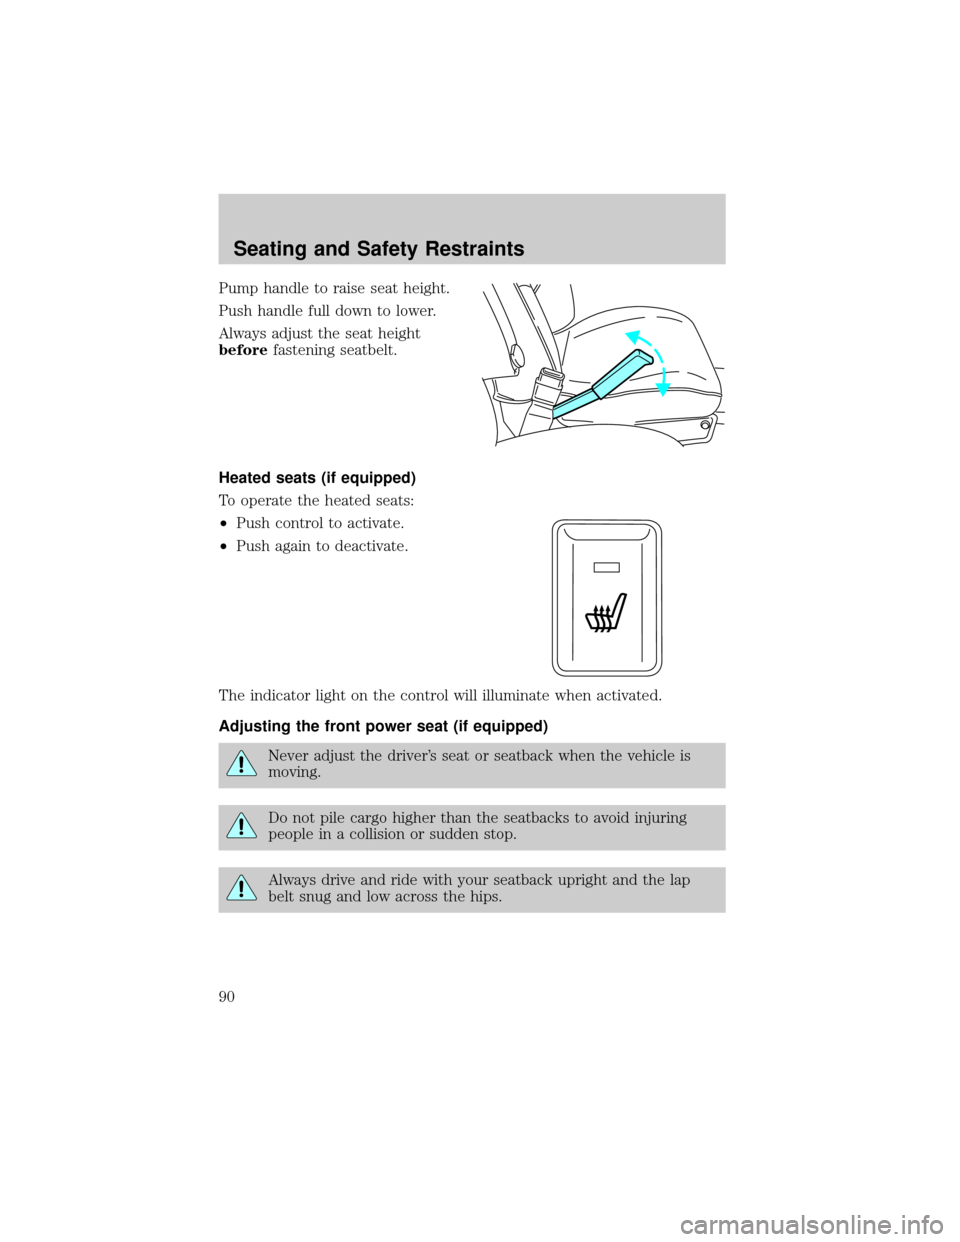
Pump handle to raise seat height.
Push handle full down to lower.
Always adjust the seat height
beforefastening seatbelt.
Heated seats (if equipped)
To operate the heated seats:
²Push control to activate.
²Push again to deactivate.
The indicator light on the control will illuminate when activated.
Adjusting the front power seat (if equipped)
Never adjust the driver's seat or seatback when the vehicle is
moving.
Do not pile cargo higher than the seatbacks to avoid injuring
people in a collision or sudden stop.
Always drive and ride with your seatback upright and the lap
belt snug and low across the hips.
Seating and Safety Restraints
90
Page 97 of 256
Lap belts
Adjusting the center lap belt
The lap belt does not adjust automatically.
The lap belt should fit snugly and as low as possible around the
hips, not across the waist.
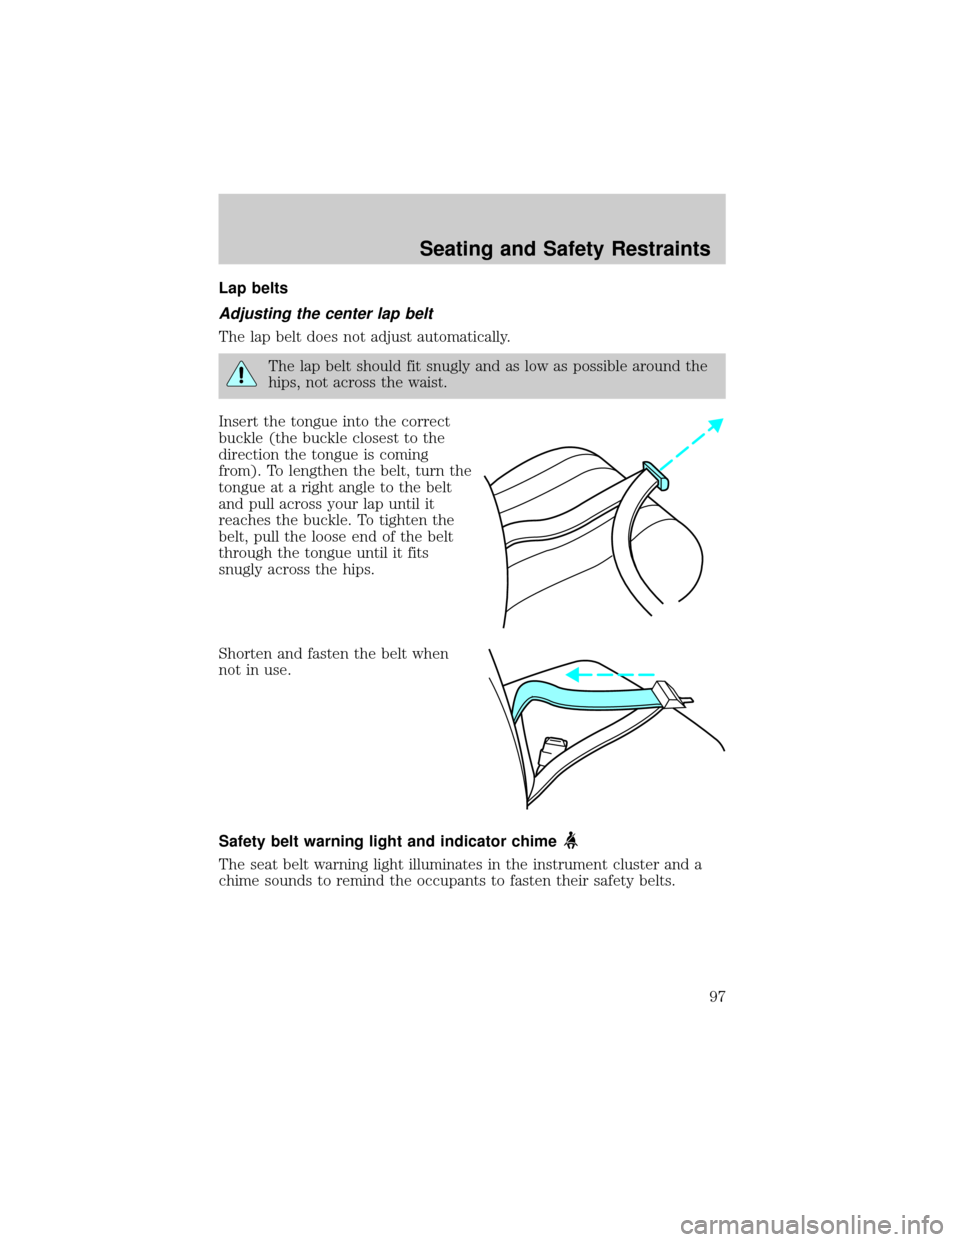
Insert the tongue into the correct
buckle (the buckle closest to the
direction the tongue is coming
from). To lengthen the belt, turn the
tongue at a right angle to the belt
and pull across your lap until it
reaches the buckle. To tighten the
belt, pull the loose end of the belt
through the tongue until it fits
snugly across the hips.
Shorten and fasten the belt when
not in use.
Safety belt warning light and indicator chime
The seat belt warning light illuminates in the instrument cluster and a
chime sounds to remind the occupants to fasten their safety belts.
Seating and Safety Restraints
97
Page 98 of 256
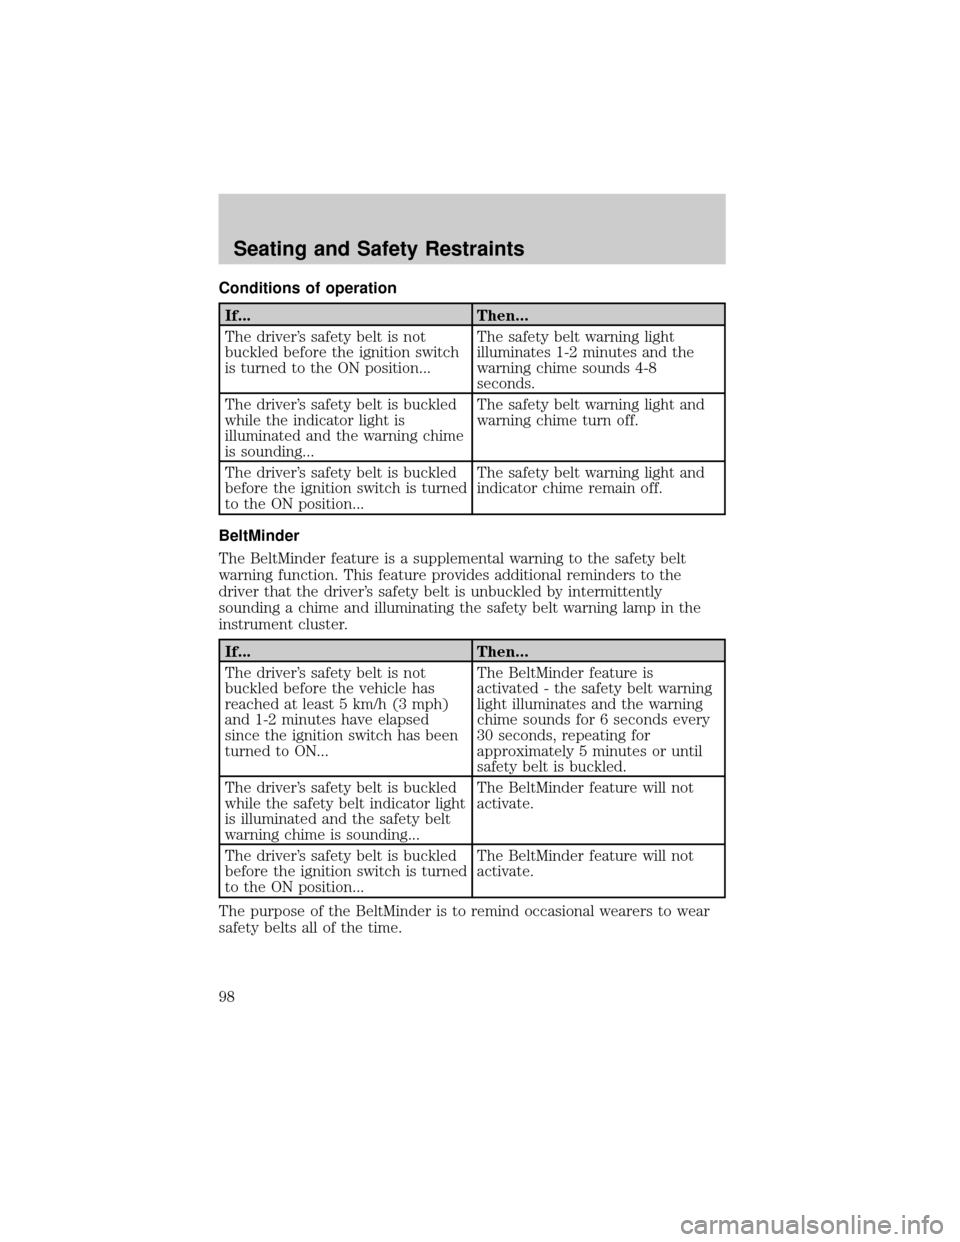
Conditions of operation
If... Then...
The driver's safety belt is not
buckled before the ignition switch
is turned to the ON position...The safety belt warning light
illuminates 1-2 minutes and the
warning chime sounds 4-8
seconds.
The driver's safety belt is buckled
while the indicator light is
illuminated and the warning chime
is sounding...The safety belt warning light and
warning chime turn off.
The driver's safety belt is buckled
before the ignition switch is turned
to the ON position...The safety belt warning light and
indicator chime remain off.
BeltMinder
The BeltMinder feature is a supplemental warning to the safety belt
warning function. This feature provides additional reminders to the
driver that the driver's safety belt is unbuckled by intermittently
sounding a chime and illuminating the safety belt warning lamp in the
instrument cluster.
If... Then...
The driver's safety belt is not
buckled before the vehicle has
reached at least 5 km/h (3 mph)
and 1-2 minutes have elapsed
since the ignition switch has been
turned to ON...The BeltMinder feature is
activated - the safety belt warning
light illuminates and the warning
chime sounds for 6 seconds every
30 seconds, repeating for
approximately 5 minutes or until
safety belt is buckled.
The driver's safety belt is buckled
while the safety belt indicator light
is illuminated and the safety belt
warning chime is sounding...The BeltMinder feature will not
activate.
The driver's safety belt is buckled
before the ignition switch is turned
to the ON position...The BeltMinder feature will not
activate.
The purpose of the BeltMinder is to remind occasional wearers to wear
safety belts all of the time.
Seating and Safety Restraints
98