light FORD F750 2002 10.G Workshop Manual
[x] Cancel search | Manufacturer: FORD, Model Year: 2002, Model line: F750, Model: FORD F750 2002 10.GPages: 256, PDF Size: 1.75 MB
Page 167 of 256

In some states (in the U.S.) you must directly notify Ford in writing
before pursuing remedies under your state's warranty laws. Ford is also
allowed a final repair attempt in some states.
In the United States, a warranty dispute must be submitted to the
Dispute Settlement Board before taking action under the Magnuson-Moss
Warranty Act, or to the extent allowed by state law, before pursuing
replacement or repurchase remedies provided by certain state laws. This
dispute handling procedure is not required prior to enforcing state
created rights or other rights which are independent of the
Magnuson-Moss Warranty Act or state replacement or repurchase laws.
THE DISPUTE SETTLEMENT BOARD (U.S. ONLY)
The Dispute Settlement Board is:
²an independent, third-party arbitration program for warranty disputes
²available free to owners and lessees of qualifying Ford Motor Company
vehicles
The Dispute Settlement Board may not be available in all states. Ford
Motor Company reserves the right to change eligibility limitations, modify
procedures and/or to discontinue this service without notice and without
incurring obligations per applicable state law.
What kinds of cases does the Board review?
Unresolved warranty repair concerns or vehicle performance concerns as
on Ford and Lincoln Mercury cars and Ford and Lincoln Mercury light
trucks which are within the terms of any applicable written new vehicle
warranty are eligible for review, except those involving:
²a non-Ford product
²a non-Ford dealership
²sales disputes between customer and dealer except those associated
with warranty repairs or concerns with the vehicle's performance as
designed
²a request for reimbursement of consequential expenses unless a
service or product concern is being reviewed
²items not covered by the New Vehicle Limited Warranty (including
maintenance and wear items)
²alleged personal injury/property damage claims
²cases currently in litigation
Customer Assistance
167
Page 174 of 256
WASHING THE EXTERIOR OF YOUR VEHICLE
Never wash a vehicle that is ªhot to
the touchº or during exposure to
strong, direct sunlight. It is
recommended that you wash your
vehicle regularly with cool or
lukewarm water and a neutral Ph
shampoo, such as Detail Wash
(ZC-3±A), which is available from
your authorized Ford, Lincoln or
Mercury dealer. Always use a clean
sponge or carwash mitt with plenty
of water for best results. Dry the vehicle with a chamois or soft terry
cloth towel in order to eliminate water spotting.
Never use strong household detergents or soap, such as dish
washing or laundry liquid. These products can discolor and spot
painted surfaces.
It is especially important to wash the vehicle regularly during winter
months, as dirt and road salt are difficult to remove and do cause
damage to the vehicle.
Items such as gasoline, diesel fuel, bird droppings and insect deposits
should be washed and sponged off as soon as possible. Deposits not
removed promptly can cause damage to the vehicle's paintwork and trim
over time.
Remove any exterior accessories, such as antennas, before
entering a car wash.
PROTECTING THE PAINT FINISH OF YOUR VEHICLE
Applying a polymer paint sealant to your vehicle on a regular basis will
assist in reducing minor scratches and paint damage.
A typical paint sealant lasts approximately six months to a year,
depending on local weather conditions and the cleaning soap that is used
in washing the vehicle.
Do not use a wax that beads excessively.
Do not allow paint sealant to come in contact with any non-body
(low-gloss black) colored trim, such as grained door handles, roof
racks, bumpers, side moldings, mirror housings or the windshield
cowl area. The paint sealant will ªgrayº or stain the parts over time.
Cleaning
174
Page 176 of 256
CLEANING THE ENGINE
Engines are more efficient when they are clean because grease and dirt
buildup keep the engine warmer than normal. When washing:
²The engine must be cool to the touch before spraying with water.
²Never spray a hot engine with cold water, as damage to the
engine block or engine components may occur.
²Use caution when using a self-serve power washer (1000psi maximum
pressure) to clean the engine, as the high-pressure fluid could
penetrate the sealed parts and cause damage.
²Never apply anything to any exposed belts in the engine
compartment, including belt dressing.
For general cleaning of the engine and engine compartment, spray
Engine Shampoo and Degreaser (F4AZ-19A536±A) on all parts that
require cleaning and pressure rinse the area with cool water.
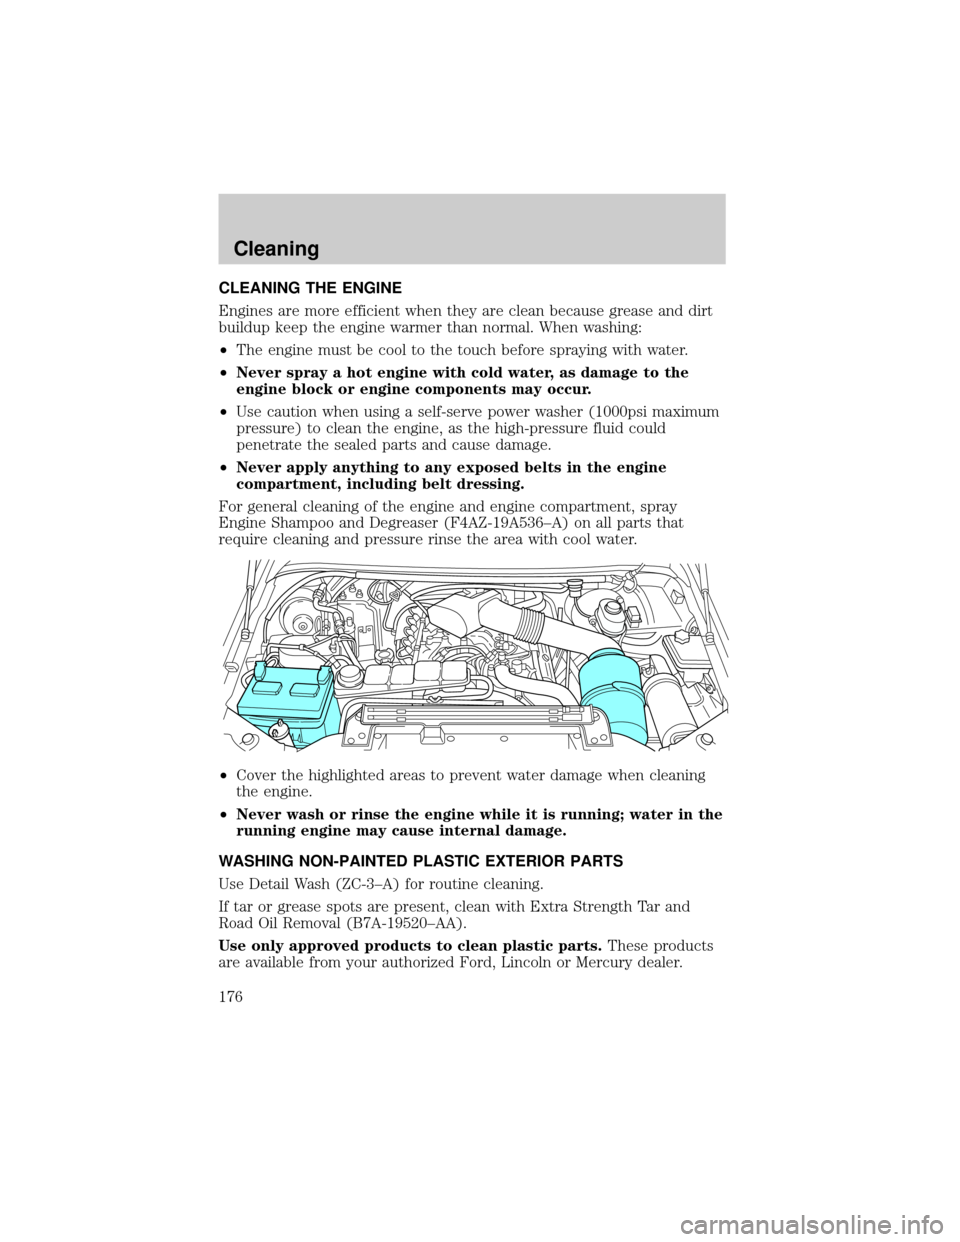
²Cover the highlighted areas to prevent water damage when cleaning
the engine.
²Never wash or rinse the engine while it is running; water in the
running engine may cause internal damage.
WASHING NON-PAINTED PLASTIC EXTERIOR PARTS
Use Detail Wash (ZC-3±A) for routine cleaning.
If tar or grease spots are present, clean with Extra Strength Tar and
Road Oil Removal (B7A-19520±AA).
Use only approved products to clean plastic parts.These products
are available from your authorized Ford, Lincoln or Mercury dealer.
Cleaning
176
Page 178 of 256
Do not use chemical solvents or strong detergents when cleaning
the steering wheel or instrument panel to avoid contamination of
the air bag system.
Cleaning the instrument cluster lens
Wipe the cluster area with a soft, damp cotton towel. Dry the area with a
clean, dry towel.
CLEANING THE INTERIOR FABRIC, CARPETS AND CLOTH SEATS
Remove dust and loose dirt with a vacuum cleaner. Remove light stains
and soil with Extra Strength Upholstery Cleaner (E8AZ-19523±AA).
Never saturate the seat covers with cleaning solution.
Do not use household cleaning products or glass cleaners, which
can stain and discolor the fabric and affect the flame retardent
abilities of the seat materials.
If grease or tar is present on the material, spot-clean the area first with
Spot and Stain Remover (F3AZ-19521±WA). Follow up by recleaning the
area with Extra Strength Upholstery Cleaner (E8AZ-19523±AA).
CLEANING LEATHER SEATS (IF EQUIPPED)
All Ford, Lincoln and Mercury vehicles with leather seating surfaces have
a clear, protective coating over the leather.
To clean the leather seats, simply use a soft cloth with Deluxe Leather
and Vinyl Cleaner (F2AZ-19521±WA). Dry the area with a soft cloth.
It is recommended that you use the Deluxe Leather Care Kit
(F8AZ-19G253±AA), available from your authorized Ford, Lincoln or
Mercury dealer. The mild cleaner and special pad available in the kit
cleans the leather and maintains its natural beauty. For best results,
follow the instructions printed on the cleaner label. Regular cleaning of
your leather upholstery helps maintain its resiliency and color.
Do not use household cleaning products, alcohol solutions,
solvents or cleaners intended for rubber, vinyl and plastics, or
oil/petroleum-based leather conditioners. These products may
cause premature wearing of the clear, protective coating.
Cleaning
178
Page 188 of 256
Motorcraft maintenance-free batteries do not normally require adding
additional water. However, for severe usage or in high temperature
climates, check the battery electrolyte levels. Refer to the Scheduled
Maintenance Guide for the service interval schedules.
Keep the electrolyte level in each cell up to the ªlevel indicatorº.
Do not overfill the battery cells.
If the electrolyte level in the battery is low, you can add plain tap water
to the battery, as long as you do not use hard water (water with a high
mineral or alkali content). If possible, however, try to only fill the battery
cells with distilled water. If the battery needs water often, have the
charging system checked.
Make sure the battery cover/shield is reinstalled after the battery
has been cleaned or replaced.
For longer, trouble-free operation, keep the top of the batteries clean
and dry. Also, make certain the battery cables are always tightly fastened
to the battery terminals.
If you see any corrosion on the battery or terminals, remove the cables
from the terminals and clean with a wire brush. You can neutralize the
acid with a solution of baking soda and water.
Batteries normally produce explosive gases which can cause
personal injury. Therefore, do not allow flames, sparks or lighted
substances to come near the battery. When working near the battery,
always shield your face and protect your eyes. Always provide proper
ventilation.
When lifting a plastic-cased battery, excessive pressure on the
end walls could cause acid to flow through the vent caps,
resulting in personal injury and/or damage to the vehicle or battery.
Lift the battery with a battery carrier or with your hands on opposite
corners.
Maintenance and Specifications
188
Page 192 of 256
²Do not add extra inhibitors or additives to the coolant.These
can be harmful and compromise the corrosion protection of the engine
coolant.
²Do not mix with recycled coolant unless from a Ford-approved
recycling process (seeUse of Recycled Engine Coolantsection).
For vehicles with overflow coolant systems with a non-pressurized cap
on the coolant recovery system, add coolant to the coolant recovery
reservoir when the engine is cool. Add the proper mixture of coolant and
water to the ªcold fullº level. For all other vehicles, which have a coolant
degas system with a pressurized cap, or if it is necessary to remove the
coolant pressure relief cap on the radiator of a vehicle with an overflow
system, follow these steps to add engine coolant.
To avoid personal injury, make sure the engine is cool before
unscrewing the coolant pressure relief cap. The cooling system is
under pressure; steam and hot liquid can come out forcefully when the
cap is loosened slightly.
1. Before you begin, turn the engine off and let it cool.
2. When the engine is cool, wrap a thick cloth around the coolant
pressure relief cap on the coolant reservoir (an opaque plastic bottle).
Slowly turn cap counterclockwise (left) until pressure begins to release.
3. Step back while the pressure releases.
4. When you are sure that all the pressure has been released, use the
cloth to turn it counterclockwise and remove the cap.
5. Fill the coolant reservoir slowly with the proper coolant mixture (see
above), to within the ªcold fill rangeº or the ªcold fullº level on the
reservoir. If you removed the radiator cap in an overflow system, fill the
radiator until the coolant is visible and radiator is almost full.
6. Replace the cap. Turn until tightly installed. (Cap must be tightly
installed to prevent coolant loss.)
After any coolant has been added, check the coolant concentration see
Checking Engine Coolant section). If the concentration is not 50/50
(protection to ±34É F/±36É C), drain some coolant and adjust the
concentration. It may take several drains and additions to obtain a 50/50
coolant concentration.
Whenever coolant has been added, the coolant level in the coolant
reservoir should be checked the next few times you drive the vehicle. If
Maintenance and Specifications
192
Page 203 of 256
the full amount of the advertised capacity of the fuel tank due to
the empty reserve still present in the tank.
Your vehicle may be equipped with dual fuel tanks. If so, you will have a
selector control. For information on the Dual Fuel Tank Selector Control
refer to theDriving Tipssection in the7.3 Liter Power Stroke Direct
Injection Turbo Diesel Owner's Guide Supplement.
Filling the tank
For consistent results:
²Use the same fill rate setting (low Ð medium Ð high) each time
during filling.
²Allow three automatic click-offs when filling.
²Always use fuel of a known quality, preferably a national brand.
²Have the vehicle loading and distribution the same every time.
²When refueling a vehicle equipped with dual fuel tanks, if the two
tanks are not filled equally, the fuel gauge reading may fluctuate
slightly until the fuel level between the two tanks balance out and
become equal.
Your results will be most accurate if your filling method is consistent.
Note:For vehicles equipped with dual fuel tanks, engine performance
may degrade if fuel is not added to both tanks when refueling.
Calculating fuel economy
1. Fill the fuel tank(s) completely and record the initial odometer
reading (in kilometers or miles).
2. Each time you fill the tank(s), record the amount of fuel added (in
liters or gallons).
3. After at least three to five tank fill-ups, fill the fuel tank(s) and record
the current odometer reading.
4. Subtract your initial odometer reading from the current odometer
reading.
5. Follow one of the simple calculations in order to determine fuel
economy:
²Multiply liters used by 100, then divide by total kilometers traveled.
²Divide total miles traveled by total gallons used.
Maintenance and Specifications
203
Page 217 of 256
A wheel or tire of the wrong size or type may adversely affect
such things as load carrying capacity, wheel and bearing life,
brake cooling, speedometer/odometer calibration, stopping ability,
headlight aim, bumper height, vehicle ground clearance and tire or tire
chain clearance to the body and chassis.
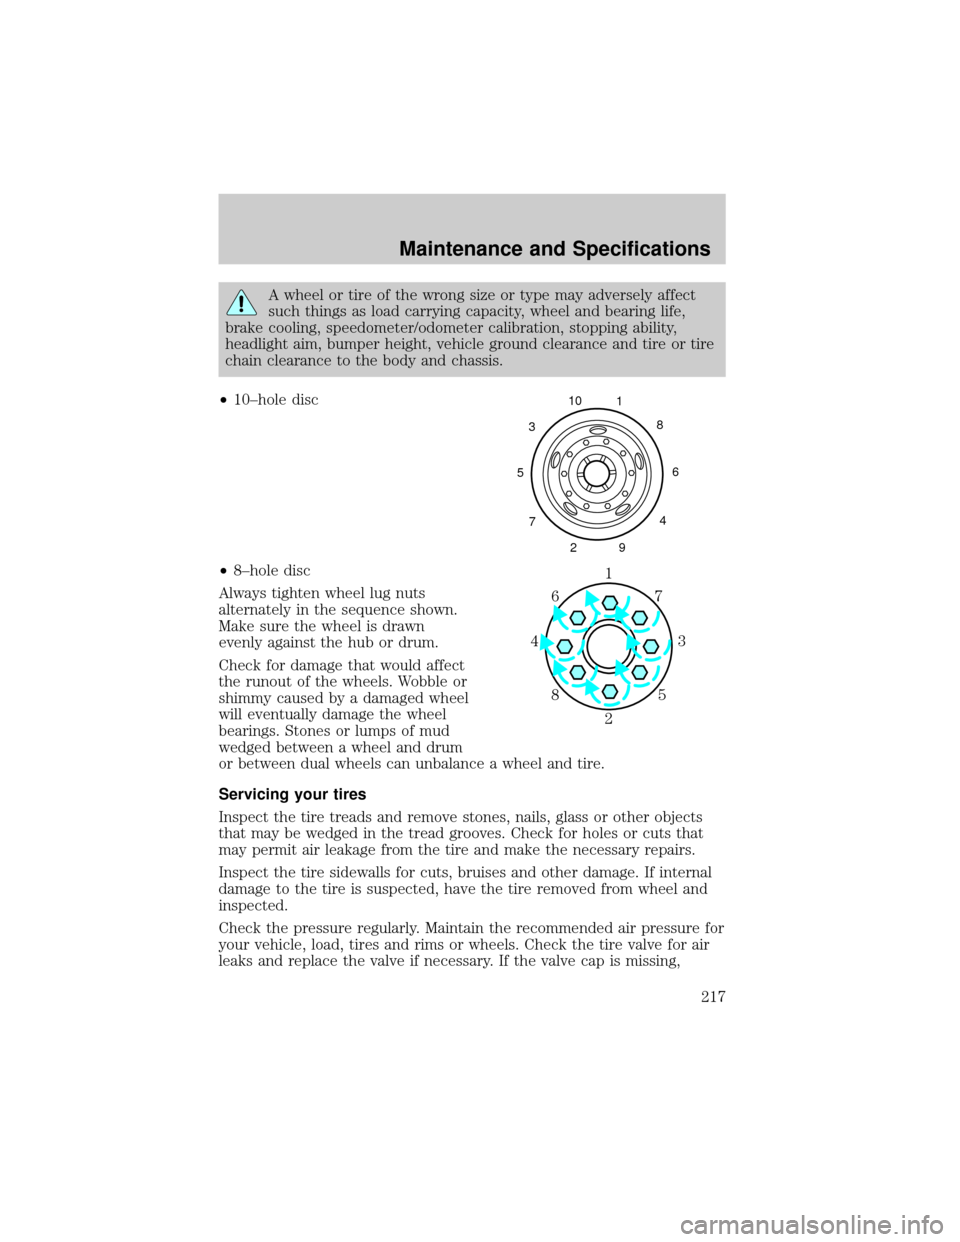
²10±hole disc
²8±hole disc
Always tighten wheel lug nuts
alternately in the sequence shown.
Make sure the wheel is drawn
evenly against the hub or drum.
Check for damage that would affect
the runout of the wheels. Wobble or
shimmy caused by a damaged wheel
will eventually damage the wheel
bearings. Stones or lumps of mud
wedged between a wheel and drum
or between dual wheels can unbalance a wheel and tire.
Servicing your tires
Inspect the tire treads and remove stones, nails, glass or other objects
that may be wedged in the tread grooves. Check for holes or cuts that
may permit air leakage from the tire and make the necessary repairs.
Inspect the tire sidewalls for cuts, bruises and other damage. If internal
damage to the tire is suspected, have the tire removed from wheel and
inspected.
Check the pressure regularly. Maintain the recommended air pressure for
your vehicle, load, tires and rims or wheels. Check the tire valve for air
leaks and replace the valve if necessary. If the valve cap is missing,
5310
1
8
6
4
9 2 7
1
3 4
27 6
5 8
Maintenance and Specifications
217
Page 237 of 256
Daily Owner Checks Engine system
Check the air filter restriction indicator
Check the engine oil
Inspect the coolant level - for Powerstroke
engine (for Caterpillar and Cummins engines,
refer to the Owner's Manual)
Brake system
Drain the air brake system reservoir - manual
valve
Check the air brake system reservoir
automatic drain valve operation
Transmission system
Visually check the automatic transmission for
fluid leakage
Steering system
Check the power steering pump fluid level and
check the system for leaks
Check the entire vehicle for evidence of fluid
leaks
U.S. Department of Transportation,
Federal Highway Administration
requirements (ensure that the entire
system is functioning properly)
Check the service brakes
Check the parking brake
Check the steering mechanism
Check the lighting devices and reflectors
Check the tires
Check the horn
Check the windshield wipers
Check the rear vision mirrors
Check the wheels and rims
Check the emergency equipment
General Maintenance Information
237
Page 249 of 256

A
Air cleaner filter .......................211
Air conditioning
manual heating and air
conditioning system .................57
Audio system
(see Radio) ..........20, 25, 31, 39±40
Automatic transmission ............132
Auxiliary power point .................73
B
Battery .......................................187
jumping a disabled battery ....164
voltage gauge ............................18
BeltMinder ...................................98
Brakes ................................113, 119
anti-lock ...................114±115, 121
anti-lock brake system
(ABS) warning light ...11±12, 114
brake warning light ............11±12
fluid, checking and adding ....208
parking ....................115, 118, 122
trailer .......................................124
C
CD-6 disc .....................................40
CD-single premium .....................31
Child safety restraints ..............102
child safety belts ....................102
Child safety seats ......................103
attaching with tether straps ..107
in front seat ............................105
in rear seat ..............................105
tether anchorage hardware ...107Cleaning your vehicle
engine compartment ..............176
exterior ....................................179
instrument cluster lens ..........178
instrument panel ....................177
interior .....................................178
plastic parts ............176±177, 179
safety belts ..............................179
washing ....................................174
waxing .....................................174
wheels ......................................175
windows ..................................179
wiper blades ............................177
Climate control (see Air
conditioning or Heating) ......56±57
Clock ..........................23, 28, 36, 44
Clutch ........................................207
fluid ..........................................206
Compass, electronic ....................70
calibration .................................72
set zone adjustment .................71
Console
overhead ....................................70
Controls
power seat .................................90
Coolant ......................................189
refill capacities ........................194
Cruise control (see Speed
control) ........................................77
Customer Assistance ................150
Ford accessories for your
vehicle .....................................180
Getting assistance outside
the U.S. and Canada ..............170
Getting roadside assistance ...150
Getting the service
you need .................................165
Index
249