drain bolt FORD FESTIVA 1991 Owner's Manual
[x] Cancel search | Manufacturer: FORD, Model Year: 1991, Model line: FESTIVA, Model: FORD FESTIVA 1991Pages: 454, PDF Size: 9.53 MB
Page 383 of 454
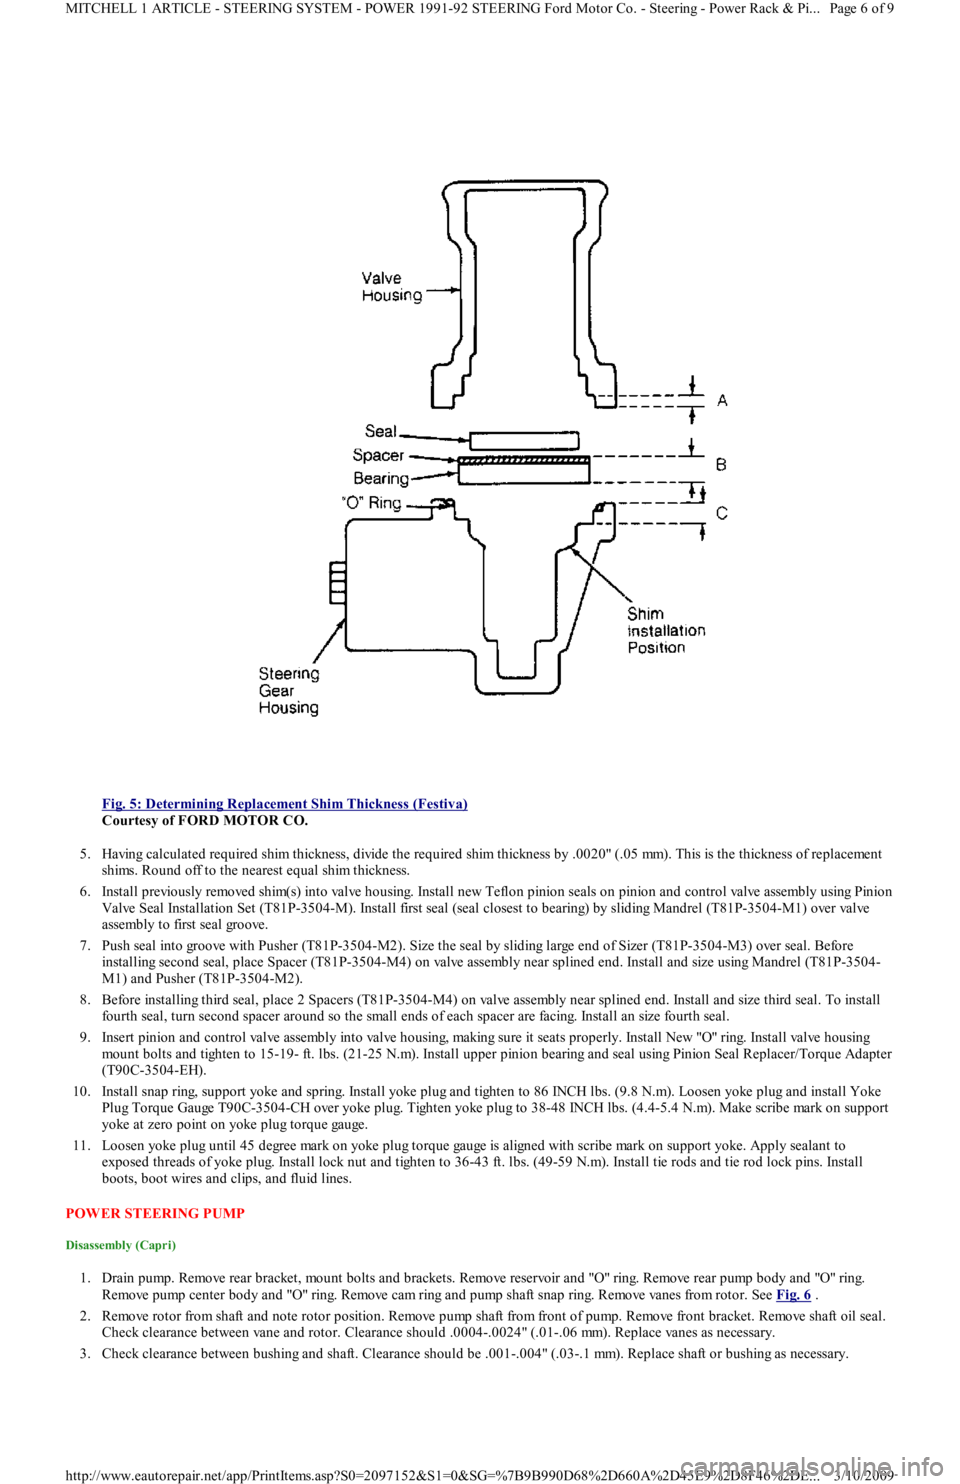
Fig. 5: Determining Replacement Shim Thickness (Festiva)
Courtesy of FORD MOTOR CO.
5. Having calculated required shim thickness, divide the required shim thickness by .0020" (.05 mm). This is the thickness of replacement
shims. Round off to the nearest equal shim thickness.
6. Install previously removed shim(s) into valve housing. Install new Teflon pinion seals on pinion and control valve assembly using Pinion
Valve Seal Installation Set (T81P-3504-M). Install first seal (seal closest to bearing) by sliding Mandrel (T81P-3504-M1) over va l ve
assembly to first seal groove.
7. Push seal into groove with Pusher (T81P-3504-M2). Size the seal by sliding large end of Sizer (T81P-3504-M3) over seal. Before
installing second seal, place Spacer (T81P-3504-M4) on valve assembly near splined end. Install and size using Mandrel (T81P-3504-
M1) and Pusher (T81P-3504-M2).
8. Before installing third seal, place 2 Spacers (T81P-3504-M4) on valve assembly near splined end. Install and size third seal. To install
fourth seal, turn second spacer around so the small ends of each spacer are facing. Install an size fourth seal.
9. Insert pinion and control valve assembly into valve housing, making sure it seats properly. Install New "O" ring. Install valve h o u sin g
mount bolts and tighten to 15-19- ft. lbs. (21-25 N.m). Install upper pinion bearing and seal using Pinion Seal Replacer/Torque Adapter
(T90C-3504-EH).
10. Install snap ring, support yoke and spring. Install yoke plug and tighten to 86 INCH lbs. (9.8 N.m). Loosen yoke plug and install Yoke
Plug Torque Gauge T90C-3504-CH over yoke plug. Tighten yoke plug to 38-48 INCH lbs. (4.4-5.4 N.m). Make scribe mark on support
yoke at zero point on yoke plug torque gauge.
11. Loosen yoke plug until 45 degree mark on yoke plug torque gauge is aligned with scribe mark on support yoke. Apply sealant to
exposed threads of yoke plug. Install lock nut and tighten to 36-43 ft. lbs. (49-59 N.m). Install tie rods and tie rod lock pins. Install
boots, boot wires and clips, and fluid lines.
POWER STEERING PUMP
Disassembly (Capri)
1. Drain pump. Remove rear bracket, mount bolts and brackets. Remove reservoir and "O" ring. Remove rear pump body and "O" ring.
Remove pump center body and "O" ring. Remove cam ring and pump shaft snap ring. Remove vanes from rotor. See Fig. 6
.
2. Remove rotor from shaft and note rotor position. Remove pump shaft from front of pump. Remove front bracket. Remove shaft oil seal.
Check clearance between vane and rotor. Clearance should .0004-.0024" (.01-.06 mm). Replace vanes as necessary.
3. Check clearance between bushing and shaft. Clearance should be .001-.004" (.03-.1 mm). Replace shaft or bushing as necessary.
Page 6 of 9 MITCHELL 1 ARTICLE - STEERING SYSTEM - POWER 1991-92 STEERING Ford Motor Co. - Steering - Power Rack & Pi
...
3/10/2009 http://www.eautorepair.net/app/PrintItems.asp?S0=2097152&S1=0&SG=%7B9B990D68%2D660A%2D45E9%2D8F46%2DE
...
Page 409 of 454
Back To Article
1988-94 AUT OMAT IC T RANSMISSIONS
Ford ATX Overhaul
APPLICATION
APPLICATION
DESCRIPTION
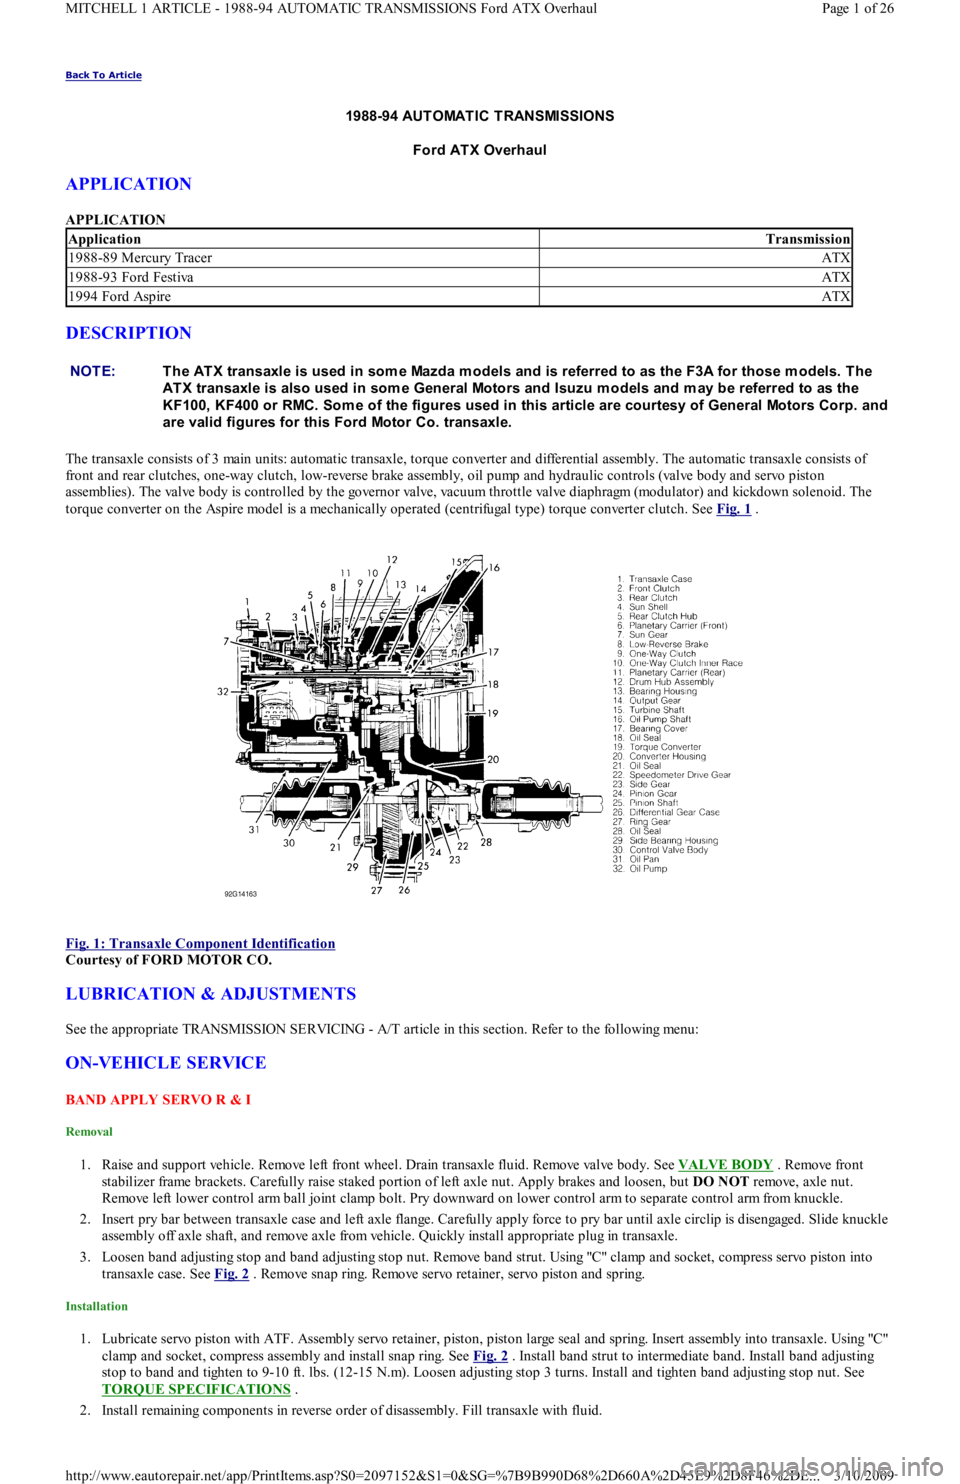
The transaxle consists of 3 main units: automatic transaxle, torque converter and differential assembly. The automatic transaxle consists of
front and rear clutches, one-way clutch, low-reverse brake assembly, oil pump and hydraulic controls (valve body and servo piston
assemblies). The valve body is controlled by the governor valve, vacuum throttle valve diaphragm (modulator) and kickdown solenoid. The
torque converter on the Aspire model is a mechanically operated (centrifugal type) torque converter clutch. See Fig. 1
.
Fig. 1: Transaxle Component Identification
Courtesy of FORD MOTOR CO.
LUBRICATION & ADJUSTMENTS
See the appropriate TRANSMISSION SERVICING - A/T article in this section. Refer to the following menu:
ON-VEHICLE SERVICE
BAND APPLY SERVO R & I
Removal
1. Raise and support vehicle. Remove left front wheel. Drain transaxle fluid. Remove valve body. See VALVE BODY . Remove front
stabilizer frame brackets. Carefully raise staked portion of left axle nut. Apply brakes and loosen, but DO NOT remove, axle nut.
Remove left lower control arm ball joint clamp bolt. Pry downward on lower control arm to separate control arm from knuckle.
2. Insert pry bar between transaxle case and left axle flange. Carefully apply force to pry bar until axle circlip is disengaged. Slide knuckle
assembly off axle shaft, and remove axle from vehicle. Quickly install appropriate plug in transaxle.
3. Loosen band adjusting stop and band adjusting stop nut. Remove band strut. Using "C" clamp and socket, compress servo piston into
transaxle case. See Fig. 2
. Remove snap ring. Remove servo retainer, servo piston and spring.
Installation
1. Lubricate servo piston with ATF. Assembly servo retainer, piston, piston large seal and spring. Insert assembly into transaxle. Usin g "C"
clamp and socket, compress assembly and install snap ring. See Fig. 2
. Install band strut to intermediate band. Install band adjusting
stop to band and tighten to 9-10 ft. lbs. (12-15 N.m). Loosen adjusting stop 3 turns. Install and tighten band adjusting stop nut. See
TORQUE SPECIFICATIONS
.
2. Install remaining components in reverse order of disassembly. Fill transaxle with fluid.
ApplicationTransmission
1988-89 Mercury TracerATX
1988-93 Ford FestivaATX
1994 Ford AspireATX
NOTE:T he AT X transaxle is used in som e Mazda m odels and is referred to as the F3A for those m odels. T he
AT X transaxle is also used in som e General Motors and Isuzu m odels and m ay be referred to as the
KF100, KF400 or RMC. Som e of the figures used in this article are courtesy of General Motors Corp. and
are valid figures for this Ford Motor Co. transaxle.
Page 1 of 26 MITCHELL 1 ARTICLE - 1988-94 AUTOMATIC TRANSMISSIONS Ford ATX Overhaul
3/10/2009 http://www.eautorepair.net/app/PrintItems.asp?S0=2097152&S1=0&SG=%7B9B990D68%2D660A%2D45E9%2D8F46%2DE
...
Page 410 of 454
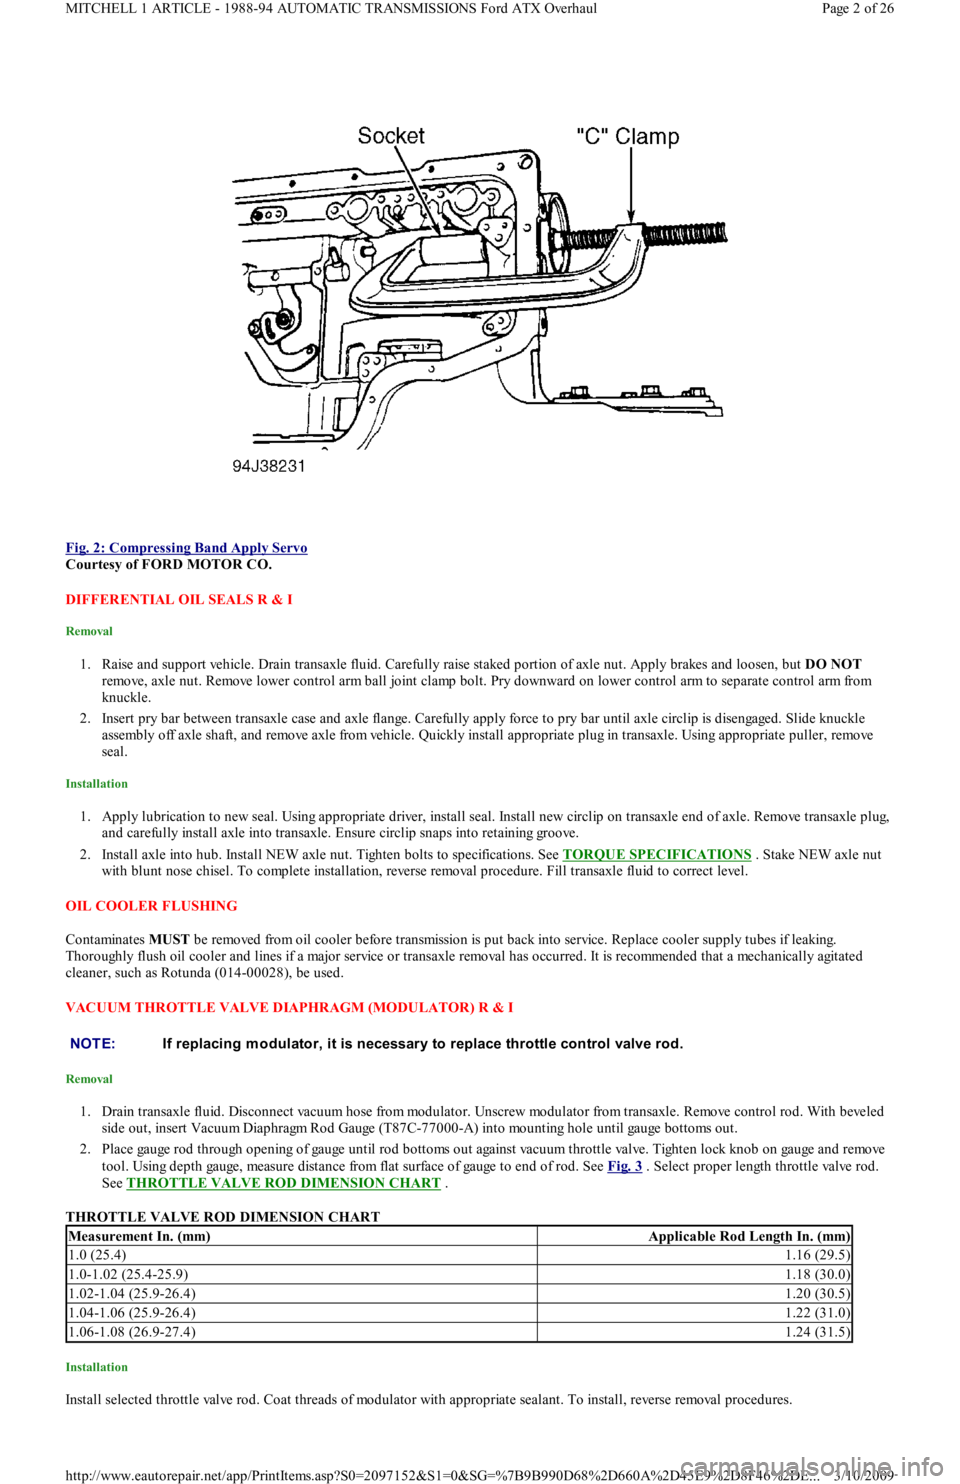
Fig. 2: Compressing Band Apply Servo
Courtesy of FORD MOTOR CO.
DIFFERENTIAL OIL SEALS R & I
Removal
1. Raise and support vehicle. Drain transaxle fluid. Carefully raise staked portion of axle nut. Apply brakes and loosen, but DO NOT
remove, axle nut. Remove lower control arm ball joint clamp bolt. Pry downward on lower control arm to separate control arm from
knuckle.
2. Insert pry bar between transaxle case and axle flange. Carefully apply force to pry bar until axle circlip is disengaged. Slide knuckle
assembly off axle shaft, and remove axle from vehicle. Quickly install appropriate plug in transaxle. Using appropriate puller, remove
seal.
Installation
1. Apply lubrication to new seal. Using appropriate driver, install seal. Install new circlip on transaxle end of axle. Remove transaxle plug,
and carefully install axle into transaxle. Ensure circlip snaps into retaining groove.
2. Install axle into hub. Install NEW axle nut. Tighten bolts to specifications. See TORQUE SPECIFICATIONS
. Stake NEW axle nut
with blunt nose chisel. To complete installation, reverse removal procedure. Fill transaxle fluid to correct level.
OIL COOLER FLUSHING
Contaminates MUST be removed from oil cooler before transmission is put back into service. Replace cooler supply tubes if leaking.
Thoroughly flush oil cooler and lines if a major service or transaxle removal has occurred. It is recommended that a mechanically agitated
cleaner, such as Rotunda (014-00028), be used.
VACUUM THROTTLE VALVE DIAPHRAGM (MODULATOR) R & I
Removal
1. Drain transaxle fluid. Disconnect vacuum hose from modulator. Unscrew modulator from transaxle. Remove control rod. With beveled
side out, insert Vacuum Diaphragm Rod Gauge (T87C-77000-A) into mounting hole until gauge bottoms out.
2. Place gauge rod through opening of gauge until rod bottoms out against vacuum throttle valve. Tighten lock knob on gauge and remove
tool. Using depth gauge, measure distance from flat surface of gauge to end of rod. See Fig. 3
. Select proper length throttle valve rod.
See THROTTLE VALVE ROD DIMENSION CHART
.
THROTTLE VALVE ROD DIMENSION CHART
Installation
Install selected throttle valve rod. Coat threads of modulator with appropriate sealant. To install, reverse removal procedures.
NOTE:If replacing m odulator, it is necessary to replace throttle control valve rod.
Measurement In. (mm)Applicable Rod Length In. (mm)
1.0 (25.4)1.16 (29.5)
1.0-1.02 (25.4-25.9)1.18 (30.0)
1.02-1.04 (25.9-26.4)1.20 (30.5)
1.04-1.06 (25.9-26.4)1.22 (31.0)
1.06-1.08 (26.9-27.4)1.24 (31.5)
Page 2 of 26 MITCHELL 1 ARTICLE - 1988-94 AUTOMATIC TRANSMISSIONS Ford ATX Overhaul
3/10/2009 http://www.eautorepair.net/app/PrintItems.asp?S0=2097152&S1=0&SG=%7B9B990D68%2D660A%2D45E9%2D8F46%2DE
...
Page 411 of 454
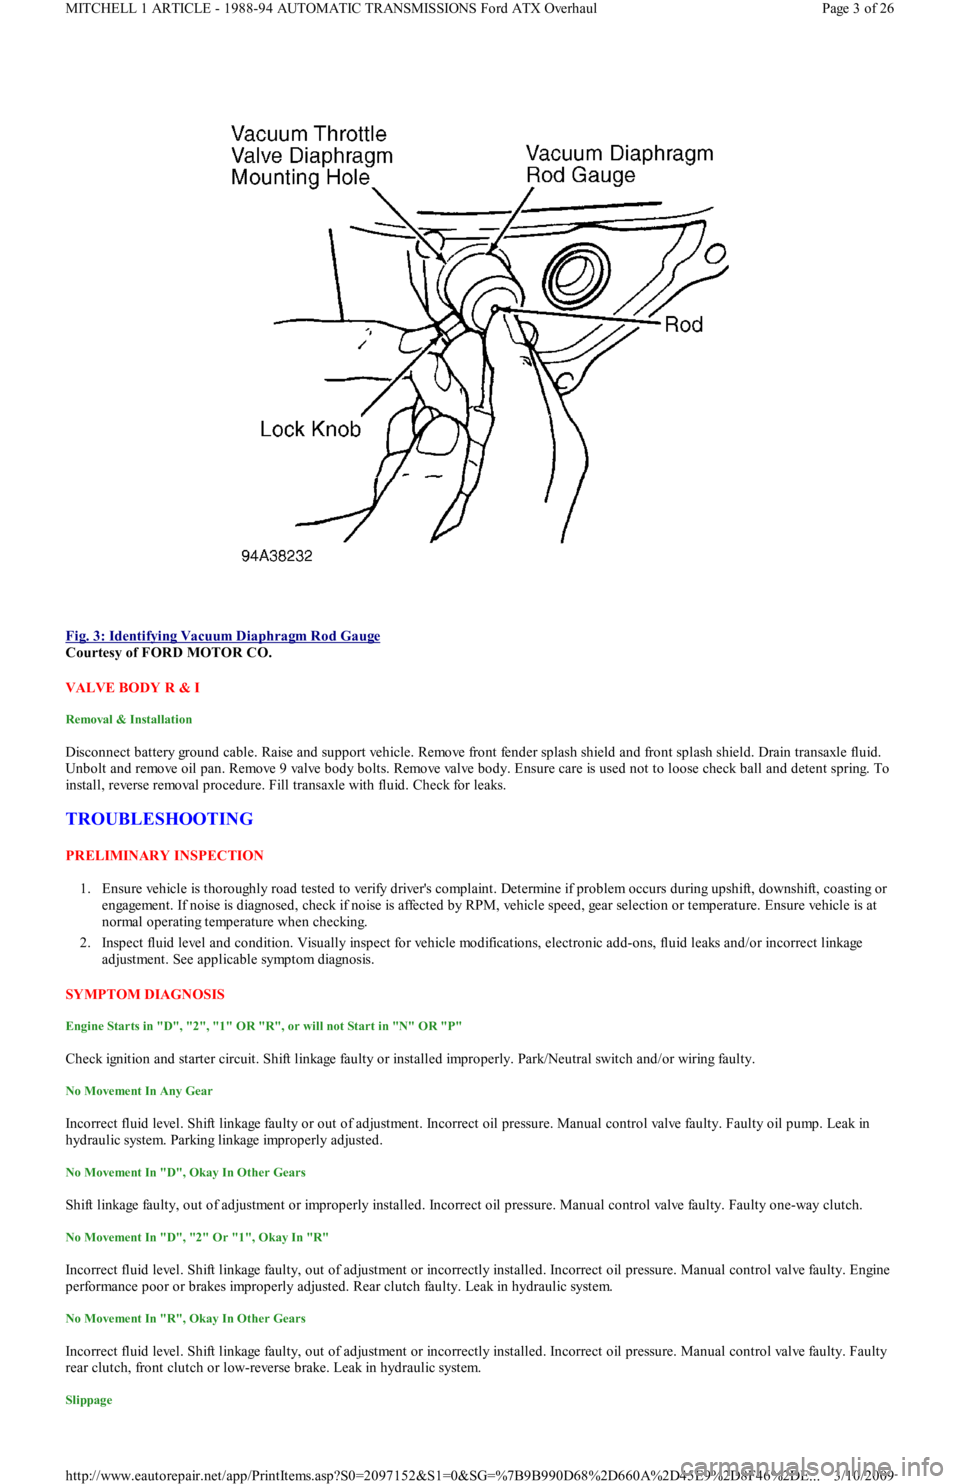
Fig. 3: Identifying Vacuum Diaphragm Rod Gauge
Courtesy of FORD MOTOR CO.
VALVE BODY R & I
Removal & Installation
Disconnect battery ground cable. Raise and support vehicle. Remove front fender splash shield and front splash shield. Drain transaxle fluid.
Unbolt and remove oil pan. Remove 9 valve body bolts. Remove valve body. Ensure care is used not to loose check ball and detent spring. To
install, reverse removal procedure. Fill transaxle with fluid. Check for leaks.
TROUBLESHOOTING
PRELIMINARY INSPECTION
1. Ensure vehicle is thoroughly road tested to verify driver's complaint. Determine if problem occurs during upshift, downshift, coasting or
engagement. If noise is diagnosed, check if noise is affected by RPM, vehicle speed, gear selection or temperature. Ensure vehicle is at
normal operating temperature when checking.
2. Inspect fluid level and condition. Visually inspect for vehicle modifications, electronic add-ons, fluid leaks and/or incorrect linkage
adjustment. See applicable symptom diagnosis.
SYMPTOM DIAGNOSIS
Engine Starts in "D", "2", "1" OR "R", or will not Start in "N" OR "P"
Check ignition and starter circuit. Shift linkage faulty or installed improperly. Park/Neutral switch and/or wiring faulty.
No Movement In Any Gear
Incorrect fluid level. Shift linkage faulty or out of adjustment. Incorrect oil pressure. Manual control valve faulty. Faulty oil pump. Leak in
hydraulic system. Parking linkage improperly adjusted.
No Movement In "D", Okay In Other Gears
Shift linkage faulty, out of adjustment or improperly installed. Incorrect oil pressure. Manual control valve faulty. Faulty one-way clutch.
No Movement In "D", "2" Or "1", Okay In "R"
Incorrect fluid level. Shift linkage faulty, out of adjustment or incorrectly installed. Incorrect oil pressure. Manual control valve faulty. Engine
performance poor or brakes improperly adjusted. Rear clutch faulty. Leak in hydraulic system.
No Movement In "R", Okay In Other Gears
Incorrect fluid level. Shift linkage faulty, out of adjustment or incorrectly installed. Incorrect oil pressure. Manual control valve faulty. Faulty
rear clutch, front clutch or low-reverse brake. Leak in hydraulic system.
Slippage
Page 3 of 26 MITCHELL 1 ARTICLE - 1988-94 AUTOMATIC TRANSMISSIONS Ford ATX Overhaul
3/10/2009 http://www.eautorepair.net/app/PrintItems.asp?S0=2097152&S1=0&SG=%7B9B990D68%2D660A%2D45E9%2D8F46%2DE
...
Page 418 of 454
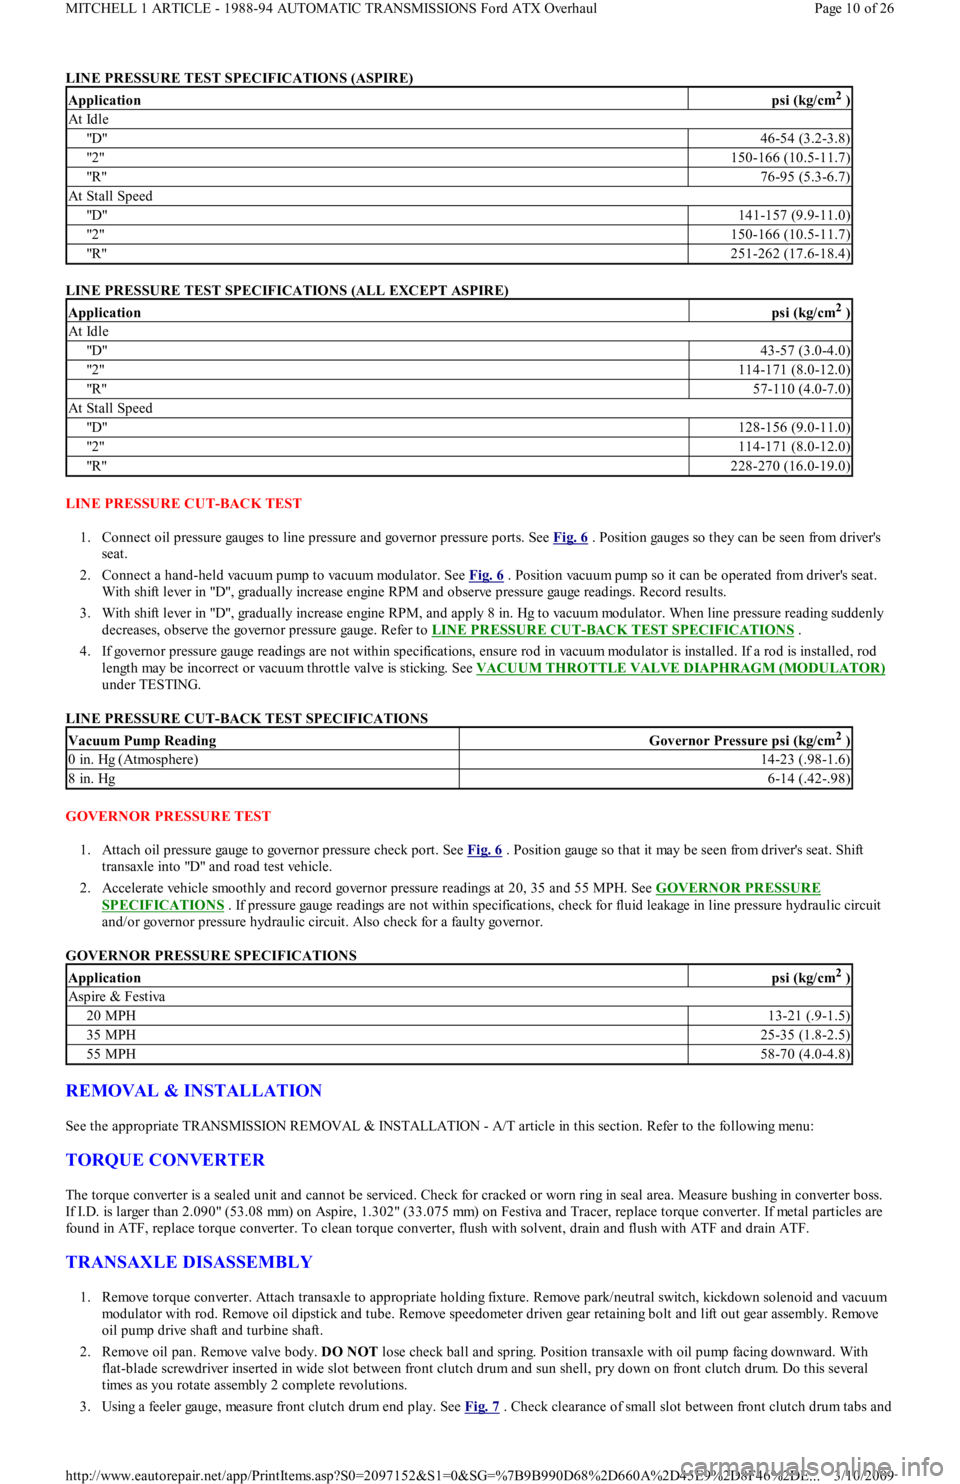
LINE PRESSURE TEST SPECIFICATIONS (ASPIRE)
LINE PRESSURE TEST SPECIFICATIONS (ALL EXCEPT ASPIRE)
LINE PRESSURE CUT-BACK TEST
1. Connect oil pressure gauges to line pressure and governor pressure ports. See Fig. 6
. Position gauges so they can be seen from driver's
seat.
2. Connect a hand-held vacuum pump to vacuum modulator. See Fig. 6
. Position vacuum pump so it can be operated from driver's seat.
With shift lever in "D", gradually increase engine RPM and observe pressure gauge readings. Record results.
3. With shift lever in "D", gradually increase engine RPM, and apply 8 in. Hg to vacuum modulator. When line pressure reading suddenly
decreases, observe the governor pressure gauge. Refer to LINE PRESSURE CUT
-BACK TEST SPECIFICATIONS .
4. If governor pressure gauge readings are not within specifications, ensure rod in vacuum modulator is installed. If a rod is installed, rod
length may be incorrect or vacuum throttle valve is sticking. See VACUUM THROTTLE VALVE DIAPHRAGM (MODULATOR)
under TESTING.
LINE PRESSURE CUT-BACK TEST SPECIFICATIONS
GOVERNOR PRESSURE TEST
1. Attach oil pressure gauge to governor pressure check port. See Fig. 6
. Position gauge so that it may be seen from driver's seat. Shift
transaxle into "D" and road test vehicle.
2. Accelerate vehicle smoothly and record governor pressure readings at 20, 35 and 55 MPH. See GOVERNOR PRESSURE
SPECIFICATIONS . If pressure gauge readings are not within specifications, check for fluid leakage in line pressure hydraulic circuit
and/or governor pressure hydraulic circuit. Also check for a faulty governor.
GOVERNOR PRESSURE SPECIFICATIONS
REMOVAL & INSTALLATION
See the appropriate TRANSMISSION REMOVAL & INSTALLATION - A/T article in this section. Refer to the following menu:
TORQUE CONVERTER
The torque converter is a sealed unit and cannot be serviced. Check for cracked or worn ring in seal area. Measure bushing in converter boss.
If I.D. is larger than 2.090" (53.08 mm) on Aspire, 1.302" (33.075 mm) on Festiva and Tracer, replace torque converter. If metal particles are
found in ATF, replace torque converter. To clean torque converter, flush with solvent, drain and flush with ATF and drain ATF.
TRANSAXLE DISASSEMBLY
1. Remove torque converter. Attach transaxle to appropriate holding fixture. Remove park/neutral switch, kickdown solenoid and vacuum
modulator with rod. Remove oil dipstick and tube. Remove speedometer driven gear retaining bolt and lift out gear assembly. Remove
oil pump drive shaft and turbine shaft.
2. Remove oil pan. Remove valve body. DO NOT lose check ball and spring. Position transaxle with oil pump facing downward. With
flat-blade screwdriver inserted in wide slot between front clutch drum and sun shell, pry down on front clutch drum. Do this seve r a l
times as you rotate assembly 2 complete revolutions.
3. Using a feeler gauge, measure front clutch drum end play. See Fig. 7
. Check clearance of small slot between front clutch drum tabs and
Applicationpsi (kg/cm2 )
At Idle
"D"46-54 (3.2-3.8)
"2 "150-166 (10.5-11.7)
"R"76-95 (5.3-6.7)
At Stall Speed
"D"141-157 (9.9-11.0)
"2 "150-166 (10.5-11.7)
"R"251-262 (17.6-18.4)
Applicationpsi (kg/cm2 )
At Idle
"D"43-57 (3.0-4.0)
"2 "114-171 (8.0-12.0)
"R"57-110 (4.0-7.0)
At Stall Speed
"D"128-156 (9.0-11.0)
"2 "114-171 (8.0-12.0)
"R"228-270 (16.0-19.0)
Vacuum Pump ReadingGovernor Pressure psi (kg/cm2 )
0 in. Hg (Atmosphere)14-23 (.98-1.6)
8 in. Hg6-14 (.42-.98)
Applicationpsi (kg/cm2 )
Aspire & Festiva
20 MPH13-21 (.9-1.5)
35 MPH25-35 (1.8-2.5)
55 MPH58-70 (4.0-4.8)
Page 10 of 26 MITCHELL 1 ARTICLE - 1988-94 AUTOMATIC TRANSMISSIONS Ford ATX Overhaul
3/10/2009 http://www.eautorepair.net/app/PrintItems.asp?S0=2097152&S1=0&SG=%7B9B990D68%2D660A%2D45E9%2D8F46%2DE
...
Page 436 of 454
Back To Article
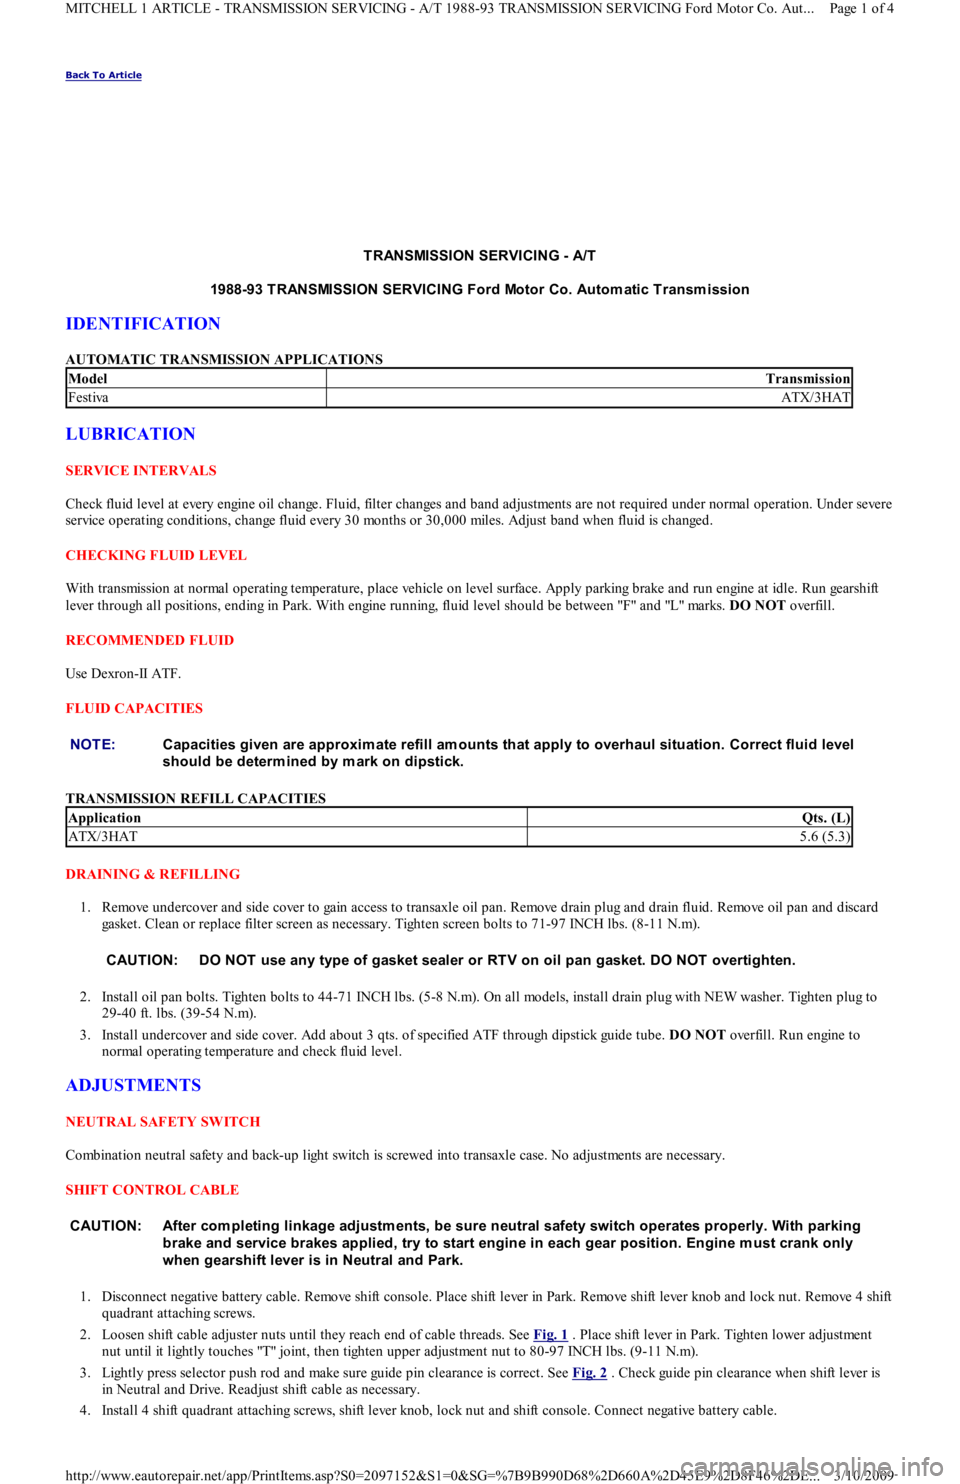
T RANSMISSION SERVICING - A/T
1988-93 T RANSMISSION SERVICING Ford Motor Co. Autom atic T ransm ission
IDENTIFICATION
AUTOMATIC TRANSMISSION APPLICATIONS
LUBRICATION
SERVICE INTERVALS
Check fluid level at every engine oil change. Fluid, filter changes and band adjustments are not required under normal operation. Under severe
service operating conditions, change fluid every 30 months or 30,000 miles. Adjust band when fluid is changed.
CHECKING FLUID LEVEL
With transmission at normal operating temperature, place vehicle on level surface. Apply parking brake and run engine at idle. Run gearshift
lever through all positions, ending in Park. With engine running, fluid level should be between "F" and "L" marks. DO NOT overfill.
RECOMMENDED FLUID
Use Dexron-II ATF.
FLUID CAPACITIES
TRANSMISSION REFILL CAPACITIES
DRAINING & REFILLING
1. Remove undercover and side cover to gain access to transaxle oil pan. Remove drain plug and drain fluid. Remove oil pan and discard
gasket. Clean or replace filter screen as necessary. Tighten screen bolts to 71-97 INCH lbs. (8-11 N.m).
2. Install oil pan bolts. Tighten bolts to 44-71 INCH lbs. (5-8 N.m). On all models, install drain plug with NEW washer. Tighten plug to
29-40 ft. lbs. (39-54 N.m).
3. Install undercover and side cover. Add about 3 qts. of specified ATF through dipstick guide tube. DO NOT overfill. Run engine to
normal operating temperature and check fluid level.
ADJUSTMENTS
NEUTRAL SAFETY SWITCH
Combination neutral safety and back-up light switch is screwed into transaxle case. No adjustments are necessary.
SHIFT CONTROL CABLE
1. Disconnect negative battery cable. Remove shift console. Place shift lever in Park. Remove shift lever knob and lock nut. Remove 4 shift
quadrant attaching screws.
2. Loosen shift cable adjuster nuts until they reach end of cable threads. See Fig. 1
. Place shift lever in Park. Tighten lower adjustment
nut until it lightly touches "T" joint, then tighten upper adjustment nut to 80-97 INCH lbs. (9-11 N.m).
3. Lightly press selector push rod and make sure guide pin clearance is correct. See Fig. 2
. Check guide pin clearance when shift lever is
in Neutral and Drive. Readjust shift cable as necessary.
4. Install 4 shift quadrant attaching screws, shift lever knob, lock nut and shift console. Connect negative battery cable.
ModelTransmission
FestivaATX/3HAT
NOTE:Capacities given are approxim ate refill am ounts that apply to overhaul situation. Correct fluid level
should be determ ined by m ark on dipstick.
ApplicationQts. (L)
ATX/3HAT5.6 (5.3)
CAUT ION: DO NOT use any type of gasket sealer or RT V on oil pan gasket. DO NOT overtighten.
CAUT ION: After com pleting linkage adjustm ents, be sure neutral safety switch operates properly. With parking
brake and service brakes applied, try to start engine in each gear position. Engine m ust crank only
when gearshift lever is in Neutral and Park.
Page 1 of 4 MITCHELL 1 ARTICLE - TRANSMISSION SERVICING - A/T 1988-93 TRANSMISSION SERVICING Ford Motor Co. Aut
...
3/10/2009 http://www.eautorepair.net/app/PrintItems.asp?S0=2097152&S1=0&SG=%7B9B990D68%2D660A%2D45E9%2D8F46%2DE
...
Page 441 of 454
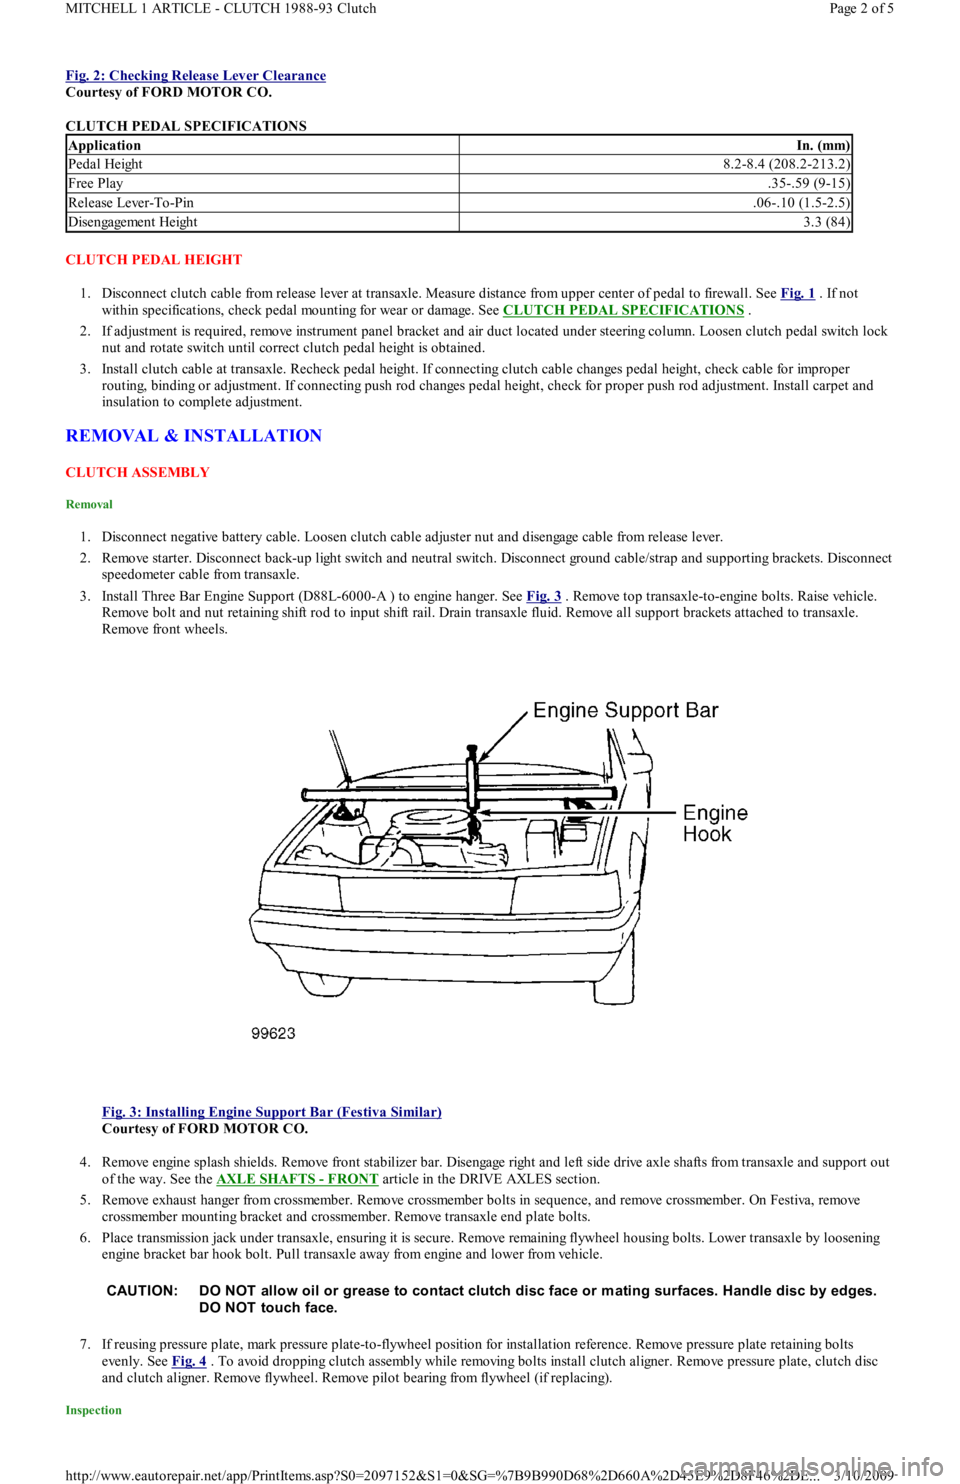
Fig. 2: Checking Release Lever Clearance
Courtesy of FORD MOTOR CO.
CLUTCH PEDAL SPECIFICATIONS
CLUTCH PEDAL HEIGHT
1. Disconnect clutch cable from release lever at transaxle. Measure distance from upper center of pedal to firewall. See Fig. 1
. If not
within specifications, check pedal mounting for wear or damage. See CLUTCH PEDAL SPECIFICATIONS
.
2. If adjustment is required, remove instrument panel bracket and air duct located under steering column. Loosen clutch pedal switch lock
nut and rotate switch until correct clutch pedal height is obtained.
3. Install clutch cable at transaxle. Recheck pedal height. If connecting clutch cable changes pedal height, check cable for improper
routing, binding or adjustment. If connecting push rod changes pedal height, check for proper push rod adjustment. Install carpet and
insulation to complete adjustment.
REMOVAL & INSTALLATION
CLUTCH ASSEMBLY
Removal
1. Disconnect negative battery cable. Loosen clutch cable adjuster nut and disengage cable from release lever.
2. Remove starter. Disconnect back-up light switch and neutral switch. Disconnect ground cable/strap and supporting brackets. Disconnect
speedometer cable from transaxle.
3. Install Three Bar Engine Support (D88L-6000-A ) to engine hanger. See Fig. 3
. Remove top transaxle-to-engine bolts. Raise vehicle.
Remove bolt and nut retaining shift rod to input shift rail. Drain transaxle fluid. Remove all support brackets attached to transaxle.
Remove front wheels.
Fig. 3: Installing Engine Support Bar (Festiva Similar)
Courtesy of FORD MOTOR CO.
4. Remove engine splash shields. Remove front stabilizer bar. Disengage right and left side drive axle shafts from transaxle and support out
of the way. See the AXLE SHAFTS
- FRONT article in the DRIVE AXLES section.
5. Remove exhaust hanger from crossmember. Remove crossmember bolts in sequence, and remove crossmember. On Festiva, remove
crossmember mounting bracket and crossmember. Remove transaxle end plate bolts.
6. Place transmission jack under transaxle, ensuring it is secure. Remove remaining flywheel housing bolts. Lower transaxle by loosening
engine bracket bar hook bolt. Pull transaxle away from engine and lower from vehicle.
7. If reusing pressure plate, mark pressure plate-to-flywheel position for installation reference. Remove pressure plate retaining bolts
evenly. See Fig. 4
. To avoid dropping clutch assembly while removing bolts install clutch aligner. Remove pressure plate, clutch disc
and clutch aligner. Remove flywheel. Remove pilot bearing from flywheel (if replacing).
Inspection
ApplicationIn. (mm)
Pedal Height8.2-8.4 (208.2-213.2)
Free Play.35-.59 (9-15)
Release Lever-To-Pin.06-.10 (1.5-2.5)
Disengagement Height3.3 (84)
CAUT ION: DO NOT allow oil or grease to contact clutch disc face or m ating surfaces. Handle disc by edges.
DO NOT touch face.
Page 2 of 5 MITCHELL 1 ARTICLE - CLUTCH 1988-93 Clutch
3/10/2009 http://www.eautorepair.net/app/PrintItems.asp?S0=2097152&S1=0&SG=%7B9B990D68%2D660A%2D45E9%2D8F46%2DE
...
Page 443 of 454
Inspection
Check release bearing rotation operation for roughness, sticking and noise. Check release lever and transaxle front bearing retainer for wear or
damage. Ensure bearing slides smoothly on transaxle input shaft. Check release lever shaft for bent, worn or damaged condition. Check all
mating surfaces for wear or damage. Replace worn or defective components.
Installation
Apply light film of grease to transmission front bearing retainer lever-to-bearing surfaces and release lever contact surface. Align bolt hole in
release lever and shaft. Apply Stud/Bearing Sealant (E0AZ-19554-B ) to release lever bolt. Fill grease groove in release bearing hub and
remove any excess grease. Install release lever return spring. To complete installation, reverse removal procedure.
PILOT BEARING
Removal & Installation
Remove transaxle, pressure plate, clutch disc and flywheel. Drive pilot bearing out of flywheel using a driver that makes full contact with
bearing outer race. Reverse procedure for installation.
CLUTCH CABLE
Removal & Installation
1. Disconnect clutch cable from release lever. Remove nuts retaining clutch cable at firewall. Unhook clutch cable at clutch pedal.
2. Remove clutch cable from engine compartment side. To install, apply lithium grease to pedal cable hook and joint between release lever
and pin. Reverse removal procedure to complete installation. See Fig. 2
.
OVERHAUL
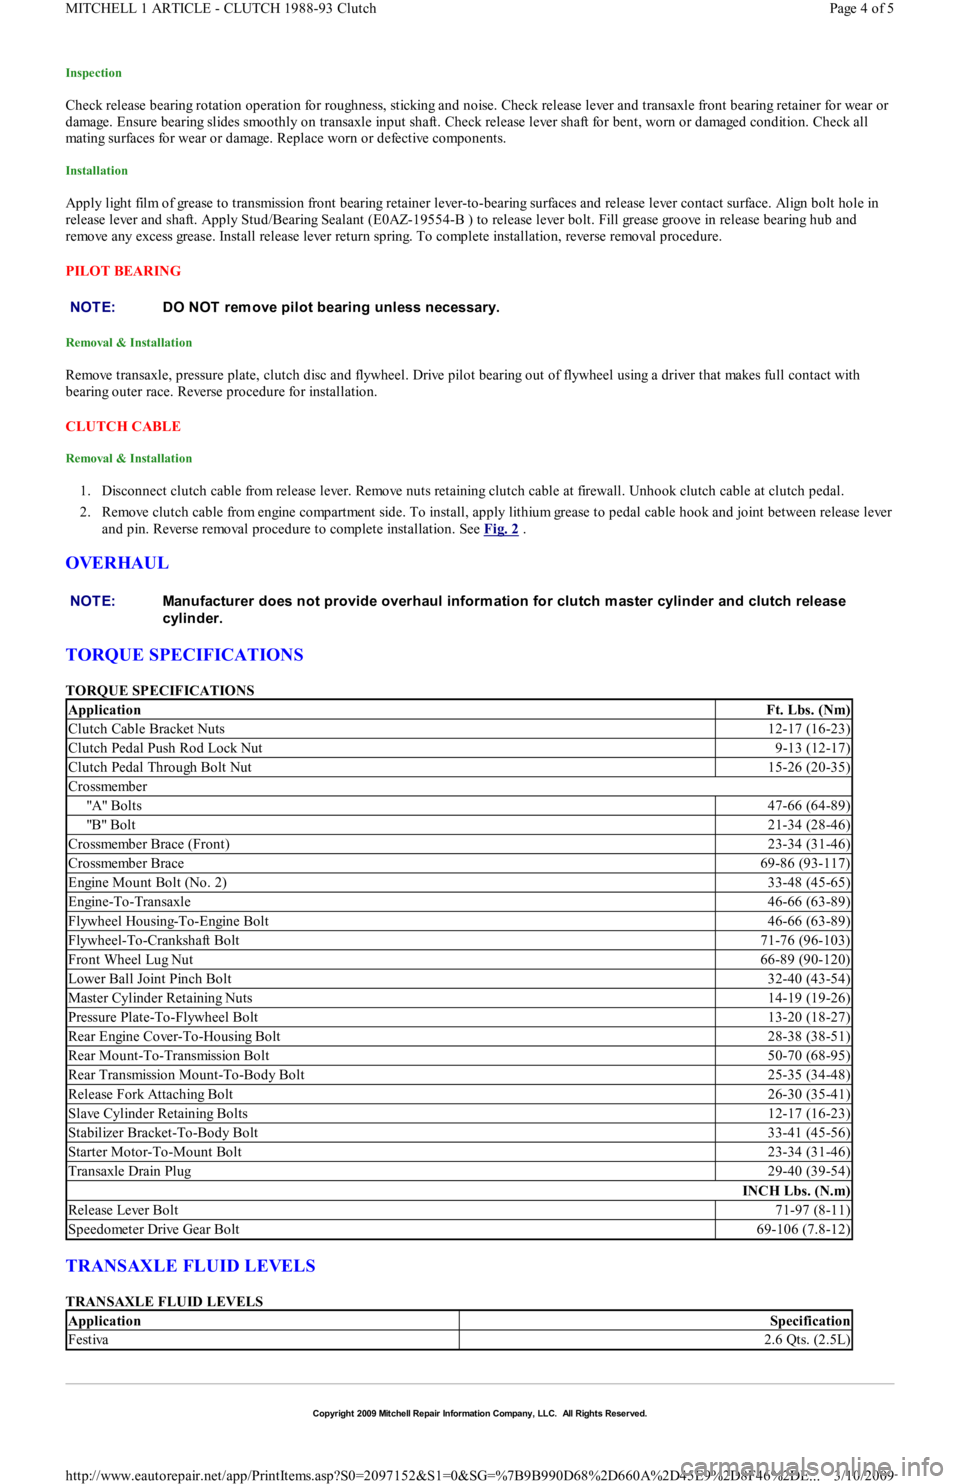
TORQUE SPECIFICATIONS
TORQUE SPECIFICATIONS
TRANSAXLE FLUID LEVELS
TRANSAXLE FLUID LEVELS NOTE:DO NOT rem ove pilot bearing unless necessary.
NOTE:Manufacturer does not provide overhaul inform ation for clutch m aster cylinder and clutch release
cylinder.
ApplicationFt. Lbs. (Nm)
Clutch Cable Bracket Nuts12-17 (16-23)
Clutch Pedal Push Rod Lock Nut9-13 (12-17)
Clutch Pedal Through Bolt Nut15-26 (20-35)
Crossmember
"A" Bo l t s47-66 (64-89)
"B" Bo l t21-34 (28-46)
Crossmember Brace (Front)23-34 (31-46)
Crossmember Brace69-86 (93-117)
Engine Mount Bolt (No. 2)33-48 (45-65)
Engine-To-Transaxle46-66 (63-89)
Flywheel Housing-To-Engine Bolt46-66 (63-89)
Flywheel-To-Crankshaft Bolt71-76 (96-103)
Front Wheel Lug Nut66-89 (90-120)
Lower Ball Joint Pinch Bolt32-40 (43-54)
Master Cylinder Retaining Nuts14-19 (19-26)
Pressure Plate-To-Flywheel Bolt13-20 (18-27)
Rear Engine Cover-To-Housing Bolt28-38 (38-51)
Rear Mount-To-Transmission Bolt50-70 (68-95)
Rear Transmission Mount-To-Body Bolt25-35 (34-48)
Release Fork Attaching Bolt26-30 (35-41)
Slave Cylinder Retaining Bolts12-17 (16-23)
Stabilizer Bracket-To-Body Bolt33-41 (45-56)
Starter Motor-To-Mount Bolt23-34 (31-46)
Transaxle Drain Plug29-40 (39-54)
INCH Lbs. (N.m)
Release Lever Bolt71-97 (8-11)
Speedometer Drive Gear Bolt69-106 (7.8-12)
ApplicationSpecification
Festiva2.6 Qts. (2.5L)
Copyr ight 2009 Mitchell Repair Information Company, LLC. All Rights Reserved.
Page 4 of 5 MITCHELL 1 ARTICLE - CLUTCH 1988-93 Clutch
3/10/2009 http://www.eautorepair.net/app/PrintItems.asp?S0=2097152&S1=0&SG=%7B9B990D68%2D660A%2D45E9%2D8F46%2DE
...