dead battery FORD FESTIVA 1991 Service Manual
[x] Cancel search | Manufacturer: FORD, Model Year: 1991, Model line: FESTIVA, Model: FORD FESTIVA 1991Pages: 454, PDF Size: 9.53 MB
Page 200 of 454
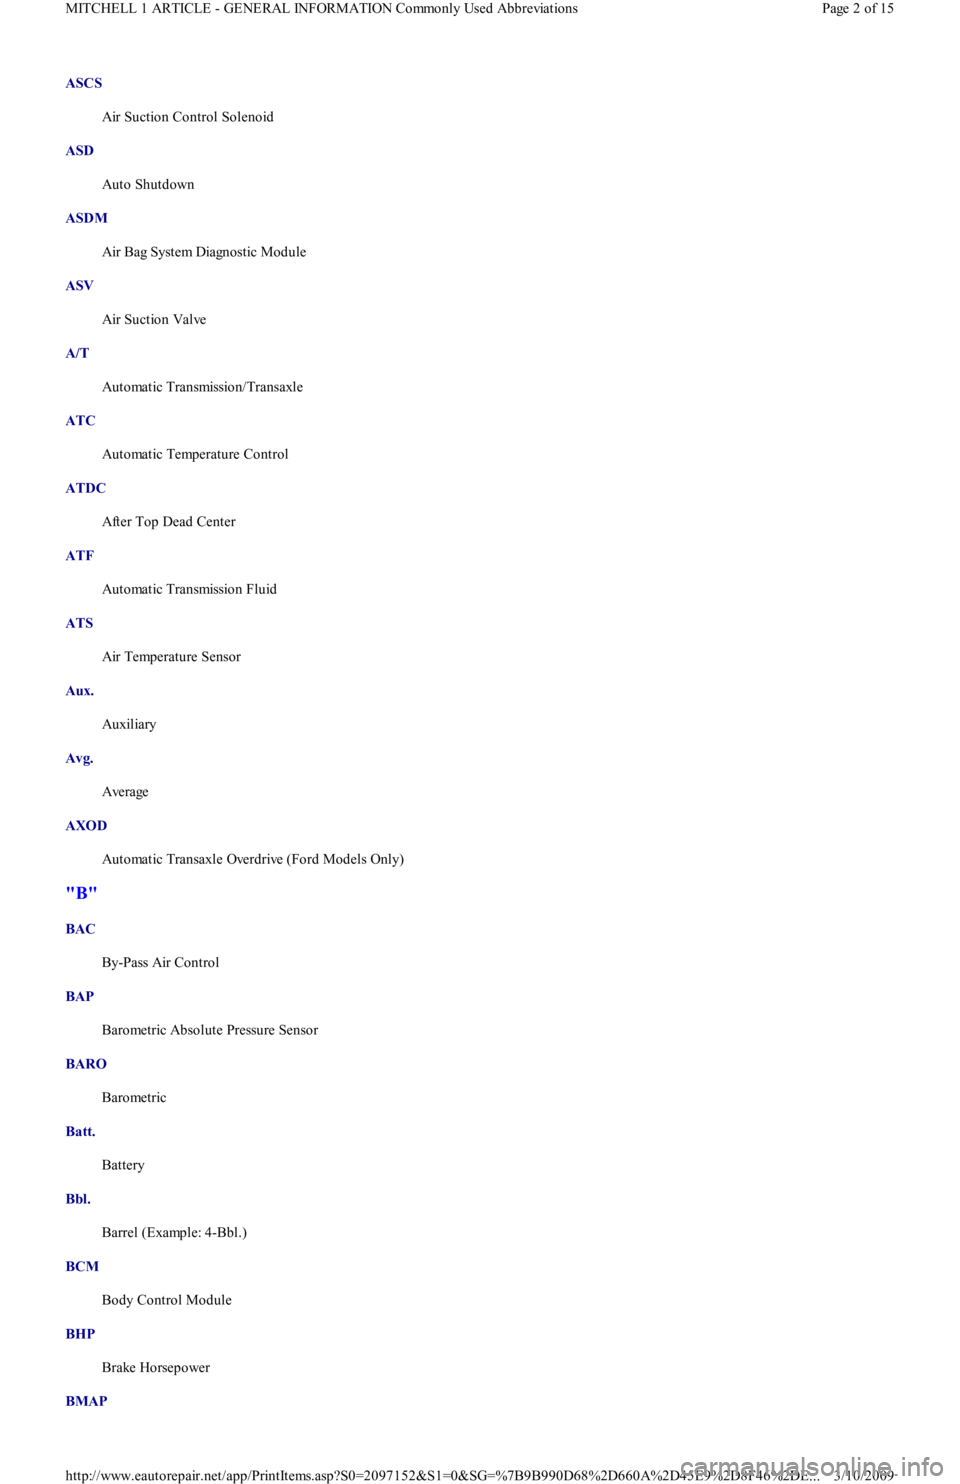
ASCS
Air Suction Control Solenoid
ASD
Auto Shutdown
ASDM
Air Bag System Diagnostic Module
ASV
Air Suction Valve
A/T
Automatic Transmission/Transaxle
ATC
Automatic Temperature Control
ATDC
After Top Dead Center
ATF
Automatic Transmission Fluid
ATS
Air Temperature Sensor
Aux.
Auxiliary
Avg.
Average
AXOD
Automatic Transaxle Overdrive (Ford Models Only)
"B"
BAC
By-Pass Air Control
BAP
Barometric Absolute Pressure Sensor
BARO
Barometric
Batt.
Battery
Bbl.
Barrel (Example: 4-Bbl.)
BCM
Body Control Module
BHP
Brake Horsepower
BMAP
Page 2 of 15 MITCHELL 1 ARTICLE - GENERAL INFORMATION Commonly Used Abbreviations
3/10/2009 http://www.eautorepair.net/app/PrintItems.asp?S0=2097152&S1=0&SG=%7B9B990D68%2D660A%2D45E9%2D8F46%2DE
...
Page 214 of 454
Back To Article
GENERAL INFORMATION
T rouble Shooting - Basic Procedures
* PLEASE READ THIS FIRST *
ACCESSORIES & ELECTRICAL
CHARGING SYSTEM TROUBLE SHOOTING
BASIC CHARGING SYSTEM TROUBLE SHOOTING CHART NOTE:This is GENERAL inform ation. This article is not intended to be specific to any unique situation or
individual vehicle configuration. T he purpose of this T rouble Shooting inform ation is to provide a list
of com m on causes to problem sym ptom s. For m odel-specific T rouble Shooting, refer to SUBJECT ,
DIAGNOST IC, or T EST ING articles available in the section(s) you are accessing.
NOTE:This is GENERAL inform ation. This article is not intended to be specific to any unique situation or
individual vehicle configuration. T he purpose of this T rouble Shooting inform ation is to provide a list
of com m on causes to problem sym ptom s. For m odel-specific T rouble Shooting, refer to SUBJECT ,
DIAGNOST IC, or T EST ING articles available in the section(s) you are accessing.
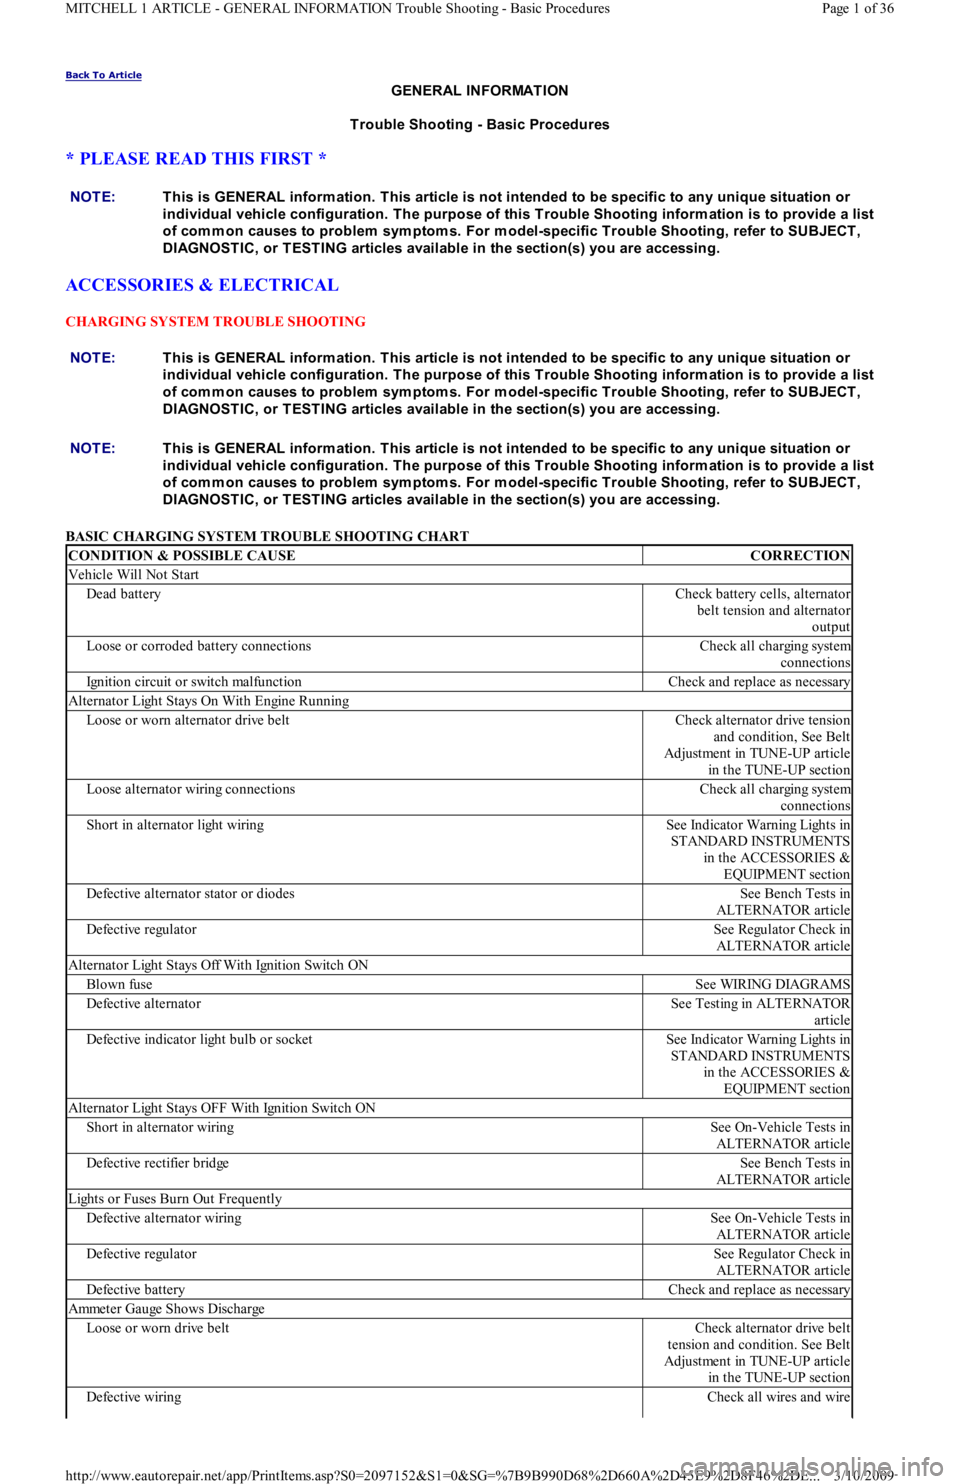
CONDITION & POSSIBLE CAUSECORRECTION
Vehicle Will Not Start
Dead batteryCheck battery cells, alternator
belt tension and alternator
output
Loose or corroded battery connectionsCheck all charging system
connections
Ignition circuit or switch malfunctionCheck and replace as necessary
Alternator Light Stays On With Engine Running
Loose or worn alternator drive beltCheck alternator drive tension
and condition, See Belt
Adjustment in TUNE-UP article
in the TUNE-UP section
Loose alternator wiring connectionsCheck all charging system
connections
Short in alternator light wiringSee Indicator Warning Lights in
STANDARD INSTRUMENTS
in the ACCESSORIES &
EQUIPMENT section
Defective alternator stator or diodesSee Bench Tests in
ALTERNATOR article
Defective regulatorSee Regulator Check in
ALTERNATOR article
Alternator Light Stays Off With Ignition Switch ON
Blown fuseSee WIRING DIAGRAMS
Defective alternatorSee Testing in ALTERNATOR
article
Defective indicator light bulb or socketSee Indicator Warning Lights in
STANDARD INSTRUMENTS
in the ACCESSORIES &
EQUIPMENT section
Alternator Light Stays OFF With Ignition Switch ON
Short in alternator wiringSee On-Vehicle Tests in
ALTERNATOR article
Defective rectifier bridgeSee Bench Tests in
ALTERNATOR article
Lights or Fuses Burn Out Frequently
Defective alternator wiringSee On-Vehicle Tests in
ALTERNATOR article
Defective regulatorSee Regulator Check in
ALTERNATOR article
Defective batteryCheck and replace as necessary
Ammeter Gauge Shows Discharge
Loose or worn drive beltCheck alternator drive belt
tension and condition. See Belt
Adjustment in TUNE-UP article
in the TUNE-UP section
Defective wiringCheck all wires and wire
Page 1 of 36 MITCHELL 1 ARTICLE - GENERAL INFORMATION Trouble Shooting - Basic Procedures
3/10/2009 http://www.eautorepair.net/app/PrintItems.asp?S0=2097152&S1=0&SG=%7B9B990D68%2D660A%2D45E9%2D8F46%2DE
...
Page 217 of 454
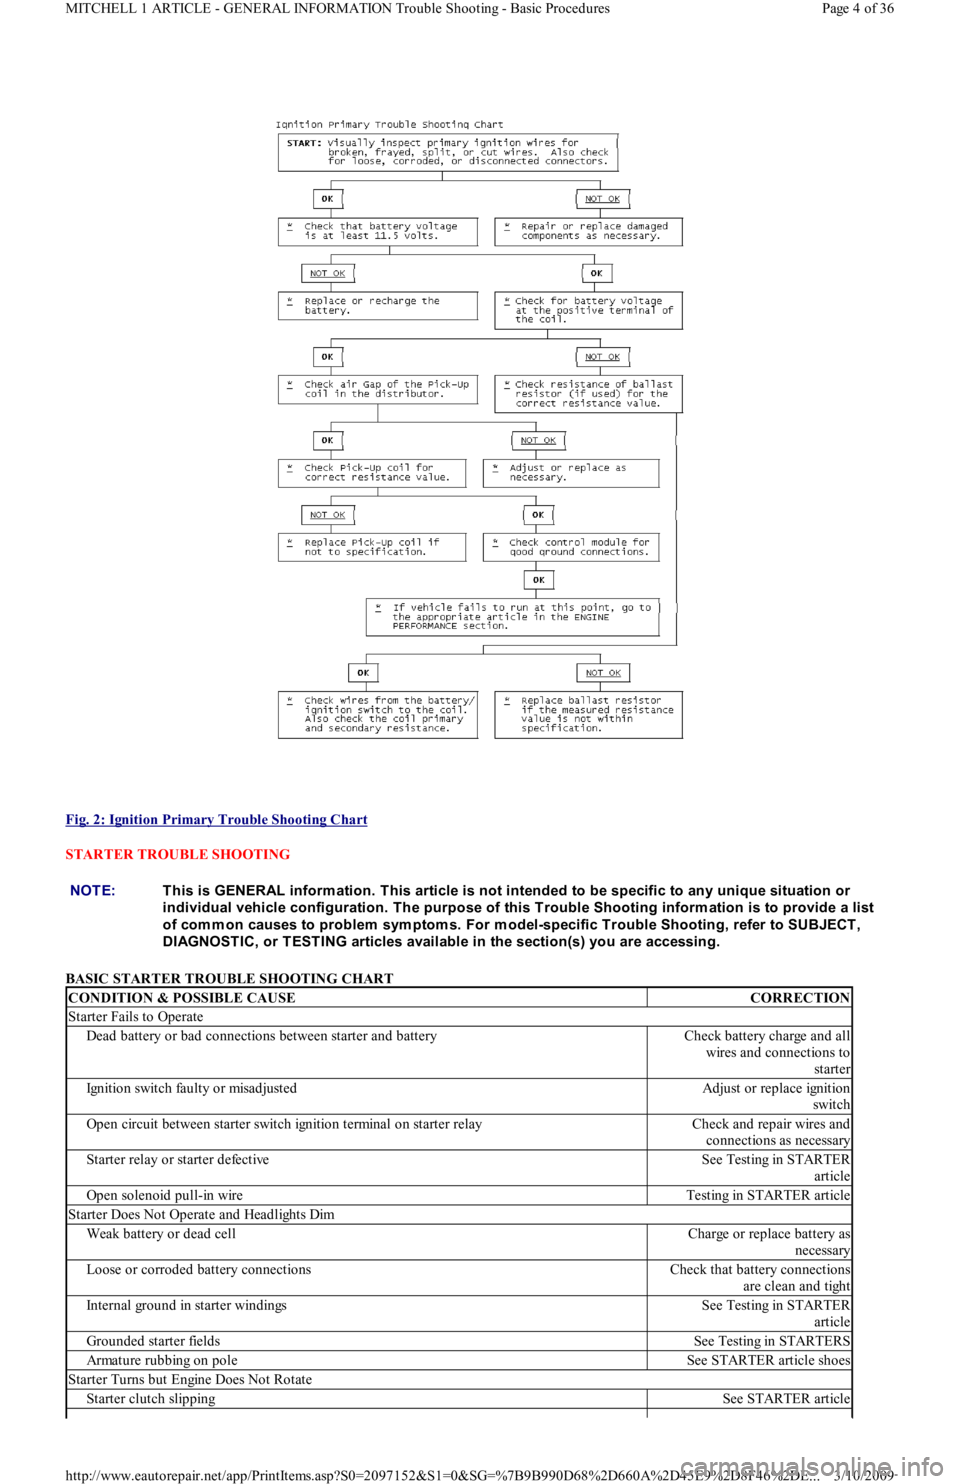
Fig. 2: Ignition Primary Trouble Shooting Chart
STARTER TROUBLE SHOOTING
BASIC STARTER TROUBLE SHOOTING CHART
NOTE:This is GENERAL inform ation. This article is not intended to be specific to any unique situation or
individual vehicle configuration. T he purpose of this T rouble Shooting inform ation is to provide a list
of com m on causes to problem sym ptom s. For m odel-specific T rouble Shooting, refer to SUBJECT ,
DIAGNOST IC, or T EST ING articles available in the section(s) you are accessing.
CONDITION & POSSIBLE CAUSECORRECTION
Starter Fails to Operate
Dead battery or bad connections between starter and batteryCheck battery charge and all
wires and connections to
starter
Ignition switch faulty or misadjustedAdjust or replace ignition
switch
Open circuit between starter switch ignition terminal on starter relayCheck and repair wires and
connections as necessary
Starter relay or starter defectiveSee Testing in STARTER
article
Open solenoid pull-in wireTesting in STARTER article
Starter Does Not Operate and Headlights Dim
Weak battery or dead cellCharge or replace battery as
necessary
Loose or corroded battery connectionsCheck that battery connections
are clean and tight
Internal ground in starter windingsSee Testing in STARTER
article
Grounded starter fieldsSee Testing in STARTERS
Armature rubbing on poleSee STARTER article shoes
Starter Turns but Engine Does Not Rotate
Starter clutch slippingSee STARTER article
Page 4 of 36 MITCHELL 1 ARTICLE - GENERAL INFORMATION Trouble Shooting - Basic Procedures
3/10/2009 http://www.eautorepair.net/app/PrintItems.asp?S0=2097152&S1=0&SG=%7B9B990D68%2D660A%2D45E9%2D8F46%2DE
...
Page 218 of 454
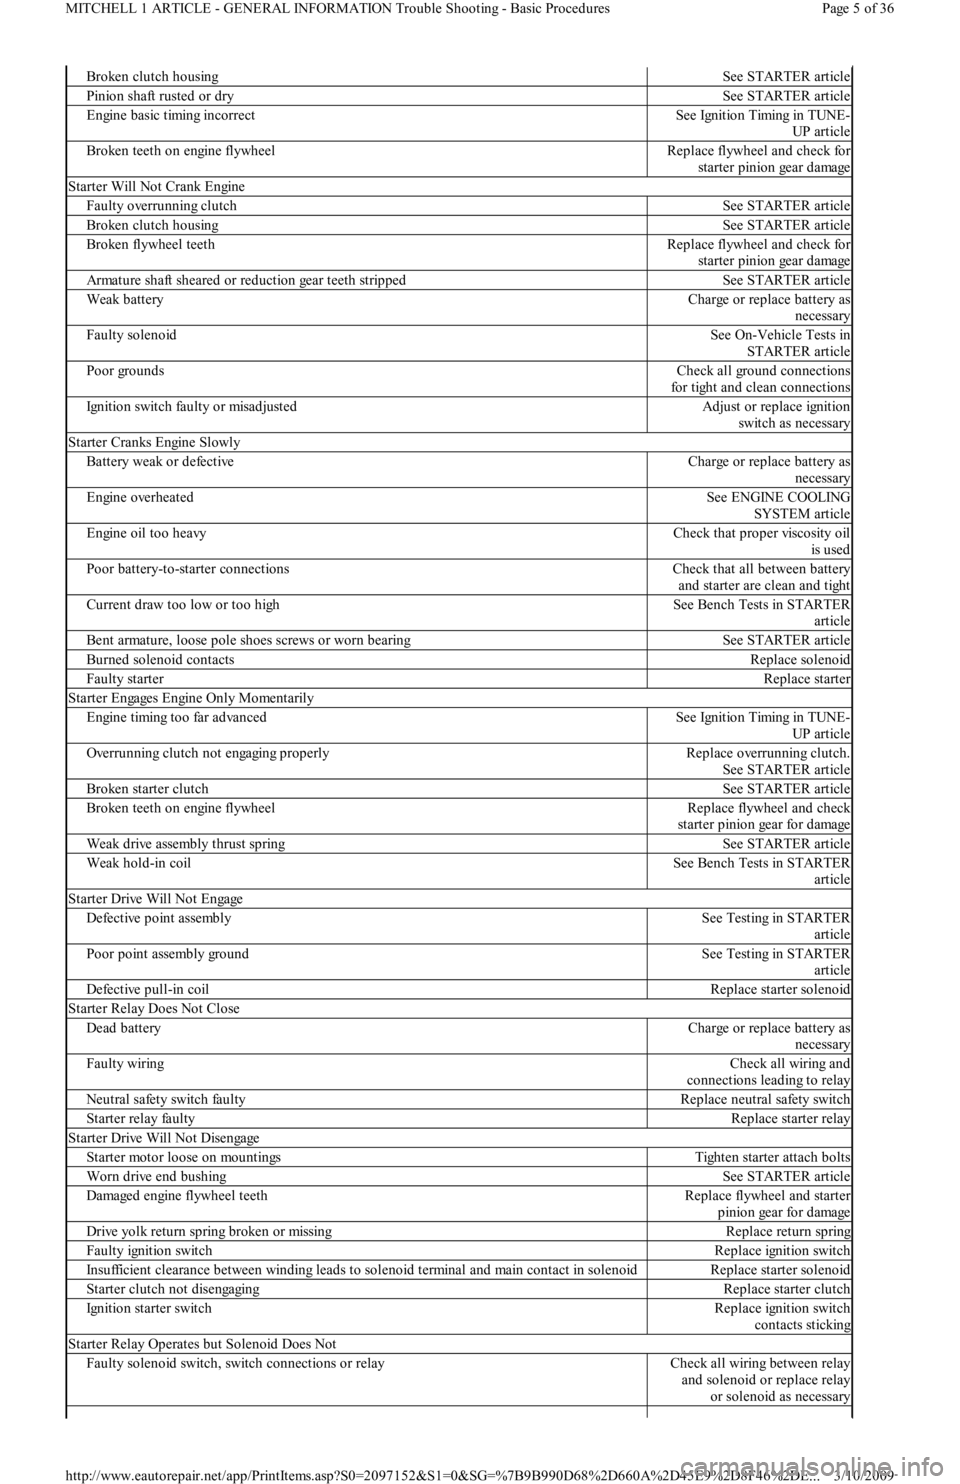
Broken clutch housingSee STARTER article
Pinion shaft rusted or drySee STARTER article
Engine basic timing incorrectSee Ignition Timing in TUNE-
UP article
Broken teeth on engine flywheelReplace flywheel and check for
starter pinion gear damage
Starter Will Not Crank Engine
Faulty overrunning clutchSee STARTER article
Broken clutch housingSee STARTER article
Broken flywheel teethReplace flywheel and check for
starter pinion gear damage
Armature shaft sheared or reduction gear teeth strippedSee STARTER article
Weak batteryCharge or replace battery as
necessary
Faulty solenoidSee On-Vehicle Tests in
STARTER article
Poor groundsCheck all ground connections
for tight and clean connections
Ignition switch faulty or misadjustedAdjust or replace ignition
switch as necessary
Starter Cranks Engine Slowly
Battery weak or defectiveCharge or replace battery as
necessary
Engine overheatedSee ENGINE COOLING
SYSTEM article
Engine oil too heavyCheck that proper viscosity oil
is used
Poor battery-to-starter connectionsCheck that all between battery
and starter are clean and tight
Current draw too low or too highSee Bench Tests in STARTER
article
Bent armature, loose pole shoes screws or worn bearingSee STARTER article
Burned solenoid contactsReplace solenoid
Faulty starterReplace starter
S t a r t e r E n ga ge s E n gin e On l y M o me n t a r il y
Engine timing too far advancedSee Ignition Timing in TUNE-
UP article
Overrunning clutch not engaging properlyReplace overrunning clutch.
See STARTER article
Broken starter clutchSee STARTER article
Broken teeth on engine flywheelReplace flywheel and check
starter pinion gear for damage
Weak drive assembly thrust springSee STARTER article
Weak hold-in coilSee Bench Tests in STARTER
article
Starter Drive Will Not Engage
Defective point assemblySee Testing in STARTER
article
Poor point assembly groundSee Testing in STARTER
article
Defective pull-in coilReplace starter solenoid
Starter Relay Does Not Close
Dead batteryCharge or replace battery as
necessary
Faulty wiringCheck all wiring and
connections leading to relay
Neutral safety switch faultyReplace neutral safety switch
Starter relay faultyReplace starter relay
Starter Drive Will Not Disengage
Starter motor loose on mountingsTighten starter attach bolts
Worn drive end bushingSee STARTER article
Damaged engine flywheel teethReplace flywheel and starter
pinion gear for damage
Drive yolk return spring broken or missingReplace return spring
Faulty ignition switchReplace ignition switch
Insufficient clearance between winding leads to solenoid terminal and main contact in solenoidReplace starter solenoid
Starter clutch not disengagingReplace starter clutch
Ignition starter switchReplace ignition switch
contacts sticking
Starter Relay Operates but Solenoid Does Not
Faulty solenoid switch, switch connections or relayCheck all wiring between relay
and solenoid or replace relay
or solenoid as necessary
Page 5 of 36 MITCHELL 1 ARTICLE - GENERAL INFORMATION Trouble Shooting - Basic Procedures
3/10/2009 http://www.eautorepair.net/app/PrintItems.asp?S0=2097152&S1=0&SG=%7B9B990D68%2D660A%2D45E9%2D8F46%2DE
...
Page 227 of 454
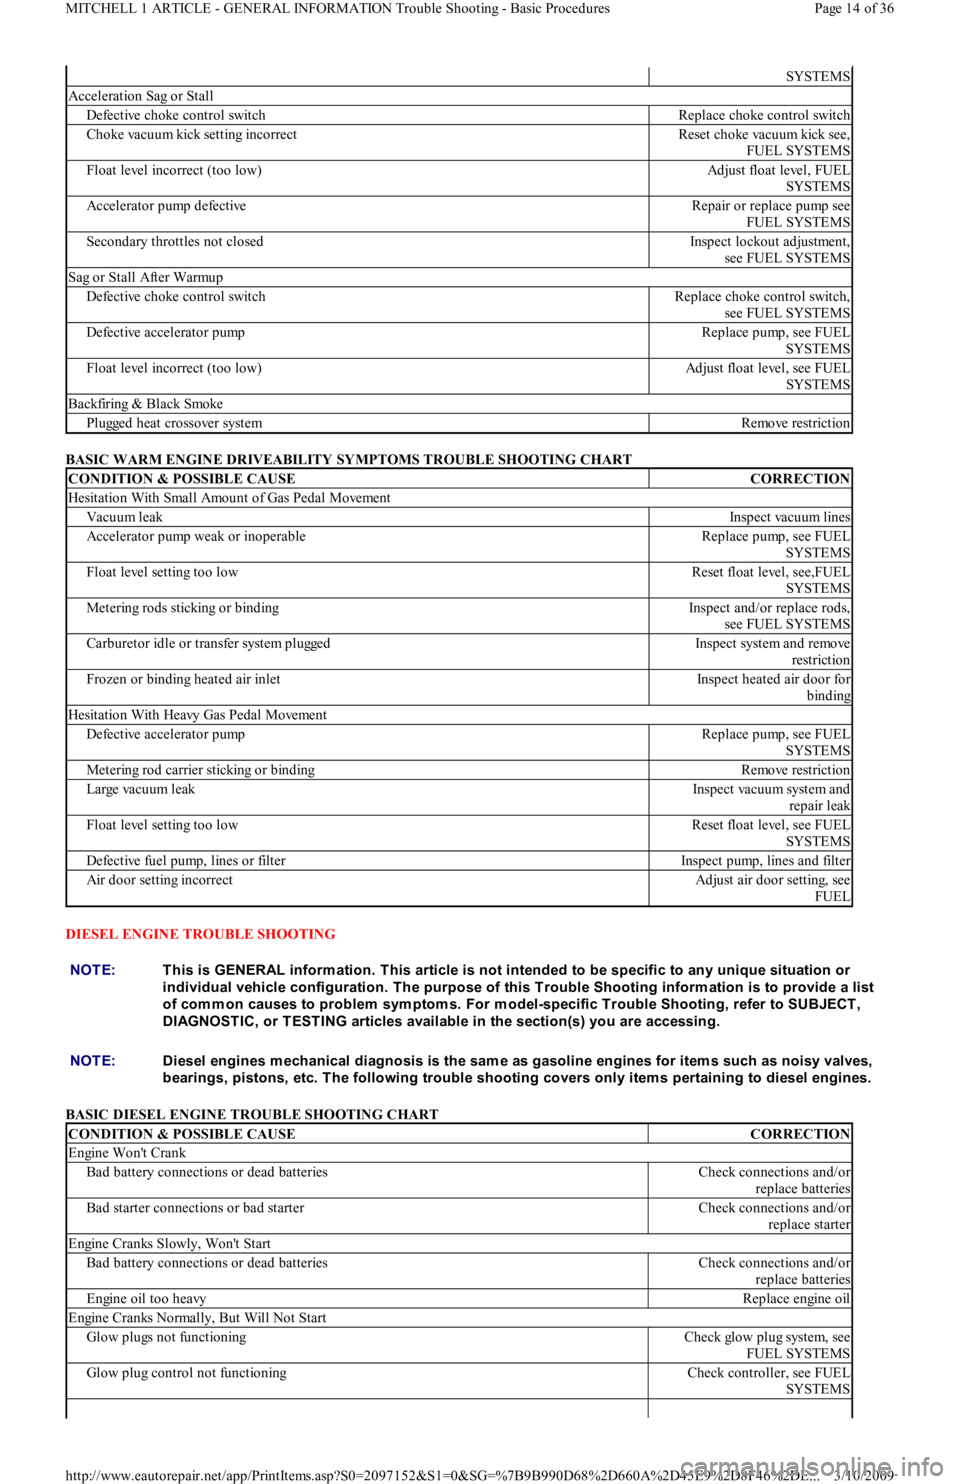
BASIC WARM ENGINE DRIVEABILITY SYMPTOMS TROUBLE SHOOTING CHART
DIESEL ENGINE TROUBLE SHOOTING
BASIC DIESEL ENGINE TROUBLE SHOOTING CHART
SYSTEMS
Acceleration Sag or Stall
Defective choke control switchReplace choke control switch
Choke vacuum kick setting incorrectReset choke vacuum kick see,
FUEL SYSTEMS
Float level incorrect (too low)Adjust float level, FUEL
SYSTEMS
Accelerator pump defectiveRepair or replace pump see
FUEL SYSTEMS
Secondary throttles not closedInspect lockout adjustment,
see FUEL SYSTEMS
Sag or Stall After Warmup
Defective choke control switchReplace choke control switch,
see FUEL SYSTEMS
Defective accelerator pumpReplace pump, see FUEL
SYSTEMS
Float level incorrect (too low)Adjust float level, see FUEL
SYSTEMS
Backfiring & Black Smoke
Plugged heat crossover systemRemove restriction
CONDITION & POSSIBLE CAUSECORRECTION
Hesitation With Small Amount of Gas Pedal Movement
Vacuum leakInspect vacuum lines
Accelerator pump weak or inoperableReplace pump, see FUEL
SYSTEMS
Float level setting too lowReset float level, see,FUEL
SYSTEMS
Metering rods sticking or bindingInspect and/or replace rods,
see FUEL SYSTEMS
Carburetor idle or transfer system pluggedInspect system and remove
restriction
Frozen or binding heated air inletInspect heated air door for
binding
Hesitation With Heavy Gas Pedal Movement
Defective accelerator pumpReplace pump, see FUEL
SYSTEMS
Metering rod carrier sticking or bindingRemove restriction
Large vacuum leakInspect vacuum system and
repair leak
Float level setting too lowReset float level, see FUEL
SYSTEMS
Defective fuel pump, lines or filterInspect pump, lines and filter
Air door setting incorrectAdjust air door setting, see
FUEL
NOTE:This is GENERAL inform ation. This article is not intended to be specific to any unique situation or
individual vehicle configuration. T he purpose of this T rouble Shooting inform ation is to provide a list
of com m on causes to problem sym ptom s. For m odel-specific T rouble Shooting, refer to SUBJECT ,
DIAGNOST IC, or T EST ING articles available in the section(s) you are accessing.
NOTE:Diesel engines m echanical diagnosis is the sam e as gasoline engines for item s such as noisy valves,
bearings, pistons, etc. T he following trouble shooting covers only item s pertaining to diesel engines.
CONDITION & POSSIBLE CAUSECORRECTION
Engine Won't Crank
Bad battery connections or dead batteriesCheck connections and/or
replace batteries
Bad starter connections or bad starterCheck connections and/or
replace starter
Engine Cranks Slowly, Won't Start
Bad battery connections or dead batteriesCheck connections and/or
replace batteries
Engine oil too heavyReplace engine oil
Engine Cranks Normally, But Will Not Start
Glow plugs not functioningCheck glow plug system, see
FUEL SYSTEMS
Glow plug control not functioningCheck controller, see FUEL
SYSTEMS
Page 14 of 36 MITCHELL 1 ARTICLE - GENERAL INFORMATION Trouble Shooting - Basic Procedures
3/10/2009 http://www.eautorepair.net/app/PrintItems.asp?S0=2097152&S1=0&SG=%7B9B990D68%2D660A%2D45E9%2D8F46%2DE
...
Page 232 of 454
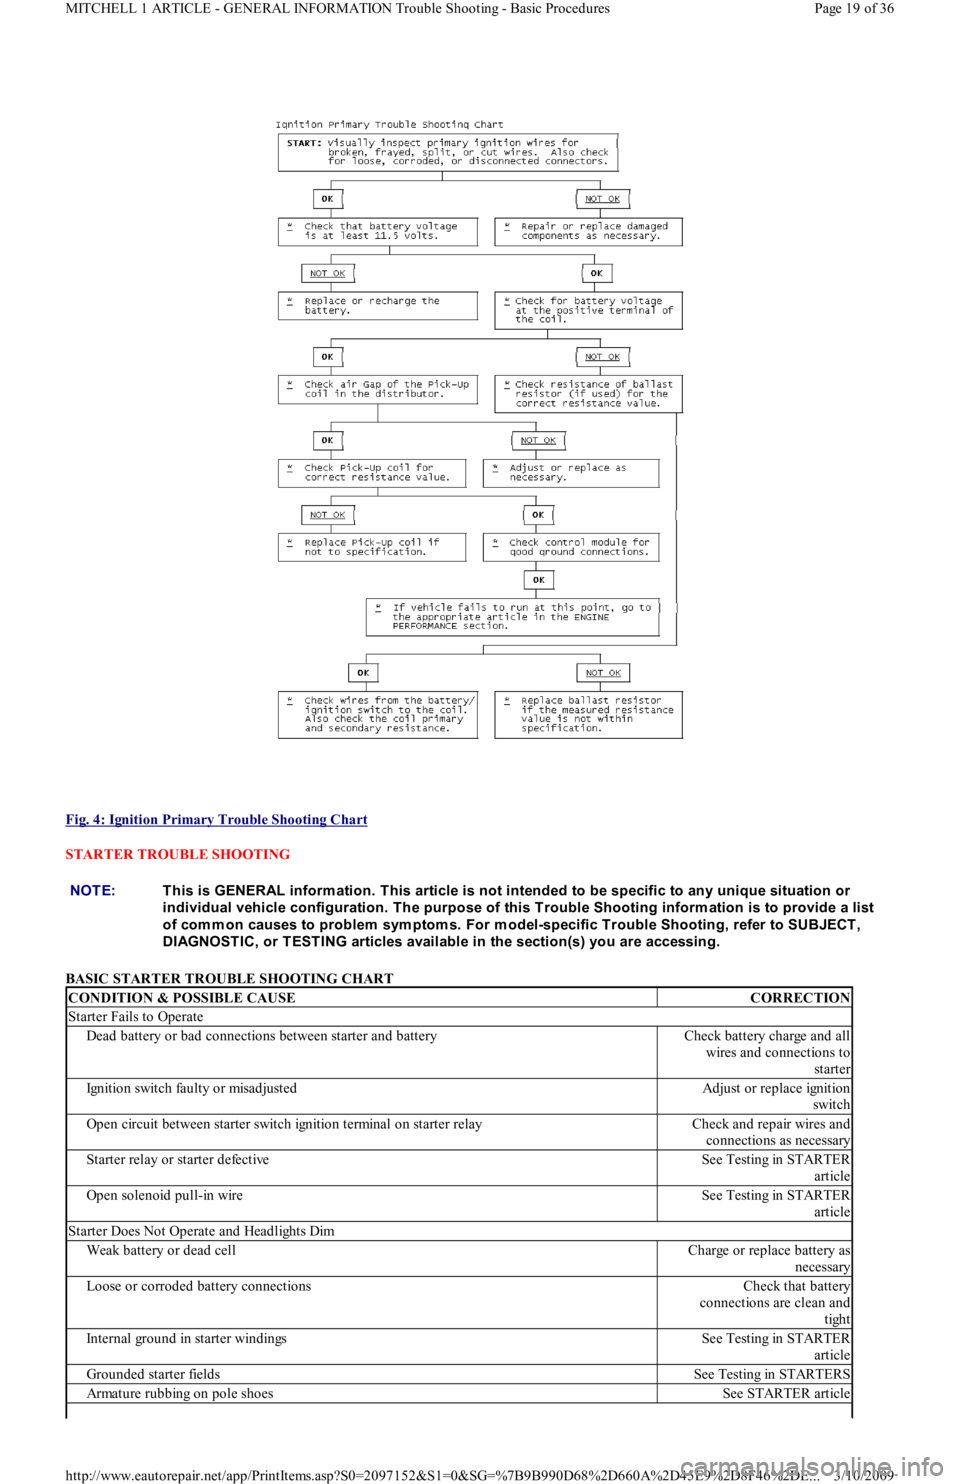
Fig. 4: Ignition Primary Trouble Shooting Chart
STARTER TROUBLE SHOOTING
BASIC STARTER TROUBLE SHOOTING CHART
NOTE:This is GENERAL inform ation. This article is not intended to be specific to any unique situation or
individual vehicle configuration. T he purpose of this T rouble Shooting inform ation is to provide a list
of com m on causes to problem sym ptom s. For m odel-specific T rouble Shooting, refer to SUBJECT ,
DIAGNOST IC, or T EST ING articles available in the section(s) you are accessing.
CONDITION & POSSIBLE CAUSECORRECTION
Starter Fails to Operate
Dead battery or bad connections between starter and batteryCheck battery charge and all
wires and connections to
starter
Ignition switch faulty or misadjustedAdjust or replace ignition
switch
Open circuit between starter switch ignition terminal on starter relayCheck and repair wires and
connections as necessary
Starter relay or starter defectiveSee Testing in STARTER
article
Open solenoid pull-in wireSee Testing in STARTER
article
Starter Does Not Operate and Headlights Dim
Weak battery or dead cellCharge or replace battery as
necessary
Loose or corroded battery connectionsCheck that battery
connections are clean and
tight
Internal ground in starter windingsSee Testing in STARTER
article
Grounded starter fieldsSee Testing in STARTERS
Armature rubbing on pole shoesSee STARTER article
Page 19 of 36 MITCHELL 1 ARTICLE - GENERAL INFORMATION Trouble Shooting - Basic Procedures
3/10/2009 http://www.eautorepair.net/app/PrintItems.asp?S0=2097152&S1=0&SG=%7B9B990D68%2D660A%2D45E9%2D8F46%2DE
...
Page 233 of 454
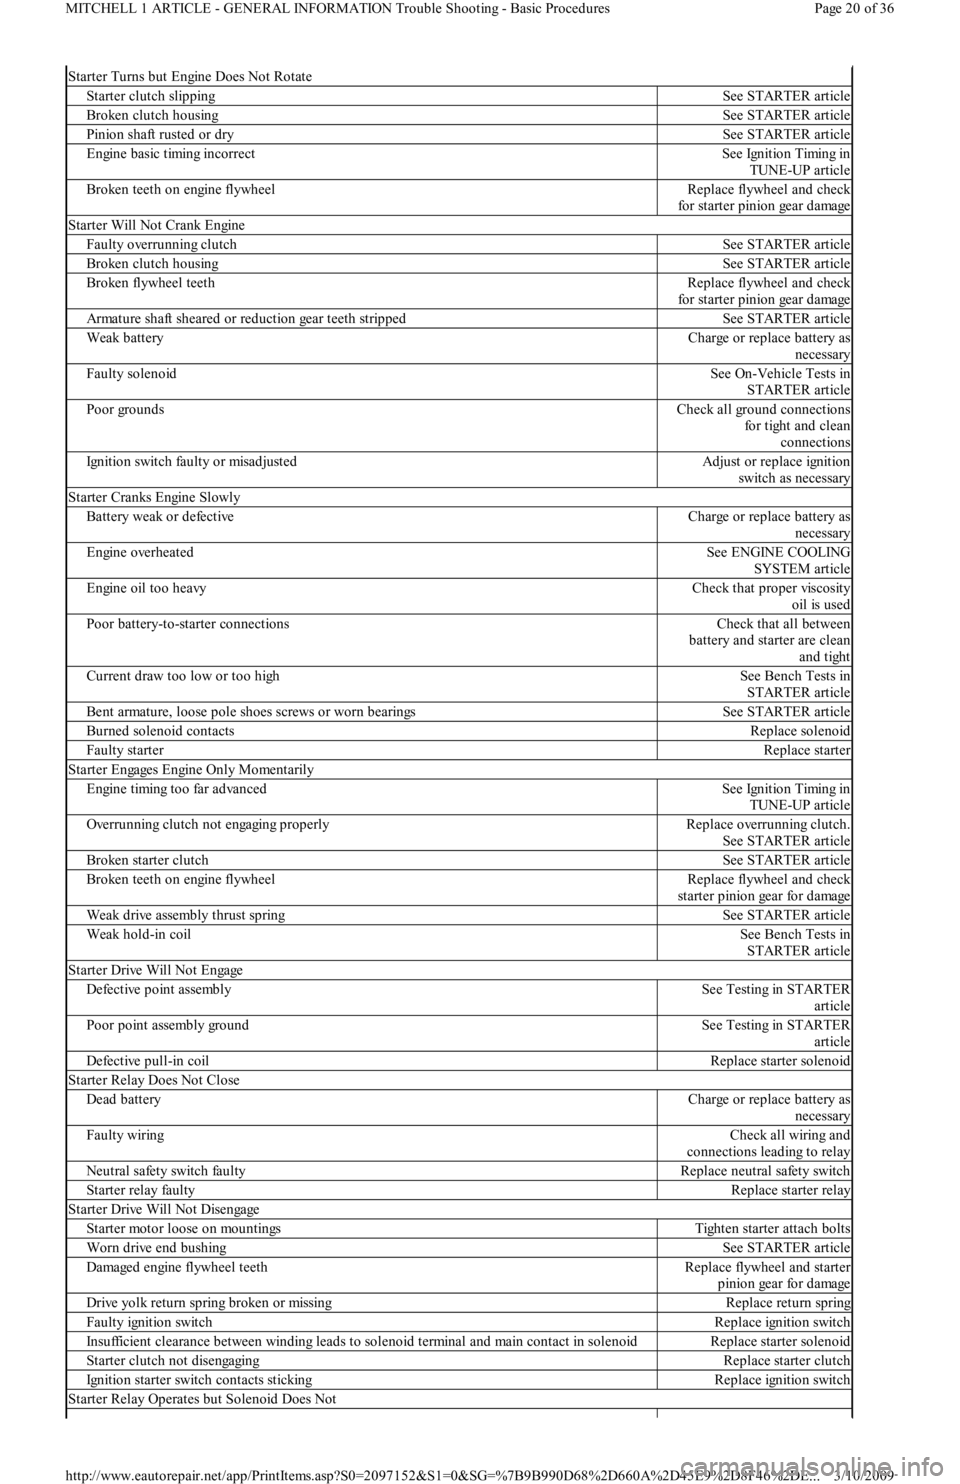
Starter Turns but Engine Does Not Rotate
Starter clutch slippingSee STARTER article
Broken clutch housingSee STARTER article
Pinion shaft rusted or drySee STARTER article
Engine basic timing incorrectSee Ignition Timing in
TUNE-UP article
Broken teeth on engine flywheelReplace flywheel and check
for starter pinion gear damage
Starter Will Not Crank Engine
Faulty overrunning clutchSee STARTER article
Broken clutch housingSee STARTER article
Broken flywheel teethReplace flywheel and check
for starter pinion gear damage
Armature shaft sheared or reduction gear teeth strippedSee STARTER article
Weak batteryCharge or replace battery as
necessary
Faulty solenoidSee On-Vehicle Tests in
STARTER article
Poor groundsCheck all ground connections
for tight and clean
connections
Ignition switch faulty or misadjustedAdjust or replace ignition
switch as necessary
Starter Cranks Engine Slowly
Battery weak or defectiveCharge or replace battery as
necessary
Engine overheatedSee ENGINE COOLING
SYSTEM article
Engine oil too heavyCheck that proper viscosity
oil is used
Poor battery-to-starter connectionsCheck that all between
battery and starter are clean
and tight
Current draw too low or too highSee Bench Tests in
STARTER article
Bent armature, loose pole shoes screws or worn bearingsSee STARTER article
Burned solenoid contactsReplace solenoid
Faulty starterReplace starter
S t a r t e r E n ga ge s E n gin e On l y M o me n t a r il y
Engine timing too far advancedSee Ignition Timing in
TUNE-UP article
Overrunning clutch not engaging properlyReplace overrunning clutch.
See STARTER article
Broken starter clutchSee STARTER article
Broken teeth on engine flywheelReplace flywheel and check
starter pinion gear for damage
Weak drive assembly thrust springSee STARTER article
Weak hold-in coilSee Bench Tests in
STARTER article
Starter Drive Will Not Engage
Defective point assemblySee Testing in STARTER
article
Poor point assembly groundSee Testing in STARTER
article
Defective pull-in coilReplace starter solenoid
Starter Relay Does Not Close
Dead batteryCharge or replace battery as
necessary
Faulty wiringCheck all wiring and
connections leading to relay
Neutral safety switch faultyReplace neutral safety switch
Starter relay faultyReplace starter relay
Starter Drive Will Not Disengage
Starter motor loose on mountingsTighten starter attach bolts
Worn drive end bushingSee STARTER article
Damaged engine flywheel teethReplace flywheel and starter
pinion gear for damage
Drive yolk return spring broken or missingReplace return spring
Faulty ignition switchReplace ignition switch
Insufficient clearance between winding leads to solenoid terminal and main contact in solenoidReplace starter solenoid
Starter clutch not disengagingReplace starter clutch
Ignition starter switch contacts stickingReplace ignition switch
Starter Relay Operates but Solenoid Does Not
Page 20 of 36 MITCHELL 1 ARTICLE - GENERAL INFORMATION Trouble Shooting - Basic Procedures
3/10/2009 http://www.eautorepair.net/app/PrintItems.asp?S0=2097152&S1=0&SG=%7B9B990D68%2D660A%2D45E9%2D8F46%2DE
...
Page 278 of 454
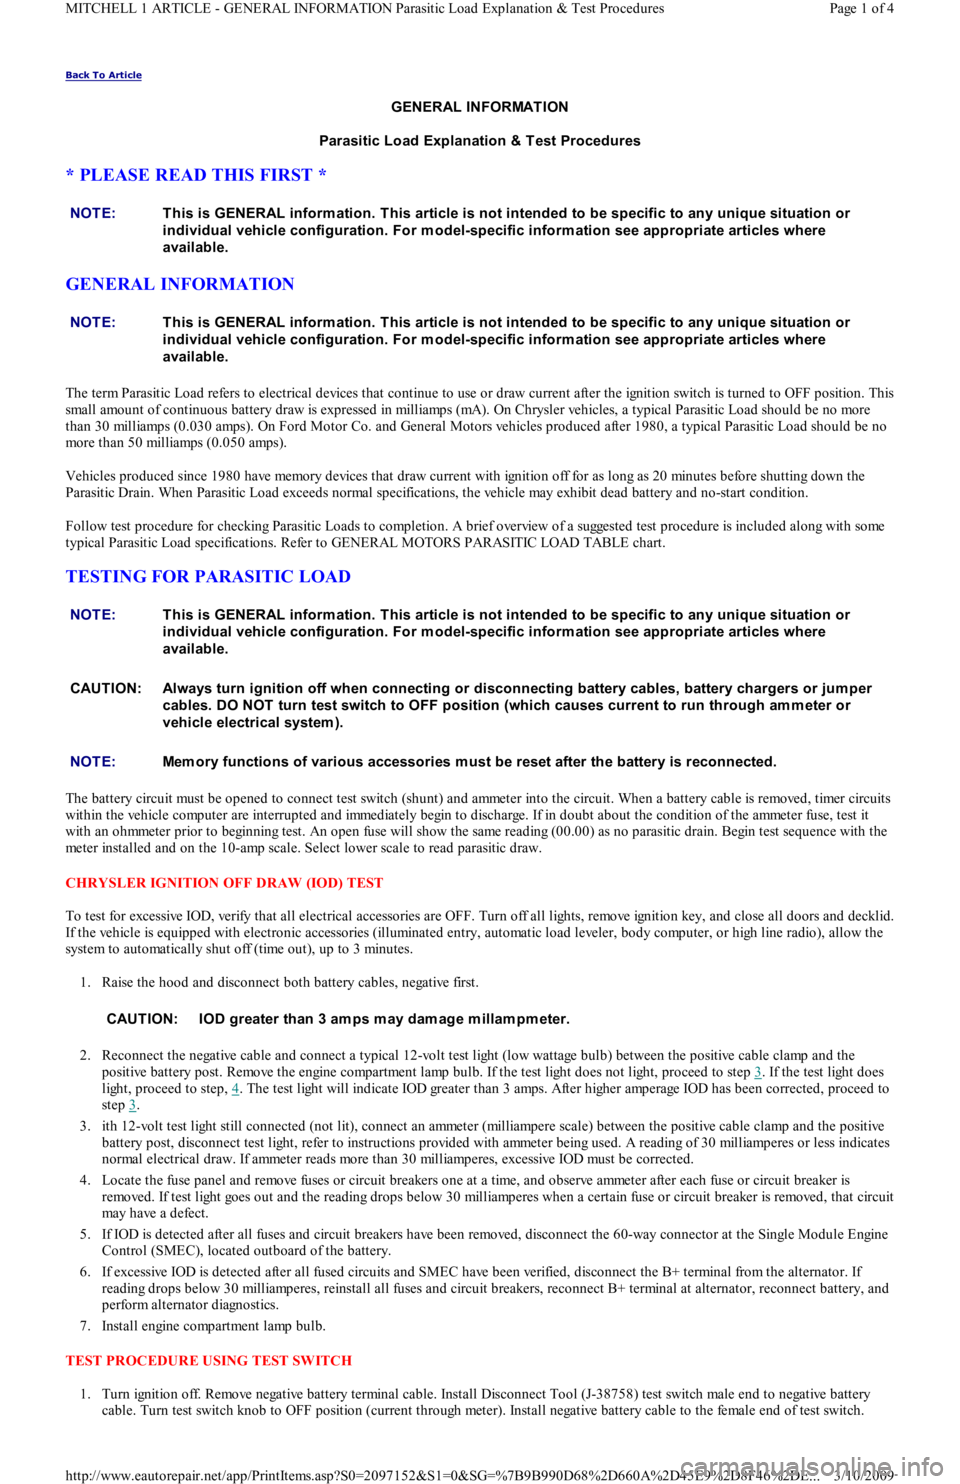
Back To Article
GENERAL INFORMATION
Parasitic Load Explanation & T est Procedures
* PLEASE READ THIS FIRST *
GENERAL INFORMATION
The term Parasitic Load refers to electrical devices that continue to use or draw current after the ignition switch is turned to OFF position. This
small amount of continuous battery draw is expressed in milliamps (mA). On Chrysler vehicles, a typical Parasitic Load should be no more
than 30 milliamps (0.030 amps). On Ford Motor Co. and General Motors vehicles produced after 1980, a typical Parasitic Load should be no
more than 50 milliamps (0.050 amps).
Vehicles produced since 1980 have memory devices that draw current with ignition off for as long as 20 minutes before shutting down the
Parasitic Drain. When Parasitic Load exceeds normal specifications, the vehicle may exhibit dead battery and no-start condition.
Follow test procedure for checking Parasitic Loads to completion. A brief overview of a suggested test procedure is included along with some
typical Parasitic Load specifications. Refer to GENERAL MOTORS PARASITIC LOAD TABLE chart.
TESTING FOR PARASITIC LOAD
The battery circuit must be opened to connect test switch (shunt) and ammeter into the circuit. When a battery cable is removed, timer circuits
within the vehicle computer are interrupted and immediately begin to discharge. If in doubt about the condition of the ammeter fuse, test it
with an ohmmeter prior to beginning test. An open fuse will show the same reading (00.00) as no parasitic drain. Begin test sequence with the
meter installed and on the 10-amp scale. Select lower scale to read parasitic draw.
CHRYSLER IGNITION OFF DRAW (IOD) TEST
To test for excessive IOD, verify that all electrical accessories are OFF. Turn off all lights, remove ignition key, and close all doors and decklid.
If the vehicle is equipped with electronic accessories (illuminated entry, automatic load leveler, body computer, or high line radio), allow the
system to automatically shut off (time out), up to 3 minutes.
1. Raise the hood and disconnect both battery cables, negative first.
2. Reconnect the negative cable and connect a typical 12-volt test light (low wattage bulb) between the positive cable clamp and the
positive battery post. Remove the engine compartment lamp bulb. If the test light does not light, proceed to step 3
. If the test light does
light, proceed to step, 4
. The test light will indicate IOD greater than 3 amps. After higher amperage IOD has been corrected, proceed to
step 3
.
3. ith 12-volt test light still connected (not lit), connect an ammeter (milliampere scale) between the positive cable clamp and the positive
battery post, disconnect test light, refer to instructions provided with ammeter being used. A reading of 30 milliamperes or less indicates
normal electrical draw. If ammeter reads more than 30 milliamperes, excessive IOD must be corrected.
4. Locate the fuse panel and remove fuses or circuit breakers one at a time, and observe ammeter after each fuse or circuit breaker is
removed. If test light goes out and the reading drops below 30 milliamperes when a certain fuse or circuit breaker is removed, that circuit
may have a defect.
5. If IOD is detected after all fuses and circuit breakers have been removed, disconnect the 60-way connector at the Single Module Engine
Control (SMEC), located outboard of the battery.
6. If excessive IOD is detected after all fused circuits and SMEC have been verified, disconnect the B+ terminal from the alternat o r. If
reading drops below 30 milliamperes, reinstall all fuses and circuit breakers, reconnect B+ terminal at alternator, reconnect battery, and
perform alternator diagnostics.
7. Install engine compartment lamp bulb.
TEST PROCEDURE USING TEST SWITCH
1. Turn ignition off. Remove negative battery terminal cable. Install Disconnect Tool (J-38758) test switch male end to negative battery
cable. Turn test switch knob to OFF position (current through meter). Install negative battery cable to the female end of test switch. NOTE:This is GENERAL inform ation. This article is not intended to be specific to any unique situation or
individual vehicle configuration. For m odel-specific inform ation see appropriate articles where
available.
NOTE:This is GENERAL inform ation. This article is not intended to be specific to any unique situation or
individual vehicle configuration. For m odel-specific inform ation see appropriate articles where
available.
NOTE:This is GENERAL inform ation. This article is not intended to be specific to any unique situation or
individual vehicle configuration. For m odel-specific inform ation see appropriate articles where
available.
CAUT ION: Always turn ignition off when connecting or disconnecting battery cables, battery chargers or jum per
cables. DO NOT turn test switch to OFF position (which causes current to run through am m eter or
vehicle electrical system ).
NOTE:Mem ory functions of various accessories m ust be reset after the battery is reconnected.
CAUT ION: IOD greater than 3 am ps m ay dam age m illam pm eter.
Page 1 of 4 MITCHELL 1 ARTICLE - GENERAL INFORMATION Parasitic Load Explanation & Test Procedures
3/10/2009 http://www.eautorepair.net/app/PrintItems.asp?S0=2097152&S1=0&SG=%7B9B990D68%2D660A%2D45E9%2D8F46%2DE
...