steering rack FORD FIESTA 1989 Service User Guide
[x] Cancel search | Manufacturer: FORD, Model Year: 1989, Model line: FIESTA, Model: FORD FIESTA 1989Pages: 296, PDF Size: 10.65 MB
Page 80 of 296
8Disconnect the accelerator cable from the
throttle linkage as described in Chapter 4D.
Secure the cable clear of the
engine/transmission.
9 Releasing its wire clip, unplug the wiring
connector from the power steering pressure
switch (where fitted), then disconnect the
earth cable from the engine lifting eye. Refit
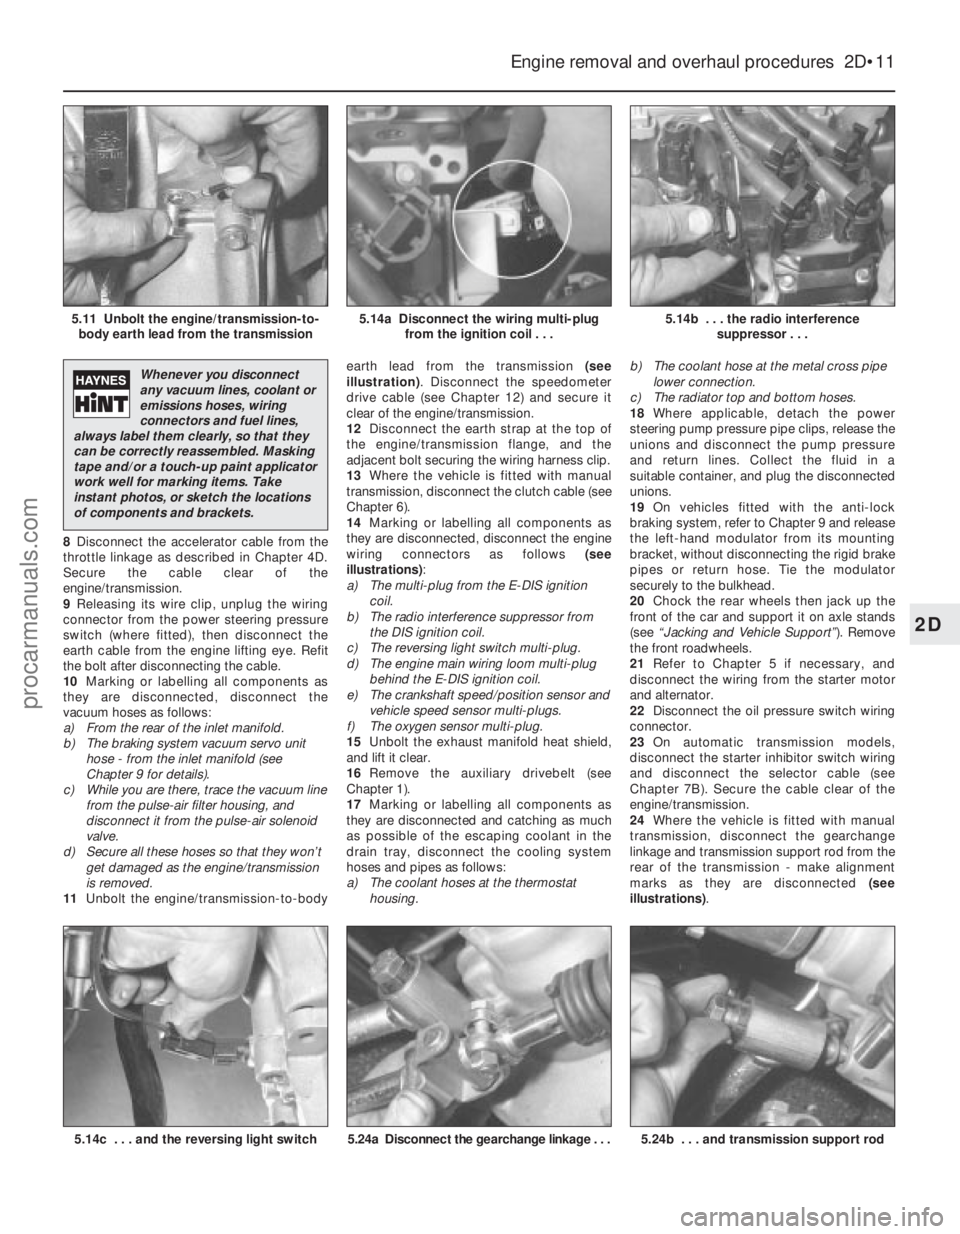
the bolt after disconnecting the cable.
10 Marking or labelling all components as
they are disconnected, disconnect the
vacuum hoses as follows:
a) From the rear of the inlet manifold.
b) The braking system vacuum servo unit
hose - from the inlet manifold (see
Chapter 9 for details).
c) While you are there, trace the vacuum line
from the pulse-air filter housing, and
disconnect it from the pulse-air solenoid
valve.
d) Secure all these hoses so that they won’t
get damaged as the engine/transmission
is removed.
11 Unbolt the engine/transmission-to-body earth lead from the transmission
(see
illustration) . Disconnect the speedometer
drive cable (see Chapter 12) and secure it
clear of the engine/transmission.
12 Disconnect the earth strap at the top of
the engine/transmission flange, and the
adjacent bolt securing the wiring harness clip.
13 Where the vehicle is fitted with manual
transmission, disconnect the clutch cable (see
Chapter 6).
14 Marking or labelling all components as
they are disconnected, disconnect the engine
wiring connectors as follows (see
illustrations) :
a) The multi-plug from the E-DIS ignition
coil.
b) The radio interference suppressor from
the DIS ignition coil.
c) The reversing light switch multi-plug.
d) The engine main wiring loom multi-plug
behind the E-DIS ignition coil.
e) The crankshaft speed/position sensor and vehicle speed sensor multi-plugs.
f) The oxygen sensor multi-plug.
15 Unbolt the exhaust manifold heat shield,
and lift it clear.
16 Remove the auxiliary drivebelt (see
Chapter 1).
17 Marking or labelling all components as
they are disconnected and catching as much
as possible of the escaping coolant in the
drain tray, disconnect the cooling system
hoses and pipes as follows:
a) The coolant hoses at the thermostat housing. b)
The coolant hose at the metal cross pipe
lower connection.
c) The radiator top and bottom hoses.
18 Where applicable, detach the power
steering pump pressure pipe clips, release the
unions and disconnect the pump pressure
and return lines. Collect the fluid in a
suitable container, and plug the disconnected
unions.
19 On vehicles fitted with the anti-lock
braking system, refer to Chapter 9 and release
the left-hand modulator from its mounting
bracket, without disconnecting the rigid brake
pipes or return hose. Tie the modulator
securely to the bulkhead.
20 Chock the rear wheels then jack up the
front of the car and support it on axle stands
(see “Jacking and Vehicle Support” ). Remove
the front roadwheels.
21 Refer to Chapter 5 if necessary, and
disconnect the wiring from the starter motor
and alternator.
22 Disconnect the oil pressure switch wiring
connector.
23 On automatic transmission models,
disconnect the starter inhibitor switch wiring
and disconnect the selector cable (see
Chapter 7B). Secure the cable clear of the
engine/transmission.
24 Where the vehicle is fitted with manual
transmission, disconnect the gearchange
linkage and transmission support rod from the
rear of the transmission - make alignment
marks as they are disconnected (see
illustrations) .
Engine removal and overhaul procedures 2D•11
5.14b . . . the radio interference
suppressor . . .5.14a Disconnect the wiring multi-plugfrom the ignition coil . . .5.11 Unbolt the engine/transmission-to-body earth lead from the transmission
5.24b . . . and transmission support rod5.24a Disconnect the gearchange linkage . . .5.14c . . . and the reversing light switch
2D
1595Ford Fiesta Remake
Whenever you disconnect
any vacuum lines, coolant or
emissions hoses, wiring
connectors and fuel lines,
always label them clearly, so that they
can be correctly reassembled. Masking
tape and/or a touch-up paint applicator
work well for marking items. Take
instant photos, or sketch the locations
of components and brackets.
procarmanuals.com
http://vnx.su
Page 81 of 296
25On automatic transmission models, clean
around the unions, then disconnect the fluid
pipes from the transmission. Plug the
openings in the transmission and the pipe
unions after removal.
26 Refer to Chapter 10 and remove the front
suspension crossmember.
27 Unscrew the nuts to disconnect the
exhaust system front downpipe from the
manifold. Undo the nuts securing the catalytic
converter to the rear part of the exhaust
system, and remove the converter and
downpipe assembly.
28 On vehicles fitted with the anti-lock braking
system, refer to Chapter 9 and release the
right-hand modulator from its mounting
bracket without disconnecting the rigid brake
pipes or return hose. Tie the modulator
securely to the bulkhead. Additionally, undo
the three bolts securing the modulator bracket.
29 Disconnect both anti-roll bar links from
their respective suspension struts, and both
track rod end ball joints from their spindle
carriers (see Chapter 10).
30 Unscrew the retaining nut and withdraw
the Torx-type clamp bolt securing the lower
suspension arm to the spindle carrier on each
side.
31 Insert a suitable lever between the right-
hand driveshaft inner joint and the
transmission housing, and prise free the
driveshaft from the transmission; be prepared
for oil spillage from the transmission case
through the vacated driveshaft aperture. As it
is being prised free, simultaneously pull the
roadwheel outwards on that side to enable the
driveshaft inboard end to separate from the
transmission. Once it is free, suspend and
support the driveshaft from the steering gear,
to prevent unnecessary strain being placed on
the driveshaft joints.
32 Insert a suitable plastic plug (or if
available, an old driveshaft joint), into the
transmission driveshaft aperture, to
immobilise the gears of the differential unit.
33 Proceed as described above in
paragraphs 31 and 32, and disconnect the
left-hand driveshaft from the transmission.
34 Remove the oil filter, referring to Chapter 1
if necessary.
35 Connect a suitable lift hoist and sling to
the engine, connecting to the lift eyes. When
securely connected, take the weight of the
engine/transmission unit so that the tension is
relieved from the mountings.
36 Unbolt the engine rear right-hand
mounting from the body (one bolt in the wheel
arch, one nut in the engine compartment),
then unbolt the engine front right-hand
mounting from the alternator mounting
bracket. Unbolt the transmission bearer from
the underbody.
37 The engine/transmission unit should now
be hanging on the hoist only, with all
components which connect it to the rest of
the vehicle disconnected or removed, and
secured well clear of the unit. Make a final
check that this is the case. 38
Lower the engine/transmission to the
ground, and withdraw it from under the
vehicle.
39 Referring to the relevant Part of Chapter 7,
separate the transmission from the engine.
40 While the engine/transmission is removed,
check the mountings; renew them if they are
worn or damaged. Similarly, check the
condition of all coolant and vacuum hoses
and pipes (see Chapter 1); components that
are normally hidden can now be checked
properly, and should be renewed if there is
any doubt at all about their condition. Where
the vehicle is fitted with manual transmission,
take the opportunity to overhaul the clutch
components (see Chapter 6). It is regarded by
many as good working practice to renew the
clutch assembly as a matter of course,
whenever major engine overhaul work is
carried out. Check also the condition of all
components (such as the transmission oil
seals) disturbed on removal, and renew any
that are damaged or worn.
Refitting
41 Refitting is a reversal of removal, however
note the following additional points:
a) Refer to the applicable Chapters and Sections as for removal.
b) Fit new spring clips to the grooves in the
inboard end of the right- and left-hand
driveshaft joints. Lubricate the splines
with transmission oil prior to fitting.
c) Renew the exhaust flange gaskets when reconnecting the exhaust. Ensure that all
wires are routed clear of the exhaust
system, and that the heat shields are
securely and correctly fitted.
d) Ensure that all earth lead connections are
clean and securely made.
e) Tighten all nuts and bolts to the specified
torque.
f) Fit a new oil filter, and refill the engine and transmission with oil, with reference to
Chapter 1.
g) Refill the cooling system with reference to
Chapter 1.
h) Bleed the power steering system with reference to Chapter 10.
42 When engine and transmission refitting is
complete, refer to the procedures described
in Section 19 before restarting the engine.
6 Engine overhaul - preliminary information
It is much easier to dismantle and work on
the engine if it is mounted on a portable
engine stand. These stands can often be hired
from a tool hire shop. Before the engine is
mounted on a stand, the flywheel/driveplate
should be removed so that the stand bolts
can be tightened into the end of the cylinder
block/crankcase. If a stand is not available, it is possible to
dismantle the engine with it suitably supported on a sturdy, workbench or on the
floor. Be careful not to tip or drop the engine
when working without a stand.
If you intend to obtain a reconditioned
engine, all ancillaries must be removed first, to
be transferred to the replacement engine (just
as they will if you are doing a complete engine
overhaul yourself). These components include
the following:
a) Alternator/power steering pump and
mounting brackets.
b) DIS/E-DIS ignition coil unit (and mounting
bracket), distributor, HT leads and spark
plugs.
c) The thermostat and housing cover.
d) Carburettor/fuel injection system
components.
e) Inlet and exhaust manifolds.
f) Oil filter.
g) Fuel pump.
h) Engine mountings.
i) Flywheel/driveplate.
j) Water pump.
Note: When removing the external
components from the engine, pay close
attention to details that may be helpful or
important during refitting. Note the fitted
positions of gaskets, seals, washers, bolts and
other small items. If you are obtaining a “short” engine
(cylinder block/crankcase, crankshaft, pistons
and connecting rods all assembled), then the
cylinder head, timing chain/belt (together with
tensioner, tensioner and idler pulleys and
covers) sump and oil pump will have to be
removed also. If a complete overhaul is planned, the
engine can be dismantled in the order given
below, referring to Part A, B or C of this
Chapter unless otherwise stated.
a) Inlet and exhaust manifolds.
b) Timing chain/belt, tensioner and
sprockets.
c) Cylinder head.
d) Flywheel/driveplate.
e) Sump.
f) Oil pump.
g) Pistons (with connecting rods).
h) Crankshaft.
i) Camshaft and tappets (HCS engines).
7 Cylinder head - dismantling
4
Note:New and reconditioned cylinder heads
are available from the manufacturers, and from
engine overhaul specialists. Due to the fact
that some specialist tools are required for the
dismantling and inspection procedures, and
new components may not be readily available,
it may be more practical and economical for
the home mechanic to purchase a
reconditioned head, rather than to dismantle,
inspect and recondition the original head.
1 Remove the cylinder head as described in
Part A, B or C of this Chapter (as applicable).
2D•12 Engine removal and overhaul procedures
1595Ford Fiesta Remakeprocarmanuals.com
http://vnx.su
Page 109 of 296

3Accelerator cable (manual
transmission models) -
removal, refitting and adjustment
1
Removal
1 Disconnect the battery negative (earth) lead
(refer to Chapter 5A, Section 1).
2 Working inside the vehicle, disconnect the
cable from the top of the accelerator pedal,
release the grommet and pull the cable free
from the pedal. Withdraw the cable through
the engine side of the bulkhead.
3 Refer to Section 2 and remove the air
cleaner.
4 Detach the inner cable from the carburettor
linkage.
5 Prise free the retaining clip, detach the
outer cable from the support bracket, and
remove the cable (see illustrations) .
Refitting and adjustment
6To refit the cable, feed the inner cable
through the bulkhead, and reconnect the inner
cable to the accelerator pedal. Note that a
plastic sleeve is supplied with new cables for
the purpose of routing through the bulkhead
panel.
7 Locate the grommet in the bulkhead, then
push the outer cable into it to secure it in the
bulkhead.
8 Lubricate the cable grommet at the
carburettor end with a mild soapy solution, then reconnect the cable to the carburettor.
Locate the outer cable by pulling it towards
the rocker cover.
9
Have an assistant depress the accelerator
pedal fully, and hold it in this position. The
outer cable should be seen to move in its
grommet. Refit the securing clip to the
bracket, then release the accelerator pedal.
10 Depress the accelerator pedal, then
release it and check that the throttle opens
and shuts fully. Further adjust if necessary
before refitting the air cleaner and
reconnecting the battery.
4 Accelerator cable (CTX automatic transmission
models) - adjustment
4
The system for operating the throttle-plate
in the carburettor on CTX automatic
transmission equipped vehicles is completely
different to that employed on manual
transmission vehicles. The cable from the
accelerator pedal leads to a linkage
mechanism which is bolted to the
transmission housing. Two further cables lead
from this linkage mechanism, one of which
operates the throttle-plate in the carburettor. As all three cables have to be adjusted at
the same time, and access to a Ford special
tool is required, it is recommended that a Ford
dealer be entrusted with cable adjustments,
or renewal.
5 Accelerator pedal -
removal and refitting
1
Removal
1 Disconnect the battery negative (earth) lead
(refer to Chapter 5A, Section 1).
2 Peel back the carpet and insulation from
the driver’s footwell to allow access to the
accelerator pedal.
3 Detach the accelerator cable from the pedal
(see Section 3), then release the circlip from
the pivot shaft and remove the accelerator
pedal.
Refitting
4 Refit in the reverse order of removal. On
completion, check the action of the pedal and
the cable to ensure that the throttle has full
unrestricted movement, and fully returns
when released.
5 Reconnect the battery negative lead.
6 Choke cable - removal,
refitting and adjustment
1
Removal
1 Disconnect the battery negative (earth) lead
(refer to Chapter 5A, Section 1).
2 Refer to Section 2 and remove the air
cleaner.
3 Referring to Chapter 10, Section 20, for
further details and illustrations, remove the
choke control knob on the side of the steering
column shroud by pushing in the pin located
on the side of the knob and withdrawing.
4 Detach the steering column lower shroud,
disconnect the multi-plug from the choke
warning light switch/pull control assembly,
and unscrew the collar securing the
switch/pull control assembly to the shroud.
5 Disconnect the choke inner cable from its
location on the carburettor choke linkage,
then release the outer cable retaining clip (see
illustrations) .
6 Push the bulkhead panel grommet through
the bulkhead and remove the cable.
Refitting
7 Route the cable through the bulkhead then
secure the bulkhead panel grommet to its
location.
8 Reconnect the choke inner cable to its
location on the carburettor choke linkage.
9 Refit the choke warning light switch/pull
control assembly to the lower steering column
shroud and secure with the collar, then
reconnect the multi-plug.
10 Refit and secure the lower steering
column shroud, then refit the choke control
knob.
11 Pull the choke control knob to the fully-on
position. Hold the choke in the fully-on
4A•4 Fuel system – carburettor engines
6.5b Choke outer cable retaining clip
released6.5a Disconnect the inner cable from thechoke linkage
3.5b . . . then release from its support bracket3.5a Remove the accelerator outer cablesecuring clip . . .
1595Ford Fiesta Remakeprocarmanuals.com
http://vnx.su
Page 131 of 296
module from inside the passenger
compartment as its mounting bracket
retaining tags are compressed and released
from the engine compartment. Do not allow
the module to drop into the passenger
compartment as irreparable damage is likely
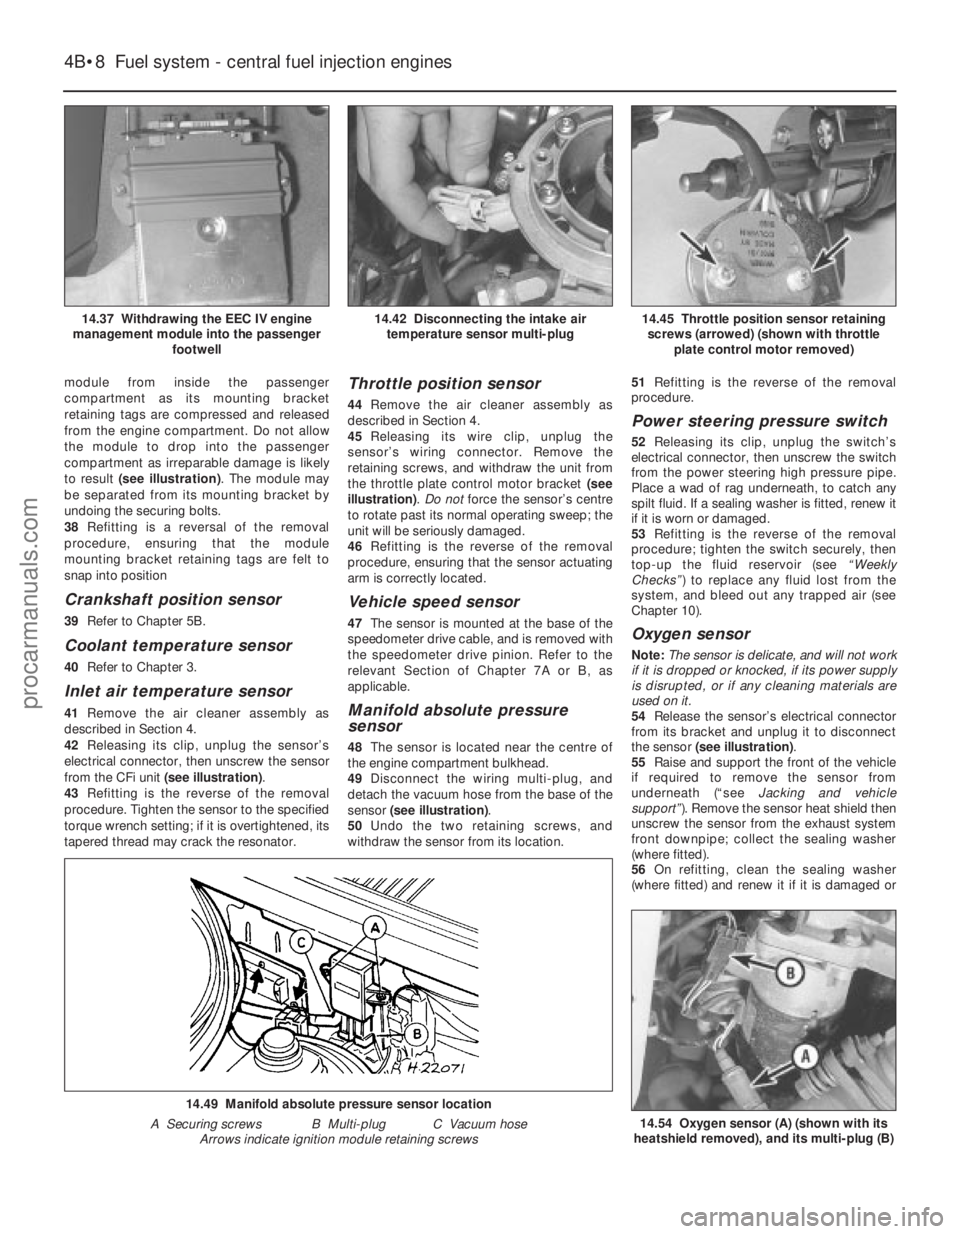
to result (see illustration) . The module may
be separated from its mounting bracket by
undoing the securing bolts.
38 Refitting is a reversal of the removal
procedure, ensuring that the module
mounting bracket retaining tags are felt to
snap into position
Crankshaft position sensor
39 Refer to Chapter 5B.
Coolant temperature sensor
40Refer to Chapter 3.
Inlet air temperature sensor
41Remove the air cleaner assembly as
described in Section 4.
42 Releasing its clip, unplug the sensor’s
electrical connector, then unscrew the sensor
from the CFi unit (see illustration).
43 Refitting is the reverse of the removal
procedure. Tighten the sensor to the specified
torque wrench setting; if it is overtightened, its
tapered thread may crack the resonator.
Throttle position sensor
44 Remove the air cleaner assembly as
described in Section 4.
45 Releasing its wire clip, unplug the
sensor’s wiring connector. Remove the
retaining screws, and withdraw the unit from
the throttle plate control motor bracket (see
illustration) . Do not force the sensor’s centre
to rotate past its normal operating sweep; the
unit will be seriously damaged.
46 Refitting is the reverse of the removal
procedure, ensuring that the sensor actuating
arm is correctly located.
Vehicle speed sensor
47 The sensor is mounted at the base of the
speedometer drive cable, and is removed with
the speedometer drive pinion. Refer to the
relevant Section of Chapter 7A or B, as
applicable.
Manifold absolute pressure
sensor
48 The sensor is located near the centre of
the engine compartment bulkhead.
49 Disconnect the wiring multi-plug, and
detach the vacuum hose from the base of the
sensor (see illustration) .
50 Undo the two retaining screws, and
withdraw the sensor from its location. 51
Refitting is the reverse of the removal
procedure.
Power steering pressure switch
52 Releasing its clip, unplug the switch’s
electrical connector, then unscrew the switch
from the power steering high pressure pipe.
Place a wad of rag underneath, to catch any
spilt fluid. If a sealing washer is fitted, renew it
if it is worn or damaged.
53 Refitting is the reverse of the removal
procedure; tighten the switch securely, then
top-up the fluid reservoir (see “Weekly
Checks” ) to replace any fluid lost from the
system, and bleed out any trapped air (see
Chapter 10).
Oxygen sensor
Note: The sensor is delicate, and will not work
if it is dropped or knocked, if its power supply
is disrupted, or if any cleaning materials are
used on it.
54 Release the sensor’s electrical connector
from its bracket and unplug it to disconnect
the sensor (see illustration) .
55 Raise and support the front of the vehicle
if required to remove the sensor from
underneath (“see Jacking and vehicle
support” ). Remove the sensor heat shield then
unscrew the sensor from the exhaust system
front downpipe; collect the sealing washer
(where fitted).
56 On refitting, clean the sealing washer
(where fitted) and renew it if it is damaged or
4B•8 Fuel system - central fuel injection engines
14.54 Oxygen sensor (A) (shown with its
heatshield removed), and its multi-plug (B)
14.49 Manifold absolute pressure sensor location
A Securing screws B Multi-plug C Vacuum hose\
Arrows indicate ignition module retaining screws
14.45 Throttle position sensor retainingscrews (arrowed) (shown with throttle plate control motor removed)14.42 Disconnecting the intake airtemperature sensor multi-plug
1595Ford Fiesta Remake
14.37 Withdrawing the EEC IV engine
management module into the passenger footwellprocarmanuals.com
http://vnx.su
Page 140 of 296
Crankshaft position sensor
40Refer to Chapter 5B.
Coolant temperature sensor
41Refer to Chapter 3.
Inlet air temperature sensor
42Remove the air inlet components as
described in Section 4.
43 Releasing its clip, unplug the sensor’s
electrical connector, then unscrew the sensor
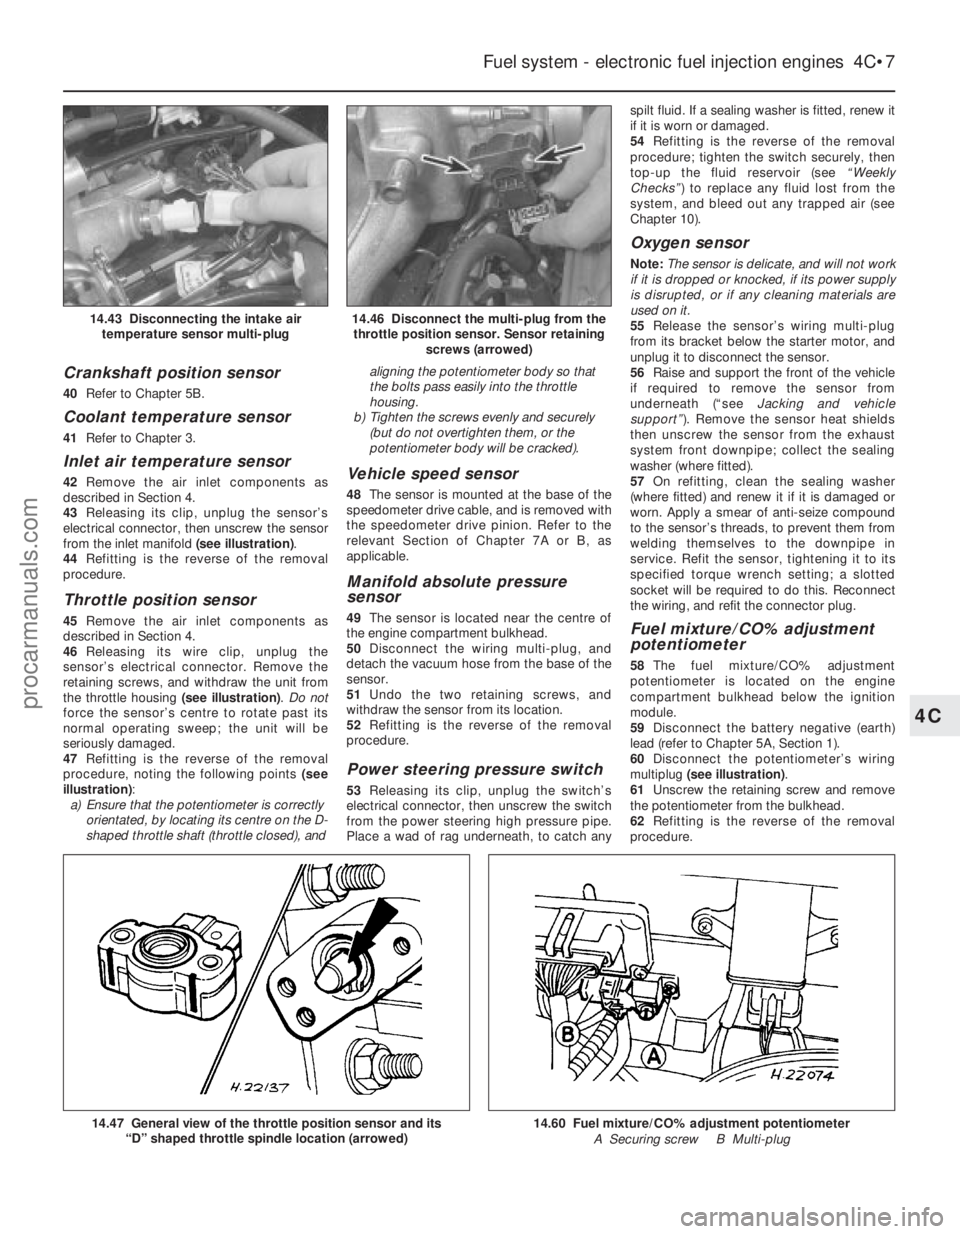
from the inlet manifold (see illustration).
44 Refitting is the reverse of the removal
procedure.
Throttle position sensor
45 Remove the air inlet components as
described in Section 4.
46 Releasing its wire clip, unplug the
sensor’s electrical connector. Remove the
retaining screws, and withdraw the unit from
the throttle housing (see illustration). Do not
force the sensor’s centre to rotate past its
normal operating sweep; the unit will be
seriously damaged.
47 Refitting is the reverse of the removal
procedure, noting the following points (see
illustration) :
a) Ensure that the potentiometer is correctly
orientated, by locating its centre on the D-
shaped throttle shaft (throttle closed), and aligning the potentiometer body so that
the bolts pass easily into the throttle
housing.
b) Tighten the screws evenly and securely
(but do not overtighten them, or the
potentiometer body will be cracked).
Vehicle speed sensor
48 The sensor is mounted at the base of the
speedometer drive cable, and is removed with
the speedometer drive pinion. Refer to the
relevant Section of Chapter 7A or B, as
applicable.
Manifold absolute pressure
sensor
49 The sensor is located near the centre of
the engine compartment bulkhead.
50 Disconnect the wiring multi-plug, and
detach the vacuum hose from the base of the
sensor.
51 Undo the two retaining screws, and
withdraw the sensor from its location.
52 Refitting is the reverse of the removal
procedure.
Power steering pressure switch
53 Releasing its clip, unplug the switch’s
electrical connector, then unscrew the switch
from the power steering high pressure pipe.
Place a wad of rag underneath, to catch any spilt fluid. If a sealing washer is fitted, renew it
if it is worn or damaged.
54
Refitting is the reverse of the removal
procedure; tighten the switch securely, then
top-up the fluid reservoir (see “Weekly
Checks” ) to replace any fluid lost from the
system, and bleed out any trapped air (see
Chapter 10).
Oxygen sensor
Note: The sensor is delicate, and will not work
if it is dropped or knocked, if its power supply
is disrupted, or if any cleaning materials are
used on it.
55 Release the sensor’s wiring multi-plug
from its bracket below the starter motor, and
unplug it to disconnect the sensor.
56 Raise and support the front of the vehicle
if required to remove the sensor from
underneath (“see Jacking and vehicle
support” ). Remove the sensor heat shields
then unscrew the sensor from the exhaust
system front downpipe; collect the sealing
washer (where fitted).
57 On refitting, clean the sealing washer
(where fitted) and renew it if it is damaged or
worn. Apply a smear of anti-seize compound
to the sensor’s threads, to prevent them from
welding themselves to the downpipe in
service. Refit the sensor, tightening it to its
specified torque wrench setting; a slotted
socket will be required to do this. Reconnect
the wiring, and refit the connector plug.
Fuel mixture/CO% adjustment
potentiometer
58 The fuel mixture/CO% adjustment
potentiometer is located on the engine
compartment bulkhead below the ignition
module.
59 Disconnect the battery negative (earth)
lead (refer to Chapter 5A, Section 1).
60 Disconnect the potentiometer’s wiring
multiplug (see illustration) .
61 Unscrew the retaining screw and remove
the potentiometer from the bulkhead.
62 Refitting is the reverse of the removal
procedure.
Fuel system - electronic fuel injection engines 4C•7
14.46 Disconnect the multi-plug from the throttle position sensor. Sensor retaining screws (arrowed)14.43 Disconnecting the intake airtemperature sensor multi-plug
14.60 Fuel mixture/CO% adjustment potentiometer
A Securing screw B Multi-plug14.47 General view of the throttle position sensor and its “D” shaped throttle spindle location (arrowed)
4C
1595Ford Fiesta Remakeprocarmanuals.com
http://vnx.su
Page 150 of 296
b)Tighten the screws evenly and securely
(but do not overtighten them, or the
potentiometer body will be cracked).
Vehicle speed sensor
48 The sensor is mounted at the base of the
speedometer drive cable, and is removed with
the speedometer drive pinion. Refer to the
relevant Section of Chapter 7A or B, as
applicable.
Power steering pressure switch
49 Releasing its clip, unplug the switch’s
electrical connector, then unscrew the switch
from the power steering high pressure pipe.
Place a wad of rag underneath, to catch any
spilt fluid. If a sealing washer is fitted, renew it
if it is worn or damaged.
50 Refitting is the reverse of the removal
procedure; tighten the switch securely, then
top-up the fluid reservoir (see “Weekly
Checks”) to replace any fluid lost from the
system, and bleed out any trapped air (see
Chapter 10).
Oxygen sensor
Note: The sensor is delicate, and will not work
if it is dropped or knocked, if its power supply
is disrupted, or if any cleaning materials are
used on it.
51 Raise and support the front of the vehicle
if required to remove the sensor from
underneath (“see Jacking and vehicle
support” ).
52 Release the sensor’s wiring multi-plug
from its support bracket, and unplug it to
disconnect the sensor (see illustration).
53 Unscrew the sensor from the exhaust
system front downpipe; collect the sealing
washer (where fitted).
54 On refitting, clean the sealing washer
(where fitted) and renew it if it is damaged or
worn. Apply a smear of anti-seize compound
to the sensor’s threads, to prevent them from
welding themselves to the downpipe in
service. Refit the sensor, tightening it to its
specified torque wrench setting; a slotted
socket will be required to do this. Reconnect
the wiring, and refit the connector plug.
15 Inlet manifold -
removal and refitting
4
Note: Refer to the warning note in Section 1
before proceeding.
Removal
PTE engines
1 The inlet manifold is a two-piece assembly
comprising an upper and lower section bolted
together.
2 Drain the cooling system with reference to
Chapter 1.
3 Relieve the residual pressure in the fuel
system (see Section 2), and equalise tank
pressure by removing the fuel filler cap. Warning: This procedure will
merely relieve the increased
pressure necessary for the engine
to run - remember that fuel will
still be present in the system components,
and take precautions accordingly before
disconnecting any of them.
4 Disconnect the battery negative (earth) lead
(refer to Chapter 5A, Section 1).
5 Remove the air inlet components (Sec-
tion 4) and disconnect the accelerator cable
from the throttle linkage (Section 5).
6 Remove the fuel injectors and fuel rail as
described in Section 14.
7 Noting their locations, disconnect the
coolant, vacuum and breather hoses from the
manifold. 8
Disconnect the wiring multi-plugs from the
engine sensors at the inlet manifold.
9 Undo the retaining bolts, and withdraw the
manifold from the cylinder head. Note the
location of the engine lifting bracket and earth
lead, where fitted. Remove the gasket.
10 With the manifold removed, clean all
traces of the old gasket from the mating
surfaces of the manifold and the cylinder
head.Zetec engines
11 Relieve the residual pressure in the fuel
system (see Section 2), and equalise tank
pressure by removing the fuel filler cap. Warning: This procedure will
merely relieve the increased
pressure necessary for the
engine to run - remember that
fuel will still be present in the system
components, and take precautions
accordingly before disconnecting any of
them.
12 Disconnect the battery negative (earth)
lead (refer to Chapter 5A, Section 1).
13 Remove the air inlet components (Sec-
tion 4) and disconnect the accelerator cable
from the throttle linkage (Section 5).
14 Disconnect the crankcase breather hose
from the cylinder head cover union.
15 Unbolt the upper part of the exhaust
manifold heat shield.
16 Remove the two screws securing the
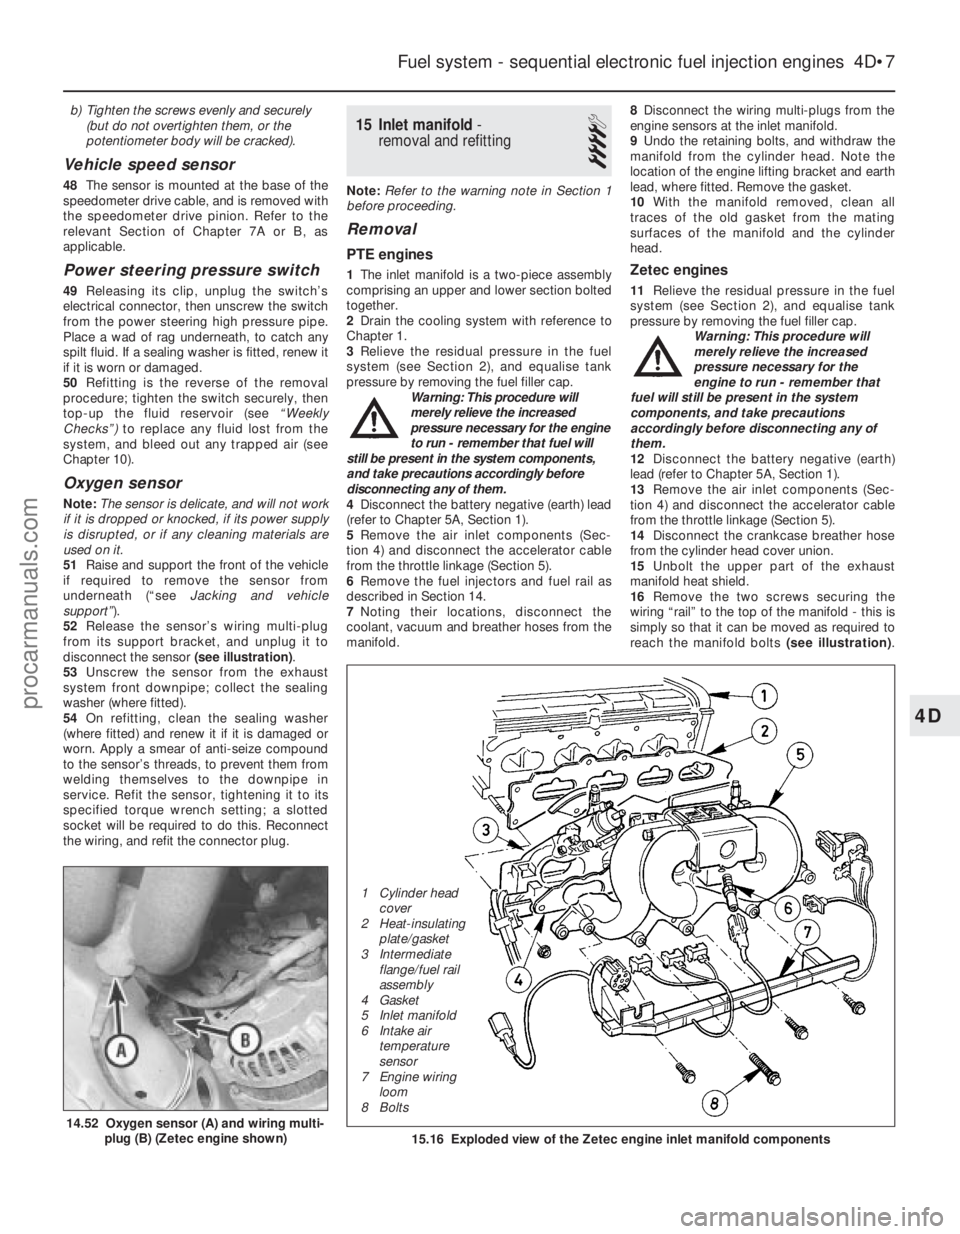
wiring “rail” to the top of the manifold - this is
simply so that it can be moved as required to
reach the manifold bolts (see illustration).
Fuel system - sequential electronic fuel injection engines 4D•7
14.52 Oxygen sensor (A) and wiring multi-
plug (B) (Zetec engine shown)15.16 Exploded view of the Zetec engine inlet manifold components
4D
1595Ford Fiesta Remake
1 Cylinder head
cover
2 Heat-insulating plate/gasket
3 Intermediate flange/fuel rail
assembly
4 Gasket
5 Inlet manifold
6 Intake air temperature
sensor
7 Engine wiring
loom
8 Boltsprocarmanuals.com
http://vnx.su
Page 163 of 296

6 Alternator-
removal and refitting
2
Removal
1 Disconnect the battery negative (earth) lead
(refer to Section 1).
2 Chock the rear wheels then jack up the
front of the car and support it on axle stands
(see “Jacking and vehicle support” ).
3 Where applicable, undo the retaining bolts
and remove the drivebelt splash guard (see
illustration) .
4 On models with power steering and a
separate drivebelt, remove the auxiliary
(power steering pump) drivebelt as described
in Chapter 1.
Alternator with manual adjustment
drivebelt
5 On models fitted with a sliding arm type
adjuster strap, unscrew and remove the top
(adjuster) bolt from the strap (see
illustration) .
6 On models fitted with a “rack-and-pinion”
type adjuster, unscrew and remove the
central (locking) bolt whilst, at the same time,
loosening the (adjuster) nut (see illustration).
7 Loosen off, but do not yet remove, the lower mounting bolts, pivot the
alternator inwards towards the engine to
slacken the tension of the drivebelt, then
disengage the drivebelt from the pulleys and
remove it.
8
Where applicable, detach and remove the
alternator splash cover/heat shield (see
illustration) .
9 Where applicable, detach and remove the
phase terminal and the splash cover.
10 Supporting the weight of the alternator
from underneath, unscrew and remove the
mounting bolts. Lower the alternator; noting
the connections, detach the wiring and
remove the alternator from the vehicle (see
illustration) .
Alternator with automatic adjustment
drivebelt
11Remove the heatshield (if fitted) and
disconnect the alternator wiring.
12 Fit a ring spanner onto the drivebelt
tensioner, and rotate it clockwise to loosen off
the tension from the drivebelt (see
illustration) . Note the routing of the drivebelt,
then disengage the belt from the pulleys and
remove it.
13 On pre-1994 model year Zetec engines,
disconnect the oxygen sensor wiring multi-
plug, then undo the two nuts and separate the
exhaust downpipe from the manifold. Support the downpipe to avoid straining the exhaust
system mountings.
14
On all models, unscrew the alternator
upper mounting bolts/nuts and disconnect the
alternator wiring. Unscrew the lower
bolts/nuts and remove the alternator from the
engine. On pre-1994 Zetec engines, it will be
necessary to de-tension the drivebelt
tensioner to provide clearance for removal of
the upper mounting bolt nut.
Refitting
15 Refit in the reverse order of removal. Refit
the drivebelt, and ensure that it is correctly re-
routed around the pulleys. Adjust the tension
of the drivebelt (according to type) as
described in Chapter 1.
7 Alternator brushes and voltage regulator - renewal
3
1Disconnect the battery negative (earth) lead
(refer to Section 1).
2 Remove the alternator from the vehicle as
described in the previous Section.
Bosch
3 Remove the two screws securing the
combined brush box/regulator unit, and
5A•4 Starting and charging systems
6.12 Automatic drivebelt tensioner
Turn tensioner clockwise to release drivebelt tension
6.10 Wiring loom routing on rear ofalternator (CVH engine)6.8 Removing the splash cover from the inner end of the alternator
6.6 Rack-and-pinion type drivebelt adjuster
A Adjuster arm C Central (locking) bolt
B Pinion (adjuster) nut6.5 Alternator sliding arm type adjuster strap
A Adjuster bolt
B Adjuster bracket to engine bolt6.3 Removing the drivebelt splash guard (where fitted)
1595Ford Fiesta Remakeprocarmanuals.com
http://vnx.su
Page 179 of 296

15Unplug the hydraulic hose, and check that
the unions are clean. Reconnect the caliper to
the hose so that the hose is not twisted or
strained. The hose union connection can be
fully tightened when the caliper is refitted.
16 Refit the brake pads as described in
Section 2.
17 The brake hydraulic hose can now be fully
tightened. When secured, turn the steering
from lock-to-lock to ensure that the hose
does not foul on the wheel housing or
suspension components.
18 Bleed the brake hydraulic system as
described in Section 13 or 14 according to
type. Providing suitable precautions were
taken to minimise loss of fluid, it should only
be necessary to bleed the relevant front
brake.
19 Refit the roadwheel, lower the vehicle to
the ground, then tighten the wheel nuts to the
specified torque.
4 Front brake disc - inspection,
removal and refitting
2
Note: Before starting work, refer to the
warning at the beginning of Section 2
concerning the dangers of asbestos dust.
Inspection
Note: If a disc requires renewal, BOTH front
discs should be renewed or reground at the
same time to ensure even and consistent
braking. New brake pads should also be fitted.
1 Chock the rear wheels then jack up the
front of the car and support it on axle stands
(see “Jacking and Vehicle Support” ). Remove
the appropriate front roadwheel.
2 Temporarily refit two of the wheel nuts to
diagonally-opposite studs, with the flat sides
of the nuts against the disc. Tighten the nuts
progressively, to hold the disc firmly.
3 Scrape any corrosion from the disc. Rotate
the disc, and examine it for deep scoring,
grooving or cracks. Using a micrometer,
measure the thickness of the disc in several
places. Light wear and scoring is normal, but
if excessive, the disc should be removed, and
either reground by a specialist, or renewed. If regrinding is undertaken, at least the minimum
thickness must be maintained. Obviously, if
the disc is cracked, it must be renewed.
4
Using a dial gauge, check that the disc run-
out, measured at a point 10.0 mm from the
outer edge of the disc, does not exceed the
limit given in the Specifications. To do this, fix
the measuring equipment, and rotate the disc,
noting the variation in measurement as the
disc is rotated (see illustration). The
difference between the minimum and
maximum measurements recorded is the disc
run-out.
5 If the run-out is greater than the specified
amount, check for variations of the disc
thickness as follows. Mark the disc at eight
positions 45° apart, then using a micrometer,
measure the disc thickness at the eight
positions, 15.0 mm in from the outer edge. If
the variation between the minimum and
maximum readings is greater than the
specified amount, the disc should be
renewed.
Removal
6 Remove the caliper and its anchor bracket
with reference to Section 3, but do not
disconnect the hydraulic brake hose.
Suspend the caliper assembly from the front
suspension coil spring, taking care to avoid
straining the brake hose.
7 Remove the wheel nuts which were
temporarily refitted in paragraph 2.
8 Unscrew the screw securing the disc to the
hub, and withdraw the disc (see
illustrations) . If it is tight, lightly tap its rear
face with a hide or plastic mallet.
Refitting
9 Refit the disc in a reversal of the removal
sequence. If new discs are being fitted, first remove their protective coating. Ensure
complete cleanliness of the hub and disc
mating faces and tighten the screw securely.
10
Refit the caliper/anchor bracket with
reference to Section 3.
11 Refit the roadwheel, lower the vehicle to
the ground, and tighten the wheel nuts to the
specified torque.
5 Rear brake drum - removal,
inspection and refitting
2
Note: Before starting work, refer to the
warning at the beginning of Section 6
concerning the dangers of asbestos dust.
Removal
1 Chock the front wheels then jack up the
rear of the car and support it on axle stands
(see “Jacking and Vehicle Support” ). Remove
the appropriate rear roadwheel, and release
the handbrake.
2 Undo the four bolts securing the drum/hub
and stub axle assembly to the rear axle
flange, then withdraw the drum/hub from the
axle. If the brake drum is stuck on the shoes,
remove the rubber access plug from the rear
of the brake backplate, and release the
automatic brake adjuster by levering the
release catch on the adjuster pawl through the
backplate (see illustration) .
3 With the brake drum removed, brush or
wipe the dust from the drum, brake shoes,
9•4 Braking system
5.2 Removing the rubber access plug from
the rear of the brake backplate
4.8b . . . and remove the disc from the hub4.8a Extract the brake disc securing screw . . .4.4 Checking brake disc run-out using a dial gauge
1595Ford Fiesta Remake
If a dial gauge is not
available, check the run-out
by positioning a fixed
pointer near the outer edge,
in contact with the disc face. Rotate
the disc and measure the maximum
displacement of the pointer with feeler
blades.
procarmanuals.com
http://vnx.su
Page 191 of 296
39With the drivebelt tensioned correctly,
tighten the pivot and adjuster bolts to the
specified torque. Re-check the tension of the
drivebelt after tightening the bolts.
40 Reconnect the rigid brake pipes to the
modulator, tightening the unions to seal the
system.
41 Refit the modulator drivebelt cover and
secure with its two retaining bolts. Take care
not to damage the driveshaft CV joint gaiter as
the cover is eased into position.
42 Refit the belt-break switch to the
modulator drivebelt cover, taking care not to
damage the belt contact arm as it passes
through the cover.
43 Reconnect the modulator return hose by
pushing the hose firmly into its brake fluid
reservoir location, then lever out the collar to
retain it.
44 Refit the front suspension crossmember
and the one-piece undertray, as applicable.
45 Refit the roadwheels, then remove the
axle stands and lower the vehicle to the
ground. Tighten the wheel nuts to the
specified torque.
46 Top-up the brake fluid reservoir using
fresh fluid of the specified type (see “ Weekly
checks ”), then bleed the brake hydraulic
system in accordance with Section 14. Refit
the reservoir filler cap and the warning
indicator wiring multi-plug on completion.
47 Reconnect the battery negative lead.
Modulator drivebelt
48Disconnect the battery negative (earth)
lead (refer to Chapter 5A, Section 1).
49 Chock the rear wheels then jack up the
front of the car and support it on axle stands
(see “Jacking and Vehicle Support” ). Remove
the relevant front roadwheel.
50 Remove the one-piece undertray where
fitted, by turning its bayonet-type fasteners,
and on XR2i models, remove the front
suspension crossmember (see Chapter 10).
51 Remove the belt-break switch from the
relevant drivebelt cover, then remove the
drivebelt cover, as described in the previous
sub-Section.
52 Slacken the modulator pivot and adjuster
bolts to release drivebelt tension, then slip the
drivebelt from the modulator.
53 Remove the track rod end balljoint from
the steering arm on the spindle carrier (see
Chapter 10).
54 Disconnect the anti-roll bar connecting
link (where applicable) and release the brake
hose from their locations on the suspension
strut.
55 Remove the pinch bolt and nut securing
the lower suspension arm balljoint to the
spindle carrier, and separate the balljoint from
the spindle carrier assembly.
56 To release the driveshaft inner CV joint
from the differential, have an assistant pull the
spindle carrier away from the centre of the
vehicle whilst you insert a lever between the
inner CV joint and the transmission casing,
then firmly strike the lever with the flat of the hand, but be careful not to damage adjacent
components. Make provision for escaping
transmission oil, if possible plugging the
opening to prevent excessive loss. Do not
allow the CV joints to bend more than 20°
from the horizontal or internal damage may
occur. If both driveshafts are to be removed,
immobilise the differential by inserting an old
joint or suitable shaft, before the other
driveshaft is removed.
57
Slide the drivebelt off the driveshaft.
58 Remove the snap-ring from the groove in
the splines of the inner CV joint. This snap-
ring must be renewed every time the
driveshaft is withdrawn from the differential.
59 With the drivebelt removed, closely
examine the condition of the belt over its
entire length. Renew the belt if any cracks are
noticed in the fabric at the roots of the teeth, if
there is any abrasion of the fabric facing
material, or if there are any tears starting from
the edge of the belt.
60 If, since the drivebelts were last renewed,
a vehicle has covered more than 30 000 miles
(48 000 km) or a period of more than two
years has elapsed, the drivebelts should be
renewed as a matter of course.
61 Prior to refitting the drivebelt, thoroughly
clean its CV joint pulley location.
62 Fit the drivebelt over the driveshaft then,
with a new snap-ring fitted to the inner CV
joint splines, lubricate the splines with
transmission oil. Remove the temporary plug
and insert the inner CV joint to its
transmission casing location. Press against
the spindle carrier so that the snap-ring
engages fully to hold the CV joint splines in
the differential.
63 Refitting is now a reversal of the removal
procedure, tensioning the drivebelt as
described in the previous sub-Section. Ensure
that the pinch-bolt securing the lower
suspension arm balljoint to the spindle carrier
locates in the annular groove on the balljoint
spindle. Secure the track rod and balljoint,
using a new split pin. Tighten the suspension
components to their specified torque (see
Chapter 10).
64 Check the level of the transmission oil,
and top-up as required (see Chapter 1).
Modulator belt-break switch
65 Modulator belt-break switches are fitted
to each of the two drivebelt covers, and clip
into position. To remove, gently squeeze the
protruding lever on the switch towards the
main switch body and lift out, ensuring that
the belt contact arm does not catch on the
drivebelt cover.
25 Load-apportioning valve (ABS models) - adjustment
3
1Before attempting to adjust the load-
apportioning valves, the vehicle must be at its
kerb weight, ie with approximately half a tank
of fuel and carrying no load. Note that a
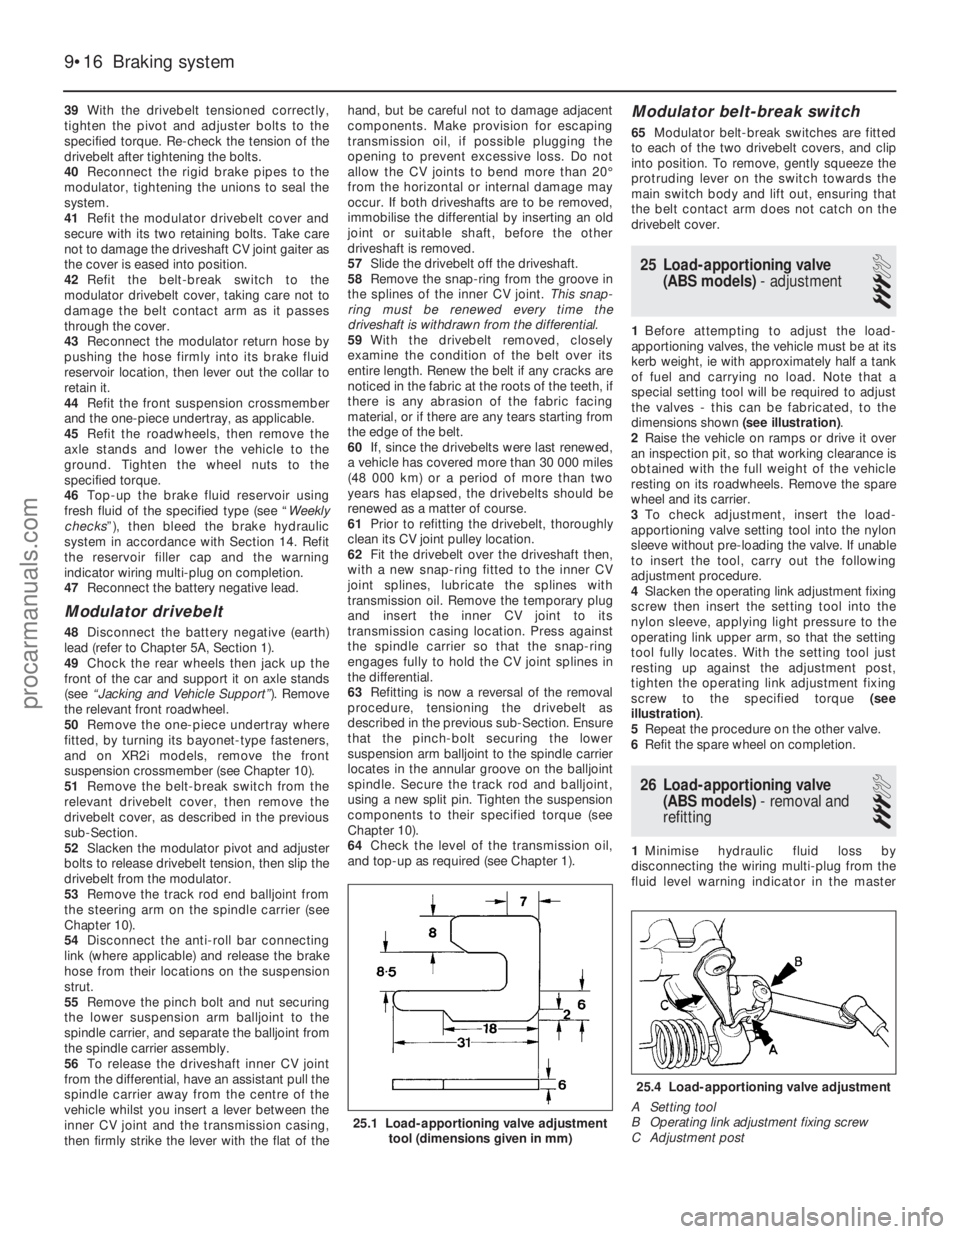
special setting tool will be required to adjust
the valves - this can be fabricated, to the
dimensions shown (see illustration).
2 Raise the vehicle on ramps or drive it over
an inspection pit, so that working clearance is
obtained with the full weight of the vehicle
resting on its roadwheels. Remove the spare
wheel and its carrier.
3 To check adjustment, insert the load-
apportioning valve setting tool into the nylon
sleeve without pre-loading the valve. If unable
to insert the tool, carry out the following
adjustment procedure.
4 Slacken the operating link adjustment fixing
screw then insert the setting tool into the
nylon sleeve, applying light pressure to the
operating link upper arm, so that the setting
tool fully locates. With the setting tool just
resting up against the adjustment post,
tighten the operating link adjustment fixing
screw to the specified torque (see
illustration) .
5 Repeat the procedure on the other valve.
6 Refit the spare wheel on completion.
26 Load-apportioning valve
(ABS models) - removal and
refitting
3
1 Minimise hydraulic fluid loss by
disconnecting the wiring multi-plug from the
fluid level warning indicator in the master
9•16 Braking system
25.4 Load-apportioning valve adjustment
A Setting tool
B Operating link adjustment fixing screw
C Adjustment post
25.1 Load-apportioning valve adjustment tool (dimensions given in mm)
1595Ford Fiesta Remakeprocarmanuals.com
http://vnx.su
Page 194 of 296
10
1595Ford Fiesta Remake
Wheel alignment and steering angles
Front wheel toe setting:Pre-1990 models: Tolerance allowed before resetting required . . . . . . . . . . . . . . . . . 3.0 mm toe-out to 3.0 mm toe-in (0°30’ toe-out to 0°30’ toe-in)
Adjustment setting (if required) . . . . . . . . . . . . . . . . . . . . . . . . . . . . Parallel ± 1.0 mm (0° ± 0°10’)
1990 models onward: All models except Turbo:
Tolerance allowed before resetting required . . . . . . . . . . . . . . \
. . 4.5 mm toe-out to 0.5 mm toe-in (0°45’ toe-out to 0°05’ toe-in)
Adjustment setting (if required) . . . . . . . . . . . . . . . . . . . . . . . . . . 2.0 mm toe-out ± 1.0 mm (0°20’ toe-out ± 0°10’)
Turbo models:
Tolerance allowed before resetting required . . . . . . . . . . . . . . \
. . 4.0 mm toe-out to parallel (0°40’ toe-out to 0°0’)
Adjustment setting (if required) . . . . . . . . . . . . . . . . . . . . . . . . . . 2.0 mm toe-out ± 1.0 mm (0°20’ toe-out ± 0°10’)
Chapter 10
Suspension and steering
Auxiliary drivebelt check and renewal . . . . . . . . . . . . . . .See Chapter 1
Front hub bearings - renewal . . . . . . . . . . . . . . . . . . . . . . . . . . . . . . 3
Front spindle carrier - removal and refitting . . . . . . . . . . . . . . . . . . . 2
Front suspension anti-roll bar - removal and refitting . . . . . . . . . . . . 6
Front suspension crossmember - removal and refitting . . . . . . . . . . 7
Front suspension lower arm - removal and refitting . . . . . . . . . . . . . 8
Front suspension strut - dismantling, examination and reassembly . . 5
Front suspension strut - removal and refitting . . . . . . . . . . . . . . . . . 4
General information . . . . . . . . . . . . . . . . . . . . . . . . . . . . . . . . . . . .\
. . 1
Power steering fluid cooler - removal and refitting . . . . . . . . . . . . . . 26
Power steering fluid level check . . . . . . . . . . . . .See
“Weekly Checks”
Power steering hydraulic system - bleeding . . . . . . . . . . . . . . . . . . . 27
Power steering pump - removal and refitting . . . . . . . . . . . . . . . . . . 25
Rear axle (all models except Courier) - removal and refitting . . . . . . 12
Rear axle pivot bushes (all models except Courier) - renewal . . . . . 13
Rear hub bearings - renewal . . . . . . . . . . . . . . . . . . . . . . . . . . . . . . . 9
Rear shock absorber (Courier models) - removal, examination and refitting . . . . . . . . . . . . . . . . . . . . . . . . . . . . . . . . . . . .\
. . . . . . 16 Rear strut (all models except Courier) - dismantling, examination
and reassembly . . . . . . . . . . . . . . . . . . . . . . . . . . . . . . . . . . . .\
. . . 11
Rear strut (all models except Courier) - removal and refitting . . . . . 10
Rear suspension anti-roll bar (all models except Courier) - removal and refitting . . . . . . . . . . . . . . . . . . . . . . . . . . . . . . . . . . . 14
Rear suspension assembly (Courier models) - removal and refitting . . 17
Rear suspension components (Courier models) - general . . . . . . . . 15
Rear suspension ride height (Courier models) - adjustment . . . . . . . 18
Steering column (manual steering) - removal and refitting . . . . . . . . 20
Steering column (power steering) - removal and refitting . . . . . . . . . 21
Steering gear (manual steering) - removal and refitting . . . . . . . . . . 23
Steering gear (power steering) - removal and refitting . . . . . . . . . . . 24
Steering gear rubber gaiters - renewal . . . . . . . . . . . . . . . . . . . . . . . 22
Steering wheel - removal and refitting . . . . . . . . . . . . . . . . . . . . . . . 19
Suspension and steering check . . . . . . . . . . . . . . . . . . .See Chapter 1
Track rod end balljoint - removal and refitting . . . . . . . . . . . . . . . . . 28
Tyre condition and pressure checks . . . . . . . . . .See “Weekly Checks”
Wheel alignment and steering angles - general information . . . . . . . 29
10•1
Specifications Contents
Easy, suitable for
novice with little
experience Fairly easy,
suitable
for beginner with
some experience Fairly difficult,
suitable for competent
DIY mechanic
Difficult,
suitable for
experienced DIY
mechanic Very difficult,
suitable for expert DIY
or professional
Degrees of difficulty
54321
procarmanuals.com
http://vnx.su