roof FORD FIESTA 1989 Service Repair Manual
[x] Cancel search | Manufacturer: FORD, Model Year: 1989, Model line: FIESTA, Model: FORD FIESTA 1989Pages: 296, PDF Size: 10.65 MB
Page 15 of 296
connections - remake the connections or
renew the leads if a fault is found. Use the
same techniques to ensure that all earth
points in the engine compartment provide
good electrical contact through clean, metal-
to-metal joints, and that all are securely
fastened. (In addition to the earth connection
at the engine lifting eye, and that from the
transmission to the body/battery, there are
others in various places, so check carefully).
8Refer to Section 21 for details of spark plug
(HT) lead checks.
7 Valve clearance adjustment
2
Refer to Chapter 2, Part A.
8 Manual transmission oil level check
1
1The manual transmission does not have a
dipstick. To check the oil level, raise the
vehicle and support it securely on axle stands,
making sure that the vehicle is level. On the
lower front side of the transmission housing,
you will see the filler/level plug. Unscrew and
remove it - an Allen key or bit will probably be
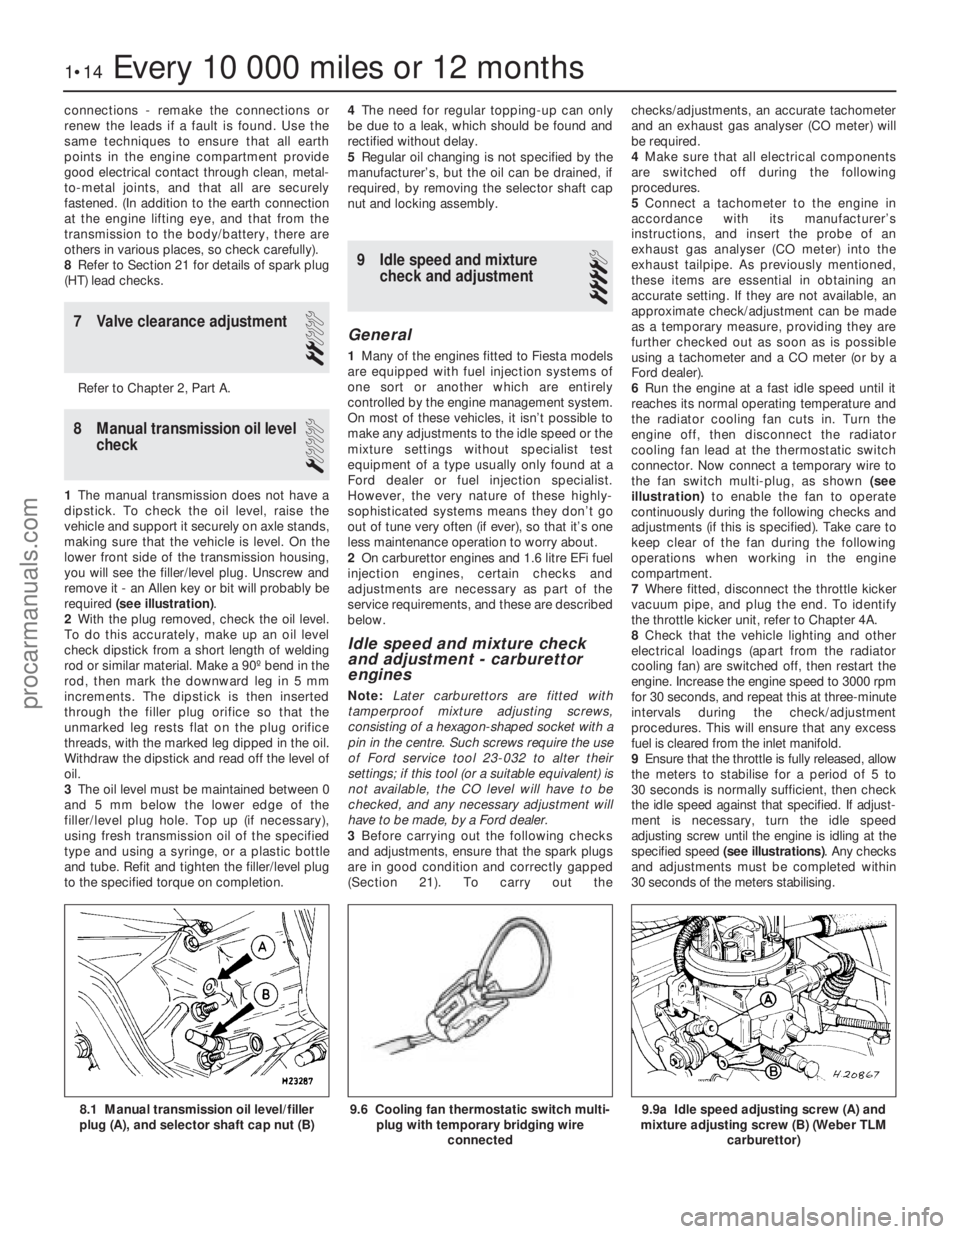
required (see illustration) .
2 With the plug removed, check the oil level.
To do this accurately, make up an oil level
check dipstick from a short length of welding
rod or similar material. Make a 90º bend in the
rod, then mark the downward leg in 5 mm
increments. The dipstick is then inserted
through the filler plug orifice so that the
unmarked leg rests flat on the plug orifice
threads, with the marked leg dipped in the oil.
Withdraw the dipstick and read off the level of
oil.
3 The oil level must be maintained between 0
and 5 mm below the lower edge of the
filler/level plug hole. Top up (if necessary),
using fresh transmission oil of the specified
type and using a syringe, or a plastic bottle
and tube. Refit and tighten the filler/level plug
to the specified torque on completion. 4
The need for regular topping-up can only
be due to a leak, which should be found and
rectified without delay.
5 Regular oil changing is not specified by the
manufacturer’s, but the oil can be drained, if
required, by removing the selector shaft cap
nut and locking assembly.
9 Idle speed and mixture check and adjustment
4
General
1Many of the engines fitted to Fiesta models
are equipped with fuel injection systems of
one sort or another which are entirely
controlled by the engine management system.
On most of these vehicles, it isn’t possible to
make any adjustments to the idle speed or the
mixture settings without specialist test
equipment of a type usually only found at a
Ford dealer or fuel injection specialist.
However, the very nature of these highly-
sophisticated systems means they don’t go
out of tune very often (if ever), so that it’s one
less maintenance operation to worry about.
2 On carburettor engines and 1.6 litre EFi fuel
injection engines, certain checks and
adjustments are necessary as part of the
service requirements, and these are described
below.
Idle speed and mixture check
and adjustment - carburettor
engines
Note: Later carburettors are fitted with
tamperproof mixture adjusting screws,
consisting of a hexagon-shaped socket with a
pin in the centre. Such screws require the use
of Ford service tool 23-032 to alter their
settings; if this tool (or a suitable equivalent) is
not available, the CO level will have to be
checked, and any necessary adjustment will
have to be made, by a Ford dealer.
3 Before carrying out the following checks
and adjustments, ensure that the spark plugs
are in good condition and correctly gapped
(Section 21). To carry out the checks/adjustments, an accurate tachometer
and an exhaust gas analyser (CO meter) will
be required.
4
Make sure that all electrical components
are switched off during the following
procedures.
5 Connect a tachometer to the engine in
accordance with its manufacturer’s
instructions, and insert the probe of an
exhaust gas analyser (CO meter) into the
exhaust tailpipe. As previously mentioned,
these items are essential in obtaining an
accurate setting. If they are not available, an
approximate check/adjustment can be made
as a temporary measure, providing they are
further checked out as soon as is possible
using a tachometer and a CO meter (or by a
Ford dealer).
6 Run the engine at a fast idle speed until it
reaches its normal operating temperature and
the radiator cooling fan cuts in. Turn the
engine off, then disconnect the radiator
cooling fan lead at the thermostatic switch
connector. Now connect a temporary wire to
the fan switch multi-plug, as shown (see
illustration) to enable the fan to operate
continuously during the following checks and
adjustments (if this is specified). Take care to
keep clear of the fan during the following
operations when working in the engine
compartment.
7 Where fitted, disconnect the throttle kicker
vacuum pipe, and plug the end. To identify
the throttle kicker unit, refer to Chapter 4A.
8 Check that the vehicle lighting and other
electrical loadings (apart from the radiator
cooling fan) are switched off, then restart the
engine. Increase the engine speed to 3000 rpm
for 30 seconds, and repeat this at three-minute
intervals during the check/adjustment
procedures. This will ensure that any excess
fuel is cleared from the inlet manifold.
9 Ensure that the throttle is fully released, allow
the meters to stabilise for a period of 5 to
30 seconds is normally sufficient, then check
the idle speed against that specified. If adjust-
ment is necessary, turn the idle speed
adjusting screw until the engine is idling at the
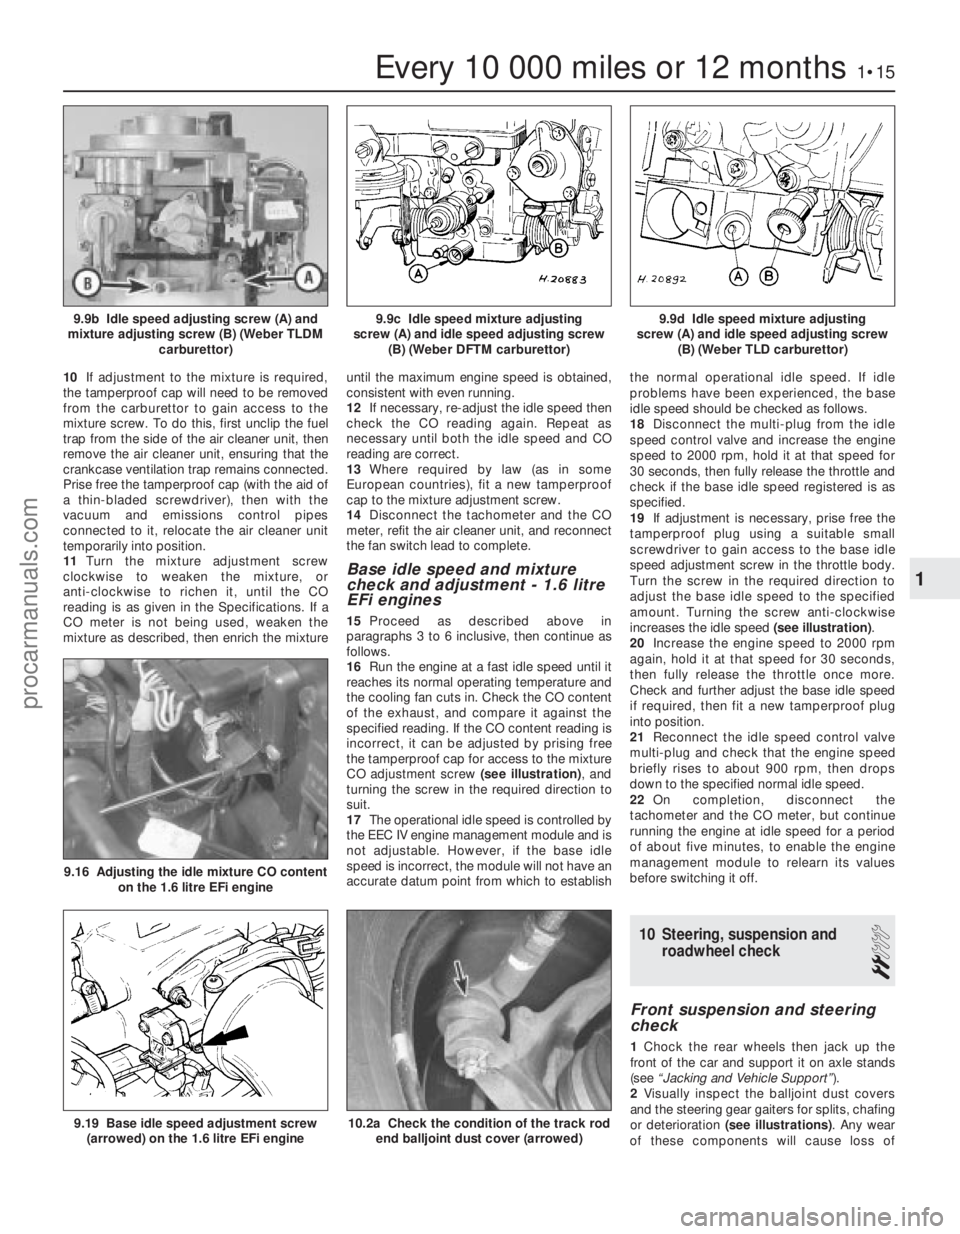
specified speed (see illustrations) . Any checks
and adjustments must be completed within
30 seconds of the meters stabilising.
1•14Every 10 000 miles or 12 months
9.9a Idle speed adjusting screw (A) and
mixture adjusting screw (B) (Weber TLM
carburettor)9.6 Cooling fan thermostatic switch multi-plug with temporary bridging wire
connected8.1 Manual transmission oil level/filler
plug (A), and selector shaft cap nut (B)
1595Ford Fiesta Remakeprocarmanuals.com
http://vnx.su
Page 16 of 296
10If adjustment to the mixture is required,
the tamperproof cap will need to be removed
from the carburettor to gain access to the
mixture screw. To do this, first unclip the fuel
trap from the side of the air cleaner unit, then
remove the air cleaner unit, ensuring that the
crankcase ventilation trap remains connected.
Prise free the tamperproof cap (with the aid of
a thin-bladed screwdriver), then with the
vacuum and emissions control pipes
connected to it, relocate the air cleaner unit
temporarily into position.
11 Turn the mixture adjustment screw
clockwise to weaken the mixture, or
anti-clockwise to richen it, until the CO
reading is as given in the Specifications. If a
CO meter is not being used, weaken the
mixture as described, then enrich the mixture until the maximum engine speed is obtained,
consistent with even running.
12
If necessary, re-adjust the idle speed then
check the CO reading again. Repeat as
necessary until both the idle speed and CO
reading are correct.
13 Where required by law (as in some
European countries), fit a new tamperproof
cap to the mixture adjustment screw.
14 Disconnect the tachometer and the CO
meter, refit the air cleaner unit, and reconnect
the fan switch lead to complete.
Base idle speed and mixture
check and adjustment - 1.6 litre
EFi engines
15 Proceed as described above in
paragraphs 3 to 6 inclusive, then continue as
follows.
16 Run the engine at a fast idle speed until it
reaches its normal operating temperature and
the cooling fan cuts in. Check the CO content
of the exhaust, and compare it against the
specified reading. If the CO content reading is
incorrect, it can be adjusted by prising free
the tamperproof cap for access to the mixture
CO adjustment screw (see illustration), and
turning the screw in the required direction to
suit.
17 The operational idle speed is controlled by
the EEC IV engine management module and is
not adjustable. However, if the base idle
speed is incorrect, the module will not have an
accurate datum point from which to establish the normal operational idle speed. If idle
problems have been experienced, the base
idle speed should be checked as follows.
18
Disconnect the multi-plug from the idle
speed control valve and increase the engine
speed to 2000 rpm, hold it at that speed for
30 seconds, then fully release the throttle and
check if the base idle speed registered is as
specified.
19 If adjustment is necessary, prise free the
tamperproof plug using a suitable small
screwdriver to gain access to the base idle
speed adjustment screw in the throttle body.
Turn the screw in the required direction to
adjust the base idle speed to the specified
amount. Turning the screw anti-clockwise
increases the idle speed (see illustration).
20 Increase the engine speed to 2000 rpm
again, hold it at that speed for 30 seconds,
then fully release the throttle once more.
Check and further adjust the base idle speed
if required, then fit a new tamperproof plug
into position.
21 Reconnect the idle speed control valve
multi-plug and check that the engine speed
briefly rises to about 900 rpm, then drops
down to the specified normal idle speed.
22 On completion, disconnect the
tachometer and the CO meter, but continue
running the engine at idle speed for a period
of about five minutes, to enable the engine
management module to relearn its values
before switching it off.
10 Steering, suspension and roadwheel check
2
Front suspension and steering
check
1Chock the rear wheels then jack up the
front of the car and support it on axle stands
(see “Jacking and Vehicle Support” ).
2 Visually inspect the balljoint dust covers
and the steering gear gaiters for splits, chafing
or deterioration (see illustrations) . Any wear
of these components will cause loss of
Every 10 000 miles or 12 months1•15
9.9d Idle speed mixture adjusting
screw (A) and idle speed adjusting screw (B) (Weber TLD carburettor)9.9c Idle speed mixture adjusting
screw (A) and idle speed adjusting screw (B) (Weber DFTM carburettor)9.9b Idle speed adjusting screw (A) and
mixture adjusting screw (B) (Weber TLDM carburettor)
10.2a Check the condition of the track rodend balljoint dust cover (arrowed)9.19 Base idle speed adjustment screw(arrowed) on the 1.6 litre EFi engine
9.16 Adjusting the idle mixture CO content on the 1.6 litre EFi engine
1
1595Ford Fiesta Remakeprocarmanuals.com
http://vnx.su
Page 42 of 296
1 General information
How to use this Chapter
This Part of Chapter 2 is devoted to repair
procedures possible while the engine is still
installed in the vehicle, and includes only the
Specifications relevant to those procedures.
Similar information concerning the 1.3 litre
HCS engine, and the 1.6 and 1.8 litre Zetec
engines, will be found in Parts A and C of this
Chapter respectively. Since these procedures
are based on the assumption that the engine
is installed in the vehicle, if the engine has
been removed from the vehicle and mounted
on a stand, some of the preliminary
dismantling steps outlined will not apply.
Information concerning engine/transmission
removal and refitting, and engine overhaul, can
be found in Part D of this Chapter, which also
includes the Specifications relevant to those
procedures.
Engine description
The engine is a four-cylinder, in-line
overhead camshaft type, designated CVH
(Compound Valve angle, Hemispherical
combustion chamber) or PTE (Pent roof, high
Torque, low Emission). The PTE engine was
introduced for 1994 and, apart from
modifications to the cylinder head, camshaft
and intake system, is virtually identical to the
CVH engine it replaces. The engine is
mounted transversely at the front of the
vehicle together with the transmission to form
a combined power unit. The crankshaft is supported in five split-
shell type main bearings within the cast-iron
crankcase. The connecting rod big-end
bearings are split-shell type, and the pistons
are attached by interference-fit gudgeon pins.
Each piston has two compression rings and
one oil control ring.
The cylinder head is of light alloy
construction, and supports the camshaft in five
bearings. Camshaft drive is by a toothed
composite rubber timing belt, which is driven by
a sprocket on the front end of the crankshaft.
The timing belt also drives the water pump,
which is mounted below the cylinder head. Hydraulic cam followers (tappets) operate the
rocker arms and valves. The tappets are
operated by pressurised engine oil. When a
valve closes, the oil passes through a port in the
body of the cam follower, through four grooves
in the plunger and into the cylinder feed
chamber. From the chamber, the oil flows to a
ball-type non-return valve and into the pressure
chamber. The tension of the coil spring causes
the plunger to press against the valve, and so
eliminates any free play. As the cam lifts the
follower, the oil pressure in the pressure
chamber is increased, and the non-return valve
closes off the port feed chamber. This in turn
provides a rigid link between the cam follower,
the cylinder and the plunger. These then rise as a unit to open the valve. The cam follower-to-
cylinder clearance allows the specified quantity
of oil to pass from the pressure chamber, oil only
being allowed past the cylinder bore when the
pressure is high during the moment of the valve
opening. When the valve closes, the escape of
oil will produce a small clearance, and no
pressure will exist in the pressure chamber. The
feed chamber oil then flows through the non-
return valve and into the pressure chamber, so
that the cam follower cylinder can be raised by
the pressure of the coil spring, eliminating free
play until the valve is operated again.
As wear occurs between the rocker arm
and the valve stem, the quantity of oil that
flows into the pressure chamber will be
slightly more than the quantity lost during the
expansion cycle of the cam follower.
Conversely, when the cam follower is
compressed by the expansion of the valve, a
slightly smaller quantity of oil will flow into the
pressure chamber than was lost. A rotor-type oil pump is mounted on the
timing cover end of the engine, and is driven
by a gear on the front end of the crankshaft. A
full-flow type oil filter is fitted, and is mounted
on the side of the crankcase.
Repair operations possible with
the engine in the car
The following work can be carried out with
the engine in the car:
a) Compression pressure - testing.
b) Rocker cover - removal and refitting.
c) Timing belt - removal, refitting and
adjustment.
d) Camshaft oil seal - renewal.
e) Camshaft - removal and refitting.
f) Cylinder head - removal and refitting.
g) Cylinder head and pistons - decarbonising.
h) Crankshaft pulley - removal and refitting.
i) Crankshaft oil seals - renewal.
j) Oil filter renewal.
k) Sump - removal and refitting.
l) Flywheel - removal, inspection and refitting.
m) Mountings - removal and refitting.
Note: It is possible to remove the pistons and
connecting rods (after removing the cylinder
head and sump) without removing the engine.
However, this is not recommended. Work of
this nature is more easily and thoroughly
completed with the engine on the bench, as
described in Chapter 2D.
2 Compression test -
description and interpretation
2
Refer to Section 2 in Part A of this Chap-
ter.
3 Top Dead Centre (TDC) for
No 1 piston - locating
2
1Top dead centre (TDC) is the highest point
of the cylinder that each piston reaches as the
crankshaft turns. Each piston reaches its TDC
position at the end of its compression stroke,
and then again at the end of its exhaust
stroke. For the purpose of engine timing, TDC
on the compression stroke for No 1 piston is
used. No 1 cylinder is at the timing belt end of
the engine. Proceed as follows.
2 Remove the upper timing belt cover as
described in Section 7.
3 Chock the rear wheels then jack up the
front of the car and support it on axle stands
(see “Jacking and Vehicle Support” ).
4 Undo the retaining bolts, and remove the
cover from the underside of the crankshaft
pulley.
5 Fit a spanner onto the crankshaft pulley bolt,
and turn the crankshaft in its normal direction
of rotation (clockwise, viewed from the pulley
end) to the point where the crankshaft pulley
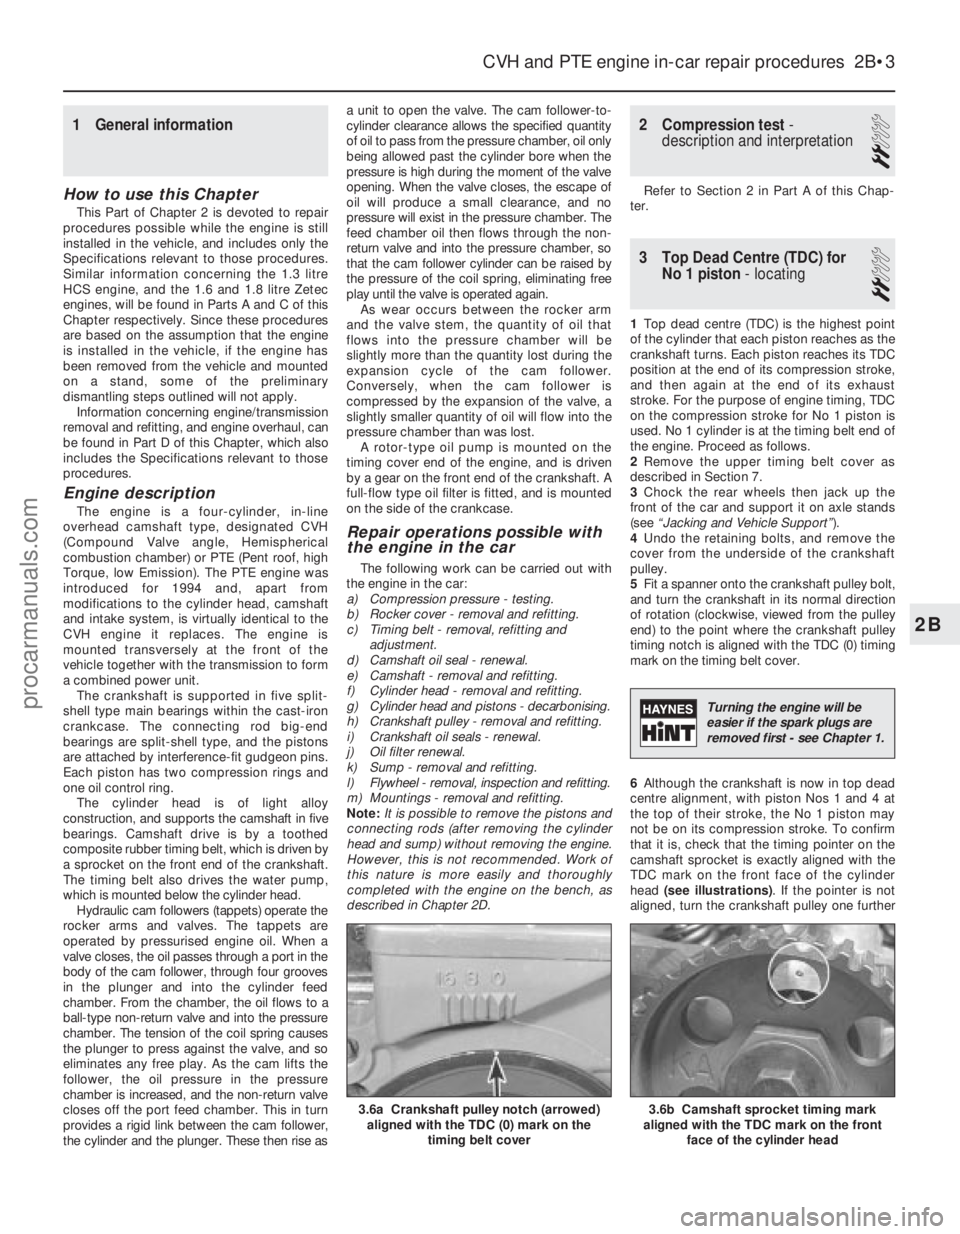
timing notch is aligned with the TDC (0) timing
mark on the timing belt cover.
6 Although the crankshaft is now in top dead
centre alignment, with piston Nos 1 and 4 at
the top of their stroke, the No 1 piston may
not be on its compression stroke. To confirm
that it is, check that the timing pointer on the
camshaft sprocket is exactly aligned with the
TDC mark on the front face of the cylinder
head (see illustrations) . If the pointer is not
aligned, turn the crankshaft pulley one further
CVH and PTE engine in-car repair procedures 2B•3
3.6b Camshaft sprocket timing mark
aligned with the TDC mark on the front
face of the cylinder head3.6a Crankshaft pulley notch (arrowed)aligned with the TDC (0) mark on the
timing belt cover
2B
1595Ford Fiesta Remake
Turning the engine will be
easier if the spark plugs are
removed first - see Chapter 1.
procarmanuals.com
http://vnx.su
Page 108 of 296
1 General information andprecautions
General information
The fuel system on all models with
carburettor induction comprises a rear-
mounted fuel tank, a mechanical diaphragm
fuel pump, a carburettor and an air cleaner. The fuel tank is mounted at the rear, under
the floorpan behind the rear seats. The tank
has a “ventilation-to-atmosphere system”
through a combined roll-over/anti-trickle fill
valve assembly, located in the left-hand rear
wheel arch. A filler neck sensing pipe, integral
with the fuel tank filler pipe, will shut off the
petrol pump filler gun when the predetermined
maximum level of fuel is reached in the tank,
so preventing spillage and wastage. A
conventional fuel level sender unit is mounted
in the top face of the fuel tank. One of two fuel pump types will be fitted,
depending on the engine type. On HCS
engines, the fuel pump is operated by a
pivoting rocker arm; one end rests on an
eccentric lobe on the engine camshaft, and
the other end is attached to the fuel pump
diaphragm. The pump fitted to the CVH
engine is operated by a separate pushrod,
one end rests on an eccentric lobe on the
engine camshaft, and the other rests on the
pump actuating rod which operates the
diaphragm. Both types of mechanical pump
incorporate a nylon mesh filter, and are of
sealed type (they cannot be serviced or
overhauled). Four different types of Weber carburettor
are featured in the range, further details being
given in later Sections of this Chapter. The air cleaner incorporates a “waxstat”
controlled air inlet, supplying either hot air
from a shroud mounted around the exhaust
manifold, or cool air from a duct in the front of
the vehicle.
Precautions
Warning: Petrol is extremely
flammable - great care must be
taken when working on any part of the fuel system. Do not smoke or allow
any naked flames or uncovered light bulbs
near the work area. Note that gas powered
domestic appliances with pilot flames,
such as heaters, boilers and tumble
dryers, also present a fire hazard - bear
this in mind if you are working in an area
where such appliances are present.
Always keep a suitable fire extinguisher
close to the work area and familiarise
yourself with its operation before starting
work. Wear eye protection when working
on fuel systems and wash off any fuel spilt
on bare skin immediately with soap and
water. Note that fuel vapour is just as
dangerous as liquid fuel; a vessel that has
just been emptied of liquid fuel will still
contain vapour and can be potentially
explosive. Petrol is a highly dangerous and
volatile liquid, and the precautions
necessary when handling it cannot be
overstressed.
Many of the operations described in this
Chapter involve the disconnection of fuel
lines, which may cause an amount of fuel
spillage. Before commencing work, refer
to the above Warning and the information
in “Safety first” at the beginning of this
manual.
When working with fuel system
components, pay particular attention to
cleanliness - dirt entering the fuel system
may cause blockages which will lead to
poor running.
Certain adjustment points in the fuel system
are protected by tamperproof caps, plugs or
seals. In some territories, it is an offence to
drive a vehicle with broken or missing
tamperproof seals. Before disturbing a
tamperproof seal, first check that no local or
national laws will be broken by doing so, and
fit a new tamperproof seal after adjustment is
complete, where required by law. Do not
break tamperproof seals on any vehicle whilst
it is still under warranty. Carburettors are delicate instruments, and
care must be taken not to disturb any
components unnecessarily. Before attempting
work on a carburettor, ensure that the relevant
spares are available; it should be noted that a complete strip down of a carburettor is
unlikely to cure a fault which is not
immediately obvious, without introducing new
problems. If persistent problems occur, it is
recommended that the services of a Ford
dealer or a carburettor specialist are sought.
Most dealers will be able to provide
carburettor rejetting and servicing facilities.
Where necessary, it may be possible to
purchase a reconditioned carburettor.
2 Air cleaner
-
removal and refitting
1
Note: Air cleaner element renewal and air
cleaner temperature control system checks
are described in Chapter 1.
Removal
1 Disconnect the battery negative (earth) lead
(refer to Chapter 5A, Section 1).
2 On CVH engine models, pull free and
release the accelerator cable from the locating
clip on the side of the air cleaner.
3 Undo the two (HCS engine) or three (CVH
engine) retaining screws, and partially lift the
air cleaner from the carburettor so that the
hose and wiring connections to the underside
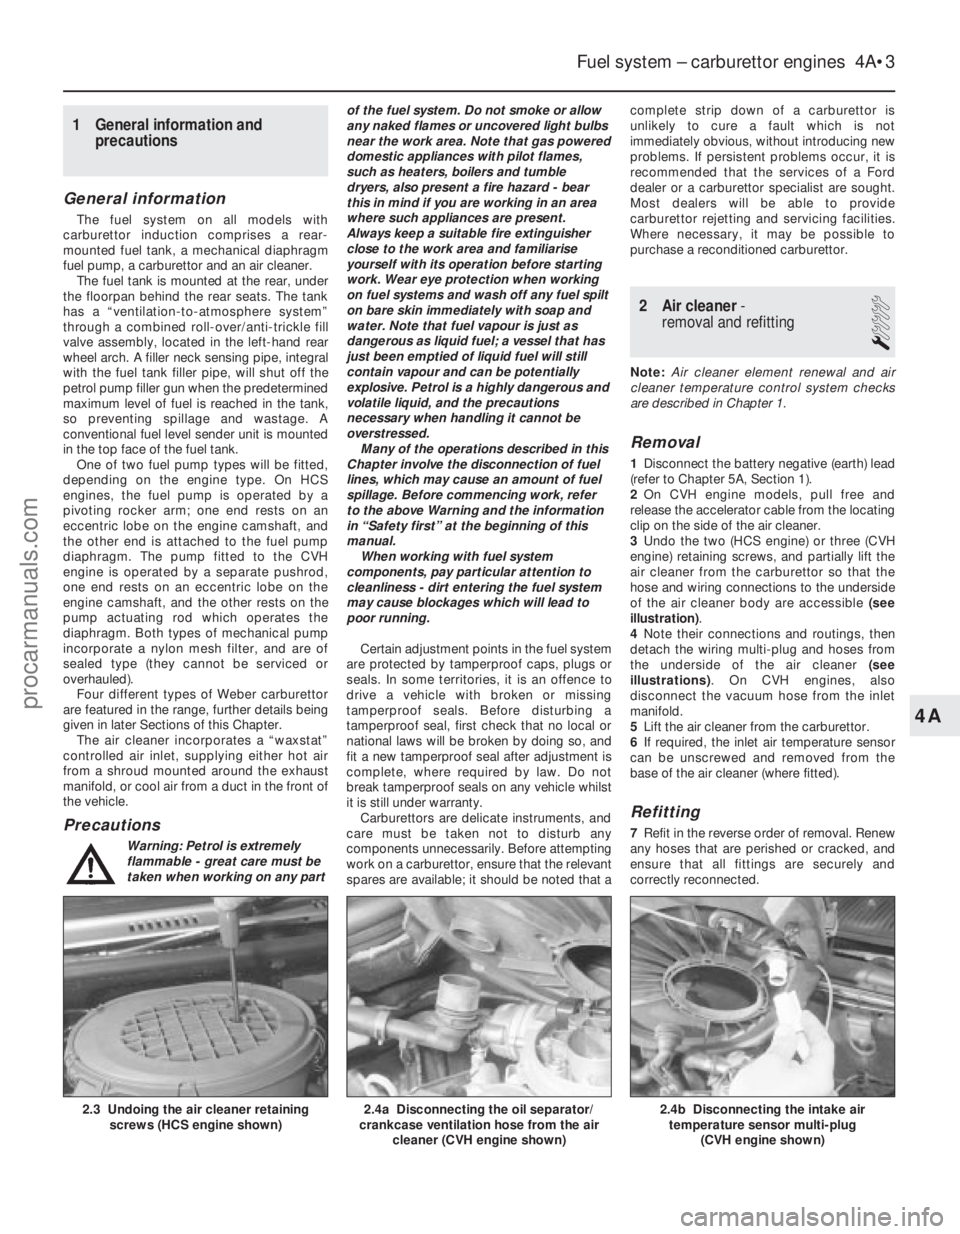
of the air cleaner body are accessible (see
illustration) .
4 Note their connections and routings, then
detach the wiring multi-plug and hoses from
the underside of the air cleaner (see
illustrations) . On CVH engines, also
disconnect the vacuum hose from the inlet
manifold.
5 Lift the air cleaner from the carburettor.
6 If required, the inlet air temperature sensor
can be unscrewed and removed from the
base of the air cleaner (where fitted).
Refitting
7 Refit in the reverse order of removal. Renew
any hoses that are perished or cracked, and
ensure that all fittings are securely and
correctly reconnected.
Fuel system – carburettor engines 4A•3
2.4b Disconnecting the intake air temperature sensor multi-plug
(CVH engine shown)2.4a Disconnecting the oil separator/
crankcase ventilation hose from the air
cleaner (CVH engine shown)2.3 Undoing the air cleaner retainingscrews (HCS engine shown)
4A
1595Ford Fiesta Remakeprocarmanuals.com
http://vnx.su
Page 115 of 296
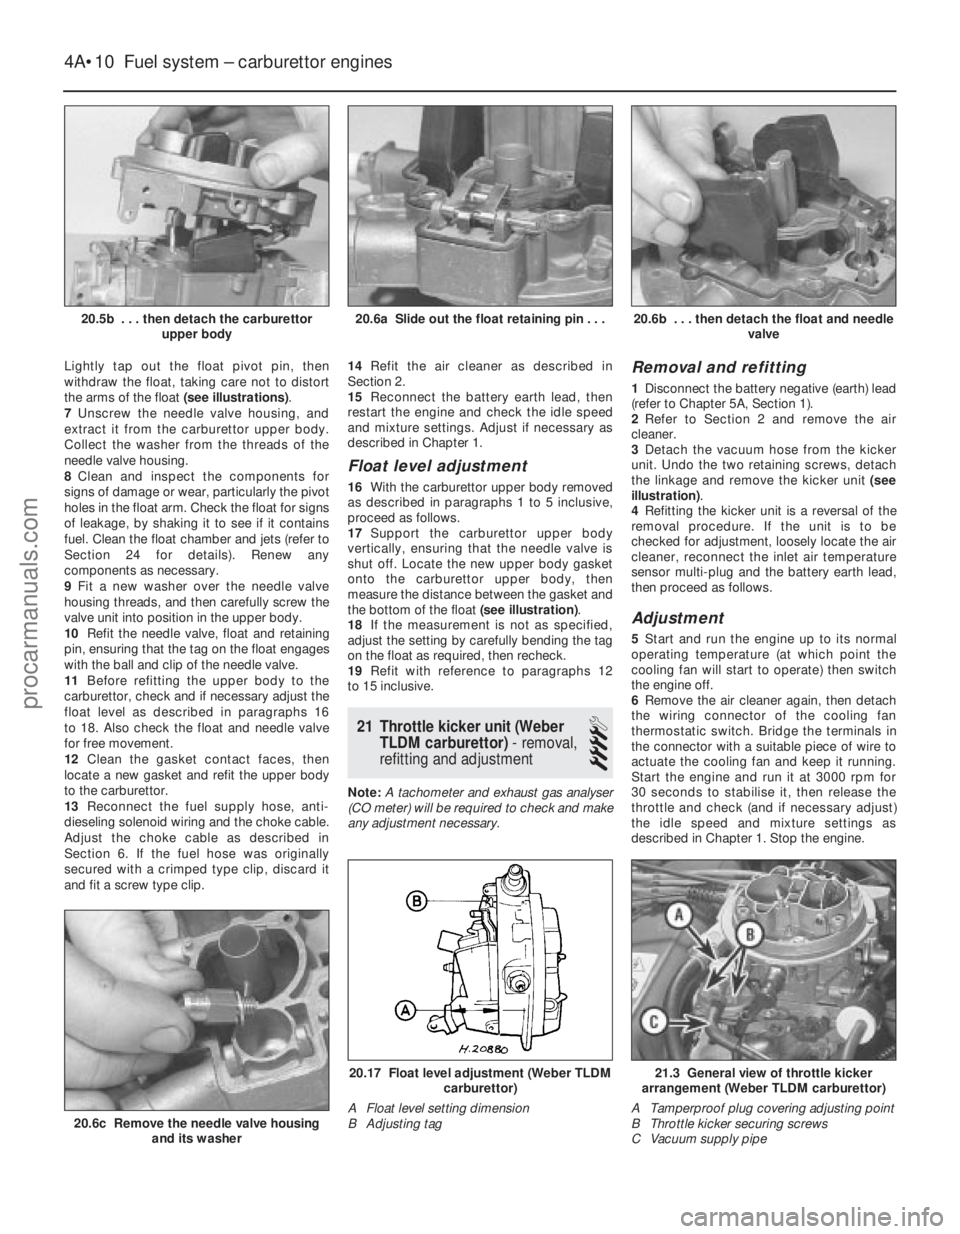
Lightly tap out the float pivot pin, then
withdraw the float, taking care not to distort
the arms of the float (see illustrations).
7 Unscrew the needle valve housing, and
extract it from the carburettor upper body.
Collect the washer from the threads of the
needle valve housing.
8 Clean and inspect the components for
signs of damage or wear, particularly the pivot
holes in the float arm. Check the float for signs
of leakage, by shaking it to see if it contains
fuel. Clean the float chamber and jets (refer to
Section 24 for details). Renew any
components as necessary.
9 Fit a new washer over the needle valve
housing threads, and then carefully screw the
valve unit into position in the upper body.
10 Refit the needle valve, float and retaining
pin, ensuring that the tag on the float engages
with the ball and clip of the needle valve.
11 Before refitting the upper body to the
carburettor, check and if necessary adjust the
float level as described in paragraphs 16
to 18. Also check the float and needle valve
for free movement.
12 Clean the gasket contact faces, then
locate a new gasket and refit the upper body
to the carburettor.
13 Reconnect the fuel supply hose, anti-
dieseling solenoid wiring and the choke cable.
Adjust the choke cable as described in
Section 6. If the fuel hose was originally
secured with a crimped type clip, discard it
and fit a screw type clip. 14
Refit the air cleaner as described in
Section 2.
15 Reconnect the battery earth lead, then
restart the engine and check the idle speed
and mixture settings. Adjust if necessary as
described in Chapter 1.
Float level adjustment
16 With the carburettor upper body removed
as described in paragraphs 1 to 5 inclusive,
proceed as follows.
17 Support the carburettor upper body
vertically, ensuring that the needle valve is
shut off. Locate the new upper body gasket
onto the carburettor upper body, then
measure the distance between the gasket and
the bottom of the float (see illustration).
18 If the measurement is not as specified,
adjust the setting by carefully bending the tag
on the float as required, then recheck.
19 Refit with reference to paragraphs 12
to 15 inclusive.
21 Throttle kicker unit (Weber TLDM carburettor) - removal,
refitting and adjustment
4
Note: A tachometer and exhaust gas analyser
(CO meter) will be required to check and make
any adjustment necessary.
Removal and refitting
1 Disconnect the battery negative (earth) lead
(refer to Chapter 5A, Section 1).
2 Refer to Section 2 and remove the air
cleaner.
3 Detach the vacuum hose from the kicker
unit. Undo the two retaining screws, detach
the linkage and remove the kicker unit (see
illustration) .
4 Refitting the kicker unit is a reversal of the
removal procedure. If the unit is to be
checked for adjustment, loosely locate the air
cleaner, reconnect the inlet air temperature
sensor multi-plug and the battery earth lead,
then proceed as follows.
Adjustment
5 Start and run the engine up to its normal
operating temperature (at which point the
cooling fan will start to operate) then switch
the engine off.
6 Remove the air cleaner again, then detach
the wiring connector of the cooling fan
thermostatic switch. Bridge the terminals in
the connector with a suitable piece of wire to
actuate the cooling fan and keep it running.
Start the engine and run it at 3000 rpm for
30 seconds to stabilise it, then release the
throttle and check (and if necessary adjust)
the idle speed and mixture settings as
described in Chapter 1. Stop the engine.
4A•10 Fuel system – carburettor engines
21.3 General view of throttle kicker
arrangement (Weber TLDM carburettor)
A Tamperproof plug covering adjusting point
B Throttle kicker securing screws
C Vacuum supply pipe20.17 Float level adjustment (Weber TLDM carburettor)
A Float level setting dimension
B Adjusting tag
20.6c Remove the needle valve housing and its washer
20.6b . . . then detach the float and needle valve20.6a Slide out the float retaining pin . . .20.5b . . . then detach the carburettorupper body
1595Ford Fiesta Remakeprocarmanuals.com
http://vnx.su
Page 116 of 296
7Detach the vacuum hose between the
throttle kicker and the inlet manifold at source
(but not the vacuum supply to the ignition
module). Connect a new length of vacuum
hose directly between the manifold and the
kicker unit.
8 Restart the engine and check the engine
speed. The throttle kicker should increase the
engine speed above its normal idle. Check the
speed registered against the specified throttle
kicker operating speed.
9 If required, the throttle kicker speed can be
adjusted by prising free the tamperproof plug
and the adjustment screw turned as
necessary (see illustration 21.3) .
10 When the adjustment is complete, stop
the engine, fit a new tamperproof plug,
disconnect the temporary vacuum hose
(between the manifold and the kicker unit) and
reconnect the original hose (between the
carburettor and the kicker unit).
11 Remove the bridging wire, and reconnect
the cooling fan thermostatic switch multi-
plug. Refit and secure the air cleaner, and
disconnect the tachometer and CO meter to
complete.
22 Throttle kicker control solenoid
(Weber TLDM carburettor) -
removal and refitting
2
Removal
1 Disconnect the battery negative (earth) lead
(refer to Chapter 5A, Section 1).
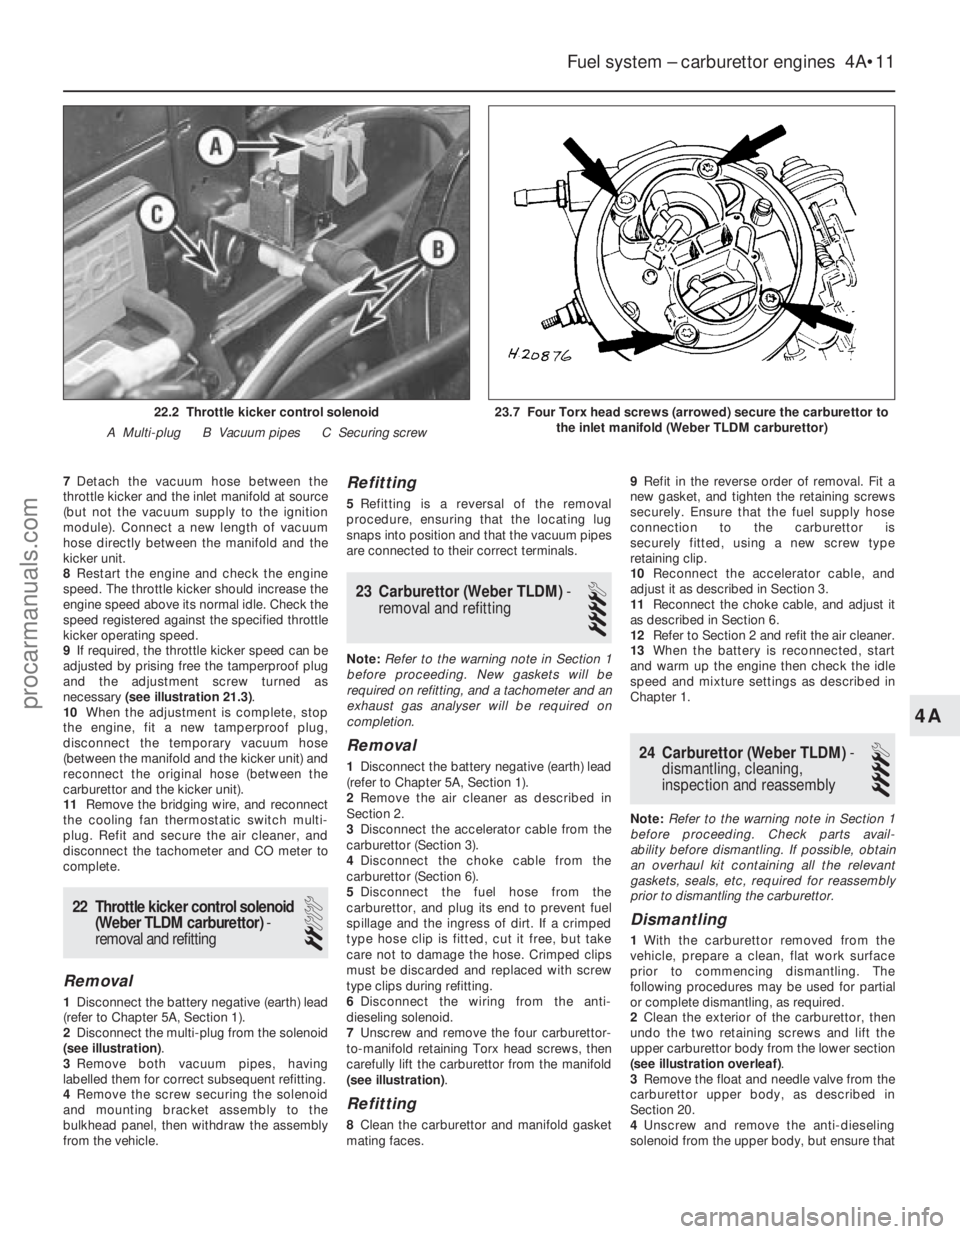
2 Disconnect the multi-plug from the solenoid
(see illustration) .
3 Remove both vacuum pipes, having
labelled them for correct subsequent refitting.
4 Remove the screw securing the solenoid
and mounting bracket assembly to the
bulkhead panel, then withdraw the assembly
from the vehicle.
Refitting
5 Refitting is a reversal of the removal
procedure, ensuring that the locating lug
snaps into position and that the vacuum pipes
are connected to their correct terminals.
23 Carburettor (Weber TLDM) -
removal and refitting
4
Note: Refer to the warning note in Section 1
before proceeding. New gaskets will be
required on refitting, and a tachometer and an
exhaust gas analyser will be required on
completion.
Removal
1 Disconnect the battery negative (earth) lead
(refer to Chapter 5A, Section 1).
2 Remove the air cleaner as described in
Section 2.
3 Disconnect the accelerator cable from the
carburettor (Section 3).
4 Disconnect the choke cable from the
carburettor (Section 6).
5 Disconnect the fuel hose from the
carburettor, and plug its end to prevent fuel
spillage and the ingress of dirt. If a crimped
type hose clip is fitted, cut it free, but take
care not to damage the hose. Crimped clips
must be discarded and replaced with screw
type clips during refitting.
6 Disconnect the wiring from the anti-
dieseling solenoid.
7 Unscrew and remove the four carburettor-
to-manifold retaining Torx head screws, then
carefully lift the carburettor from the manifold
(see illustration) .
Refitting
8Clean the carburettor and manifold gasket
mating faces. 9
Refit in the reverse order of removal. Fit a
new gasket, and tighten the retaining screws
securely. Ensure that the fuel supply hose
connection to the carburettor is
securely fitted, using a new screw type
retaining clip.
10 Reconnect the accelerator cable, and
adjust it as described in Section 3.
11 Reconnect the choke cable, and adjust it
as described in Section 6.
12 Refer to Section 2 and refit the air cleaner.
13 When the battery is reconnected, start
and warm up the engine then check the idle
speed and mixture settings as described in
Chapter 1.
24 Carburettor (Weber TLDM) -
dismantling, cleaning,
inspection and reassembly
4
Note: Refer to the warning note in Section 1
before proceeding. Check parts avail-
ability before dismantling. If possible, obtain
an overhaul kit containing all the relevant
gaskets, seals, etc, required for reassembly
prior to dismantling the carburettor.
Dismantling
1 With the carburettor removed from the
vehicle, prepare a clean, flat work surface
prior to commencing dismantling. The
following procedures may be used for partial
or complete dismantling, as required.
2 Clean the exterior of the carburettor, then
undo the two retaining screws and lift the
upper carburettor body from the lower section
(see illustration overleaf) .
3 Remove the float and needle valve from the
carburettor upper body, as described in
Section 20.
4 Unscrew and remove the anti-dieseling
solenoid from the upper body, but ensure that
Fuel system – carburettor engines 4A•11
23.7 Four Torx head screws (arrowed) secure the carburettor to the inlet manifold (Weber TLDM carburettor)22.2 Throttle kicker control solenoid
A Multi-plug B Vacuum pipes C Securing screw
4A
1595Ford Fiesta Remakeprocarmanuals.com
http://vnx.su
Page 118 of 296
14Prise free and remove the tamperproof
seal, then unscrew and remove the idle
mixture adjustment screw.
15 Undo the retaining screws, and remove
the throttle housing from the carburettor main
body.
Cleaning and inspection
16 Wash the carburettor components,
drillings and passages with clean petrol, then
blow them dry using a low-pressure air line. A
high-pressure air line must not be applied to
the accelerator pump discharge assembly or
the pump supply valve, as they each contain a
rubber Vernay valve, and these can easily be
damaged under high pressure. Never use a
piece of wire for cleaning purposes.
17 Examine all of the carburettor
components for signs of damage or wear,
paying particular attention to the diaphragms,
throttle spindle and plates, needle valve and
mixture screw; the power valve jet is adjacent
to the primary main jet. Renew all
diaphragms, sealing washers and gaskets as
a matter of course.
Reassembly
18 Refit the throttle housing to the
carburettor main body (fitting a new gasket),
and secure with its retaining screws.
19 Refit the idle mixture adjustment screw.
Make an initial adjustment by screwing it fully
in (but do not overtighten or screw it onto its
seat), then unscrew it two full turns.
20 Where fitted, reassemble the throttle
kicker, ensuring that its diaphragm lies flat,
and that the relative position of the operating
link to the kicker cover is correct.
21 Fit the power valve, ensuring that its
diaphragm lies flat and the vacuum
gallery aligns with the diaphragm and
housing.
22 Refit the accelerator pump. Take care not
damage the valve as it is inserted, and check
that the O-ring seal is correctly located on the
end of the valve. Check that the valve is not
trapped by the spring.
23 Refit the accelerator pump discharge jet.
Take care not to damage the valve and/or the
O-ring seal, and ensure that they are correctly
located.
24 Commence reassembly of the upper body
by inserting the emulsion tubes and the air
correction jets into their respective ports (as
noted during removal).
25 Screw the anti-dieseling solenoid into
position. Ensure that the aluminium washer is
fitted, and take care not to overtighten the
valve.
26 Refit the needle valve and the float, and
adjust the float setting as described in Sec-
tion 20.
27 Refit the choke control mechanism, and
secure with its three retaining screws.
28 Locate a new gasket onto the mating
face, then refit the carburettor upper body to
the main body. As they are reassembled, take
care not to snag the float on the carburettor main body. Fit and tighten the retaining
screws to secure.
29
On completion, refit the carburettor as
described in Section 23. Where applicable,
check and adjust the throttle kicker setting
(Section 21) after adjusting the idle speed and
mixture settings.
25 Carburettor (Weber DFTM) -
description
The carburettor operates in essentially the
same manner as TLDM instrument described
in Section 18, but the following features
should be noted. A throttle kicker is fitted to both manual
transmission, and CTX automatic trans-
mission models, the operation of the unit is
described in Section 18. The secondary venturi (barrel) is vacuum-
operated on manual transmission models. On
CTX automatic transmission equipped models
it is operated sequentially. A bleed back solenoid (if fitted) is used to
control the amount of fuel being delivered to
the venturi by the action of the accelerator
pump. Idle speed and mixture adjustment
procedures are described in Chapter 1, but it
is important to note that accurate adjustments
can only be made using the necessary
equipment.
26 Carburettor (Weber DFTM) -
fast-idle speed adjustment
4
Refer to the procedure contained in Sec-
tion 19, but note the following points:
a) When removing the air cleaner, do not disconnect the vacuum supply or
crankcase ventilation hoses; the air
cleaner should be positioned clear of the
carburettor assembly.
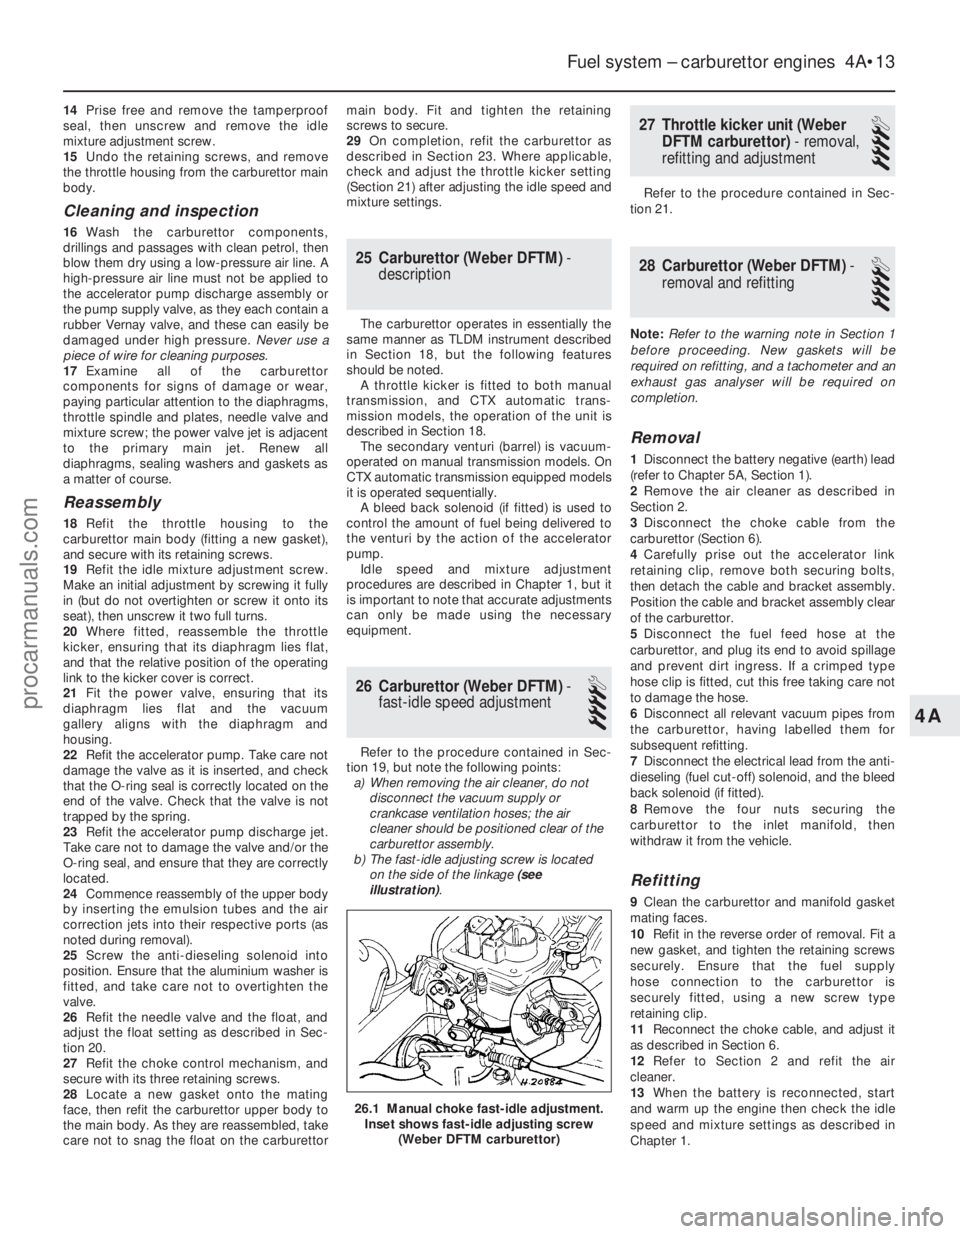
b) The fast-idle adjusting screw is located
on the side of the linkage (see
illustration) .
27 Throttle kicker unit (Weber
DFTM carburettor) - removal,
refitting and adjustment
4
Refer to the procedure contained in Sec-
tion 21.
28 Carburettor (Weber DFTM) -
removal and refitting
4
Note: Refer to the warning note in Section 1
before proceeding. New gaskets will be
required on refitting, and a tachometer and an
exhaust gas analyser will be required on
completion.
Removal
1 Disconnect the battery negative (earth) lead
(refer to Chapter 5A, Section 1).
2 Remove the air cleaner as described in
Section 2.
3 Disconnect the choke cable from the
carburettor (Section 6).
4 Carefully prise out the accelerator link
retaining clip, remove both securing bolts,
then detach the cable and bracket assembly.
Position the cable and bracket assembly clear
of the carburettor.
5 Disconnect the fuel feed hose at the
carburettor, and plug its end to avoid spillage
and prevent dirt ingress. If a crimped type
hose clip is fitted, cut this free taking care not
to damage the hose.
6 Disconnect all relevant vacuum pipes from
the carburettor, having labelled them for
subsequent refitting.
7 Disconnect the electrical lead from the anti-
dieseling (fuel cut-off) solenoid, and the bleed
back solenoid (if fitted).
8 Remove the four nuts securing the
carburettor to the inlet manifold, then
withdraw it from the vehicle.
Refitting
9 Clean the carburettor and manifold gasket
mating faces.
10 Refit in the reverse order of removal. Fit a
new gasket, and tighten the retaining screws
securely. Ensure that the fuel supply
hose connection to the carburettor is
securely fitted, using a new screw type
retaining clip.
11 Reconnect the choke cable, and adjust it
as described in Section 6.
12 Refer to Section 2 and refit the air
cleaner.
13 When the battery is reconnected, start
and warm up the engine then check the idle
speed and mixture settings as described in
Chapter 1.
Fuel system – carburettor engines 4A•13
26.1 Manual choke fast-idle adjustment. Inset shows fast-idle adjusting screw (Weber DFTM carburettor)
4A
1595Ford Fiesta Remakeprocarmanuals.com
http://vnx.su
Page 120 of 296
16Prise out the tamperproof seal covering
the fuel mixture screw, then undo and remove
the mixture screw.
Cleaning and inspection
17 Wash the carburettor components,
drillings and passages with clean petrol, then
blow them dry using a low-pressure air line. A
high-pressure air line must not be applied to
the accelerator pump discharge assembly or
the pump supply valve, as they each contain a
rubber Vernay valve, and these can easily be
damaged under high pressure. Never use a
piece of wire for cleaning purposes.
18 Examine all of the carburettor
components for signs of damage or wear,
paying particular attention to the diaphragms,
throttle spindle and plates, needle valve and
mixture screw; the power valve jet is adjacent
to the primary main jet. Renew all
diaphragms, sealing washers and gaskets as
a matter of course.
Reassembly
19 Refit the fuel mixture screw by fully
winding the screw in, then unwinding three
turns to give an approximate setting.
20 Refit the power valve assembly ensuring
that the diaphragm lies flat, and that the
vacuum gallery lines up correctly with the
diaphragm and housing.
21 Reassemble the secondary barrel
diaphragm into its housing, ensuring that
the diaphragm lies flat and that the vacuum
gallery lines up with the diaphragm and
housing. Also, to assist with installation, do
not reconnect its operating rod until the cover
has been secured.
22 Refit the throttle kicker mounting bracket.
23 Refit the anti-dieseling (fuel cut-off)
solenoid, using a new sealing washer.
24 Refit the accelerator pump assembly,
ensuring that the diaphragm lies flat and is not
kinked.
25 Reassemble the throttle kicker, ensuring
that the diaphragm lies flat and that the relative position of the diaphragm operating
link to the throttle kicker cover is correct. Fully
attach the throttle kicker assembly.
26
Refit the main and idle jets, making
reference to the notes taken during
dismantling to ensure correct fitted locations.
27 Reassemble the carburettor upper body
as described in the following paragraphs.
28 Refit the needle valve housing (using a
new washer if applicable).
29 Refit the needle valve and float assembly,
having ensured that the float tag locates
below the spring clip on the needle valve.
Insert the float retaining pin to secure.
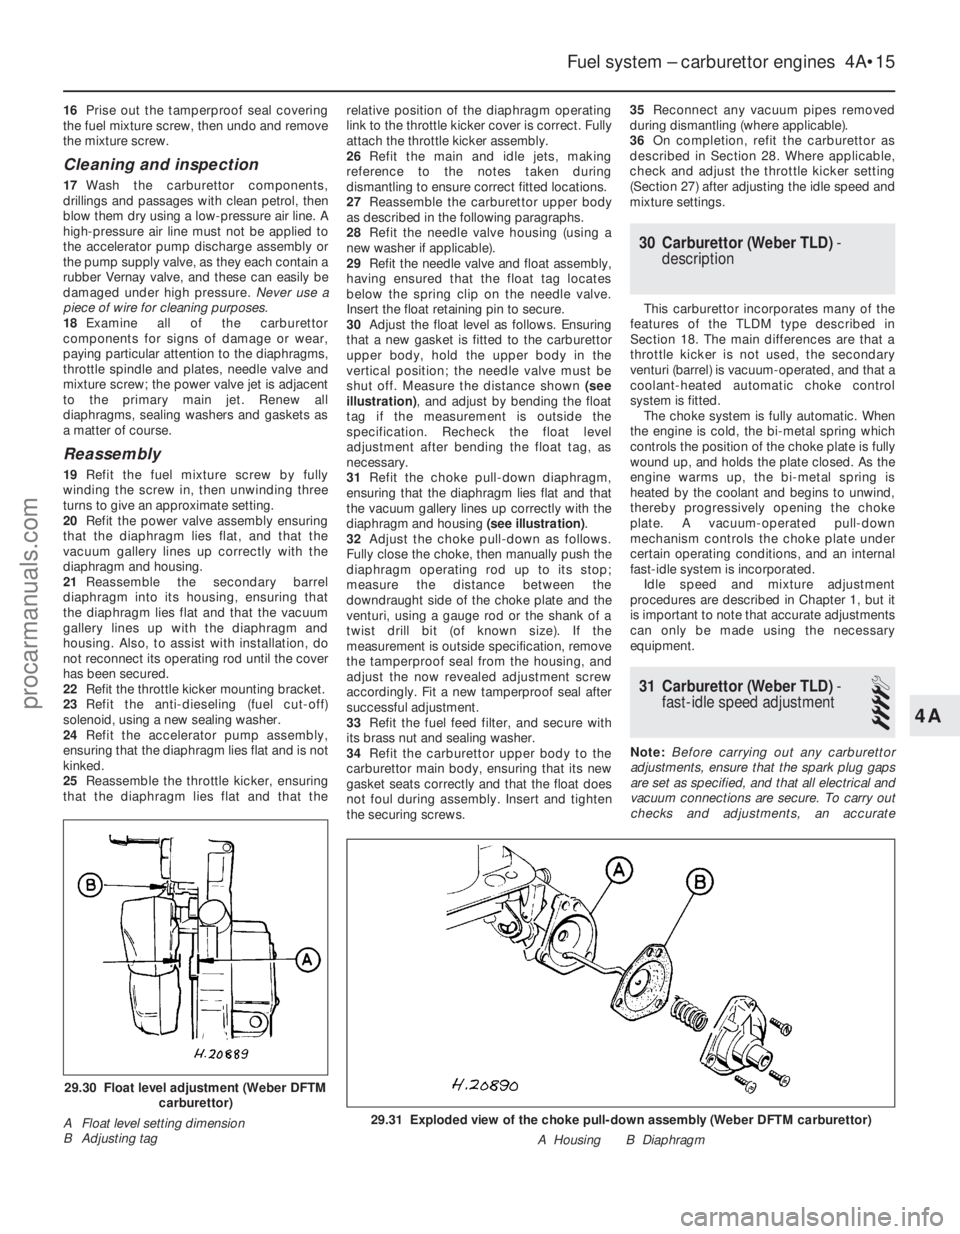
30 Adjust the float level as follows. Ensuring
that a new gasket is fitted to the carburettor
upper body, hold the upper body in the
vertical position; the needle valve must be
shut off. Measure the distance shown (see
illustration) , and adjust by bending the float
tag if the measurement is outside the
specification. Recheck the float level
adjustment after bending the float tag, as
necessary.
31 Refit the choke pull-down diaphragm,
ensuring that the diaphragm lies flat and that
the vacuum gallery lines up correctly with the
diaphragm and housing (see illustration).
32 Adjust the choke pull-down as follows.
Fully close the choke, then manually push the
diaphragm operating rod up to its stop;
measure the distance between the
downdraught side of the choke plate and the
venturi, using a gauge rod or the shank of a
twist drill bit (of known size). If the
measurement is outside specification, remove
the tamperproof seal from the housing, and
adjust the now revealed adjustment screw
accordingly. Fit a new tamperproof seal after
successful adjustment.
33 Refit the fuel feed filter, and secure with
its brass nut and sealing washer.
34 Refit the carburettor upper body to the
carburettor main body, ensuring that its new
gasket seats correctly and that the float does
not foul during assembly. Insert and tighten
the securing screws. 35
Reconnect any vacuum pipes removed
during dismantling (where applicable).
36 On completion, refit the carburettor as
described in Section 28. Where applicable,
check and adjust the throttle kicker setting
(Section 27) after adjusting the idle speed and
mixture settings.
30 Carburettor (Weber TLD) -
description
This carburettor incorporates many of the
features of the TLDM type described in
Section 18. The main differences are that a
throttle kicker is not used, the secondary
venturi (barrel) is vacuum-operated, and that a
coolant-heated automatic choke control
system is fitted. The choke system is fully automatic. When
the engine is cold, the bi-metal spring which
controls the position of the choke plate is fully
wound up, and holds the plate closed. As the
engine warms up, the bi-metal spring is
heated by the coolant and begins to unwind,
thereby progressively opening the choke
plate. A vacuum-operated pull-down
mechanism controls the choke plate under
certain operating conditions, and an internal
fast-idle system is incorporated. Idle speed and mixture adjustment
procedures are described in Chapter 1, but it
is important to note that accurate adjustments
can only be made using the necessary
equipment.
31 Carburettor (Weber TLD) -
fast-idle speed adjustment
4
Note: Before carrying out any carburettor
adjustments, ensure that the spark plug gaps
are set as specified, and that all electrical and
vacuum connections are secure. To carry out
checks and adjustments, an accurate
Fuel system – carburettor engines 4A•15
29.31 Exploded view of the choke pull-down assembly (Weber DFTM carbur\
ettor)
A Housing B Diaphragm
29.30 Float level adjustment (Weber DFTMcarburettor)
A Float level setting dimension
B Adjusting tag
4A
1595Ford Fiesta Remakeprocarmanuals.com
http://vnx.su
Page 135 of 296
Torque wrench settingsNmlbf ft
Idle speed control valve bolts . . . . . . . . . . . . . . . . . . . . . . . . . . . . . . . . . 4 to 5 3 to 4
Fuel pressure regulator bolts . . . . . . . . . . . . . . . . . . . . . . . . . . . . . . . . . 8 to 12 6 to 9
Fuel rail bolts . . . . . . . . . . . . . . . . . . . . . . . . . . . . . . . . . . . .\
. . . . . . . . . 20 to 26 15 to 19
Inlet air temperature sensor . . . . . . . . . . . . . . . . . . . . . . . . . . . . . . . . . . 20 to 25 15 to 18
Inlet manifold . . . . . . . . . . . . . . . . . . . . . . . . . . . . . . . . . . . .\
. . . . . . . . . 16 to 20 12 to 15
Oxygen sensor . . . . . . . . . . . . . . . . . . . . . . . . . . . . . . . . . . . .\
. . . . . . . . 50 to 70 37 to 52
Intercooler-to-radiator bolts . . . . . . . . . . . . . . . . . . . . . . . . . . . . . . . . . . 4 to 6 3 to 5
Boost control valve screws . . . . . . . . . . . . . . . . . . . . . . . . . . . . . . . . . . . 2.2 to 2.7 1.5 to 2
Exhaust manifold heatshield bolts . . . . . . . . . . . . . . . . . . . . . . . . . . . . . 21 to 26 16 to 19
Exhaust manifold-to-engine nuts (non-Turbo models) . . . . . . . . . . . . . . 14 to 17 11 to 13
Exhaust manifold-to-engine nuts (Turbo models) . . . . . . . . . . . . . . . . . 28 to 31 21 to 23
Exhaust manifold-to-turbocharger bolts . . . . . . . . . . . . . . . . . . . . . . . . 20 to 28 15 to 21
Turbocharger-to-exhaust downpipe nuts . . . . . . . . . . . . . . . . . . . . . . . . 35 to 47 26 to 35
Turbocharger cooling pipe banjo union bolts . . . . . . . . . . . . . . . . . . . . . 22 to 29 17 to 22
Turbocharger oil feed and return line couplings . . . . . . . . . . . . . . . . . . . 15 to 20 11 to 15
4C•2 Fuel system - electronic fuel injection engines
1595Ford Fiesta Remake
1 General information and
precautions
General information
The fuel system consists of a fuel tank
(mounted under the body, beneath the rear
seats), fuel hoses, an electric fuel pump
mounted in the fuel tank, and an electronic
fuel injection system. Fuel is supplied under pressure from the
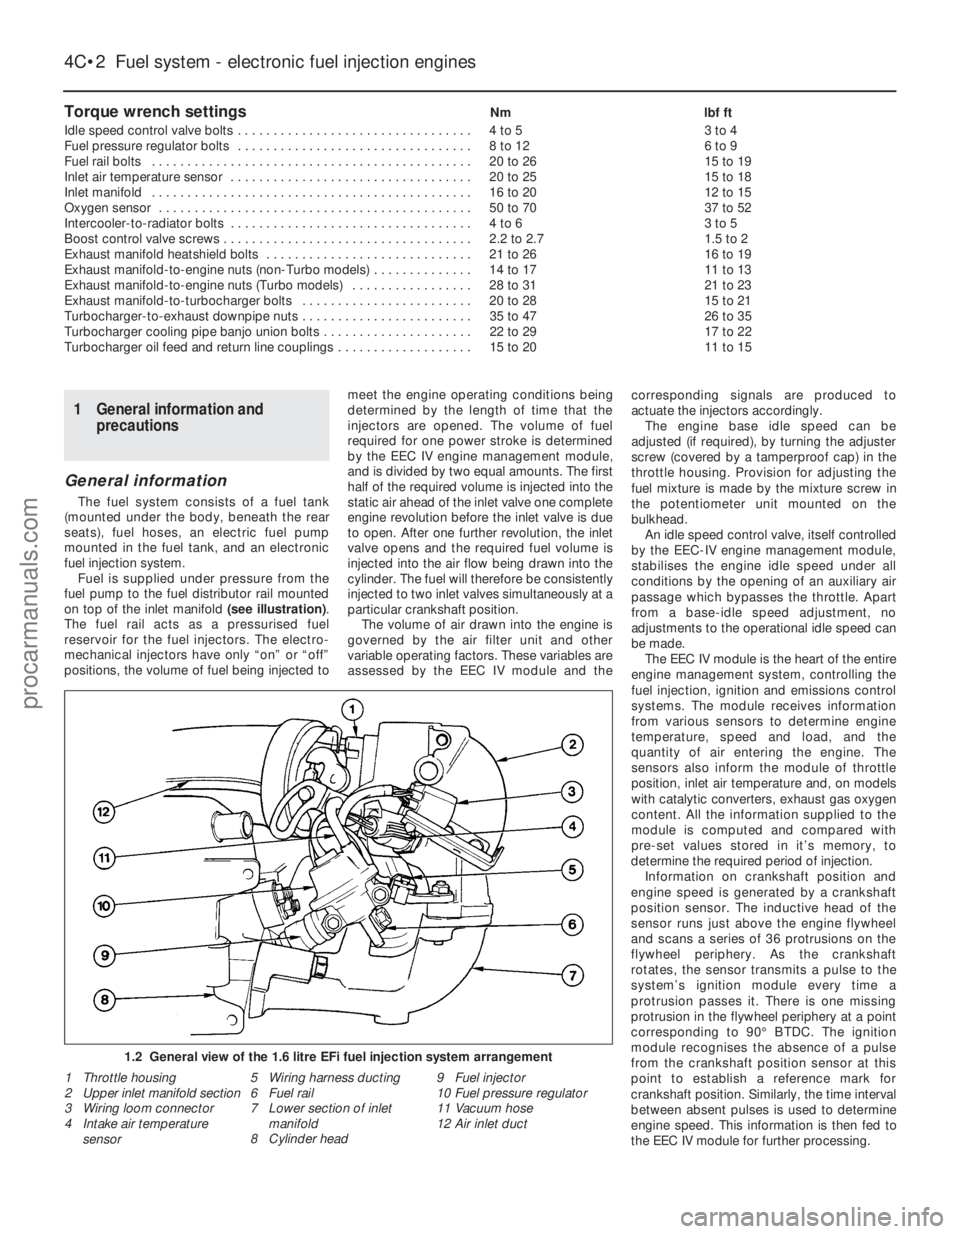
fuel pump to the fuel distributor rail mounted
on top of the inlet manifold (see illustration).
The fuel rail acts as a pressurised fuel
reservoir for the fuel injectors. The electro-
mechanical injectors have only “on” or “off”
positions, the volume of fuel being injected to meet the engine operating conditions being
determined by the length of time that the
injectors are opened. The volume of fuel
required for one power stroke is determined
by the EEC IV engine management module,
and is divided by two equal amounts. The first
half of the required volume is injected into the
static air ahead of the inlet valve one complete
engine revolution before the inlet valve is due
to open. After one further revolution, the inlet
valve opens and the required fuel volume is
injected into the air flow being drawn into the
cylinder. The fuel will therefore be consistently
injected to two inlet valves simultaneously at a
particular crankshaft position.
The volume of air drawn into the engine is
governed by the air filter unit and other
variable operating factors. These variables are
assessed by the EEC IV module and the corresponding signals are produced to
actuate the injectors accordingly.
The engine base idle speed can be
adjusted (if required), by turning the adjuster
screw (covered by a tamperproof cap) in the
throttle housing. Provision for adjusting the
fuel mixture is made by the mixture screw in
the potentiometer unit mounted on the
bulkhead. An idle speed control valve, itself controlled
by the EEC-IV engine management module,
stabilises the engine idle speed under all
conditions by the opening of an auxiliary air
passage which bypasses the throttle. Apart
from a base-idle speed adjustment, no
adjustments to the operational idle speed can
be made. The EEC IV module is the heart of the entire
engine management system, controlling the
fuel injection, ignition and emissions control
systems. The module receives information
from various sensors to determine engine
temperature, speed and load, and the
quantity of air entering the engine. The
sensors also inform the module of throttle
position, inlet air temperature and, on models
with catalytic converters, exhaust gas oxygen
content. All the information supplied to the
module is computed and compared with
pre-set values stored in it’s memory, to
determine the required period of injection.
Information on crankshaft position and
engine speed is generated by a crankshaft
position sensor. The inductive head of the
sensor runs just above the engine flywheel
and scans a series of 36 protrusions on the
flywheel periphery. As the crankshaft
rotates, the sensor transmits a pulse to the
system’s ignition module every time a
protrusion passes it. There is one missing
protrusion in the flywheel periphery at a point
corresponding to 90° BTDC. The ignition
module recognises the absence of a pulse
from the crankshaft position sensor at this
point to establish a reference mark for
crankshaft position. Similarly, the time interval
between absent pulses is used to determine
engine speed. This information is then fed to
the EEC IV module for further processing.
1.2 General view of the 1.6 litre EFi fuel injection system arrangement\
1 Throttle housing
2 Upper inlet manifold section
3 Wiring loom connector
4 Intake air temperature sensor 5 Wiring harness ducting
6 Fuel rail
7 Lower section of inlet
manifold
8 Cylinder head 9 Fuel injector
10
Fuel pressure regulator
11 Vacuum hose
12 Air inlet duct
procarmanuals.com
http://vnx.su
Page 161 of 296
1 General information,precautions and battery
disconnection
General information
The engine electrical system consists
mainly of the charging and starting systems.
Because of their engine-related functions,
these components are covered separately
from the body electrical devices such as the
lights, instruments, etc (which are covered in
Chapter 12). Information on the ignition
system is covered in Part B of this Chapter.
The electrical system is of the 12-volt
negative earth type. The battery is of the low maintenance or
“maintenance-free” (sealed for life) type and is
charged by the alternator, which is belt-driven
from the crankshaft pulley. The starter motor is of the pre-engaged
type incorporating an integral solenoid. On
starting, the solenoid moves the drive pinion
into engagement with the flywheel ring gear
before the starter motor is energised. Once
the engine has started, a one-way clutch
prevents the motor armature being driven by
the engine until the pinion disengages from
the flywheel.
Precautions
Further details of the various systems are
given in the relevant Sections of this Chapter.
While some repair procedures are given, the
usual course of action is to renew the
component concerned. The owner whose
interest extends beyond mere component
renewal should obtain a copy of the
“Automobile Electrical & Electronic Systems
Manual” , available from the publishers of this
manual. It is necessary to take extra care when
working on the electrical system to avoid
damage to semi-conductor devices (diodes
and transistors), and to avoid the risk of
personal injury. In addition to the precautions
given in “Safety first!” at the beginning of this
manual, observe the following when working
on the system:
Always remove rings, watches, etc before
working on the electrical system. Even with
the battery disconnected, capacitive
discharge could occur if a component’s live
terminal is earthed through a metal object.
This could cause a shock or nasty burn. Do not reverse the battery connections.
Components such as the alternator, electronic
control units, or any other components having
semi-conductor circuitry could be irreparably
damaged. If the engine is being started using jump
leads and a slave battery, connect the
batteries positive-to-positive and negative-to-
negative (see “Jump starting” ). This also
applies when connecting a battery charger.
Never disconnect the battery terminals, the
alternator, any electrical wiring or any test instruments when the engine is running.
Do not allow the engine to turn the
alternator when the alternator is not
connected. Never “test” for alternator output by
“flashing” the output lead to earth.
Never use an ohmmeter of the type
incorporating a hand-cranked generator for
circuit or continuity testing.
Always ensure that the battery negative lead
is disconnected when working on the
electrical system. Before using electric-arc welding
equipment on the car, disconnect the battery,
alternator and components such as the fuel
injection/ignition electronic control unit to
protect them from the risk of damage.
Battery disconnection
Several systems fitted to the vehicle require
battery power to be available at all times, either
to ensure that their continued operation (such as
the clock) or to maintain control unit memories
(such as that in the engine management
system’s ECU) which would be wiped if the
battery were to be disconnected. Whenever the
battery is to be disconnected therefore, first note
the following, to ensure that there are no
unforeseen consequences of this action:
a) First, on any vehicle with central locking, it is a wise precaution to remove the key
from the ignition, and to keep it with you,
so that it does not get locked in, if the
central locking should engage accidentally
when the battery is reconnected.
b) On cars equipped with an engine
management system, the system’s ECU will
lose the information stored in its memory -
referred to by Ford as the “KAM” (Keep-
Alive Memory) - when the battery is
disconnected. This includes idling and
operating values, and any fault codes
detected - in the case of the fault codes, if
it is thought likely that the system has
developed a fault for which the
corresponding code has been logged, the
vehicle must be taken to a Ford dealer for
the codes to be read, using the special
diagnostic equipment necessary for this.
Whenever the battery is disconnected, the
information relating to idle speed control
and other operating values will have to be
re-programmed into the unit’s memory.
The ECU does this by itself, but until then,
there may be surging, hesitation, erratic idle
and a generally inferior level of
performance. To allow the ECU to relearn
these values, start the engine and run it as
close to idle speed as possible until it
reaches its normal operating temperature,
then run it for approximately two minutes at
1200 rpm. Next, drive the vehicle as far as
necessary - approximately 5 miles of varied
driving conditions is usually sufficient - to
complete the relearning process.
c) If the battery is disconnected while the alarm system is armed or activated, the
alarm will remain in the same state when the battery is reconnected. The same
applies to the engine immobiliser system
(where fitted).
d) If a Ford “Keycode” audio unit is fitted,
and the unit and/or the battery is
disconnected, the unit will not function
again on reconnection until the correct
security code is entered. Details of this
procedure, which varies according to the
unit and model year, are given in the
“Ford Audio Systems Operating Guide”
supplied with the vehicle when new, with
the code itself being given in a “Radio
Passport” and/or a “Keycode Label” at
the same time. Ensure you have the
correct code before you disconnect the
battery. For obvious security reasons, the
procedure is not given in this manual. If
you do not have the code or details of the
correct procedure, but can supply proof
of ownership and a legitimate reason for
wanting this information, the vehicle’s
selling dealer may be able to help.
Devices known as “memory-savers” (or
“code-savers”) can be used to avoid some of
the above problems. Precise details vary
according to the device used. Typically, it is
plugged into the cigarette lighter, and is
connected by its own wires to a spare battery;
the vehicle’s own battery is then disconnected
from the electrical system, leaving the
“memory-saver” to pass sufficient current to
maintain audio unit security codes and ECU
memory values, and also to run permanently-
live circuits such as the clock, all the while
isolating the battery in the event of a short-
circuit occurring while work is carried out.
Warning: Some of these devices
allow a considerable amount of
current to pass, which can mean
that many of the vehicle’s
systems are still operational when the
main battery is disconnected. If a
“memory-saver” is used, ensure that the
circuit concerned is actually “dead” before
carrying out any work on it!
2 Electrical fault finding - general information
Refer to Chapter 12.
3 Battery -testing and charging
1
Standard and low maintenance
battery - testing
1If the vehicle covers a small annual mileage,
it is worthwhile checking the specific gravity
of the electrolyte every three months to
determine the state of charge of the battery.
Use a hydrometer to make the check and
compare the results with the following table.
5A•2 Starting and charging systems
1595Ford Fiesta Remakeprocarmanuals.com
http://vnx.su