key FORD FIESTA 2007 Owner's Manual
[x] Cancel search | Manufacturer: FORD, Model Year: 2007, Model line: FIESTA, Model: FORD FIESTA 2007Pages: 1226, PDF Size: 61.26 MB
Page 417 of 1226
21 I -04-9 Steering Column 2 1 1 -04-9
DISASSEMBLY AND ASSEMBLY
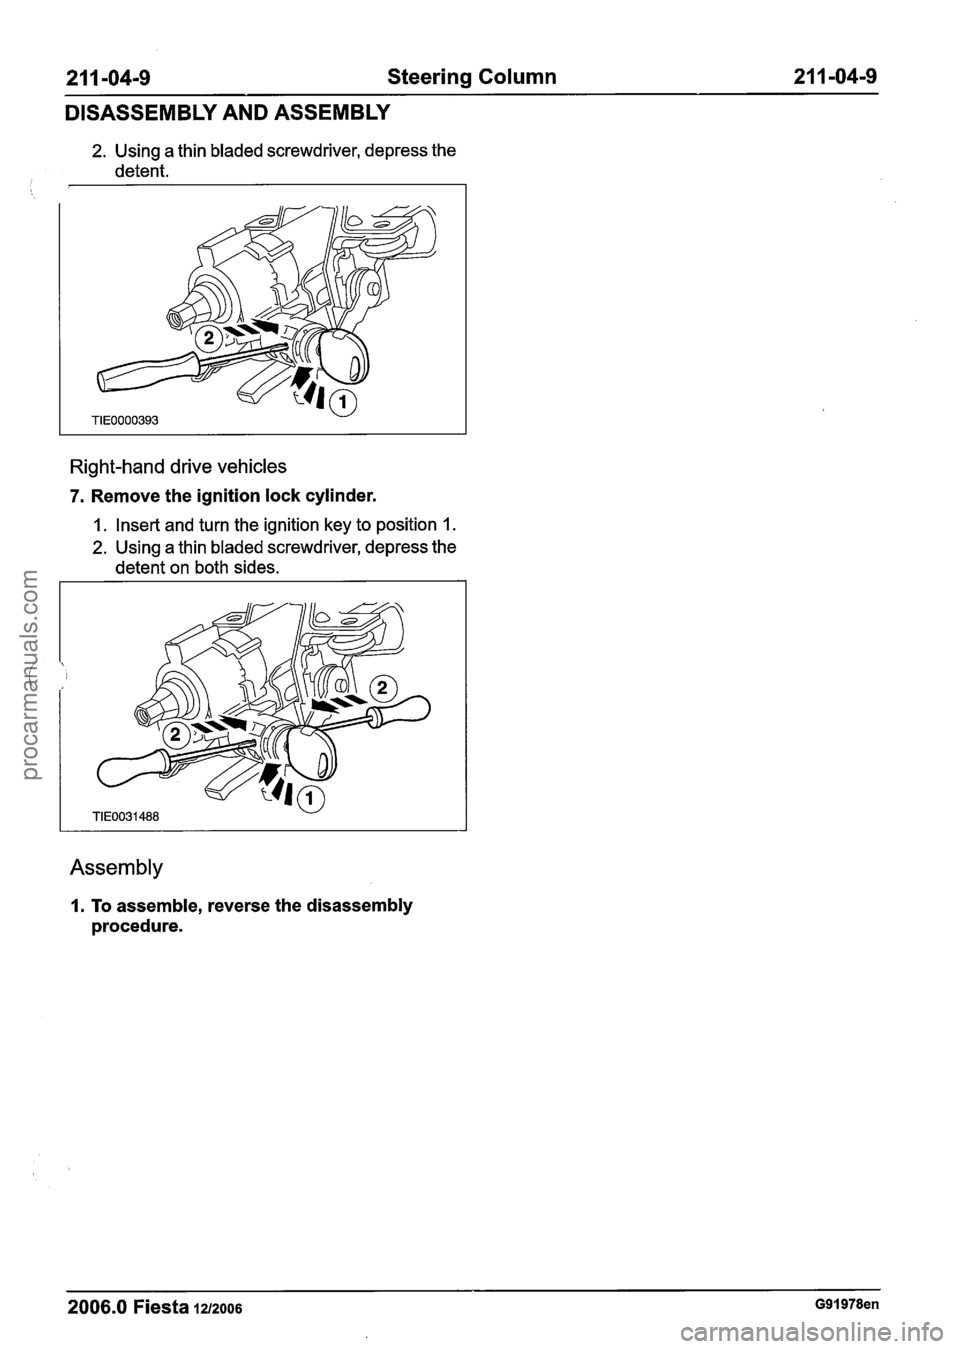
2. Using a thin bladed screwdriver, depress the
detent.
Right-hand drive vehicles
7. Remove the ignition lock cylinder.
1. Insert and turn the ignition key to position 1.
2. Using a thin bladed screwdriver, depress the
detent on both sides.
Assembly
1. To assemble, reverse the disassembly
procedure.
2006.0 Fiesta 1212006 G91978en
procarmanuals.com
Page 802 of 1226
Fuel Charging and Controls - 1.25L
Duratec-1 6V (Sigma)ll.4L Duratec-I 6V
303-04A-4 (Sigma)ll.GL Duratec-1 6V (Sigma) 303-04A-4
REMOVAL AND INSTALLATION
Throttle Body(23 198 0)
Removal 2. N0TE:Do not press the accelerator pedal
during the initialization period as this will
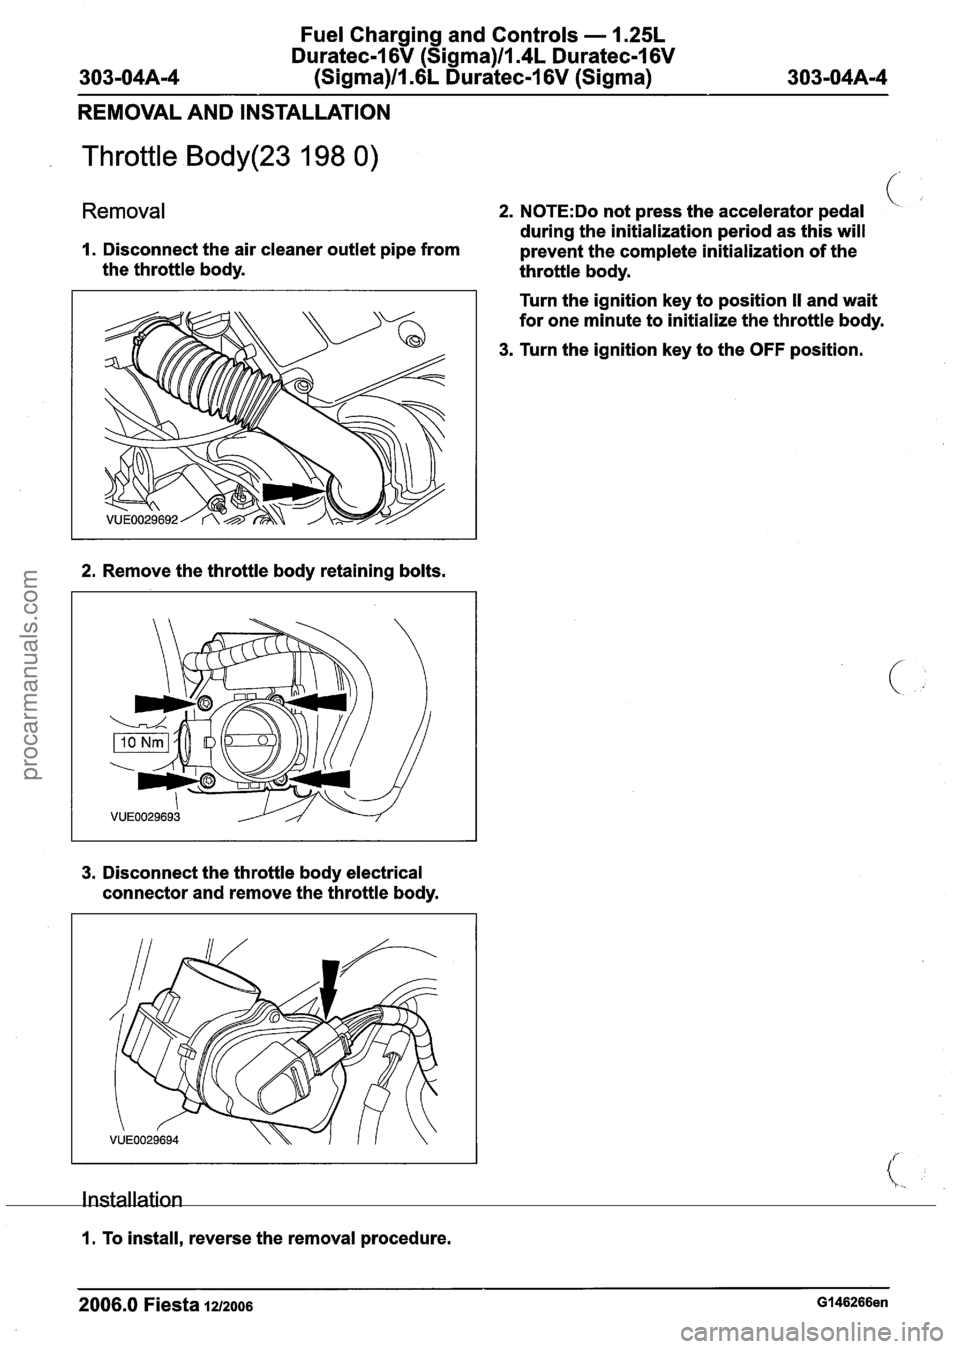
1. Disconnect the air cleaner outlet pipe from
prevent the complete initialization of the
the throttle body. throttle body.
2. Remove the throttle body retaining bolts. Turn
the ignition key to position
II and wait
for one minute to
initialize the throttle body.
3. Turn the ignition key to the OFF position.
3. Disconnect the throttle body electrical
connector and remove the throttle body.
I nin
1. To install, reverse the removal procedure.
2006.0 Fiesta 1212006 GI 46266en
procarmanuals.com
Page 832 of 1226
Fuel Charging and Controls - 2.OL
303-04B-24 Duratec-HE (M14) 303-04B-24
REMOVAL AND INSTALLATION
Throttle Body
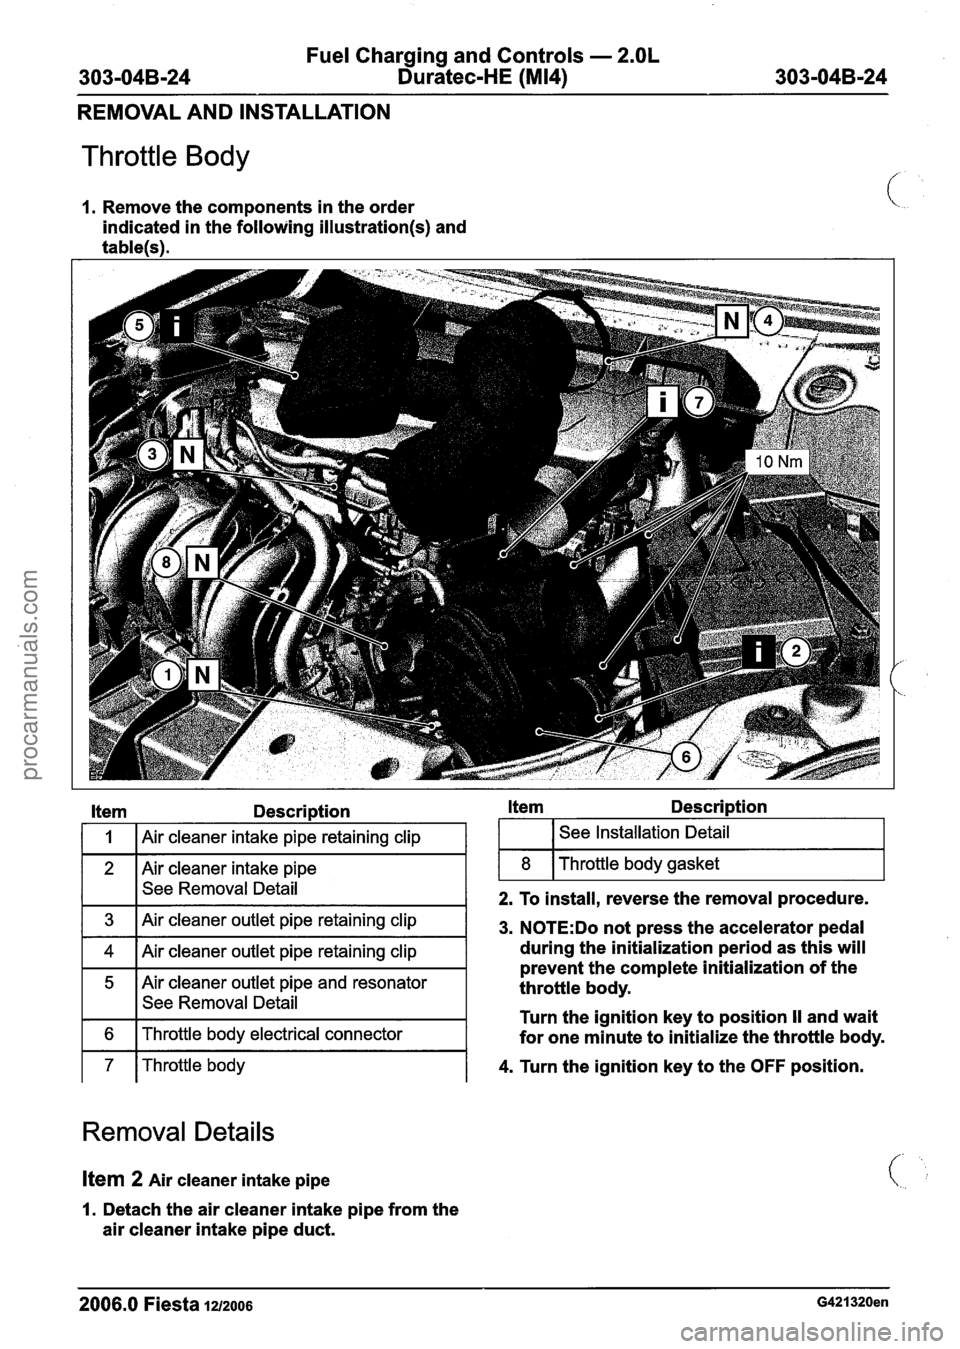
1. Remove the components in the order
indicated in the following
illustration(s) and
tablelsl.
Item Description Item Description
See Removal ~etaii-
1 7 I Throttle body 1 4. Turn the ignition key to the OFF position.
1
2 I I
2. To install, reverse the removal procedure.
3
4
5
6
Removal Details
8
Air cleaner intake pipe retaining clip
Air cleaner intake pipe
Item 2 Air cleaner intake pipe
See Installation Detail
Throttle body gasket
Air cleaner outlet pipe retaining clip
Air cleaner outlet pipe retaining clip
Air cleaner outlet pipe and resonator
See Removal Detail
Throttle body electrical connector
1. Detach the air cleaner intake pipe from the
air cleaner intake pipe duct.
3. N0TE:Do not press the accelerator pedal
during the initialization period as this will
prevent the complete initialization of the
throttle body.
Turn the ignition key to position
II and wait
for one minute to initialize the throttle body.
2006.0 Fiesta 1212006 G421320en
procarmanuals.com
Page 867 of 1226
303-06-3 Starting System 303-06-3
DESCRIPTION AND OPERATION
Starting System
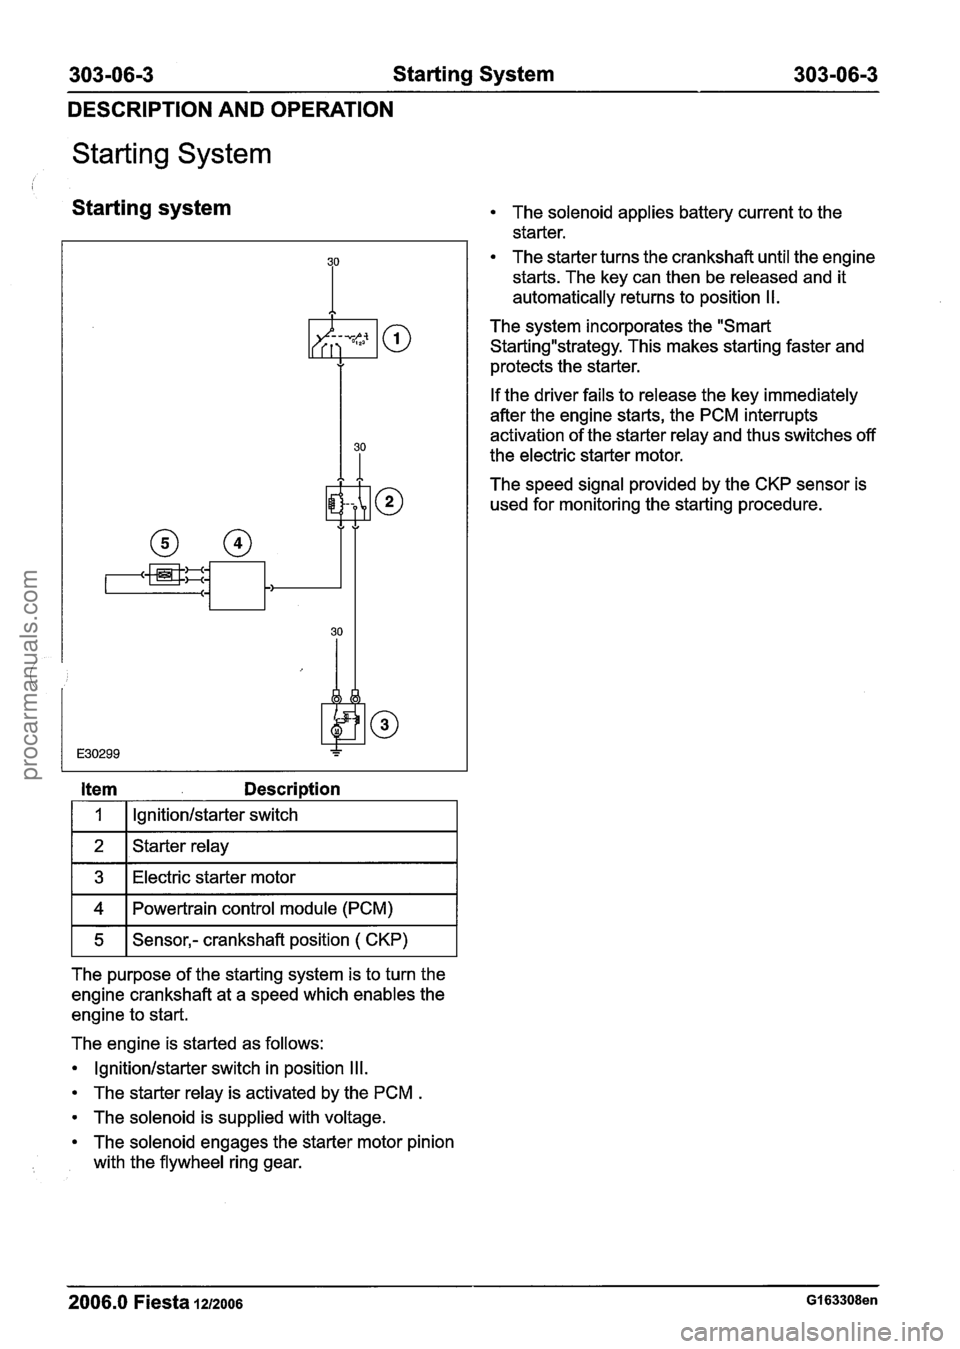
Starting system
1 tern Description
I 1 I lgnitionlstarter switch I
1 2 1 Starter relay I
1 3 1 Electric starter motor I
1 4 1 Powertrain control module (PCM) I
1 5 1 Sensor,- crankshaft position ( CKP) I
The purpose of the starting system is to turn the
engine crankshaft at a speed which enables the
engine to start.
The engine is started as follows:
Ignitionlstarter switch in position
Ill.
The starter relay is activated by the PCM .
The solenoid is supplied with voltage.
The solenoid engages the starter motor pinion
with the flywheel ring gear.
The solenoid applies battery current to the
starter.
The starter turns the crankshaft until the engine
starts. The key can then be released and it
automatically returns to position
I I.
The system incorporates the "Smart
StartingWstrategy. This makes starting faster and
protects the starter.
If the driver fails to release the key immediately
after the engine starts, the PCM interrupts
activation of the starter relay and thus switches off
the electric starter motor.
The speed signal provided by the CKP sensor is
used for monitoring the starting procedure.
2006.0 Fiesta 1212006 GI 63308en
procarmanuals.com
Page 930 of 1226
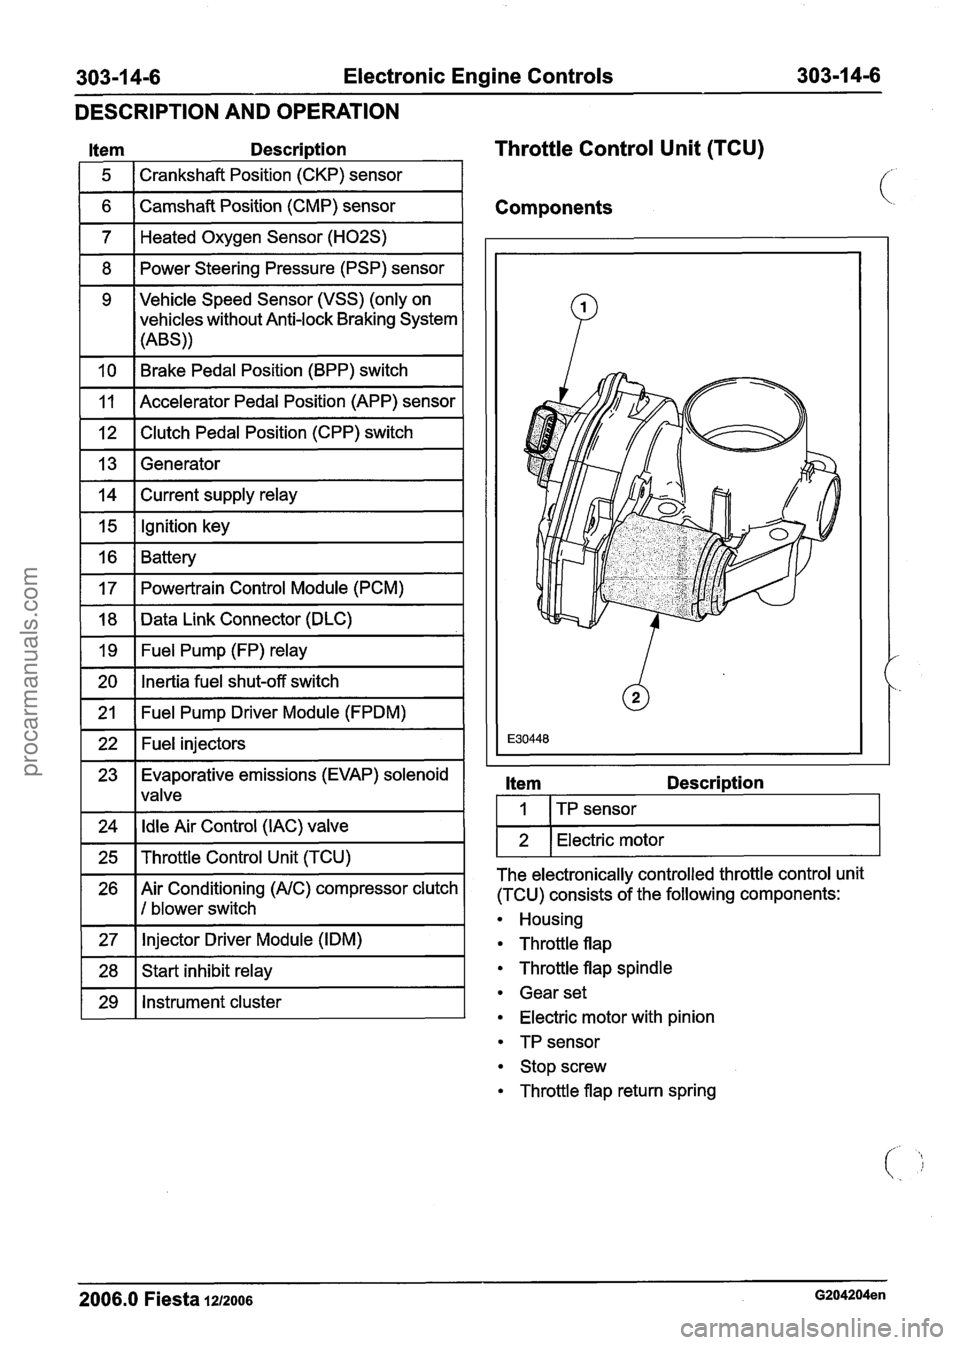
303-1 4-6 Electronic Engine Controls 303-1 4-6
DESCRIPTION
AND OPERATION
Item Descri~tion
1 5 1 Crankshaft Position (CKP) sensor 1
Throttle Control Unit (TCU)
1 6 ( Camshaft Position (CMP) sensor I Components
1 7 1 Heated Oxygen Sensor (H02S) I
1 8 1 Power Steering Pressure (PSP) sensor I
1 10 1 Brake Pedal Position (BPP) switch I
9 Vehicle Speed Sensor (VSS)
(only on
vehicles without Anti-lock Braking System
(ABS))
1 12 1 Clutch Pedal Position (CPP) switch I
11
1 13 1 Generator I
Accelerator Pedal Position (APP) sensor
1 14 1 Current supply relay I
1 15 1 Ignition key I -
16
17
1 20 1 Inertia fuel shut-off switch I
Battery
Powertrain Control Module (PCM)
-
18
19
1 21 1 Fuel Pump Driver Module (FPDM) I
Data Link Connector (DLC)
Fuel Pump (FP) relay
1 22 1 Fuel injectors I
23 Evaporative emissions (EVAP) solenoid
1 lvalve
1 24 1 Idle Air Control (IAC) valve 1
1 25 1 Throttle Control Unit (TCU) I
26 Air Conditioning (AIC) compressor clutch
1 I 1 blower switch
1 27 1 Injector Driver
Module (IDM) I
1 28 1 Start inhibit relay I
1 29 1 Instrument cluster I
Item Descri~tion
I I ITP sensor I
1 2 1 Electric motor I
The electronically controlled throttle control unit
(TCU) consists of the following components:
Housing
Throttle flap
Throttle flap spindle
Gear set
Electric motor with pinion
TP sensor
Stop screw
Throttle flap return spring
2006.0 Fiesta 1212006 G204204en
procarmanuals.com
Page 938 of 1226
303-1 4-1 4 Electronic Engine Controls 303-1 4-1 4
DIAGNOSIS AND TESTING
Electronic Engine Controls
General Equipment
I Worldwide Diagnostic system (WDS)
Principles of Operation
For Principles of Operation on the electronic
accelerator control system
REFER to: Acceleration Control (31
0-02A,
Diagnosis and Testing).
European On-Board Diagnostics (EOBD)
EOBD is a diagnostic system integrated into the
powertrain control module (PCM). This system
continuously monitors vehicle emission
components. The system includes a malfunction
indicator lamp (MIL) which indicates when there is
a concern that can affect emissions or the system
malfunctions. Data stored within the module DTC
memory can be accessed using a generic scan
tool or WDS.
EOBD is mandated within European Union
regulations from the year 2000 for passenger
vehicles with petrol engines and from 2003 onwards for passenger vehicles with diesel
engines.
EOBD Functions:
Establishes when and how emissions control
faults must be indicated.
Actuates emission control malfunction indicator
lamp (MIL) and fault memory.
Indicates operating conditions in which the
concern occurred (freeze frame data).
Standardized output of operating data such as
engine speed, engine coolant temperature etc.
Standardized names and abbreviations for
components and systems.
Standardized
DTCs for all manufacturers.
Standardized communication with the diagnostic
equipment.
Standardized 16-pin data link connector (DLC)
in area of the instrument panel.
Concern display must be possible using a
generic scan tool.
EOBD consists of the following elements:
Warm-up Cycle C'
The warm-up cycle is an operation that consists of
key on, engine start and a coolant temperature
increase of
22"C, exceeding 71 OC on completion.
Drive Cycle
A drive cycle commences when the engine is
started (cold or warm) and ends when the engine
is switched off.
Trip
A trip begins when the engine is started and is
complete when all the EOBD monitors have
completed a self-test. This may take place over a
number of drive cycles. On diesel variants, the
information gathered from one drive cycle is not
carried over to a subsequent cycle or cycles.
When a concern has been rectified, particularly
after electronic engine control components have
been changed, the DTC memory, which is part of
the EEPROM must be cleared of all trouble codes.
When the DTC memory has been cleared, the code
.
PI000 (known as the readiness code) is set in the
PCM memory, which indicates that since the
EEPROM has been cleared, not all of the
monitoring systems have completed their tests.
PI000 can only be cleared by carrying out a trip,
which includes driving the vehicle under variable
conditions of speed, load and time so that all of the
monitors are completed. As
PI000 will not
illuminate the MIL it is not necessary to carry out
the trip before returning the vehicle to the customer.
Freeze Frame Data
When a concern is detected, various data is stored
depending on application including:
Diagnostic trouble code.
Vehicle speed.
Engine coolant temperature.
Engine speed.
Engine load.
Mixture formation trim value (trim value for
engine wear) (All except vehicles with diesel
engine).
State of oxygen sensor control (open and closed
loop) (All except vehicles with diesel engine).
Distance covered since the concern was first
registered.
2006.0 Fiesta 1212006 G384566en
procarmanuals.com
Page 940 of 1226
Electronic Engine Controls
DIAGNOSIS AND TESTING
detected in either the STFT or LTFT, and it is still
present on a second trip, the MIL will be switched
on.
Heated Oxygen Sensor (H02S) Monitor (All except
vehicles with diesel engine)
This monitors the operation of the pre (upstream)
and post (downstream) catalytic converter
H02S
sensors. It will detect deviations in airlfuel ratios
(AFR) and sensor faults.
The
H02S will cause emission increase when its
response time increases too much. To diagnose
a sensor a period is measured and the number of
leanlrich transitions are counted. The sum of valid
periods is then calculated. To avoid
non-representative measurements, the period is
valid only if the
H02S has been below a low
threshold and above a high threshold between 2
consecutive leanlrich transitions.
A failure is
declared when the sum of the measured periods
exceeds the sum of the corresponding limit (held
within the PCM) and the MIL is illuminated.
Catalytic Converter Efficiency Monitor (All except
vehicles with diesel engine)
The efficiency of a catalytic converter is measured
by its ability to store and later release oxygen to
convert harmful gases. The efficiency is reduced
if the converter becomes contaminated as it ages,
and at high gas flow rates, because the exhaust
gas does not remain in the converter long enough
to complete the conversion process. switches
over or until the end of a delay. If this
delay expires or the sensor does not switch, the
sensor is treated as failed.
Combustion Noise Monitor (Vehicles with common
rail fuel injection)
In diesel variants, the Combustion Noise Monitor
is used to trim the fuel injection pulse lengths. Each
fuel injector has an associated set of correction
data that is determined during a production end of
line test. The Combustion Noise Monitor is used
to determine how the fuel injector characteristic
changes from this initial calibration over the life of
the fuel injector.
EGR Monitor (Vehicles with diesel engine)
The functionality of the EGR system is checked by
comparing either the MAP sensor output or EGR
valve lift potentiometer output (depending upon
application) with expected values.
Diagnostic Requirements
Vehicles equipped with EOBD, can be diagnosed
using the WDS. In order for the EOBD system to
be invoked, a number of criteria must be met. After
any repair, which could affect emissions, a trip must
be carried out on the vehicle, to make sure that
engine management system operates correctly.
Malfunction Indicator Lamp (MIL)
The MIL is located in the instrument cluster and is
fitted to alert the driver to the fact that an abnormal
This monitor checks for the oxygen storage condition
has developed in the engine management
capacity (OSC) of the catalytic converter. During system,
that is having an adverse effect on
a controlled period, the catalyst monitor sensor emissions.
In cases of misfires which are likely to
signal is analyzed to evaluate the OSC of the cause
catalytic converter damage, it is switched
catalyst. It represents the quantity of oxygen that on immediately.
With all other faults it will illuminate
is really used for the oxidation-reduction reaction continuously
from the second trip after the condition
by the catalytic converter If a fault has occurred occurred.
Under normal operation it should
with the catalyst monitor sensor during the catalyst illuminate
at key-on and go out almost as soon as
diagnosis, a sensor diagnosis is carried out. During the
engine is started.
the controlled diagnosis phase, the catalyst monitor
Diagnostic Trouble Codes (DTCs) sensor activity is measured and is compared to the
OSC of the catalyst. If this activity is high (low The
DTCs given
by the PCM are standardized,
0SC)theMILwillbeilluminated.Ifthroughoutthe whichmeansthatgenericscantoolscanread
controlled phase, repeated several times, the results from
all vehicles.
downstream sensor output has not moved, the
closed loop mode is delayed in order to test the
sensor. If the catalyst monitor sensor is set to rich,
the injection time is forced to lean and conversely
if the downstream sensor is set to lean, the
injection time is forced to rich until the sensor
2006.0 Fiesta 1212006 G384566en
procarmanuals.com
Page 945 of 1226
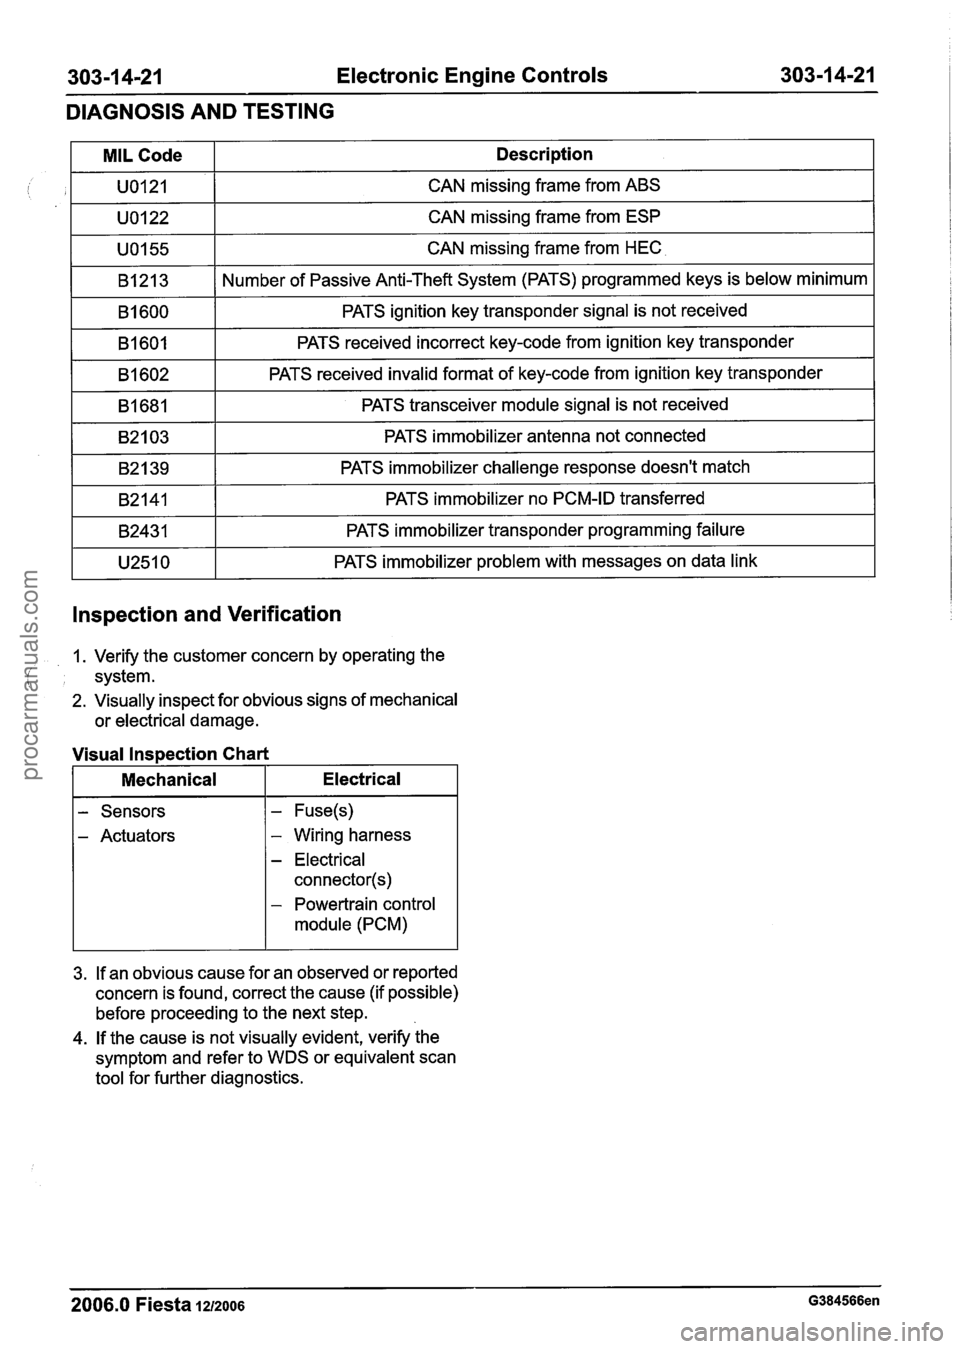
303-1 4-21 Electronic Engine Controls 303-1 4-21
DIAGNOSIS AND TESTING
lnspection and Verification
MIL Code
U0121
U0122
U0155
B1213
B1600
B1601
B1602
B1681
B2103
B2139
B2141
B2431
U2510
1. Verify the customer concern by operating the
( I system.
2. Visually inspect for obvious signs of mechanical
or electrical damage. Description
CAN missing frame from ABS
CAN missing frame from ESP
CAN missing frame from HEC
Number of Passive Anti-Theft System (PATS) programmed keys is below minimum
PATS ignition key transponder signal is not received
PATS received incorrect key-code from ignition key transponder
PATS received invalid format of key-code from ignition key transponder
PATS transceiver module signal is not received
PATS immobilizer antenna not connected
PATS immobilizer challenge response doesn't match
PATS immobilizer no PCM-ID transferred
PATS immobilizer transponder programming failure
PATS immobilizer problem with messages on data link
Visual Inspection Chart
Mechanical
I Electrical
- Sensors
- Actuators - Wiring harness
- Electrical
connector(s)
- Powertrain control
module (PCM)
3. If an obvious cause for an observed or reported
concern is found, correct the cause (if possible)
before proceeding to the next step.
4. If the cause is not visually evident, verify the
symptom and refer to WDS or equivalent scan
tool for further diagnostics.
- -
2006.0 Fiesta 1212006 G384566en
procarmanuals.com
Page 947 of 1226
303-1 4-23 Electronic Engine Controls 303-1 4-23
REMOVAL AND INSTALLATION
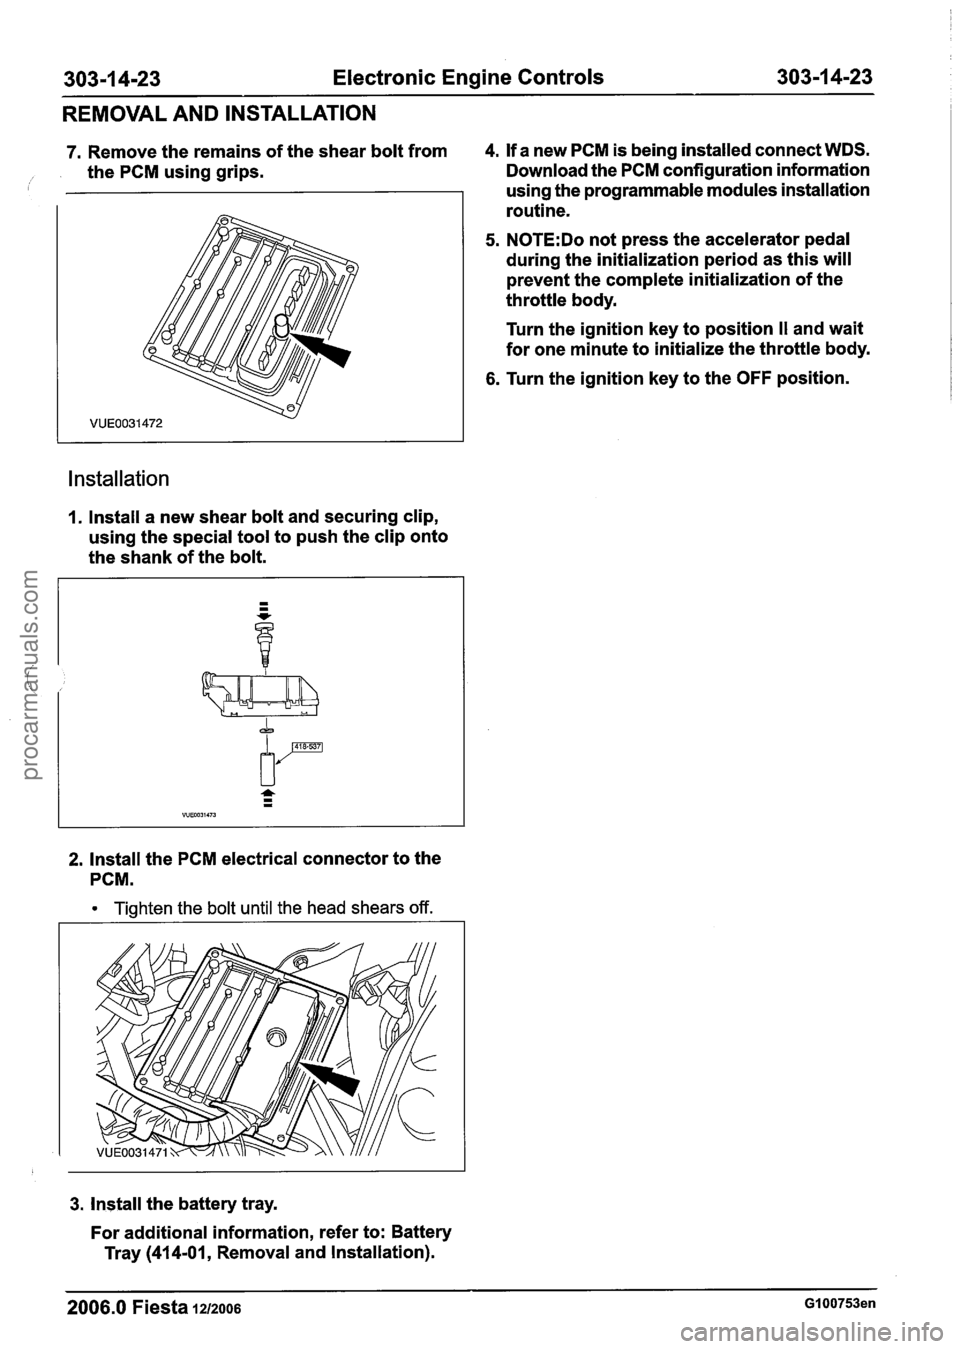
7. Remove the remains of the shear bolt from 4.
If a new PCM is being installed connect WDS.
/ the PCM using grips. Download the PCM configuration information
using the programmable modules installation
routine.
5. N0TE:Do not press the accelerator pedal
during the initialization period as this will
prevent the complete initialization of the
throttle body.
Turn the ignition key to position
I1 and wait
for one minute to initialize the throttle body.
6. Turn the ignition key to the OFF position.
Installation
I. Install a new shear bolt and securing clip,
using the special tool to push the clip onto
the shank of the bolt.
2. Install the PCM electrical connector to the
PCM.
Tighten the bolt until the head shears off.
3. Install the battery tray.
For additional information, refer to: Battery
Tray
(414-01, Removal and Installation).
procarmanuals.com
Page 972 of 1226
Automatic Transmission/Transaxle -
Vehicles With: 4-Speed Automatic
307-01 -1 2 Transmission (AW81-40) 307-01 -1 2 --
DESCRIPTION AND OPERATION
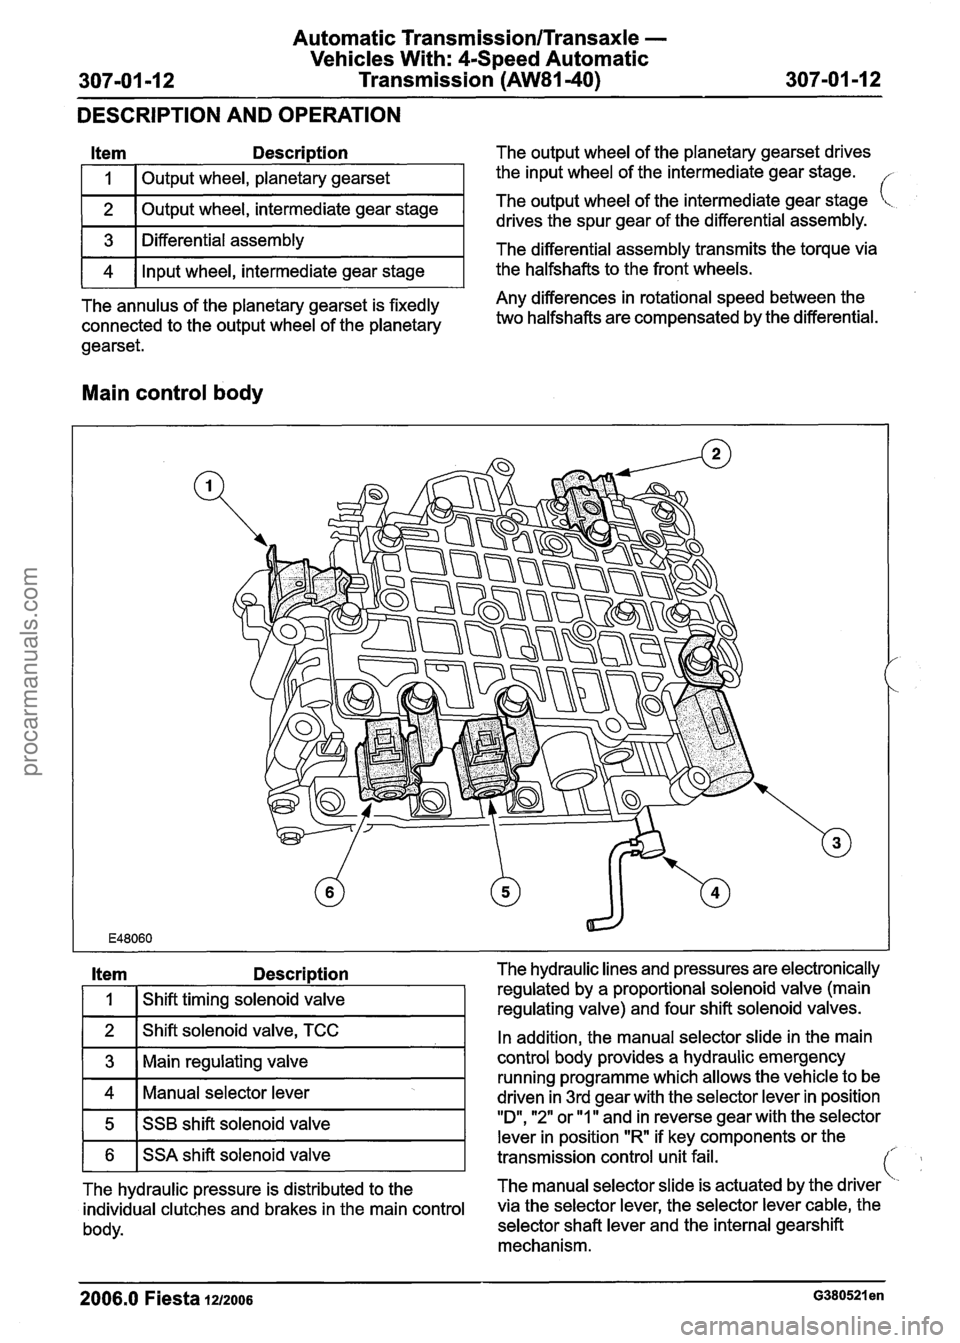
Item Description The output wheel of the planetary gearset drives
I 1 I Output wheel, planetary gearset
2
I I 1
The annulus of the planetary gearset is fixedly Any differences in rotational speed between the
connected to the output
wheel of the planetary two halfshafts are compensated by the differential.
gearset.
the input wheel of the intermediate gear stage.
3
4
Main control body
Output wheel, intermediate gear stage
Item Descri~tion The hydraulic lines and pressures are electronically
The output
wheel of
the intermediate gear stage [<.
drives the spur gear of the differential assembly.
Differential assembly
Input wheel, intermediate gear stage The
differential assembly transmits the torque
via
the halfshafts to the front wheels.
In addition, the manual selector slide in the main
control body provides a hydraulic emergency
running programme which
allows the vehicle to be
Manual selector lever driven in 3rd aear with the selector lever in position
.
1
Shift timing solenoid valve
5
2006.0 Fiesta 1212006 ~380521 en
regulated by a proportional solenoid valve (main
regulating valve) and four shift solenoid valves.
1 6 1 SSA shift solenoid valve
SSB
shift solenoid valve
transmission control unit-fail. -
"D", "2" or "ll'and in reverse gear with the selector
lever in position "R if key components or the
The hydraulic pressure is distributed to the The
manual selector slide is actuated by the driver
individual clutches and brakes in the main control via the selector lever, the selector lever cable, the
body. selector shaft lever and the internal gearshift
mechanism.
procarmanuals.com