key FORD FIESTA 2007 User Guide
[x] Cancel search | Manufacturer: FORD, Model Year: 2007, Model line: FIESTA, Model: FORD FIESTA 2007Pages: 1226, PDF Size: 61.26 MB
Page 375 of 1226
21 1-02-27 Power Steering 21 1 -02-27
REMOVAL AND INSTALLATION
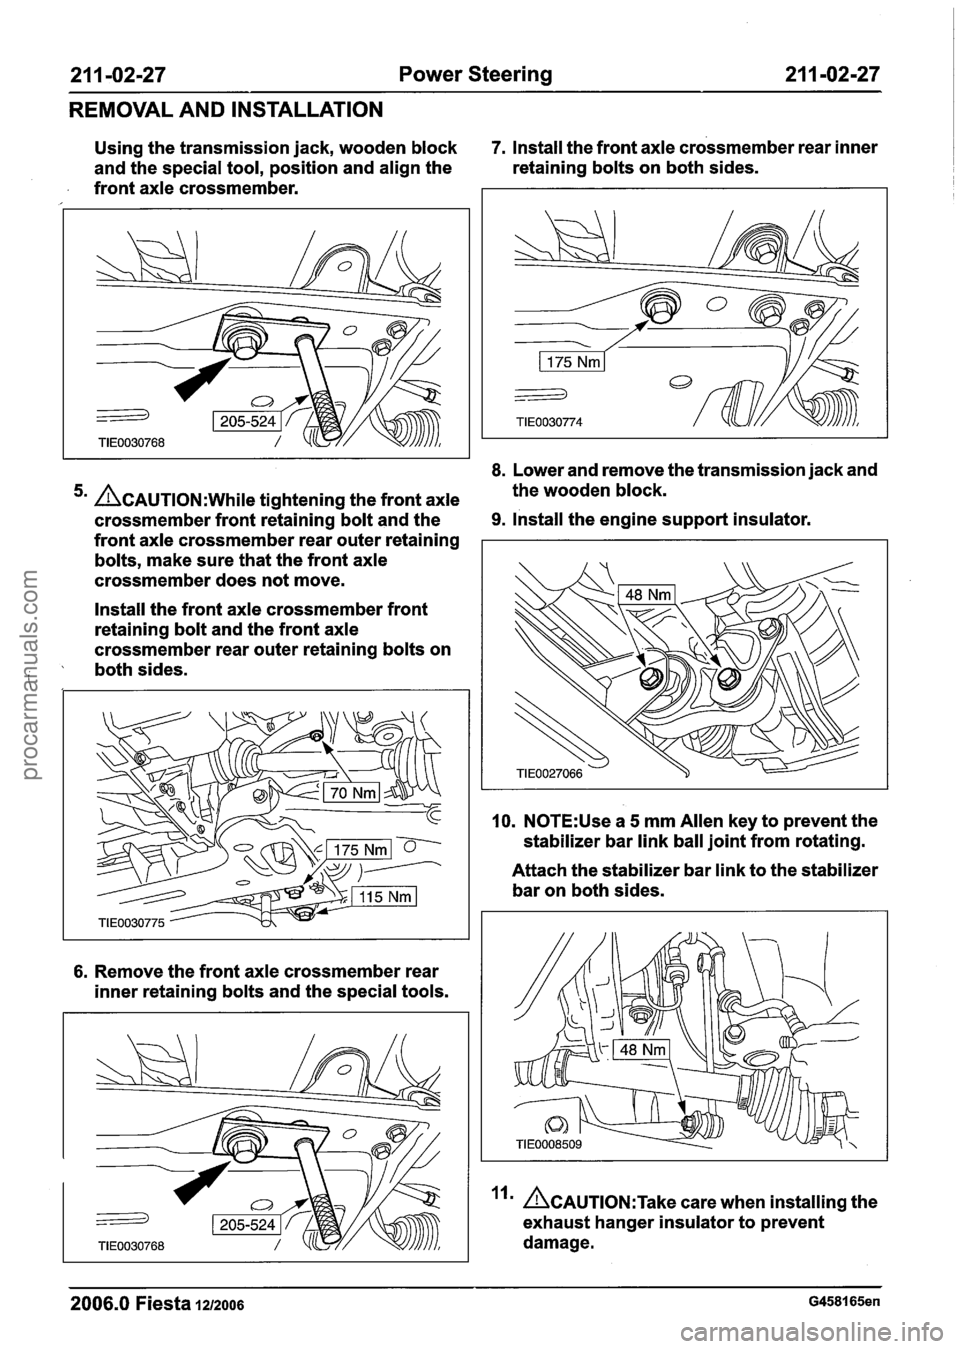
Using the transmission jack, wooden block 7.
Install the front axle crossmember rear inner
and the special tool, position and align the retaining
bolts on both sides.
front axle crossmember.
8. Lower and remove the transmission jack and
5m &AUTION:W~~I~ tightening the front axle the
wooden block.
crossmember front retaining bolt and the
9. Install the engine support insulator.
front axle crossmem ber rear outer retaining
bolts, make sure that the front axle
crossmember does not move.
Install the front axle crossmember front
retaining bolt and the front axle
crossmember rear outer retaining bolts on
both sides.
i,
6. Remove the front axle crossmember rear
inner retaining bolts and the special tools.
10. N0TE:Use a 5 mm Allen key to prevent the
stabilizer bar link ball joint from rotating.
Attach the stabilizer bar link to the stabilizer
bar on both sides.
~CAUTION:T~~~ care when installing the
exhaust hanger insulator to prevent
damage.
2006.0 Fiesta 1212006 G458165en
procarmanuals.com
Page 381 of 1226
21 1 -02-33 Power Steering 21 1-02-33
REMOVAL AND INSTALLATION
Ifem 5 Cable ties Remove
the exhaust hanger insulator.
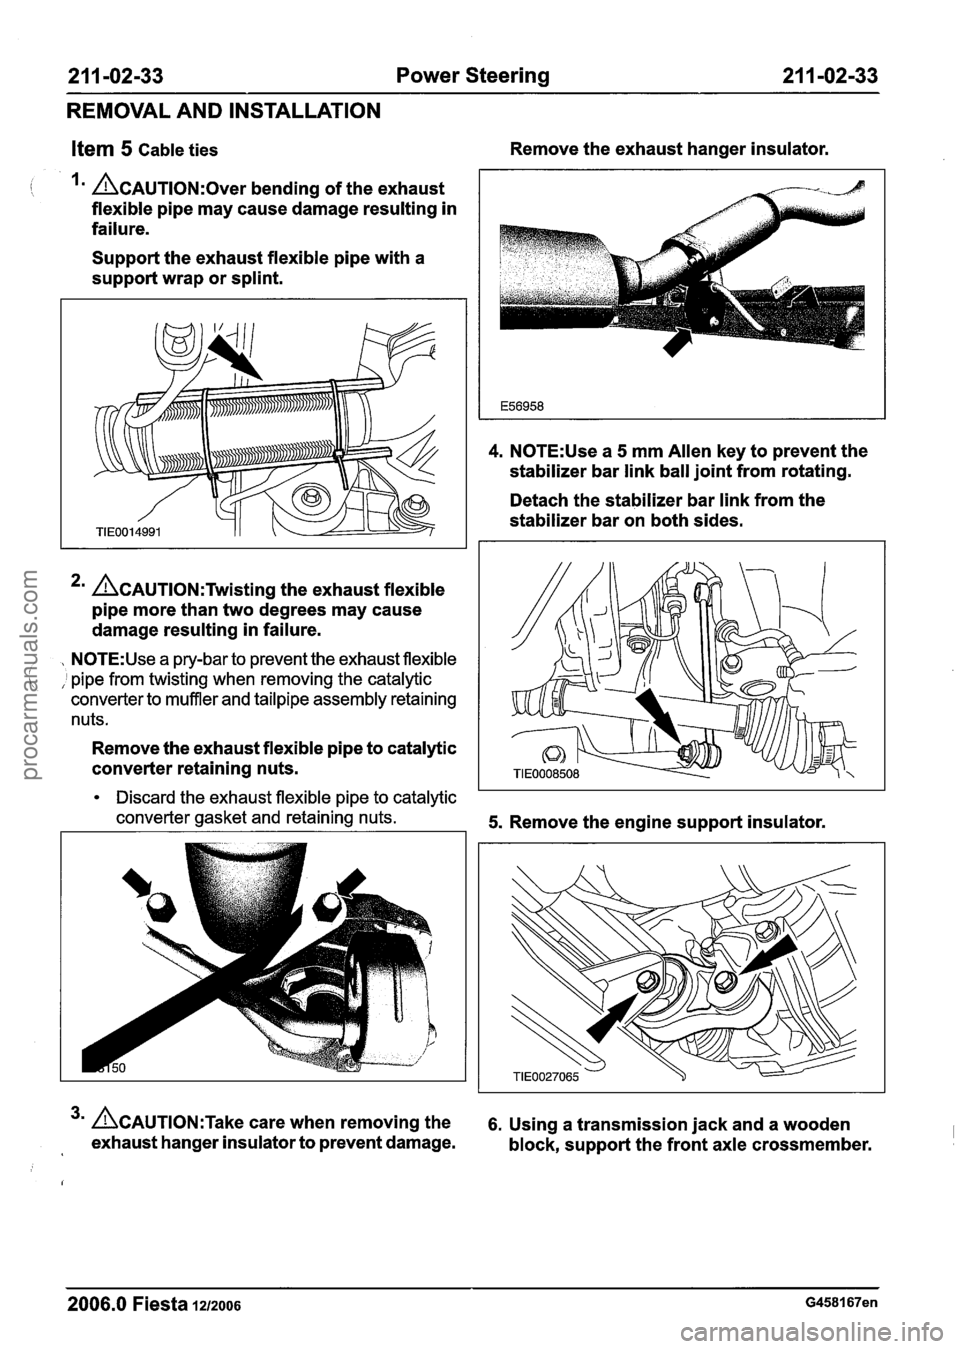
I I CAUTION:^^^^ bending of the exhaust
flexible pipe may cause damage resulting in
failure.
Support the exhaust flexible pipe with a
support wrap or splint.
*' n~A~T10~:Twistin~ the exhaust flexible
pipe more than two degrees may cause
damage resulting in failure.
, N0TE:Use a pry-bar to prevent the exhaust flexible
( , pipe from twisting when removing the catalytic
converter to muffler and tailpipe assembly retaining
nuts.
Remove the exhaust flexible pipe to catalytic
converter retaining nuts.
4. N0TE:Use a 5 mm Allen key to prevent the
stabilizer bar link ball joint from rotating.
Detach the stabilizer bar link from the
stabilizer bar on both sides.
Discard the exhaust flexible pipe to catalytic
converter gasket and retaining nuts.
5. Remove the engine support insulator.
3m ~CAUTION:T~~~ care when removing the 6. Using a transmission jack and a wooden
exhaust hanger insulator to prevent damage.
block, support the front axle crossmember.
2006.0 Fiesta 1212006 G458167en
procarmanuals.com
Page 384 of 1226
21 1 -02-36 Power Steering 21 1 -02-36
REMOVAL AND INSTALLATION
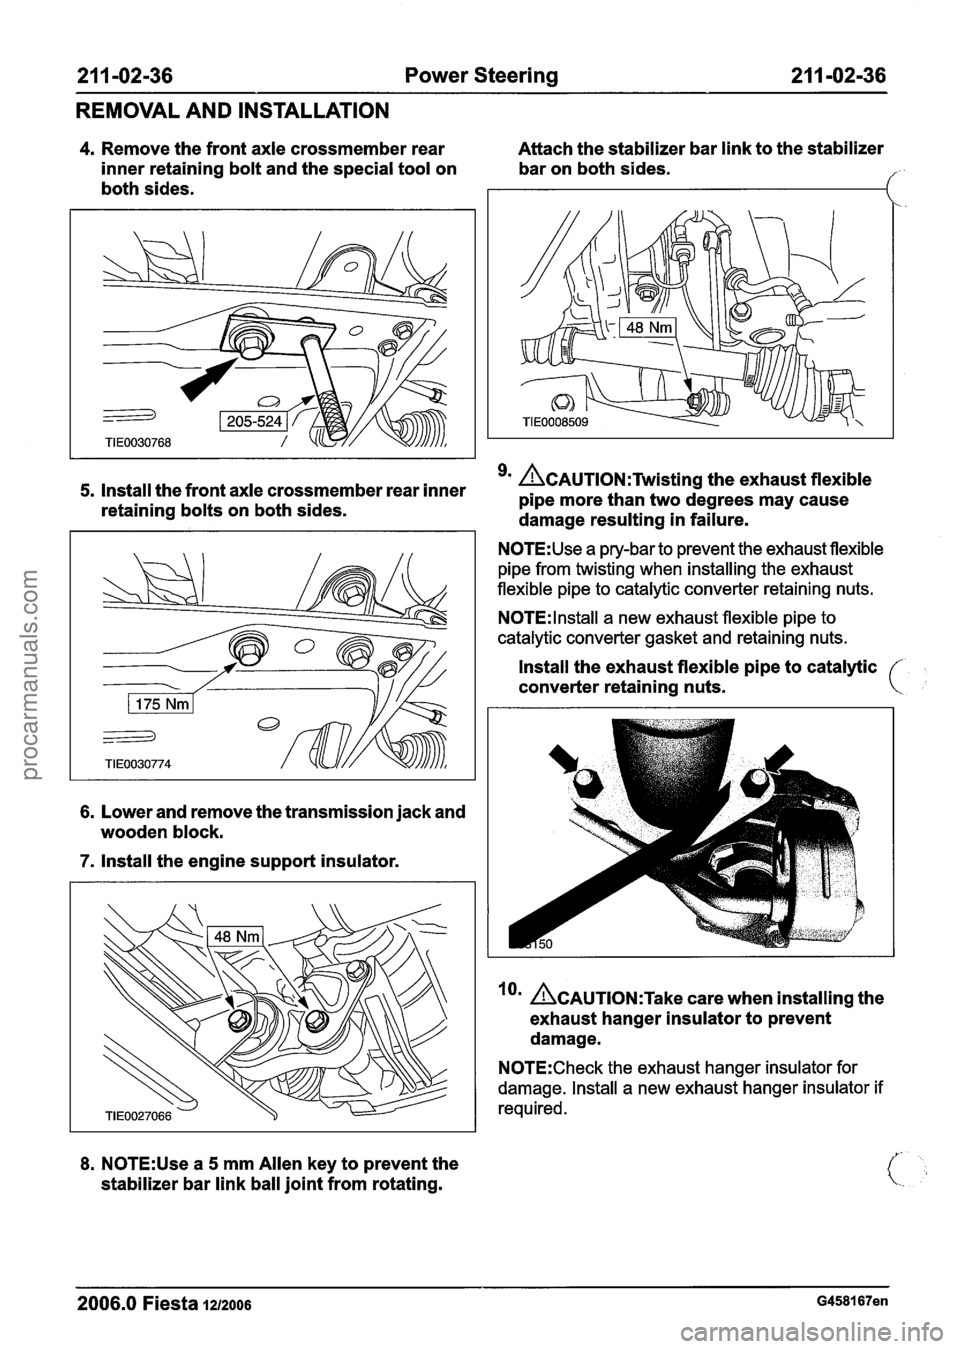
4. Remove the front axle crossmember rear Attach the stabilizer bar link to the stabilizer
inner retaining bolt and the special tool on
bar on both sides.
both sides.
9m &~uTl~~:Twistin~ the exhaust flexible 5. Install the front axle crossmember rear inner pipe more than two degrees may cause retaining bolts on both sides.
damage resulting in failure.
N0TE:Use a pry-bar to prevent the exhaust flexible
pipe from twisting when installing the exhaust
flexible pipe to catalytic converter retaining nuts.
N0TE:lnstall a new exhaust flexible pipe to
catalytic converter gasket and retaining nuts.
Install the exhaust flexible pipe to catalytic
converter retaining nuts.
6. Lower and remove the transmission jack and
wooden block.
7. Install the engine support insulator.
8. N0TE:Use a 5 mm Allen key to prevent the
stabilizer bar link ball joint from rotating.
lo' ~CAUTION:T~~~ care when installing the
exhaust hanger insulator to prevent
damage.
N0TE:Check the exhaust hanger insulator for
damage. lnstall a new exhaust hanger insulator if
required.
2006.0 Fiesta 12/2006 G458167en
procarmanuals.com
Page 387 of 1226
2 1 1 -02-39 Power Steering 21 1-02-39
REMOVAL AND INSTALLATION
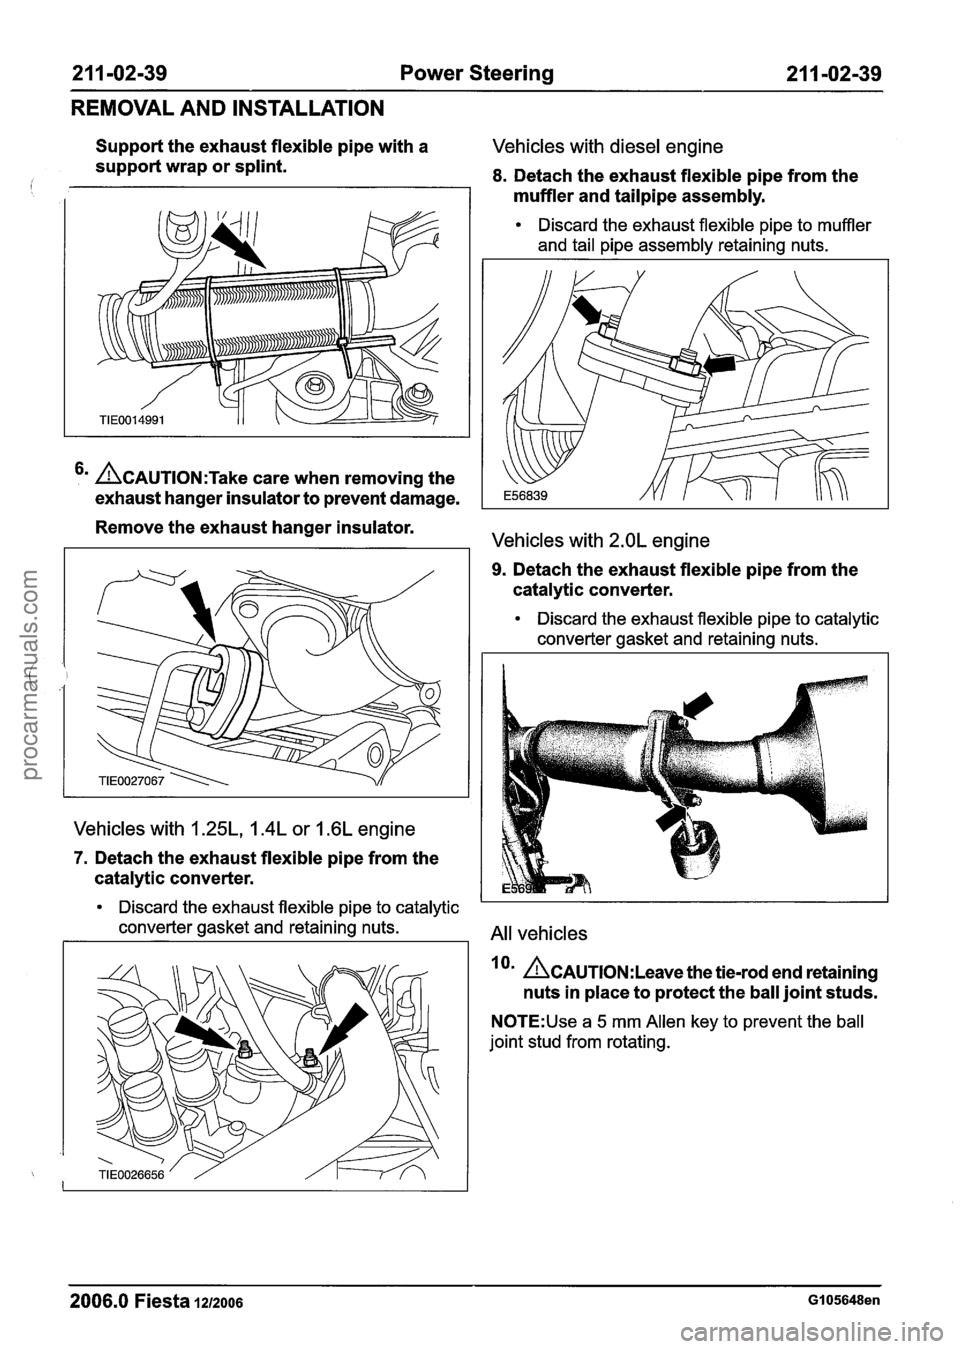
Support the exhaust flexible pipe with a Vehicles with diesel engine
support wrap or splint.
i 8. Detach the exhaust flexible pipe from the
muffler and tailpipe assembly.
&AUTION:T~~~ care when removing the
exhaust hanger insulator to prevent damage.
Discard the exhaust flexible pipe to muffler
and tail pipe assembly retaining nuts.
Remove the exhaust hanger insulator. Vehicles with 2.OL engine
9. Detach the exhaust flexible pipe from the
catalytic converter.
Discard the exhaust flexible pipe to catalytic
converter gasket and retaining nuts.
Vehicles with 1.25L, 1.4L or 1.6L engine
7. Detach the exhaust flexible pipe from the
catalytic converter.
Discard the exhaust flexible pipe to catalytic
converter gasket and retaining nuts.
All vehicles
On &AUTION:L~~~~ the tie-rod end retaining
nuts in place to protect the ball joint studs.
N0TE:Use a 5 mm Allen key to prevent the ball
joint stud from rotating.
2006.0 Fiesta 1212006 GI 05648en
procarmanuals.com
Page 388 of 1226
21 1 -02-40 Power Steering 211=02-40
REMOVAL AND INSTALLATION
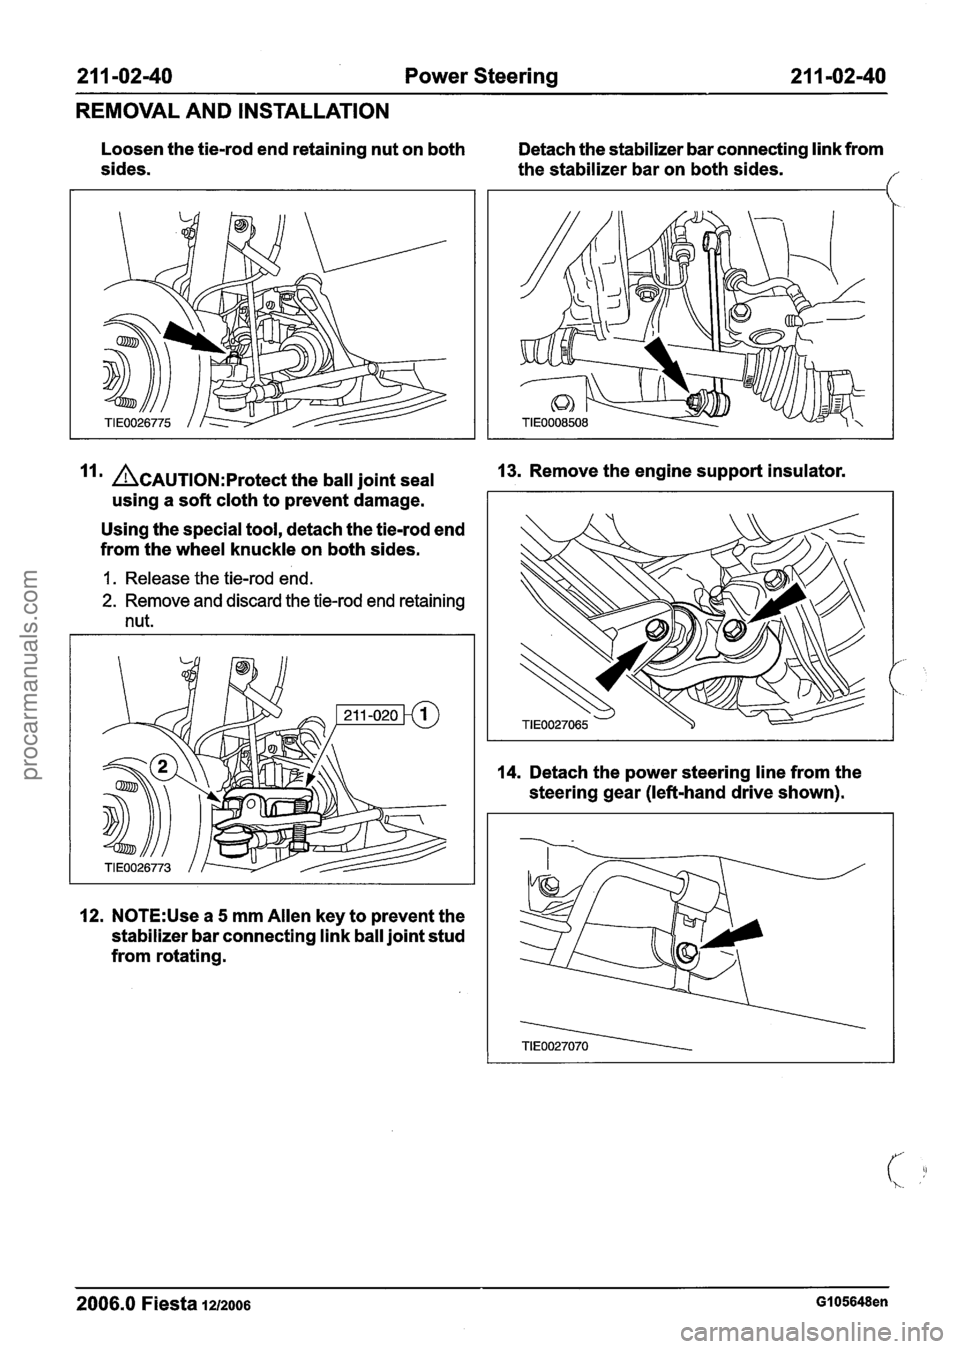
Loosen the tie-rod end retaining nut on both Detach the stabilizer bar connecting link from
sides. the stabilizer bar on both sides.
//
'Irn &AUTION:P~~~~~~ the ball joint seal 13.
Remove the engine support insulator.
using a soft cloth to prevent damage.
Using the special tool, detach the tie-rod end
from the wheel knuckle on both sides.
1 . Release the tie-rod end.
2. Remove and discard the tie-rod end retaining
nut.
12. N0TE:Use a 5 mm Allen key to prevent the
stabilizer bar connecting link ball joint stud
from rotating.
14. Detach the power steering line from the
steering gear (left-hand drive shown).
2006.0 Fiesta 1212006 GI 05648en
procarmanuals.com
Page 392 of 1226

211 -02-44 Power Steering 211 -02-44
REMOVAL AND INSTALLATION
Attach the exhaust flexible pipe to the muffler Check the exhaust hanger insulator for
and tailpipe assembly. damage. Install a new exhaust hanger
insulator
if required..
Vehicles with 1.25L, 1.4L or 1.6L engine
15. N0TE:Coat the exhaust flexible pipe studs 17' &AUTION:O~~~ bending of the exhaust
with grease.
flexible pipe may cause damage resulting
N0TE:lnstall a new exhaust flexible pipe to in failure.
catalytic converter gasket and retaining nuts. Remove the exhaust flexible pipe support
Attach the exhaust flexible pipe to the wrap
or splint.
catalytic converter.
*- AwARNING:~~~~~~~ new tie-rod end
All vehicles retaining nuts. Failure to follow this
instruction may result in personal injury.
16' AcAu~~oN:Take care when installing the NOTE:"se a 5 mm Allen key to prevent the tie-rod exhaust hanger insulator to prevent
damage. end ball joint stud from rotating.
2006.0 Fiesta iu2006 GI 05648en
procarmanuals.com
Page 393 of 1226
211 -02-45 Power Steering 21 1-02-45
REMOVAL AND INSTALLATION
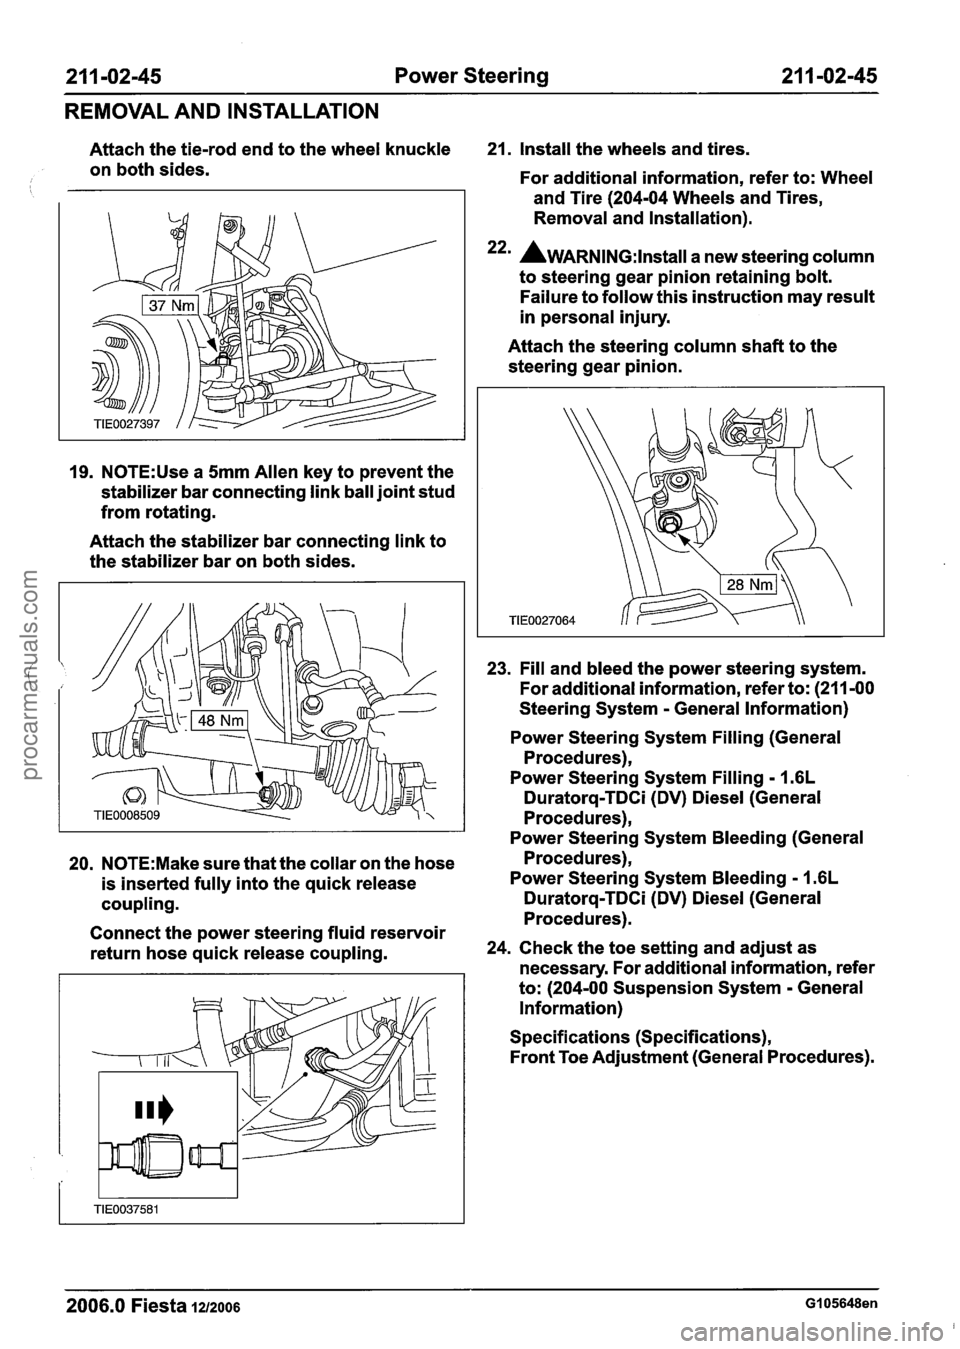
Attach the tie-rod end to the wheel knuckle 21. Install the wheels and tires.
on both sides.
For additional information, refer to: Wheel
and Tire (204-04 Wheels and Tires,
Removal and Installation).
22m AwARNING:~~~~~~~ a new steering column
to steering gear pinion retaining bolt.
Failure to follow this instruction may result
in personal injury.
19.
N0TE:Use a 5mm Allen key to prevent the
stabilizer bar connecting link ball joint stud
from rotating.
Attach the stabilizer bar connecting link to
the stabilizer bar on both sides. Attach
the steering column shaft to the
steering gear pinion.
23. Fill and bleed the power steering system.
For additional information, refer to: (211 -00
Steering System
- General Information)
Power Steering System Filling (General
Procedures),
Power Steering System Filling
- I .6L
Duratorq-TDCi (DV) Diesel (General
Procedures),
Power Steering System Bleeding (General
20.
N0TE:Make sure that the collar on the hose Procedures),
is inserted fully into the quick release Power Steering System
Bleeding - 1.6L
coupling. Duratorq-TDCi (DV) Diesel (General
Procedures).
Connect the power steering fluid reservoir
return hose quick release coupling. 24.
Check the toe setting and adjust as
necessary. For additional information, refer
to: (204-00 Suspension System
- General
Information)
Specifications (Specifications),
Front Toe Adjustment (General Procedures).
2006.0 Fiesta 1212006 GI 05648en
procarmanuals.com
Page 402 of 1226
211 -03-4 Steering Linkage 21 1-03-4
REMOVAL AND INSTALLATION
Tie Rod End(l3 273 0)
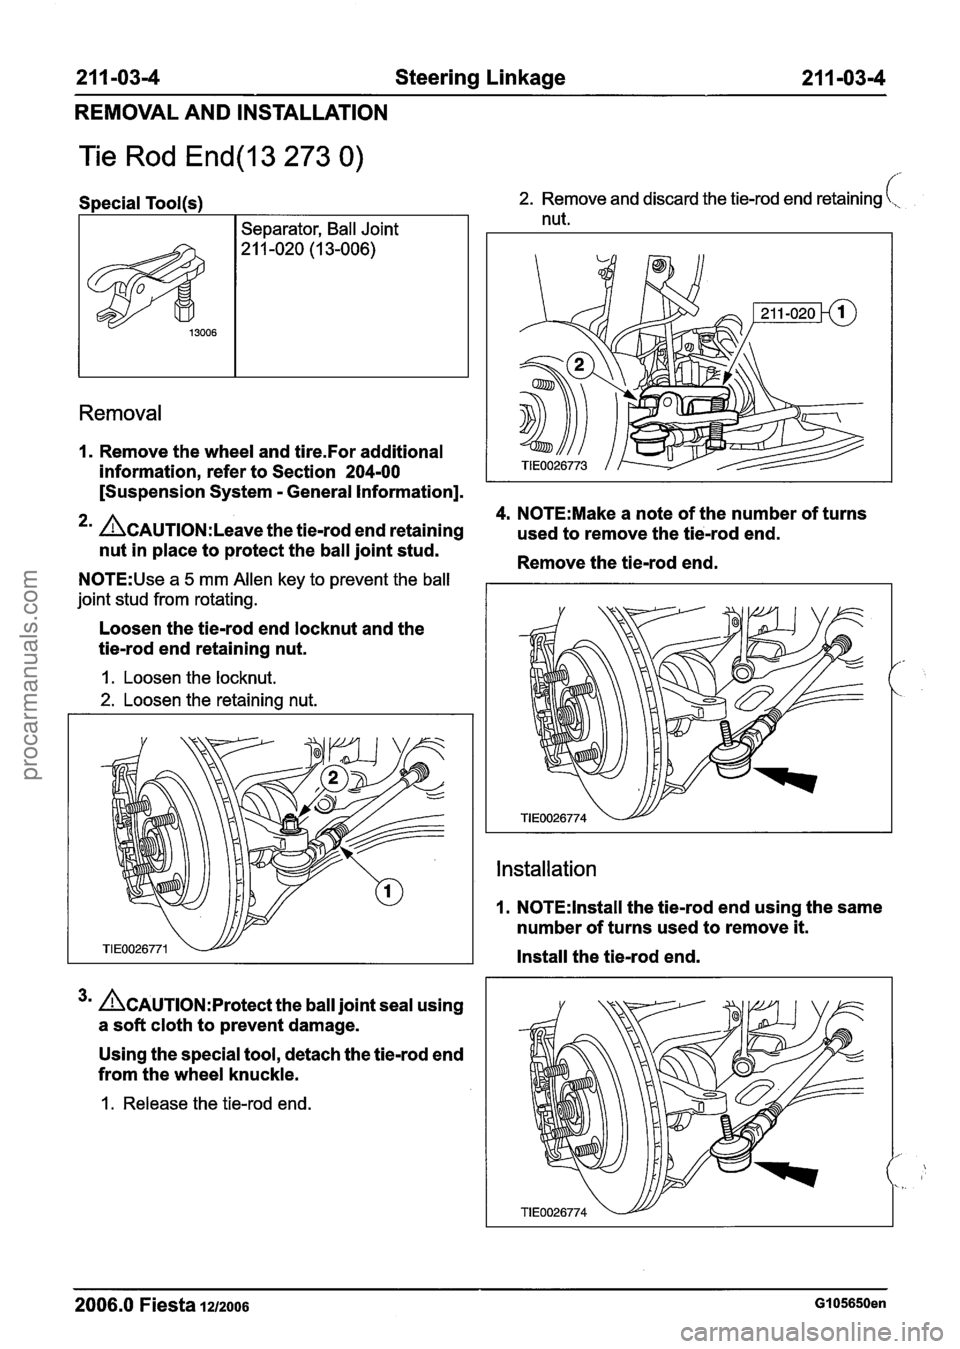
Special Tool(s)
I Separator, Ball Joint
2. Remove and discard the tie-rod end retaining (,,
nut.
Removal
1. Remove the wheel and tire.For additional
information, refer to Section 204-00
[Suspension System
- General Information].
4. N0TE:Make a note of the number of turns
2m &AUTION:L~~~~ the tie-rod end retaining used to remove the tie-rod endrn
nut in place to protect the ball joint stud.
Remove the tie-rod end.
N0TE:Use a 5 mm Allen key to prevent the ball
joint stud from rotating.
Loosen the tie-rod end locknut and the
tie-rod end retaining nut.
1. Loosen the locknut.
2. Loosen the retaining nut.
3m &Au~l~N:~rotect the ball joint seal using
a soft cloth to prevent damage.
Using the special tool, detach the tie-rod end
from the wheel knuckle.
1. Release the tie-rod end.
Installation
I. N0TE:lnstall the tie-rod end using the same
number of turns used to remove
it.
Install the tie-rod end.
2006.0 fiesta 12,2006 GI 05650en
procarmanuals.com
Page 403 of 1226
21 1 -03-5 Steering Linkage 21 1 -03-5
REMOVAL AND INSTALLATION
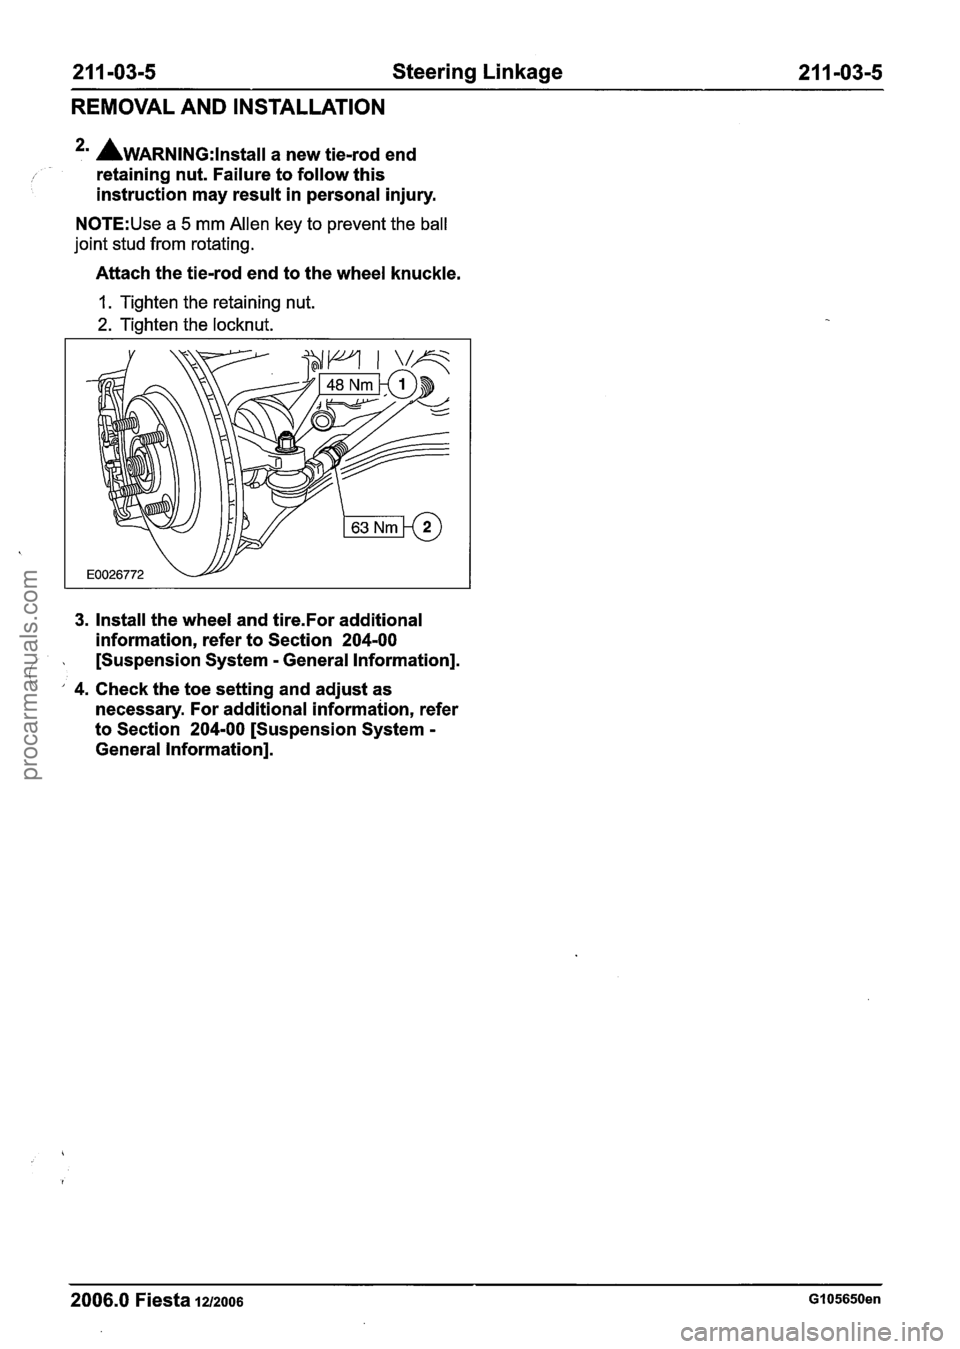
2m AwARNING:~~~~~~~ a new tie-rod end
/ I retaining nut. Failure to follow this
instruction may result in personal injury.
N0TE:Use a 5 mm Allen key to prevent the ball
joint stud from rotating.
Attach the tie-rod end to the wheel knuckle.
1. Tighten the retaining nut.
2. Tighten the locknut.
3. Install the wheel and tire.For additional
information, refer to Section 204-00
f ' [Suspension System - General Information]. ' ' 4. Check the toe setting and adjust as
necessary. For additional information, refer
to Section 204-00 [Suspension System
-
General Information].
- - --
2006.0 Fiesta 1212006 GI 05650en
procarmanuals.com
Page 416 of 1226
2 1 1 -04-8 Steering Column 2 1 1 -04-8
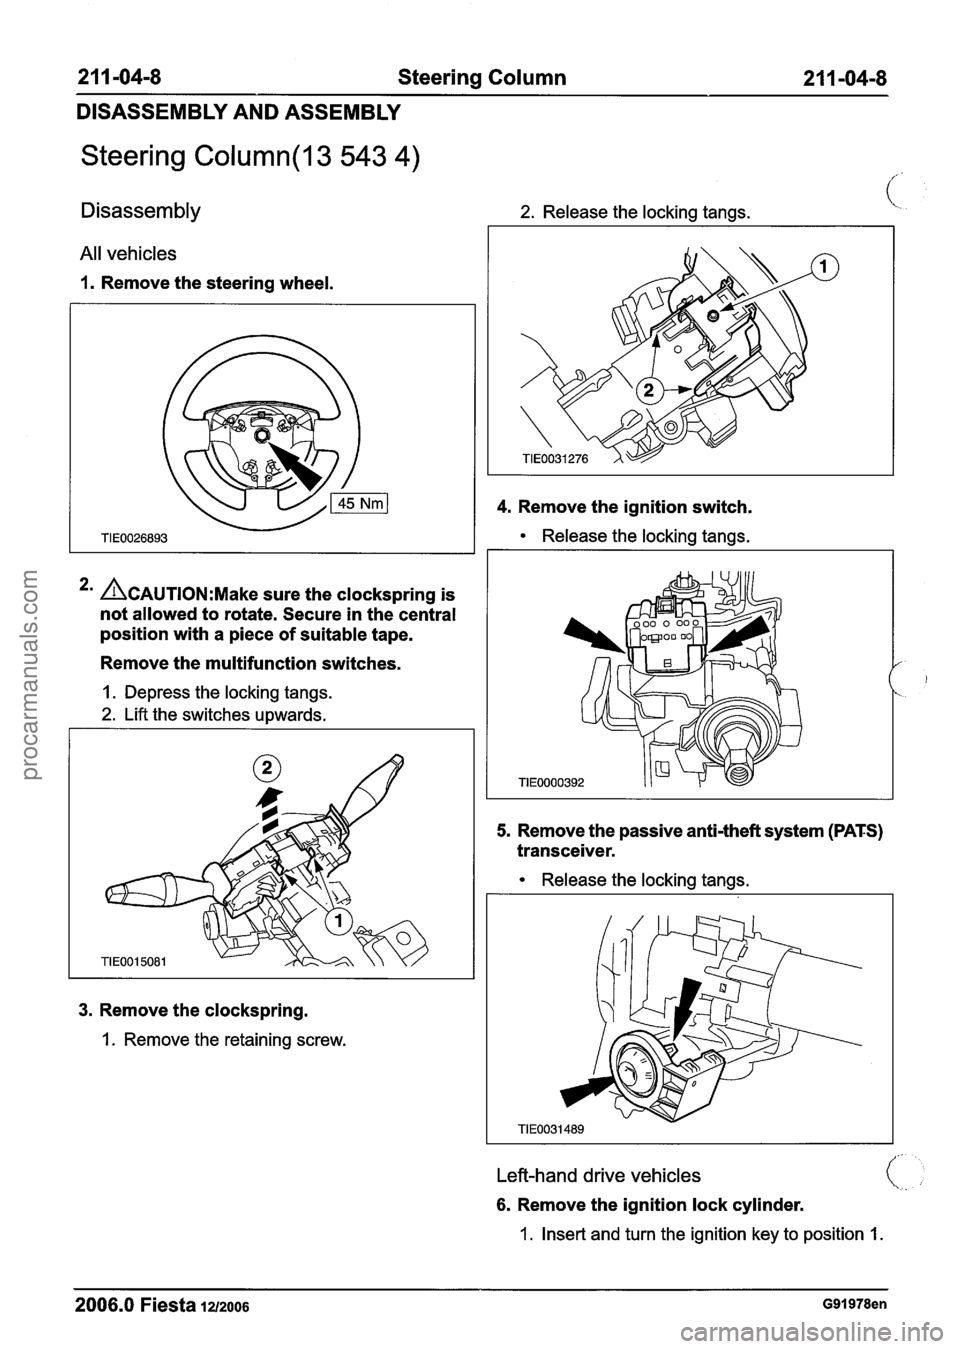
DISASSEMBLY AND ASSEMBLY
Steering Column(l3 543 4)
Disassembly 2. Release the locking tangs. (:
All vehicles
1. Remove the steering wheel.
4. Remove the ignition switch.
Release the locking tangs.
3. Remove the clockspring.
1. Remove the retaining screw.
*' ACAUTION:M~~~ sure the clockspring is
not allowed to rotate. Secure in the central
position with a piece of suitable tape.
Remove the multifunction switches.
1. Depress the locking tangs.
2. Lift the switches upwards.
5. Remove the passive anti-theft system (PATS)
transceiver.
1
TIE0000392
Release the locking tangs.
Left-hand drive vehicles
6. Remove the ignition lock cylinder.
1. Insert and turn the ignition key to position 1.
2006.0 Fiesta 12/2006 G91978en
procarmanuals.com