engine FORD FLEX 2015 1.G Owners Manual
[x] Cancel search | Manufacturer: FORD, Model Year: 2015, Model line: FLEX, Model: FORD FLEX 2015 1.GPages: 571, PDF Size: 5.52 MB
Page 304 of 571
When Fail-Safe Mode is Activated
WARNING:Fail-safe mode is for use during emergencies only.
Operate the vehicle in fail-safe mode only as long as necessary to
bring the vehicle to rest in a safe location and seek immediate repairs.
When in fail-safe mode, the vehicle will have limited power, will not be
able to maintain high-speed operation, and may completely shut down
without warning, potentially losing engine power, power steering assist,
and power brake assist, which may increase the possibility of a crash
resulting in serious injury.
WARNING:Never remove the coolant reservoir cap while the
engine is running or hot.
You have limited engine power when in the fail-safe mode, so drive the
vehicle with caution. The vehicle will not be able to maintain high-speed
operation and the engine will run rough. Remember that the engine is
capable of completely shutting down automatically to prevent engine
damage, therefore:
1. Pull off the road as soon as safely possible and turn off the engine.
2. Arrange for the vehicle to be taken to an authorized dealer.
3. If this is not possible, wait a short period for the engine to cool.
4. Check the coolant level and replenish if low.
5. Restart the engine and take your vehicle to an authorized dealer.
Note:Driving the vehicle without repairing the engine problem increases
the chance of engine damage. Take your vehicle to an authorized dealer
as soon as possible.
Maintenance303
2015 Flex(471)
Owners Guide gf, 1st Printing, October 2014
USA(fus)
Page 305 of 571
TRANSMISSION FLUID CHECK
6F50/6F55 Transmission
WARNING:The dipstick cap and surrounding components may
be hot; gloves are recommended.
WARNING:Use gloves when moving the air filter assembly;
components will be hot.
Note:Automatic transmission fluid expands when warmed. To obtain an
accurate fluid check, drive the vehicle until it is warmed up (approximately
20 miles [30 km]). If your vehicle has been operated for an extended
period at high speeds, in city traffic during hot weather or pulling a trailer,
the vehicle should be turned off until normal operating temperatures are
reached to allow the fluid to cool before checking. Depending on vehicle
use, cooling times could take up to 30 minutes or longer.
Refer to yourscheduled maintenance informationfor scheduled
intervals for fluid checks and changes. Your transmission does not
consume fluid. However, the fluid level should be checked if the
transmission is not working properly, i.e., if the transmission slips or
shifts slowly or if you notice some sign of fluid leakage.
1. Drive the vehicle 20 miles (30 km) or until it reaches normal operating
temperature.
2. Park the vehicle on a level surface and engage the parking brake.
3. With the parking brake engaged and your foot on the brake pedal,
start the engine and move the gearshift lever through all of the gear
ranges. Allow a minimum of 10 seconds for each gear to engage.
4. Latch the gearshift lever inP(Park) and leave the engine running.
5. Remove the dipstick, wiping it clean with a clean, dry lintfree rag. If
necessary, refer toUnder hood overviewin this chapter for the location
of the dipstick. (For vehicles with the EcoBoost engine, move the air
filter assembly aside to access the transmission dipstick. SeeMoving the
Air Filter Assembly (EcoBoost engine)for more information.
6. Install the dipstick making sure it is fully seated in the filler tube by
turning it to the locked position.
7. Remove the dipstick and inspect the fluid level. The fluid should be in
the designated areas for normal operating temperature.
304Maintenance
2015 Flex(471)
Owners Guide gf, 1st Printing, October 2014
USA(fus)
Page 306 of 571
Moving the Air Filter Assembly (EcoBoost engine)
WARNING:Do not run engine with the air filter disconnected.
1. Shut the engine off.
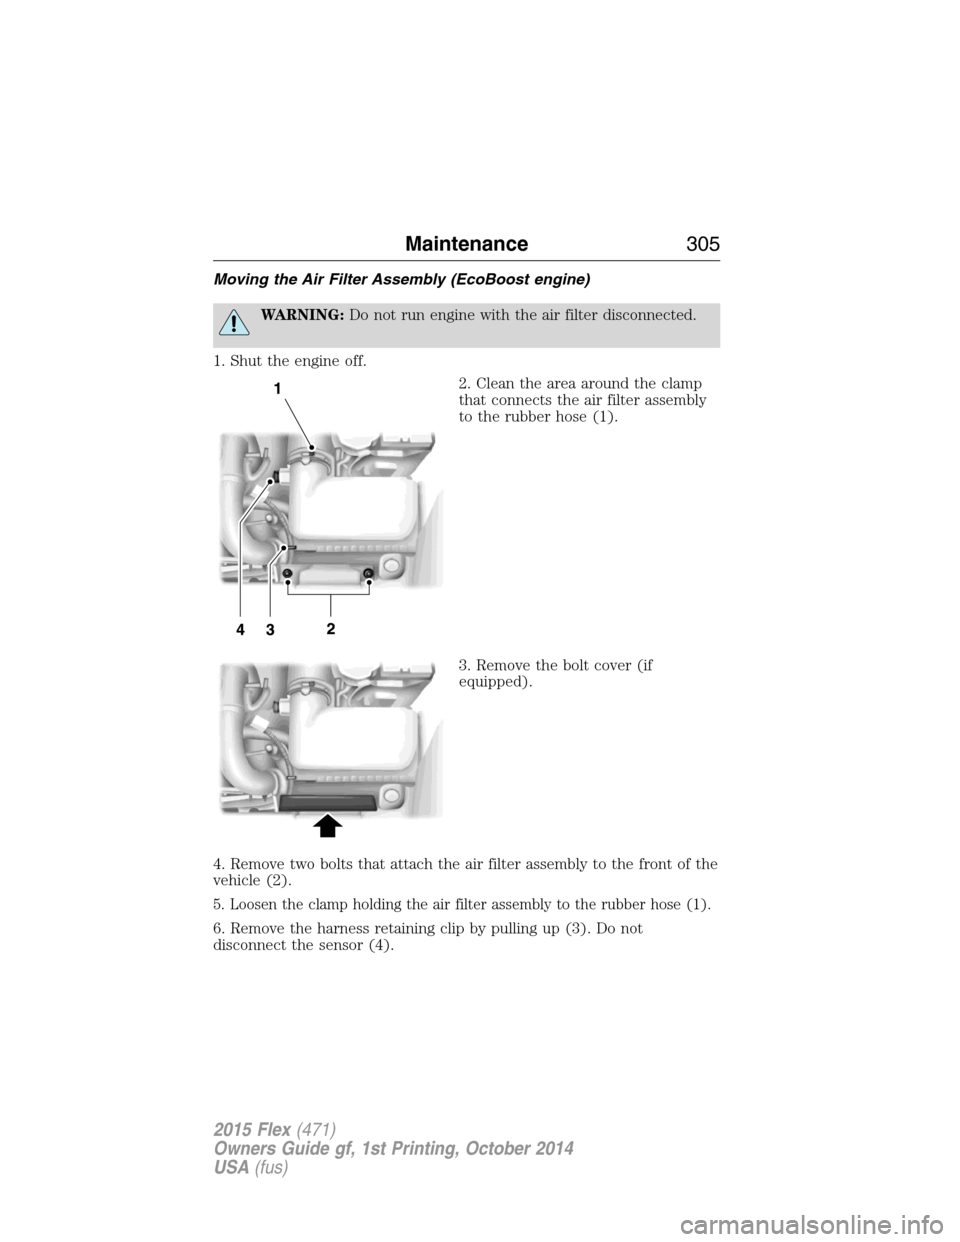
2. Clean the area around the clamp
that connects the air filter assembly
to the rubber hose (1).
3. Remove the bolt cover (if
equipped).
4. Remove two bolts that attach the air filter assembly to the front of the
vehicle (2).
5. Loosen the clamp holding the air filter assembly to the rubber hose (1).
6. Remove the harness retaining clip by pulling up (3). Do not
disconnect the sensor (4).
Maintenance305
2015 Flex(471)
Owners Guide gf, 1st Printing, October 2014
USA(fus)
Page 308 of 571
High fluid level
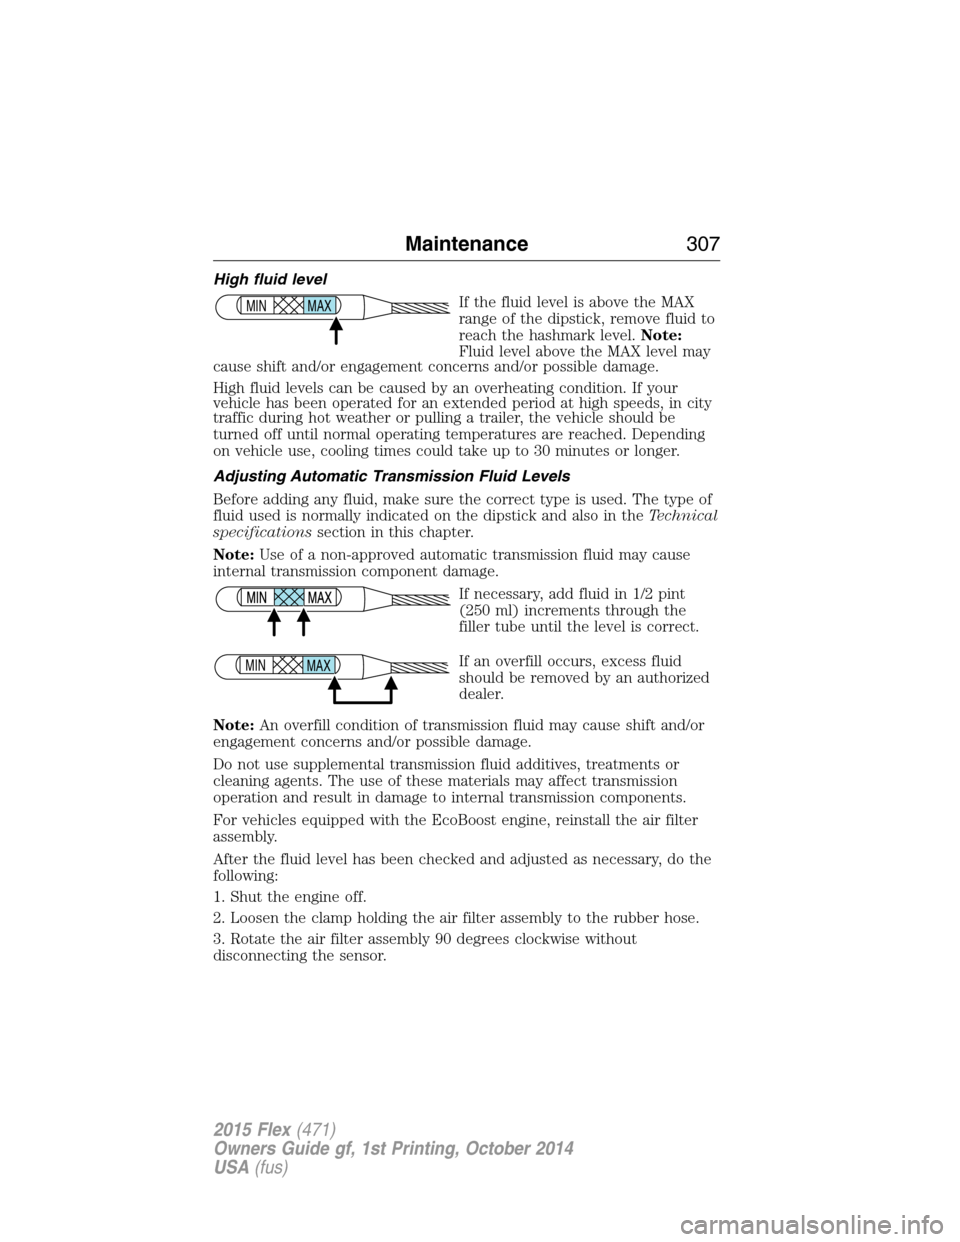
If the fluid level is above the MAX
range of the dipstick, remove fluid to
reach the hashmark level.Note:
Fluid level above the MAX level may
cause shift and/or engagement concerns and/or possible damage.
High fluid levels can be caused by an overheating condition. If your
vehicle has been operated for an extended period at high speeds, in city
traffic during hot weather or pulling a trailer, the vehicle should be
turned off until normal operating temperatures are reached. Depending
on vehicle use, cooling times could take up to 30 minutes or longer.
Adjusting Automatic Transmission Fluid Levels
Before adding any fluid, make sure the correct type is used. The type of
fluid used is normally indicated on the dipstick and also in theTechnical
specificationssection in this chapter.
Note:Use of a non-approved automatic transmission fluid may cause
internal transmission component damage.
If necessary, add fluid in 1/2 pint
(250 ml) increments through the
filler tube until the level is correct.
If an overfill occurs, excess fluid
should be removed by an authorized
dealer.
Note:An overfill condition of transmission fluid may cause shift and/or
engagement concerns and/or possible damage.
Do not use supplemental transmission fluid additives, treatments or
cleaning agents. The use of these materials may affect transmission
operation and result in damage to internal transmission components.
For vehicles equipped with the EcoBoost engine, reinstall the air filter
assembly.
After the fluid level has been checked and adjusted as necessary, do the
following:
1. Shut the engine off.
2. Loosen the clamp holding the air filter assembly to the rubber hose.
3. Rotate the air filter assembly 90 degrees clockwise without
disconnecting the sensor.
MAX MIN
MAX MIN
Maintenance307
2015 Flex(471)
Owners Guide gf, 1st Printing, October 2014
USA(fus)
Page 311 of 571

Battery relearn
Because your vehicle’s engine is electronically controlled by a computer,
some control conditions are maintained by power from the battery. When
the battery is disconnected or a new battery is installed, the engine must
relearn its idle and fuel trim strategy for optimum driveability and
performance. To begin this process:
1. With the vehicle at a complete stop, set the parking brake.
2. Put the gearshift lever inP(Park), turn off all accessories and start
the engine.
3. Run the engine until it reaches normal operating temperature.
4. Allow the engine to idle for at least one minute.
5. Turn the A/C on and allow the engine to idle for at least one minute.
6. Drive the vehicle to complete the relearning process.
•The vehicle may need to be driven to relearn the idle and fuel trim
strategy.
•Note:If you do not allow the engine to relearn its idle trim, the idle
quality of your vehicle may be adversely affected until the idle trim is
eventually relearned.
When the battery is disconnected or a new battery installed, the
transmission must relearn its adaptive strategy. As a result of this, the
transmission may shift firmly. This operation is considered normal and
will not affect function or durability of the transmission. Over time the
adaptive learning process will fully update transmission operation to its
optimum shift feel.
If the battery has been disconnected or a new battery has been installed,
the clock and the preset radio stations must be reset once the battery is
reconnected.
Always dispose of automotive batteries in a responsible manner. Follow
your local authorized standards for disposal. Call your local authorized
recycling center to find out more about recycling automotive batteries.
310Maintenance
2015 Flex(471)
Owners Guide gf, 1st Printing, October 2014
USA(fus)
Page 313 of 571
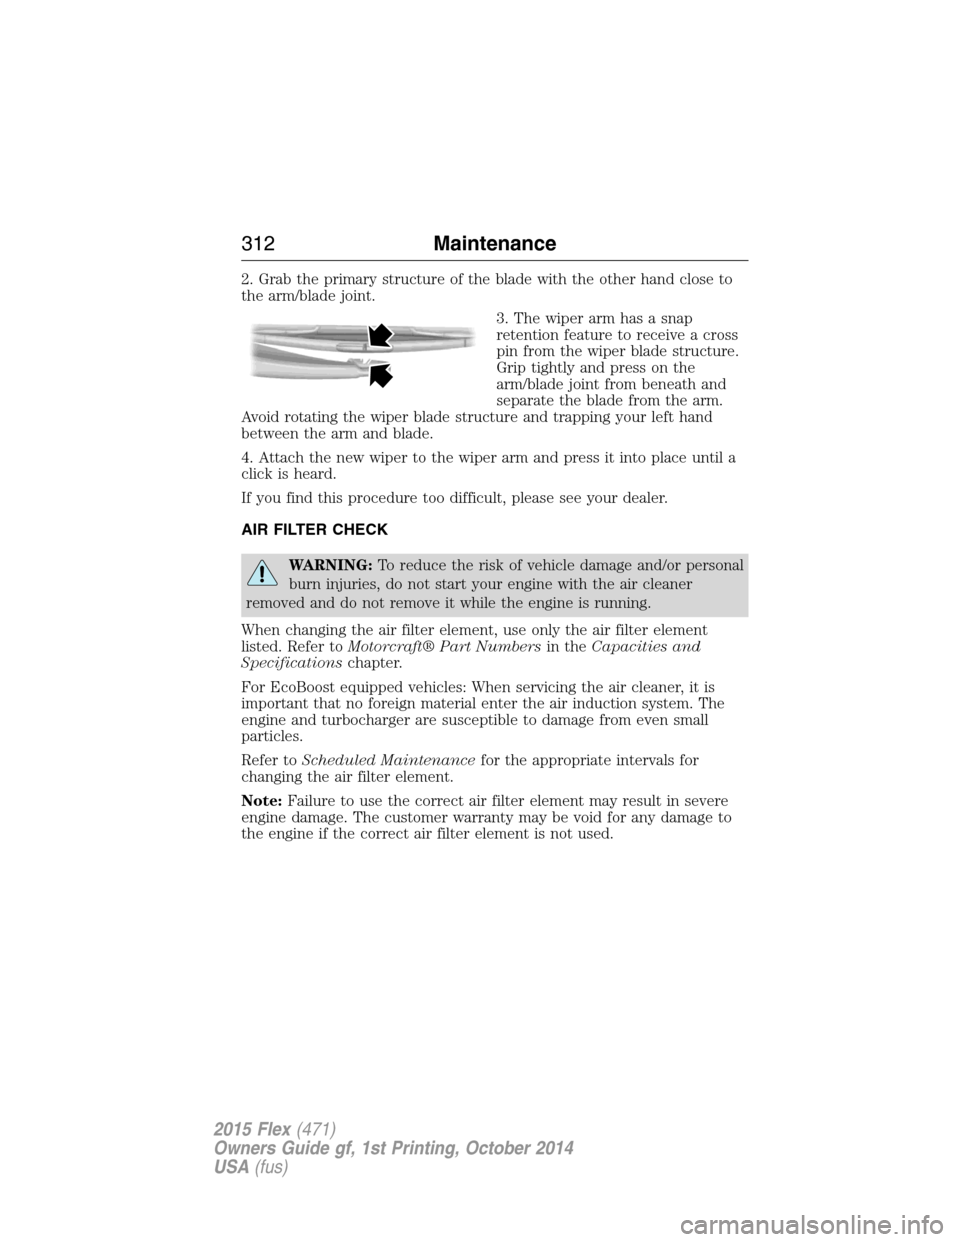
2. Grab the primary structure of the blade with the other hand close to
the arm/blade joint.
3. The wiper arm has a snap
retention feature to receive a cross
pin from the wiper blade structure.
Grip tightly and press on the
arm/blade joint from beneath and
separate the blade from the arm.
Avoid rotating the wiper blade structure and trapping your left hand
between the arm and blade.
4. Attach the new wiper to the wiper arm and press it into place until a
click is heard.
If you find this procedure too difficult, please see your dealer.
AIR FILTER CHECK
WARNING:To reduce the risk of vehicle damage and/or personal
burn injuries, do not start your engine with the air cleaner
removed and do not remove it while the engine is running.
When changing the air filter element, use only the air filter element
listed. Refer toMotorcraft® Part Numbersin theCapacities and
Specificationschapter.
For EcoBoost equipped vehicles: When servicing the air cleaner, it is
important that no foreign material enter the air induction system. The
engine and turbocharger are susceptible to damage from even small
particles.
Refer toScheduled Maintenancefor the appropriate intervals for
changing the air filter element.
Note:Failure to use the correct air filter element may result in severe
engine damage. The customer warranty may be void for any damage to
the engine if the correct air filter element is not used.
312Maintenance
2015 Flex(471)
Owners Guide gf, 1st Printing, October 2014
USA(fus)
Page 314 of 571
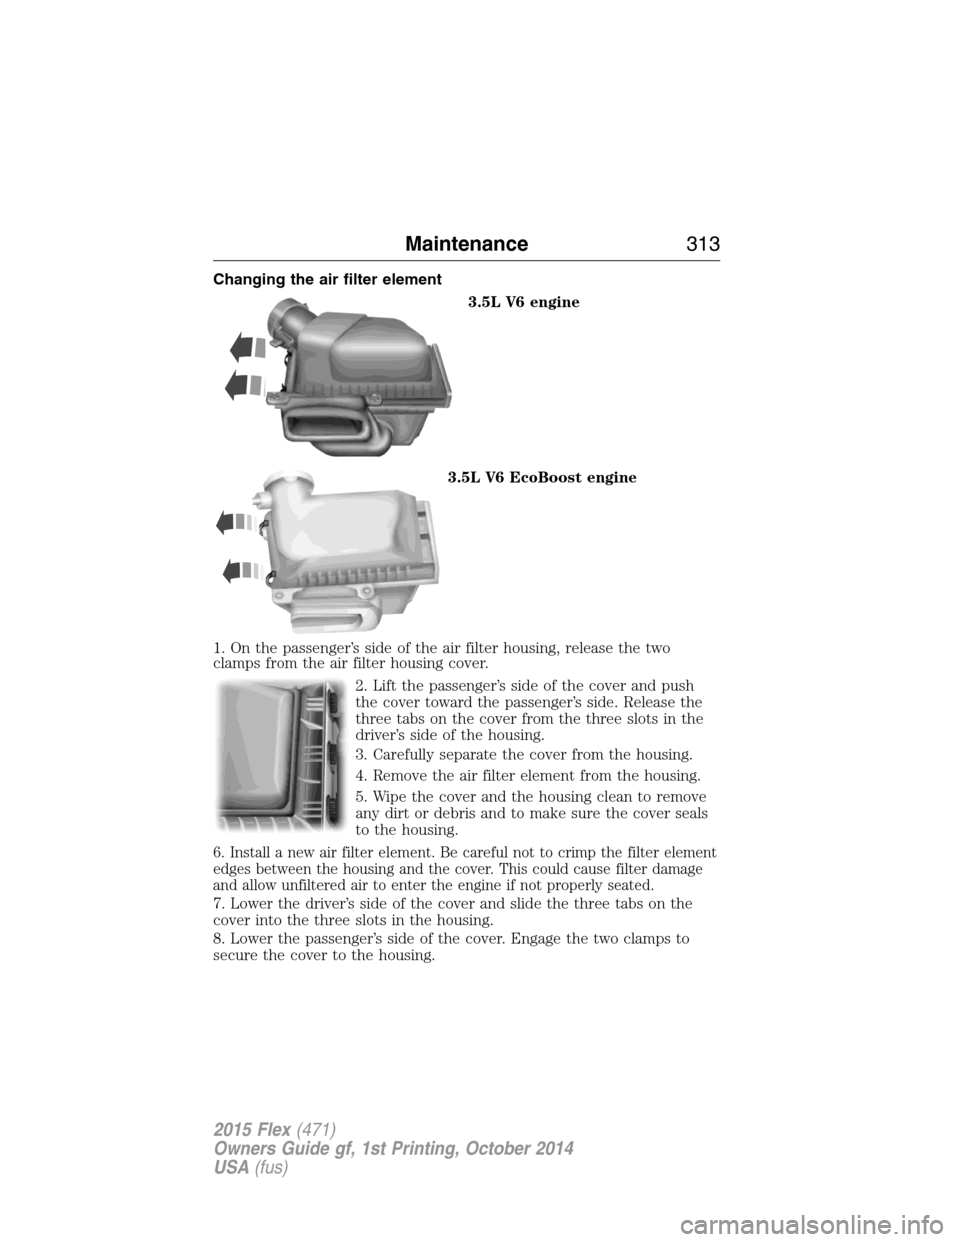
Changing the air filter element
3.5L V6 engine
3.5L V6 EcoBoost engine
1. On the passenger’s side of the air filter housing, release the two
clamps from the air filter housing cover.
2. Lift the passenger’s side of the cover and push
the cover toward the passenger’s side. Release the
three tabs on the cover from the three slots in the
driver’s side of the housing.
3. Carefully separate the cover from the housing.
4. Remove the air filter element from the housing.
5. Wipe the cover and the housing clean to remove
any dirt or debris and to make sure the cover seals
to the housing.
6. Install a new air filter element. Be careful not to crimp the filter element
edges between the housing and the cover. This could cause filter damage
and allow unfiltered air to enter the engine if not properly seated.
7. Lower the driver’s side of the cover and slide the three tabs on the
cover into the three slots in the housing.
8. Lower the passenger’s side of the cover. Engage the two clamps to
secure the cover to the housing.
Maintenance313
2015 Flex(471)
Owners Guide gf, 1st Printing, October 2014
USA(fus)
Page 321 of 571
GENERAL INFORMATION
Your Ford or Lincoln authorized dealer has many quality products
available to clean your vehicle and protect its finishes.
CLEANING PRODUCTS
For best results, use the following products or products of equivalent
quality:
Motorcraft Bug and Tar Remover (ZC-42)
Motorcraft Custom Bright Metal Cleaner (ZC-15)
Motorcraft Detail Wash (ZC-3-A)
Motorcraft Dusting Cloth (ZC-24)
Motorcraft Engine Shampoo and Degreaser (United States only) (ZC-20)
Motorcraft Engine Shampoo (Canada only) (CXC-66-A)
Motorcraft Multi-Purpose Cleaner (Canada only) (CXC-101)
Motorcraft Premium Glass Cleaner (Canada only) (CXC-100)
Motorcraft Premium Quality Windshield Washer Fluid (Canada only)
[CXC-37-(A, B, D or F)]
Motorcraft Premium Windshield Wash Concentrate with Bitterant (United
States only) (ZC-32-B2)
Motorcraft Professional Strength Carpet & Upholstery Cleaner (ZC-54)
Motorcraft Premium Leather and Vinyl Cleaner (ZC-56)
Motorcraft Spot and Stain Remover (United States only) (ZC-14)
Motorcraft Ultra-Clear Spray Glass Cleaner (ZC-23)
Motorcraft Wheel and Tire Cleaner (ZC-37-A)
CLEANING THE EXTERIOR
Wash your vehicle regularly with cool or lukewarm water and a neutral
pH shampoo, such as Motorcraft® Detail Wash.
•Never use strong household detergents or soap, such as dish washing
or laundry liquid. These products can discolor and spot painted
surfaces.
•Never wash a vehicle that is hot to the touch or during exposure to
strong, direct sunlight.
•Dry the vehicle with a chamois or soft terry cloth towel in order to
eliminate water spotting.
320Vehicle Care
2015 Flex(471)
Owners Guide gf, 1st Printing, October 2014
USA(fus)
Page 323 of 571
WAXING
Regular waxing is necessary to protect the paint on your car from the
elements. We recommend that you wash and wax the painted surface
once or twice a year.
When washing and waxing, park your vehicle in a shaded area out of
direct sunlight. Always wash your vehicle before applying wax.
•
Use a quality wax that does not contain abrasives.
•Follow the manufacturer’s instructions to apply and remove the wax.
•Apply a small amount of wax in a back-and-forth motion, not in circles.
•Do not allow wax to come in contact with any non-body (low-gloss
black) colored trim. The wax discolors or stains the parts over time,
such as:
•Bumpers
•Grained door handles
•Side mouldings
•Mirror housings
•Windshield cowl area.
•Do not apply wax to glass areas.
•After waxing, your car’s paint should feel smooth, and be free of streaks
and smudges.
REPAIRING MINOR PAINT DAMAGE
Your authorized dealer has touch-up paint to match your vehicle’s color.
Take your color code (printed on a sticker in the driver’s door jamb) to
an authorized dealer to make sure you get the correct color.
•Before repairing minor paint damage, use a cleaner such as Motorcraft
Bug and Tar Remover to remove particles such as bird droppings, tree
sap, insect deposits, tar spots, road salt and industrial fallout before
repairing paint chips.
•Always read the instructions before using the products.
CLEANING THE ENGINE
Engines are more efficient when they are clean because grease and dirt
buildup keep the engine warmer than normal.
When washing:
•
Take care when using a power washer to clean the engine. The
high-pressure fluid could penetrate the sealed parts and cause damage.
•Do not spray a hot engine with cold water to avoid cracking the
engine block or other engine components.
322Vehicle Care
2015 Flex(471)
Owners Guide gf, 1st Printing, October 2014
USA(fus)
Page 324 of 571
•Spray Motorcraft Engine Shampoo and Degreaser on all parts that
require cleaning and pressure rinse clean. In Canada, use Motorcraft
Engine Shampoo.
•Never wash or rinse the engine while it is hot or running; water in the
running engine may cause internal damage.
•Never wash or rinse any ignition coil, spark plug wire or spark plug
well, or the area in and around these locations.
•Cover the battery, power distribution box, and air filter assembly to
prevent water damage when cleaning the engine.
CLEANING THE WINDOWS AND WIPER BLADES
The windows and wiper blades should be cleaned regularly. If the wipers
do not wipe properly, substances on the vehicle’s glass or the wiper
blades may cause squeaking or chatter noise from the blades, and
streaking and smearing of the windshield. To clean these items, follow
these tips:
•The windows may be cleaned with a non-abrasive cleaner such as
Motorcraft® Ultra-Clear Spray Glass Cleaner (U.S.) or Motorcraft
Premium Glass Cleaner (Canada).
•The wiper blades can be cleaned with isopropyl (rubbing) alcohol or
Motorcraft Premium Windshield Washer Concentrates in the U.S., or
Motorcraft Premium Quality Windshield Washer Fluid in Canada.
Replace your wiper blades when they appear worn or do not function
properly.
•Do not use abrasive materials, as they may cause scratches.
•Do not use fuel, kerosene, or paint thinner to clean any parts.
If you cannot remove those streaks after cleaning with the glass cleaner
or if the wipers chatter and move in a jerky motion, clean the outer
surface of the windshield and the wiper blades using a sponge or soft
cloth with a neutral detergent or mild-abrasive cleaning solution. After
cleaning, rinse the windshield and wiper blades with clean water. The
windshield is clean if beads do not form when you rinse the windshield
with water.
Note:Do not use sharp objects, such as a razor blade, to clean the
inside of the rear window or to remove decals, as it may cause damage
to the rear window defroster’s heated grid lines.
Vehicle Care323
2015 Flex(471)
Owners Guide gf, 1st Printing, October 2014
USA(fus)