sensor FORD FLEX 2016 1.G User Guide
[x] Cancel search | Manufacturer: FORD, Model Year: 2016, Model line: FLEX, Model: FORD FLEX 2016 1.GPages: 417, PDF Size: 4.52 MB
Page 51 of 417
If any of these things happen, even
intermittently, have the supplemental
restraint system serviced at an authorized
dealer immediately. Unless serviced, the
system may not function properly in the
event of a crash.
The fact that the safety belt pretensioners
or front airbags did not activate for both
front seat occupants in a crash does not
mean that something is wrong with the
system. Rather, it means the restraints
control module determined the accident
conditions (crash severity, belt usage)
were not appropriate to activate these
safety devices.
•
The design of the front airbags is to
activate only in frontal and near-frontal
crashes (not rollovers, side impacts or
rear impacts) unless the crash causes
sufficient frontal deceleration.
• The safety belt pretensioners and rear
inflatable safety belts are designed to
activate in frontal, near-frontal, side
and rollover crashes.
• The design of the side airbags is to
inflate in certain side crashes. Side
airbags may activate in other types of
crashes if the vehicle experiences
sufficient sideways motion or
deformation.
• The design of the Safety Canopy is to
inflate in certain side impact crashes
and when a certain likelihood of
rollover is detected by the rollover
sensor. The Safety Canopy may
activate in other types of crashes if the
vehicle experiences sufficient sideways
motion or deformation, or a certain
likelihood of rollover.
AIRBAG DISPOSAL
Contact your authorized dealer as soon as
possible. Airbags must be disposed of by
qualified personnel.
48
Flex (), enUSA, First Printing Supplementary Restraints System
Page 64 of 417
Opening a Rear Door From the
Inside
Pull the interior door handle twice to
unlock and open a rear door. The first pull
unlocks the door and the second pull
opens the door.
Activating Intelligent Access (If
Equipped)
The intelligent access key must be within
3 ft (1 m)
of your vehicle.
At a Door
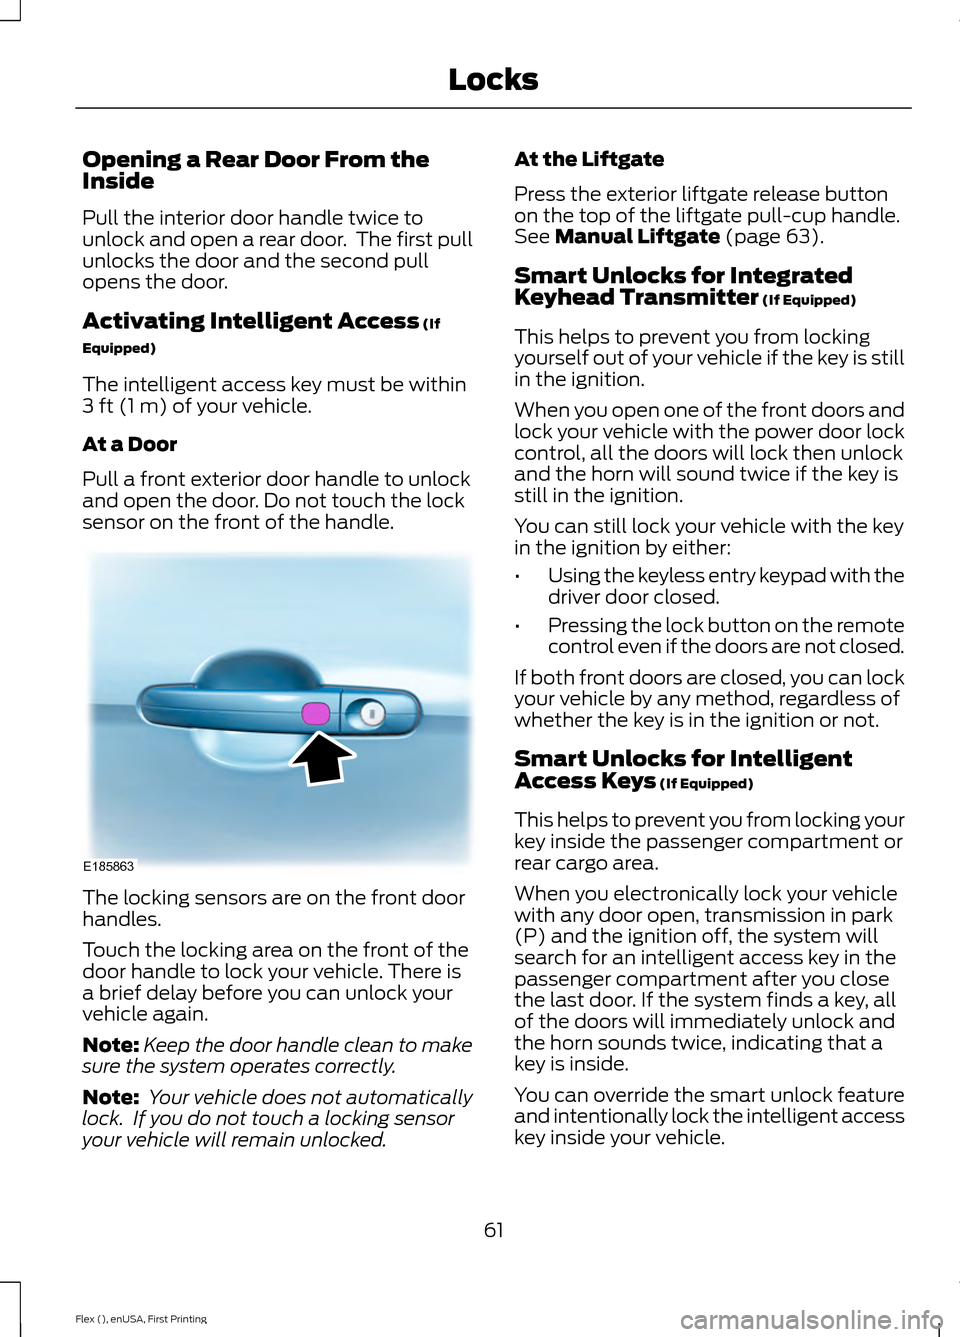
Pull a front exterior door handle to unlock
and open the door. Do not touch the lock
sensor on the front of the handle. The locking sensors are on the front door
handles.
Touch the locking area on the front of the
door handle to lock your vehicle. There is
a brief delay before you can unlock your
vehicle again.
Note:
Keep the door handle clean to make
sure the system operates correctly.
Note: Your vehicle does not automatically
lock. If you do not touch a locking sensor
your vehicle will remain unlocked. At the Liftgate
Press the exterior liftgate release button
on the top of the liftgate pull-cup handle.
See
Manual Liftgate (page 63).
Smart Unlocks for Integrated
Keyhead Transmitter
(If Equipped)
This helps to prevent you from locking
yourself out of your vehicle if the key is still
in the ignition.
When you open one of the front doors and
lock your vehicle with the power door lock
control, all the doors will lock then unlock
and the horn will sound twice if the key is
still in the ignition.
You can still lock your vehicle with the key
in the ignition by either:
• Using the keyless entry keypad with the
driver door closed.
• Pressing the lock button on the remote
control even if the doors are not closed.
If both front doors are closed, you can lock
your vehicle by any method, regardless of
whether the key is in the ignition or not.
Smart Unlocks for Intelligent
Access Keys
(If Equipped)
This helps to prevent you from locking your
key inside the passenger compartment or
rear cargo area.
When you electronically lock your vehicle
with any door open, transmission in park
(P) and the ignition off, the system will
search for an intelligent access key in the
passenger compartment after you close
the last door. If the system finds a key, all
of the doors will immediately unlock and
the horn sounds twice, indicating that a
key is inside.
You can override the smart unlock feature
and intentionally lock the intelligent access
key inside your vehicle.
61
Flex (), enUSA, First Printing LocksE185863
Page 70 of 417
When Opening
The system stops when it detects an
obstacle and a tone sounds. Once you
remove the obstacle, you can continue to
operate the liftgate.
Hands-Free Feature (If Equipped)
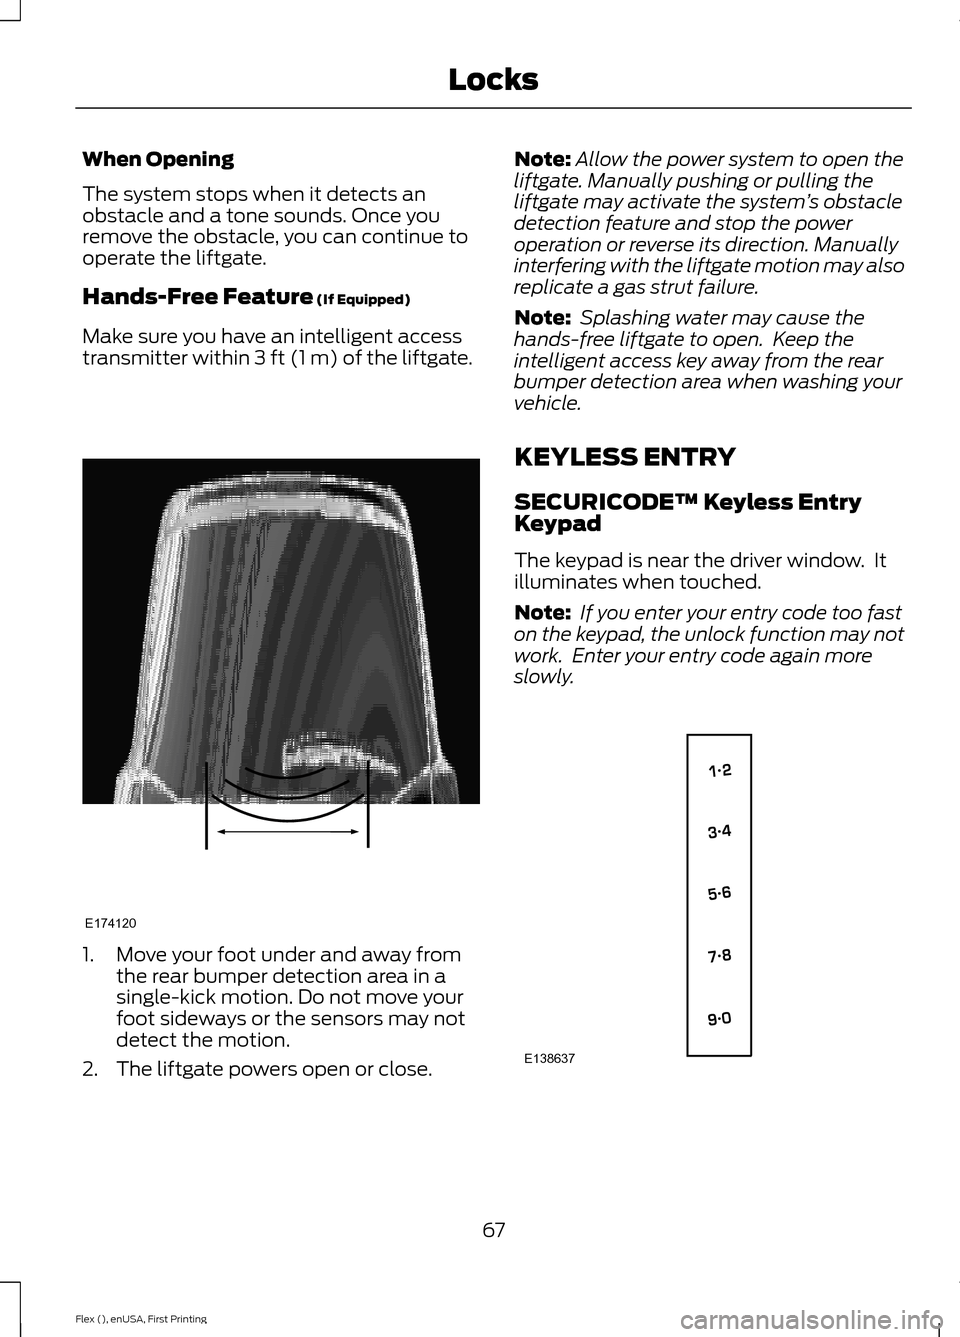
Make sure you have an intelligent access
transmitter within
3 ft (1 m) of the liftgate. 1. Move your foot under and away from
the rear bumper detection area in a
single-kick motion. Do not move your
foot sideways or the sensors may not
detect the motion.
2. The liftgate powers open or close. Note:
Allow the power system to open the
liftgate. Manually pushing or pulling the
liftgate may activate the system ’s obstacle
detection feature and stop the power
operation or reverse its direction. Manually
interfering with the liftgate motion may also
replicate a gas strut failure.
Note: Splashing water may cause the
hands-free liftgate to open. Keep the
intelligent access key away from the rear
bumper detection area when washing your
vehicle.
KEYLESS ENTRY
SECURICODE™ Keyless Entry
Keypad
The keypad is near the driver window. It
illuminates when touched.
Note: If you enter your entry code too fast
on the keypad, the unlock function may not
work. Enter your entry code again more
slowly. 67
Flex (), enUSA, First Printing LocksE174120 E138637
Page 79 of 417
WINDSHIELD WIPERS
Note:
Fully defrost the windshield before
you switch the windshield wipers on.
Note: Make sure you switch the windshield
wipers off before entering a car wash.
Note: Clean the windshield and wiper
blades if they begin to leave streaks or
smears. If that does not resolve the issue,
install new wiper blades. See Changing
the Wiper Blades (page 256).
Note: Do not operate the wipers on a dry
windshield. This may scratch the glass,
damage the wiper blades or cause the wiper
motor to burn out. Always use the
windshield washers before wiping a dry
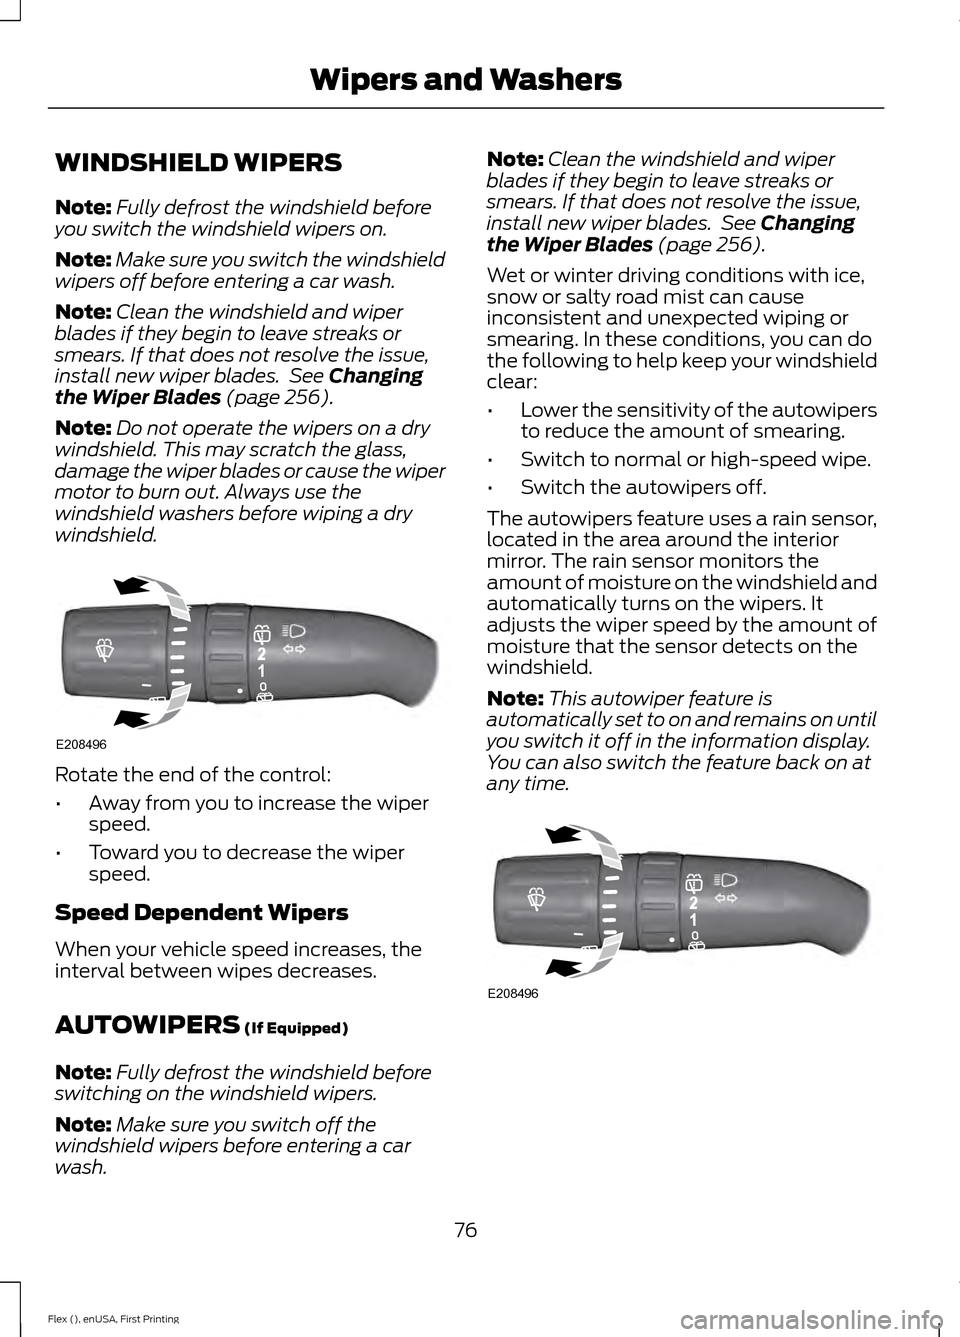
windshield. Rotate the end of the control:
•
Away from you to increase the wiper
speed.
• Toward you to decrease the wiper
speed.
Speed Dependent Wipers
When your vehicle speed increases, the
interval between wipes decreases.
AUTOWIPERS
(If Equipped)
Note: Fully defrost the windshield before
switching on the windshield wipers.
Note: Make sure you switch off the
windshield wipers before entering a car
wash. Note:
Clean the windshield and wiper
blades if they begin to leave streaks or
smears. If that does not resolve the issue,
install new wiper blades. See
Changing
the Wiper Blades (page 256).
Wet or winter driving conditions with ice,
snow or salty road mist can cause
inconsistent and unexpected wiping or
smearing. In these conditions, you can do
the following to help keep your windshield
clear:
• Lower the sensitivity of the autowipers
to reduce the amount of smearing.
• Switch to normal or high-speed wipe.
• Switch the autowipers off.
The autowipers feature uses a rain sensor,
located in the area around the interior
mirror. The rain sensor monitors the
amount of moisture on the windshield and
automatically turns on the wipers. It
adjusts the wiper speed by the amount of
moisture that the sensor detects on the
windshield.
Note: This autowiper feature is
automatically set to on and remains on until
you switch it off in the information display.
You can also switch the feature back on at
any time. 76
Flex (), enUSA, First Printing Wipers and WashersE208496 E208496
Page 80 of 417
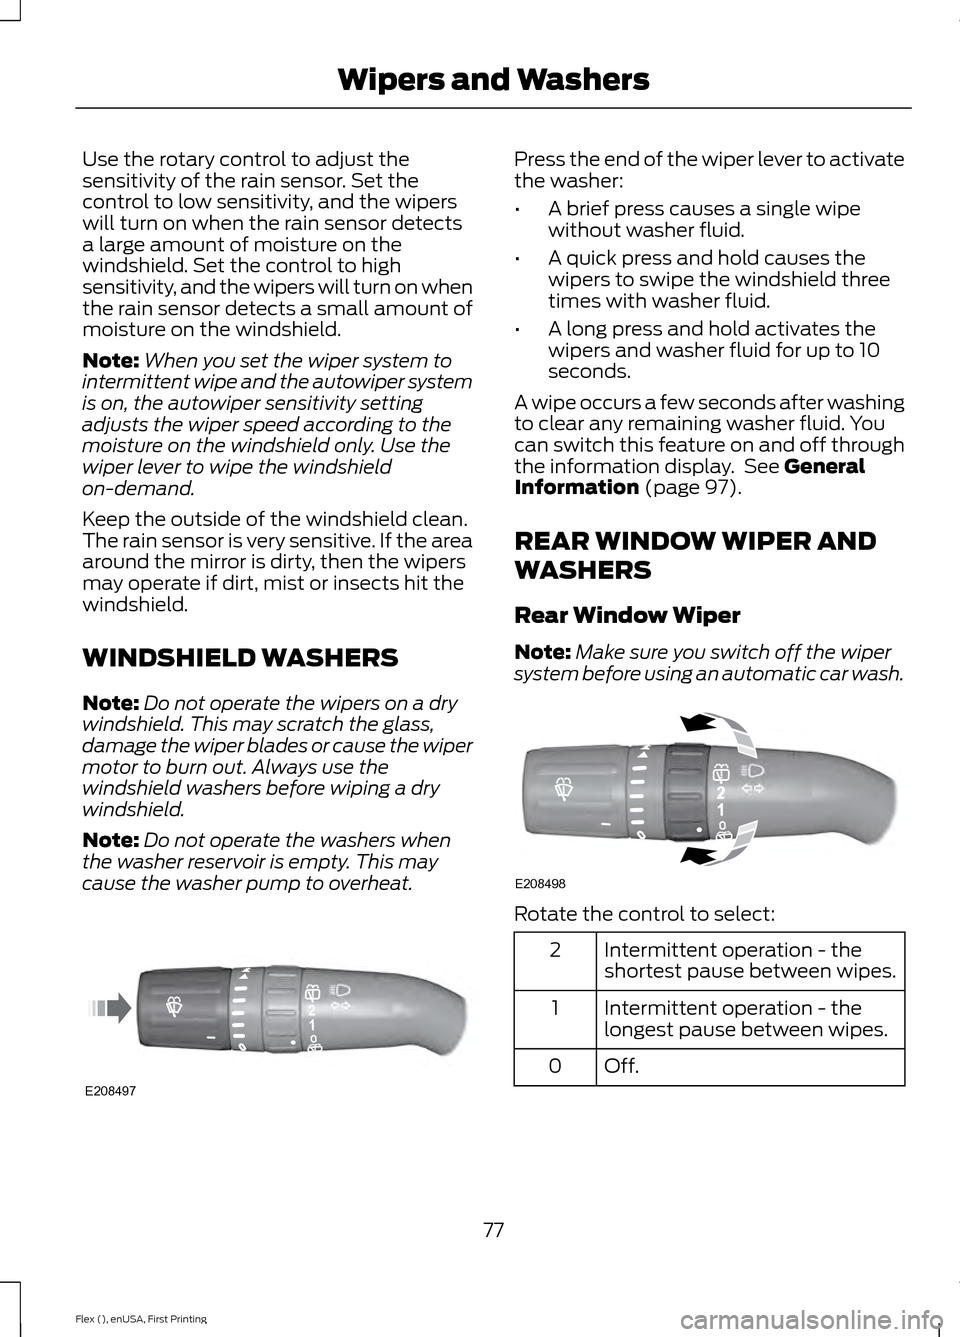
Use the rotary control to adjust the
sensitivity of the rain sensor. Set the
control to low sensitivity, and the wipers
will turn on when the rain sensor detects
a large amount of moisture on the
windshield. Set the control to high
sensitivity, and the wipers will turn on when
the rain sensor detects a small amount of
moisture on the windshield.
Note:
When you set the wiper system to
intermittent wipe and the autowiper system
is on, the autowiper sensitivity setting
adjusts the wiper speed according to the
moisture on the windshield only. Use the
wiper lever to wipe the windshield
on-demand.
Keep the outside of the windshield clean.
The rain sensor is very sensitive. If the area
around the mirror is dirty, then the wipers
may operate if dirt, mist or insects hit the
windshield.
WINDSHIELD WASHERS
Note: Do not operate the wipers on a dry
windshield. This may scratch the glass,
damage the wiper blades or cause the wiper
motor to burn out. Always use the
windshield washers before wiping a dry
windshield.
Note: Do not operate the washers when
the washer reservoir is empty. This may
cause the washer pump to overheat. Press the end of the wiper lever to activate
the washer:
•
A brief press causes a single wipe
without washer fluid.
• A quick press and hold causes the
wipers to swipe the windshield three
times with washer fluid.
• A long press and hold activates the
wipers and washer fluid for up to 10
seconds.
A wipe occurs a few seconds after washing
to clear any remaining washer fluid. You
can switch this feature on and off through
the information display. See General
Information (page 97).
REAR WINDOW WIPER AND
WASHERS
Rear Window Wiper
Note: Make sure you switch off the wiper
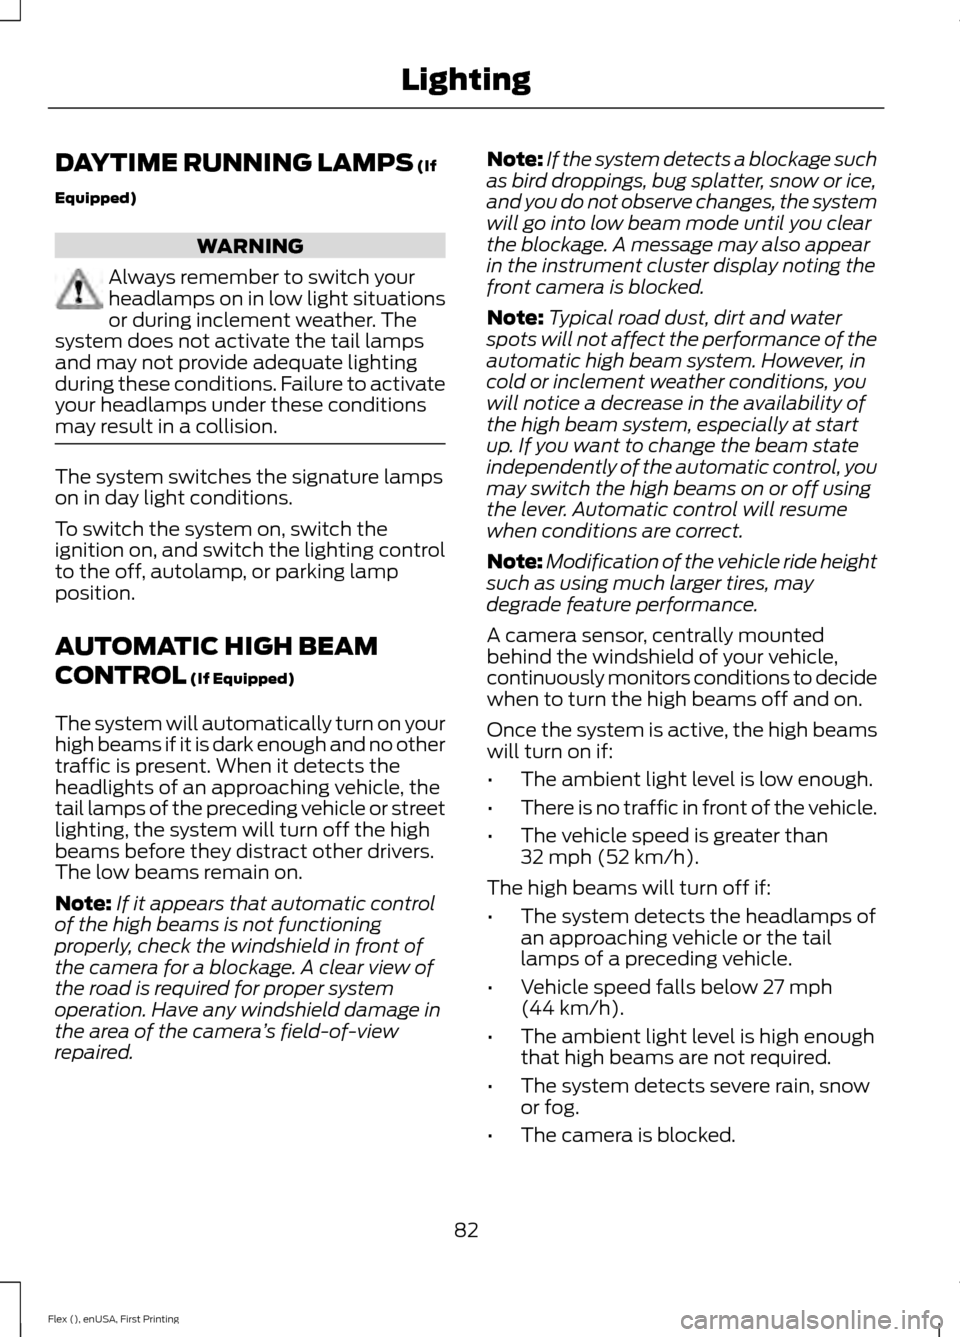
system before using an automatic car wash. Rotate the control to select:
Intermittent operation - the
shortest pause between wipes.
2
Intermittent operation - the
longest pause between wipes.
1
Off.0
77
Flex (), enUSA, First Printing Wipers and WashersE208497 E208498
Page 85 of 417
DAYTIME RUNNING LAMPS (If
Equipped) WARNING
Always remember to switch your
headlamps on in low light situations
or during inclement weather. The
system does not activate the tail lamps
and may not provide adequate lighting
during these conditions. Failure to activate
your headlamps under these conditions
may result in a collision. The system switches the signature lamps
on in day light conditions.
To switch the system on, switch the
ignition on, and switch the lighting control
to the off, autolamp, or parking lamp
position.
AUTOMATIC HIGH BEAM
CONTROL
(If Equipped)
The system will automatically turn on your
high beams if it is dark enough and no other
traffic is present. When it detects the
headlights of an approaching vehicle, the
tail lamps of the preceding vehicle or street
lighting, the system will turn off the high
beams before they distract other drivers.
The low beams remain on.
Note: If it appears that automatic control
of the high beams is not functioning
properly, check the windshield in front of
the camera for a blockage. A clear view of
the road is required for proper system
operation. Have any windshield damage in
the area of the camera ’s field-of-view
repaired. Note:
If the system detects a blockage such
as bird droppings, bug splatter, snow or ice,
and you do not observe changes, the system
will go into low beam mode until you clear
the blockage. A message may also appear
in the instrument cluster display noting the
front camera is blocked.
Note: Typical road dust, dirt and water
spots will not affect the performance of the
automatic high beam system. However, in
cold or inclement weather conditions, you
will notice a decrease in the availability of
the high beam system, especially at start
up. If you want to change the beam state
independently of the automatic control, you
may switch the high beams on or off using
the lever. Automatic control will resume
when conditions are correct.
Note: Modification of the vehicle ride height
such as using much larger tires, may
degrade feature performance.
A camera sensor, centrally mounted
behind the windshield of your vehicle,
continuously monitors conditions to decide
when to turn the high beams off and on.
Once the system is active, the high beams
will turn on if:
• The ambient light level is low enough.
• There is no traffic in front of the vehicle.
• The vehicle speed is greater than
32 mph (52 km/h)
.
The high beams will turn off if:
• The system detects the headlamps of
an approaching vehicle or the tail
lamps of a preceding vehicle.
• Vehicle speed falls below
27 mph
(44 km/h).
• The ambient light level is high enough
that high beams are not required.
• The system detects severe rain, snow
or fog.
• The camera is blocked.
82
Flex (), enUSA, First Printing Lighting
Page 92 of 417
INTERIOR MIRROR
WARNING
Do not adjust the mirror when your
vehicle is moving.
Note:
Do not clean the housing or glass of
any mirror with harsh abrasives, fuel or other
petroleum or ammonia-based cleaning
products.
You can adjust the interior mirror to your
preference. Some mirrors also have a
second pivot point. This lets you move the
mirror head up or down and from side to
side.
Auto-Dimming Mirror
Note: Do not block the sensors on the front
and back of the mirror. Mirror performance
may be affected. A rear center passenger or
raised rear center head restraint may also
block light from reaching the sensor.
The mirror will dim automatically to reduce
glare when bright lights are detected from
behind your vehicle. It will automatically
return to normal reflection when you select
reverse gear to make sure you have a clear
view when backing up.
SUN VISORS Rotate the sun visor toward the side
window and extend it rearward for extra
shade.
Illuminated Vanity Mirror
Lift the cover to switch the lamp on.
MOONROOF (If Equipped)
WARNINGS
Do not let children play with the
moonroof or leave them unattended
in the vehicle. They may seriously
hurt themselves. When closing the moonroof, you
should verify that it is free of
obstructions and make sure that
children and pets are not in the proximity
of the roof opening. You can manually open or close the sliding
shade when the moonroof is closed. Pull
the shade toward the front of your vehicle
to close it.
The moonroof controls are located on the
overhead console and have a one-touch
open and close feature. To stop it during
one-touch operation, press the control a
second time.
89
Flex (), enUSA, First Printing Windows and MirrorsE138666 E162197
Page 109 of 417
Certain messages need to be confirmed before you can access the menus.
Adaptive Cruise Control
Action
Message
A radar malfunction is preventing the adaptive cruise from
engaging. See Using Adaptive Cruise Control (page 186).
Adaptive Cruise
Malfunction
Conditions exist such that the adaptive cruise cannot functionproperly. See
Using Adaptive Cruise Control (page 186).
Adaptive Cruise Not
Available
The radar is blocked because of poor radar visibility due tobad weather or ice/mud/water in front of radar. Driver can
typically clean the sensor to resolve. See
Using Adaptive
Cruise Control (page 186).
Adaptive Cruise Not
Available Sensor
Blocked See Manual
AdvanceTrac ™ Action
Message
The system detects a malfunction due to a blocked sensor.
Service AdvanceTrac
The traction control has been disabled or enabled by thedriver.
AdvanceTrac Off On
Alarm Action
Message
The alarm has been triggered due to unauthorized entry. SeeAnti-Theft Alarm
(page 71).
Vehicle Alarm To Stop
Alarm, Start Vehicle.
106
Flex (), enUSA, First Printing Information Displays
Page 111 of 417
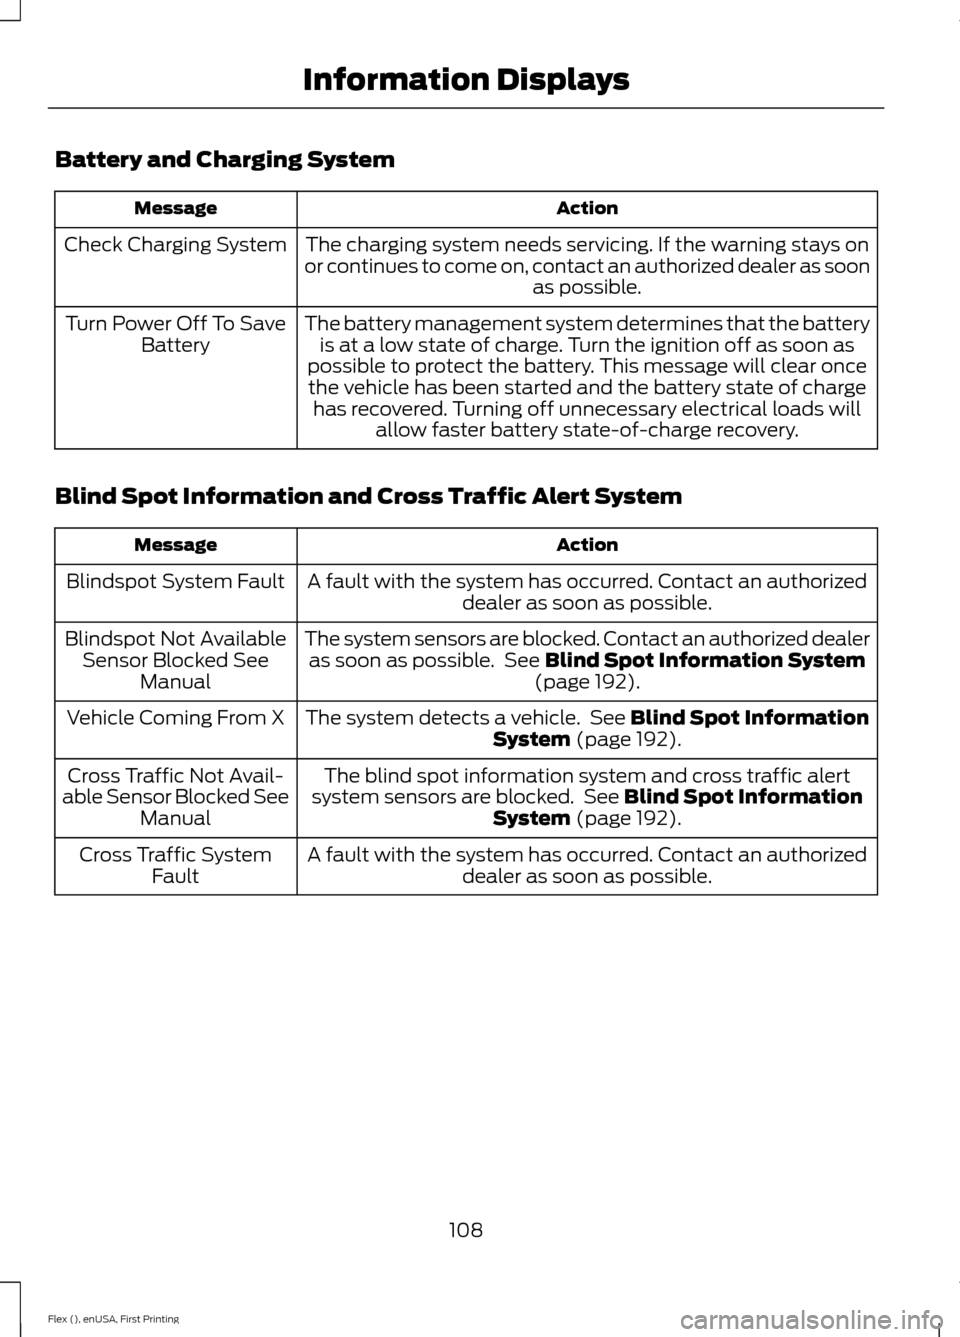
Battery and Charging System
Action
Message
The charging system needs servicing. If the warning stays on
or continues to come on, contact an authorized dealer as soon as possible.
Check Charging System
The battery management system determines that the batteryis at a low state of charge. Turn the ignition off as soon as
possible to protect the battery. This message will clear once the vehicle has been started and the battery state of charge has recovered. Turning off unnecessary electrical loads will allow faster battery state-of-charge recovery.
Turn Power Off To Save
Battery
Blind Spot Information and Cross Traffic Alert System Action
Message
A fault with the system has occurred. Contact an authorizeddealer as soon as possible.
Blindspot System Fault
The system sensors are blocked. Contact an authorized dealeras soon as possible. See Blind Spot Information System
(page 192).
Blindspot Not Available
Sensor Blocked See Manual
The system detects a vehicle. See
Blind Spot Information
System (page 192).
Vehicle Coming From X
The blind spot information system and cross traffic alert
system sensors are blocked. See
Blind Spot Information
System (page 192).
Cross Traffic Not Avail-
able Sensor Blocked See Manual
A fault with the system has occurred. Contact an authorizeddealer as soon as possible.
Cross Traffic System
Fault
108
Flex (), enUSA, First Printing Information Displays
Page 112 of 417
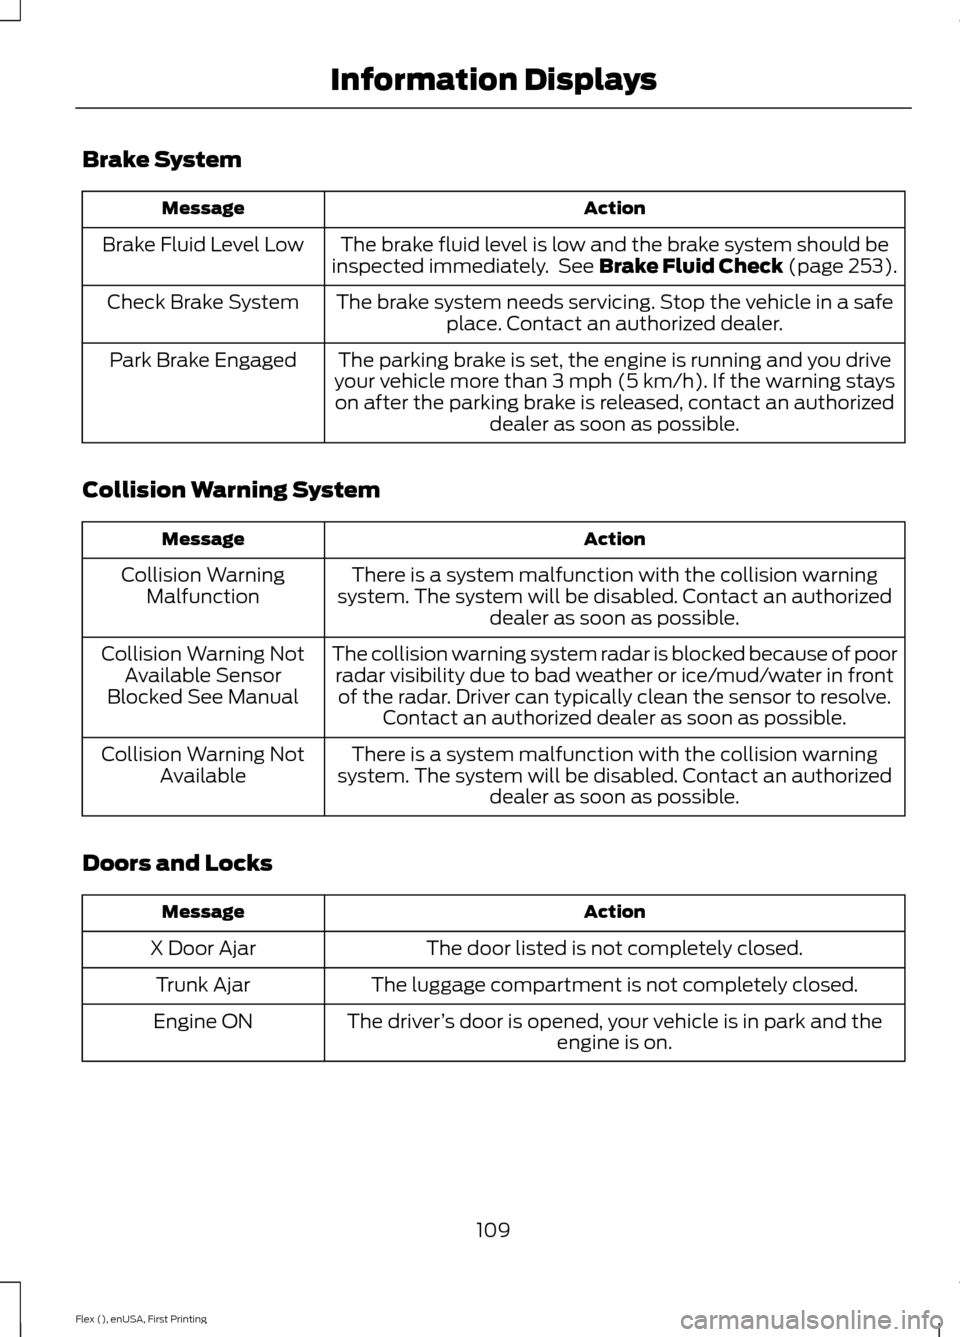
Brake System
Action
Message
The brake fluid level is low and the brake system should be
inspected immediately. See Brake Fluid Check (page 253).
Brake Fluid Level Low
The brake system needs servicing. Stop the vehicle in a safeplace. Contact an authorized dealer.
Check Brake System
The parking brake is set, the engine is running and you drive
your vehicle more than 3 mph (5 km/h). If the warning stays on after the parking brake is released, contact an authorized dealer as soon as possible.
Park Brake Engaged
Collision Warning System Action
Message
There is a system malfunction with the collision warning
system. The system will be disabled. Contact an authorized dealer as soon as possible.
Collision Warning
Malfunction
The collision warning system radar is blocked because of poorradar visibility due to bad weather or ice/mud/water in frontof the radar. Driver can typically clean the sensor to resolve. Contact an authorized dealer as soon as possible.
Collision Warning Not
Available Sensor
Blocked See Manual
There is a system malfunction with the collision warning
system. The system will be disabled. Contact an authorized dealer as soon as possible.
Collision Warning Not
Available
Doors and Locks Action
Message
The door listed is not completely closed.
X Door Ajar
The luggage compartment is not completely closed.
Trunk Ajar
The driver’s door is opened, your vehicle is in park and the
engine is on.
Engine ON
109
Flex (), enUSA, First Printing Information Displays